How to Quickly Lock Your iPhone Screen Orientation

This post discusses how to easily enable and disable the Portrait Orientation Lock on iPhones and iPads via the Control Center. It explains the significance of locking screen orientation to prevent unwanted rotations when switching device positions. Tips are provided for troubleshooting issues with screen orientation.

RAYMOND OGLESBY @RaymondOglesby2
October 21, 2025 –3 minutes read time

It’s super convenient to be able to rotate your screen from portrait to landscape mode automatically, as well as lock it later when you need to. Luckily, both the iPhone’s and iPad’s screen rotation lock buttons are easily accessible via the Control Panel. With the Orientation Lock enabled, you can keep your screen from adjusting regardless of whether the device is rotated vertically or horizontally.

What does “portrait orientation lock” mean? The Portrait Orientation Lock button is located in the Control Center. When it is on, your iPhone or iPad will not automatically rotate. If you get annoyed when your iPhone or iPad screen flips and flops around every time you shift positions, this is the tip for you. Let’s explore how to rotate the screen on your iPhone and iPad.

  • Learn how to quickly access the Portrait Orientation lock to enable or disable automatic screen rotation.
  • Lock your screen’s orientation as horizontal or vertical so you can read or watch videos on your devices in any position.

This tip was performed on an iPhone 14Pro running iOS 26.

Click here to learn how to update your iPhone to the latest iOS version.

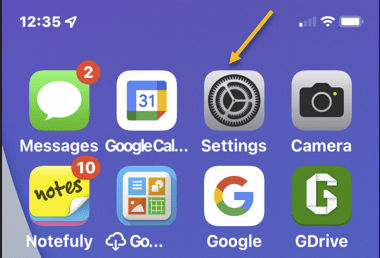
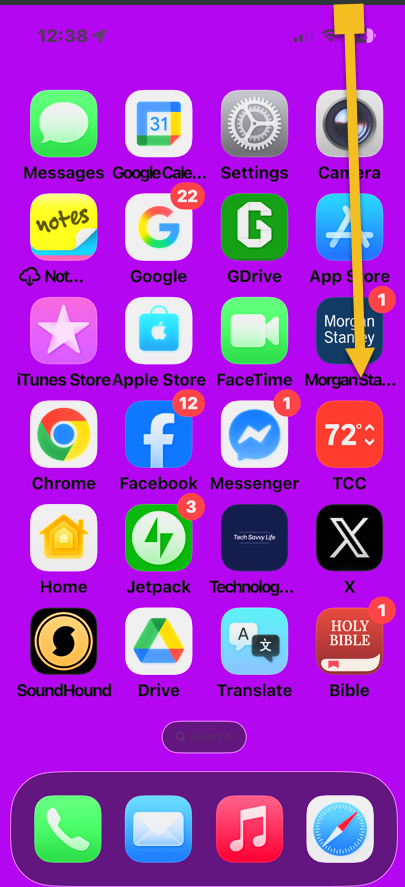
First, from the Home Screen of your iPhone, swipe down from the top right to access the Control Panel.

Note! Your Control Center will likely look different from the one in the screenshots below. We have customized the Control Center and rearranged the icons.

Refer to the image below:

Portrait 1
Scrolling down from the top right to access the Control Panel

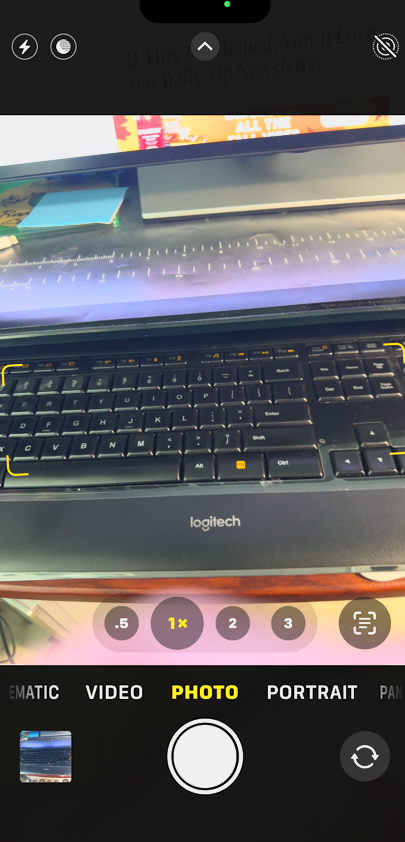
Next, the Portrait Orientation Lock is the button with a round arrow containing a lock. It will be gray when disabled. This means your iPhone will automatically rotate according to how you are holding it. See the image below:

Portrait 2
Selecting the Orientation Lock option

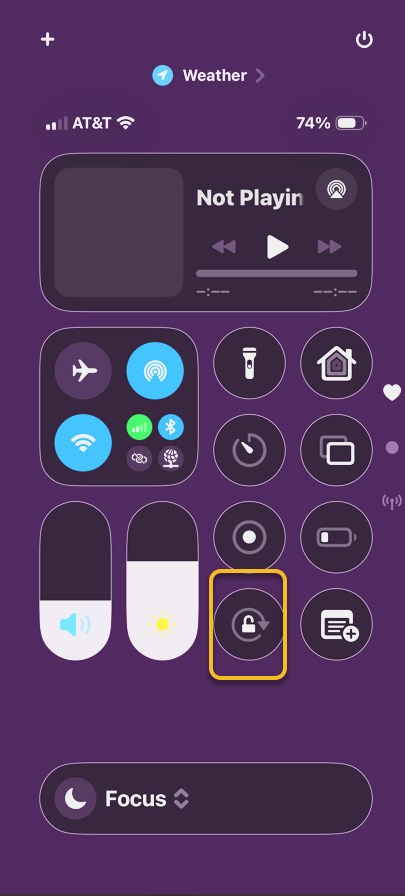
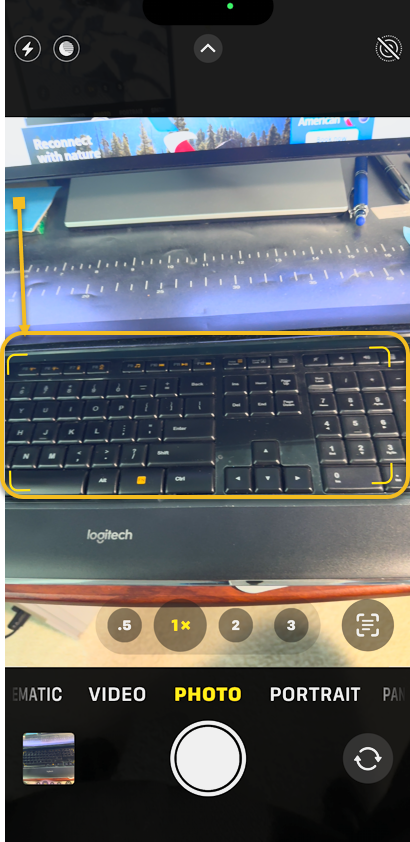
To lock your screen orientation, tap  Portrait Orientation Lock. It will be white when enabled. See the following image:

Portrait 3
Orientation Lock is enabled

With your iPhone rotation lock enabled, your screen will no longer rotate when you turn your phone sideways unless you use an app that only has landscape mode. Using the iPhone orientation lock will prevent apps that offer both modes from auto-rotating. However, apps that are only available in landscape mode will not switch to portrait mode.

But what does the rotation lock button look like on my iPad? Well, the steps are essentially the same on the iPad. Just open your iPad’s Control Center and look for the circular arrow icon.

If you find your iPhone stuck on landscape mode, try turning the lock on and off until it rotates again. If you keep experiencing problems, restarting your iPhone should help.

Technology is constantly evolving, and smartphone and desktop tech rarely remains static. Therefore, the information in this post is only accurate as of the date it was written. Blog posts that are older than six months may contain instructions that are no longer compatible with your device or operating system. We hope that the content from previous posts continues to function as intended. Thank you for reading TechSavvy.Life, where technology works for you.

“Cybersecurity is much more than an IT topic—it’s a business imperative.” 

– Raj Samani, Chief Scientist at Rapid7

That’s it. Please feel free to share this post! One way to share is via Twitter.

Just click the Tweet icon below. This will launch Twitter where you click its icon to post the Tweet.

Checkout TechSavvy.Life for blog posts on smartphones, PCs, and Macs! You may email us at contact@techsavvy.life for comments or questions.

We value your feedback! Was this post helpful? Please share your comments with us. If you have a tech question related to your computer or smart device, feel free to reach out. Just send an email to contact@techsavvy.life, and be sure to include the device, app, and version you are using. To assist us further, you can also attach screenshots related to your inquiry.

Author’s eBook

The author’s Vietnam eBook on the “Battle for Tra Bong Vietnam: Events and Aftermath” can be accessed from a Kindle device or the Kindle App for a desktop or smartphone. The apps are free.

The author’s Vietnam eBook on the Battle for Tra Bong Vietnam: Events and Aftermath

How to Use the Camera Level on Your iPhone

The iPhone Camera app includes a helpful Camera Level feature that ensures photos are straight by displaying a leveling indicator on the screen. It automatically adjusts for landscape or portrait orientations and disappears when intentionally off-level. To enable it, access the Camera settings and toggle the Level option on.

RAYMOND OGLESBY @RaymondOglesby2
October 14, 2025 – 3 minutes read time

A cool feature in the Camera app is the Camera Level. What is the level on the iPhone camera? It appears on the iPhone screen as you are taking your photo. The level will help you ensure that the photos you take are as straight as possible without obstructing too much of the picture while you’re taking it.

The level feature is really helpful and simple to use. One of the cool things about it is that it understands whether you’re taking the image in landscape or portrait and will automatically adjust. It also disappears if the photo you are taking is intentionally off-level. Let’s explore how to enable the level on the iPhone camera:.

  • Always take level photos with the leveler right on the screen in the Camera app.
  • Instead of straightening your image in the editing process, take the photo straight the first time.

This tip was performed on an iPhone 14 Pro running iOS 18.7.

Click here to learn how to update your iPhone to the latest iOS version.

Durst, open your iPhone, open the Settings app, and tap Camera. Refer to the image below:

Camera 1
Accessing the Camera app

Next, under the Composition section, tap the Level toggle to the ON position.

Note! To experience the grid feature, you can enable the Grid toggle from this screen.

See the image below:

Camera 2
Enabling the Camera Level toggle

Now, open the Camera app. See the following image:

Camera 3
Selecting the Camera app

Next, the Camera Level will appear as a white line.

Note! The level will only appear if you are holding the camera upright; if you are taking a bird’s eye view picture, a cross will appear to help you hold your phone level.

Refer to the image below:

Camera 4
Align your photo

Now, when the corners turn yellow and do not shake, you will know the image is level. Additionally, a slight vibration may indicate that it is level. You can now take your shot. See the image below:

Camera 5
Take your photo

That’s how to adjust the iPhone Camera Level setting! Now you can make sure all your photos are perfectly level.

Technology is constantly evolving, and smartphone and desktop tech rarely remains static. Therefore, the information in this post is only accurate as of the date it was written. Blog posts that are older than six months may contain instructions that are no longer compatible with your device or operating system. We hope that the content from previous posts continues to function as intended. Thank you for reading TechSavvy.Life, where technology works for you.

“Technology should improve your life, not become your life.”

“Technology should improve your life, not become your life.”

That was easy. Please feel free to share this post! One way to share is via Twitter.

Just click the Tweet icon below. This will launch Twitter where you click its icon to post the Tweet.

Checkout TechSavvy.Life for blog posts on smartphones, PCs, and Macs! You may email us at contact@techsavvy.life for comments or questions.

We value your feedback! Was this post helpful? Please share your comments with us. If you have a tech question related to your computer or smart device, feel free to reach out. Just send an email to contact@techsavvy.life, and be sure to include the device, app, and version you are using. To assist us further, you can also attach screenshots related to your inquiry.

Author’s eBook

The author’s Vietnam eBook on the “Battle for Tra Bong Vietnam: Events and Aftermath” can be accessed from a Kindle device or the Kindle App for a desktop or smartphone. The apps are free.

The author’s Vietnam eBook on the Battle for Tra Bong Vietnam: Events and Aftermath

Understanding iPhone Camera Lenses: A Guide

The post discusses the evolution and function of iPhone camera lenses since the iPhone 11 Pro, detailing the Wide, Ultra Wide, and Telephoto lenses. It emphasizes the significance of each lens type, particularly noting the advancements in the iPhone 16 Pro Max. Users can enhance photography with third-party lens options.

RAYMOND OGLESBY @RaymondOglesby2
September 23, 2025 – 7 minutes read time

Since the release of the iPhone 11 Pro in September 2019, seeing three lenses on an iPhone has become the norm, at least for the Pro models. In this post we will explain why iPhones, iPads, and most Android phones have multiple lenses and what each iPhone 16 lens does. Let’s go over all the different iPhone camera lenses!

  • The Wide lens is the main camera lens that every iPhone has.
  • Most models after the iPhone 11 have an Ultra Wide lens.
  • Only the Pro models have an iPhone telephoto lens.

The wide camera lens on the iPhone is the standard lens that has no optical zoom and shows the subject the way you see it with your eyes. Every iPhone that ever existed has had one, but that does not mean that they are all the same.

The Original 2007 iPhone’s wide lens had a resolution of 320×480 and 2 Megapixels with a pixel size of 163 pixels per inch. Today’s most powerful iPhone, the iPhone 16 Pro Max, has a resolution of 2796×1290 and 48 Megapixels with 460 pixels per inch. The iPhone 16e has a new type of camera lens that Apple calls a 2-in-1 48 MP Fusion camera. It’s a single lens that can functions both as a wide lens and a telephoto lens.

Typically, on an iPhone with three cameras (or an iPhone with two cameras), the bottom lens will be the Wide lens. If your device only has one lens, you can buy a third-party telephoto or macro lens for your iPhone, regardless of its model.

Ultra Wide Angle Lens: iPhone SE 2 & SE 3, & 11–16

The Ultra Wide lens can be used to “zoom out” of the frame before taking the photo. It is sometimes called a fisheye lens. If you are backed against a wall and want the camera to show more of what’s ahead of you, switch to the Ultra Wide lens. The Ultra Wide lens is also the key to taking great macro mode photos.

Keep in mind that the image may appear distorted around the edges when you use this lens. This is sometimes called the fisheye effect. You can turn on Lens Correction in your Camera settings to make it look more natural. You can find an Ultra Wide Angle lens, sometimes simply called the wide-angle lens, on the iPhone SE 2, iPhone SE 3, and any model of iPhone 11 to 16.

When you see an iPhone with two lenses, one will be the regular Wide lens, and the other will be the Ultra Wide lens. On an iPhone with three cameras, the Ultra Wide lens is in the middle. What many people do not realize is that even though the Wide lens has a 0.5x zoom, you can pinch your fingers to zoom between the range of 0.5 and 1x.

Telephoto Lens: Pro Models of iPhone 11–16

What is a Telephoto lens? The iPhone zoom lens, officially known as the Telephoto lens, has a higher zoom and can take close-up photos of your subject; it is useful for Portrait mode photos. The Telephoto lens can help you see faraway objects closer without compromising quality. For example, if your subject is a wild animal and you cannot get physically closer, you might use the Telephoto lens on your iPhone to make it look closer than it actually is.

So which iPhone has a Telephoto lens? Only the Pro models of the iPhone 11 through the 16 have the Telephoto lens. The iPhone 16 Telephoto lens is the top one and has a 5x zoom with a focal length of 120 mm, ƒ/2.8 aperture, as well as a 2x zoom that has a focal length of 48 mm, ƒ/1.78 aperture, and a digital zoom of up to 25x. What’s confusing is that 5x zoom does not mean that the image will be magnified five times. The magnification depends on the focal length of the lens.

Every iPhone Telephoto lens happens to have a different zoom:

  • The iPhone 11 has a 2x zoom
  • The iPhone 12 has a 2.5x zoom
  • The iPhone 13 has a 3x zoom.
  • The iPhone 14 has a 2x and a 3x zoom
  • The iPhone 15 has a 2x and a 5x zoom
  • The iPhone 16 has a 2x and a 5x zoom

Note! The two telephoto zooms on the Pro models of iPhone 14, 15, and 16 are why Portrait mode on these phones has a different zoom amount, so if you upgrade to a newer model, you’ll notice that it has a different magnification.

iPhone is known for having one of the best phone cameras on the market, thanks to its powerful lenses. When shopping for a new iPhone, you may be wondering which iPhone has the best camera. Currently, the iPhone 16 Pro Max has the best resolution and highest zoom, but every iPhone with ‘zoom lenses’ (Pro models with Telephoto lenses) is an excellent option. Plus, it has LiDAR sensors for better low-light photography. While the newest pro model tends to have the best camera, even older models and the SE take great photos, so it really depends on your individual photography and videography needs. Next, find out how to share your pictures with your non-iPhone friends!

  • Can you buy third-party iPhone camera lenses?Yes! Many third-party companies create lenses and other iPhone camera attachments that can be clipped onto your existing lenses. I recommend checking out Sandmarc and Moment lenses in particular. Moment has a great telephoto lens for iPhone (also called a zoom lens for iPhone or a telescoping lens for iPhone).
  • What is LiDAR? LiDAR sensors accurately measure distances between objects.
  • How does the iPhone telephoto lens work? The iPhone telephoto lens lets you “zoom in” or take close-up photos of your subjects or a landscape. The slight protrusion of the lenses is what makes it possible for newer iPhones to have up to 5x digital (and 25x optical) zoom.

Technology is constantly evolving, and smartphone and desktop tech rarely remains static. Therefore, the information in this post is only accurate as of the date it was written. Blog posts that are older than six months may contain instructions that are no longer compatible with your device or operating system. We hope that the content from previous posts continues to function as intended. Thank you for reading TechSavvy.Life, where technology works for you.

“When it comes to technology, curiosity is the new currency.” 

– Susan Wojcicki, Former CEO of YouTube

That’s it. Please feel free to share this post! One way to share is via Twitter.

Just click the Tweet icon below. This will launch Twitter where you click its icon to post the Tweet.

Checkout TechSavvy.Life for blog posts on smartphones, PCs, and Macs! You may email us at contact@techsavvy.life for comments or questions.

We value your feedback! Was this post helpful? Please share your comments with us. If you have a tech question related to your computer or smart device, feel free to reach out. Just send an email to contact@techsavvy.life, and be sure to include the device, app, and version you are using. To assist us further, you can also attach screenshots related to your inquiry.

Author’s eBook

The author’s Vietnam eBook on the “Battle for Tra Bong Vietnam: Events and Aftermath” can be accessed from a Kindle device or the Kindle App for a desktop or smartphone. The apps are free.

The author’s Vietnam eBook on the Battle for Tra Bong Vietnam: Events and Aftermath

Access Selfie, Video, and Portrait Modes Instantly

In iOS 26, the Camera app’s controls are hidden, complicating mode selection. A useful tip allows users to open the Camera in desired modes (Selfie, Video, Portrait) directly from the Home Screen via a long press. This method saves time and enhances usability for capturing moments.

RAYMOND OGLESBY @RaymondOglesby2
September 9, 2025 – 3 minutes read time

In iOS 26, the Camera app controls have been tucked away, making the display cleaner but making it more challenging to find the camera mode (like selfie, video, or portrait) you want. We all know that taking the perfect photo can require lightning reflexes, so here’s how to launch into your camera mode of choice right from your Home Screen, bypassing your in-app controls altogether.

Why You Will Like This Tip

  • Open your Camera in the exact mode you’re looking for, whether Selfie, Video, or Portrait.
  • Save time by not swiping between modes.
  • Avoid confusion with the iOS 26 Camera layout.

This tip can be performed on an iPhone running iOS 26 to be available in September 2025. This tip works on earlier OS versions as well such as iOS 18.6.

Click here to learn how to update your iPhone to the latest iOS version.

Did you know you can open your Camera app to a specific mode right from your Home Screen? No need to swipe to find the right one. All you have to do is long-press on your Camera icon and then select either Selfie, Video, Portrait, or Portrait Selfie.

Note! This only works from your Home Screen, not from a Lock Screen shortcut.

First, on your Home Screen, long-press on your Camera app icon. Refer to the image below:

Selfie 1
Selecting the Camera app

Next, tap SelfieVideoPortrait, or Portrait Selfie from the menu. See the image below:

Selfie 2
Selecting a camera option

Now, yourCamera app will open in your selected mode, ready to shoot. Tap the Capture/Record icon , and you are set! See the following image:

Selfie 3
Selecting the icon to take a selfie

Say cheese! Your photos will capture as usual, and if you want to switch modes, you can do it in the now-open Camera app.

Technology is constantly evolving, and smartphone and desktop tech rarely remains static. Therefore, the information in this post is only accurate as of the date it was written. Blog posts that are older than six months may contain instructions that are no longer compatible with your device or operating system. We hope that the content from previous posts continues to function as intended. Thank you for reading TechSavvy.Life, where technology works for you.

“In a tech-savvy world, true innovation lies in being people-savvy.”

 – Whitney Wolfe Herd, Founder of Bumble

You are finished. Please feel free to share this post! One way to share is via Twitter.

Just click the Tweet icon below. This will launch Twitter where you click its icon to post the Tweet.

Checkout TechSavvy.Life for blog posts on smartphones, PCs, and Macs! You may email us at contact@techsavvy.life for comments or questions.

We value your feedback! Was this post helpful? Please share your comments with us. If you have a tech question related to your computer or smart device, feel free to reach out. Just send an email to contact@techsavvy.life, and be sure to include the device, app, and version you are using. To assist us further, you can also attach screenshots related to your inquiry.

Author’s eBook

The author’s Vietnam eBook on the “Battle for Tra Bong Vietnam: Events and Aftermath” can be accessed from a Kindle device or the Kindle App for a desktop or smartphone. The apps are free.

The author’s Vietnam eBook on the Battle for Tra Bong Vietnam: Events and Aftermath

How to Fix Photo Quality on iPhone

TechSavvy.Life explores an iPhone Camera app setting called Prioritize Faster Shooting, which allows quick, successive photography, specifically for iPhone models XS/XR or later running on iOS 14 and above. However, enabling this feature reduces photo quality due to shorter image processing time. Users can personalize this setting in their iPhone settings.

RAYMOND OGLESBY @RaymondOglesby2
January 16, 2024

This is for the iPhone XS/XR or later running iOS 14 or higher. Screenshots are from iPhone 14 Pro running iOS 17+

The iPhone is a great camera out of the box. Just set the phone up and start taking photos and recording videos without worrying about advanced settings. However, if you do want to take your photo skills to the next level, all sorts of iPhone photo tricks can help you improve your game. The iPhone’s Camera app holds settings that can also enhance the pictures and clips coming out of your iPhone.

One of those image settings can come in handy when you do not want to miss a shot. But it can also ruin photo quality, as the iPhone might devote less time to processing the image.

Called Prioritize Faster Shooting, the setting is straightforward. It does what it says; it enables faster shooting, especially if you take lots of burst photos. The setting lets the iPhone capture more shots per unit of time, which can be useful if you are following certain events and want to capture everything. But it might not be worth taking so many shots if the quality of the resulting images has to suffer.

The setting comes enabled by default. To disable this feature, head to:

Settings > Camera > Prioritize Faster Shooting

and toggle to the OFF position. Reger to the below image:

Fix Photo 1
To disable, turn the option to OFF

To enable, set the toggle to the ON position.

If you do not find the setting, you probably use an older iPhone or iOS. You must either update the software or get a new iPhone to take advantage of Prioritize Faster Shooting.

Technology is always changing and rarely is there static tech for smartphones and desktops. Thus, the contents of this post are only valid at the time of writing. Blog posts older than six months may have directions incompatible with your device or OS. Hopefully, older post content will continue to work as advertised. Thank you for reading TechSavvy.Life for Technology at Work For You.

. “You don’t learn to walk by following rules. You learn by doing and falling over.”

Richard Branson

That’s it. Please feel free to share this post! One way to share is via Twitter.

Just click the Tweet icon below. This will launch Twitter where you click its icon to post the Tweet.

Checkout TechSavvy.Life for blog posts on smartphones, PCs, and Macs! You may email us at contact@techsavvy.life for comments or questions.

Please feel free to leave a comment. I would love to hear from you. Do you have a computer or smart device tech question? I will do my best to answer your inquiry. Just send an email to contact@techsavvy.life. Please mention the device, app, and version you are using. To help us out, you can send screenshots of your data related to your question.

You can access the e-book from a Kindle device, the Kindle App for the desktop or smartphone, which is a free app.

The author’s Vietnam eBook on the Battle for Tra Bong Vietnam: Events and Aftermath

How to Shoot Photos in 16:9 Aspect Ratio on iPhone

The iPhone camera is capable of shooting two aspect ratios, 4:3 and 16:9. The 4:3 aspect ratio uses the full megapixels, whereas the 16:9 crops in for a wider view.

RAYMOND OGLESBY @RaymondOglesby2
November 22, 2022

The iPhone Camera is capable of shooting two aspect ratios, 4:3 and 16:9. The 4:3 aspect ratio uses full megapixels, whereas the 16:9 crops in for a wider view. Let’s explore this feature.

This is for the iPhone. Screenshots are from iPhone XR running iOS 16+

Dilbert and Employee
Copyright Scott Adams, Inc./Distributed by Universal Uclick for UFS

The difference between 4:3 and 16:9 is the width of the photo. However, it’s not that simple on the iPhone. Shooting in 16:9 does not necessarily mean you will get captured more from the sides of the shot. Depending on the cameras on your iPhone, it may simply crop the 4:3 photo.

First, open the Camera app on your iPhone. Refer to the below image:

Photo 1
Accessing Camera

Next, tap the Arrow at the top of the screen. To turn off Live Photo, tap the Concentric Circle icon. See the below image:

Photo 2
Accessing the Arrow and optionally turning off Live Photo

Now, some controls will slide up from the bottom of the screen. Tap the 4:3 or 16:9 button. See the following image:

Photo 3
Accessing the Aspect Ratio

Next, you can choose 16:9, Square, or 4:3. Refer to the below image:

Photo 4
Changing the Aspect Ratio to 16:9

Again, keep in mind that the 16:9 aspect ratio typically is a lower resolution than 4:3 since it’s cropping the shot. If you want to always take full advantage of the Camera hardware, shoot in 4:3.

To set your last Camera settings go to:

Settings > Camera > Preserve Settings > Camera Mode

and turn it ON, then open the Camera and take a photo.

Photos with Aspect Ratio

Photo 43 1
Aspect Ratio 4:3
Photo 16 9 1
Aspect Ratio 16:9

Quote For the Day

Computers are useless. They can only give you answers

Pablo Picasso

Tweet Info

That’s it. Please feel free to share this post! One way to share is via Twitter.

Just click the Tweet icon below. This will launch Twitter where you click its icon to post the Tweet.

Checkout TechSavvy.Life for blog posts on smartphones, PCs, and Macs! You may email us at contact@techsavvy.life for comments or questions.

I Would Like to Hear From You

Please feel free to leave a comment. I would love to hear from you. Do you have a computer or smart device tech question? I will do my best to answer your inquiry. Just send an email to contact@techsavvy.life. Please mention the device, app, and version you are using. To help us out, you can send screenshots of your data related to your question.

Author’s E-Book

You can access the e-book from a Kindle device, the Kindle App for the desktop or smartphone, which is a free app.

The author’s Vietnam eBook on the Battle for Tra Bong Vietnam: Events and Aftermath

How to Mirror Selfies on iPhone

Instead of flipping photos after taking selfies, you can capture “mirror selfies” automatically as they appear in the preview on your iPhone.

RAYMOND OGLESBY @RaymondOglesby2
January 19, 2022

Instead of flipping photos after taking selfies, you can capture “mirror selfies” automatically as they appear in the preview on your iPhone. Let’s explore this feature.

The Camera app on the iPhone packs several features, including an option to automatically take mirror selfies. This feature is available on iPhones running at least iOS 14 or later.

First, open the Settings app on your iPhone. Refer to the below image:

Camera 1
Accessing Settings

Next, in Settings, scroll down and tap Camera. See the below image:

Camera 2
Accessing the Camera

Now, scroll down to the Composition section and toggle the switch for Mirror Front Camera to ON. (On some iPhones, this option might be labeled Mirror Front Photos.) See the following image:

Camera 3
Enabling the Mirror Front Camera toggle

Next, open the Camera app on your iPhone. Turn the camera to face yourself and snap a selfie. The saved image will appear as you see yourself in the mirror, instead of flipped as it usually is. Note that your front camera automatically mirrors the front camera viewfinder, so this setting only affects the image that’s saved to your photo library.

Quote For the Day

To learn something but not to do is really not to learn. To know something but not to do is really not to know.

Stephen Covey

That was easy. Please feel free to share this post! One way to share is via Twitter.

Just click the Tweet icon below. This will launch Twitter where you click its icon to post the Tweet.

Check out TechSavvy.Life for blog posts on smartphones, PCs, and Macs! You may email us at techsavvy.life for comments or questions.

I Would Like to Hear From You

Please feel free to leave a comment. I would love to hear from you. Do you have a computer or smart device tech question? I will do my best to answer your inquiry. Just send an email to contact@techsavvy.life. Please mention the device, app, and version you are using. To help us out, you can send screenshots of your data related to your question.

Author’s E-book

You can access the e-book from a Kindle device, the Kindle App for the desktop or smartphone, which is a free app.

The author’s Vietnam eBook on the Battle for Tra Bong Vietnam: Events and Aftermath

How to Access iPhone Camera From Lock Screen

If you need to quickly take a photo or video on your iPhone, you can swipe into the Camera app quickly without unlocking your phone. Let’s explore how this is done.

If you need to quickly take a photo or video on your iPhone, you can swipe into the Camera app quickly without unlocking your phone. Let’s explore how this is done.

This is for the iPhone

Dilbert and Hats
Copyright Scott Adams, Inc./Distributed by Universal Uclick for UFS

First, wake up your iPhone. Place your finger anywhere on the lock screen and swipe it to the left until the Camera app appears. If you try to swipe on a notification that will reveal options for the notification rather than opening the Camera app. Refer to below image:

Camera 1
Swipe left to open the Camera

Next, with the Camera app open, you can take photos or videos as you normally would, and they will be saved automatically to your Photos library. You can even use the volume buttons to trigger the shutter if you like. See below image that will be saved to Photos library:

Camera 2
Your photo

Now, to exit Camera mode, press the top button (for iPhones with home buttons) or the side button (for iPhones without home buttons) to turn off your screen. The photos you took will still be saved.

iPhones Without Home Button

If you have an iPhone without a home button (one that uses Face ID) you might notice a tiny camera icon in the lower-right corner of your lock screen. See following image:

Camera 3
Access Camera by the photo icon

You can use this button to launch the Camera app with a long-press. Just place your finger on the camera icon for a moment. When you lift your finger, the Camera app will launch.

When you are done, press the side button, and the photos and videos you have taken will be saved automatically.

Quote For the Day

The beginning is the most important part of the work.

Plato

You are finished. Please feel free to share this post! One way to share is via Twitter.

Just click the Tweet icon below. This will launch Twitter where you click its icon to post the Tweet.

Check out TechSavvy.Life for blog posts on smartphones, PCs, and Macs! You may email us at contact@techsavvy.life for comments or questions.

I Would Like to Hear From You

Please feel free to leave a comment. I would love hearing from you. Do you have a computer or smart device tech question? I will do my best to answer your inquiry. Just send an email to contact@techsavvy.life. Please mention the device, app and version that you are using. To help us out, you can send screenshots of your data related to your question.

The author’s Vietnam eBook on the Battle for Tra Bong: Events and Aftermath

How to See Which Apps Are Accessing Your Camera or Microphone on iPhone

Some iPhone apps require camera/microphone access to function properly, and some do not. Apple has introduced new app privacy settings with iOS 14 and higher, which allow you to see what apps have camera/microphone access. This way, you can change camera/microphone settings for any app, all in the same place, so apps that do not need to see or hear you, can not.

Some iPhone apps require camera/microphone access to function properly, and some do not. Apple has introduced new app privacy settings with iOS 14 and higher, which allow you to see what apps have camera/microphone access. This way, you can change camera/microphone settings for any app, all in the same place, so apps that do not need to see or hear you, can not.

Let’s explore how to allow camera/microphone access on your iPhone or turn it off.

This is for iPhone running iOS 14+

Dilbert and Idiot
Copyright Scott Adams, Inc./Distributed by Universal Uclick for UFS

First, open Settings (the gear icon) on your iPhone. Refer to below image:

Camera 1
Accessing Settings

Next, scroll down and tap the Privacy option. See below image:

Camera 2
Accessing Privacy option

Now, scroll down and tap the Camera or Microphone option. See following image:

Camera 3
Accessing Microphone or Camera option

Here, you will see a list of apps that have asked you for camera or microphone access in the past. Apps that currently have access to your iPhone camera/microphone will have the switch turned On. Apps that do not have access will have its switch turned Off. Refer to below image:

Camera 4
List of apps with Facebook and Gmail turned On

If you.would like to remove iPhone camera/microphone access from an app, tap its switch to turn it off Off. Likewise, you can also grant camera/microphone access to a listed app by turning the switch On. See below image:

Camera 5
Facebook app is turned Off

Now, exit Settings.

If you want to know if your camera/microphone is in use, look in the upper-right corner of your screen at the status bar. If you see a green dot there, then an app is using the camera. If there’s an orange dot, that means your microphone is in use. The color scheme depends on your display mode. See following image for microphone in use as a blue dot:

Camera 6
Colored coded dots to indicate if Microphone or Camera is in use

If an app is using your camera/microphone when you do not expect it to, revisit the above steps and flip its switch to Off.

You are finished setting your access to camera or microphone. Please feel free to share this post! One way to share is via Twitter.

Just click the Tweet icon below. This will launch Twitter where you click its icon to post the Tweet.

Check out TechSavvy.Life for blog posts on smartphones, PCs, and Macs! You may email us at contact@techsavvy.life for comments or questions.

I Would Like to Hear From You

Please feel free to leave a comment. I would love hearing from you. Do you have a computer or smart device tech question? I will do my best to answer your inquiry. Just send an email to contact@techsavvy.life. Please mention the device, app and version that you are using. To help us out, you can send screenshots of your data related to your question.

The author’s Vietnam eBook on the Battle for Tra Bong: Events and Aftermath

How to Control Exposure in Camera App on iPhone in iOS 14

The iPhone’s user-friendly Camera app makes it possible for anyone to take great photos. But the app does not get it right every time, and sometimes you might want to brighten or darken your scene.

The iPhone’s user-friendly Camera app makes it possible for anyone to take great photos. But the app does not get it right every time, and sometimes you might want to brighten or darken your scene.

To do that, you will need to use the Exposure Compensation dial. Apple added it in the iOS 14 update released in September 2020. This built-in feature works on the iPhone 11, iPhone 11 Pro, and newer iPhones. On older iPhones, you will have to use a third-party camera app.

This is for the iPhone running iOS 14

Dilbert and Social Media
Copyright Scott Adams, Inc./Distributed by Universal Uclick for UFS

Exposure Compensation Dial

To enable the Exposure Compensation dial, launch the Camera app, and tap on the arrow at the top of the viewfinder in portrait orientation.

A row of icons will appear just above the shutter button. The Exposure Compensation slider is the plus/minus (+/-) icon. Tap on it and a new slider will appear along the bottom of the frame.

You can now move the slider left and right to decrease or increase the amount of light in your scene.

If you tap on the plus/minus (+/-) again, you will get back to the main row of icons. You can close the menu using the arrow at the top of the viewfinder. Keep in mind that, if you set an exposure compensation value, it will persist until the next time you open the camera app; even if you close this menu.

The Exposure Compensation feature added in iOS 14 is not full manual control, but fine-tuning of a scene. As you move around the Camera app will continue to adapt to lighting conditions unless you manually lock exposure and focus. It is an effective way to get more control over the image without having to go fully manual.

If you do not have an iPhone 11 or newer, you will not see this option as it is not available on older devices.

Third Party Apps

If you own an iPhone XS, XR, or earlier, you will not be able to access the Exposure Compensation dial. You’ll have to make do with the old method of doing things, which means locking focus and exposure to a single point and then making micro-adjustments inside the yellow box.

If you have an older device and want to set exposure and focus separately in a more intuitive way, try VSCOManual, or Camera+ 2. My favorite is the latter, Camera+2.

I hope you have found this post helpful. If so, click the Tweet icon below. This will launch Twitter where you click its icon to post the Tweet.

Check out TechSavvy.Life for blog posts on smartphones, PCs, and Macs! You may email us at contact@techsavvy.life for comments or questions.

I Would Like to Hear From You

Please feel free to leave a comment. I would love hearing from you. Do you have a computer or smart device tech question? I will do my best to answer your inquiry. Just send an email to contact@techsavvy.life. Please mention the device, app and version that you are using. To help us out, you can send screenshots of your data related to your question.

The author’s Vietnam eBook on the Battle for Tra Bong: Events and Aftermath