Three Features You Should Be Using in Word

If you use Microsoft Word to create your documents, then you are likely familiar with the features you use every day. But there are plenty of features that fly under the radar that could be just as useful, if not more.

RAYMOND OGLESBY @RaymondOglesby2
November 10, 2022

If you use Microsoft Word to create your documents, then you are likely familiar with the features you use every day. But there are plenty of features that fly under the radar that could be just as useful, if not more.

Here, we will look at just three Word features you should be using. These tools can save you time, improve the readability of your document, and even enhance your overall Microsoft Word experience.

This is for devices using Microsoft Word. Screenshots are from Windows 10

Dilbert and CO2
Copyright Scott Adams, Inc./Distributed by Universal Uclick for UFS

Distraction Free Writing Using Focus

If you do a lot of writing in Word, especially for things that need your full attention, you can enjoy distraction-free writing with Focus.

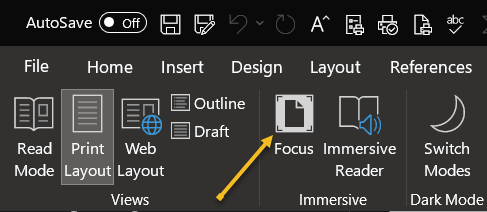
First, enable the feature by selecting Focus in the Status Bar on the View tab. Refer to the below image:

Word 1
Accessing the Focus option

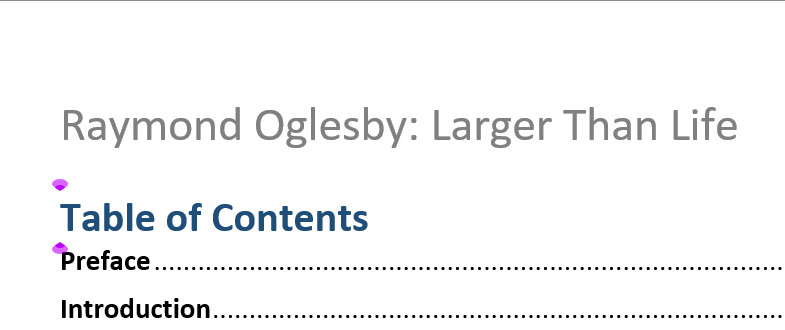
Next, you will see your document take over your entire screen with no Ribbon, Status Bar, or anything else to get in the way of your concentration. See the below image:

Word 2
Your Focus enabled document

Move your cursor to the top anytime to redisplay these items or to deselect Focus and return to your normal view.

Document Preview Using Document Editor

Another terrific feature in Microsoft Word is the Editor. With it, you can check your document for spelling, grammar, punctuation, readability, and more, all in one spot.

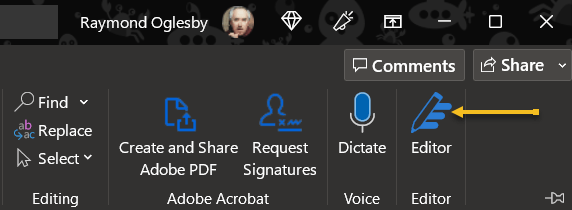
First, head to the Home tab and select Editor in the Editor section of the Ribbon. See the following image:

Word 3
Accessing Editor option

Next, when the sidebar opens, you will see your score at the top. You can then review necessary Corrections, Refinements, and see if similar documents appear on the web.

Note! For a very long document, this may take several minutes for the stats to be collected.

Refer to the below image:

Word 4
Your Editor stats

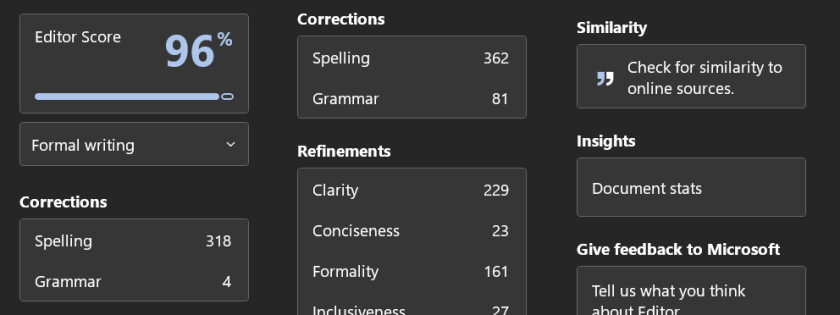
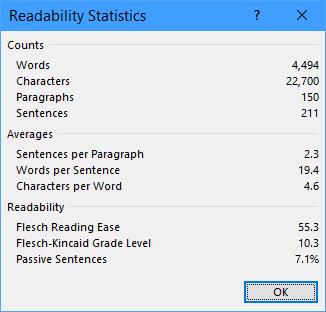
Now, select Document Stats in the Insights section to view counts of words and paragraphs, averages of characters per word and words per sentence, and readability scores for grade-level and passive sentences. See the below image:

Word 5
Your Document stats

Next, click the “X” on the top right of the Editor sidebar to close the tool when you finish.

References and Citations Using Researcher

One more feature in Word that goes a bit unnoticed is the Researcher tool. With it, you can look up almost anything on the internet and insert details for it without ever leaving your document.

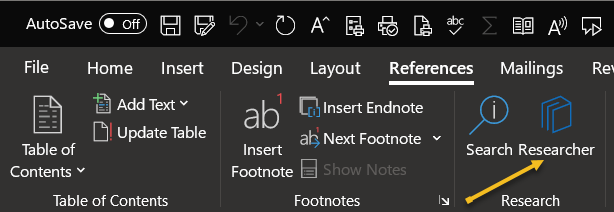
First, head to the References tab and choose Researcher in the Research section of the Ribbon. See the following image:

Word 6
Accessing the Researcher option

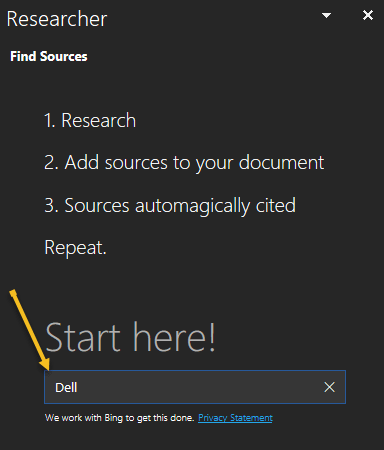
Next, the Researcher sidebar opens on the right. Enter your search term into the box and press Enter. Refer to the below image:

Word 7
Entering your search

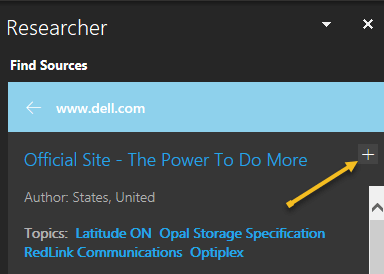
Now, you will see the results of your search. Select one to read more. See the below image:

Word 8
Your search results

You can copy and paste the text you see into your document, then click the plus sign on the top right of the item in the sidebar to add a citation for it. See the following image:

Word 9
Add a citation to your document

Researcher is a handy and helpful tool for essays, papers, and research documents.

These three features can help you no matter what type of document, article, or paper you create in Microsoft Word.

Quote For the Day

My life is now a constant assessment of whether what’s happening in real life is more entertaining than what’s happening on my phone.

Damien Fahey

Tweet Info

You are finished. Please feel free to share this post! One way to share is via Twitter.

Just click the Tweet icon below. This will launch Twitter where you click its icon to post the Tweet.

Checkout TechSavvy.Life for blog posts on smartphones, PCs, and Macs! You may email us at contact@techsavvy.life for comments or questions.

I Would Like to Hear From You

Please feel free to leave a comment. I would love to hear from you. Do you have a computer or smart device tech question? I will do my best to answer your inquiry. Just send an email to contact@techsavvy.life. Please mention the device, app, and version you are using. To help us out, you can send screenshots of your data related to your question.

Author’s E-Book

You can access the e-book from a Kindle device, the Kindle App for the desktop or smartphone, which is a free app.

The author’s Vietnam eBook on the Battle for Tra Bong Vietnam: Events and Aftermath
Advertisement

Is Windows 11 Upgrade For Now or Later

Based on reading other blog posts and websites, we recommend you wait to upgrade. Microsoft even seems to be reluctant about this upgrade. Why else would they offer a 10 day rollback to Windows 10? One thing it does is allow you to try out the upgrade.

RAYMOND OGLESBY @RaymondOglesby2
October 12, 2021

Based on reading other blog posts and websites, we recommend you wait to upgrade. Microsoft even seems to be reluctant about this upgrade. Why else would they offer a 10 day rollback to Windows 10? One thing it does is allow you to try out the upgrade.

Windows 11 arrived on October 5, 2021. Unlike the big Windows 10 upgrade offer that felt impossible to avoid, Microsoft is recommending many PC owners not to upgrade.

This is for devices running Windows 10 and 11

Dilbert and Plan
Copyright Scott Adams, Inc./Distributed by Universal Uclick for UFS

How the Upgrade Will Work

Windows 11 will be a free upgrade for PCs running Windows 10, just as Windows 10 was a free upgrade for PCs running Windows 7 and Windows 8.

However, this time, Windows 11 is not designed for all those PCs. Windows 11 officially supports only very recent hardware. In addition to requiring TPM 2.0 and UFFI with Secure Boot, Windows 11 only supports certain recent CPUs.

Specifically, PCs with Intel processors must have an Intel 8th generation or newer processor. AMD PCs must be running at least AMD Zen 2. ARM PCs must have Qualcomm 7 or 8 Series hardware.

Microsoft refuses to explain exactly why only certain CPUs are supported.

Can your PC Run Windows 11

Not sure what hardware your PC has and whether it will support Windows 11? Microsoft offers an official PC Health Check app (yes the app is back) that will tell you whether your PC can officially run Windows 11. If not, the PC Health Check will tell you what the problem is. First, to check on your PC, download the PC Health Check app and scroll down to the bottom, then click on the download button. Refer to below image:

Upgrade 1
Download PC Health Check

Next, after the download, click on the .msi file to install. Once installed, click the big blue Check now button. See below image:

Upgrade 2
Run the PC Health Check

Now, the app will tell you whether your PC can officially run Windows 11. See following image:

Upgrade 3
A possible result in running the PC Health Check

However, the tool will not tell you the full story. Even if your PC can run Windows 11, you might not want to upgrade yet. And, even if your PC does not officially support Windows 11, you can upgrade anyway.

If Your PC Does Supports the Upgrade

Next, if Windows 11 officially supports your PC and you are not too worried about any missing options or potential bugs, feel free to upgrade. Refer to below image:

Upgrade 4
Your PC supports Windows 11

For example, Windows 11’s Taskbar is missing some features that were found in Windows 10’s. Windows 11’s Taskbar is glued to the bottom of your screen, and you can not drag and drop files and other items to Taskbar icons, as you could on Windows 10.

If Your PC Does Not Support the Upgrade

Now, if Windows 11 does not officially support your PC, you have a more difficult decision to make. Microsoft recommends against installing Windows 11 on computers that have older CPUs it does not officially support. We would also recommend against installing Windows 11 on these PCs.

Sure, it may work, but you may encounter bugs; and Microsoft says it will not guarantee security updates will be available in the future. After all, Windows 10 will be officially supported until late 2025.

So that’s our official recommendation: Do not do it, particularly if you use your PC for work or other critical tasks and you just need it to work. See below image where the processor is outdated:

Upgrade 6
Your PC does not support Windows 11

However, if you really want to get your hands on Windows 11 on a PC that is not officially supported, feel free to install the upgrade anyway. Just know what you are getting into. That’s why Microsoft makes you agree to a waiver full of legalese before you install Windows 11 on such a PC.

Try It For 10 Days

Next, if you are on the fence about Windows 11, you can give it a try. For the first 10 days after you upgrade, you will have the option to downgrade back to Windows 10.

It will be at;

Settings > System > Recovery > Go Back

under Recovery options. If the option is grayed out, it’s no longer available. See following image:

Upgrade 5
Revert back to Windows 10 within 10 days

After 10 days, the option to downgrade will silently vanish as Windows 11 will delete your old Windows 10 files from your system drive to free up space.

You can still downgrade a PC running Windows 11 back to Windows 10. However, you will have to perform a full reinstall of Windows 10, so you will have to reinstall all your applications and set everything up from scratch.

Quote For the Day

Design is a funny word. Some people think design means how it looks. But of course, if you dig deeper, it’s really how it works.

Steve Jobs

That’s it. Please feel free to share this post! One way to share is via Twitter.

Just click the Tweet icon below. This will launch Twitter where you click its icon to post the Tweet.

Check out TechSavvy.Life for blog posts on smartphones, PCs, or Macs! You may email us at techsavvy.life for comments or questions.

I Would Like to Hear From You

Please feel free to leave a comment. I would love hearing from you. Do you have a computer or smart device tech question? I will do my best to answer your inquiry. Just send an email to contact@techsavvy.life. Please mention the device, app, and version you are using. To help us out, you can send screenshots of your data related to your question.

The author’s Vietnam eBook on the Battle for Tra Bong Vietnam: Events and Aftermath

How to Save Office Default Save Location in Windows 10

Saving documents from the Microsoft 365 suite is a simple process. As you do, your Word, Excel, and PowerPoint files are saved to the default location of your choosing. If you wish to change this location, you can do so.

RAYMOND OGLESBY @RaymondOglesby2
September 2, 2021

Saving documents from the Microsoft 365 suite is a simple process. As you do, your Word, Excel, and PowerPoint files are saved to the default location of your choosing. If you wish to change this location, you can do so. Let’s explore how this is done.

This is for Windows and Office 365

Dilbert and Decision
Copyright Scott Adams, Inc./Distributed by Universal Uclick for UFS

Microsoft’s recommendation is to save files to your OneDrive location. However, you might want to save all of your Microsoft 365 files to your local drive. By default, Office will use your Documents folder when you save files on your PC.

Thankfully, you do not have to change the saved location every time manually. Instead, you can set a new default. Better still, if you make the change in one Microsoft 365 app, the change carries over to every other one.

Make Your PC the Default Save Location

First, open an Office application, like Word, and click File > Options. (The Options is found in lower left-hand pane). Refer to below image:

Office 1
Selecting Options

Next, the Word Options window will appear. Click the Save tab in the left-hand pane. See below image:

Office 2
Selecting Save option

Now, under the Save Documents section, check the box next to Save to computer by default and click Browse. This will launch File Explorer for you to choose a location. See following image:

Office 3
Set default location

Next. click the OK button in the bottom-right corner of the window to apply the change. Refer to below image:

Office 4
Apply your change

Now, check your default save file location and click OK. Your Word option screen will close. The next time you save an Office file, your computer will be the default save location to the drive or folder you have chosen. (Note! I did not change the default location. This is for demonstration purposes only). See below image:

Office 5
Check default location and save

Quote For the Day

People who think they know everything are a great annoyance to those of us who do.

Isaac Asimov

That’s it. Please feel free to share this post! One way to share is via Twitter.

Just click the Tweet icon below. This will launch Twitter where you click its icon to post the Tweet.

Check out TechSavvy.Life for blog posts on smartphones, PCs, and Macs! You may email us at contact@techsavvy.life for comments or questions.

I Would Like to Hear From You

Please feel free to leave a comment. I would love hearing from you. Do you have a computer or smart device tech question? I will do my best to answer your inquiry. Just send an email to contact@techsavvy.life. Please mention the device, app and version that you are using. To help us out, you can send screenshots of your data related to your question.

The author’s Vietnam eBook on the Battle for Tra Bong: Events and Aftermath

How to Use the Microsoft Measurement Converter

Microsoft Word, PowerPoint, and Outlook offer a hidden measurement converter to save you from doing measurement conversions manually. If you are working with a document, presentation, or email that contains measurements, you will find this time-saving feature useful.

RAYMOND OGLESBY @RaymondOglesby2
August 17, 2021

Microsoft Word, PowerPoint, and Outlook offer a hidden measurement converter to save you from doing measurement conversions manually. If you are working with a document, presentation, or email that contains measurements, you will find this time-saving feature useful. Lets explore this feature.

This is for Office 365. Screenshots are from Windows 10 PC.

Dilbert and Employee
Copyright Scott Adams, Inc./Distributed by Universal Uclick for UFS

Enable Converter in Word and PowerPoint

First, open a document in Microsoft Word or a presentation in PowerPoint. Next, click

File > Options

from the menu. Now, select Proofing on the left and click AutoCorrect Options on the right. Refer to below image:

Accessing AutoCorrect.Options

Next, select the Actions tab. Now, check the boxes for Enable Additional Actions in the right-click menu then Measurement Converter from the list. You will notice other actions you can enable. Just checkmark any additional ones you would like to use. See below image:

Enabling Measurement Converter option

Click OK, then OK once more to save and exit the options menu.

Enable Converter in Outlook

First, open Microsoft Outlook and click

File > Options

from your inbox or an email window.

Now, select Mail on the left and click Editor Options on the right. See following image:

Accessing Editor Options

On the next screen, choose Proofing on the left and AutoCorrect Options on the right. Refer to below image:

Accessing AutoCorrect Options

Next, select the Actions tab. Now, check the boxes for Enable Additional Actions in the right-click menu, and Measurement Converter in the list. Like with Word and PowerPoint you can checkmark the boxes for any other actions you would like to use. See below image:

Enabling Measurement Converter option

Next click OK on all screens to save and exit,

Use the Converter in Office

When you receive a document that includes unfamiliar measurements, such as those from a foreign country, this tool takes the work out of manual conversions. And if you are creating the document yourself, you can convert the measurement for your audience.

Just, select the text containing the measurement. You can do this by dragging your cursor through it.

Now, right-click and move your cursor down to Additional Actions in the menu. You will see the Measurement Converter in the pop-out window. Refer to below image:

Accessing Measurement Converter

This lets you view the conversion. Additionally, you can click to select a conversion from the list and it will replace the measurement in your document, presentation, or email. This is convenient when you are preparing an item for someone expecting a different unit of measurement.

Quote For the Day

The greatest mistake you can make in life is continually fearing that you’ll make one.

Elbert Hubbard

That’s it. Please feel free to share this post! One way to share is via Twitter.

Just click the Tweet icon below. This will launch Twitter where you click its icon to post the Tweet.

Check out TechSavvy.Life for blog posts on smartphones, PCs, and Macs! You may email us at contact@techsavvy.life for comments or questions.

I Would Like to Hear From You

Please feel free to leave a comment. I would love hearing from you. Do you have a computer or smart device tech question? I will do my best to answer your inquiry. Just send an email to contact@techsavvy.life. Please mention the device, app and version that you are using. To help us out, you can send screenshots of your data related to your question.

The author’s Vietnam eBook on the Battle for Tra Bong: Events and Aftermath

How to Free Up Space in Google Drive

It’s easy to run out of space on Google Drive, since it stores data across much of your Google account. Fortunately, it’s also easy to delete data and free up some storage. As you will see, I am running out of space. Let’s explore how to do this.

RAYMOND OGLESBY @RaymondOglesby2
August 10, 2021

It’s easy to run out of space on Google Drive, since it stores data across much of your Google account. Fortunately, it’s also easy to delete data and free up some storage. As you will see, I am running out of space. Let’s explore how to do this.

This is for devices using Google Drive. Screenshots are from Drive on Windows 10 PC

Dilbert and Sane
Copyright Scott Adams, Inc./Distributed by Universal Uclick for UFS

If you use Google Drive to share large files, it’s quite easy to hit the 15GB free data limit on your Google account. While you can upgrade, for a price, it’s best to manually delete some data for more space first. After doing this, I upgraded to the 100GB plan, yet I am still out of space.

You will not need to spend hours combing through every nook and cranny in Google Drive. The website has a storage management feature that lists all your files, sorting them based on their file size.

First, open the Drive website in your browser.

You will see the Storage section at the bottom of the left sidebar. This will show you how much storage space you have left in your account. Now, click the Storage button. Refer to below image:

Drive 1
Your used Storage space

Next, you will see a list of all the large files in your account. Just click a file to select it. To select multiple files, hold the Command/Control key while selecting the file.

Now, to delete the file (or files), click the Remove button (the Trashcan icon) in the top toolbar. See below image:

Drive 2
Delete a file

Google Drive will remove the file and send it to the Trash.

If you want to find and open a folder where a particular file is saved (or find more files to delete), right-click and choose the Show File Location option. See following image:

Drive 3
Find more files

Next, you can select multiple files and use the Remove (Trashcan icon) in the toolbar to delete all the files at once. (You can use this method to delete entire folders as well.)

If you do not have a backup of the file that you are planning to delete, click the Download button in the right-click menu to download a copy of the file to your local storage. Refer to below image:

Drive 4
Download a file before deletion

Once you delete files like this, the files are no longer available in Google Drive, but you have not recovered any storage space yet. That’s because Google Drive does not actually delete the files for 30 days. So, if you change your mind, you have up to 30 days to recover the data.

If you want to reclaim the storage space, you will have to force Google Drive to permanently delete the data. To do this, go to the Trash or Bin section in the sidebar. See below image:

Drive 5
Accessing the Trash

Now, in the Trash, you will see a list of files that have yet to be deleted. To individually delete a file, right-click and choose the Delete Forever option. Or, click Empty Trash to delete all the files. See following image:

Drive 6
Delete your file(s)

Next, in the pop-up that appears, confirm using the Delete Forever button. Refer to below image:

Drive 7
Confirm to delete the file(s) forever

Now, all the files will be deleted. Once you reload the page, you will see that the storage space has been recovered.

Quote For the Day

I have noticed even people who claim everything is predestined, and that we can do nothing to change it, look before they cross the road.

Stephen Hawking

You now know how to clean up storage space on Google Drive. Please feel free to share this post! One way to share is via Twitter.

Just click the Tweet icon below. This will launch Twitter where you click its icon to post the Tweet.

Check out TechSavvy.Life for blog posts on smartphones, PCs, and Macs! You may email us at contact@techsavvy.life for comments or questions.

I Would Like to Hear From You

Please feel free to leave a comment. I would love hearing from you. Do you have a computer or smart device tech question? I will do my best to answer your inquiry. Just send an email to contact@techsavvy.life. Please mention the device, app and version that you are using. To help us out, you can send screenshots of your data related to your question.

The author’s Vietnam eBook on the Battle for Tra Bong: Events and Aftermath

How to Use Advanced Search to Find Tweets

Twitter has tons of information that flows by faster than we can comprehend. Fortunately, it’s possible to search for tweets using various parameters.

5RAYMOND OGLESBY @RaymondOglesby2
August 5, 2021

Twitter has tons of information that flows by faster than we can comprehend. Fortunately, it’s possible to search for tweets using various parameters. Let’s explore this feature.

This is for devices running Twitter

Copyright Scott Adams, Inc./Distributed by Universal Uclick for UFS

Search Tweets by Dates Range

Twitter provides both a mobile and a desktop browser Advanced Search page that lets you search for tweets posted within a certain date range. If you are on a mobile device, open your browser and click here for mobile. For the desktop browser, open your browser and click here for desktop.

Now, on the Advanced Search page, scroll all the way down to the bottom to the Dates section. There, you will find two parameters: From and To. Refer to below image:

Accessing Dates section

Next, choose your desired month, day, and year for each parameter. Here’s what they do:

  • From: Set this to find tweets posted after midnight (12:00 a.m.) on this date.
  • To: Set this to find tweets posted up until midnight (12:00 a.m.) on this date.

While this sounds simple, using the parameters can be confusing. For example, if you want to find tweets only from May 20, 2021, you would set From to “May 20, 2021” and To to “May 21, 2021.” You will get tweets posted between midnight on May 20 until midnight on May 21. You would not set both fields to the same date. See below image:

Setting From and To date

Similarly, if you wanted to find only tweets from the month of May 2021, you would set From to “May 1, 2021” and To to “June 1, 2021.” That way, your search will cover all 31 days of May.

Now, scroll up and enter another parameter, such as a search term in the Words section, or an account name in the Accounts section. Next, click Search when you are done. See following image for an Account search:

Search an Account

When you see the results, you can further sort them by different criteria using tabs located just below the search bar. Top shows the matching tweets with the most engagements. Latest shows all matching tweets in reverse chronological order. Refer to below image for the Latest using my domain name:

Display Latest posts for an Account

See below image for my Top posts using my Twitter name:

Display Top posts for a Twitter name

If you need to do another search, just revisit Twitter’s advanced search page and search again. It includes many parameters that allow you to narrow down tweets on certain dates, people, photos, videos, and much more.

Search Tweets by Date Range Using Inline Parameters

Another way of searching for tweets from a specific date or dates is using inline search parameters that you type directly into the search box in the Twitter app or on the Twitter website.

Here are three parameters that you can use:

Note! the following are just examples, not for literal input.

  • From: Find tweets posted only by this Twitter account. For example: from:raymondxxx  or from:techsavvy.
  • Since: Find tweets posted since 12:00 a.m. on this date. The date format is YYYY-MM-DD. For example: since:2021-05-01.
  • Until: Find tweets posted until 12:00 a.m. on this date. The date format is YYYY-MM-DD. For example: until:2021-06-01.

For example, if you would like to see all tweets posted by the “techsavvy” Twitter account between May 1, 2021 and June 1, 2021, you would type the following into the Twitter search box:

from:techsavvy until:2021-06-01 since:2021-05-01

If you wanted to find all posts about “Safari” by “raymondxxx” posted on May 15, 2021, you would enter:

safari from:raymondxxx since:2021-05-15 until:2021-05-16

And so on. This kind of quick inline search can be quite powerful once you get the syntax of the date format. You can also find embarrassing old tweets and delete them.

Quote For the Day

There ain’t no answer. There ain’t gonna be any answer. There never has been an answer. That’s the answer.

Gertrude Stein

You are finished with learning how to find tweets using Advance Search. Please feel free to share this post! One way to share is via Twitter.

Just click the Tweet icon below. This will launch Twitter where you click its icon to post the Tweet.

Check out TechSavvy.Life for blog posts on smartphones, PCs, and Macs! You may email us at contact@techsavvy.life for comments or questions.

I Would Like to Hear From You

Please feel free to leave a comment. I would love hearing from you. Do you have a computer or smart device tech question? I will do my best to answer your inquiry. Just send an email to contact@techsavvy.life. Please mention the device, app and version that you are using. To help us out, you can send screenshots of your data related to your question.

The author’s Vietnam eBook on the Battle for Tra Bong: Events and Aftermath

How to View Excel Sheet/Workbook Statistics

If you need to see how many formulas, pivot tables, or form controls you have in a spreadsheet or workbook, check out the Workbook Statistics feature in Microsoft Excel.

If you need to see how many formulas, pivot tables, or form controls you have in a spreadsheet or workbook, check out the Workbook Statistics feature in Microsoft Excel. Let’s explore this feature.

This is for devices running Excel. Screenshots are from Excel in Office 365 on Windows 10

Dilbert and Issue
Copyright Scott Adams, Inc./Distributed by Universal Uclick for UFS

You may have found statistics in Word helpful for seeing the number of pages, words, or characters. Getting statistics in Excel can be just as useful. You may have a workbook for a class with specific requirements, or you may have a spreadsheet for business that you want to review for unnecessary elements.

View Your Sheet/Workbook Statistics

First, open your Excel workbook. Next, navigate to the Review tab. Now, click Workbook Statistics in the Proofing section. You can also press Ctrl+Shift+G. (Note that the shortcut will not work in Excel for the Web.) Refer to below image:

Stats 1
Accessing Workbook Statistics button

Now, a small window will open to display the data for your current sheet at the top and the entire workbook at the bottom. See below image:

Stats 2
Displaying one Sheet Statistics

If you want details for a different sheet in your workbook, close the Workbook Statistics window by clicking OK. Next click the tab for the sheet that you want to see and follow the same steps listed above. As a downside, the sheet and workbook name are not shown. See following image:

Stats 3
Displaying two Sheets and Workbook Statistics

Data Included

You can see a the following data with the Workbook Statistics feature. This is helpful for situations where you expect to see something in your current sheet or workbook and you do not, or vice versa. Statistics may differ slightly between the spreadsheet and the entire workbook.

Spreadsheet Statistics:

  • The end of the sheet (the last cell with data)
  • Cells with data
  • Tables and PivotTables
  • Formulas
  • Charts
  • Images and objects
  • Form controls
  • Comments and notes

Workbook Statistics:

  • Number of sheets
  • Cells with data
  • Tables and PivotTables
  • Formulas
  • Charts
  • External connections
  • Macros

You can view Workbook Statistics in Excel for Microsoft 365 on Windows and Mac as well as in Excel on the Web. The only difference is that Excel online does not display the complete data lists written above for sheets and workbooks.

The scientific theory I like best is that the rings of Saturn are composed entirely of lost airline luggage.

Mark Russell

That’s it. Please feel free to share this post! One way to share is via Twitter.

Just click the Tweet icon below. This will launch Twitter where you click its icon to post the Tweet.

Check out TechSavvy.Life for blog posts on smartphones, PCs, and Macs! You may email us at contact@techsavvy.life for comments or questions.

I Would Like to Hear From You

Please feel free to leave a comment. I would love hearing from you. Do you have a computer or smart device tech question? I will do my best to answer your inquiry. Just send an email to contact@techsavvy.life. Please mention the device, app and version that you are using. To help us out, you can send screenshots of your data related to your question.

The author’s Vietnam eBook on the Battle for Tra Bong: Events and Aftermath

How to Remove All Images in a Word Document

If you need to quickly remove all the images and graphics from a Microsoft Word document, it’s easy to use a built-in option to delete them all at once.

If you need to quickly remove all the images and graphics from a Microsoft Word document, it’s easy to use a built-in option to delete them all at once. Let’s explore how this is done.

This is for devices running Microsoft Word

Dilbert and Politics
Copyright Scott Adams, Inc./Distributed by Universal Uclick for UFS

The Technique

Microsoft Word includes a feature called Find and Replace to find items in your documents and replace them with something of your choice. Using this feature, you can find all the images in your document and replace them with nothing. This removes the images and leaves a blank space where they were located.

As a slight drawback, this technique will also remove all charts and graphs from your document.

The Removal Process

First, open your document with Microsoft Word. Next, in the menu at the top of the window, click Home. Now, click Replace in the Editing section of the toolbar. Refer to below image:

Image 1
Accessing the Replace button

Next, in the Find and Replace window, click the Find what box. In this box, type:

^g

(Alternately, you can click the More button, and then select Special and Graphic from the drop-down menu. Word will insert a ^g for you.)

In this case, ^g is a special code that means “graphic.” This “graphic” tag includes all images, charts, or graphs in your document. But no need to worry, you can undo this step later if you remove the images by mistake.

Now, click Replace All at the bottom of the window. See below image:

Image 2
Selecting Replace All to remove all images

All images in your document will be removed. A pop-up window will appear denoting the number of images removed. Click OK to close the window. See following image:

Image 3
Pop-up window denoting number of images replaced with a blank line

If you want to bring them back, press Ctrl+Z on Windows or Command+Z on Mac to undo the removal process. Or, you can insert images again if necessary. (You may need to edit your document to remove blank lines). Now, save your changes (if any) and exit Word.

Quote For the Day

The art of teaching is the art of assisting discovery.

Mark Van Doren

That was easy. Please feel free to share this post! One way to share is via Twitter.

Just click the Tweet icon below. This will launch Twitter where you click its icon to post the Tweet.

Check out TechSavvy.Life for blog posts on smartphones, PCs, and Macs! You may email us at contact@techsavvy.life for comments or questions.

I Would Like to Hear From You

Please feel free to leave a comment. I would love hearing from you. Do you have a computer or smart device tech question? I will do my best to answer your inquiry. Just send an email to contact@techsavvy.life. Please mention the device, app and version that you are using. To help us out, you can send screenshots of your data related to your question.

The author’s Vietnam eBook on the Battle for Tra Bong: Events and Aftermath

What Are Windows 11 Minimum Requirements

Following are the basic requirements for installing Windows 11 on a PC. If your device does not meet these requirements, you may not be able to install Windows 11 and might want to consider purchasing a new device.


Following are the basic requirements for installing Windows 11 on a PC. If your device does not meet these requirements, you may not be able to install Windows 11 and might want to consider purchasing a new device. If you are unsure whether your PC meets these requirements, you can check with your PC Original Equipment Manufacturer (OEM) or, if your device is already running Windows 10, you can use the PC Health Check app to assess compatibility.

Note! As of this writing, the PC Health Check app has been removed from the App Store. The reason is because the app is denying millions of PCs for the upgrade. Microsoft has some hurdles to overcome. Let’s find out.

This is for Windows 10 devices

Dilbert and Skin
Copyright Scott Adams, Inc./Distributed by Universal Uclick for UFS

The Requirements

Processor:

  • 1 gigahertz (GHz) or faster with 2 or more cores on a compatible 64 bit processor System on a Chip (SoC)

RAM:

  • 4 gigabyte (GB)

Storage:

  • 64 GB or larger storage device

System firmware:

  • UEFI, Secure Boot capable

TPM:

  • Trusted Platform Module (TPM) version 2.0

Graphics card:

  • Compatible with DirectX 12 or later with WDDM 2.0 driver

Display:

  • High definition (720p) display that is greater than 9” diagonally, 8 bits per color channel

Internet connection and Microsoft accounts: 

  • Windows 11 Home edition requires internet connectivity and a Microsoft account to complete device setup on first use. Switching a device out of Windows 11 Home in S mode also requires internet connectivity.

For all Windows 11 editions, internet access is required to perform updates and to download and take advantage of some features. A Microsoft account is required for some features.

Check Your Version of Trusted Platform Module (TPM)

To check this, we are going to use the Device Manager.

First, type “device manager” in the Cortana search box in lower left-hand corner. Next, in the search results, click on Device Manager in upper left-hand corner. Refer to below image:

Win 11 Requirements 1
Selecting Device Manager

Now, after the Device Manager opens, scroll down and click on Security Device to expand the menu and see if any TPM entries exist. See below image:

Win 11 Requirements 2
Opening Security devices for TPM entry

This computer meets the requirement for version 2.0 of TPM.

If you have TPM 1.2, you may be able to upgrade to Windows 11; there are no guarantees.

Quote For the Day

No sensible decision can be made any longer without taking into account not only the world as it is, but the world as it will be.

Isaac Asimov

That’s it. Please feel free to share this post! One way to share is via Twitter.

Just click the Tweet icon below. This will launch Twitter where you click its icon to post the Tweet.

Check out TechSavvy.Life for blog posts on smartphones, PCs, and Macs! You may email us at contact@techsavvy.life for comments or questions.

I Would Like to Hear From You

Please feel free to leave a comment. I would love hearing from you. Do you have a computer or smart device tech question? I will do my best to answer your inquiry. Just send an email to contact@techsavvy.life. Please mention the device, app and version that you are using. To help us out, you can send screenshots of your data related to your question.

The author’s Vietnam eBook on the Battle for Tra Bong: Events and Aftermath

How to Use Safety Check in Google Chrome

Google Chrome offers a tool that lets you perform a checkup to secure your web browsing.

Google Chrome offers a tool that lets you perform a checkup to secure your web browsing. Let’s explore this feature.

This is for devices running Google Chrome. Screenshots are from Windows 10 PC

Dilbert and Keyboard
Copyright Scott Adams, Inc./Distributed by Universal Uclick for UFS

First, launch the Chrome web browser on your Windows 10, Mac, Chrome OS, or Linux computer and click the three-dot (hamburger icon) located in the top-right corner. Refer to below image:

Selecting the hamburger icon

Next, click on Settings from the drop-down menu. See below image:

Selecting the Settings option

Now, scroll down to find the Safety Check section and click the Check Now option. See following image:

Selecting the Check Now option

Next, Chrome will kick off the Safety Check test. Depending on how much browsing data you have, this can take anywhere from a few seconds to a couple of minutes. When finished, just click the Review option by any listing. Refer to below image:

Selecting the Review button

In this process, Chrome scans a total of four core modules to look for any malicious code. It will make sure that the browser app is on the most recent version for protection against the latest internet viruses and that all of your installed third-party extensions are harmless. It will also check whether any of your saved passwords have been compromised in a data breach and that Safe Browsing, a setting that warns you against suspicious sites, is enabled.

Once the Safety Check is complete, Chrome will pull up shortcuts for anything that may need your immediate attention, such as reviewing compromised credentials.

After running Safety Check on my PC, it found comprised passwords. See below image where we are displaying three of them:

Viewing Comprised Passwords

After taking the recommended steps, you can also run the Safety Check again to ensure that your new security settings are active.

There’s another feature you can use by switching on Enhanced Safe Browsing, an advanced mode that allows Google to assess your browsing for potential threats and suggest privacy-focused improvements. However, we do not recommend using this option because you are choosing to share a copy of your browsing data with Google.

You are finished. Please feel free to share this post! One way to share is via Twitter.

Just click the Tweet icon below. This will launch Twitter where you click its icon to post the Tweet.

Check out TechSavvy.Life for blog posts on smartphones, PCs, and Macs! You may email us at contact@techsavvy.life for comments or questions.

I Would Like to Hear From You

Please feel free to leave a comment. I would love hearing from you. Do you have a computer or smart device tech question? I will do my best to answer your inquiry. Just send an email to contact@techsavvy.life. Please mention the device, app and version that you are using. To help us out, you can send screenshots of your data related to your question.

The author’s Vietnam eBook on the Battle for Tra Bong: Events and Aftermath
%d bloggers like this: