Sooner or later, you will need the Developer Tab in Word, Excel, PowerPoint, or Outlook. Even if you know nothing about programming, there are buttons on the Developer tab that are necessary for some of the clever features in Office.
Sooner or later, you will need the Developer Tab in Word, Excel, PowerPoint, or Outlook. Even if you know nothing about programming, there are buttons on the Developer tab that are necessary for some of the clever features in Office.
The Developer tab is not displayed by default, but you can add it to the ribbon in a few easy steps.
This is for devices running Microsoft Office
Copyright Scott Adams, Inc./Distributed by Universal Uclick for UFS
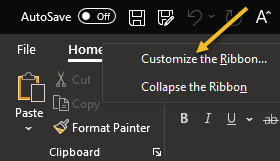
First, open an Office app, like Word, and any document. Now, right-click within any Tab in the Ribbon and select Customize the Ribbon. Refer to below image:
Select Customize the Ribbon option
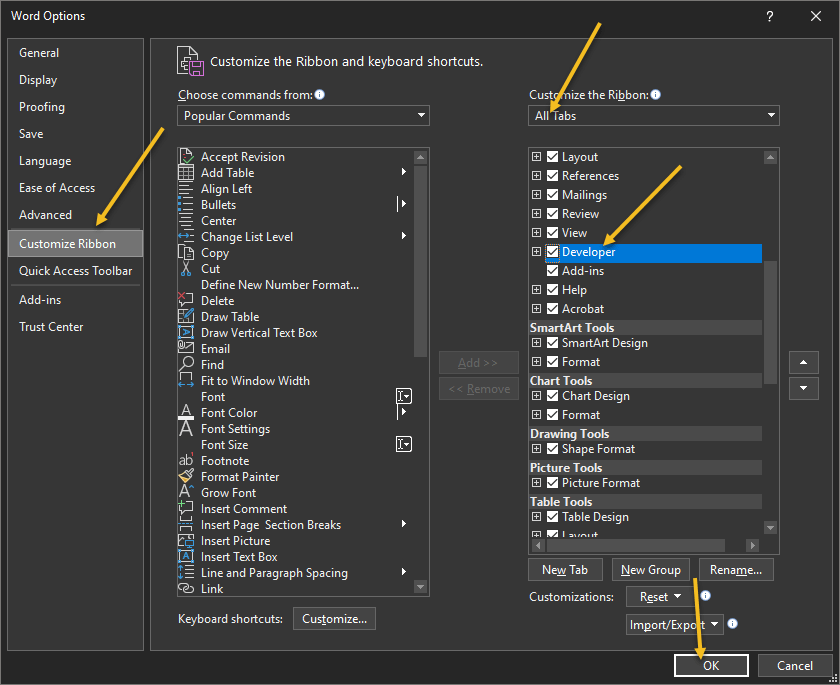
Next, in the right-hand side, select All Tabs from the drop down menu and simply checkmark the Developer tab box. Now, select OK to enable the Developer tab. See below image:
Enable the Developer tab
Next, exit your Office app, restart the app and load your document. You will see the Developer tab in your ribbon. Just click the tab to view its options. See following image:
Your Developer tab
Quote For the Day
‘Fahrenheit 451’ postulates a lot of things I didn’t want to have happen.
Ray Bradbury
That was easy. Please feel free to share this post! One way to share is via Twitter.
Just click the Tweet icon below. This will launch Twitter where you click its icon to post the Tweet.
Check out TechSavvy.Life for blog posts on smartphones, PCs, and Macs! You may email us at contact@techsavvy.life for comments or questions.
Please feel free to leave a comment. I would love hearing from you. Do you have a computer or smart device tech question? I will do my best to answer your inquiry. Just send an email to contact@techsavvy.life. Please mention the device, app and version that you are using. To help us out, you can send screenshots of your data related to your question.
The author’s Vietnam eBook on the Battle for Tra Bong Vietnam: Events and Aftermath
It is possible to add videos to a PowerPoint Kiosk or self-running presentation. You have been able to do this for years but it’s become a lot easier in recent versions of Office. Making the video work within a self-running presentation takes a little extra trickery. L
It is possible to add videos to a PowerPoint Kiosk or self-running presentation. You have been able to do this for years but it’s become a lot easier in recent versions of Office. Making the video work within a self-running presentation takes a little extra trickery. Let’s explore how to do this.
This is for devices running PowerPoint
Copyright Scott Adams, Inc./Distributed by Universal Uclick for UFS
Here are the steps:
Go to the presentation and add a blank slide where you want the video to go.
Insert the video onto the slide from Insert | Video.
Make any changes you want to the video; trimming, effects, fades , and so on.
Ensure that Video Tools | Playback | Video Options | Start is set to Automatically. Refer to below image:
Set the Playback to automatically
Using the slider below the video, note the running time of the video.
Switch to the Transitions tab. Under Timing | Advance Slide | After set the duration to the same (our video is 41 seconds) or a little more than the video playback time. See below image:
Set the timing for the video
With those settings the video will automatically play when the slide appears and will advance to the next slide when the video ends. If the video slide gets ‘stuck’ set the Advance Slide duration to match the video playing time.
Quote For The Day
The saddest aspect of life right now is that science gathers knowledge faster than society gathers wisdom
Isaac Asimov
That was easy. Please feel free to share this post! One way to share is via Twitter.
Just click the Tweet icon below. This will launch Twitter where you click its icon to post the Tweet.
Check out TechSavvy.Life for blog posts on smartphones, PCs, and Macs! You may email us at contact@techsavvy.life for comments or questions.
Please feel free to leave a comment. I would love hearing from you. Do you have a computer or smart device tech question? I will do my best to answer your inquiry. Just send an email to contact@techsavvy.life. Please mention the device, app and version that you are using. To help us out, you can send screenshots of your data related to your question.
The author’s Vietnam eBook on the Battle for Tra Bong: Events and Aftermath
Microsoft Word, PowerPoint, and Outlook offer a hidden measurement converter to save you from doing measurement conversions manually. If you are working with a document, presentation, or email that contains measurements, you will find this time-saving feature useful.
Microsoft Word, PowerPoint, and Outlook offer a hidden measurement converter to save you from doing measurement conversions manually. If you are working with a document, presentation, or email that contains measurements, you will find this time-saving feature useful. Lets explore this feature.
This is for Office 365. Screenshots are from Windows 10 PC.
Copyright Scott Adams, Inc./Distributed by Universal Uclick for UFS
Enable Converter in Word and PowerPoint
First, open a document in Microsoft Word or a presentation in PowerPoint. Next, click
File > Options
from the menu. Now, select Proofing on the left and click AutoCorrect Options on the right. Refer to below image:
Accessing AutoCorrect.Options
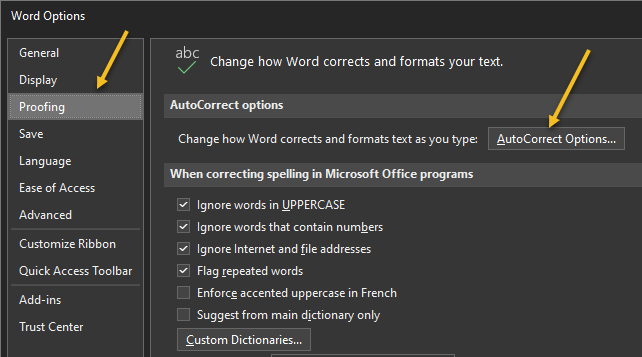
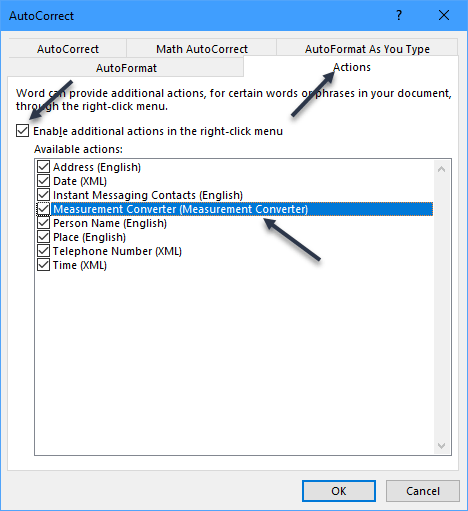
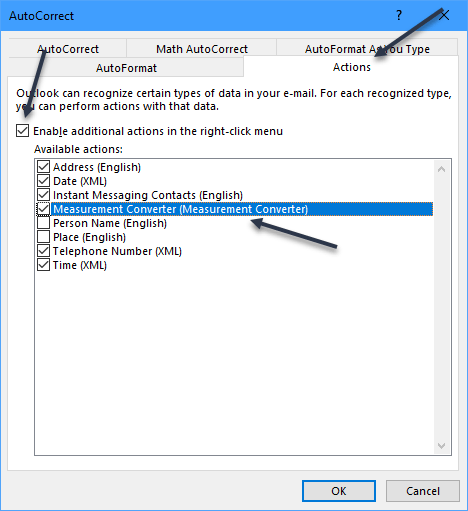
Next, select the Actions tab. Now, check the boxes for EnableAdditionalActions in the right-click menu then Measurement Converter from the list. You will notice other actions you can enable. Just checkmark any additional ones you would like to use. See below image:
Enabling Measurement Converter option
Click OK, then OK once more to save and exit the options menu.
Enable Converter in Outlook
First, open Microsoft Outlook and click
File > Options
from your inbox or an email window.
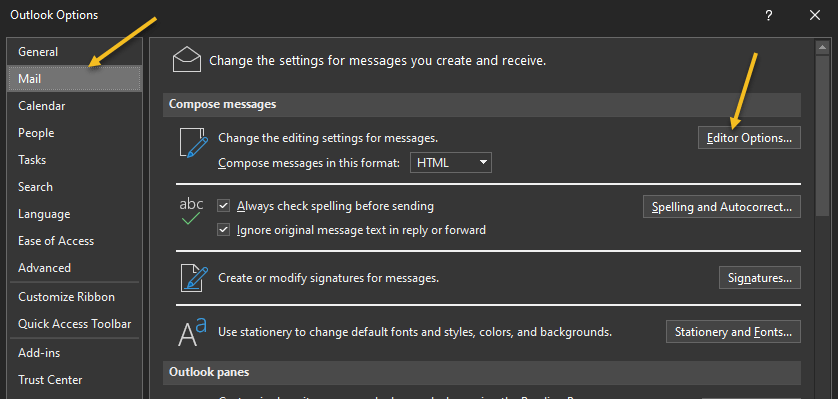
Now, select Mail on the left and click Editor Options on the right. See following image:
Accessing Editor Options
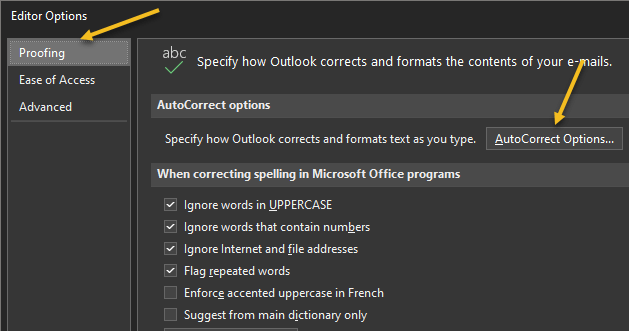
On the next screen, choose Proofing on the left and AutoCorrect Options on the right. Refer to below image:
Accessing AutoCorrect Options
Next, select the Actions tab. Now, check the boxes for Enable Additional Actions in the right-click menu, and Measurement Converter in the list. Like with Word and PowerPoint you can checkmark the boxes for any other actions you would like to use. See below image:
Enabling Measurement Converter option
Next click OK on all screens to save and exit,
Use the Converter in Office
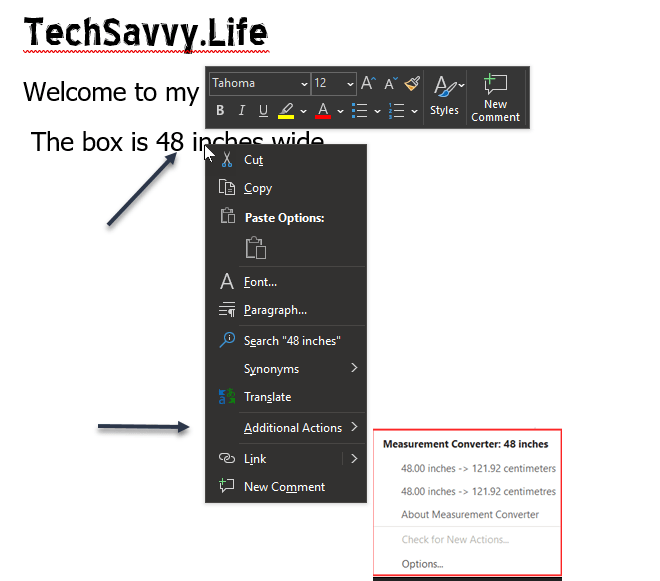
When you receive a document that includes unfamiliar measurements, such as those from a foreign country, this tool takes the work out of manual conversions. And if you are creating the document yourself, you can convert the measurement for your audience.
Just, select the text containing the measurement. You can do this by dragging your cursor through it.
Now, right-click and move your cursor down to Additional Actions in the menu. You will see the Measurement Converter in the pop-out window. Refer to below image:
Accessing Measurement Converter
This lets you view the conversion. Additionally, you can click to select a conversion from the list and it will replace the measurement in your document, presentation, or email. This is convenient when you are preparing an item for someone expecting a different unit of measurement.
Quote For the Day
The greatest mistake you can make in life is continually fearing that you’ll make one.
Elbert Hubbard
That’s it. Please feel free to share this post! One way to share is via Twitter.
Just click the Tweet icon below. This will launch Twitter where you click its icon to post the Tweet.
Check out TechSavvy.Life for blog posts on smartphones, PCs, and Macs! You may email us at contact@techsavvy.life for comments or questions.
Please feel free to leave a comment. I would love hearing from you. Do you have a computer or smart device tech question? I will do my best to answer your inquiry. Just send an email to contact@techsavvy.life. Please mention the device, app and version that you are using. To help us out, you can send screenshots of your data related to your question.
The author’s Vietnam eBook on the Battle for Tra Bong: Events and Aftermath
The advantage of the Microsoft Office suite is that all the programs in the collection work quite well together. An example is the ability to link or embed a Microsoft PowerPoint slides into a Microsoft Word document.
The advantage of the Microsoft Office suite is that all the programs in the collection work quite well together. An example is the ability to link or embed a Microsoft PowerPoint slides into a Microsoft Word document. Lets explore how this is done.
This is for devices running PowerPoint and Word
Copyright Scott Adams, Inc./Distributed by Universal Uclick for UFS
Linking vs. Embedding Explained
If you link or embed a PowerPoint slide in a Word document, the goal is always the same; to provide an external reference that complements the content of the document. However, there are subtle differences between linking and embedding that you should be aware of.
The difference between linking and embedding an object is how the object’s data is stored and how the object’s content is updated. Since data is stored differently between the two methods, the content update process will also be different.
If you link an object, then that link simply sends the reader to the location of the source object when clicked. The file itself does not actually store any data from the linked object to the file. This is advantageous if the object you are linking to is large in size and you need to reduce the size of your Word document. The downside is that if the location of the linked object changes, the link in your Word document will break.
If you embed an object, then you do not need to worry about whether the location of the object changes, as it becomes part of the document itself. That is, Word stores the object data in the actual Word file. The good news is that you do not have to worry about broken links in your document. The downside is that when the object is updated, those updates are not reflected in your embedded object, because there is no link connecting it to the source. Also, you will need to consider that the file size increases with embedded objects.
Link or Embed a PowerPoint Slide into a Word Document
First, open the PowerPoint project that contains the slide you want to link or embed. Now, select the desired slide by clicking its preview thumbnail. Refer to below image:
Selecting a PowerPoint slide
Next, copy the slide to your clipboard by using the Ctrl+c (Cmd+c on Mac) keyboard shortcut, or by right-clicking the slide and selecting Copy from the context menu. See below image:
Selecting the Copy option
Now, open your Word documentyou would like to link or embed the slide to. In the Clipboard group of the Home tab, click the down arrow under Paste. See following image:
Selecting the Paste option
In the drop-down menu, click Paste Special. Refer to below image:
Selecting the Paste Special option from drop-down list
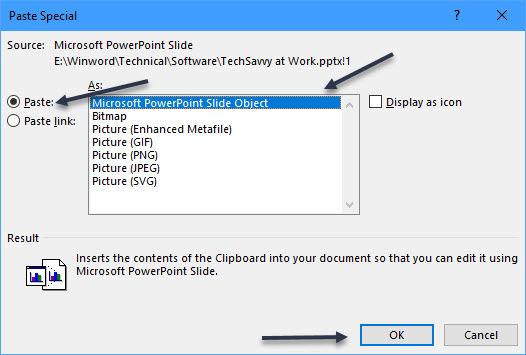
The Paste Special window will appear. If you have copied the PowerPoint slide to your clipboard, you will see a Microsoft PowerPoint Slide Object option in the box under As. Next, click it to select the option. If you do not see this option, repeat the above steps. You may not have copied the slide to your Clipboard.
To embed the slide, click the bubble icon next to Paste.
To link the slide, click the bubble icon next to Paste Link.
Now, select OK to insert the linked or embedded object. See below image:
Selecting the Paste option to embed the PowerPoint slide
Your final Word document should look like the following image:
Your Word document with the PowerPoint slide embedded
The Microsoft PowerPoint slide is now linked or embedded into your Microsoft Word document.
That was easy. You are now finished. Please feel free to share this post! One way to share is via Twitter.
Just click the Tweet icon below. This will launch Twitter where you click its icon to post the Tweet.
Check out TechSavvy.Life for blog posts on smartphones, PCs, and Macs! You may email us at contact@techsavvy.life for comments or questions.
Please feel free to leave a comment. I would love hearing from you. Do you have a computer or smart device tech question? I will do my best to answer your inquiry. Just send an email to contact@techsavvy.life. Please mention the device, app and version that you are using. To help us out, you can send screenshots of your data related to your question.
The author’s Vietnam eBook on the Battle for Tra Bong: Events and Aftermath
In PowerPoint, it’s hard to remember what slide number you are presenting. As an aid, we can add the slide number to our slides.
One way, we could manually add a number using a text box. But what if you added or deleted a slide? This would require you to manually update your slide numbers; a time consuming and error prone task.
Instead, you can have the slide numbers update automatically on all your hidden and active slides. By default, your slide numbers appear in your slide footer, but you can move and format them.
This is for PowerPoint for Office 365 Windows and Mac versions. Other versions of PowerPoint will be similar.
Copyright Scott Adams, Inc./Distributed by Universal Uclick for UFS
Adding Slide Numbers
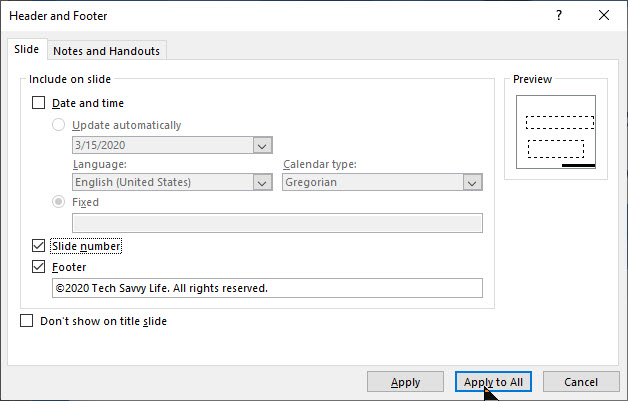
Open a PowerPoint presentation with several slides to see the feature. Click the Insert tab. In the Text section, click the Header & Footer icon. See below image:
Text dialog box
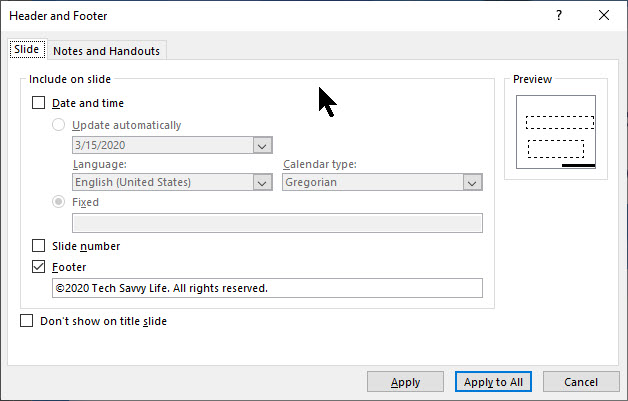
The Header & Footer options box will open. Refer to below image:
Slide Header and Footer options
Under the Slide option, place a check in the Slide number checkbox. To add your slide number to all of your slides, select Apply to All button. Refer to below image:
Checkmarking the Slide Number option
Your slide number will appear in the bottom right corner. Note! The number place holder will be small. See following image:
Sliode Number placeholder
Remove Slide Numbers
To remove your slide numbers, follow the steps above. In the Header & Footer options options box, simply uncheck the Slide number checkbox. Then click Apply to All button. Your slide numbers will be removed.
Format Slide Numbers
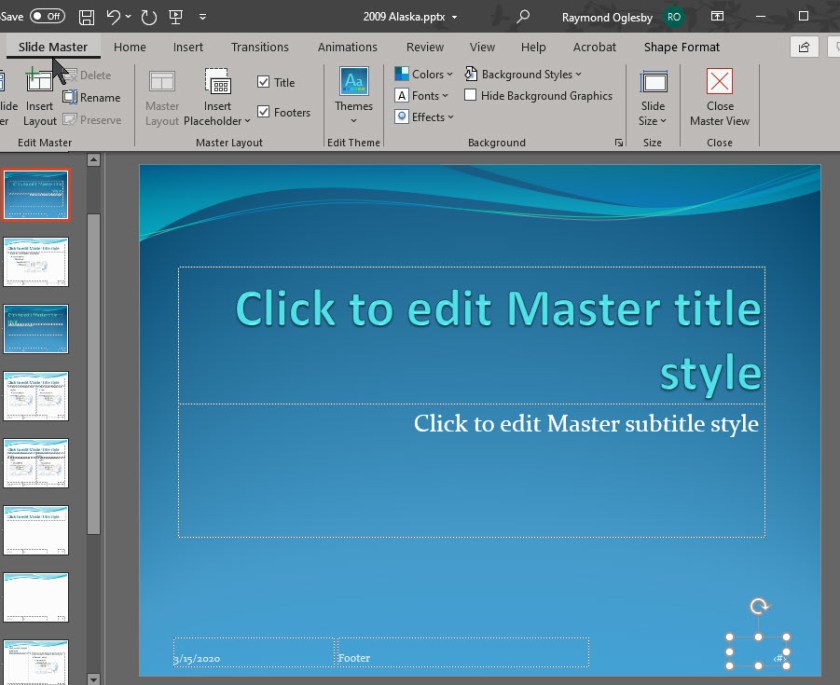
We are going to use PowerPoint Slide Master to make the slide number in a different font, color, size or position.
To do this, click View from the main menu, then select Slide Master. This will load the Slide Master editing box. You will see the slide number box in its default position at the bottom right section of the slide. See following image:
Accessing the Slide Master
Note! You could add a text box with the word “Slide” next to the slide number; this is not shown.
When you move or apply a different font, size or color, it will apply to all your slides.
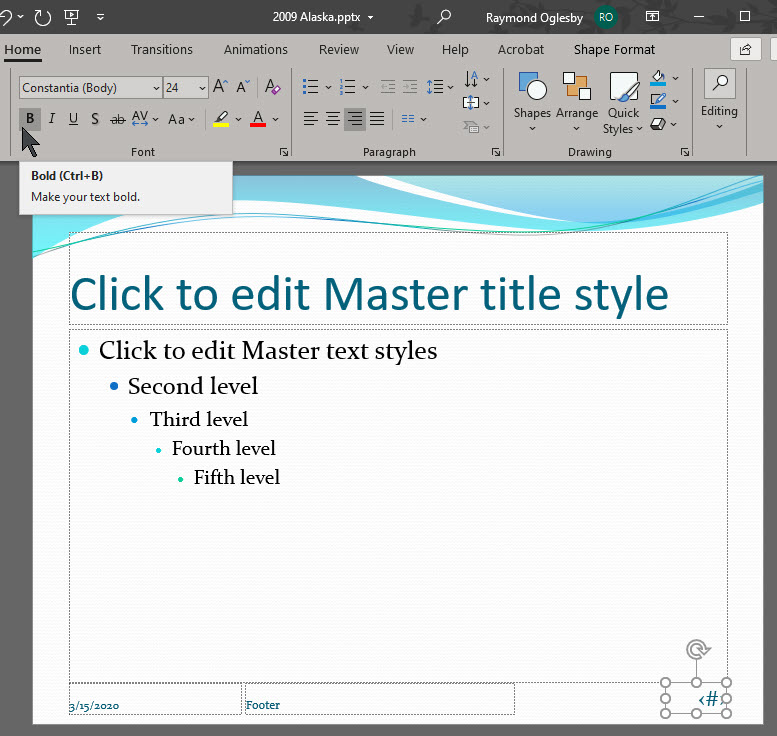
To edit the text box, select the box then select the Home tab. See below image:
Selecting the Home tab for editing
Then you can use the available options in the Font and Paragraph sections to format the number like choosing Bold, Underline, etc. I have set the number to be Bold and made the font size bigger. See below image:
Editing the Slide Number placeholder
Once you have finished editing, return back to the Slide Master tab and click Close Master View button. Refer to below image:
Closing the Slide Master
Be sure to Save your presentation with the automatic slide numbering feature.
Please feel free to leave a comment. I would love hearing from you. Do you have a computer or smart device tech question? I will do my best to answer your inquiry. Please mention the device, app and version that you are using. To help me out, you can send screenshots of your data related to your question.
The author’s Vietnam eBook on the Battle for Tra Bong: Events and Aftermath
Do you need to give people credit for your PowerPoint presentation? If so, you can add these credits to your final slide by using the scrolling text animation feature. You can use an existing presentation or add this to your next one. In our example, we are using an existing PowerPoint slide show.
This is for PowerPoint for Office 365 Windows and Mac versions. Other versions of PowerPoint will be similar.
Setting Up the Slide
Open an existing presentation or create a new one
Navigate to the final slide
Click the Insert tab
Insert a blank text box by clicking the Text Box icon in the Text group. Your cursor will turn into an down arrow. After you click, the cursor changes to a crossbar. Click and drag the cursor to draw the text box. See followin image:
PowerPoint drawing the text box for the Credits
Entering Your Presentation Credits
Enter your credits. The text box will expand, if necessary, as you enter the names.
Highlight your entries
Select the Home tab
Since credits are usually centered, select the Center alignment icon in the Paragraph group. See following screen:
PowerPoint Credits completed and centered
Adding the Animation Effects
Now lets add the animation to the text box. With the textbox selected:
Click the Animations tab
Select Add Animation button in the Advanced Animation group. See following image:
PowerPoint about to add the animations
A drop down menu will appear. Scroll to the bottom and select More Entrance effects. The Add Entrance Effect window will be shown. See following image:
PowerPoint Add Entrance Effect drop down menu
Setting the Credits Animation
Scroll down to the Exciting group and select Credits. You will see the credits animation scrolling effect in the background.
Click OK to save your changes
PowerPoint selecting the Credits animation
The rolling credits will be added to your presentation. You may now view your slideshow from the beginning or from the current slide to see the Rolling Credits in action.
Thats it. You are finished.
I Would Like to Hear from You
Please feel free to leave a comment. I would love hearing from you. Do you have a computer or smart device tech question? I will do my best to answer your inquiry. Please mention the device, app and version that you are using. To help us out, you can send screenshots of your data related to your question.
The author’s Vietnam eBook on the Battle for Tra Bong: Events and Aftermath
At times, you will want to entertain your guests before an event, like at a wedding or a trade show. You’ll want to loop your PowerPoint presentation so your guests aren’t staring at a blank screen. I have included a link to a sample slideshow using the loop feature.
This is for PowerPoint for Office 365 Windows and Mac versions. Other versions of PowerPoint will be similar.
Copyright Scott Adams, Inc./Distributed by Universal Uclick for UFS
Setting Up your Slideshow
First, open your PowerPoint presentation in which you would like to use the loop feature. Once open, navigate to the Set Up group of the Slide Show tab and select the Set Up Slide Show option.
The Set Up Show window will open. Check the box next to Loop continuously until Esc. After selection, click OK. Refer to below image:
Setting the Loop feature
When you play your slideshow, it will loop until you press the “Esc” key. Now we want to set up the presentation for automatic slide transitions.
Applying the Loop Feature
Navigate back to the Set Up group of the Slide Show tab and select the Set Up Slide Show option. There is one option you need to set, the Using Timings, if Present under the Advance Slides group.
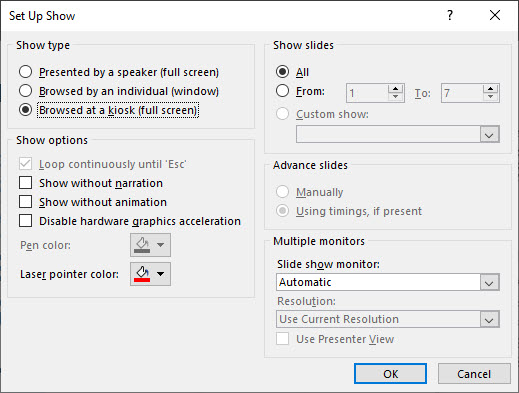
Now, under the Show Type group, select Browsed at a kiosk (full screen). The Loop continuously until Esc option will be enabled automatically (we turned it on above) Also, select the Using timings, if present option. Select OK to proceed. See following image:
Setting the kiosk feature
By setting the Browsed at a kiosh (full screen) option, the Forward and Back keys are locked, thus allowing unattended playback without the fear of someone breaking it.
Setting Up Transitions
Now, lets setup the timings of your slides. Click on the Transitions tab and check the box next to After and set the timing for slide transition. In my example, I have the timining set to 10 seconds. If On Mouse Click is enabled, it won’t work because we have previously selected to loop the slideshow until the presenter has pressed the “Esc” key. To finish the loop feature, select the Apply To All option. See following image:
Now when you play your presentation, it will continuously loop until you press the “Esc” key.
Please feel free to leave a comment. I would love hearing from you. Do you have a computer or smart device tech question? I will do my best to answer your inquiry. Please mention the device, app and version that you are using. To help us out, you can send screenshots of your data related to your question.
The author’s Vietnam eBook on the Battle for Tra Bong: Events and Aftermath
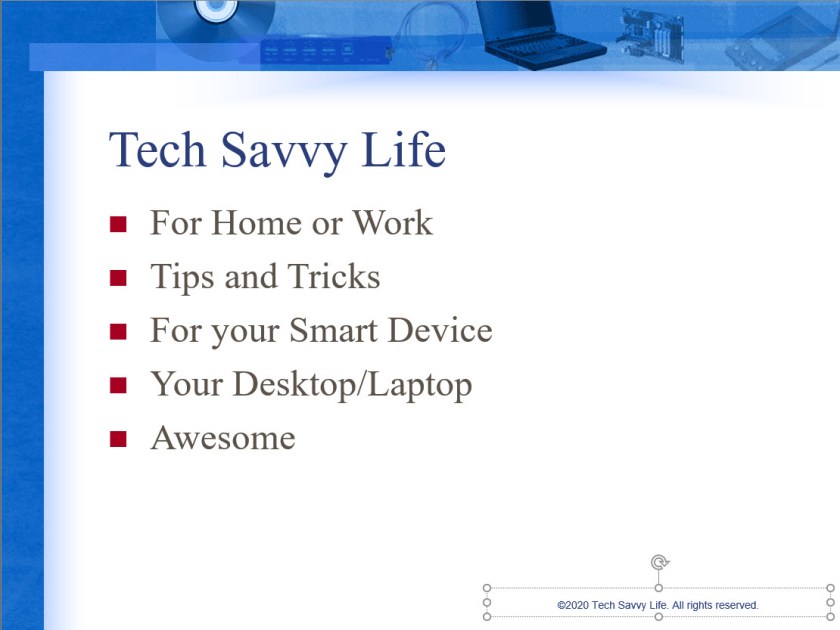
I ran across this neat feature of Microsoft PowerPoint that I want to share with you. As a presenter, you are in control of what is being displayed. Instead of presenting all your bullet points at once lets dim there appearance one at a time. The “dim text” feature allows the audience to focus on one topic. For my example I am using a single slide with five bullet points.
This is for PowerPoint for Office 365 Windows and Mac versions. Other versions of PowerPoint will be similar.
Launch PowerPoint
Open PowerPoint on your Desktop/Laptop or Mac
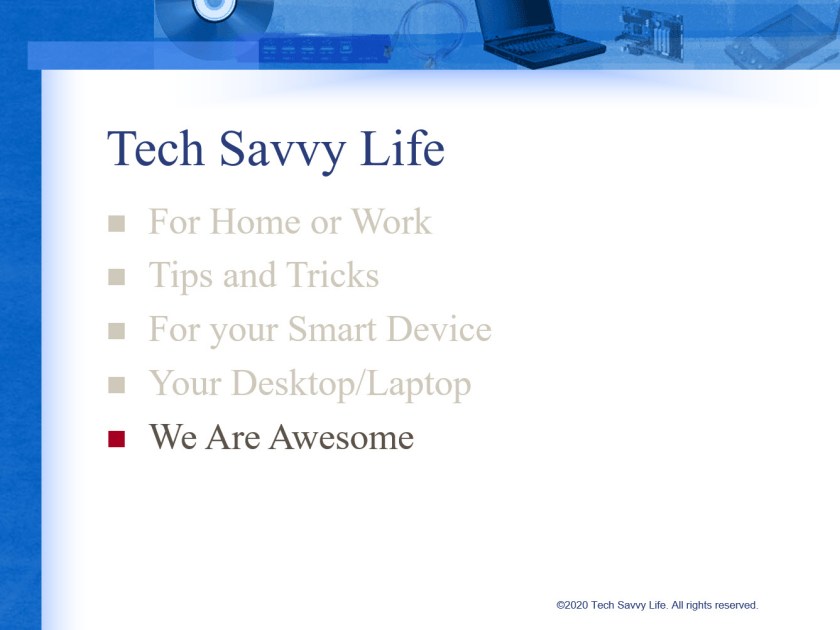
Find a slide that contains bullet points or text you want to dim. See my example below:
PowerPoint Slide Bullet Points screen
Highlight a bullet point or text
Select the Animations tab and choose the Appear animation
Set Animations
The animation will be successfully applied if you see a number next to the bullet point or slide.
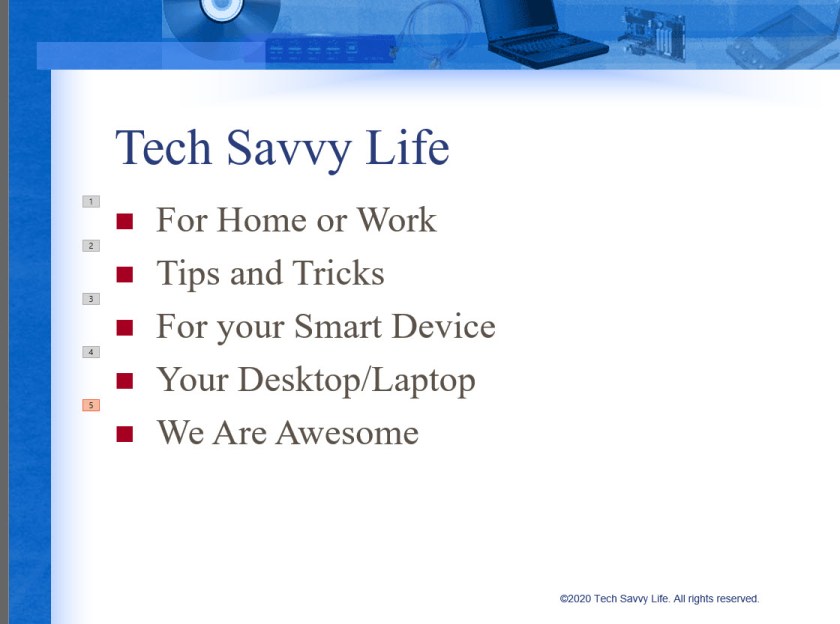
Repeat the above steps until you have applied an animation to each bullet point or text. Refer to the following image:
PowerPoint Slide with Animation applied screen
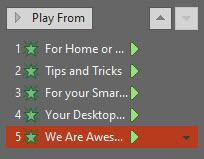
Select all the Animations by using the “Ctrl” key and clicking on each animation.
Select the arrow next to the right side of the animation
PowerPoint Animations screen
Set Effects
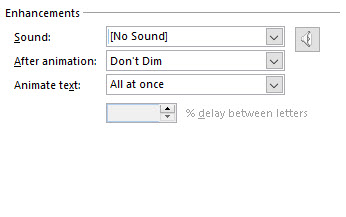
Select Effect Options. See following image:
PowerPoint Effects screen
Change Behavior for Dimming
We are going to change the behavior of the default Don’t Dim option by clicking the arrow next to the item (a drop down box selection) and select a color slightly different than your bullet points or text. You want your color selected to be visible to the audience. For my example, I selected a light red color:
PowerPoint Color Selection for Animation screen
Click OK
Test Your Slide
Now its time to test out your slide. You should see something like the following screen as you manually or automatically select each bullet point.
PowerPoint using the Dim Feature
This is a nifty feature for your next text presentation. Save your slide or presentation, you are finished.
I Would Like to Hear from You
Please feel free to leave a comment. I would love hearing from you. Do you have a computer tech question? I will do my best to answer your inquiry. Please mention the app and version that you are using. To help me out, you can send screenshots of your data related to your question.