The article explains how to remove a person from the People album in Apple’s Photos app on iPhone or iPad. Users can easily hide photos of individuals without deleting them from their main library.
RAYMOND OGLESBY @RaymondOglesby2 July 28, 2026 – 3 minutes read time
Overview
The People album in Apple’s Photos app is a very handy feature for finding pictures of a particular person. But what if there’s a particular person whose People album you want to remove?
It’s easy to remove a person from the People album on your iPhone or iPad. Do not worry, though, if you can always add back the person you removed. Here’s how to remove a People album in Photos on iPhone.
Key Tskeaways
Hide photos on iPhone of people you don’t want to see in the People album.
Keep photos of the person in your regular photos library, without seeing them in the People album.
System Requirements
This tip was performed on an iPhone 17 Pro running iOS 26.5.
Click here to learn how to update your iPhone to the latest iOS version.
Remove a People Album
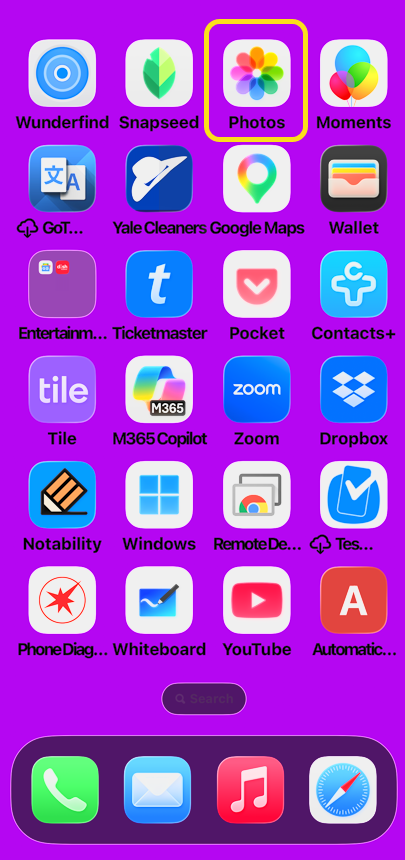
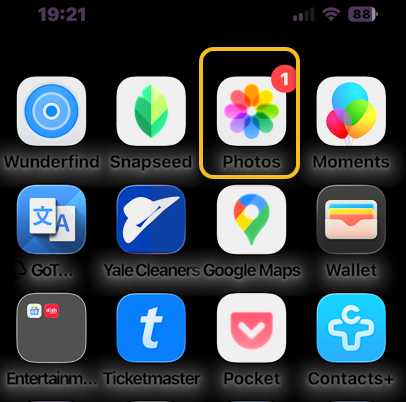
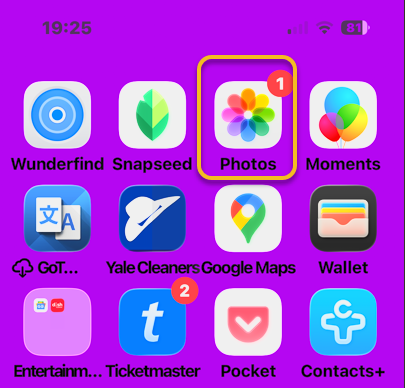
1. Open the Photos app on your iPhone. Refer the image below:
Selecting the Photos app
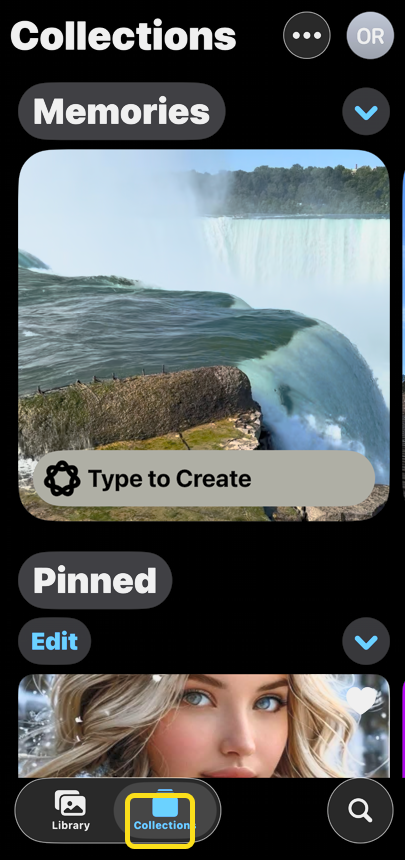
2. Tap the Collections tab. See the image below;
Selecting the Collections tab
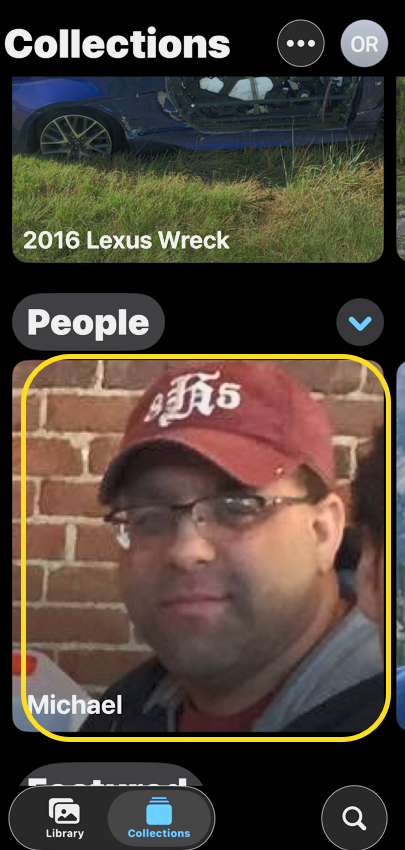
3. In the People section, tap the person album that you want to remove. See the following image:
Selecting a People album you want removed
4. Tap the More icon. Refer to the image below:
Selecting the More icon
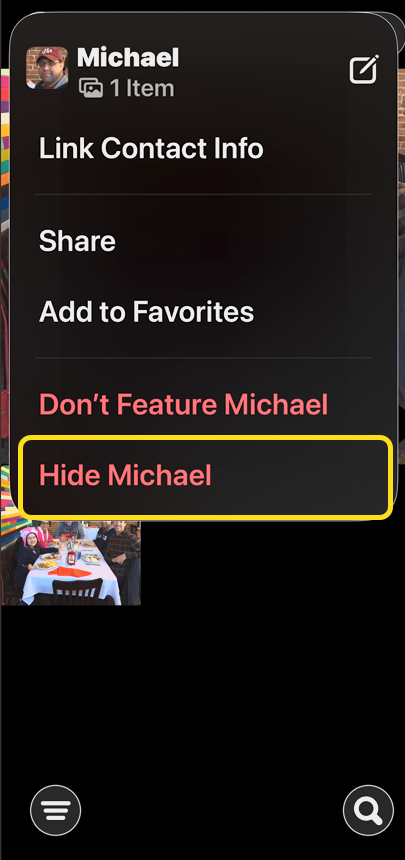
5. Tap Hide (Name). See the image below:
Selecting to Hide the album option
6. Tap Hide from People Album. See the following image:
Confirming to Hide the album
Disclaimer
Technology is constantly evolving, and smartphone and desktop tech rarely remains static. Therefore, the information in this post is only accurate as of the date it was written. Blog posts that are older than six months may contain instructions that are no longer compatible with your device or operating system. We hope that the content from previous posts continues to function as intended. Thank you for reading TechSavvy.Life, where technology works for you.
Quote For the Day
As a technology, the book is like a hammer. That is to say, it is perfect: a tool ideally suited to its task. Hammers can be tweaked and varied but will never go obsolete. Even when builders pound nails by the thousand with pneumatic nail guns, every household needs a hammer.
– James Gleick
(X) Twitter Info
That’s it. Please feel free to share this post! One way to share is via Twitter.
Just click the Tweet icon below. This will launch Twitter where you click its icon to post the Tweet.
Checkout TechSavvy.Life for blog posts on smartphones, PCs, and Macs! You may email us at contact@techsavvy.life for comments or questions.
We value your feedback! Was this post helpful? Please share your comments with us. If you have a tech question related to your computer or smart device, feel free to reach out. Just send an email to contact@techsavvy.life, and be sure to include the device, app, and version you are using. To assist us further, you can also attach screenshots related to your inquiry.
The author’s Vietnam eBook, “Battle for Tra Bong Vietnam: Events and Aftermath”, is available on Kindle devices and the Kindle App for desktop, laptop, and smartphone. The apps are free.
The author’s Vietnam eBook on the Battle for Tra Bong Vietnam: Events and Aftermath
The content discusses how to create and organize photo albums in the iPhone’s Photos app. It emphasizes the benefits of using albums for easier access and sharing of memories. The article provides a step-by-step guide for creating a new album, highlighting the app’s features for selecting and adding photos.
RAYMOND OGLESBY @RaymondOglesby2 July 21, 2026 – 4 minutes read time
Overview
iPhone photo albums are the best way to keep your Photos app organized. Creating albums to sort your photos and videos can help you easily share specific memories with loved ones or simply make them easier to access whenever you need them.
All the photos and videos you take or save to the Photos app end up in your Library. While you can search the Photos app to find the exact content you are interested in seeing, creating and using albums is the best way to keep things organized and shareable. Let’s explore how to make iPhone albums!
Key Takeaways
Learn how to create an album on iPhone to keep your memories organized.
Creating iPhone photo albums is the best way to quickly access certain photos and videos and share them with others.
System Requirements
This tip was checked on an iPhone 17 Pro running iOS 26.5.
Click here to learn how to update your iPhone to the latest iOS version.
Create a Photo Album
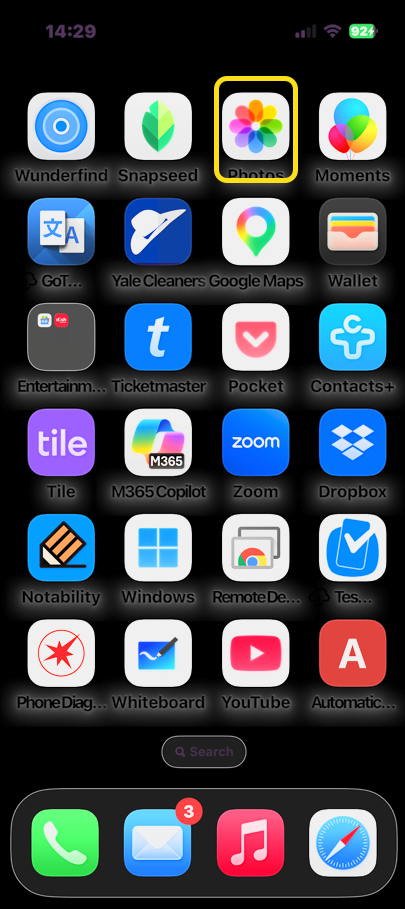
1. Open the Photos app. Refer to the image below:
Selecting the Photos app
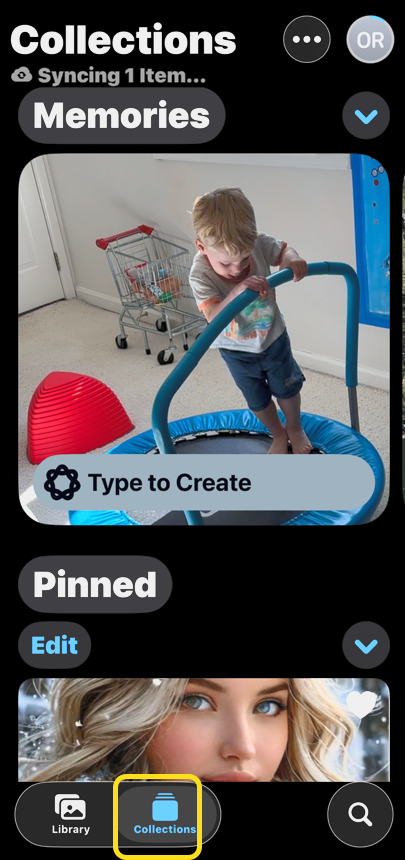
2. Tap the Collections tab at the bottom of the screen. See the image below:
Selecting the Collections icon
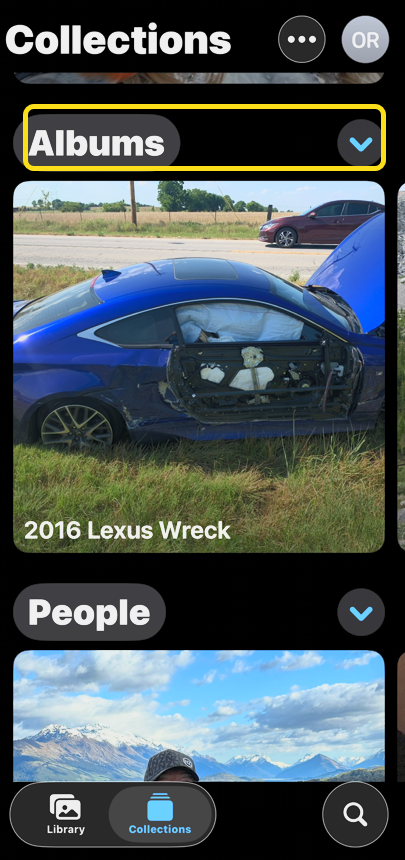
3. Scroll down and tap Albums. See the following image:
Selecting the Albums tab
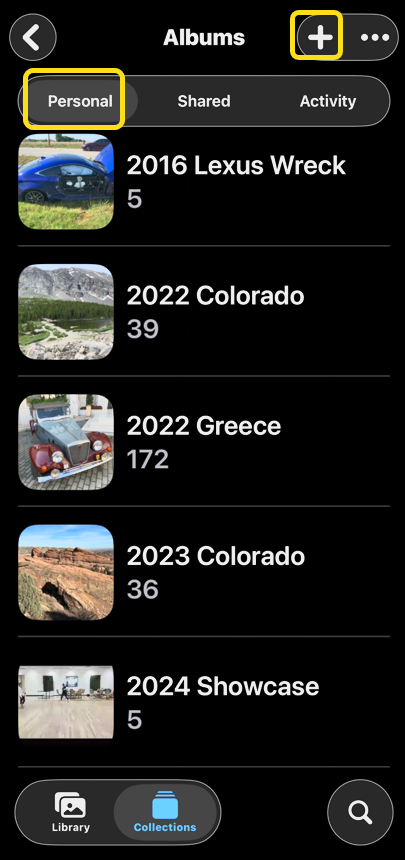
4. Under Albums, make sure Personal is selected, then tap the plus sign in the top right. Refer to the image below:
Selecting the Personal option and the plus sign
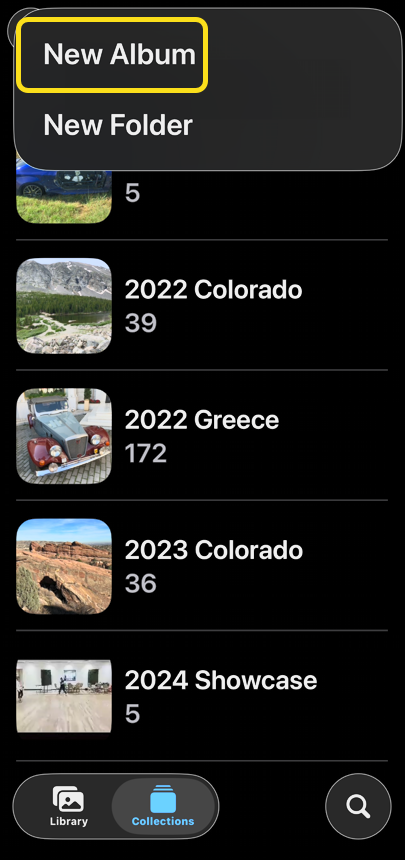
5. Select New Album. See the image below:
Selecting the New Album option
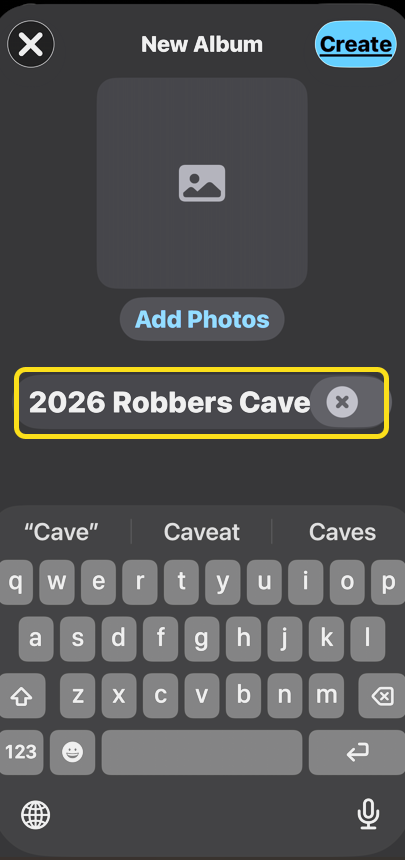
6. Type the name of your album. See the following image:
Naming your new Album
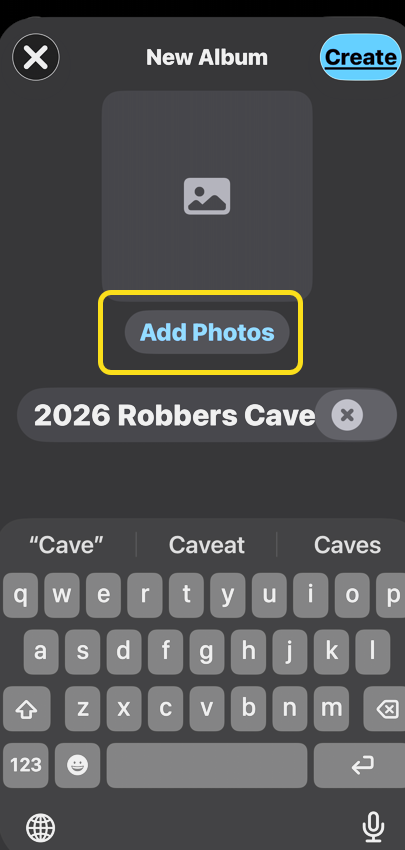
7. Now you can either add photos to the album or create the album to add them later. Let’s tap Add Photos for this example. Refer to the image below:
Selecting the Add Photos option
8. Here you can tap on the photos you wish to add. You can search your Library, scroll through your Photos, Collections, or use the Filter feature to find what you are looking for. Once you are done selecting photos, tap the check mark in the blue circle. You can always add more photos and videos or delete content from your album at a later time. See the image below:
Selecting your photos and tapping the Done icon
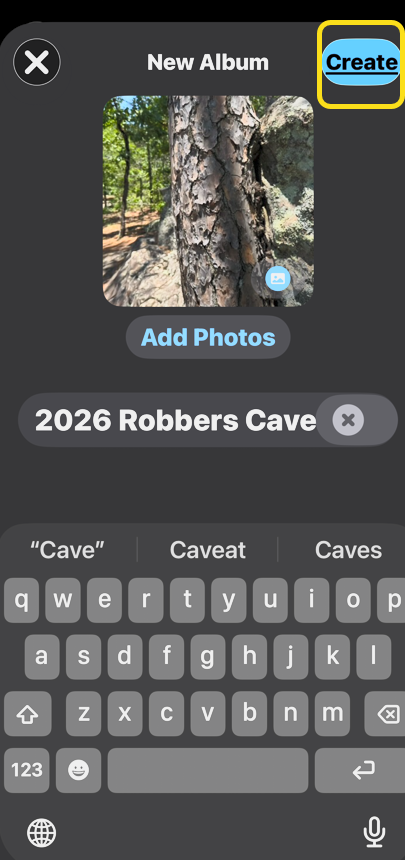
9. Tap Create, and your new album will show up in your Albums collection. See the following image:
Selecting the Create option
10. You might need to swipe down to refresh the app to see your new album appear in your Albums list. Refer to the image below:
Your new album
Now you know how to create an album on iPhone and iPad in the Photos app.
Disclaimer
Technology is constantly evolving, and smartphone and desktop tech rarely remains static. Therefore, the information in this post is only accurate as of the date it was written. Blog posts that are older than six months may contain instructions that are no longer compatible with your device or operating system. We hope that the content from previous posts continues to function as intended. Thank you for reading TechSavvy.Life, where technology works for you.
Quote For the Day
Technology is dominated by two types of people: those who understand what they do not manage and those who manage what they do not understand.
– Archibald Putt
(X) Twitter Info
You are finished. Please feel free to share this post! One way to share is via Twitter.
Just click the Tweet icon below. This will launch Twitter where you click its icon to post the Tweet.
Checkout TechSavvy.Life for blog posts on smartphones, PCs, and Macs! You may email us at contact@techsavvy.life for comments or questions.
The author’s Vietnam eBook, “Battle for Tra Bong Vietnam: Events and Aftermath”, is available on Kindle devices and the Kindle App for desktop, laptop, and smartphone. The apps are free.
The author’s Vietnam eBook on the Battle for Tra Bong Vietnam: Events and Aftermath
The article provides a guide on how to rearrange photo albums in the Photos app on iPhone and iPad. It explains methods for sorting albums by different criteria and demonstrates a simple drag-and-drop technique for reordering them. The information is applicable to iOS 26.5, highlighting the need for current updates.
RAYMOND OGLESBY @RaymondOglesby2 July 14, 2026 – 4 minutes read time
Overview
When you make a photo album on your iPhone, the Photos app automatically sorts that picture album in the Albums tab in order of when the album was created. You can rearrange albums on iPhone in two different ways.
Want to learn how to rearrange albums on an iPhone or iPad in Apple’s Photos app? Read on to learn how to organize photos by rearranging how your albums appear in the Photos app.
Key Takeaways
Learn how to rearrange albums in Photos on your iPhone or iPad using the drag-and-drop method.
Learn how to sort albums on iPhone by Date Modified, Name, or Custom Order.
Learn how to move albums around on iPhone so you can find your albums quickly and easily.
System Requirements
This tip was tested on an iPhone 17 Pro running iOS 26.5.
Click here to learn how to update your iPhone to the latest iOS version.
Reorganize Your Photo Albums
1. Open the Photos app. Refer to the image below:
Selecting the Photos app
2. Tap the Collections tab at the bottom of the screen. See the image below:
Selecting the Collections icon
3. Scroll down and tap Albums. See the following image:
Selecting the Albums tab
4. Tap the More icon. Refer to the image below:
Selecting the More icon
5. Tap a photo album sorting option. Choose Sort by Name to sort albums alphabetically.
Note! In order for this tip to work, the List View menu option must be checked.
See the image below:
Selecting the Sort by Name option
6. Head back to Albums. See the following image:
Returning back to Albums
7. Here you can also touch and hold the center of a photo album you want to move, then drag it to a new place. You may need to try this more than once, as sometimes a menu pops up, and sometimes the album is ready to be dragged and dropped. Refer to the image below:
Drag and drop an album
8. Release your finger to drop the album in its new location. See the image below:
Release your finger after dragging
8. When you are done, close the Photos app, and you have finished rearranging albums on your iPhone or iPad.
Now you know how to organize photos on your iPhone or iPad by reordering albums.
Disclaimer
Technology is constantly evolving, and smartphone and desktop tech rarely remains static. Therefore, the information in this post is only accurate as of the date it was written. Blog posts that are older than six months may contain instructions that are no longer compatible with your device or operating system. We hope that the content from previous posts continues to function as intended. Thank you for reading TechSavvy.Life, where technology works for you.
Quote For the Day
Programs must be written for people to read, and only incidentally for machines to execute.
– Harold Abelson
(X) Twitter Info
That’s it. Please feel free to share this post! One way to share is via Twitter.
Just click the Tweet icon below. This will launch Twitter where you click its icon to post the Tweet.
Checkout TechSavvy.Life for blog posts on smartphones, PCs, and Macs! You may email us at contact@techsavvy.life for comments or questions.
We value your feedback! Was this post helpful? Please share your comments with us. If you have a tech question related to your computer or smart device, feel free to reach out. Just send an email to contact@techsavvy.life, and be sure to include the device, app, and version you are using. To assist us further, you can also attach screenshots related to your inquiry.
The author’s Vietnam eBook, “Battle for Tra Bong Vietnam: Events and Aftermath”, is available on Kindle devices and the Kindle App for desktop, laptop, and smartphone. The apps are free.
The author’s Vietnam eBook on the Battle for Tra Bong Vietnam: Events and Aftermath
RAYMOND OGLESBY @RaymondOglesby2 June 2, 2026 – 3 minutes read time
Overview
When you take photos with your location enabled, your iPhone will pin them to a map, which you can use to see everywhere you have been.
If you have Location Services enabled on your iPhone Camera and photos, every picture you take will have a location saved to its metadata. The Photos app will pin these photos to a map, so that you can see all the places you have traveled to and taken photos. Here’s how to view your iPhone photos by location.
Key Takeaways
Easily find photos if you remember where you took them.
See all the places you’ve traveled to and taken photos.
Revisit memories of every location where you’ve taken photos.
System Requirements
This tip was performed on an iPhone 17 Pro running iOS 26.4.
Click here to learn how to update your iPhone to the latest iOS version.
View Your Photos Map
First, open the Photos app. Refer to the image below:
Selecting the Photos app
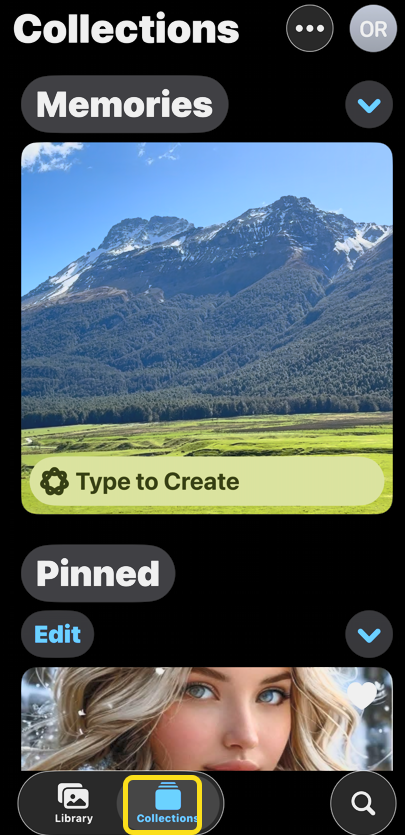
Next, tap Collections (if you do not see the Collections button, scroll to the bottom of the Photos app first). See the image below:
Selecting the Collections icon
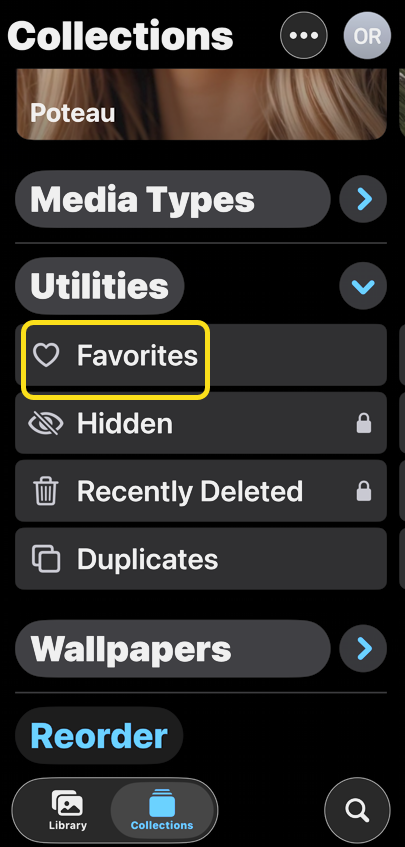
Now, scroll down and under Utilities, select an album, then swipe to the left. See the following image:
Selecting an album and swiping left
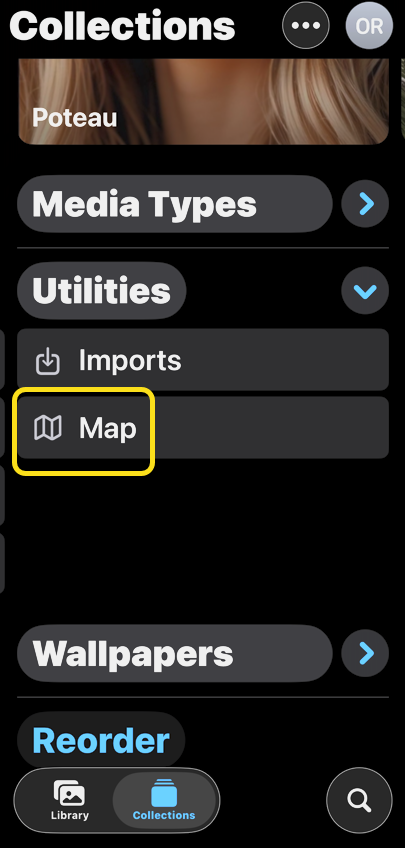
Next, keep swiping left, and tap Map. (You may also see this option under Pinned Collections, but in case you have unpinned it, you can always find it here.) Refer to the image below:
Selecting the Map option
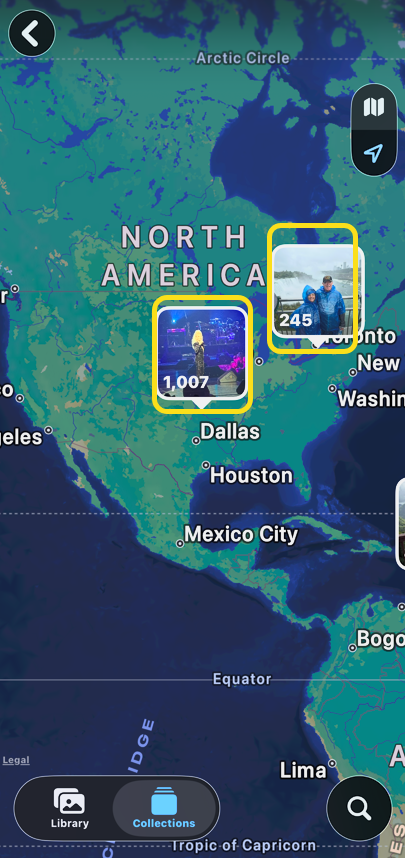
Now, you will see a map. Zoom in and out to see more, and tap a location to see all the photos you have taken there. See the image below:
Your Photos map
That’s how to find the photo map on your iPhone. This is a fun way to keep track of all the places you have traveled to.
Disclaimer
Technology is constantly evolving, and smartphone and desktop tech rarely remains static. Therefore, the information in this post is only accurate as of the date it was written. Blog posts that are older than six months may contain instructions that are no longer compatible with your device or operating system. We hope that the content from previous posts continues to function as intended. Thank you for reading TechSavvy.Life, where technology works for you.
Quote For the Day
TV and the Internet are good because they keep stupid people from spending too much time out in public.
– Douglas Coupland
(X) Twitter Info
You are finished. Please feel free to share this post! One way to share is via Twitter.
Just click the Tweet icon below. This will launch Twitter where you click its icon to post the Tweet.
Checkout TechSavvy.Life for blog posts on smartphones, PCs, and Macs! You may email us at contact@techsavvy.life for comments or questions.
We value your feedback! Was this post helpful? Please share your comments with us. If you have a tech question related to your computer or smart device, feel free to reach out. Just send an email to contact@techsavvy.life, and be sure to include the device, app, and version you are using. To assist us further, you can also attach screenshots related to your inquiry.
The author’s Vietnam eBook on the “Battle for Tra Bong Vietnam: Events and Aftermath” can be accessed from a Kindle device or the Kindle App for a desktop or smartphone. The apps are free.
The author’s Vietnam eBook on the Battle for Tra Bong Vietnam: Events and Aftermath
The post explains how to quickly record videos on an iPhone using the QuickTake feature without switching from Photo mode. Users can directly access the Camera app from the Lock Screen, press and hold the Shutter button to record, and easily return to Photo mode after stopping the recording.
IRAYMOND OGLESBY @RaymondOglesby2 March 31, 2026 – 3 minutes read time
Overview
How do you take a video in picture mode on an iPhone? Use Apple’s QuickTake, the fastest way to record a video on the iPhone.
When you find the perfect moment for a video, you do not always have time to switch between Photo and Video mode on your iPhone.Here’s how to record on an iPhone quickly right from Photo mode, and directly from your Lock Screen.
Key Takeaways
Record video on your iPhone without leaving photo mode.
Makes recording video quick and easy, so you do not miss important moments.
System Requirements
This tip was performed on an iPhone 17 Pro running iOS 26.3.
Click here to learn how to update your iPhone to the latest iOS version.
The QuickTake Recording Feature
First, open the Camera app directly from your Lock Screen. Refer to the image below:
Selecting the Camera icon
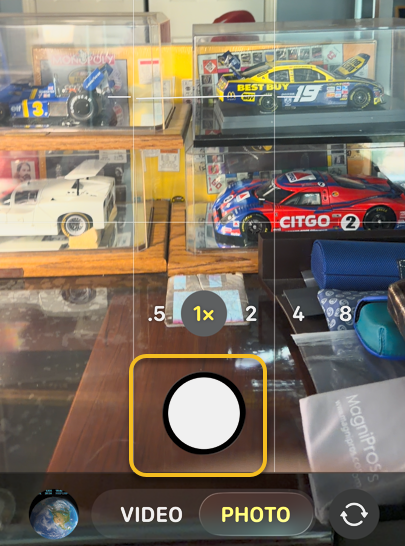
Next, in Photo mode, press and hold the Shutter button; your iPhone will begin video recording. See the image below:
Press and hold the Shutter button
Now, you can drag the Shutter button to the right to temporarily lock your camera into Video mode. See the following image:
Drag the Shutter button to the right
Next, when you are finished, tap the red square or release the Stutter button (if you did not slide it to the right) to stop recording. Refer to the image below:
Tap or release the Shutter button
Now, when you are finished recording, your Camera app will return to Photo mode.
You now know how to record a video on an iPhone! The Camera app is truly versatile and perfect for capturing life’s most precious and exciting moments.
Disclaimer
Technology is constantly evolving, and smartphone and desktop tech rarely remains static. Therefore, the information in this post is only accurate as of the date it was written. Blog posts that are older than six months may contain instructions that are no longer compatible with your device or operating system. We hope that the content from previous posts continues to function as intended. Thank you for reading TechSavvy.Life, where technology works for you.
Quote For the Day
Books may look like nothing more than words on a page, but they are actually an infinitely complex imaginotransference technology that translates odd, inky squiggles into pictures inside your head.
– Jasper Fforde
(X) Twitter Info
That’s it. Please feel free to share this post! One way to share is via Twitter.
Just click the Tweet icon below. This will launch Twitter where you click its icon to post the Tweet.
Checkout TechSavvy.Life for blog posts on smartphones, PCs, and Macs! You may email us at contact@techsavvy.life for comments or questions.
The author’s Vietnam eBook, “Battle for Tra Bong Vietnam: Events and Aftermath,” is available on Kindle devices and the Kindle App for desktop, laptop, and smartphone. The apps are free.
The author’s Vietnam eBook on the Battle for Tra Bong Vietnam: Events and Aftermath
The Photos app on iOS 18 features an improved search function, allowing users to find pictures using specific search terms like dates, locations, or objects. Users can now easily search for text or items within photos, enhancing the efficiency of locating images from vacations or other events.
RAYMOND OGLESBY @RaymondOglesby2 March 10 2026 – 4 minutes read time
Overview
You can use multiple search terms to find specific pictures in the Photos app. We use this time-saving feature to search for specific pictures from vacations, entering a date and location to see all videos and photos from each trip.
With iOS 18, Apple completely revamped the Photos app, introducing a brand-new search function. Previously, you could use search terms from one or more of the following categories: date, location, business name, events, people, pets, captions, and type of photo. Now, you can do an image search on your iPhone for objects or text that show up in your photos. For example, we often forget our license plate number when paying for public parking. We know we have photos of it, so we can just go into the Photos app, type “license plate,” and our phone will show me all the photos of our license plate. Let’s explore how to image search on your iPhone and iPad using multiple keywords.
Key Tskeaways
Learn how to search photos on your iPhone and iPad to find Photos of nearly anything.
Do an iPhone photo search to find objects or text that appear in your photos.
System Requirements
This tip works on iPhones running iOS 18 or later, but was tested on an iPhone 17 Pro running iOS 26.3.
Click here to learn how to update your iPhone to the latest iOS version.…
Searching Photos
First, open the Photos app. Refer to the image below:
Selecting the Photos app
Next, tap the Search icon. See the image below:
Selecting the Search icon
Now, you will see some personalized suggestions, which you can tap. Or you can tap the Search bar to type in your own search terms. See the following image:
Selecting the Search bar
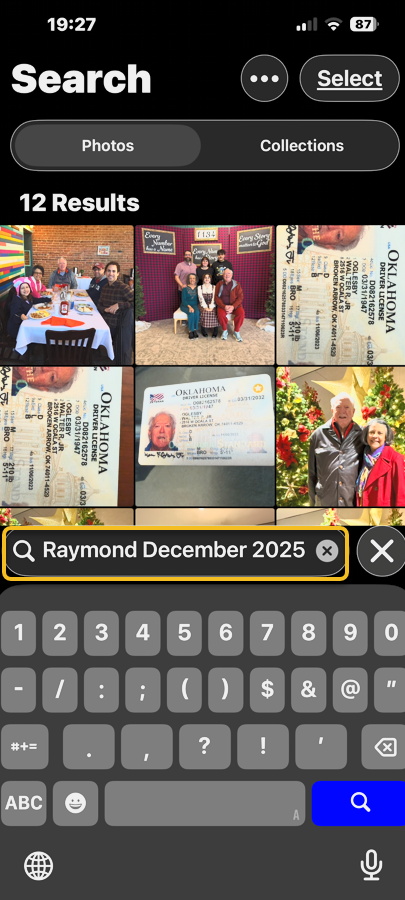
Next, once you enter a search term, you will see all the photos in your library that match. For example, we searched “Raymond December 2025”, and now we can see all my photos of myself, Raymond, from December 2025. Notice that it found blurred text and rotated images. Refer to the image below:
Entering your search criteria into the Search bar
That’s how to search photos on the iPhone or iPad. Try it out yourself! Put in a few search terms and see what you get. It’s super easy to find the exact photo you are looking for every time.
Disclaimer
Technology is constantly evolving, and smartphone and desktop tech rarely remains static. Therefore, the information in this post is only accurate as of the date it was written. Blog posts that are older than six months may contain instructions that are no longer compatible with your device or operating system. We hope that the content from previous posts continues to function as intended. Thank you for reading TechSavvy.Life, where technology works for you.
Quote For the Day
The art challenges the technology, and the technology inspires the art.
. – John Lasseter
X (Twitter) Info
That’s it. Please feel free to share this post! One way to share is via Twitter.
Just click the Tweet icon below. This will launch Twitter where you click its icon to post the Tweet.
Checkout TechSavvy.Life for blog posts on smartphones, PCs, and Macs! You may email us at contact@techsavvy.life for comments or questions.
We value your feedback! Was this post helpful? Please share your comments with us. If you have a tech question related to your computer or smart device, feel free to reach out. Just send an email to contact@techsavvy.life, and be sure to include the device, app, and version you are using. To assist us further, you can also attach screenshots related to your inquiry.
The author’s Vietnam eBook, “Battle for Tra Bong Vietnam: Events and Aftermath,” is available on Kindle devices and the Kindle App for desktop, laptop, and smartphone. The apps are free.
The author’s Vietnam eBook on the Battle for Tra Bong Vietnam: Events and Aftermath
The Photos app on iPhone allows users to add searchable captions to photos, enhancing organization and retrieval. Captions sync with iCloud if enabled, aiding in finding important images. The process involves selecting a photo, swiping up, and entering a caption. This feature is beneficial for recalling specific details later.
InseRAYMOND OGLESBY @RaymondOglesby2 October 28, 2025 – 4 minutes read time
Overview
Did you know that your Photos app comes with a built-in feature that allows you to add captions to photos on your iPhone? You do not have to download an extra app to add captions, and any captions added to photos on your iPhone will sync to the cloud if iCloud Photo Library is enabled.
Picture captions are handy for searching your iPhone Photo Library and reminding you of certain details when you come across the photo later. For these reasons, it’s best to keep the captions simple but useful—we recommend including notes about a holiday or occasion, if applicable, and any other keywords you may think of later when wanting to search for that photo.
Let’s explore how to caption pictures on iPhone:
Key Takeaways
Captions added to photos on iPhone or iPad help keep track of picture details.
Photo captions are searchable and appear in search results, making important photos easy to find.
Photo captions are automatically applied to your synced iCloud photos.
System Requirements
This tip works on most iPhones, but the screenshots below were captured on an iPhone 14 Pro iOS 26.
Click here to learn how to update your iPhone to the latest iOS version.
Add a Photo Caption
First, open the Photos app. Refer to the image below:
Selecting the Photos app
Next, tap a photo you would like to add a caption to. See the image below:
Selecting a photo
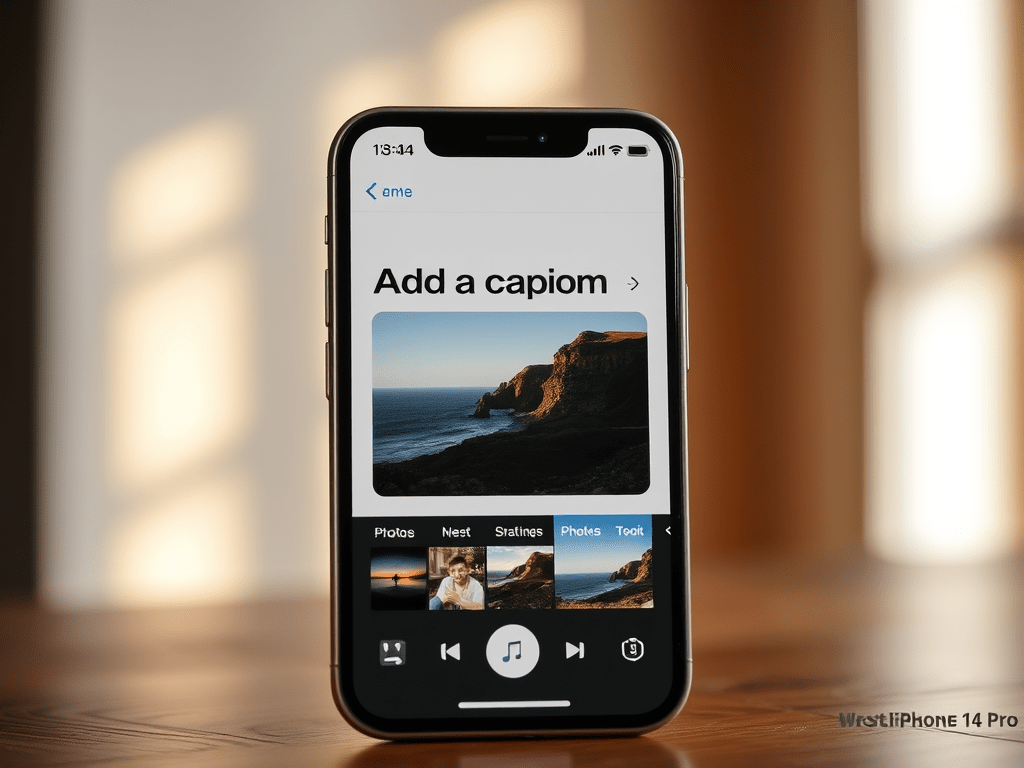
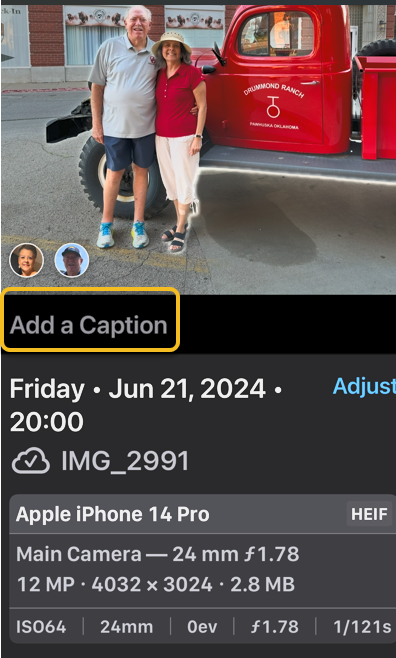
Now, when the photo opens, swipe up on the photo to reveal the Add a Caption area.
Tip:Make sure to place your finger on the photo itself before you swipe up; otherwise, you might accidentally start scrolling through recent photos instead of pulling up the photo information card.
See the following image:
Swipe up to reveal add a caption option
Next, tap Add a Caption. Refer to the image below:
Selecting Add a Caption
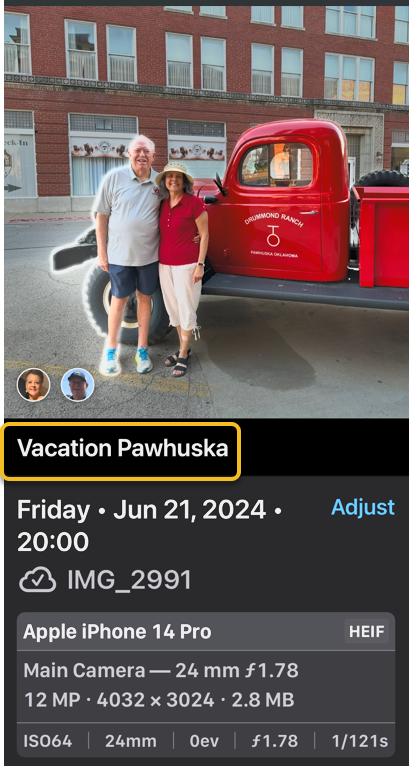
Now, type in your photo caption using the keyboard that appears, then tap the check mark in the blue circle to save the caption. See tjhe image below:
Entering y and saving our caption
Next, reopen your Photos app and find your picture. You will see your added caption. See the following image:
Your added caption for the photo
And that’s how you add a caption to an iPhone photo. We especially love being able to access these photo captions across our devices.
Disclaimer
Technology is constantly evolving, and smartphone and desktop tech rarely remains static. Therefore, the information in this post is only accurate as of the date it was written. Blog posts that are older than six months may contain instructions that are no longer compatible with your device or operating system. We hope that the content from previous posts continues to function as intended. Thank you for reading TechSavvy.Life, where technology works for you.
Quote for the Day
“When you innovate, you’ve got to be prepared for everyone telling you you’re nuts.”
– Larry Ellison, Co-founder of Oracle
(X) Twitter Info
That’s it. Please feel free to share this post! One way to share is via Twitter.
Just click the Tweet icon below. This will launch Twitter where you click its icon to post the Tweet.
Checkout TechSavvy.Life for blog posts on smartphones, PCs, and Macs! You may email us at contact@techsavvy.life for comments or questions.
We value your feedback! Was this post helpful? Please share your comments with us. If you have a tech question related to your computer or smart device, feel free to reach out. Just send an email to contact@techsavvy.life, and be sure to include the device, app, and version you are using. To assist us further, you can also attach screenshots related to your inquiry.
The author’s Vietnam eBook on the “Battle for Tra Bong Vietnam: Events and Aftermath” can be accessed from a Kindle device or the Kindle App for a desktop or smartphone. The apps are free.
The author’s Vietnam eBook on the Battle for Tra Bong Vietnam: Events and Aftermath
The Photos app helps users efficiently manage storage by identifying and merging duplicate photos on iPhones. Users can choose to delete lower-quality versions while retaining higher-quality images. The process allows for manual or automatic merging, ensuring that storage is optimized and photos remain organized. If mistakes occur, deleted photos can be restored within 30 days.
RAYMOND OGLESBY @RaymondOglesby2 September 16, 2025 – 5 minutes read time
Overview
Duplicate photos take up valuable storage space and make it harder to keep your photos organized. The Photos app has the perfect solution for putting an end to duplicates once and for all!
Understanding the algorithm used by the Photos app to delete duplicate photos can save you the headache of attempting to retrieve a version of a photo you wanted to keep.
Let’s explore how to automatically find duplicate photos on iPhones and merge them to delete the lower-quality image.
Why You Will Like This Tip
Save space and declutter your Photos app by automatically merging duplicate photos.
Keep the higher quality version of duplicated photos.
System Requirements
This tip was performed on an iPhone 14 Pro running iOS 18.6.1.
Click here to learn how to update your iPhone to the latest iOS version.
How to Remove Duplicate Photos
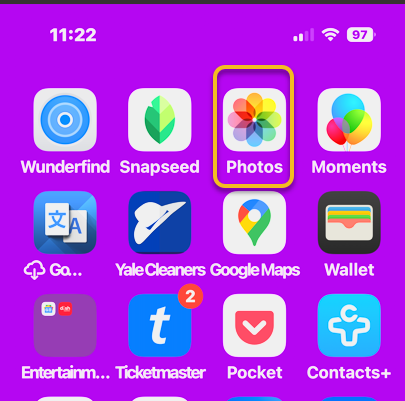
First, open the Photos app . Refer to the image below:
Selecting the Photos app
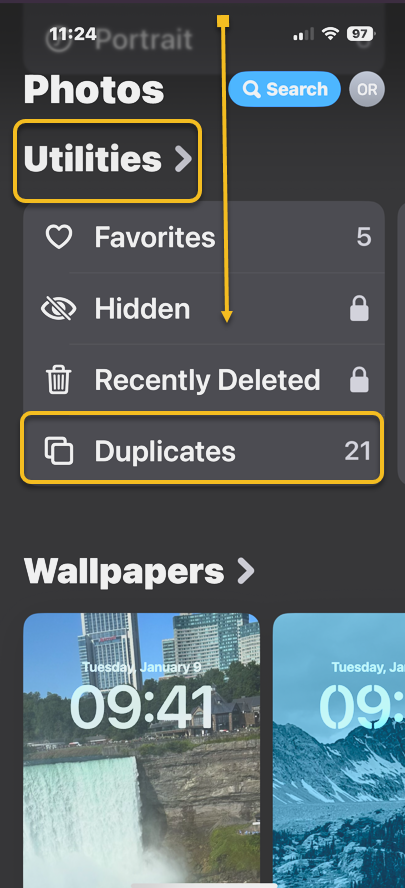
Next, scroll down until you see Utilities and select Duplicates underneath. If you do not see Duplicates as an option, you can select the Customize & Reorder button by scrolling to the bottom to get this option. See the image below:
Selecting Duplications option
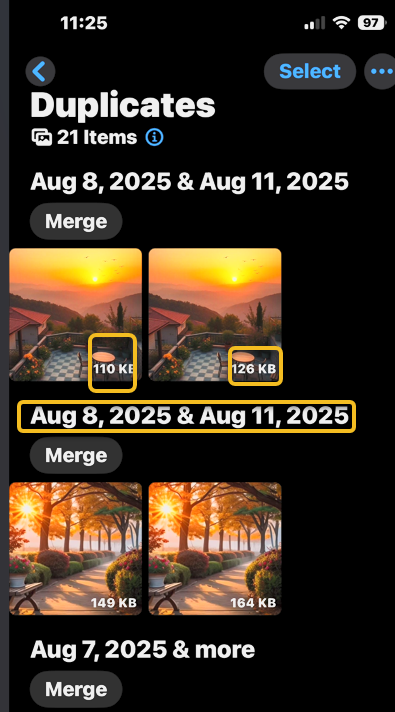
Now, you will see a list of duplicate photos, including the date you took or saved them, and the size of each image. See the following image:
Date and Size of the duplicate photo
Next, you can go through them individually and tap on the one you wish to delete, then tap the Trash icon. Refer to the image below:
Delete a photo via the Trash icon
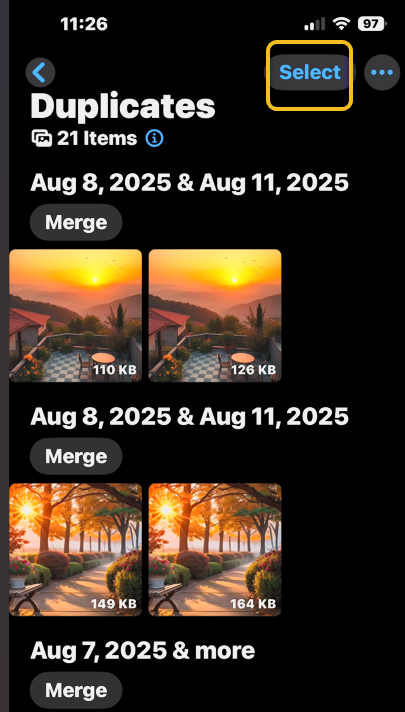
Now, you can also tap Select in the top right corner. See the image below:
Accessing the Select option
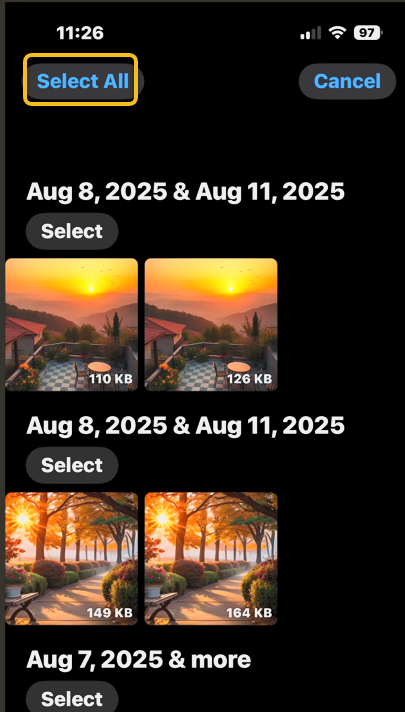
Next, you can either go through and tap the individual photos that you wish to delete so that you have more control over what you are keeping, or you can tap Select All. See the following image:
Accessing the Select All option
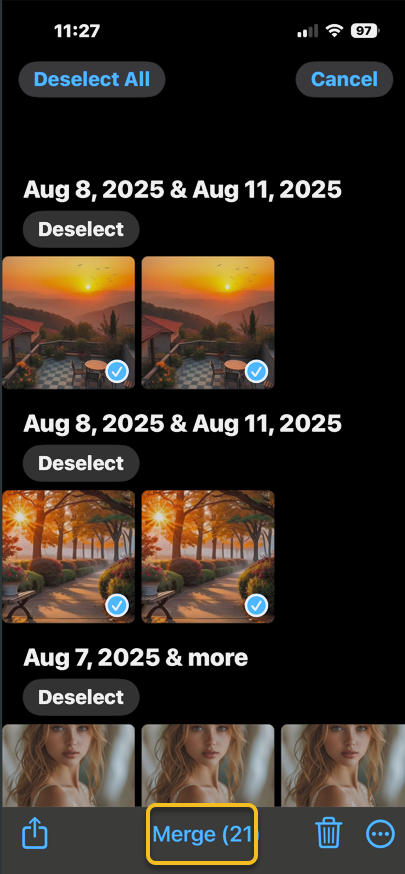
Now, if you tap Merge and confirm that you wish to merge the duplicates, it will keep the highest-quality image and relevant metadata while moving the rest to Recently Deleted. Refer to the image below:
Selecting to merge all duplicates
Next, you can also go through individually and tap Merge to manually delete the duplicate. See the image below:
Selecting to merge one duplicate
Now you know how to delete duplicate pictures on iPhones automatically or one by one, if you are worried about deleting something you wanted to keep, you have 30 days to restore it from Recently Deleted folder.
Note! Please keep in mind that the Photos app will identify duplicate photos of various qualities. If you just want to keep the photos on your phone and do not plan on printing them or entering photo contests, a lower-quality image might not be a problem for you. In this case, you may want to delete the higher-quality one because it takes up more storage, but otherwise, you will probably want to keep the higher-quality photo. It is also possible that one of the photos will be a Live photo while the other is not. Finally, it is possible that you edited one by blurring out sensitive information, yet it still shows up next to the unblurred one as a duplicate. If you automatically select them all and merge them, your iPhone will pick the highest-quality image with the most data. So while it should pick the best quality image, which is generally also the unedited version, because doctoring a photo lowers image quality, we cannot be sure that it will always pick the one you prefer. So keep in mind that this process may require some manual editing if you do not do it manually on a case-by-case basis.
Now you know how to find duplicate photos on iPhones and then merge them automatically or manually, all via the Photos app. Merging is a quick way to delete them and doing this helps you quickly clean up your Photos app and enjoy more storage on your phone. Before the iOS16 update, you needed to use a duplicate picture finder app, but all subsequent software updates have included this handy feature.
Disclaimer
Technology is constantly evolving, and smartphone and desktop tech rarely remains static. Therefore, the information in this post is only accurate as of the date it was written. Blog posts that are older than six months may contain instructions that are no longer compatible with your device or operating system. We hope that the content from previous posts continues to function as intended. Thank you for reading TechSavvy.Life, where technology works for you.
Quote For the Day
“The advancement of technology is based on making it fit in so that you don’t really even notice it.”
– Mark Weiser, Chief Technologist at Xerox PARC
(X) Twitter Info
That’s it. Please feel free to share this post! One way to share is via Twitter.
Just click the Tweet icon below. This will launch Twitter where you click its icon to post the Tweet.
Checkout TechSavvy.Life for blog posts on smartphones, PCs, and Macs! You may email us at contact@techsavvy.life for comments or questions.
We value your feedback! Was this post helpful? Please share your comments with us. If you have a tech question related to your computer or smart device, feel free to reach out. Just send an email to contact@techsavvy.life, and be sure to include the device, app, and version you are using. To assist us further, you can also attach screenshots related to your inquiry.
The author’s Vietnam eBook on the “Battle for Tra Bong Vietnam: Events and Aftermath” can be accessed from a Kindle device or the Kindle App for a desktop or smartphone. The apps are free.
The author’s Vietnam eBook on the Battle for Tra Bong Vietnam: Events and Aftermath
In iOS 26, the Camera app’s controls are hidden, complicating mode selection. A useful tip allows users to open the Camera in desired modes (Selfie, Video, Portrait) directly from the Home Screen via a long press. This method saves time and enhances usability for capturing moments.
RAYMOND OGLESBY @RaymondOglesby2 September 9, 2025 – 3 minutes read time
Overview
In iOS 26, the Camera app controls have been tucked away, making the display cleaner but making it more challenging to find the camera mode (like selfie, video, or portrait) you want. We all know that taking the perfect photo can require lightning reflexes, so here’s how to launch into your camera mode of choice right from your Home Screen, bypassing your in-app controls altogether.
Why You Will Like This Tip
Open your Camera in the exact mode you’re looking for, whether Selfie, Video, or Portrait.
Save time by not swiping between modes.
Avoid confusion with the iOS 26 Camera layout.
System Requirements
This tip can be performed on an iPhone running iOS 26 to be available in September 2025. This tip works on earlier OS versions as well such as iOS 18.6.
Click here to learn how to update your iPhone to the latest iOS version.
Accessing the Hidden Selfie Shortcut
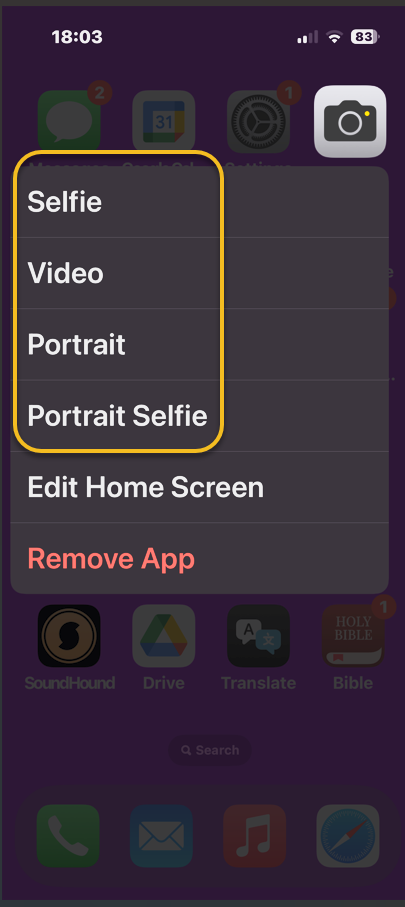
Did you know you can open your Camera app to a specific mode right from your Home Screen? No need to swipe to find the right one. All you have to do is long-press on your Camera icon and then select either Selfie, Video, Portrait, or Portrait Selfie.
Note! This only works from your Home Screen, not from a Lock Screen shortcut.
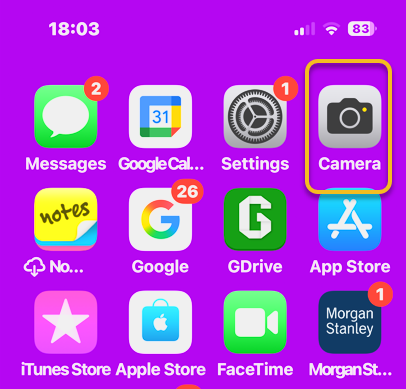
First, on your Home Screen, long-press on your Camera app icon. Refer to the image below:
Selecting the Camera app
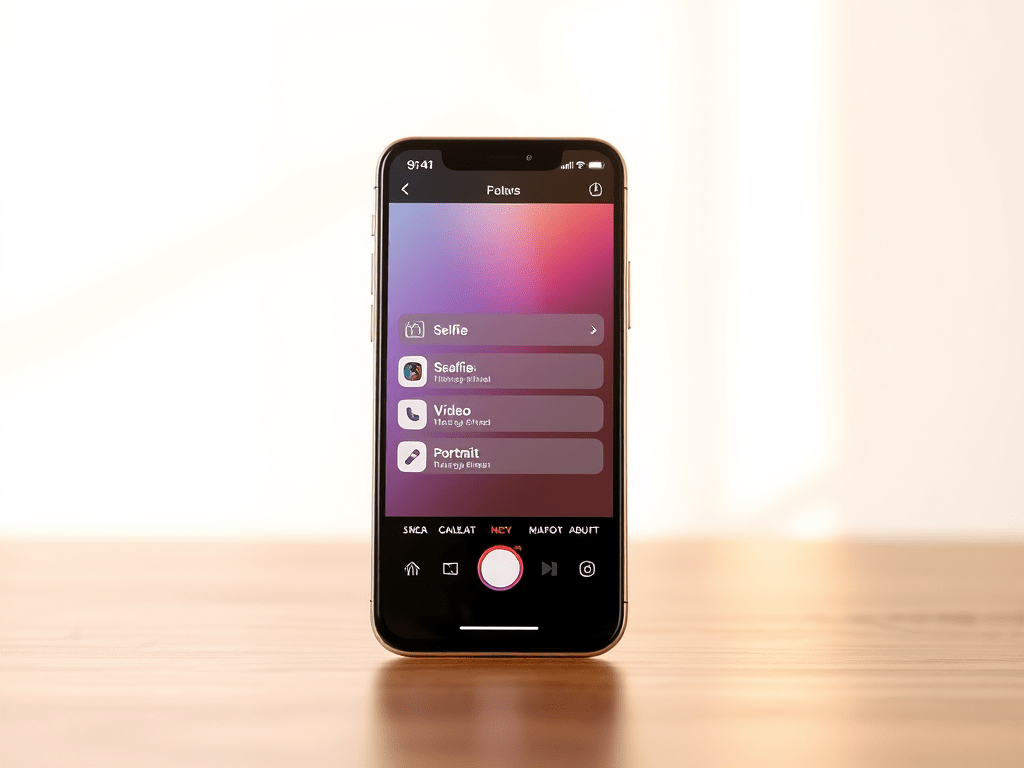
Next, tap Selfie, Video, Portrait, or Portrait Selfie from the menu. See the image below:
Selecting a camera option
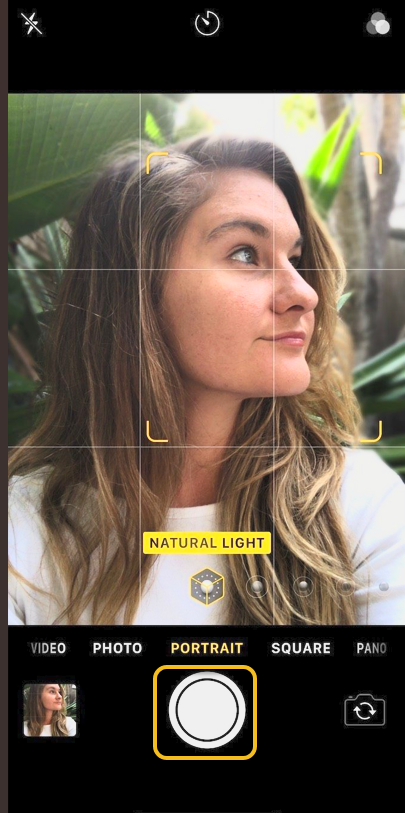
Now, yourCamera app will open in your selected mode, ready to shoot. Tap the Capture/Record icon , and you are set! See the following image:
Selecting the icon to take a selfie
Say cheese! Your photos will capture as usual, and if you want to switch modes, you can do it in the now-open Camera app.
Disclaimer
Technology is constantly evolving, and smartphone and desktop tech rarely remains static. Therefore, the information in this post is only accurate as of the date it was written. Blog posts that are older than six months may contain instructions that are no longer compatible with your device or operating system. We hope that the content from previous posts continues to function as intended. Thank you for reading TechSavvy.Life, where technology works for you.
Quote For the Day
“In a tech-savvy world, true innovation lies in being people-savvy.”
– Whitney Wolfe Herd, Founder of Bumble
(X) Twitter info
You are finished. Please feel free to share this post! One way to share is via Twitter.
Just click the Tweet icon below. This will launch Twitter where you click its icon to post the Tweet.
Checkout TechSavvy.Life for blog posts on smartphones, PCs, and Macs! You may email us at contact@techsavvy.life for comments or questions.
We value your feedback! Was this post helpful? Please share your comments with us. If you have a tech question related to your computer or smart device, feel free to reach out. Just send an email to contact@techsavvy.life, and be sure to include the device, app, and version you are using. To assist us further, you can also attach screenshots related to your inquiry.
The author’s Vietnam eBook on the “Battle for Tra Bong Vietnam: Events and Aftermath” can be accessed from a Kindle device or the Kindle App for a desktop or smartphone. The apps are free.
The author’s Vietnam eBook on the Battle for Tra Bong Vietnam: Events and Aftermath
The iOS 18 Photos app introduces the Pinned Collections widget, allowing users to pin their favorite albums for quick access. This guide details steps to pin, unpin, reorder, and modify albums within the app, ensuring a personalized and efficient photo management experience on the iPhone.
RAYMOND OGLESBY @RaymondOglesby2 August 19, 2025 – 4 minutes read time
Overview
The iPhone’s new Photos app on iOS 18 has been one of the update’s most controversial changes. That’s why we are here to help you navigate these new changes. In this tip, we will explore how to pin an album in the iOS 18 18 Photos app.
The new Photos app has a widget called Pinned Collections, which you can place at the top of the app for easy access to your most-used albums. In this tip, we will explore how to pin an album in the iOS 18 18 Photos app.
Why You Will Like This Tip
Keep albums easily accessible from your Pinned Collections.
Pin photo albums to the top of the Photos app.
System Requirements
This tip was performed on an iPhone 4Pro running iOS 18.5.
Click here to learn how to update your iPhone to the latest iOS version.
Pin a Photo Album in uOS 18
First, open the Photos app. Refer to the image below/
Selecting the Photos app
Next, scroll down and tap Albums. See the image below:
Selecting Albums
Now, locate the album you want and long press it. See the following image:
Selecting an Album
Next, tap Pin. If the collection is already pinned, you can tap Unpin to remove it from your collection. Refer to the image below:
Selecting the Pin or Unpin option
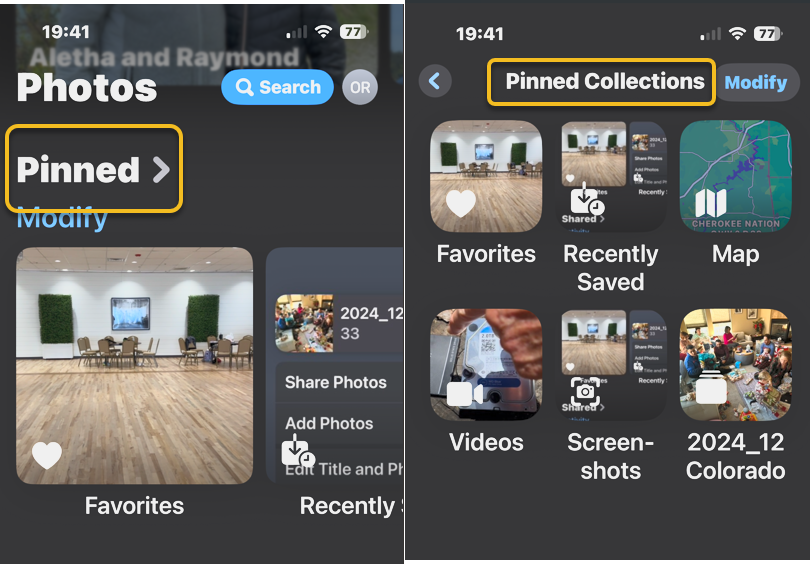
Now, tap Pinned to reveal your your Pinned Collections. See the image below:
Selecting Pinned Collections
Next, you will find the album there. See the following image:
Your newly added album
Reorder Pinned Collections
First, open the Photos app, then scroll to the bottom, and tap Customize & Reorder. Refer to the image below:
Selecting Customize & Reorder option
Next, touch and hold the three lines next to the collection you want to move and drag it to a new position.
Note! Its best to hold and drag to the right then up or down to your new position in order to see what you are doing.
See the image below:
Reorder your collections
Modify Pinned Collections
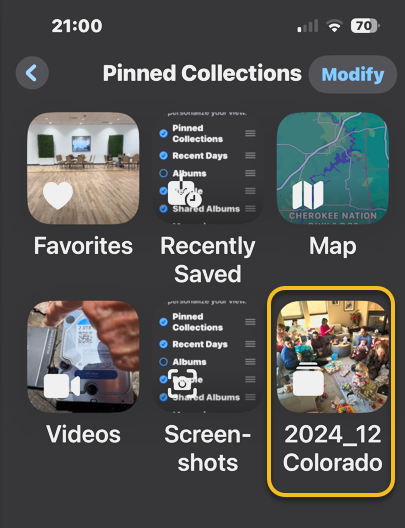
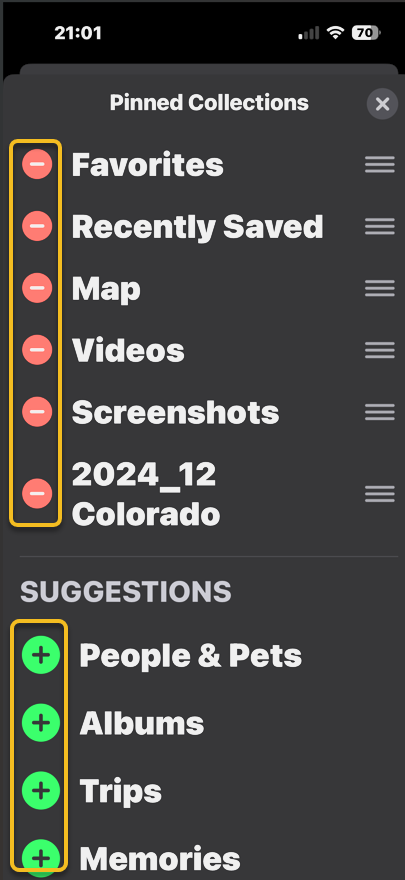
Navigate to your Pinned Collections and tap Modify in the upper right. See the following image:
Selecting the Modify option
The collections with a red circle are in your Pinned Cillections. Those with a green circle can ce added by tapping on the collection. Refer to the image below:
Your Pinned Collections and available collections to be pinned
That’s how to pin/unpin, reorder,, and modify an album in the iOS 18 Photos app. Now, you can quickly access the album whenever you need.
Disclaimer
Technology is constantly evolving, and smartphone and desktop tech rarely remains static. Therefore, the information in this post is only accurate as of the date it was written. Blog posts that are older than six months may contain instructions that are no longer compatible with your device or operating system. We hope that the content from previous posts continues to function as intended. Thank you for reading TechSavvy.Life, where technology works for you.
Quote For the Day
“Robots are not going to replace humans, they’re going to make their jobs much more humane.”
– Sabine Hauert, Roboticist
(X) Twitter Info
You are finished. Please feel free to share this post! One way to share is via Twitter.
Just click the Tweet icon below. This will launch Twitter where you click its icon to post the Tweet.
Checkout TechSavvy.Life for blog posts on smartphones, PCs, and Macs! You may email us at contact@techsavvy.life for comments or questions.
We value your feedback! Was this post helpful? Please share your comments with us. If you have a tech question related to your computer or smart device, feel free to reach out. Just send an email to contact@techsavvy.life, and be sure to include the device, app, and version you are using. To assist us further, you can also attach screenshots related to your inquiry.
The author’s Vietnam eBook on the “Battle for Tra Bong Vietnam: Events and Aftermath” can be accessed from a Kindle device or the Kindle App for a desktop or smartphone. The apps are free.
The author’s Vietnam eBook on the Battle for Tra Bong Vietnam: Events and Aftermath