How to Use Apple Maps For a City Flyover Tour on iPhone

The Apple Maps app’s Flyover feature provides an immersive 3D city tour experience. Users can select a city, initiate the tour, pause, and exit at will. This augmented reality feature offers a unique way to explore cities worldwide from the comfort of your home, with new cities continually being added.

RAYMOND OGLESBY @RaymondOglesby2
April 30, 2024

This is for the iPhone running iOS 17.3+. Screenshots are from iPhone 14 Pro running iOS 17.4

Did you know you can take a city tour from the comfort of your home with the Apple Maps app? Apple has a Flyover feature which allows you to view 3D modeling of large worldwide cities.

Flyover is an AR (augmented reality) feature to view a city in various ways as you move your iPhone around. For example, if you position your iPhone parallel to the floor, you can see a complete bird’s-eye view of cities such as New York, Florence, Paris, or Rome.

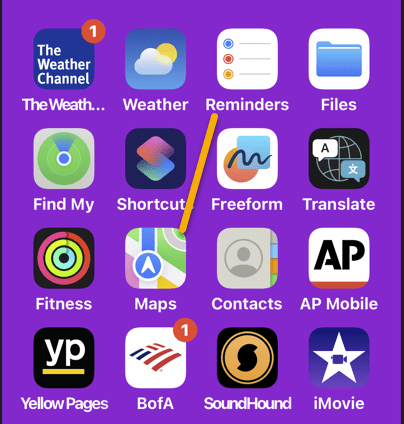
First, locate and open the Maps app. Refer to the below page:

Flyover 1
Selecting the Maps app

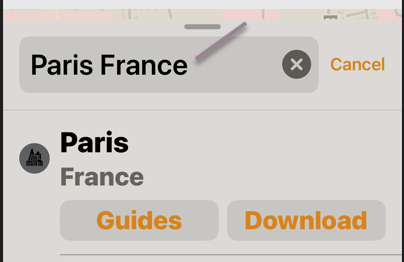
Next, search for a city, such as Paris, France. See the below image:

Flyover 2
Entering a City to flyover

Now, tap the Flyover button. See the following image:

Flyover 3
Selecting the Flyover option

Next, you will see an AR of the City! You can look around by turning your iPhone or by swiping the screen. Refer to the below image:
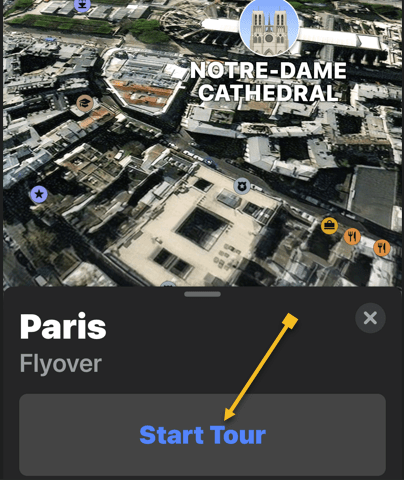
Flyover 4
AR view of your city

Now, tap Start Tour. See the below image:

Flyover 5
Selecting the Start Tour button

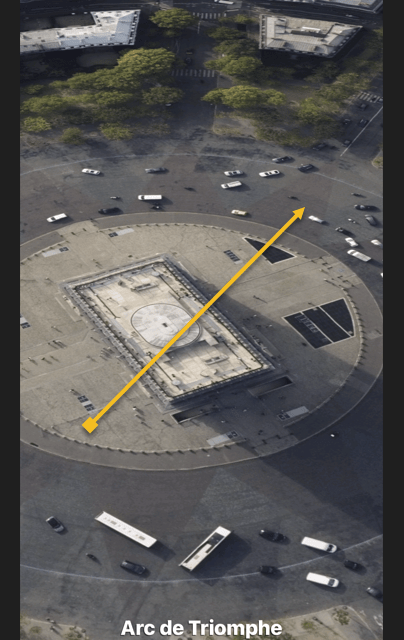
Next, you will view a tour around the city, stopping at various monuments and landmarks with the names listed at the bottom. See the following image:
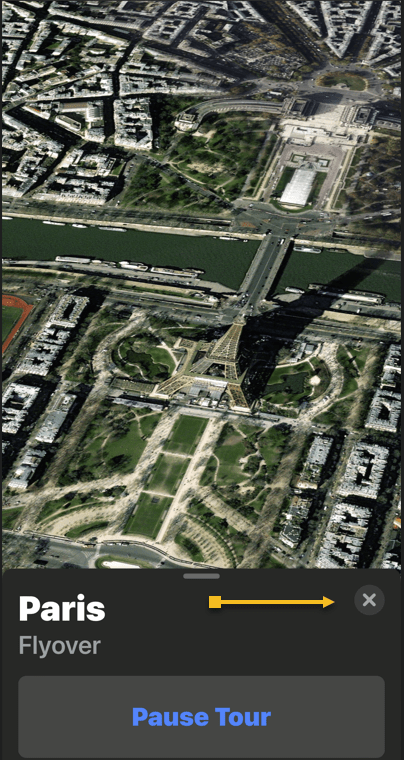
Flyover 6
Viewing a specific site in your city

Now, you can pause the tour by tapping Pause Tour. Refer to the below image:

Flyover 7
Selecting the Pause Tour button

Next, you can also deviate from the tour if you would like to see something better. When you let go of the screen, the tour will continue. See the below image:

Flyover 8
A different view

You can exit the tour at any time by tapping the “X.” Icon. See the following image:

Flyover 9
Selecting to Exit the tour

Apple should continue adding more cities to the Flyover feature. You can also click to view the complete list of cities set up for the Flyover feature. 

Disclaimer

Technology is always changing. Rarely is there static tech for smartphones and desktops. Thus, the contents of this post are only valid at the time of writing. Blog posts older than six months may have directions incompatible with your device or OS. Hopefully, older post content will continue to work as advertised. Thank you for reading TechSavvy.Life for Technology at Work For You.

The true entrepreneur is a doer, not a dreamer.

Jan Bushnell

That’s it. Please feel free to share this post! One way to share is via Twitter.

Just click the Tweet icon below. This will launch Twitter where you click its icon to post the Tweet.

Checkout TechSavvy.Life for blog posts on smartphones, PCs, and Macs! You may email us at contact@techsavvy.life for comments or questions.

Please feel free to leave a comment. I would love to hear from you. Do you have a computer or smart device tech question? I will do my best to answer your inquiry. Just send an email to contact@techsavvy.life. Please mention the device, app, and version you are using. To help us out, you can send screenshots of your data related to your question.

You can access the E-book from a Kindle device, or the Kindle App for a desktop or smartphone. The apps are free.

The author’s Vietnam eBook on the Battle for Tra Bong Vietnam: Events and Aftermath

How to Print Lists in iOS Reminders App

The post provides a tutorial for iPhone users on how to print lists from the Reminders app. It includes step-by-step instructions with images.

RAYMOND OGLESBY @RaymondOglesby2
April 9, 2024

This is for the iPhone running iOS 16 or above. Screenshots are from iPhone 14 Pro running iOS 17+

For those who love printing physical documents instead of staring at them on their iPhones, this Reminders app trick is a must-have! We will show you how to print lists from the Reminders app on your iPhone so you can check things off your to-do list.

First, open the Reminders app. Refer to the below image:

Print Notes 1
Open your Reminders app

Next, select the list you would like to print. See the below image:

Print Notes 2
Select your list

Now, tap the Nenu icon (the three dots) in the top-right corner of your screen. See the following image:

Print Notes 3
Select the Menu option

Next, tap Print. Refer to the below image:

Print Notes 4
Select the Print option

Now, if a printer is not already selected, tap Printer. See the below image:

Print Notes 5
Select the Printer option

Next, select the printer you would like to use. See the following image:

Print Notes 6
Select your Printer

Now, set the options you want to use for printing. Refer to the below page:

Print Notes 7
Select your Print options

Next, tap Print. See the below image:

Print Notes 8
Print your Reminders list

You can now bring your list to the store or give out physical to-do lists to your family members as needed.

Additionally, you can use the Print option in the Notes app to print a note list.

Disclaimer

Technology is always changing. Rarely is there static tech for smartphones and desktops. Thus, the contents of this post are only valid at the time of writing. Blog posts older than six months may have directions incompatible with your device or OS. Hopefully, older post content will continue to work as advertised. Thank you for reading TechSavvy.Life for Technology at Work For You.

 Make it happen now, not tomorrow. Tomorrow is a loser’s excuse.

Farrah Gray

You ar finished. Please feel free to share this post! One way to share is via Twitter.

Just click the Tweet icon below. This will launch Twitter where you click its icon to post the Tweet.

Checkout TechSavvy.Life for blog posts on smartphones, PCs, and Macs! You may email us at contact@techsavvy.life for comments or questions.

Please feel free to leave a comment. I would love to hear from you. Do you have a computer or smart device tech question? I will do my best to answer your inquiry. Just send an email to contact@techsavvy.life. Please mention the device, app, and version you are using. To help us out, you can send screenshots of your data related to your question.

You can access the E-book from a Kindle device, or the Kindle App for a desktop or smartphone. The apps are free.

The author’s Vietnam eBook on the Battle for Tra Bong Vietnam: Events and Aftermath

How to Identify Your Car’s Maintenance Symbols Ysing iPhone

The latest iOS version introduced Visual Look Up, allowing iPhone users to easily identify car dashboard symbols by taking a picture. After snapping the photo, users can access the symbol’s meaning and further information. Visual Look Up can also identify objects in photos and videos, but may require adjusting angles and lighting.

RAYMOND OGLESBY @RaymondOglesby2
March 19, 2024

This is for the iPhone. Screenshots are from iPhone 14 Pro running iOS 17+

Ever run into car trouble, and you are unsure what those symbols on your dashboard mean? Or, do you just want to know information about the symbols? Now, you can use your iPhone to easily identify car dashboard symbols and meanings by simply snapping a picture. Let’s explore how to use this cool new Visual Look Up feature.

With the latest version of iOS, you can now use Visual Look Up to easily identify your car dashboard’s symbols. This handy new feature makes diagnosing your car troubles a breeze.

First, open the Camera app, and snap a picture of the car dashboard symbols you want to identify. It’s best to take the photo in a dark environment. Refer to the below image:

Auto Symbol 1
Your dashboard symbols

Next, tap the Image Preview to open it. Then tap the Info icon at the bottom of the screen. It might change into a Steering Wheel icon. See the below image:

Auto Symbol 2
Accessing the Info icon

Now, tap Look Up Auto Symbol. See the following image:

Auto Symbol 3
Selecting the Look Up Symbol option

Next, your iPhone should display the meaning of the symbols. Refer to the below image:

Auto Symbol 4
Your car symbols result

Now, tap on the result entry to see more information. See the below image:

Auto Symbol 5
More information about the car symbol you selected

Now you know how to use Visual Look Up to identify your car’s maintenance symbols! Visual Look Up can be a tricky feature to get working right. If your iPhone is having trouble identifying your car dashboard symbols, try a different angle, moving closer or further away, different lighting, etc.

Also, Visual Look Up can be used to identify various objects in photos and videos.

Disclaimer

Technology is always changing and rarely is there static tech for smartphones and desktops. Thus, the contents of this post are only valid at the time of writing. Blog posts older than six months may have directions incompatible with your device or OS. Hopefully, older post content will continue to work as advertised. Thank you for reading TechSavvy.Life for Technology at Work For You.

I insist on a lot of time being spent, almost every day, to just sit and think. That is very uncommon in American business. I read and think. So I do more reading and thinking, and make less impulse decisions than most people in business. I do it because I like this kind of life.


Warren Buffett

You are finished Please feel free to share this post! One way to share is via Twitter.

Just click the Tweet icon below. This will launch Twitter where you click its icon to post the Tweet.

Checkout TechSavvy.Life for blog posts on smartphones, PCs, and Macs! You may email us at contact@techsavvy.life for comments or questions.

Please feel free to leave a comment. I would love to hear from you. Do you have a computer or smart device tech question? I will do my best to answer your inquiry. Just send an email to contact@techsavvy.life. Please mention the device, app, and version you are using. To help us out, you can send screenshots of your data related to your question.

You can access the E-book from a Kindle device, the Kindle App for the desktop or smartphone, which is a free app.

The author’s Vietnam eBook on the Battle for Tra Bong Vietnam: Events and Aftermath

How to Manage iPhone Always-On Display

The “always-on display” feature, exclusive to Pro versions of the iPhone 14 or 15 running iOS 17+, allows users to view important information without unlocking the device. The feature can be turned off in various situations, including when the phone is face down or connected to CarPlay, when low power mode is on, or through setting up a Sleep Focus. It can be turned off or adjusted through the Display & Brightness menu in Settings. Apple plans future updates to detail the feature’s battery consumption and introduce additional focus modes.

RAYMOND OGLESBY @RaymondOglesby2
December 19, 203

This is for the iPhone 14 or 15 Pro. Screenshots are from iPhone 14 Pro running iOS 17+

An “always-on display” lets you see important information at a glance. Those with a Pro version of the iPhone 14 or 15 have this feature. It’s exclusive to iPhone 14 Pro, iPhone 14 Pro Max, iPhone 15 Pro, and iPhone 15 Pro Max on iOS.

Those with older iPhones need to update their phones to see any information (or use the Rise to Wake feature), but “always-on” changes all that by dimming the Lock Screen so you can still see certain data without touching your phone. Let’s explore how to take control of the iPhone’s “always-only displays” (and even turn it off if it’s not your thing).

If you feel uneasy about a phone screen that never turns off, do not worry. Despite the name, Apple has done a few things to ensure the feature is not unnecessarily draining your battery (and a future iOS update may detail “always-on” battery consumption). If you do any of the following actions, the “always-on display” will turn off:

  • Place the phone face down, in your pocket, or in a bag. When charging your iPhone, we recommend placing your phone face down and when you are not using your iPhone. By doing this, your battery will last longer between charges.
  • Set up a Sleep Focus for certain times.
  • Connect to CarPlay.
  • Use the Continuity Camera feature.
  • Have low power mode turned on.

Additionally, if you have an Apple Watch connected to your iPhone, it will use your proximity to turn the screen on and off automatically. For example, if you leave your phone in the kitchen and walk upstairs, the display will turn black. When you return to the kitchen, the screen will light up.

To disable the feature, head to:

Settings > Display & Brightness > Always On Display

and toggle OFF the Always On Display option. Refer to the below image:

Always 1
Always On Display option

To enable the feature, toggle ON the Always On Display option.

If you are not ready to give up on the “always-on display” completely, there are a few options you can adjust. You can disable Show Wallpaper to prevent your phone’s wallpaper from appearing on the display. Or disable Notifications to make the screen less distracting.

Since iOS 16.4, Apple has let you schedule or automate when your iPhone’s “always-on display” is enabled using Focus modes. So you could add a filter to make the display stay on during working hours, for example, but turn it off in the evenings.

Other options coming to future updates include seeing how much battery life the “always-on display” consumes and controlling it with additional Focus modes.

Disclaimer

Technology is constantly changing; there is rarely static tech for smartphones and desktops. Thus, the contents of this post are only valid at the time of writing. Blog posts older than six months may have directions incompatible with your device or OS. Hopefully, older post content will continue to work as advertised. Thank you for reading TechSavvy.Life for Technology at Work For You.

. “Don’t worry about failure; you only have to be right once.”

Drew Houston

That’s it. Please feel free to share this post! One way to share is via Twitter.

Just click the Tweet icon below. This will launch Twitter where you click its icon to post the Tweet.

Checkout TechSavvy.Life for blog posts on smartphones, PCs, and Macs! You may email us at contact@techsavvy.life for comments or questions.

Please feel free to leave a comment. I would love to hear from you. Do you have a computer or smart device tech question? I will do my best to answer your inquiry. Just send an email to contact@techsavvy.life. Please mention the device, app, and version you are using. To help us out, you can send screenshots of your data related to your question.

You can access the e-book from a Kindle device, the Kindle App for the desktop or smartphone, which is a free app.

The author’s Vietnam eBook on the Battle for Tra Bong Vietnam: Events and Aftermath

How to Find Kaleidoscope Wallpapers on iPhone

Apple’s iOS 17+ introduces new customization features for iPhones, including kaleidoscopic wallpapers that change appearance throughout the day. Users can explore these options in the Wallpaper menu within the Settings app and select images for Lock and Home screens. There are two categories of images to choose from: Jewels and Flowers. Widgets can also be added to the Kaleidoscope screen for further customization. Unfortunately, one can’t set up two different kaleidoscopic images for Lock and Home screens.

RAYMOND OGLESBY @RaymondOglesby2
December 5, 2023

This is for iPhones running iOS 17+. Screenshots are from iPhone 14 Pro.

The iPhone is boring, some people often say. As if Apple had to come up with a new design every year. As if it could significantly and regularly update the external appearance at this particular point in smartphone history, where nearly every device features an all-screen display. But you can make the iPhone a lot more fun by customizing the look of the software. You can change the icons to custom images, set wallpapers for each Focus mode, and then rotate them regularly.

Apple has plenty of good options in the Wallpapers gallery. And it so happens that iOS 17 brings over new kaleidoscopic wallpapers to iPhone that you can start using right away. Let’s find out about the Kaleidoscope wallpapers.

The new wallpapers might not be immediately visible, as you might need to do a bit of scrolling to find them. But they are there, and we will tell you exactly where to go.

What’s so special about the Kaleidoscope wallpapers, you ask? Well, there’s an algorithm at work here that will apply changes to them as the day passes.

First of all, since iOS 16, you have two ways of customizing the wallpaper on your iPhone. One involves pressing and holding your finger against the Lock Screen wallpaper until the customization menu pops up. The other is the one you might have been using since the early days of the iPhone. It involves going to the Settings app and looking for the Wallpaper menu.

Whatever the route, you will get to an Add New Wallpaper menu to select new images for your Lock and Home screens.

Once there, scroll until you find the Kaleidoscope category to select one of the new wallpapers. You might see the category in the Featured section, so you might not need to scroll. Refer to the below image:

Kai 1
Add a Kaleidoscope wallpaper

You will discover six Jewels kaleidoscope images and eight Flower ones. The Jewels will also feature Dark and Light modes, which means they will change appearance depending on how you have set up your iPhone. Unfortunately, the Flowers kaleidoscopes do not. But we would say the color palette is even better for the Flowers options.

Once you have selected the one you like best, you can set it as a Wallpaper Pair for both the Lock and Home screens. Or you can customize the Home screen with a separate image. You can always select a kaleidoscope for the Lock Screen and a different image for the Home Screen. Sadly, you can not set up two different kaleidoscopes, one for each screen.

Just like other Apple wallpapers, you can add widget(s) to your Kaleidoscope screen. See the below image:

Kai 2
Add Widgets

Related

We have TechSavvy.Life stats and Google Lens widgets for our wallpaper. Your new wallpaper will look similar to the one below. See the following image:

Kai 3
Your added Widgets

That’s all you have to do to take advantage of the new Kaleidoscope wallpapers on iPhone after updating to iOS 17 or higher.

Disclaimer

Technology is always changing and rarely is there static tech for smartphones and desktops. Thus, the contents of this post are only valid at the time of writing. Blog posts older than six months may have directions incompatible with your device or OS. Hopefully, older post content will continue to work as advertised. Thank you for reading TechSavvy.Life for Technology at Work For You.

If you are not willing to risk the unusual, you will have to settle for the ordinary.

Jim Rohn

That’s it. Please feel free to share this post! One way to share is via Twitter.

Just click the Tweet icon below. This will launch Twitter where you click its icon to post the Tweet.

Checkout TechSavvy.Life for blog posts on smartphones, PCs, and Macs! You may email us at contact@techsavvy.life for comments or questions.

Please feel free to leave a comment. I would love to hear from you. Do you have a computer or smart device tech question? I will do my best to answer your inquiry. Just send an email to contact@techsavvy.life. Please mention the device, app, and version you are using. To help us out, you can send screenshots of your data related to your question.

You can access the e-book from a Kindle device, the Kindle App for the desktop or smartphone, which is a free app.

The author’s Vietnam eBook on the Battle for Tra Bong Vietnam: Events and Aftermath

How to Invert the Colors on Your iPhone

The post provides a guide on how to invert colors on an iPhone running iOS 17+, which can assist color-blind individuals or those who find phone screens hard to read. However, if this function results in ghostly blue screenshots, the post advises heading to Accessibility in the Settings app and turning off both Smart Invert and Classic Invert.

RAYMOND OGLESBY @RaymondOglesby2
November 28, 2023

This is for the iPhone running iOS 17+. Screenshots are from iPhone 14 Pro.

Are you considering inverting the colors on your iPhone? It can be a useful feature; especially for those with color blindness or for those who find phone screens difficult to read. The process of inverting your iPhone’s display colors is simple and can be done in no time. Let’s explore using the side button to toggle inverted colors on or off.

But first, what if you take a photo like the one below?

Invert 2
Your photo

Next, you take a screenshot of your photo and it turns out ghostly blue as displayed below.

Invert 1
Your ghostly blue screenshot

Yikes! How did this happen? We spent hours searching on Google how to fix this to no avail. Then we chatted with two Apple Support specialists before we got an answer on how to resolve this. This issue goes back to iOS 11.

To fix this problem:

  1. Open the Settings app on your iPhone and go to Accessibility.
  2. Select Display and Text Size.
  3. Scroll down to Smart Invert and Classic Invert.
    • Smart Invert will only invert the colors within the app you are currently using. 
    • Classic Invert will invert all the colors on your iPhone, including photos and videos. 
  4. Turn both options to the OFF position.

This will make the screenshot resemble your photo. Refer to the below image:

Invert 3
Turn OFF both options

Note! When you update your iOS, the Smart Invert option is reset to the ON position. If your iPhone is still displaying ghostly images from your Camera Roll or the Photos app while using Dark Mode, turn the Smart Invert and Classic Invert to the OFF position.

In Settings > Display & Brightness resetting the Options, True Tone and Night Shift options has no effect in eliminating the ghostly images as noted in various help articles..Only the steps described in this blog post fixes the problem.

To quickly turn the inverted colors on or off on your iPhone, you can set up an Accessibility Shortcut. To do this, go to the Accessibility section of the Settings app then scroll down to select Accessibility Shortcut. Now, click either Smart Invert or Classic Invert. Once done, triple-click the power button on the side of your iPhone to toggle the inverted colors. To disable the shortcut, triple-click the power button again.

Inverting the display colors on your iPhone can be a helpful tool for those who struggle with bright screens or color blindness, as it creates more contrast and, for some, an easier-to-read display. It’s important to note that while inverted colors can be a useful feature, they are not for everyone, and it may take some time to get used to inverted colors. However, if you find inverted colors to be helpful or think they do improve your overall viewing experience on an iPhone, it’s definitely worth enabling.

Disclaimer

Technology is always changing and rarely is there static tech for smartphones and desktops. Thus, the contents of this post are only valid at the time of writing. Blog posts older than six months may have directions incompatible with your device or OS. Hopefully, older post content will continue to work as advertised. Thank you for reading TechSavvy.Life for Technology at Work For You.

The best vision is insight.

Malcolm Forbes

That’s it. Please feel free to share this post! One way to share is via Twitter.

Just click the Tweet icon below. This will launch Twitter where you click its icon to post the Tweet.

Checkout TechSavvy.Life for blog posts on smartphones, PCs, and Macs! You may email us at contact@techsavvy.life for comments or questions.

Please feel free to leave a comment. I would love to hear from you. Do you have a computer or smart device tech question? I will do my best to answer your inquiry. Just send an email to contact@techsavvy.life. Please mention the device, app, and version you are using. To help us out, you can send screenshots of your data related to your question.

You can access the e-book from a Kindle device, the Kindle App for the desktop or smartphone, which is a free app.

The author’s Vietnam eBook on the Battle for Tra Bong Vietnam: Events and Aftermath