A cybersecurity firm has identified 17 malicious browser extensions, including “Google Translate in Right Click,” which collectively garnered over 840,000 downloads. Mozilla and Microsoft have removed these from their stores, but users must uninstall them manually. The extensions pose risks across several popular web browsers.
RAYMOND OGLESBY @RaymondOglesby2 February 17, 2026 –3 minutes read time
Overview
The most popular malicious extension, dubbed Google Translate in Right Click, was downloaded more than 500,000 times from app stores. Another, Translate Selected Text with Google, racked up almost 160,000 downloads.
If you have been using browser extensions to download YouTube videos or images from Pinterest, translate text in real time, check Amazon price histories, or even enhance colors, you might have some uninstalling to do.
Cybersecurity firm LayerX has uncovered 17 malicious browser extensions that were downloaded more than 840,000 times in total, with some remaining active in the wild for up to five years. Instances were recorded across Firefox, Google Chrome, and Microsoft Edge browsers.
Mozilla and Microsoft have removed all of the extensions from their official stores at the time of writing. However, if you have already installed one, you will need to uninstall it manually.
Extensions to Remove
Here is the list of extensions you should remove:
Google Translate in Right Click
Translate Selected Text with Google
One Key Translate
Translate Selected Text with Right Click
Cool Cursor
Screenshot Clipper
Ads Block Ultimate
Convert Everything
Amazon Price History
RSS Feed
Color Enhancer
Floating Player – PiP Mode
YouTube Download
, Instagram Downloader
Save Image to Pinterest on Right Click
Full Page Screenshot
Youtube Download
Removing Chrome Extensions
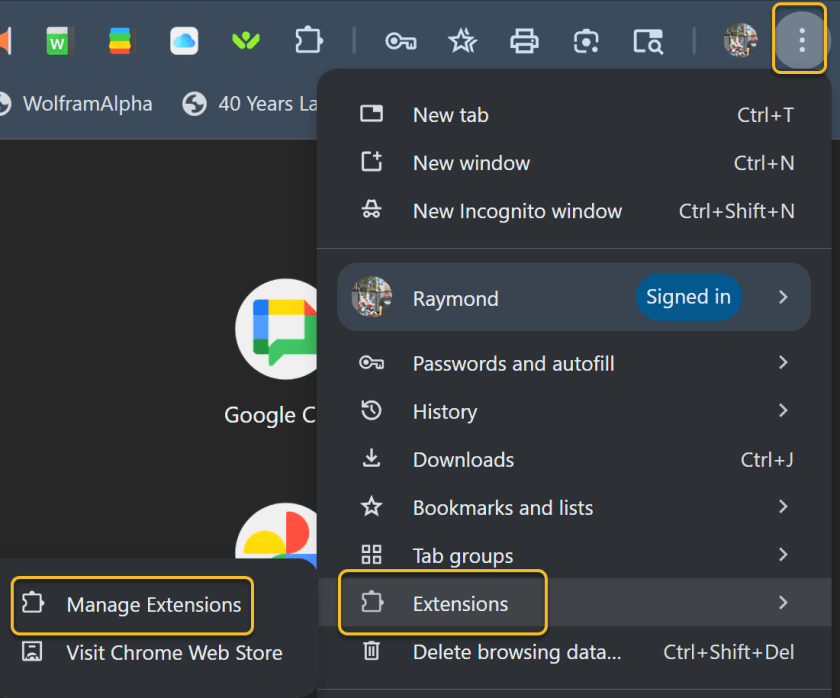
If you want to view all your extensions in Chrome, click the three-dot icon in the upper right, move to More tools, and select Extensions. Alternatively, click the Extensions button on the toolbar and select Manage extensions. This will take you to a page where you can manage all your installed extensions. Refer to the image below:
Accessing Manage Extensions option
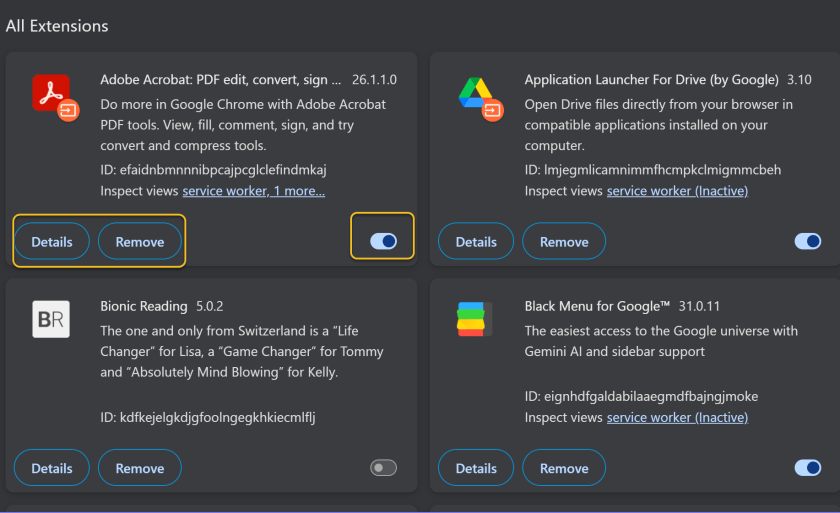
You can click Details to view information on a specific extension. If you turn off an extension switch, this will temporarily disable it. Otherwise, click Remove to uninstall the extension completely. See the image below:
Disable, Remove, or view Details for an Extension
Disclaimer
Technology is constantly evolving, and smartphone and desktop tech rarely remains static. Therefore, the information in this post is only accurate as of the date it was written. Blog posts that are older than six months may contain instructions that are no longer compatible with your device or operating system. We hope that the content from previous posts continues to function as intended. Thank you for reading TechSavvy.Life, where technology works for you.
Quote For the Day
Technology is a gift of God. After the gift of life it is perhaps the greatest of God’s gifts. It is the motherof civilizations, of arts and of sciences.
– Freeman Dyson
(X) Twitter Info
That’s it. Please feel free to share this post! One way to share is via Twitter.
Just click the Tweet icon below. This will launch Twitter where you click its icon to post the Tweet.
Checkout TechSavvy.Life for blog posts on smartphones, PCs, and Macs! You may email us at contact@techsavvy.life for comments or questions.
We value your feedback! Was this post helpful? Please share your comments with us. If you have a tech question related to your computer or smart device, feel free to reach out. Just send an email to contact@techsavvy.life, and be sure to include the device, app, and version you are using. To assist us further, you can also attach screenshots related to your inquiry.
The author’s Vietnam eBook, “Battle for Tra Bong Vietnam: Events and Aftermath,” can be accessed on a Kindle device or the Kindle App for a desktop, laptop, or smartphone. The apps are free.
The author’s Vietnam eBook on the Battle for Tra Bong Vietnam: Events and Aftermath
Windows 11’s Settings app is loaded with unexpected features beyond basic configurations. It allows wireless file sharing via Nearby Sharing, Dynamic Lock using Bluetooth, and clipboard syncing across devices, including Android. Other highlights include Storage Sense for disk cleanup, projecting from other devices, and an End Task button for frozen applications.
InRAYMOND OGLESBY @RaymondOglesby2 January 13, 2026 – 11 minutes read time
Overview
The Windows 11 Settings app isn’t just for configuring your PC’s display and changing your password. It’s also packed with surprisingly weird (and mostly useful) features that give the desktop OS a bit of flair. For example, did you know that it has a native option for sharing files wirelessly between your PCs? Or that you could sync your clipboard to an Android phone? We dug deep through the Settings app to surface the most unexpected capabilities in Windows. Simply press Windows key + I to open the Settings app and get started.
Key Takeaways
Learn some hidden useful Windows 11 Settings options.
Make Windows 11 easier to use.
System Requirements
This post was performed on Windows 11 Pro desktop running 25H2 version.
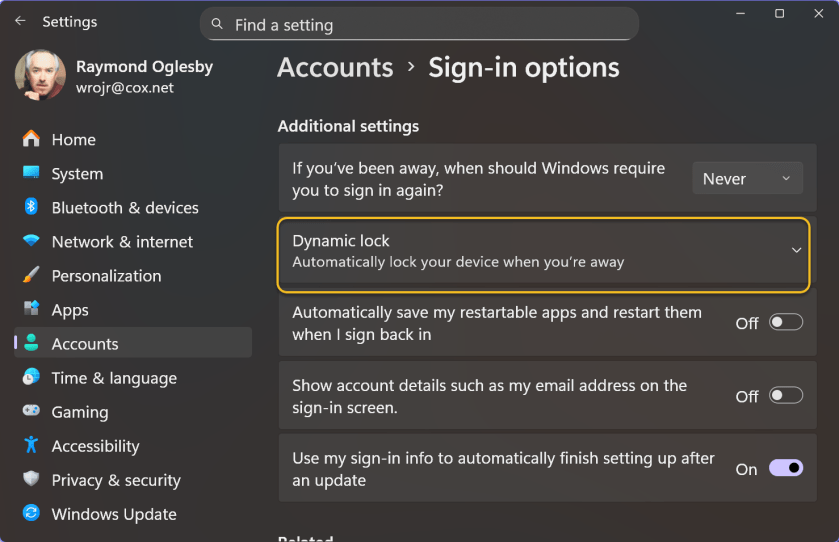
Dynamic Lock
Windows 11 can track your phone’s movements via its Bluetooth signal strength, locking your PC when your phone moves too far away from your computer. Microsoft calls this feature Dynamic Lock, and it serves as an alternative to the Windows key+L shortcut. To activate Dynamic Lock, head to:
Accounts > Sign-In Options > Additional Settings
Refer to the image below:
Dynamic Lock
Some modern Windows 11 PCs with presence sensors do not need to rely on your phone for this feature—they know when you are sitting in front of them. This is probably the more convenient solution in the long term, especially since presence sensors work well with Windows Hello facial recognition. Your PC’s presence sensor notices when you sit back down, and the IR camera checks your face before automatically signing you in. However, until this type of hardware becomes mainstream, setting up Dynamic Lock to work with your phone is the next best option.
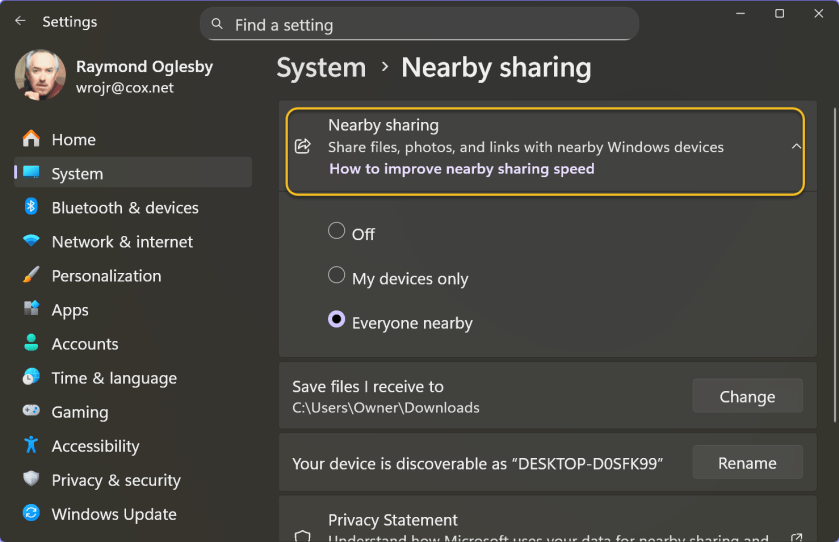
Nearby Sharing
What if Microsoft built the Windows version of Apple’s AirDrop, but nobody noticed? That’s exactly what Nearby Sharing is. I do not think I have ever seen Microsoft seriously promote it.
Nearby Sharing lets you share files, photos, and website links between close by PCs using Bluetooth or Wi-Fi. You can restrict it to devices signed in with the same Microsoft account or allow anyone nearby to send you things. To activate and configure this feature, head to:
System > Nearby Sharing > Share
For example, you can right-click a file in File Explorer and select the Share option. You will see Nearby Sharing as an option here.
Nearby Sharing works only between Windows devices. See the image below:
Nearby Sharing
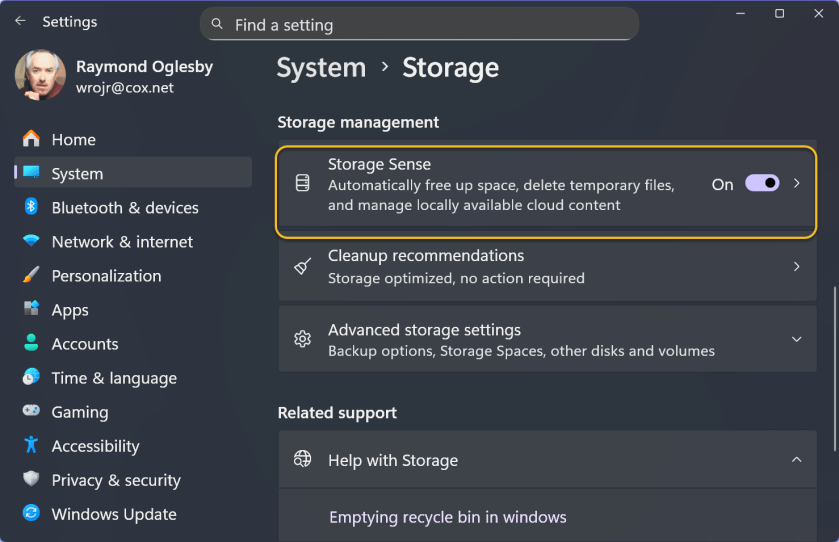
Storage Sense
Windows 11 offers multiple methods for freeing up disk space. You can turn to the classic Disk Cleanup tool, for example, or use something called Storage Sense. The most interesting option under the Storage Sense umbrella is the ability to purge files from your Downloads folder. But it can also automatically clean up temporary files and empty your Recycle Bin. Be sure to save all necessary information from those locations before enabling these settin Simply head to:
System > Storage > Storage Sense
to get started. Under Cleanup schedules, you can choose to have Windows automatically delete files from your Downloads folder if you have not opened them in one, 14, 30, or 60 days. Yes, Windows 11 can automatically delete downloads you have not touched in 24 hours, if you like to live dangerously. See the following image:
Storage Sense
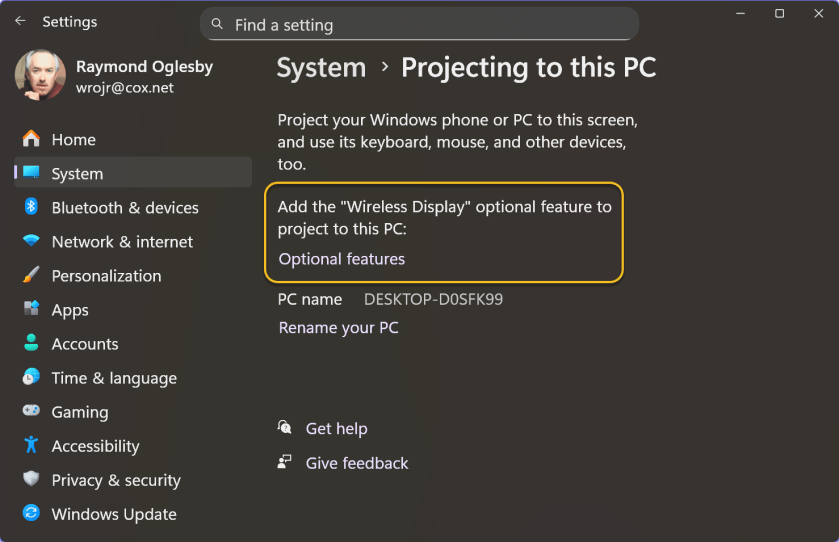
Project to Your PC
Sure, you can project from your Windows PC to an external display. But did you know that you can project from another device—like a PC or phone—and use your PC’s display as a target. To set this up, head to:
System > Projecting to this PC
Windows will ask you to install the Wireless Display optional feature to continue. After activating it, you can press Windows key+K on another PC on your network and cast to your PC’s display.
This capability could be useful if you have a Windows 11 laptop with a small screen and want to interact with it on your larger all-in-one (AIO)machine.
Here’s another oddity: This screen says you can “Project your Windows phone or PC to this screen.” Hey Microsoft, it’s 2026! People no longer have Windows phones. Refer to the image below:
Project to Tour PC
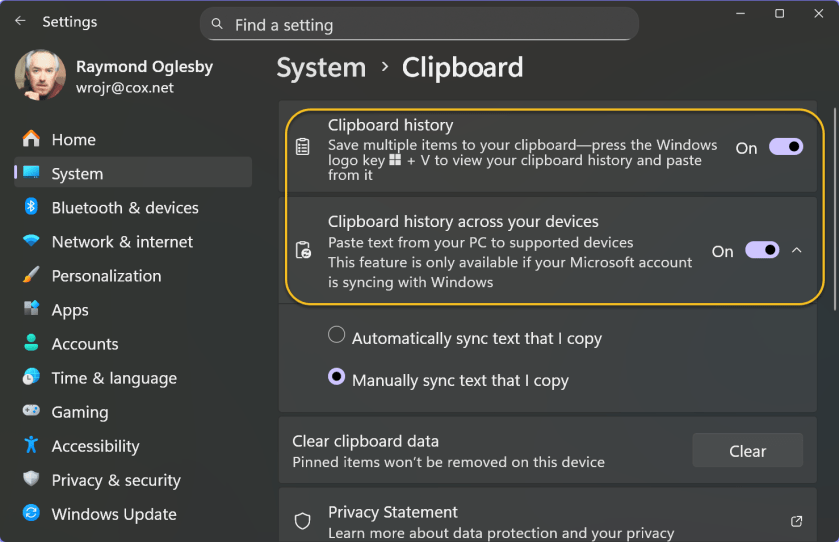
Clipboard Sync
You might be aware that Windows 11 has a clipboard history feature (press Windows key+V to see it), but you might not know that Windows can sync your clipboard between PCs. If you activate that feature, you can copy text on your desktop PC and paste it on your laptop. The clipboard sync feature is strangely configurable and powerful.
Windows offers multiple types of clipboard sync. One is automatic: Everything you copy syncs to your other Windows PCs. The other is manual: You can copy some text, press Windows key+V, and then choose to push that content to your other PCs. In other words, Windows does not sync anything you copy to the cloud until you explicitly request it.
You can also sync your Clipboard to your Android phone by signing into the Microsoft-owned SwiftKey keyboard with your Microsoft account. iPhone users are out of luck—the SwiftKey app does not offer the Clipboard sync feature on iOS. See the image below:
Clipboard Sync
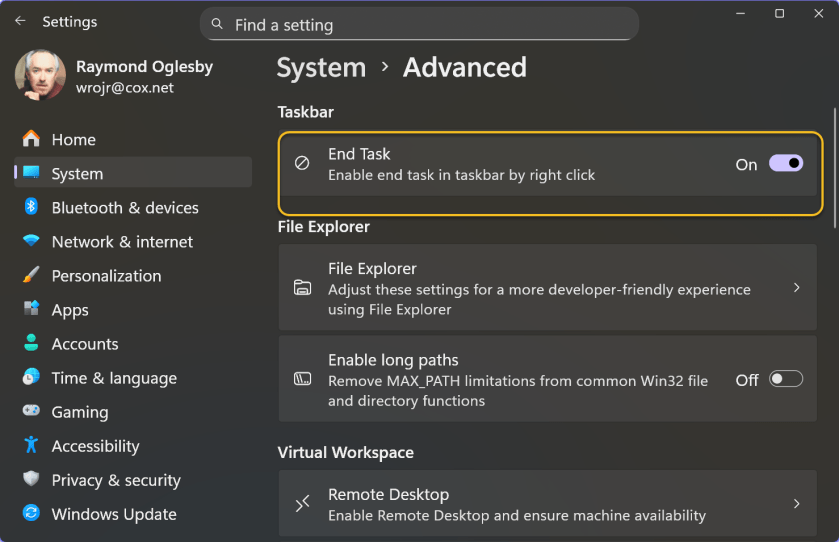
An End Task Button on the Taskbar
If a program freezes or starts to misbehave, you normally have to visit the Task Manager and use the End Task feature to forcibly close it. If you find yourself doing that often, Microsoft has a convenient shortcut for you: You can add an End Task button on the taskbar. After that, you can right-click an application icon and select End Task to forcibly close it. It’s not ideal for day-to-day use—you are forcibly closing an application without giving it a chance to save your work and any data—but it definitely comes in handy sometimes. To turn this on, head to:
System > Advanced
and activate the End Task toggle under the Taskbar section. see the following image:
End Task Button
Game Mode
Game Mode, which is on by default, is not as straightforward as it sounds. In theory, it means that Windows should detect when you are playing a game and limit background tasks to improve performance. When Game Mode originally launched with Windows 10’s Creators Update in 2017, it was more aggressive. Microsoft provided APIs for game developers to manage the system.
Now, Game Mode primarily prevents Windows from sending notifications that interrupt your gameplay. Microsoft makes a vague promise that Game Mode stops Windows Update from installing driver updates while you are gaming and “helps achieve a more stable frame rate depending on the specific game and system,” with no further explanation. YouTube is full of benchmark videos showing no real change in game performance with Game Mode on or off. To find this toggle, head to:
Gaming > Game Mode
The good news is you likely will never have to turn Game Mode off—it should never break anything because it does not do much. Refer to the image below:
Game Mode
Eye Tracking
Did you know that Windows 11 supports eye-tracking hardware without any third-party software? What this means is you can use your eyes to control your PC, including clicking and typing. Of course, you need very specific hardwareto use this accessibility feature, such as a Tobii eye tracking device.
Despite Microsoft pushing PCs with IR cameras and presence sensors, Windows can not perform eye-tracking with standard hardware. Perhaps that’s something we should expect to see in the future as Windows increasingly embraces AI. Imagine if Copilot Vision could see what you were looking at. Right now, even an AI laptop with an NPU for on-device AI processing ca not do much more. Related options are in:
Accessibility > Eye control
See the image below:
Eye Tracking
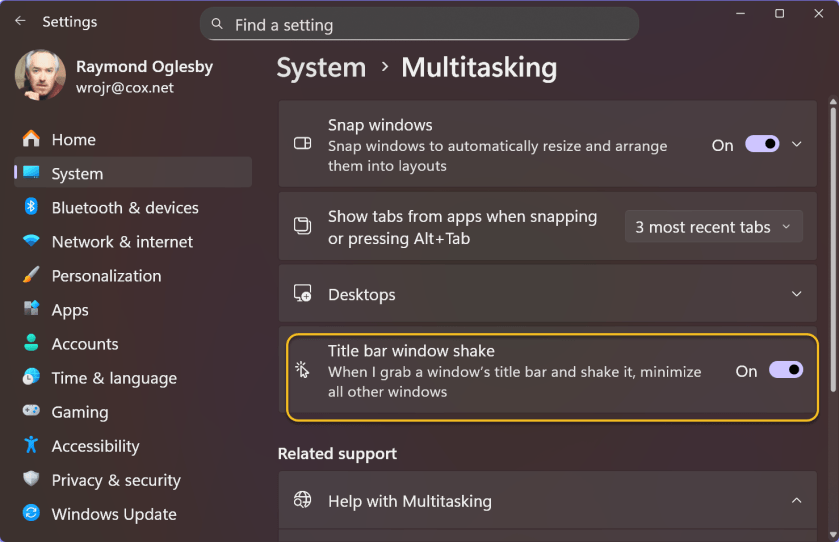
Title Bar Window Shake
Windows Aero launched with Windows Vista and became even better with Windows 7. Some beloved Aero features, such as the Aero Glass translucent interface, are no longer available. (Check out macOS Tahoe if you enjoyed that aesthetic.) Microsoft rebranded other Aero features, however: Aero Snap, for example, evolved into Snap Layouts for arranging desktop windows.
One odd feature that somehow survived under a new name is Aero Shake. It allows you to grab a window’s title bar with your mouse and shake it to minimize all other windows. It’s off by default but was apparently important enough that Microsoft kept it around. To activate this option, head to:
System > Multitasking
and then look for the Title Bar Window Shake option. See the following image:
Title Bar Shake
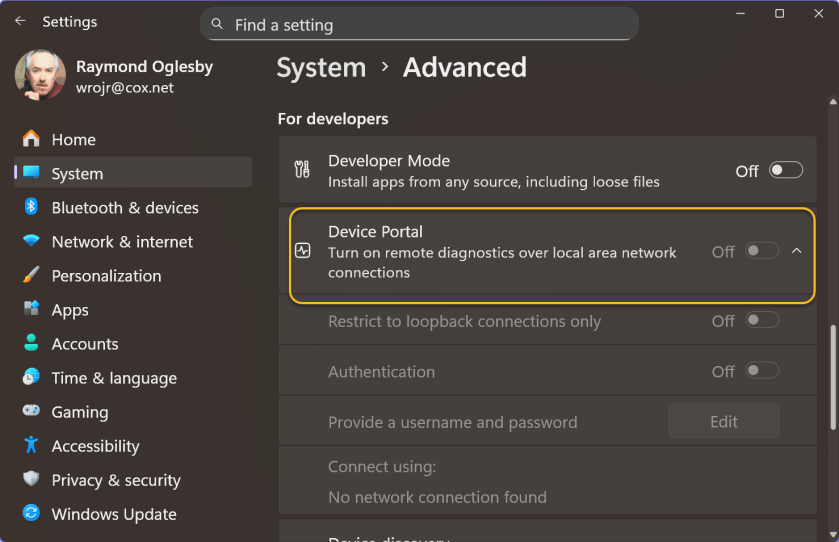
Device Portal
Windows 11 has a Device Portal web interface for “remote diagnostics over local area network connections.” You can activate it via the
System > Advanced
pane. Just turn on Developer Mode and then Device Portal.
This web interface is very strange. It includes an empty Mixed Reality page—functionality that is now no longer available in Windows. It also features a Window Manager page that does not show a single window open on your PC’s desktop. The File Explorer page also highlights the long-forgotten 3D Objects folder. It’s downright bizarre.
The Device Portal was originally meant for managing Microsoft HoloLens hardware, as Microsoft explains. The Window Manager page presumably only shows the kind of floating Mixed Reality windows you would see on a HoloLens. Of course, HoloLens is now dead—Microsoft handed its US military contract off to Anduril earlier this year. Mixed Reality and 3D Objects are gone, too.
But the ghost of HoloLens past lives on, available just a few clicks away in Windows 11’s Settings app. If your PC is not on a network, the options are unavailable. Refer to the image below:
Device Portal
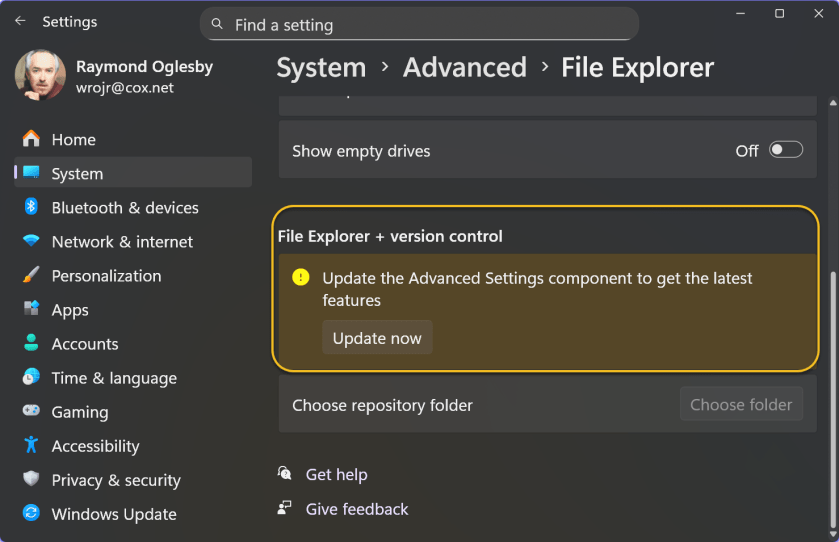
File Explorer
Advanced Windows Settings provides additional functionality to the Advanced page inside Windows settings, such as File Explorer with version control integration. File Explorer with version control integration lets you view Git information directly in your source folder. Head to:
System > Advanced > File Explorer
Under the File Explorer + version control section, click the Update Now button to see if you have the latest Advanced Settings control. See the image below:
File Explorer
The Settings App Is the New Control Panel
Although Microsoft has not finished migrating all the useful options from Windows 11’s Control Panel to the Settings app yet, the latter is already (and amusingly) becoming a junk drawer full of historical options. Exploring the Settings app is like walking through a Windows history museum. Some options only make sense if you understand Microsoft’s original intentions when they were released. Perhaps Microsoft’s Mu-based AI agent can clean things up in the future.
Disclaimer
Technology is constantly evolving, and smartphone and desktop tech rarely remains static. Therefore, the information in this post is only accurate as of the date it was written. Blog posts that are older than six months may contain instructions that are no longer compatible with your device or operating system. We hope that the content from previous posts continues to function as intended. Thank you for reading TechSavvy.Life, where technology works for you.
Quote For the Day
Let’s go invent tomorrow instead of worrying about what happened yesterday – Steve Jobs
(X) Twitter Info
You are finished. Please feel free to share this post! One way to share is via Twitter.
Just click the Tweet icon below. This will launch Twitter where you click its icon to post the Tweet.
Checkout TechSavvy.Life for blog posts on smartphones, PCs, and Macs! You may email us at contact@techsavvy.life for comments or questions.
We value your feedback! Was this post helpful? Please share your comments with us. If you have a tech question related to your computer or smart device, feel free to reach out. Just send an email to contact@techsavvy.life, and be sure to include the device, app, and version you are using. To assist us further, you can also attach screenshots related to your inquiry.
The author’s Vietnam eBook on the “Battle for Tra Bong Vietnam: Events and Aftermath” can be accessed from a Kindle device or the Kindle App for a desktop or smartphone. The apps are free.
The author’s Vietnam eBook on the Battle for Tra Bong Vietnam: Events and Aftermath
The article discusses the resurgence of National Public Data, a site previously infamous for leaking millions of Social Security numbers. It offers users the ability to search personal information and opt out of data display. Caution is advised regarding online privacy, as data security on the web remains a significant concern.
RAYMOND OGLESBY @RaymondOglesby2 September 2, 2025 – 8 minutes read time
Note! Although we recommend you use this tip, we are NOT responsible for what happens to your data. Also, remember there is no such thing as “privacy” on the web. If major USA companies get hacked, so will you. But this tip will help protect your data.
Overview
National Public Data is back with new owners, joining the ranks of other creepy, people-finding services. The website, infamous for its role in leaking millions of Social Security numbers in 2024, has returned with the ability to look up anyone’s personal information.
The site shut down in December amid a wave of lawsuits against parent company Jericho Picturesafter a breach exposed an estimated 272 million unique SSNs and 600 million phone numbers. Since then, the site has been relatively dormant. But recently, we spotted it springing back to life with a new interface.
It looks like the domain has changed hands:. In a page about last year’s breach, the site’s new owners write: “Important Notice: Jericho Pictures, Inc., the Florida company that suffered a major data breach in 2024, no longer operates this site. We have zero affiliation with them. We are keeping this page, originally posted by Jericho Pictures, Inc., intact so its history remains traceable.”
Why You Will Like This Tip
Protect your privacy from others or companies
View and/or remove your personal data from pubic searches
Be in control of your data
System Requirements
This tip was performed on a Dell XPS desktop running Windows 11 Pro. Screenshots are from the latest update for the Google Chrome browser.
Your Profile On National Public Data Website
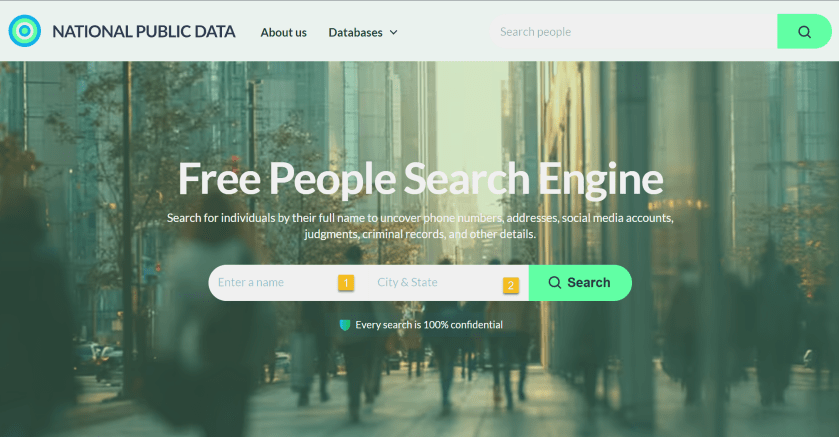
First, it’s relatively easy to look up anybody’s information using their website. Click here to access their interface. Refer to the image below:
National Public Data website
The site does not explain who the new owners are, but a domain lookup shows that it’s registered to Florida-based “Perfect Privacy,” (what an oxymoron), a brand name associated with a VPN service. However, Perfect Privacy VPN has no affiliation with National Public Data.
The new site functions as a “free people search engine,” which might alarm the public since National Public Data housed a huge trove of sensitive data on Americans.
It is unclear where the site is getting its data. But the new National Public Data says: “We collect the data you find on our people search engine from publicly available sources, including federal, state, and local government agencies, social media pages, property ownership databases, and other reliable platforms. After the data is in our hands, we verify and filter it to make sure it is indeed accurate and up-to-date.”
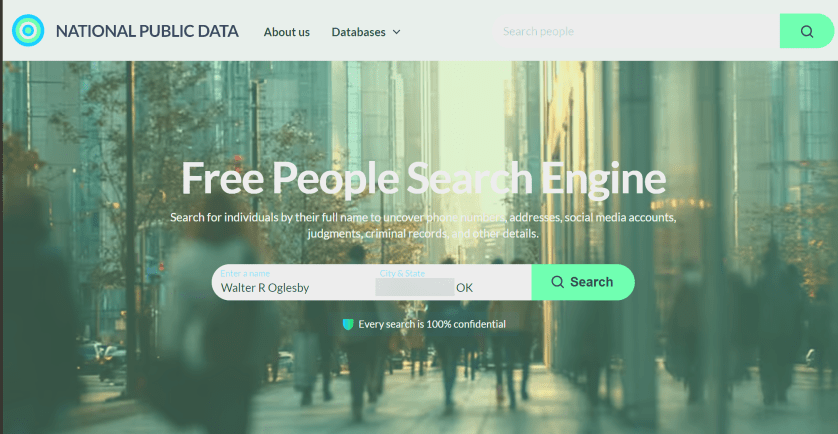
Next, key in your full name, City/State. Both fields are autofill. As you enter the information, it pops up with matching criteria. Then tap the Search button. The search is extremely FAST. I tried both of my names and got the same results.
My wife used the site in her genealogy research to find a distant cousin’s phone number and contacted him. See the image below:
Enter your data
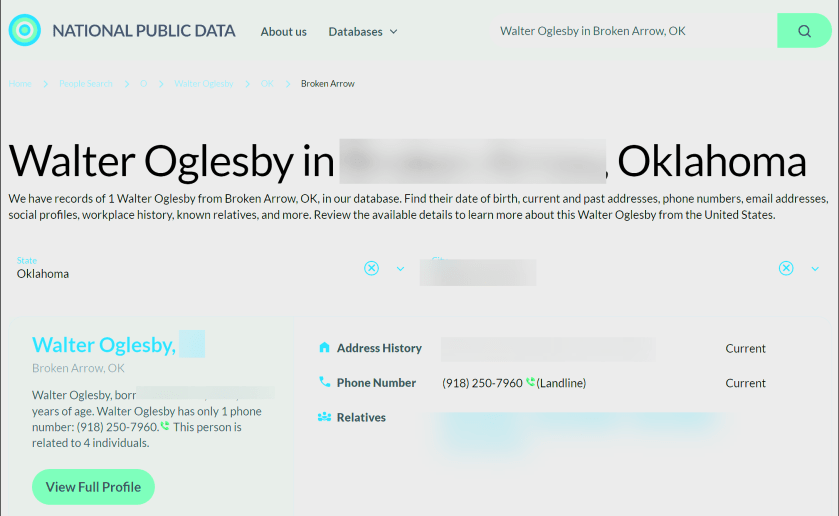
Now, your basic profile information will be displayed. We have redacted specific fields for privacy. We noted that the basic profile information was correct except for the landline phone number, which we no longer have. When I clicked on my relatives, the data was incorrect. To view more information, click the View Full Profile button. See the following image for basic details about myself:
Your basic profile data
Still, what makes the site disturbing is how you can freely look up people’s data, including neighbors, and sometimes find accurate addresses, phone numbers, and dates of birth, along with a person’s relatives. None of the data is behind a paywall. That said, the new site is not much different from other people-finding services, which serve up similar data for free.
The new National Public Data adds: “On our people search website, you can find pretty much anything you need, from someone’s contact info, location, age, and birthday to workplace, relatives, and criminal records. No need to sift through different web pages.” It does not reveal your SSN.
Next, the data it reveals is a lot. Refer to the image below about the data it finds:
Listing of what the website searches
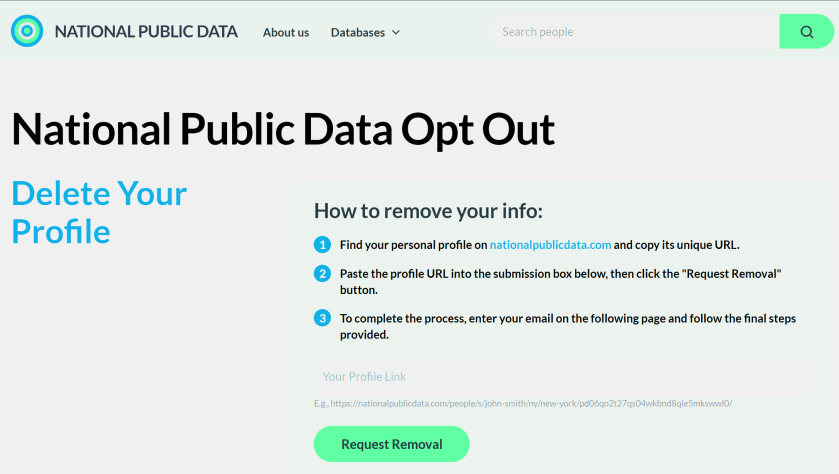
Opt-Out From National Piblic Data Site
Now, the new National Public Data site has an opt-out form to delete your profile data. However, many users are likely unaware of such an option, enabling these types of sites to continue trafficking their information. See the image below:
Opt-Out form
Remember, proactively managing your online privacy and staying informed about potential data breaches are crucial steps in protecting your personal information.
Drop the URL into the Your Profile Link field and click Request Removal
Enter an email address, and the site will send you a message and ask you to click to confirm deletion. You need a separate email address for each profile you want to delete.
We tried the opt-out function, and the site appears to remove our data immediately. Some commenters say they have not received the confirmation email. Check your Spam folder and make sure you are dropping the full URL for your profile into the Link box, not just the search results page.
Atlas Privacy Website
Sites such asAtlas Privacy have emerged to help people remove their data from the open web and people-finding services. Note: we did not try their service.
Atlas Privacy focuses on removing your personal information from data broker websites and other online sources, NOT your own website. They help you regain control of your data by removing it from places where it’s being collected and shared without your consent.
They scan over 150 sites to remove your information and help protect your privacy by removing your name, age, address, phone number, and other personal details from these sources. Atlas Privacy does not have its own list of websites it searches, but rather, it targets specific data brokers and people finder sites.
Unlike the National Public Data, you must create an account to use their service. There are both free and paid services.
After you have removed your data, recheck to see if it’s actually deleted!
Note! Remember you are responsible for your own data. Acting proactivity by removing your data allows you to be in control.
Want to Recover Your Dara (Why Would You)
National Public Data
If your data has been removed from Natural Public Data sources, it is generally not possible to get it back in the same way it was stored. Once data is deleted, it is often permanently removed from the system or archived in a way that is not easily accessible. However, the possibility of data restoration depends on the specific circumstances of the removal and d the policies of the data provider.
Atlas Privacy
If your data has been removed from Atlas Privacy, in some cases, you may be able to restore data that has been removed.
Sources: National Public Data, Perfect Privacy, Jericho pictures, Microsoft, PCMag, Atlas Prvacy, Meta
Disclaimer
Technology is constantly evolving, and smartphone and desktop tech rarely remains static. Therefore, the information in this post is only accurate as of the date it was written. Blog posts that are older than six months may contain instructions that are no longer compatible with your device or operating system. We hope that the content from previous posts continues to function as intended. Thank you for reading TechSavvy.Life, where technology works for you.
Quote For the Day
“The art challenges the technology, and the technology inspires the art.”
– John Lasseter, Co-founder of Pixar
(X) Twitter Info
That’s it. Please feel free to share this post! One way to share is via Twitter.
Just click the Tweet icon below. This will launch Twitter where you click its icon to post the Tweet.
Checkout TechSavvy.Life for blog posts on smartphones, PCs, and Macs! You may email us at contact@techsavvy.life for comments or questions.
We value your feedback! Was this post helpful? Please share your comments with us. If you have a tech question related to your computer or smart device, feel free to reach out. Just send an email to contact@techsavvy.life, and be sure to include the device, app, and version you are using. To assist us further, you can also attach screenshots related to your inquiry.
The author’s Vietnam eBook on the “Battle for Tra Bong Vietnam: Events and Aftermath” can be accessed from a Kindle device or the Kindle App for a desktop or smartphone. The apps are free.
The author’s Vietnam eBook on the Battle for Tra Bong Vietnam: Events and Aftermath
This article presents six essential tips for optimizing the Windows 11 experience. Key features include using passkeys for security, utilizing tabs in File Explorer, customizing the Start Menu, exploring new sound modes, learning keyboard shortcuts, and managing desktop clutter with Title Bar Shake. Stay updated as Microsoft refines the operating system.
RAYMOND OGLESBY @RaymondOglesby2 April 22, 2025 –5 minutes read time
Overview
With these hand-picked tips and pointers, customize your Windows 11 experience, learn about the best new features, and get the most out of Microsoft’s superb desktop OS.
Windows 11 has been out for a while now, but you likely do not know about every setting and feature this operating system offers. We have done all the hard work for you, collecting six of our favorite tips and tricks that help you maximize your enjoyment and productivity with Windows. Microsoft is always refining and updating Windows 11, of course, so we will continue to update this story with new and exciting pointers.
Why You Wil Like This Tip
Learn some new tips about Windows 11.
Improve the Windows 11 operating system.
System Requirements
Any device running Windows 11. Screenshots are from a desktop running Windows 11 Pro.
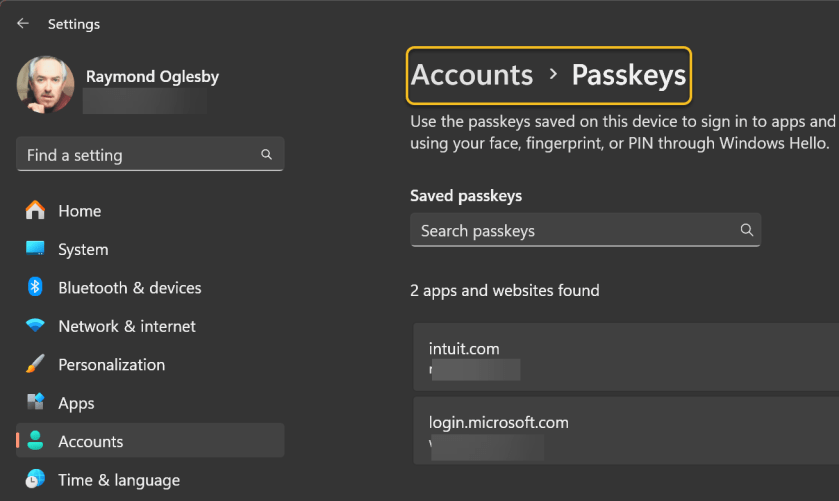
1,. Increase Security by Using Passkeys
Using Passkeys
Passwords are so passé and not as secure as other options. Forward-minded websites and apps support more secure Passkeys to log in, which are linked to a specific device. Windows 11 can now store your passkeys or use those you store on other devices, such as your smartphone. On Windows 11, head to:
Settings > Accounts >Passkeys
Passkeys take advantage of Windows Hello authentication via facial recognition, fingerprint, or PIN.
2. Add Tabs to File Explorer
Using Tabs
Explorer tabs save you from littering your desktop with multiple File Explorer windows when you need to view more than one at a time. Just right-click on a folder and choose Open in New Tab, like you would in a web browser. You can even drag a file between tabs. Just drag it to the desired tab and then down into the file list for that tab. You can also drag tabs sideways to rearrange them and press Alt-Left Arrow to navigate back in a tab (but not Ctrl-PgUp and Ctrl-PgDn as you can on a web browser).
With the initial Windows 11 release, Microsoft streamlined the ribbon at the top of the File Explorer menu. Cut, Copy, Paste, Rename, Share, Delete, Sort, and View choices get prominent buttons at the top, saving you from having to wade through multiple menus you seldom use. Windows 11 also adds a New button for creating new folders and shortcuts, as well as documents based on installed programs. The buttons change based on context, too. So, for example, when you are searching in the right-hand search box, you get a Search Options button.
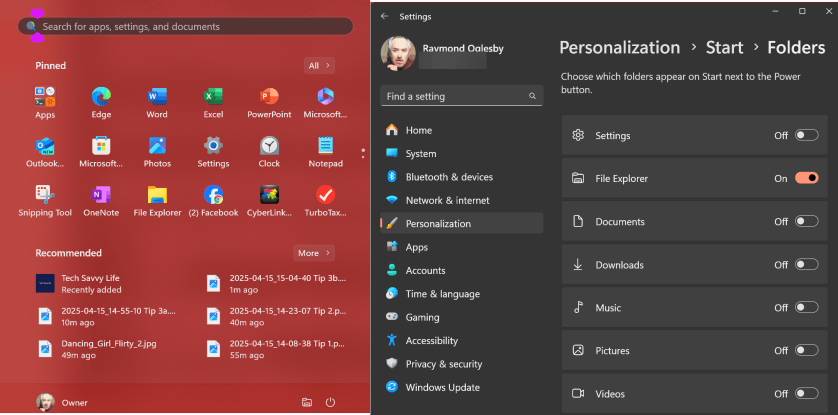
3. Customize the Start Menu
Customize Start Menu
In Windows 10, the Settings button appears above the Start button when you tap it by default. Not so in Windows 11, but you can add it back via:
Settings > Personalization > Start > Folders
You can add folders from here, as well as Settings, File Explorer, and Network buttons, as well as folders for music, pictures, documents, and so on.
4. Listen With New Sound Modes
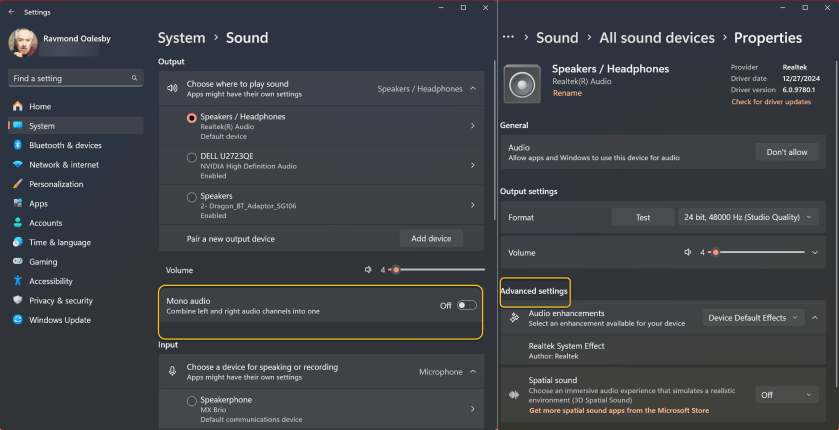
Using new Sound Modes
In Windows 11, you have extra control over your audio output, including mono audio and enhanced audio modes. To go Mono, open:
Settings > System > Sound
then enable Mono audio to combine the left and right audio channels.
For enhanced audio, which includes bass boost, loudness equalization, room correction, and virtual surround, under the Advanced Section, click:
All sound devices > (choose a device) > Properties
and enable its options.
5. Learn New Keyboard Shortcuts
New Keyboard Shortcuts
Windows 11 has new keyboard shortcuts, and they are worth learning:
Windows Key-W to open the Widgets panel
Windows Key-A to access the Quick Settings
Windows Key-Z to access Snap Layouts
Windows Key-K to Cast Media
A couple of the best keyboard shortcuts are still in place from Windows 10, including Windows Key-V to show clipboard history and Windows Key-Shift-S for the Screenshot Tool.
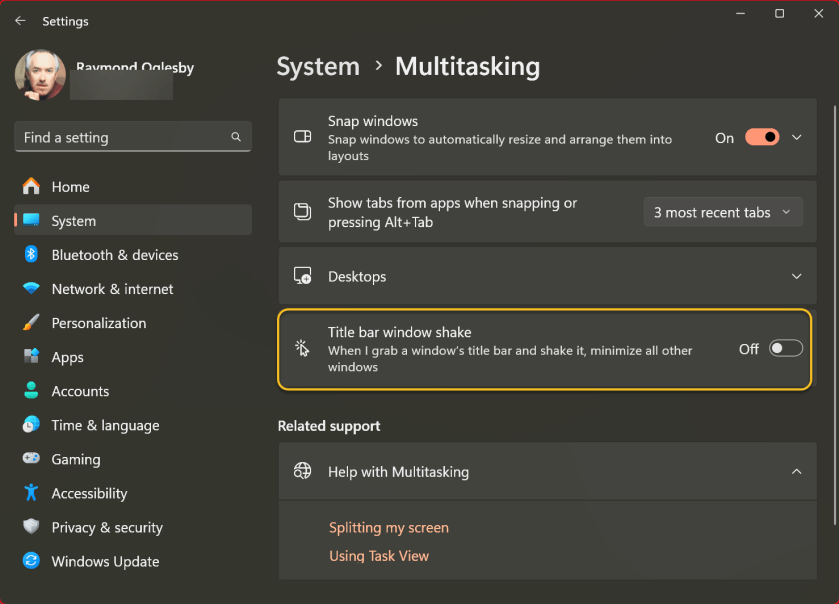
6. Clear Your Desktop With Title Bar Shake
Clear desktop with a Shake
(
The Windows Title Bar Shake setting is a favorite of ours. It’s off by default, but you can enable it in:
Settings > System > Multitasking
(or just search for “shake” in Settings). It lets you grab a window’s top title bar and shake it to dismiss all other windows. We use it all the time to clear out a messy desktop and focus on the active window.
Disclaimer
Technology is constantly evolving, and smartphone and desktop tech rarely remains static. Therefore, the information in this post is only accurate as of the date it was written. Blog posts that are older than six months may contain instructions that are no longer compatible with your device or operating system. We hope that the content from previous posts continues to function as intended. Thank you for reading TechSavvy.Life, where technology works for you.
Quote For the Day
“What I did in my youth is hundreds of times easier today. Technology breeds crime.”
― Frank W. Abagnale
X (Twitter) Info
You are finished. Please feel free to share this post! One way to share is via Twitter.
Just click the Tweet icon below. This will launch Twitter where you click its icon to post the Tweet.
Checkout TechSavvy.Life for blog posts on smartphones, PCs, and Macs! You may email us at contact@techsavvy.life for comments or questions.
We value your feedback! Was this post helpful? Please share your comments with us. If you have a tech question related to your computer or smart device, feel free to reach out. Just send an email to contact@techsavvy.life, and be sure to include the device, app, and version you are using. To assist us further, you can also attach screenshots related to your inquiry.
The author’s Vietnam eBook on the “Battle for Tra Bong Vietnam: Events and Aftermath” can be accessed from a Kindle device or the Kindle App for a desktop or smartphone. The apps are free.
The author’s Vietnam eBook on the Battle for Tra Bong Vietnam: Events and Aftermath
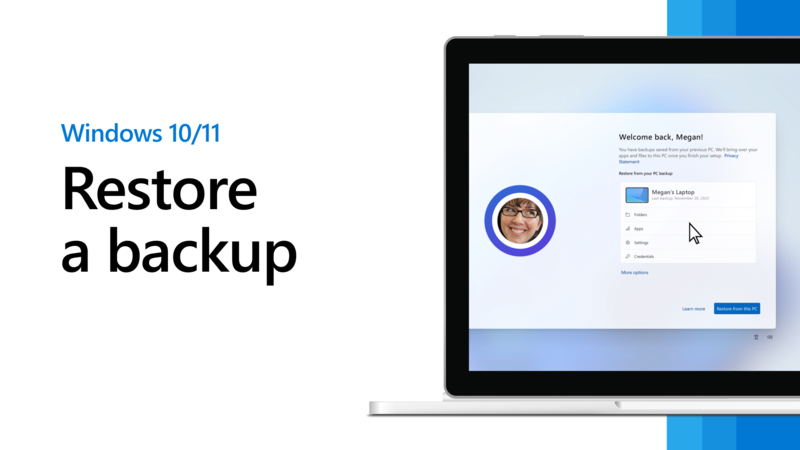
The new Windows Backup tool allows users to back up specific folders, apps, settings, and credentials to OneDrive, enabling restoration on the same or different PCs. A Microsoft Account is required, while traditional desktop apps cannot be backed up. Users can manage their backups through the Windows Backup interface.
RAYMOND OGLESBY @RaymondOglesby2 April 15, 2025 – 5 minutes read time
Overview
The new Windows Backup tool will back up specific folders, apps, settings, and credentials to the cloud.Also, user data and files, including documents, pictures, music, and videos, are backed up. You can then restore all those items to the same PC or a new computer. To use this feature, you need a Microsoft Account (work and school accounts are not supported, and neither is a local account). You also need adequate storage space. OneDrive offers 5GB for free, but you may need to upgrade to one of the paid Microsoft 365 plans for more storage.
NOTE! The primary limitation of the Windows Backup tool is that it will back up only certain locations and items. For example, it will not back up and restore traditional desktop apps, such as Microsoft 365 (which is strange), so make sure you have the software and sources for all the programs you will need to reinstall.
Why You Will Like This Tip
Peace of mind knowing your PC is backed up.
If something goes wrong, you can restore your data.
System Requirements
A PC Desktop or Laptop running Windows 10 or 11. Screenshots are from Windows 11 Pro.
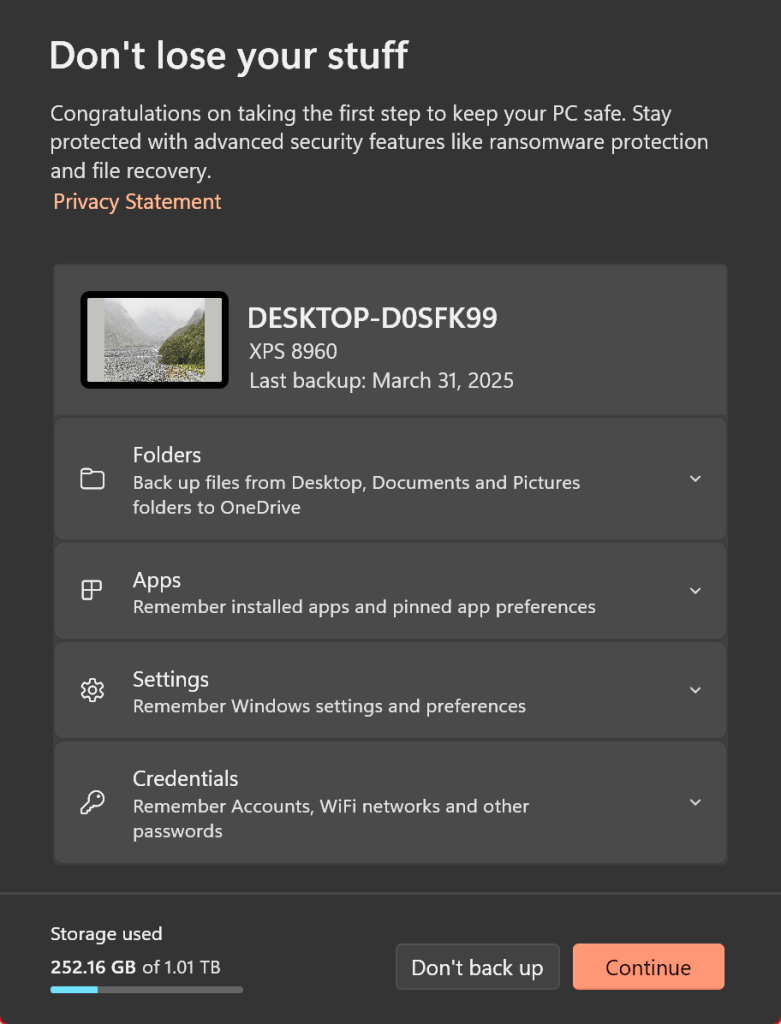
Backup
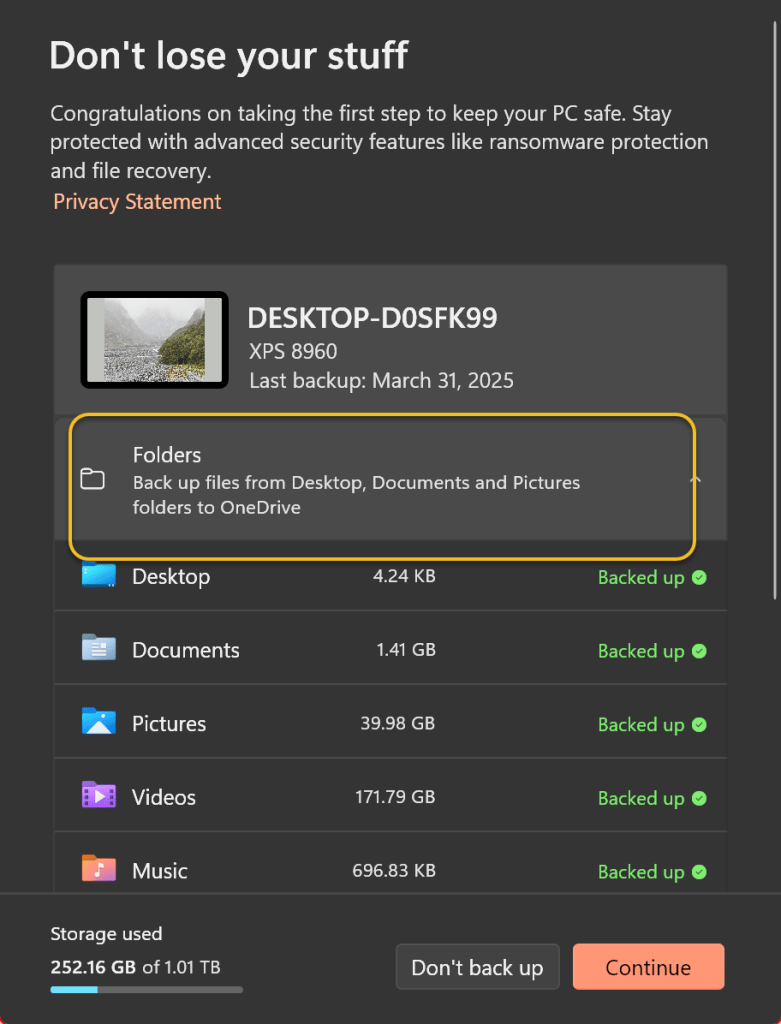
First, turn to the PC you want to back up. In Windows 10, click the Start button and select Windows Backup from the menu. In Windows 11, click the Start button, go to the All Apps screen, and then select Windows Backup. The Windows Backup Tool offers four different categories to configure—Folders, Apps, Settings, and Credentials. Refer to the image below:
Starting Windows Backup Tool
Now, click the down arrow next to Folders and enable the folders you wish to back up. If you have previously done a folder(s) backup, the last backup date will be shown and is enabled. You will be able to back up the Desktop, Documents, and Pictures folders. See the image below:
Selecting folders to backup
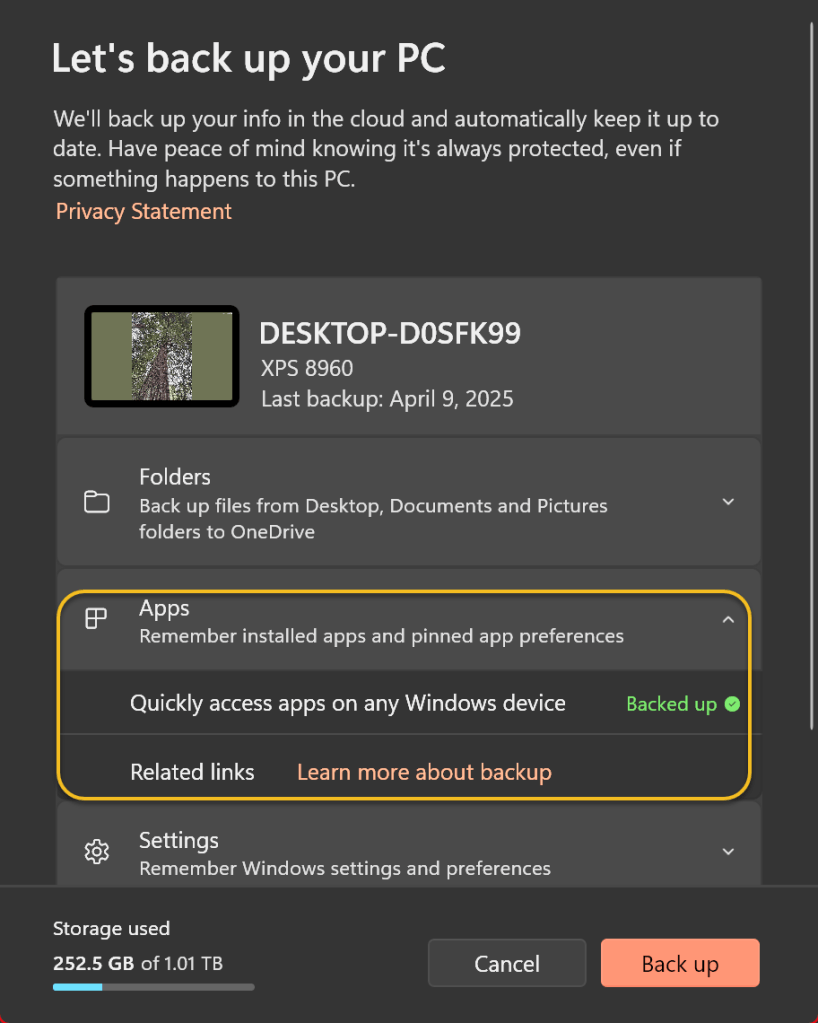
Next, click the down arrow next to Apps. Make sure Quickly access apps on any Windows device is turned on, as this will generate a list of installed apps so you can more easily recover them when you restore the backup. See the following image:
Selecting all Apps to backup
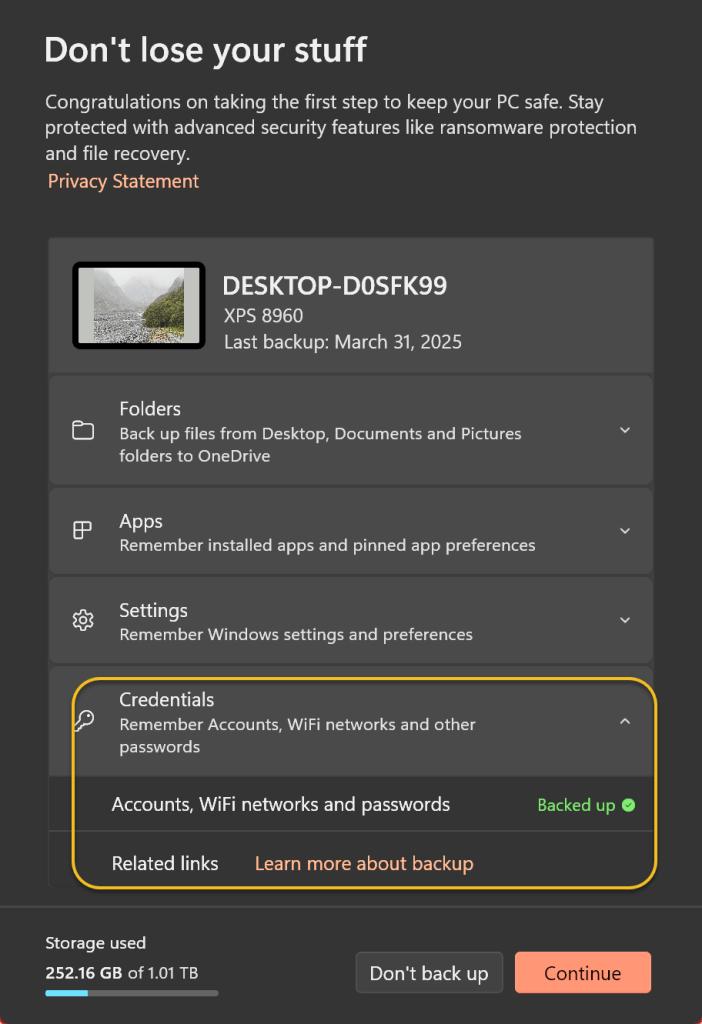
Now, click the down arrow next to Credentials and make sure the switch for Accounts, Wi-Fi networks and other passwords is turned on. Refer to the image below:
Selecting everything else to backup
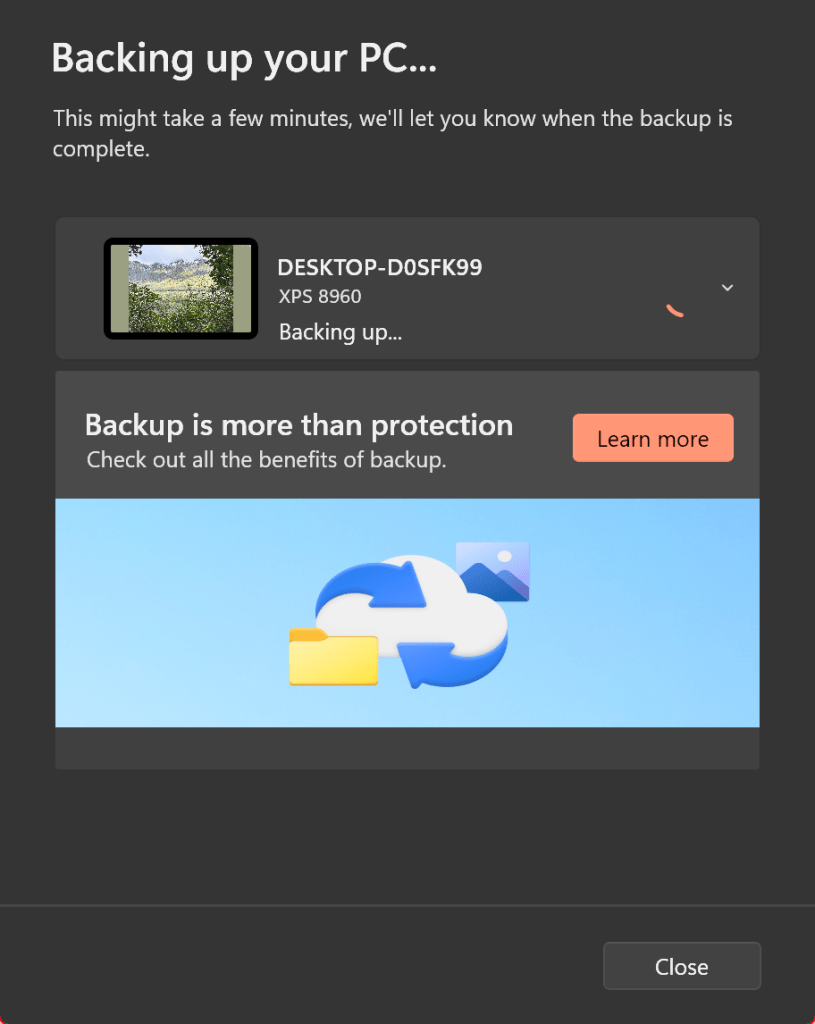
Next, when you are ready, click the Continue button. The items you selected are then backed up to your OneDrive storage. As the backup runs, you can minimize the Windows Backup app and work on other tasks. When the entire backup is finished, you will see that each of the four categories has been backed up. See the image below:
Clicking Continue to start the backup
Now, you will receive a screen stating that your backup is in process. See the following image:
Your backup progress screen
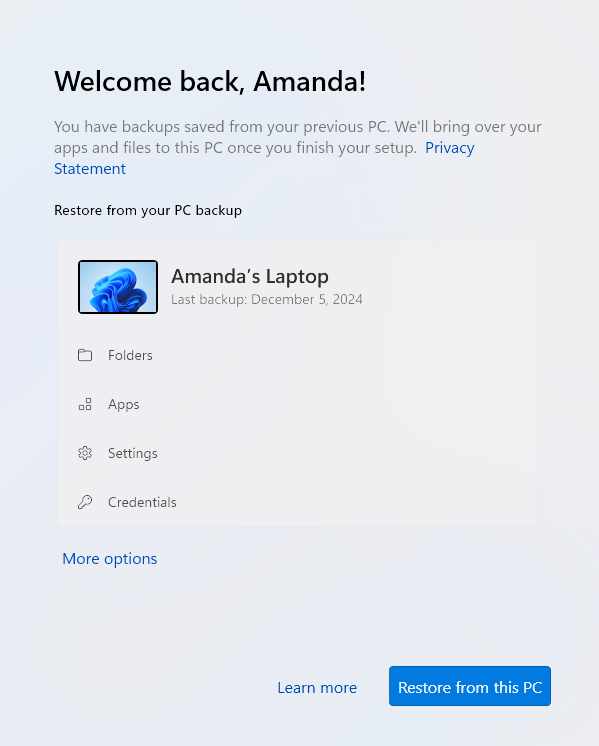
Now, if you reset Windows or switch to a new PC, you can restore your saved files during the setup process. You should see a screen welcoming you back and telling you that there are backups saved from the previous PC. Click the More options link. Refer to the image below:
Selecting to start a Restore from a backup
Next, select the name of the backup of your previous PC, and then click the Restore from this PC button. The items that you chose to back up are restored to your new computer. After this process is done, continue with the setup. When finished, sign in to your PC. See the image below:
Clicking Restore from this PC to begin the restore process
Now, click the Start menu, Settings screen, and File Explorer to see which apps and settings have been restored. Any program that needs to be reinstalled will display an arrow with the word Install on the icon. Click the app to either automatically reinstall it or open the Microsoft Store so you can download the program.
Disclaimer
Technology is constantly evolving, and smartphone and desktop tech rarely remains static. Therefore, the information in this post is only accurate as of the date it was written. Blog posts that are older than six months may contain instructions that are no longer compatible with your device or operating system. We hope that the content from previous posts continues to function as intended. Thank you for reading TechSavvy.Life, where technology works for you.
Quote For the Day
“Good, bad, or indifferent, if you are not investing in new technology, you are going to be left behind.
— Philip Green
X (Twitter) Info
You are finished. Please feel free to share this post! One way to share is via Twitter.
Just click the Tweet icon below. This will launch Twitter where you click its icon to post the Tweet.
Checkout TechSavvy.Life for blog posts on smartphones, PCs, and Macs! You may email us at contact@techsavvy.life for comments or questions.
We value your feedback! Was this post helpful? Please share your comments with us. If you have a tech question related to your computer or smart device, feel free to reach out. Just send an email to contact@techsavvy.life, and be sure to include the device, app, and version you are using. To assist us further, you can also attach screenshots related to your inquiry.
The author’s Vietnam eBook on the “Battle for Tra Bong Vietnam: Events and Aftermath” can be accessed from a Kindle device or the Kindle App for a desktop or smartphone. The apps are free.
The author’s Vietnam eBook on the Battle for Tra Bong Vietnam: Events and Aftermath
Apple has disabled Advanced Data Protection (ADP) for iCloud in the UK due to government demands for law enforcement access. This compromises data security, as backdoor access could be exploited. In contrast, ADP offers end-to-end encryption unavailable to Apple, ensuring only users can access their data. Users outside the UK retain this protection.
Insert dRAYMOND OGLESBY @RaymondOglesby2 April 1, 2025 – 6 minutes read time
Overview
Recently. Apple took the unusual step of turning off its highest level of iCloud encryption, Advanced Data Protection (ADP) for customers in the UK. The British government has reportedly demanded that Apple provide a method for law enforcement to access encrypted data as part of criminal investigations. But that creates a serious security problem, because this type of backdoor access can also be exploited by criminals or untrustworthy governments.
Why You Will like This Tip
Have the best encryption for your Apple devices.
Prevent hackers from accessing and viewing your data.
System Requirements
See below for the Apple software versions. These screenshots were captured using iOS 18.3.2 on iPhone 14 Pro.
Click here to learn how to update your iPhone to the latest iOS version.
United Kingdom vs United States
For people in the UK, ADP can no longer be enabled. If you are currently using ADP, you will need to turn off the feature at a future date.
If you are outside the UK and concerned about who can see your data, ADP adds an extra layer of security by making it unreadable even by Apple. If ADP is disabled, your data could be at risk because it can still be unlocked by Apple, a legal request or a data breach.
Let’s explore how to turn Advanced Data Protection on, and how it differs from the default iCloud encryption methods.
How Does ADP Work
The key difference between ADP and how Apple encrypts data by default is how accessible your information is when stored on Apple’s servers.
In what Apple calls standard data protection, information sent between points, such as files stored on iCloud Drive and iCloud backups of your devices, is encrypted and transmitted securely. If someone intercepts that data between the two points, they will see only gibberish.
That data remains encrypted when it’s stored on Apple’s servers, so you can access it from other devices, for instance. However, Apple can still access the encryption keys to unscramble and read the data; and provide it to law enforcement following a legal request.
By contrast, when you enable Advanced Data Protection for iCloud, the data is end-to-end encrypted, meaning only your trusted devices possess the encryption keys to read it. The information remains encrypted on the servers, and not even Apple can access its contents. (Not all iCloud data can be end-to-end encrypted. Apple breaks out-which types of information, such as iCloud Mail messages, that remain covered by standard data protection even when ADP is turned on.)
The UK’s Investigatory Powers Act, the “Snooperd’s Charter”, makes that inaccessibility illegal, which is why Apple is turning the feature off for UK customers.
Some services are end-to-end encrypted regardless due to the sensitivity of the data, such as passwords, information stored in the Health app and payment information.
Setup Your Account for ADP
Note! Setting up ADP applies to all devices in your Apple account.
To set up ADP on your account, first make sure you have met all the prerequisites for the feature:
Your Apple Account must use two-factor authentication.
You must have a recovery method set up in case you lose access to your account. That can be a 28-character Recovery Key or a person you have designated as a Trusted Contact.
Every device connected with your Apple Account must be able to run at least
iOS 16.2, iPadOS 16.2, MacOS 13.1
WatchOS 9.2
TVOS 16.2
HomePod 16.0
For Windows computers, make sure iCloud for Windows is at version 14.1 or later.
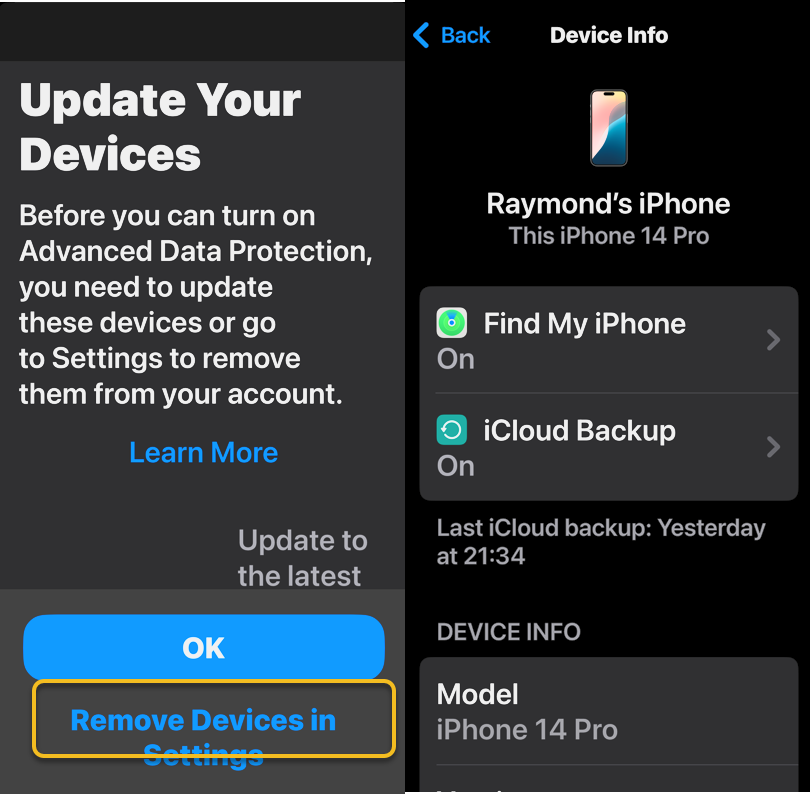
If any of your devices do not qualify, you will be warned during the ADP setup process. If any of those are too old or you no longer have access to them, head to:
Settings > Remove Devices and delete them from your list.
Refer to the below image:
Update your Devices
How to Setup
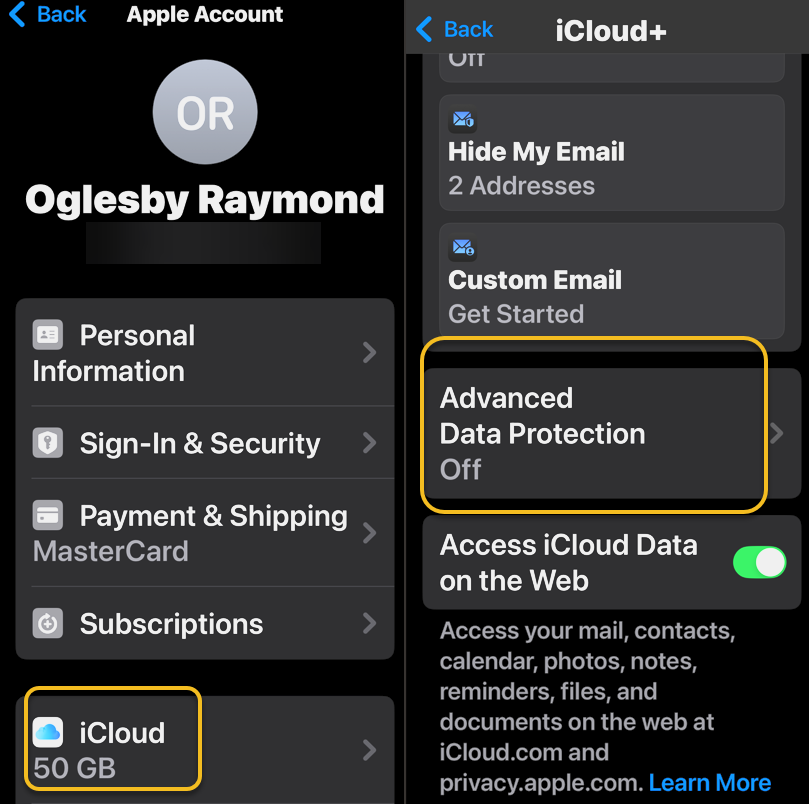
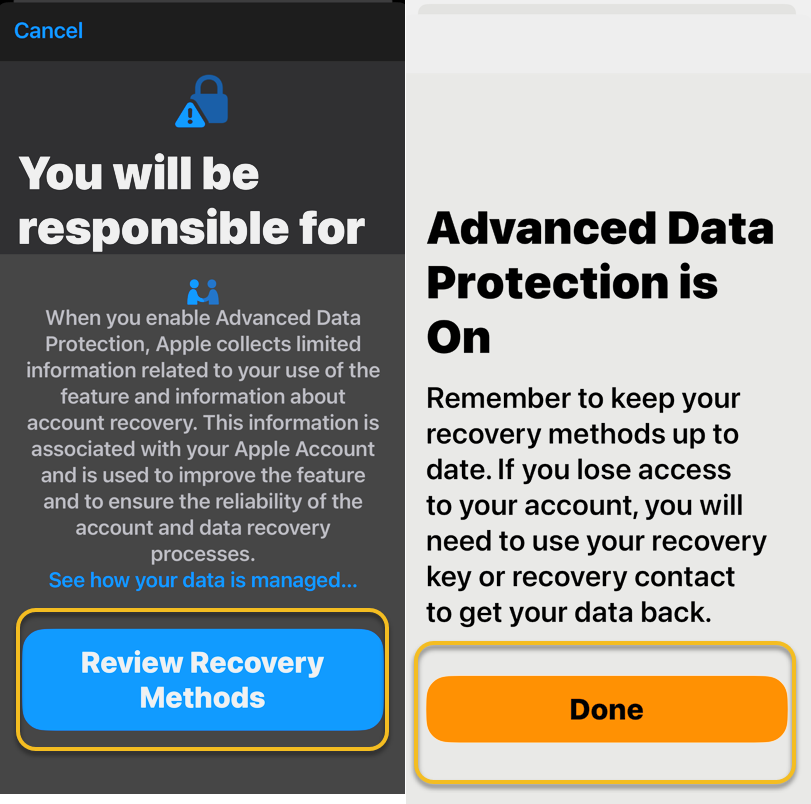
To turn on ADP on an iPhone, iPad or Mac do the following:
1. Go to Settings > [Your Name] > iCloud. On a Mac, open System Settings > [Your Name] > iCloud.
2. Scroll down to Advanced Data Protection, which likely says Off, and tap that to enable. This will take some time, and the screen will appear to be unresponsive; Just be patient. Later, if you want to disable ADP, repeat the above steps and select the Turn Off button.
See the below image:
Turn on ADP
3, If there are any of the aforementioned impediments to setting up ADP, such as needing to update other devices on your account, you will review them on the next screen.
4. In the following screen, tap Review Recovery Options. You need to have a Recovery Key, Recovery Contact or both to ensure that you can get your data if you lose access to your iCloud account.
5. Enter your device’s passcode to finish.
See the following image:
ADP is Enables
Activating ADP on one device means it’s on for all of your devices using the same Apple account, so you only need to set it up once.
Disclaimer
Technology is constantly evolving, and smartphone and desktop tech rarely remains static. Therefore, the information in this post is only accurate as of the date it was written. Blog posts that are older than six months may contain instructions that are no longer compatible with your device or operating system. We hope that the content from previous posts continues to function as intended. Thank you for reading TechSavvy.Life, where technology works for you.
Quote For the Day
. “Imagination is more important than knowledge. For knowledge is limited, whereas imagination embraces the entire world, stimulating progress, giving birth to evolution.”
-Albert Einstein
X (Twitter) info
That’s it. Please feel free to share this post! One way to share is via Twitter.
Just click the Tweet icon below. This will launch Twitter where you click its icon to post the Tweet.
Checkout TechSavvy.Life for blog posts on smartphones, PCs, and Macs! You may email us at contact@techsavvy.life for comments or questions.
We value your feedback! Was this post helpful? Please share your comments with us. If you have a tech question related to your computer or smart device, feel free to reach out. Just send an email to contact@techsavvy.life, and be sure to include the device, app, and version you are using. To assist us further, you can also attach screenshots related to your inquiry.
The author’s Vietnam eBook on the “Battle for Tra Bong Vietnam: Events and Aftermath” can be accessed from a Kindle device or the Kindle App for a desktop or smartphone. The apps are free.
The author’s Vietnam eBook on the Battle for Tra Bong Vietnam: Events and Aftermath
The article emphasizes the importance of a web browser, specifically Google Chrome, in daily online activities. It provides four methods to enhance its performance: updating Chrome, clearing the cache, upgrading security settings, and managing performance settings like using Memory Saver. These steps aim to ensure a smoother browsing experience.
RAYMOND OGLESBY @RaymondOglesby2 March 11, 2025 – 6 minutes read time
Overview
In many ways, your web browser is as important as, if not more so than, your computer’s operating system. Think about it: Nearly everything you do, from writing emails and posting on social media to editing documents and streaming videos, can happen inside a browser. So when Chrome starts feeling sluggish, it can affect your whole online experience, professionally and personally. Do not get bogged down by your browser. Here are four ways to speed it up.
System Requirements
This tip works on devices running Google Chrome. Screenshots are from Windows 11 Pro running Chrome Version 134.0.6998.36 (Official Build) (64-bit).
1) Update Google Chrome
Each new version of Chrome contains fresh features, security fixes, and performance improvements. So, it’s possible that updating to the latest version may help your speed woes. Even if it does not, it will keep you safer from online threats. When a new version is available, Chrome automatically updates in the background, when you close and re-open the browser.
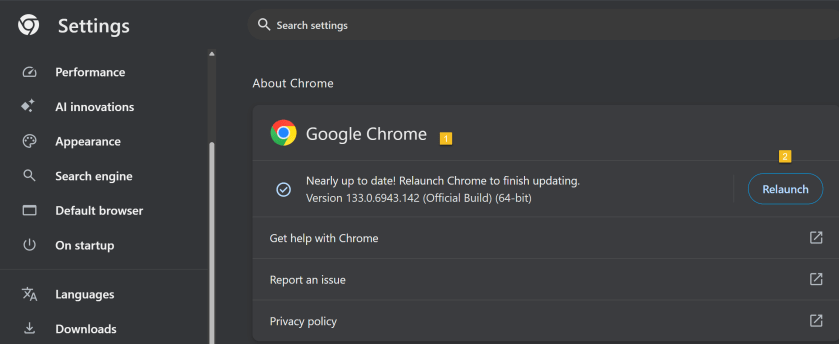
First, open Chrome and click the Menu icon (the 3 dots) in the upper right. From the Menu, click the Settings option. Next, on the left side, scroll down to the bottom and click on the About Chrome option.
If Chrome is not up-to-date, Chrome will automatically download. Now, click the Relaunch button to update Chrome and reopen the browser. Your Chrome browser is now up-to-date. Refer to the below image:
Updating Google Chrome
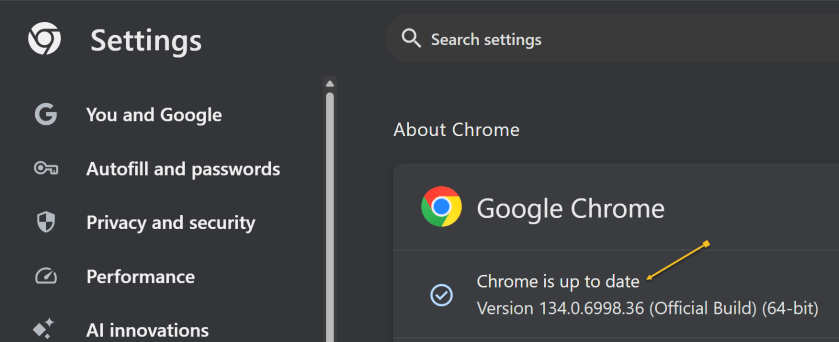
To check which version of Chrome you are running, repeat the above. Chrome will show the version and indicate it is up-to-date. See the below image:
Google Chrome up to date
2) Clear Google Cache
To clear your cache in Google Chrome, you clear your browsing data. This will clear your cache, cookies, and other browsing history.
Clearing your cache can fix problems with loading or formatting on websites.
In the Chrome browser:
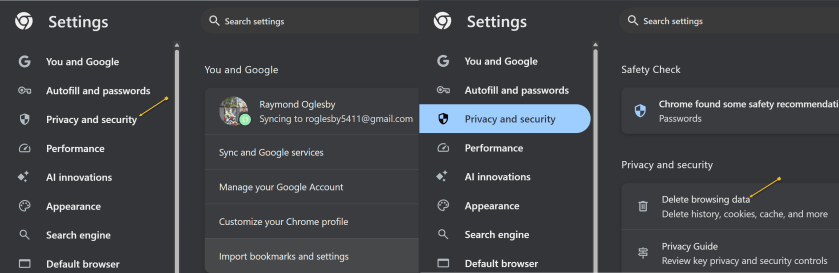
Open Chrome and click the Menu icon (the 3 dots) in the upper right.
From the Menu, click the Settings option.
On the left side, click Privacy and security option.
Under the Privacy and security section click the Delete browsing data button. See the following image:
Accessing Privacy and security options
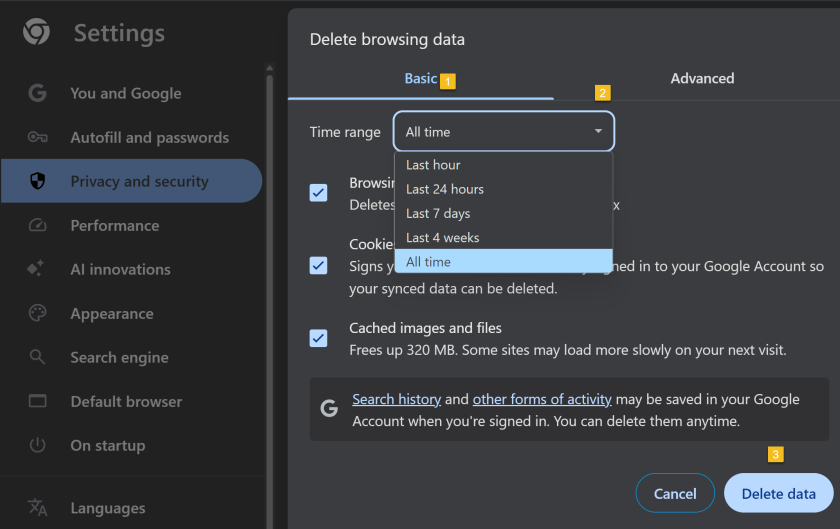
A new dialogue box will open.
Click the Basic menu option.
Select the period to delete from in the Time range drop down menu (To clear all cached data and cookies, select All time, this is recommended).
Ensure check boxes for Browsing history. Cookies and other site data and Cached images and files are ticked.
Click on Delete data and wait for that dialogue box to exit.
Close all open Chrome tabs.
Restart Chrome.
Refer to the below image:
Selecting what data and when to delete
3) Upgrade Chrome Security
Once upon a time, Google developed the Chrome Cleanup Tool, an application that helps find and remove unwanted software (UwS), toolbars, and other automatically installed extensions that antivirus probes may miss from Windows devices. These types of programs can slow down your browser, so checking it for unwanted add-ons every so often is a must.
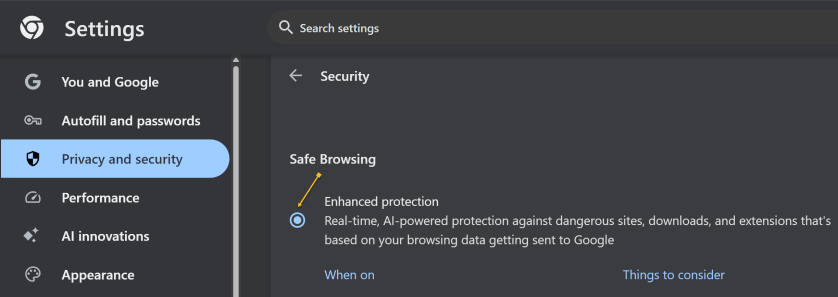
Unfortunately, the program was shut down in 2023. However, Google says users will remain “automatically protected” by its Safe Browsing features in Chrome. For extra protection, navigate to:
Settings >Privacy and security > Security, > Enhanced Protection
And enable which offers “real-time, AI-powered protection against dangerous sites, downloads, and extensions that’s based on your browsing data getting sent to Google.” See the below image:
Enable Enhanced protection
4) Manage Performance Settings
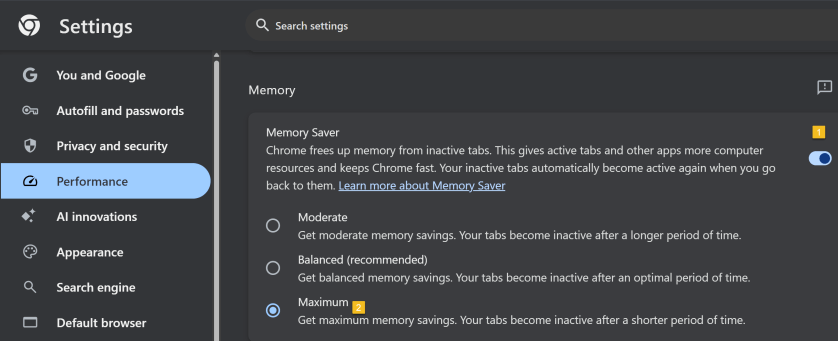
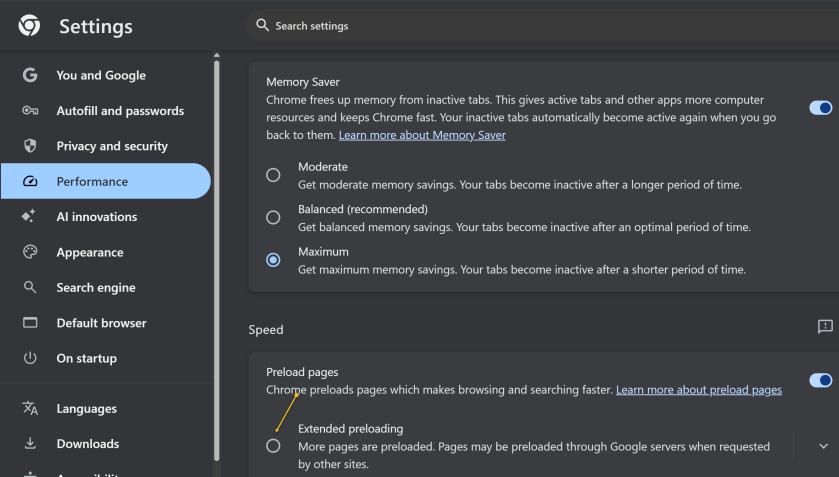
There are two types of people in the world: Those who open just a few tabs at a time, then close them, and those who hoard tabs like they have never heard of bookmarking. If you are the latter, it’s a safe bet what’s causing your slowdown, and you should take action. Not sure which tabs to close? Hover over a tab, and the pop-up preview shows how much memory it’s taking up.
For something more automatic, Google introduced Memory Saver mode in 2022. This feature frees up resources from unused tabs in order to improve performance on tabs that are in use. While this feature should be enabled by default, you can open:
Settings > Performance > Memory Saver
and set to Maximum so tabs become inactive sooner. See the following image:
Setting Memory Saver to Maximum
While you are here, go one further and scroll down to the Speed section. Make sure Preload pagesis enabled so websites and search results load faster. For an extra boost, enable Extended preloading for an even faster experience, though Google will be able to see what sites are being preloaded for you. Refer to the below image:
Enable Preload and Extended preloading
Disclaimer
Technology is constantly evolving, and smartphone and desktop tech rarely remains static. Therefore, the information in this post is only accurate as of the date it was written. Blog posts that are older than six months may contain instructions that are no longer compatible with your device or operating system. We hope that the content from previous posts continues to function as intended. Thank you for reading TechSavvy.Life, where technology works for you.
Quote For the Day
“Technology is nothing. What’s important is that you have faith in people, that they’re basically good and smart, and if you give them tools, they’ll do wonderful things with them.”
-Steve Jobs
X (Twitter)
You are finished. Please feel free to share this post! One way to share is via Twitter.
Just click the Tweet icon below. This will launch Twitter where you click its icon to post the Tweet.
Checkout TechSavvy.Life for blog posts on smartphones, PCs, and Macs! You may email us at contact@techsavvy.life for comments or questions.
We value your feedback! Was this post helpful? Please share your comments with us. If you have a tech question related to your computer or smart device, feel free to reach out. Just send an email to contact@techsavvy.life, and be sure to include the device, app, and version you are using. To assist us further, you can also attach screenshots related to your inquiry.
The author’s Vietnam eBook on the “Battle for Tra Bong Vietnam: Events and Aftermath” can be accessed from a Kindle device or the Kindle App for a desktop or smartphone. The apps are free.
The author’s Vietnam eBook on the Battle for Tra Bong Vietnam: Events and Aftermath
The Amazon Kindle is an effective ebook reader, linked closely to Amazon’s ecosystem. Users can send various ebook formats to their Kindle via methods like the Send to Kindle tool, Kindle app, or email. Free ebooks are readily available through various platforms, enhancing Kindle’s reading options.
RAYMOND OGLESBY @RaymondOglesby2 January 28, 2025 – 7 minutes read time
Overview
The Amazon Kindle is a great ebook reader, but it’s tightly tied to Amazon’s ecosystem. If you have a Fire tablet or a smartphone, you can download other e-reading apps to beef up your library, but with the Kindle hardware, you are pretty much tied to getting your content directly from Amazon. Well, sort of. Using some free software, you can take ebooks in various formats and zap them over to your Kindle.
Let’s explore how to send other ebook formats to your e-reader, and where to get free ebooks.
Why You Will Like This Tip
Of course, we all like free stuff.
A large variety of free ebooks to choose from.
Download in a variety of formats for reading on your Kindle.
System Requirements
This is for the Amazon Kindle. It uses the iPhone, Android, PC, and Mac. The screenshots are from Windows 10 and iPhone 14 Pro.
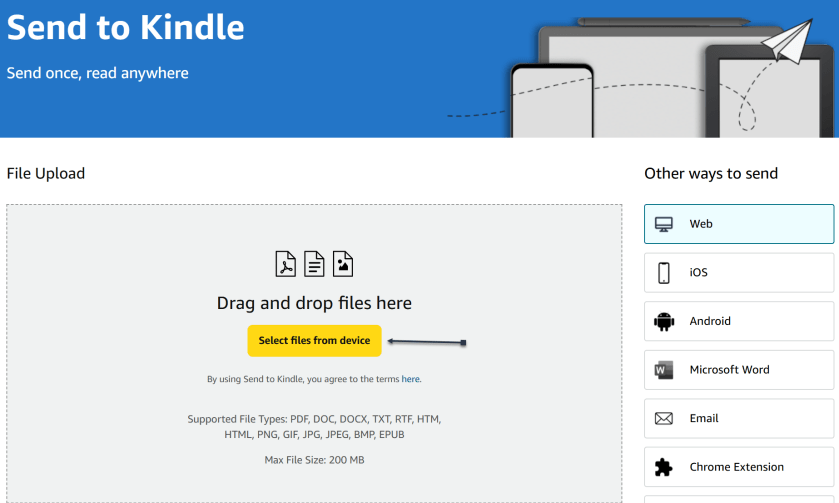
Use “Send to Kindle”
Amazon offers a Send to Kindle page where you can upload ebook files saved on your device. First, on amazon.com/sendtokindle, click Select files from device. Refer to the below image:
Selecting files to send
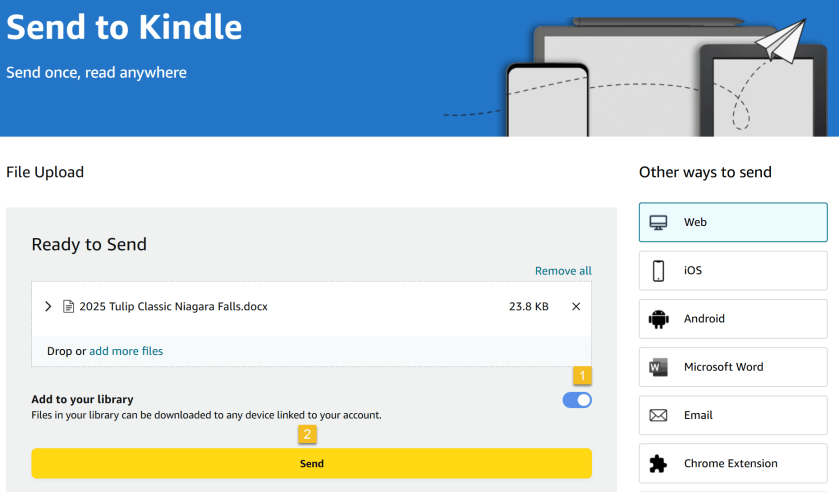
Next, select the book you want on your Kindle. This tool supports PDF, DOC, DOCX, TXT, RTF, HTM, HTML, PNG, GIF, JPG, JPEG, BMP, and EPUB formats on ebooks up to 200MB in size. (Amazon no longer supports sending new Mobi files.) Ensure the Add to your library toggle is ON, then click Send. See the below image:
Send your files
Now, a status bar will appear, letting you keep tabs on the upload. You will see a checkmark and an In Library notice when it’s ready. See the following image:
Status of sending to Kindle
Amazon also has an app for Windows and macOS that lets you do the same thing. Chrome has an extension you can enable though results are mixed.
Use Your iPhone
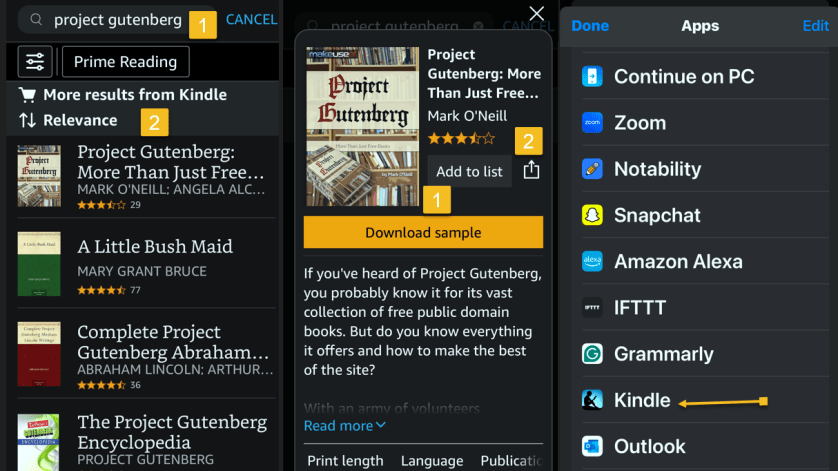
If you have the Kindle app installed on your iPhone or Android device, you can add ebooks to your library with a few taps. In the example below we downloaded an ebook from Project Gutenberg on the iPhone.
First, open your Kindle app on your iPhone and search for an ebook. Next, tap the ebook. From here, you can Download sample to see a preview or tap the Share icon. Now, locate the Kindle app and tap it. Refer to the below image:
Selecting a file to send to Kindle
Next, ensure the Add to your library toggle is ON, then tap Send. Now, the ebook will be saved in your library in the Kindle app and on our Kindle device. The process is similar for Android. See the below image:
Send your file
Use Your Kindle Email
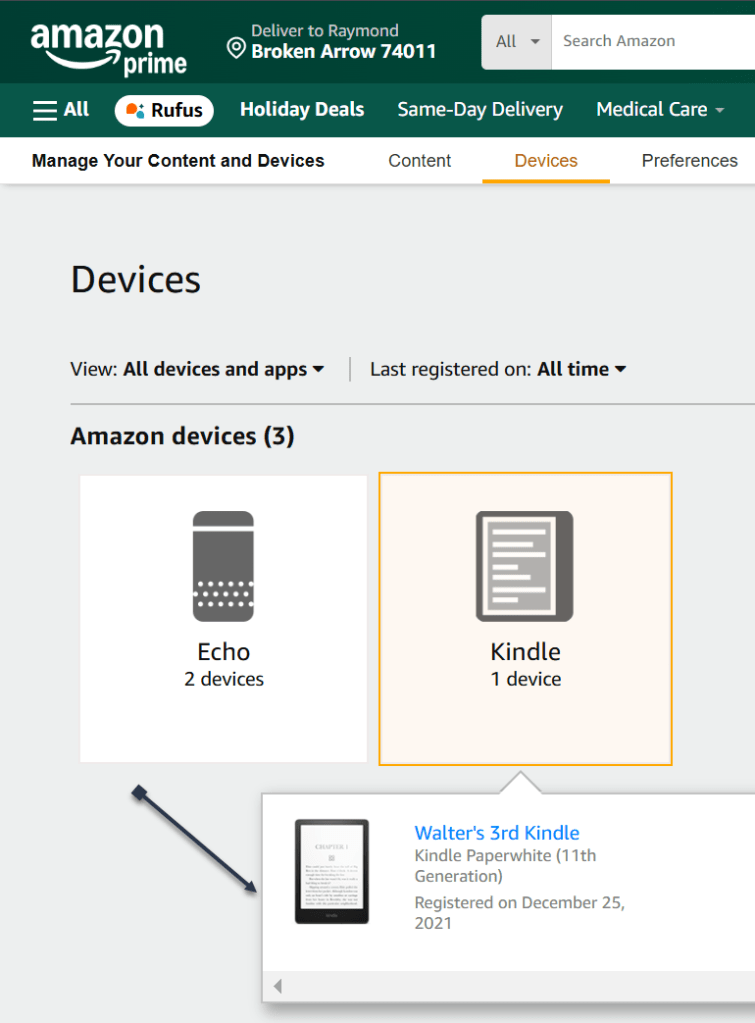
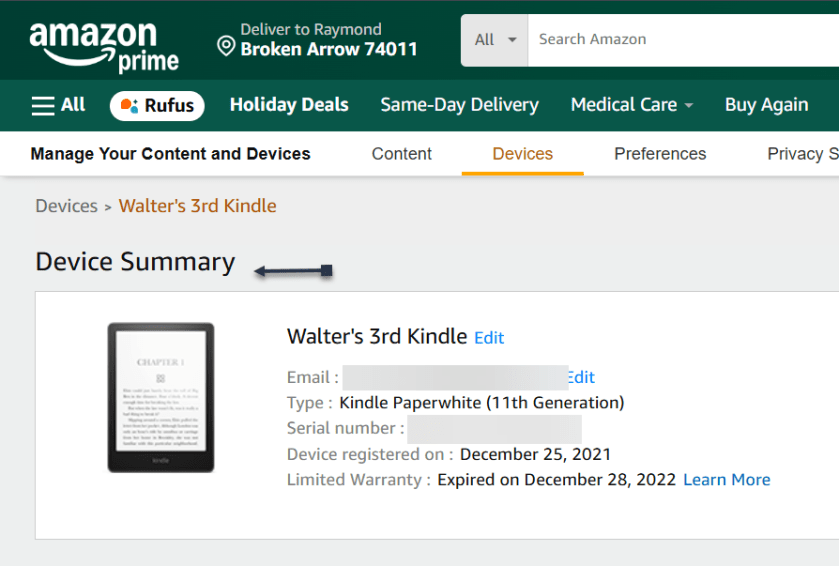
Amazon also lets you email ebooks to your Kindle account via a specially crafted email address. First, to get your Kindle’s email address, go to:
Next, in the list below, find your Kindle device and click it. In the drop-down window, click [your name’s] Kindle. See the following image:
Find your Kindle
On the next page, you will see a Device Summary that lists your @kindle.com email address. (It’s set to a default address, but you can change it by clicking Edit.) Refer to the below page:
Your Kindle information
Back up top, click the Preferences tab, and scroll down to Personal Document Settings. Click the down arrow on the right and scroll to Approved Personal Document E-mail List. The email attached to your Amazon account should be listed here. If that’s the email address you will be using to send ebooks to your Kindle, you are all set. To use a different email, click:
Add a new approved e-mail address and enter the address you want to use.
Remember, your Kindle needs to be attached to a Wi-Fi network for this to work.
Use a PDF
Amazon can automatically convert PDFs into the Kindle format, but you get two formatting choices. If you want your Kindle to display every page in the PDF as if it were a graphic, just email the .pdf file to your Kindle’s address without a subject line, upload it via the Send to Kindle website, or drag and drop the file onto a Kindle that’s attached to your PC with a USB cable.
That will maintain the formatting and graphics; it will appear on your Kindle like on your laptop. However, the font size may be too small to read.
Your other option is to attach the PDF file to an email and make the subject line “convert”—just that word. Send it to your Kindle email address and your PDF will be converted into a Kindle version that will let you mark it up and change the formatting. The graphics will still be in there as well, but you will lose the layout of the original PDF.
Third-party software, such as MiniTool PDF Editor – Kindle format converter, can also convert PDF files to Kindle formats like Word, image, TXT, and HTML.
Where to Find Your eBooks
Once you have emailed your ebook, on your Kindle head to:
Home > From Your Library
It might take a few minutes, but if your Kindle is connected to Wi-Fi, it should update automatically and the ebook will appear.
Want to delete the ebook? Tap the Menu icon (the three-dots) on the bottom right of your ebook in Your Library and select Remove download to remove it from your Kindle or Permanently Delete to remove it from your Amazon account.
Where to Find Free eBooks
Amazon hosts periodic Stuff Your Kindle Days, where select ebooks are free for a 24-hour period. They are usually grouped by theme.
To hook into public library catalogs and send ebooks to your Kindle, check out the Libby app from OverDrive. (Hoopla offers a similar service.)
If you want classics, Project Gutenberg has 70,000+ copyright-free ebooks.
For historical and academic texts, check out archive.org.
ManyBooks.net has a mix of free and paid classics and self-published titles.
Free-Ebooks.net has a large collection of self-published ebooks and classics; provide your email address to get five free ebooks per month.
If you like science fiction, the publisher Baen also has a set of free ebooks.
BookBub has a free ebook section filled with romance novels and other casual reads.
Source: Amazon, PC Mag
Disclaimer
Technology is always changing. Rarely is there static tech for smartphones and desktops. Thus, the contents of this post are only valid at the time of writing. Blog posts older than six months may have directions incompatible with your device or OS. Hopefully, older post content will continue to work as advertised. Thank you for reading TechSavvy.Life for Technology at Work For You.
Quote For the Day
Technology is just a tool. In terms of getting the kids working together and motivating them, the teacher is the most important.
-Bill Gates
X (Twitter) Info
That’s it. Please feel free to share this post! One way to share is via Twitter.
Just click the Tweet icon below. This will launch Twitter where you click its icon to post the Tweet.
Checkout TechSavvy.Life for blog posts on smartphones, PCs, and Macs! You may email us at contact@techsavvy.life for comments or questions.
Was this post helpful? We would love to hear your comments. Do you have a computer or smart device tech question? I will do my best to answer your inquiry. Just send an email to contact@techsavvy.life. Please mention the device, app, and version you are using. To help us, you can send screenshots of the data related to your question.
The author’s Vietnam eBook on the “Battle for Tra Bong Vietnam: Events and Aftermath” can be accessed from a Kindle device or the Kindle App for a desktop or smartphone. The apps are free.
The author’s Vietnam eBook on the Battle for Tra Bong Vietnam: Events and Aftermath
The post warns about the risks of overheating computers, which can harm performance and lifespan. It suggests monitoring CPU temperatures using the BIOS or third-party software like Core Temp. Tips for reducing heat include cleaning dust, adjusting fan settings, and ensuring proper CPU cooler contact. Regular checks are advisable for maintaining optimal performance.
RAYMOND OGLESBY @RaymondOglesby2 January 14, 2025 – 8 minutes read time
Overview
If your computer gets too hot, its performance will suffer and the CPU could get damaged.
Just as you do not want your phone to get too hot, an overheating computer is no joke. If your CPU goes over a certain temperature, it will start throttling performance in an effort to reduce excess heat. If your internal components get too hot for too long, it can decrease the lifespan of your PC, not to mention burn your thighs if you are using your laptop on bare legs, which, by the way, is not a good idea.
Unfortunately, most PCs do not have user-facing temperature-monitoring tools, so you can not easily check how hot your computer is getting at any given time. If you want to see how hot your computer is running, you will need to download some extra software. Let’s explore what you need to check your machine’s internal temperature.
Why You Will Like This Tip
Ability to monitor the CPU core(s) temperature.
Keep your PC running at peak performance with a cool CPU temperature.
System Requirements
Windows 7 or above with 32 or 64 bit OS.
Screenshots are from Dell XPS 8960 running Windows 11 Pro.
How to Monitor CPU Temperature in Windows
Use the BIOS Screen
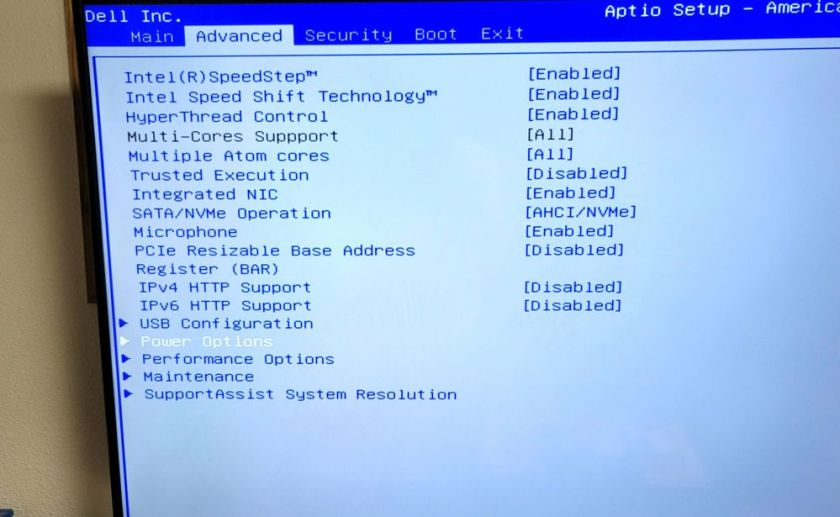
Do not want to install third-party software? The only way to observe your PC’s internal temperature is from the BIOS screen. To access this menu, restart your computer and hit a button on the keyboard that will disrupt the normal boot process (it can be Delete, Esc, or Enter; it will say on the screen). Or Google your machine for the button to press to view its BIOS screen upon a restart. For our Dell XPS 8960 desktop, it is the F2 key.
Every BIOS screen is different, so we cannot tell you where to look for your specific manufacturer, but the machine’s internal temperature should be displayed on the main screen. Some may even show CPU and motherboard temperatures separately. Refer to the below image:
the BIOS screen
The CPU temperature is not displayed on our Dell XPS 8960 desktop, so we need to use a third-party app.
Use Core Temp App
Unfortunately, this is no way to consistently monitor your PC temperature, so you will want to use third-party software instead.
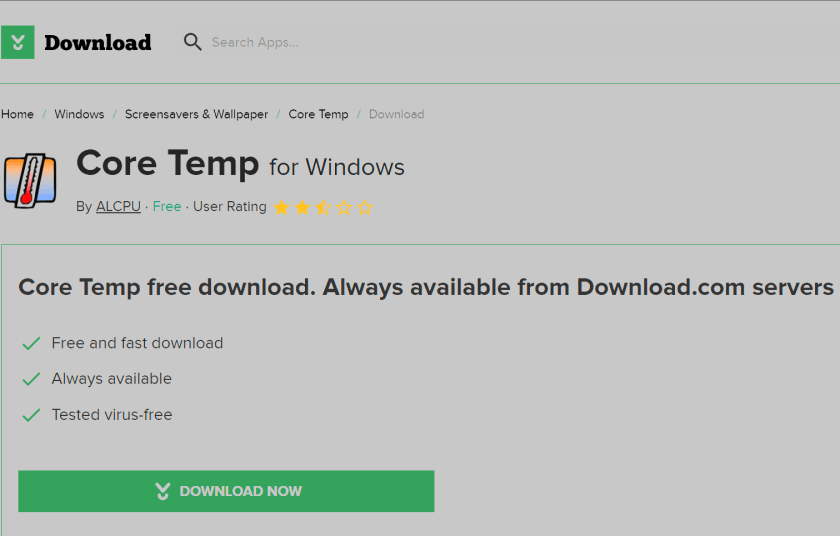
There are dozens of temperature-monitoring programs out there, but we recommend Core Temp for Windows for most users.
Note! We are downloading the app from the CNET website. We recommend only using this website. The CNET webpage will point to the ALCPU page, the app’s owner. Click the download button on the left of your screen. See the below image:
The Core Temp main webpage has too many download buttons to choose from is the reason for using CNET. Some of their download buttons will download blotware, browser extensions, etc., that you do not need.
Also, when installing the app, consider the install options as they want to install a game.
Download Core Temp app
The app provides plenty of information without being as overwhelming as more thorough utilities, and it comes as an installer and EXE file. Plus, it allows you to monitor your temperature from the Windows taskbar, which is great if you want to keep an eye on it over time.
Our Dell XPS 8960 desktop has an Intel i9 processor with 24 cores. See the following image:
Running Core Temp app
The top portion of the window lists your CPU, its current load, and a few other technical tidbits. The real meat is at the bottom, where it says Temperature Readings. You will see the current temperature in the left column, alongside the lowest and highest recorded temperatures since you last launched it. If you are using an AMD CPU, you will probably have one value here, while Intel CPUs will likely have one reading per CPU core; just watch the hottest core to keep things simple.
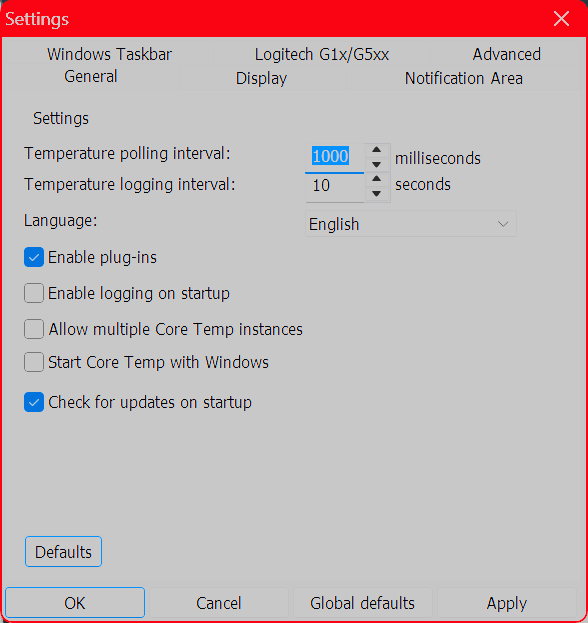
We highly recommend heading to:
Options > Settings
and playing with the options available here, especially those under the Notification Area tab, which will let you view your CPU temperature in the taskbar. We personally recommend selecting Highest Temperature here, then clicking the system tray’s arrow and dragging Core Temp’s icon to the taskbar to keep it visible at all times. You can also enable Core Temp to start with Windows. Refer to the below image:
Use Other Third Party Apps for Windows
HWINFO – Provides detailed reporting on chipsets, graphics cards, and processors for AMD and Intel families. It can also help detect overheating, performance loss, and overload.
If your CPU gets too hot, it will reduce performance to try and reduce the temperature; meaning whatever you are doing at the time will probably run slower. It will also keep your fans spinning at high speeds—meaning lots of noise; and could permanently damage your CPU, fan, or battery.
“Normal” temperatures, though, can vary wildly depending on the CPU type of computer. A thin and light ultraportable laptop that crams a powerful CPU into a small space with little airflow, for example, will likely get hotter than a desktop PC with a low-power CPU, even when performing the same tasks. And a CPU running at 70 degrees is likely to be just as effective as a CPU running at 40 degrees in that given moment.
That said, your CPU does have a maximum threshold; a specific temperature it will try to avoid going over. This is known as the maximum temperature junction or TJ Max. It varies from CPU to CPU, but for most chips, it lies somewhere between 95° C and 105° C. (Our Dell XPS 8960 TJ Max temperature is 100 degrees). So if your computer is regularly hitting that temperature, it’s probably throttling itself (and, if it cannot decrease the temperature, it may even shut itself off to prevent overheating.)
Lower CPU Temperature
If you regularly experience that kind of heat, you have a few options. First, open up your computer, either by removing the side panel on a desktop or unscrewing the bottom case on a laptop, and blow out any dust bunnies with an air blower or Blaster. This should help improve airflow and reduce temperatures. You can also adjust your CPU’s fan behavior, allowing it to run at higher speeds more often.
If you have a desktop, you may even want to reseat the CPU cooler to make sure it’s making good contact with the CPU, and if your computer is rather old, some new thermal paste could help lower temperatures as well. If you have a thin laptop known for overheating, though, these tips may only take you so far; and you will just have to deal with the excess heat. The next time you buy a laptop, be sure to read through reviews that include heat and fan noise before you commit.Spacer
Disclaimer
Technology is constantly evolving, and smartphone and desktop tech rarely remains static. Therefore, the information in this post is only accurate as of the date it was written. Blog posts that are older than six months may contain instructions that are no longer compatible with your device or operating system. We hope that the content from previous posts continues to function as intended. Thank you for reading TechSavvy.Life, where technology works for you.
Quote For the Day
“Technology made large populations possible; large populations now make technology indispensable.”
– Joseph Krutch
X (Twitter) Info
That’s it. Please feel free to share this post! One way to share is via Twitter.
Just click the Tweet icon below. This will launch Twitter where you click its icon to post the Tweet.
Checkout TechSavvy.Life for blog posts on smartphones, PCs, and Macs! You may email us at contact@techsavvy.life for comments or questions.
We value your feedback! Was this post helpful? Please share your comments with us. If you have a tech question related to your computer or smart device, feel free to reach out. Just send an email to contact@techsavvy.life, and be sure to include the device, app, and version you are using. To assist us further, you can also attach screenshots related to your inquiry.
The author’s Vietnam eBook on the “Battle for Tra Bong Vietnam: Events and Aftermath” can be accessed from a Kindle device or the Kindle App for a desktop or smartphone. The apps are free.
The author’s Vietnam eBook on the Battle for Tra Bong Vietnam: Events and Aftermath
0patch, a Slovenia-based service, offers extended Windows 10 updates after Microsoft’s support ends in October 2025. For €24.95 ($27) per year, users receive small security “micropatches” for critical vulnerabilities, without needing to reboot. This service may appeal to those with incompatible Windows 11 PCs.
RAYMOND OGLESBY @RaymondOglesby2 October 8, 2024 – 4 minutes read time
This is for devices running Windows 10. Screenshots are from Dell XPS PC
Overview
As Microsoft prepares to end support for Windows 10, a third-party service is ready to step into the void by offering five years of extra updates for the popular OS.
The offer comes from Slovenia-based 0patch, which has made a business out of patching out-of-date Windows operating systems, including Windows 7. It plans to supply critical security patches for $27.00 annually to Windows 10 users once Microsoft officially stops supporting the OS in October 2025.
“With 0patch, you will be receiving security ‘micro patches’ for critical, likely-to-be-exploited vulnerabilities that get discovered after October 14, 2025,” Refer to the below image:
Protected by Opatch screen
Pricing
The catch is trusting Opatch, an unofficial Microsoft service, to safely maintain your Windows 10 installation. Extended support will cost €24.95 ($27) per year.
Still, the price might be a bargain. Microsoft will also offer an Extended Security Updates (ESU) program, but the cost to business customers starts at $61 per device per year and doubles every consecutive year for up to three years ESU does not include new features, nonsecurity updates, or design changes. It has not announced pricing for consumers yet, but it will likely be more than $27 per year as Microsoft would prefer you upgrade to Windows 11.
The 0patch service may appeal to those with one of the estimated 240 million PCswhich are incompatible with Windows 11.
“Many of us do not want to, or simply can not upgrade to Windows 11,” 0patch wrote in a blog post that also excoriates Microsoft’s efforts to revamp the OS. “We do not want to because of increasing enshittification including bloatware, Start Menu ads, and serious privacy issues. We do not want to have an automated integrated screenshot and key-logging feature constantly recording our activity on the computer”.
How It Works
In contrast, 0patch promises to maintain Windows 10 by serving its critical security fixes. “These patches will be small, typically just a couple of CPU instructions (hence the name), and will get applied to running processes in memory without modifying a single byte of original Microsoft’s binary files,” the service says. Thus, no CrowdStrike-like crash.
“There will be no rebooting the computer after a patch is downloaded because applying the patch in memory can be done by briefly stopping the application, patching it, and then letting it continue,” 0patch adds. “Users will not even notice that their computer was patched while they were writing a document, just like servers with 0patch get patched without any downtime at all.”
Still, 0patch will not fix every security vulnerability for Windows 10, only “the important ones, such as those exploited in the wild or those without official vendor patches.” If demand for 0patch’s Windows 10 support is high, the service plans will support the OS beyond five years.
Source – PC Mag, Microsoft
Disclaimer
Technology is always changing. Rarely is there static tech for smartphones and desktops. Thus, the contents of this post are only valid at the time of writing. Blog posts older than six months may have directions incompatible with your device or OS. Hopefully, older post content will continue to work as advertised. Thank you for reading TechSavvy.Life for Technology at Work For You.
Quote For the Day
“Real stupidity beats artificial intelligence every time.”
-Terry Prachett
X (Twitter info)
That’s it. Please feel free to share this post! One way to share is via Twitter.
Just click the Tweet icon below. This will launch Twitter where you click its icon to post the Tweet.
Checkout TechSavvy.Life for blog posts on smartphones, PCs, and Macs! You may email us at contact@techsavvy.life for comments or questions.
Was this post helpful? We would love to hear your comments. Do you have a computer or smart device tech question? I will do my best to answer your inquiry. Just send an email to contact@techsavvy.life. Please mention the device, app, and version you are using. To help us out, you can send screenshots of the data related to your question.
The author’s Vietnam eBook on the “Battle for Tra Bong Vietnam: Events and Aftermath” can be accessed from a Kindle device or the Kindle App for a desktop or smartphone. The apps are free.
The author’s Vietnam eBook on the Battle for Tra Bong Vietnam: Events and Aftermath