Generally speaking, the more you tweet, the further your past tweets move down your profile page. However, Twitter makes it possible to pin a tweet so that it stays at the top of your page until you remove it.
If you use Twitter regularly, you may occasionally post a message that gains attention with other users or that you want to stand out from the rest of your feed.
Generally speaking, the more you tweet, the further your past tweets move down your profile page. However, Twitter makes it possible to pin a tweet so that it stays at the top of your page until you remove it.
Pinning tweets to the top of your Twitter profile will not take more than a few seconds, and you can unpin a tweet or choose a new one to pin in its place at any time. Let’s explore how to do this.
Note! You can only have one pinned tweet at a time. Pinning a new tweet will unpin any tweet you already have pinned.
This is for the iPhone and Android using Twitter
Copyright Scott Adams, Inc./Distributed by Universal Uclick for UFS
Pin a Tweet
Twitter’s mobile apps for iOS and Android allow you to pin tweets to your profile. You can also do this on your desktop.
First, open the Twitter app. Make sure you are logged in to your account.
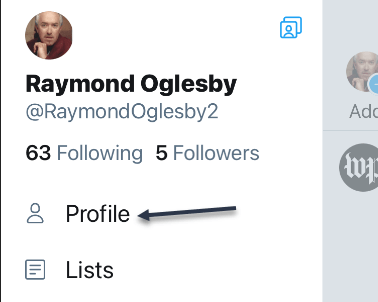
Next, in the top-left corner of the app, tap the three horizontal lines. Refer to below image:
Accessing the Twitter menu
In the menu that opens, select Profile. See below image:
Accessing your Profile
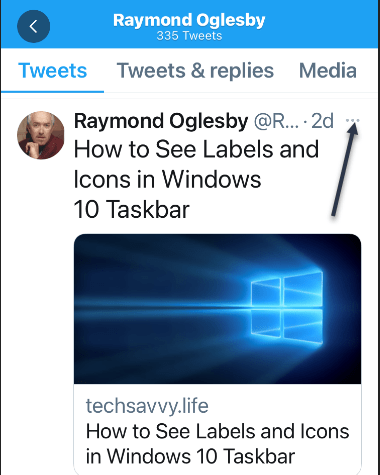
Your Twitter profile opens. Now, scroll down and find the tweet to pin.
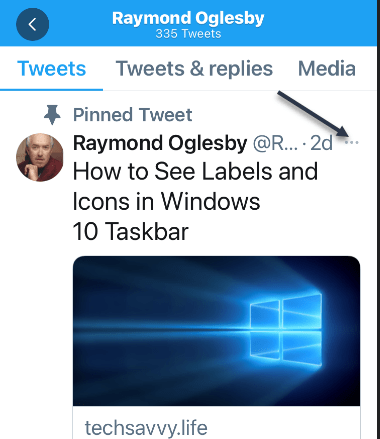
When you find the tweet, at the top-right corner of that tweet, tap the three-dots hamburger menu. See following image:
Accessing the Tweet menu
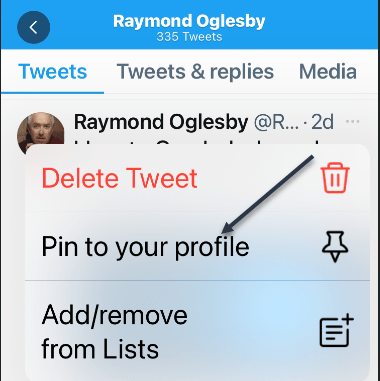
From the menu that pops up from the bottom of your phone’s screen, select Pin to profile. Refer to below image:
Accessing Pin tweet to your Profile
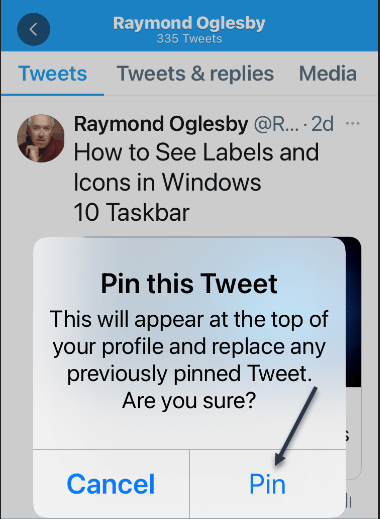
Select Pin in the prompt that appears in the middle of your phone’s screen. See below image:
Pin your tweet
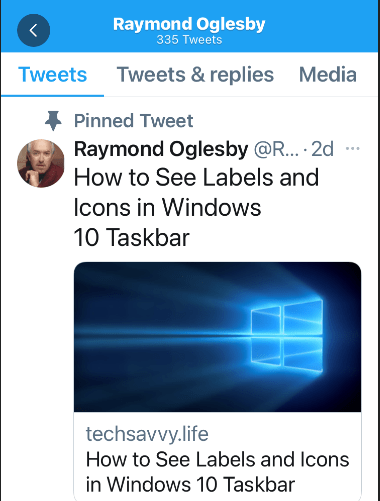
Your selected tweet is now pinned to your profile page. See following image:
Your pinned tweet
Unpin a Tweet
To unpin the tweet, scroll to the top of your profile page in Twitter’s mobile app. Then, at the top-right corner of the pinned tweet, tap the three-dots hamburger menu. Refer to below image:
Accessing your tweet menu
In the menu that appears from the bottom of your phone’s screen, tap Unpin from profile. See below image:
Accessing Unpin tweet from your Profile
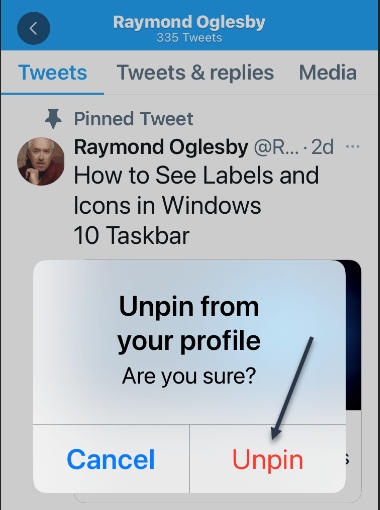
Select Unpin in the prompt. See following image:
Unpin your tweet
And your tweet disappears from the top area of your Twitter profile.
It’s easy to pin and unpin tweets on Twitter, and you should make use of this feature to display your most important tweet at the top of your profile page.
Quote For the Day
The true sign of intelligence is not knowledge but imagination.
Albert Einstein
That’s it, a nifty feature. Please feel free to share this post! One way to share is via Twitter.
Just click the Tweet icon below. This will launch Twitter where you click its icon to post the Tweet.
Check out TechSavvy.Life for blog posts on smartphones, PCs, and Macs! You may email us at contact@techsavvy.life for comments or questions.
Please feel free to leave a comment. I would love hearing from you. Do you have a computer or smart device tech question? I will do my best to answer your inquiry. Just send an email to contact@techsavvy.life. Please mention the device, app and version that you are using. To help us out, you can send screenshots of your data related to your question.
The author’s Vietnam eBook on the Battle for Tra Bong: Events and Aftermath
Turning off your iPhone seems like it should be a simple task; and it is, provided you remember the specific buttons you are supposed to press to power down your device. The challenge is that Apple has changed the method every few models so that turning off your iPhone on an older device is quite different than what’s required to turn off the newer models.
Turning off your iPhone seems like it should be a simple task; and it is, provided you remember the specific buttons you are supposed to press to power down your device. The challenge is that Apple has changed the method every few models so that turning off your iPhone on an older device is quite different than what’s required to turn off the newer models. Let’s explore how to turn off and on your device.
This is for the iPhone
Copyright Scott Adams, Inc./Distributed by Universal Uclick for UFS
To help you turn off your iPhone, there are the different ways you can shut down an iPhone based on Apple’s assorted models. It all comes down to the position of the Sleep/Wake button and whether your iPhone is unlocked with a Passcode, Touch ID, or FaceID.
Sometimes you need to completely shut down your iPhone, perhaps to help with troubleshooting, or to save your battery life during a long period of inactivity, or the device is acting strangely. Fortunately, it’s easy to do.
What is Sleep Mode vs Shutting Down
Normally, when you briefly press the top or side button on your iPhone, the screen on your device turns off, but the iPhone stays running. This is called sleep mode or lock mode. While it turns off the screen, it does not completely power off the device.
In contrast, shutting down your iPhone starts a special software shutdown process where your iPhone cleans up and prepares for power-off. Then, your iPhone turns off completely.
Perform Hardware Shutdown
If you need to turn off your iPhone, the easiest way to do so is by using a hardware button on your device. How to do this varies slightly by model, since certain iPhones include different types of buttons:
On iPhones without a Home Button: Simultaneously hold the side button and the volume up or down button for about four seconds until the power-off slider appears on the screen.
On iPhones with a Home Button and a Side Button: Hold the side button for a few seconds until the power-off slider appears.
On iPhones with a Home Button and a Top Button: Press and hold the top button until the power-off slider appears.
Refer to below image:
Apple
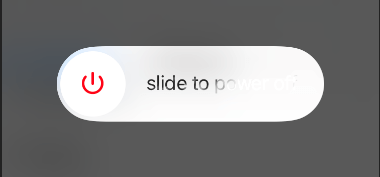
When the Slide to Power Off slider appears, swipe your finger to the right. See below image:
Hardware shut down
Now, your iPhone will shut down and power off completely.
Perform Shutdown via Settings
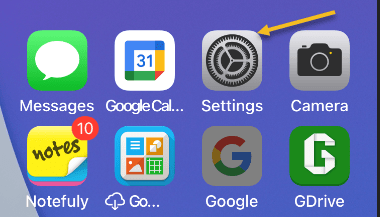
First, open Settings on your iPhone. See following image:
Accessing Settings
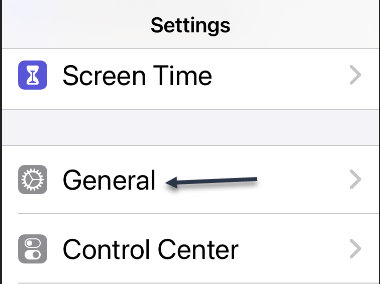
Next, in the Settings app, tap General. Refer to below image:
Accessing General option
Now, on the General page, scroll down to the bottom of the page and tap Shut Down. See below image:
Accessing Shut Down option
When the Slide to Power Off slider appears, swipe your finger to the right. See following image:
Software shut down
Now, your iPhone will shut down and power off completely.
Restart
If you just powered off, waiting 10 seconds is a good rule of thumb before a restart.
For newer models, (12, 11, 10), press and quickly release the volume up button, press and quickly release the volume down button, then press and hold the side button. When the Apple logo appears, release the button.
For iPhone SE (2nd generation), 8, 7, or 6, press and hold the side button until you see the Apple logo, then release the button.
Quote For the Day
A little more persistence, a little more effort, and what seemed hopeless failure may turn to glorious success.
Elbert Hubbard
That was easy.. Please feel free to share this post! One way to share is via Twitter.
Just click the Tweet icon below. This will launch Twitter where you click its icon to post the Tweet.
Check out TechSavvy.Life for blog posts on smartphones, PCs, and Macs! You may email us at techsavvy.life for comments or questions.
Please feel free to leave a comment. I would love hearing from you. Do you have a computer or smart device tech question? I will do my best to answer your inquiry. Just send an email to contact@techsavvy.life. Please mention the device, app and version that you are using. To help us out, you can send screenshots of your data related to your question.
The author’s Vietnam eBook on the Battle for Tra Bong: Events and Aftermath
If you need to quickly take a photo or video on your iPhone, you can swipe into the Camera app quickly without unlocking your phone. Let’s explore how this is done.
If you need to quickly take a photo or video on your iPhone, you can swipe into the Camera app quickly without unlocking your phone. Let’s explore how this is done.
This is for the iPhone
Copyright Scott Adams, Inc./Distributed by Universal Uclick for UFS
First, wake up your iPhone. Place your finger anywhere on the lock screen and swipe it to the left until the Camera app appears. If you try to swipe on a notification that will reveal options for the notification rather than opening the Camera app. Refer to below image:
Swipe left to open the Camera
Next, with the Camera app open, you can take photos or videos as you normally would, and they will be saved automatically to your Photos library. You can even use the volume buttons to trigger the shutter if you like. See below image that will be saved to Photos library:
Your photo
Now, to exit Camera mode, press the top button (for iPhones with home buttons) or the side button (for iPhones without home buttons) to turn off your screen. The photos you took will still be saved.
iPhones Without Home Button
If you have an iPhone without a home button (one that uses Face ID) you might notice a tiny camera icon in the lower-right corner of your lock screen. See following image:
Access Camera by the photo icon
You can use this button to launch the Camera app with a long-press. Just place your finger on the camera icon for a moment. When you lift your finger, the Camera app will launch.
When you are done, press the side button, and the photos and videos you have taken will be saved automatically.
Quote For the Day
The beginning is the most important part of the work.
Plato
You are finished. Please feel free to share this post! One way to share is via Twitter.
Just click the Tweet icon below. This will launch Twitter where you click its icon to post the Tweet.
Check out TechSavvy.Life for blog posts on smartphones, PCs, and Macs! You may email us at contact@techsavvy.life for comments or questions.
Please feel free to leave a comment. I would love hearing from you. Do you have a computer or smart device tech question? I will do my best to answer your inquiry. Just send an email to contact@techsavvy.life. Please mention the device, app and version that you are using. To help us out, you can send screenshots of your data related to your question.
The author’s Vietnam eBook on the Battle for Tra Bong: Events and Aftermath
On the iPhone, there are two features you should be using; the SOS Contacts and Comprised Passwords.
On the iPhone, there are two features you should be using; the SOSContacts and Comprised Psswords. Let’s explore how to use these two features.
This is for iPhone running iOS 14+
Copyright Scott Adams, Inc./Distributed by Universal Uclick for UFS
Create a SOS Contact
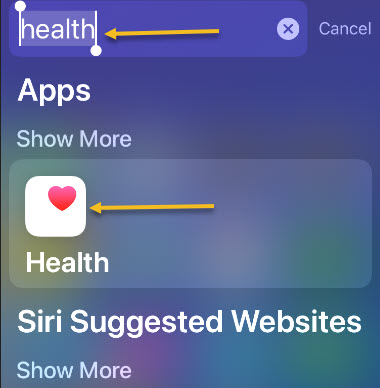
First, ensure that your most important people are in your Contacts. Now, search for your Health app either from your App Library (your last screen) or the Spotlight Search (your first screen). We are using the Spotlight Search. Just type the name “health” in the search box (without the quotes) and click the result. Refer to below image:
Accessing your Health app
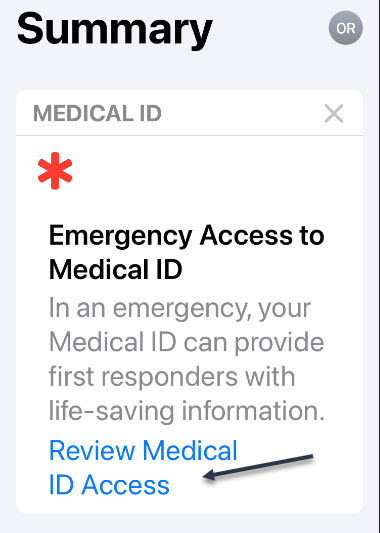
Next, the Summary screen will be displayed. Now, click the Review Medical ID Access link. See Below image:
Displaying your Health Summary screen
Next, the Emergency Access to Medical ID screen will be displayed. Click on the Review Medical ID button at the bottom. See following image:
Displaying your Medical ID screen
Now, your Emergency Contacts will be shown (if any). Click on add emergency contact to add a SOS contact you want notified in case of an emergency. Refer to below image:
Displaying your Emergency Contacts and add one
SOS also contacts emergency services. A red asterisk icon will now appear next to Emergency Contacts in your Contacts list.
To send an SOS, hold down the power button on the right and one of the volume buttons on the left at same time. You can either use the Emergency SOS slider, or keep holding the button. A countdown will start, an alert will sound, and when the call goes through to 911, messages are sent to your Emergency Contacts. See below image:
Accessing your Emergency SOS slider
Security Recommendations
iOS 14 features Security Recommendations, which are handy if you store a lot of passwords in iOS, be it for apps or website visits. It will tell you if a password appeared in a known data breach/leak, and suggest you make changes if you have repeated passwords (because that is a big no-no).
First, launch your Settings (the gear icon) app. See following image:
Your Settings app
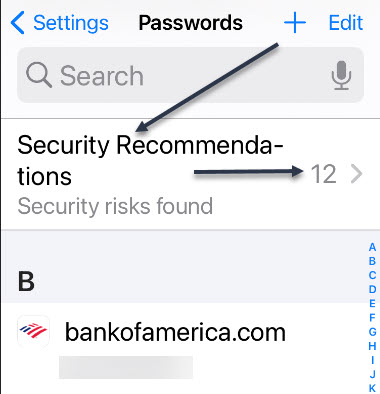
Next, scroll down and tap the Passwords option. Refer to below image:
Accessing your Passwords option
Now, the Security Recommendations screen will be shown. The number to the right indicates security risks found. Next, tap on the label. See below image:
Your number of security risks
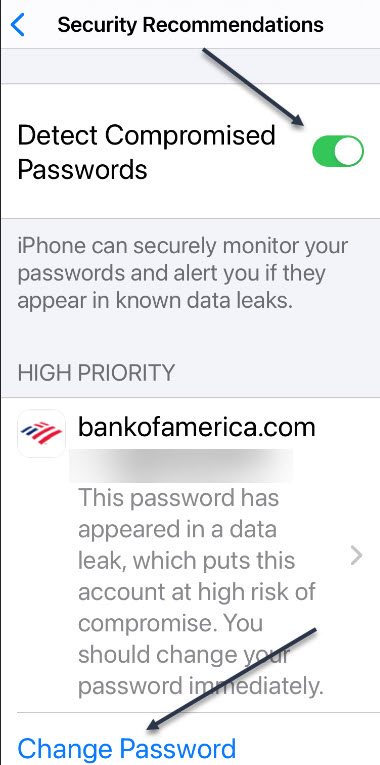
Now, on the Security Recommendations screen, toggle Detected Comprised Passwords to On. Next, go through your list of compromised passwords and click the Change Password link as necessary. See following image:
Enabling the Detect Comprised Passwords toggle and reviewing your risks
Note! Some of your comprised passwords may be from old leaks. You know you have changed it since the date of the leak. If so, click the label to open the entry, then click Delete Password.
Next, go back to your Security Recommendations screen to check if your comprised passwords has been resolved. Now, exit Settings.
Quote For the Day
Civilization advances by extending the number of important operations which we can perform without thinking of them.
Alfred North Whitehead
That’s it. You have now setup two important features on the iPhone. Please feel free to share this post! One way to share is via Twitter.
Just click the Tweet icon below. This will launch Twitter where you click its icon to post the Tweet.
Check out TechSavvy.Life for blog posts on smartphones, PCs, and Macs! You may email us at contact@techsavvy.life for comments or questions.
Please feel free to leave a comment. I would love hearing from you. Do you have a computer or smart device tech question? I will do my best to answer your inquiry. Just send an email to contact@techsavvy.life. Please mention the device, app and version that you are using. To help us out, you can send screenshots of your data related to your question.d
The author’s Vietnam eBook on the Battle for Tra Bong: Events and Aftermath
Every iPhone, iPad, and iPod touch comes pre-loaded with a ton of useful apps from Apple, but sometimes those apps can go missing. If that happens, you may wonder where they went, why they disappeared, and how to get them back.
Every iPhone, iPad, and iPod touch comes pre-loaded with a ton of useful apps from Apple, but sometimes those apps can go missing. If that happens, you may wonder where they went, why they disappeared, and how to get them back. Let’s explore how to do this.
This is for the iPhone
Copyright Scott Adams, Inc./Distributed by Universal Uclick for UFS
The apps that this can happen to include iTunes, FaceTime, Reminders, Stocks, Calendar, Music, Calculator, News, Notes, and many others; in fact 27 apps can be deleted. There are a number of possible reasons why an app has disappeared. It could have been moved or deleted. That’s obvious. Less obvious is that “missing” apps may still be on your device but have been hidden.
Find App Using Spotlight Searcn
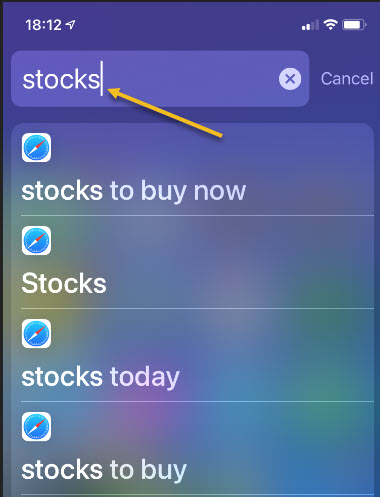
First, before you try to reinstall a missing app, make sure that it’s not simply hiding on your device. On your Home screen, swipe downward with one finger near the middle of the screen, and your SpotlightSearch bar will appear. Now, type in the name of the app to see whether its icon appears in the results. In our example, we are searching for the Stocks app. Although Stocks appears in the results list, it’s not the right icon. Refer to below image:
Using Spotlight Search
If you see the app in the results, then the app is installed. But where is it? It’s possible that you can not see it on a cluttered screen full of apps, or it might be hidden in a folder somewhere. Also, with iOS 14 and higher, the app could be in your App Library but not present on your Home screen.
Find App Using App Library
To check your App Library, swipe all the way to the left (to the last page) and look for it. In my case, it’s in the Recently Added box because I just added it in creating this blog post. See below image:
Using the App Librtary
Download App From App Store
If you do not see the app you are looking for in the SpotlightSearch results or the App Library, then the app is not on your device. Fortunately, every removable iPhone app is available for free download again from the App Store. To get it back, open the App Store app. See following image:
Accessing the App Store
Next, when the App Store opens, type the name of the app you are looking for in the search bar and tap the Search button. Refer to below image:
Searching for the Stocks app
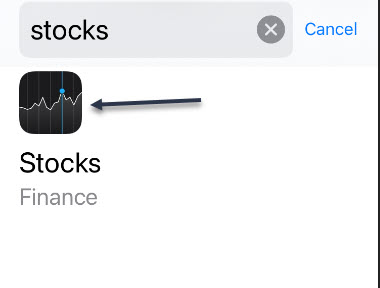
Some third-party apps have similar names to the built-in apps and may show up in the results. To confirm it’s the real app you are looking for, tap on its entry in the results list to see if it’s from Apple. See below image:
Finding the Stocks app
Now, the app you want will be free to download; you will see Apple’s iCloud download icon in the listing instead of a Get or Buy button. If you see an Open button, you already have the app on your device. See following image:
Download the Stocks app from iCloud
Check if App is From Apple
Next, when you are ready to download, just tap the iCloud download button and the app will be downloaded to your device. Once downloaded, you may ccheck if this is the correct app. Open the app and tap the blue link at the bottom labeled, in our example, About Stocks and Privacy… Refer to below image:
Check to see if we have the correct Stocks app
Now, read the verbage for mentioning of Apple. In the below image, a reference is made to Stocks are provided by Apple News:
Verifying the Stocks app is from Apple
Repeat the above process with any other missing Apple apps you want restored. Next, exit out of all open screens.
You are finished restoring a missing or deleted app. Please feel free to share this post! One way to share is via Twitter.
Just click the Tweet icon below. This will launch Twitter where you click its icon to post the Tweet.
Check out TechSavvy.Life for blog posts on smartphones, PCs, and Macs! You may email us at contact@techsavvy.life for comments or questions.
Please feel free to leave a comment. I would love hearing from you. Do you have a computer or smart device tech question? I will do my best to answer your inquiry. Just send an email to contact@techsavvy.life. Please mention the device, app and version that you are using. To help us out, you can send screenshots of your data related to your question.
The author’s Vietnam eBook on the Battle for Tra Bong: Events and Aftermath
You can use the Code Scanner to scan Quick Response (QR) codes for links to websites, apps, coupons, tickets, and more. The iPhone camera automatically detects and highlights a QR code.
You can use the Code Scanner to scan Quick Response (QR) codes for links to websites, apps, coupons, tickets, and more. The iPhone camera automatically detects and highlights a QR code.
This is for the iPhone running iOS 11 and higher
Copyright Scott Adams, Inc./Distributed by Universal Uclick for UFS
A QR code is a type of two-dimensional barcode that can be read by devices with camera or specialized barcode reader. Some QR codes even allow users to pay for goods, such as groceriess, as an alternative form of touchless payment.
The dedicated scanner is helpful for scanning QR codes in dark environments, as it enables you to use your camera’s flash as a light to illuminate the code.
First, open the Settings app (the gear icon). Refer to below image:
Accessing Settings
Next, scroll down and choose the Control Center option. See below image:
Accessing Control Center option
Now, scroll down and tap the “+” icon next to the Code Scanner option. See following image:
About to add the Code Scanner option to the Control Center
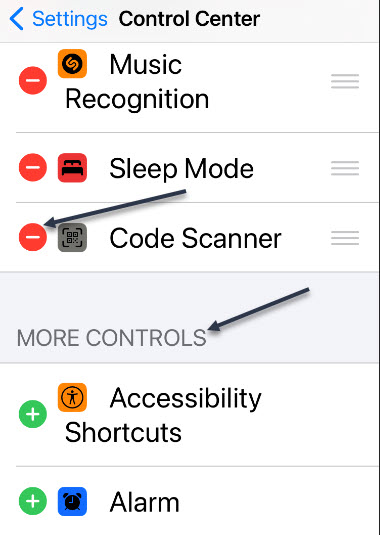
Now, the Code Scanner control will be added to the bottom of the Control Center. You will see the Code Scanner option with a “–” icon just above the More Controls section. This indicates that the Code Scanner is now embedded in the Control Center. Refer to below image:’
The Code Scanner added to the Control Center
It’s now time to use the feature to scan a QR code.To open Control Center, swipe down from the top-right corner of your iPhone’s screen.
Next, tap the new Code Scanner control. See below image:
The QR icon in the Control Center
This will open a dedicated QR code scanning interface. Just point your iPhone’s camera toward the QR code. See following image:
Scanning a QR code with the iPhone camera
It will be scanned after a second, and your iPhone will automatically open the designated app to complete the action. In our example, we are opening the USPS website regarding a customer experience questionarre. Refer to below image:
Opening the website corresponding to the QR code
You are finished. Also, you can use your iPhone to create your own QR code, like pointing to your website or Facebook page. Please feel free to share this post! One way to share is via Twitter.
Just click the Tweet icon below. This will launch Twitter where you click its icon to post the Tweet.
Check out TechSavvy.Life for blog posts on smartphones, PCs, and Macs! You may email us at contact@techsavvy.life for comments or questions.
Please feel free to leave a comment. I would love hearing from you. Do you have a computer or smart device tech question? I will do my best to answer your inquiry. Just send an email to contact@techsavvy.life. Please mention the device, app and version that you are using. To help us out, you can send screenshots of your data related to your question.
Copyright Scott Adams, Inc./Distributed by Universal Uclick for UFS
It is easy to setup birthday alerts on iPhone and make sure that you never forget birthdays of important people in your life.
It is easy to setup birthday alerts on iPhone and make sure that you never forget birthdays of important people in your life. You first need to tell your iPhone the birthday dates of your family members, friends, and relatives. This can be done using the Contacts app on iPhone, which allows you to add Birthdays and important dates in its Contact details section. Your iPhone can alert you on the day of the occasion, 1 day early, 2 days early or a week before the birthday.
This is for the iPhone
Copyright Scott Adams, Inc./Distributed by Universal Uclick for UFS
Couple of Prelimanary Steps
First, you must have notifications enabled for your Calendar app. To turn this on, visit:
Settings > Notifications > Calendar
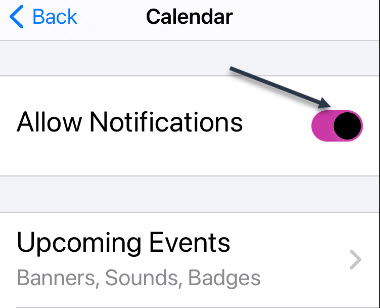
scroll down and set the toggle beside Allow Notifications to On. Now, exit Settings. Refer to below image:
Enabling Allow Notifications for Calendar app
Also, you will need to have some birthdays defined in your Contacts app. To do this, open Contacts, tap a contact from the list, and select Edit. Next, tap add birthday. See below image:
Selecting Add a Birthday option to a Contact
Set a Birthday Notification
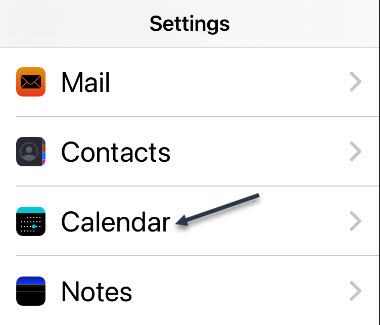
Now, exit Contacts. To turn on automatic Calendar birthday reminders, open Settings, scroll down and tap your Calendar app. See following image:
Selecting your Calendar app
Next, in Calendar settings, tap Default Alert Times. Refer to below image:
Selecting Default Alert Times option
Now, in Default Alert times, select Birthdays. See below image:
Seledting the Birthdays option
Next, on the Birthdays screen, you can pick a time when Calendar will alert you about upcoming birthdays. You can choose On day of event, 1 day before, 2 days before, or 1 week before. For the first three of those choices, your Calendar app will notify you at 9 a.m. on the day you selected. See following image:
Setting a time for the Birthday notification
Now, exit Settings. When the proper alert time comes, your Calendar app will send you a notification about the birthday. Refer to below image:
A birthday reminder
Depending on your notifications settings, you can potentially see this alert on your Lock Screen or Notification Center as well as via pop-ups on your screen.
That’s it. Please feel free to share this post! One way to share is via Twitter.
Just click the Tweet icon below. This will launch Twitter where you click its icon to post the Tweet.
Check out TechSavvy.Life for blog posts on smartphones, PCs, and Macs! You may email us at contact@techsavvy.life for comments or questions.
Please feel free to leave a comment. I would love hearing from you. Do you have a computer or smart device tech question? I will do my best to answer your inquiry. Just send an email to contact@techsavvy.life. Please mention the device, app and version that you are using. To help us out, you can send screenshots of your data related to your question.
The author’s Vietnam eBook on the Battle for Tra Bong: Events and Aftermath
This is a fun and informational blog post about how an iPhone is designed, manufactured, tested, marketed and shipped. I learned a lot about one of the greatest achievements in technology.
This is an informational blog post about how an iPhone is designed, manufactured, tested, marketed and shipped. I learned a lot about one of the greatest achievements in technology and hope you will to.
This is for an iPhone
Copyright Scott Adams, Inc./Distributed by Universal Uclick for UFS
Did you know your iPhone screen is made up of eight layers? Each one plays an integral role in making sure users get the best experience every time the phone is used. Beyond the display, are many other layers, about 176 layers for iPhone 11 Pro Max.
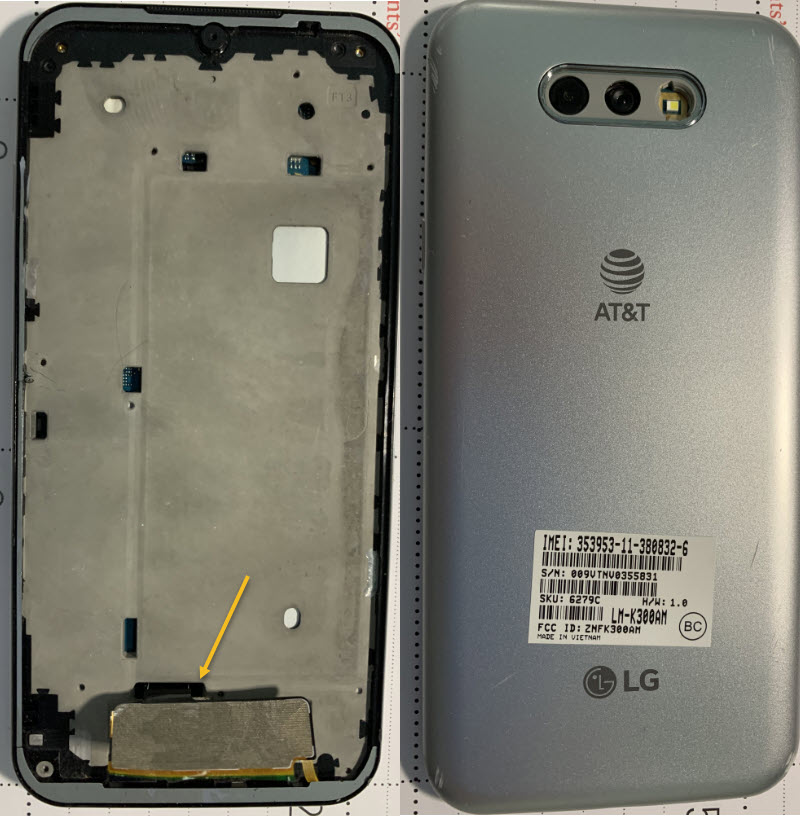
My wife and I were walking in our neighborhood. She noticed a smartphone on the ground so, I picked it up and noticed the display screen was missing. The arrow points to the ribbon connector for the missing display. Refer to below images of the AT&T LG smartphone we found made in Vietnam:
AT&T LG smartphone with missing display that we found
She said, “why not write a blog post about the making of a smartphone?” So, here are some snippets of information about the making of an iPhone. Read on if you want to learn more.
The cost to make the iPhone 11 Pro Max was $490.
The components manufactured by many companies around the world are ultimately sent to just two companies to assemble into iPods, iPhones, and iPads. Those companies are Foxconn and Pegatron, both of which are based in Taiwan.
Foxconn is Apple’s longest-running partner in building these devices. It currently assembles the majority of Apple’s iPhones in its Shenzen, China, location, although Foxconn maintains factories in countries across the world, including Thailand, Malaysia, the Czech Republic, South Korea, Singapore, and the Philippines.
Pegatron is a relatively recent addition to the iPhone assembly process. It is estimated that it builds around 30 percent of the orders.
Apple buys many of the components for iPhones — like the memory chip, the modem, the camera module, the microphone and the touch-screen controller — from more than 200 suppliers around the world. Foxconn, the Taiwanese company that runs the Zhengzhou facility, even produces some smaller parts, such as metal casings.
Foxconn’s facilities in Zhengzhou cover 2.2 square miles and can employ up to 350,000 workers, many of whom earn about $1.90 an hour. They work up to 12 hour shifts under intense pressure. The operation does what is called F.A.T.P., or final assembly, testing and packaging.
There are 94 production lines at the Zhengzhou manufacturing site, and it takes about 400 steps to assemble the iPhone, including polishing, soldering, drilling and fitting screws. The facility can produce 500,000 iPhones a day, or roughly 350 a minute.
After the iPhone rolls off the assembly line, it is placed in a sleek white fiberboard box, wrapped and put on a wooden pallet, and then wheeled out to waiting trucks.
As the final point of assembly for the iPhone, China also serves as a starting point for Apple’s global tax strategy. In Zhengzhou, often in the customs facility, Foxconn sells the completed iPhones to Apple, which in turn resells them to Apple affiliates around the world.
The process, most of which takes place electronically, allows Apple to assign a portion of its profits to an affiliate in Ireland, a tax-advantageous locale. The system is not unique to China.
Smartphones are small enough to be shipped by plane in huge quantities — and cost effectively. A single wide-body Boeing 747 can easily carry 150,000 iPhones tucked into its aluminum canisters.
From Zhengzhou, UPS, FedEx and other freight carriers typically fly United States-bound iPhones to Anchorage. There, they refuel, before going on to Louisville, Ky., a major logistics hub, or other points in the country.
Domestic-bound iPhones are typically loaded onto a large truck and taken on an 18-hour drive from Zhengzhou to Shanghai, in eastern China, where Apple has set up its national distribution center. A single tractor-trailer holds up to 36,000 iPhones. Because the vehicles have about $27 million worth of freight on board, they are equipped with cameras and sometimes accompanied by armed security guards.
After the iPhone leaves the Foxconn factory in Zhengzhou, it takes two days, on average, to get to a store in Shanghai, a 590-mile trip. It takes three days, on average, to get a store in San Francisco, some 6,300 miles away.
Apple does very little of its own manufacturing. Instead it relies on contract outsourcing companies like Foxconn (one of the largest employers in the world) to do this for them. This removes much of the headache of manufacturing for Apple while keeping production costs as low as possible. There is a significant market advantage to this approach and its one that many other electronics manufacturers are emulating now.
Like any good design company, the design process at Apple is not over when manufacturing begins. In fact, Apple iterates the design throughout manufacturing. The product is built, it’s tested and reviewed, then the design team improves on it and it’s built all over again. These cycles take 4-6 weeks at a time and may be run many times over a product’s development lifecycle.
This is a very costly approach but it’s one of the reasons that Apple has a reputation for quality. The more you invest in design, the more likely you are to build incredible market changing products. It’s the process that the iPod, the iPhone and the iPad go through.
The packaging room is a very-high security area in Apple and it’s where prototypes are unboxed. As you might expect, the security is to prevent leaks to the outside world. If you ever do see a leaked prototype for an Apple product – it won’t have come from here. It’s more likely to have vanished from a production line in China.
The final step in Apple’s product development is product launch. When the product is considered to be as good as it can be – it enters an action plan known as “the Rules of the Road”. This explains all the responsibilities and actions that must be taken prior to a commercial launch of the product. It is an extremely remarkable accomplishment to design, manufacture, market, and ship an iPhone.
It must be a nerve-wracking experience to be privy to the “Rules of the Road” because if you lose it or leak it, you are immediately fired.
Please feel free to leave a comment. I would love hearing from you. Do you have a computer or smart device tech question? I will do my best to answer your inquiry. Just send an email to contact@techsavvy.life. Please mention the device, app and version that you are using. To help us out, you can send screenshots of your data related to your question.
Copyright Scott Adams, Inc./Distributed by Universal Uclick for UFS
Apple recently introduced new “nutrition labels” for privacy in the iPhone App Store. With the help of these labels, you can quickly learn how an app can track you or use your personal information.
Apple recently introduced new “nutrition labels” for privacy in the iPhone App Store. With the help of these labels, you can quickly learn how an app can track you or use your personal information. Let’s explore how to view the privacy policies of apps you already have on your device.
This is for the iPhone
Copyright Scott Adams, Inc./Distributed by Universal Uclick for UFS
First, open the App Store on your iPhone. Next, tap your profile image in the upper-right corner of your screen. Refer to below image:
Selecting your Profile
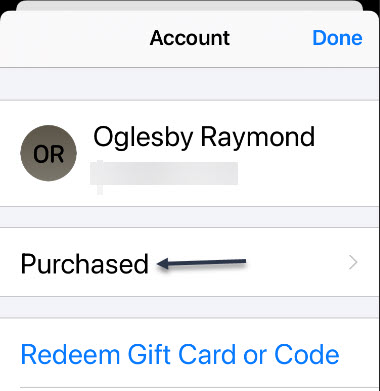
Now, in your Profile, tap Purchased. See below image:
Selecting your Purchased apps
Next, select My Purchases. See following image:
Selecting your Purchases
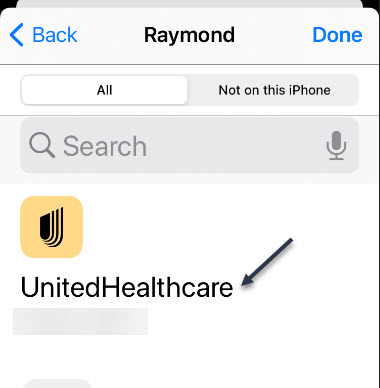
Next, you will see a list of every app you have purchased or downloaded to your iPhone. Scroll through the list and tap the icon of the one whose privacy policies you would like to check. Refer to below image:
Selecting an app to check its Privacy policy
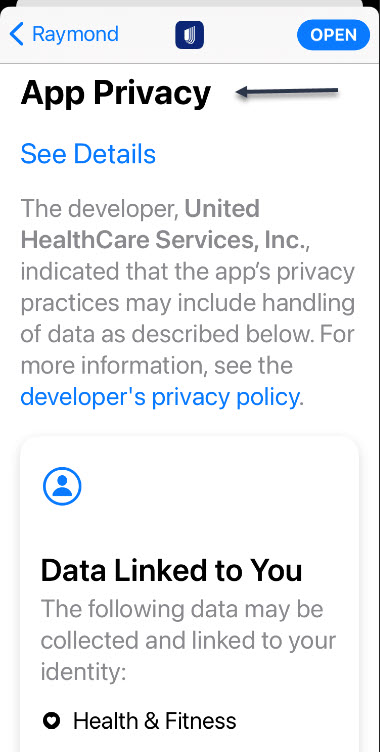
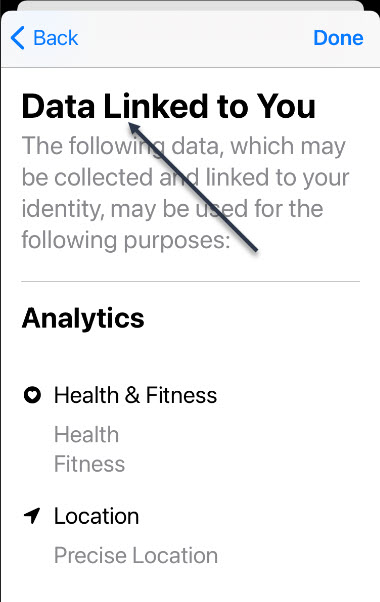
Now, you will be taken to the App Store page for that particular app. Scroll down the page until you see the App Privacy section. Here, you will see summaries of how the app tracks you or uses your data in sections like Data Used to Track You and Data Linked to You. See below image:
Selecting your App Privacy option
To see more details about the app Privacy, tap on the See Details link. See following image:
Selecting the Details option
Here, you will get a detailed rundown about what information the app stores and how it is used. Refer to below image:
View the details about your app Privacy
Once you are done, tap Back twice and return to the list of purchased apps. To check another app, tap its icon and repeat the process above. If you do not like what you see, you can always delete the app.
You are finished. Please feel free to share this post! One way to share is via Twitter.
Just click the Tweet icon below. This will launch Twitter where you click its icon to post the Tweet.
Check out TechSavvy.Life for blog posts on smartphones, PCs, and Macs!.You may email us at contact@techsavvy.life for comments or questions.
Please feel free to leave a comment. I would love hearing from you. Do you have a computer or smart device tech question? I will do my best to answer your inquiry. Just send an email to contact@techsavvy.life. Please mention the device, app and version that you are using. To help us out, you can send screenshots of your data related to your question.
The author’s Vietnam eBook on the Battle for Tra Bong: Events and Aftermath
There is a good chance you will see a “COVID-19 Exposure Notifications Are Available” pop-up on your iPhone sometime soon; if you have not already seen it. Apple and Google launched this feature in May 2020 for the iPhone.
There is a good chance you will see a “COVID-19 Exposure Notifications Are Available” pop-up on your iPhone sometime soon; if you have not already seen it. Apple and Google launched this feature in May 2020 for the iPhone.
This is for the iPhone
Copyright Scott Adams, Inc./Distributed by Universal Uclick for UFS
The contact-tracing feature is dependent on apps from your local health authority that take advantage of it. In the USA, this means your state government generally has to roll out its own contact-tracing app. Not all state governments have done this yet.
You will see this notification when your local health authority rolls out its app if it has not already done so. If you travel between states or countries, you may see the notification when you arrive in a location that has such an app, too.
Contact-tracing is not enabled by default, and it does not do anything unless you choose to enable it. Also, it is just an API that your local public health authority; for example, your state government health agency; can use. If your local public health authority has not released an app that takes advantage of the API, there is no way to use it. Additionally, other people must be using the app for contact-tracing to work.
Turn On Exposure Notifications
You can choose to activate exposure notifications through Settings. First, open Settings (the gear icon), scroll down and tap Exposure Notifications to enable it. Refer to below image:
Accessing Notifications
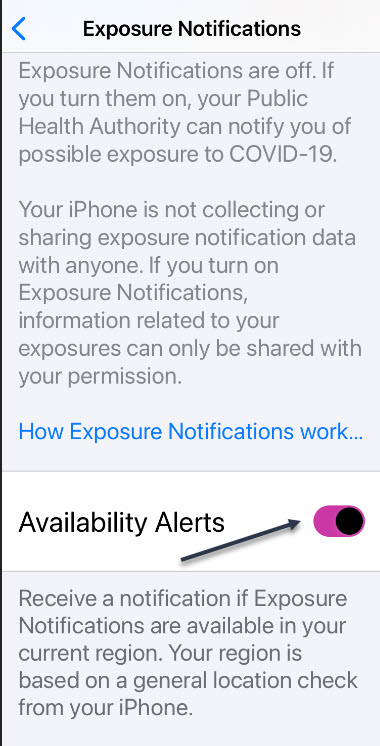
Now, tap on the Turn On Exposure Notifications link. Also, enable the toggle Availability Alerts to On. See below image:
Enabling Notifications
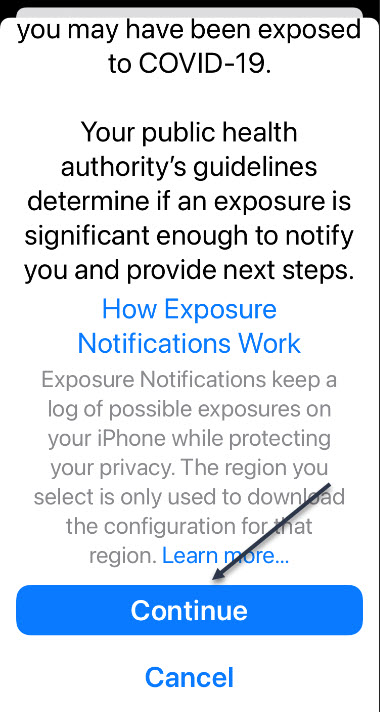
If you want the notifications, scroll down and tap Continue and you will be prompted to install the app from your local public health authority, if not already installed. See following two images:
Continuing Exposure Notifications
Next, scroll and select your your Country. See below image:
Selecting your Country
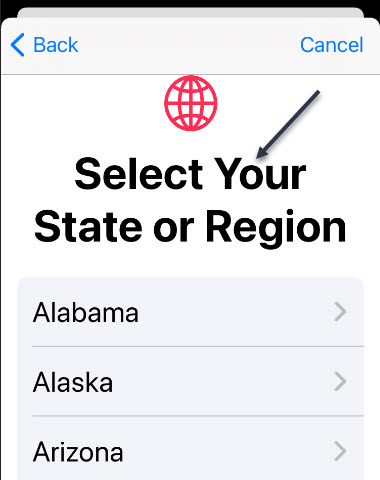
Now, scroll and select your your State (for USA). See following image:
Selecting your State
You will be shown a screen whether Exposure Notifications is available or not. In our case, we selected our state, Oklahoma, where Exposure Notifications is NOT available. Next, click Done. Refer to below image:
Checking if Exposure Notification is available
Turn Off Exposure Notifications
If you do not want to see availability alerts when a COVID-19 tracking app is available in your area, head to
Settings > Exposure Notifications
And switch the Availability Alerts toggle to Off. See below image:
Turning off Exposure Notifications
Now, exit Settings. You are finished. Please feel free to share this post! One way to share is via Twitter.
Just click the Tweet icon below. This will launch Twitter where you click its icon to post the Tweet.
Check our TechSavvy.Life for blog posts on smartphones, PCs, and Macs! You may email us at contact@techsavvy.life for comments or questions.
Please feel free to leave a comment. I would love hearing from you. Do you have a computer or smart device tech question? I will do my best to answer your inquiry. Just send an email to contact@techsavvy.life. Please mention the device, app and version that you are using. To help us out, you can send screenshots of your data related to your question.
The author’s Vietnam eBook on the Battle for Tra Bong: Events and Aftermath