If you would like to mark a specific location to get directions to it, save it to your favorites list, or share it with someone, simply drop a pin on that location in Apple Maps on your iPhone.
If you would like to mark a specific location to get directions to it, save it to your favorites list, or share it with someone, simply drop a pin on that location in Apple Maps on your iPhone. Let’s explore this feature.
This is for the iPhone. Screenshots are from iPhone XR
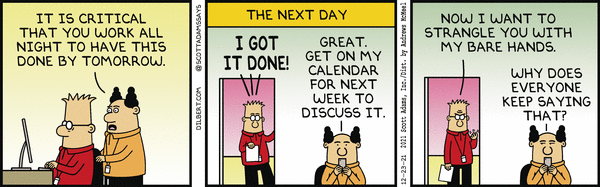
Copyright Scott Adams, Inc./Distributed by Universal Uclick for UFS
First, launch Apple Maps on your iPhone. In the app, navigate to the location by using the Search Maps to a specific address. Refer to the below image:
Accessing Search Maps
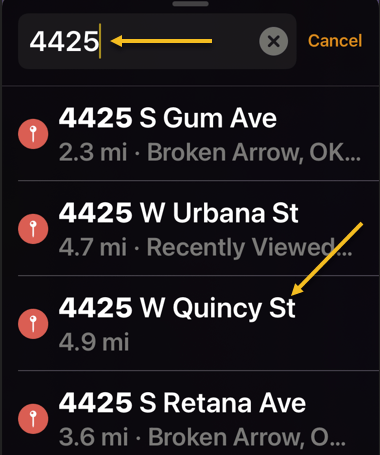
Next, type in the address, and a pop-up list of possible addresses will appear. Choose one from the list. See the below image:
Type in an address and select the address from the list
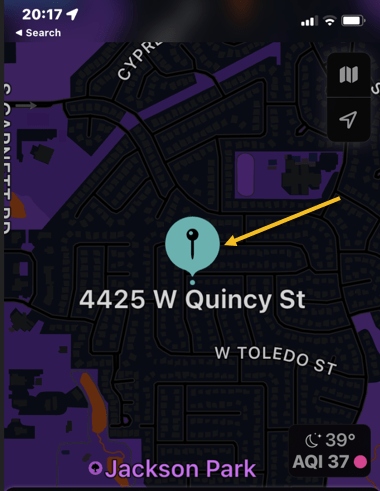
Now, a drop pin will be placed at that location. From here, tap the drop pin. See the following image :
Selecting the dropx pin
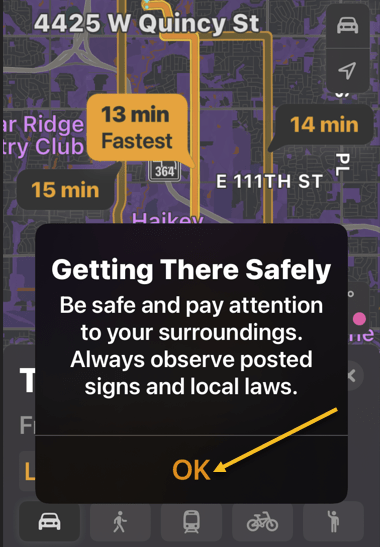
Next, tap OK on the Getting There Safely message. Refer to the below image:
Selecting OK
Now, the driving route(s) will appear. See the below image:
The routes
Next, tap the 3-dots next to the shortest route time. See the following image:
Accessing the menu
Now, tap on Directions. Refer to the below image:
Selecting Directions
Next, in the pop-up that appears, tap Add to Favorites. You can share the location by tapping Share. See the below image:
Add to Favorites and/or Share
And that’s how you set and use pins in Apple Maps on iPhone.
Quote For the Day
What you get by achieving your goals is not as important as what you become by achieving your goals.
Zig Ziglar
That’s it. Please feel free to share this post! One way to share is via Twitter.
Just click the Tweet icon below. This will launch Twitter where you click its icon to post the Tweet.
Check out TechSavvy.Life for blog posts on smartphones, PCs, and Macs! You may email us at contact@techsavvy.life for comments or questions.
Please feel free to leave a comment. I would love to hear from you. Do you have a computer or smart device tech question? I will do my best to answer your inquiry. Just send an email to contact@techsavvy.life. Please mention the device, app, and version you are using. To help us out, you can send screenshots of your data related to your question.
Author’s E-book
You can access the e-book from a Kindle device, the Kindle App for the desktop or smartphone, which is a free app.
The author’s Vietnam eBook on the Battle for Tra Bong Vietnam: Events and Aftermath
If your credit card has expired, or you simply do not wish to use it for Amazon purchases, it’s easy to remove your credit cards as well as any other payment methods from your Amazon account on a mobile phone. Let’s see how this is done.
If your credit card has expired, or you simply do not wish to use it for Amazon purchases, it’s easy to remove your credit cards as well as any other payment methods from your Amazon account on a mobile phone. Let’s see how this is done.
Note: Keep in mind that removing a payment method does not cancel any open orders that use that payment method.
This is for mobile phones using Amazon. Screenshots are from iPhone XR
Copyright Scott Adams, Inc./Distributed by Universal Uclick for UFS
To get rid of an unused payment method from your phone, first, open the Amazon app.
In the Amazon app’s bottom bar, tap the User icon. Refer to the below image:
Selecting the User icon
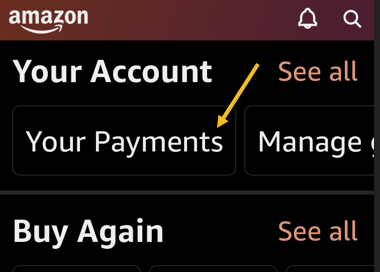
Next, scroll down the page to the Your Account section, then tap Your Payments. See the below image:
Selecting Your Payments option
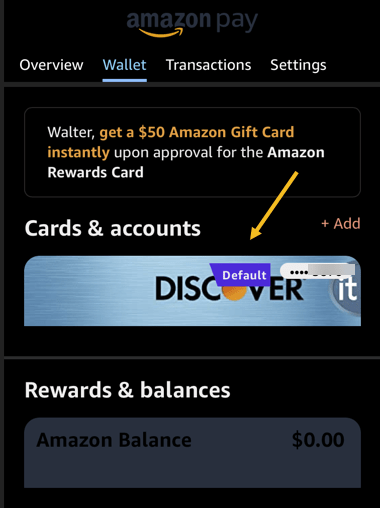
Now, choose the credit card or any other payment method to remove. See the following image:
Selecting a credit card to remove
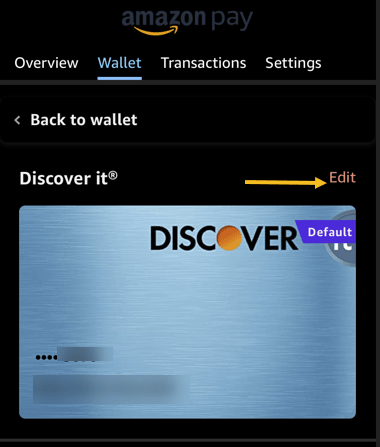
Next, at the top right-hand corner, tap Edit. Refer to the below image:
Selecting to Edit the credit card
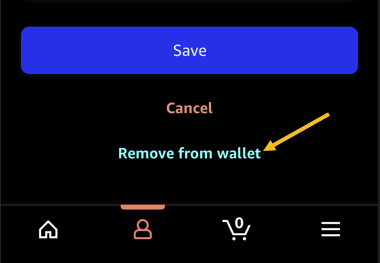
Now, scroll the Edit Payment Method page to the bottom then tap Remove From Wallet. See the below image:
Selecting to remove the credit card
Next, tap Confirm in the Remove Confirmation prompt. See the following image:
Confirm your removal
And Amazon has now removed your selected payment method.
You may want to check Google Chrome as well if you have saved an expired or unwanted credit card there.
Quote For the Day
You’ve got to be before you can do and do before you can have.
Zig Ziglar
That’s it. Please feel free to share this post! One way to share is via Twitter.
Just click the Tweet icon below. This will launch Twitter where you click its icon to post the Tweet.
Check out TechSavvy.Life for blog posts on smartphones, PCs, and Macs! You may email us at contact@techsavvy.life for comments or questions.
Please feel free to leave a comment. I would love to hear from you. Do you have a computer or smart device tech question? I will do my best to answer your inquiry. Just send an email to contact@techsavvy.life. Please mention the device, app, and version you are using. To help us out, you can send screenshots of your data related to your question.
Author’s E-book
You can access the e-book from a Kindle device, the Kindle App for the desktop or smartphone, which is a free app.
The author’s Vietnam eBook on the Battle for Tra Bong Vietnam: Events and Aftermath
If you are constantly closing apps on your iPhone while attempting to speed things up or save battery life, you are doing the opposite and making your iPhone perform worse.
If you are constantly closing apps on your iPhone while attempting to speed things up or save battery life, you are doing the opposite and making your iPhone perform worse. Let’s explore why.
This is for the iPhone
Copyright Scott Adams, Inc./Distributed by Universal Uclick for UFS
iPhone and Resources
If you are like us, you might be familiar with how apps run on a Mac or a Windows PC. On those platforms, if an application is running in the background, it can still be using up CPU cycles or taking up RAM. Conventional wisdom says that closing those programs will make your Mac or PC perform better. Refer to the below image:
iPhone Multitasking
On an iPhone, things work differently. When you switch away from an app, the app enters a suspended state, and iOS automatically frees up CPU cycles and RAM that were devoted to running the app. iPhone’s automatic resource management is so good that you never need to worry about an app paused in the background slowing down the app you are using in the foreground. On our iOS 15.2, we have 237 apps running in the background with no problems.
Officially, Apple says “You should close an app only if it’s unresponsive.”
Re-launching Apps Hurts the System
In fact, when you force an app to close on your iPhone, it will not only slow down your app experience but will also use up more battery life. That’s because, once an app is closed completely, it needs to re-launch and reload all of its resources the next time you open the app. That takes extra CPU power, which uses up your battery faster. Re-launching a completely closed app is also slower than switching quickly to a suspended app.
So, instead of increasing performance and saving battery life, regularly closing apps on iPhone will actually do exactly the opposite.
There is one exception. Sometimes a background app can check for new information. If that app is programmed improperly, it might use more battery life than usual. If an app is abusing its resources in the background, you might see evidence of it in the Battery section of the Settings app. In that case, do not force-close. Instead, you can disable Background App Refresh in Settings. Head to:
Settings > General > Background App Refresh
Here, you can turn it off on an app basis.
When to Close Apps
Despite everything we just wrote, there are still a few legitimate reasons you might need to force-close an iPhone app. If an app stops responding or is not working properly, it’s a good idea to bring up the App Switcher and close the app completely. To do so, you will need to perform a different action depending on the type of iPhone you have:
On iPhone X or later: Swipe upward from the bottom of the screen toward the middle of the screen, then lift your finger.
On iPhones with Home buttons: Double-press the Home button located below the screen.
When the App Switcher opens, you will see thumbnails of apps that are suspended in the background. To force-close an app, swipe its thumbnail upward, off the screen. See the below image:
Force-close an app by swiping it up
When the app disappears, the app has been completely closed. The next time you tap its icon, it will re-launch itself.
Even though Apple allows you to force-close appsin this manner, doing so should be a very rare occurrence. iOS takes care of multitasking in an efficient way.
Quote For the Day
It’s better to hang out with people better than you. Pick out associates whose behavior is better than yours and you’ll drift in that direction.
Warren Buffett
That’s it. Please feel free to share this post! One way to share is via Twitter.
Just click the Tweet icon below. This will launch Twitter where you click its icon to post the Tweet.
Check out TechSavvy.Life for blog posts on smartphones, PCs, and Macs! You may email us at contact@techsavvy.life for comments or questions.
Please feel free to leave a comment. I would love to hear from you. Do you have a computer or smart device tech question? I will do my best to answer your inquiry. Just send an email to contact@techsavvy.life. Please mention the device, app, and version you are using. To help us out, you can send screenshots of your data related to your question.
Author’s E-book
You can access the e-book from a Kindle device, the Kindle App for the desktop or smartphone, which is a free app.
The author’s Vietnam eBook on the Battle for Tra Bong Vietnam: Events and Aftermath
Facebook’s dark mode on iPhone turns your entire social media experience dark, giving profiles, pages, newsfeeds, and everything else, a sleek appearance.
Facebook’s dark mode on iPhone turns your entire social media experience dark, giving profiles, pages, newsfeeds, and everything else, a sleek appearance. Let’s explore how to set this feature.
This is for the iPhone
Copyright Scott Adams, Inc./Distributed by Universal Uclick for UFS
First, launch the Facebook app on your phone.
Next, in the app’s bottom bar, tap the hamburger Menu icon (the three horizontal lines icon). Refer to the below image:
Accessing the Menu
Now, on the Menu page, in the top-right corner, tap Settings & Privacy (the gear icon). See the below image:
Accessing Menu Settings
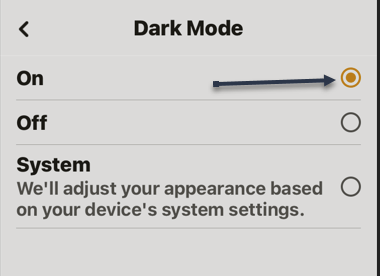
Next, on the Settings & Privacy page, from the Preferences section, select Dark Mode. See the following image:
Accessing Dark Mode option
Now, a Dark Mode page will open. Here, you have various ways to control the mode:
On: Enable this option to activate dark mode in the Facebook app.
Off: Turn off dark mode with this option.
System: This option uses your phone’s default mode, which means if you have enabled dark mode on your iPhone, the Facebook app will also use dark mode. The same applies to light mode.
Refer to the below image:
Enabling Dark Mode
And instantly, the Facebook app will turn dark. See the below image where we have the dark mode set to System. See the below image:
Your Facebook in Dark Mode
Quote For the Day
Be careful not to compromise what you want most for what you want now.
Zig Ziglar
That’s it. Please feel free to share this post! One way to share is via Twitter.
Just click the Tweet icon below. This will launch Twitter where you click its icon to post the Tweet.
Check out TechSavvy.Life for blog posts on smartphones, PCs, and Macs! You may email us at contact@techsavvy.life for comments or questions.
Please feel free to leave a comment. I would love to hear from you. Do you have a computer or smart device tech question? I will do my best to answer your inquiry. Just send an email to contact@techsavvy.life. Please mention the device, app, and version you are using. To help us out, you can send screenshots of your data related to your question.
Author’s E-book
You can access the e-book from a Kindle device, the Kindle App for the desktop or smartphone, which is a free app.
The author’s Vietnam eBook on the Battle for Tra Bong Vietnam: Events and Aftermath
Did you hide some photos on your iPhone but you are not sure where those photos are? It’s easy to see those hidden photos on an iPhone. Let’s explore how this is done.
Note: Respect other people’s privacy when using this knowledge, as they have their own reasons for hiding photos on their iPhones.
This is for the iPhone
Copyright Scott Adams, Inc./Distributed by Universal Uclick for UFS
View iPhone’s Hidden Photos
To view your hidden photos, first, launch the Photos app on your iPhone. At the bottom of the Photos app, tap Albums. Refer to the below image:
Accessing photo Albums
Next, on the Albums page, scroll down to the bottom. There, in the Other Albums section, tap Hidden.
On certain iOS versions, the Hidden album is located in the Utilities section as shown below.
Note: If you do not see the Hidden album option, the album itself might be hidden. To enable it, follow the steps in the section below.
See the below image:
Accessing the Hidden option
Now, the Hidden album screen shows all your hidden photos and videos. If none is displayed, you have no hidden photos or videos. See the following image:
Selecting a hidden photo
Next, to unhide a photo or video, tap that item on the list. When the item opens in full-screen, in the bottom left-hand corner, tap the Share icon. Refer to the below image:
Accessing the Share icon
Now, in the Share menu, tap Unhide. See the below image:
Unhide your photo
Next, your selected photo or video is now visible to everyone in Photos.
If you are not finding the photos you were looking for, consider trying to recover deleted photos on your iPhone or iPad.
Enable the Hidden Album
On iOS 14 and later, you can turn off the Hidden album in the Photos app. To re-enable that album, you will have to change an option in your iPhone’s Settings.
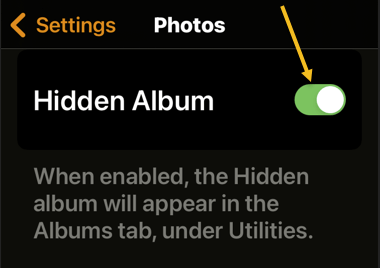
To do so, first, open the Settings app on your iPhone and tap Photos. See the following image:
Accessing Photos
Next, toggle the Hidden Album option to ON. Refer to the below image:
Enable Hidden Album option
Now, your album is now visible in the Photos app, and you can access your hidden photo(s).
Quote For the Day
Your attitude, not your aptitude, will determine your altitude.
Zig Zigler
That’s it. Please feel free to share this post! One way to share is via Twitter.
Just click the Tweet icon below. This will launch Twitter where you click its icon to post the Tweet.
Check out TechSavvy.Life for blog posts on smartphones, PCs, and Macs! You may email us at contact@techsavvy.life for comments or questions.
Please feel free to leave a comment. I would love to hear from you. Do you have a computer or smart device tech question? I will do my best to answer your inquiry. Just send an email to contact@techsavvy.life. Please mention the device, app, and version you are using. To help us out, you can send screenshots of your data related to your question.
Author’s E-book
You can access the e-book from a Kindle device, the Kindle App for the desktop or smartphone, which is a free app.
The author’s Vietnam eBook on the Battle for Tra Bong Vietnam: Events and Aftermath
Even if you are already filtering unknown senders in Messages on iPhone, you still might see notifications every time you get a text from an unknown number. To stop that and silence the annoying notifications, you will need to make a change in Settings.
Even if you are already filtering unknown senders in Messages on iPhone, you still might see notifications every time you get a text from an unknown number. To stop that and silence the annoying notifications, you will need to make a change in Settings. Let’s explore how to do this.
This is for the iPhone. Screenshots are from iPhone XR
Copyright Scott Adams, Inc./Distributed by Universal Uclick for UFS
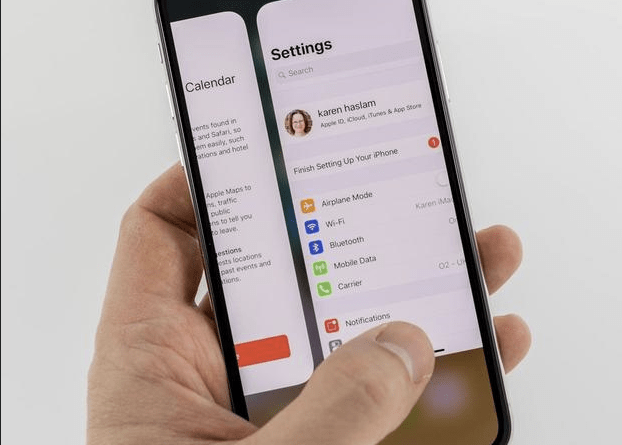
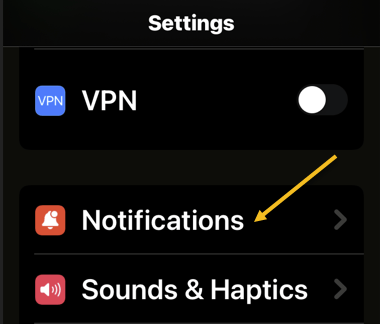
First, open Settings (the grey gear icon, usually on your Home Screen). Refer to the below image:
Accessing Settings
Next, on Settings, scroll down and tap Notifications. See the below image:
Accessing Notifications
Now, in Notifications, tap Messages. See the following image:
Accessing Messages
Next, in Messages notification settings, scroll down to the very bottom and tap Customize Notifications. Refer to the below image:
Selecting Customize Notifications
Now, in Customize Notifications, flip the toggle beside Unknown Senders to the OFF position. See the below image:
Disable Unknown Senders
Next, exit Settings. Now, we want to enable Filter Unknown Senders. Head to:
Settings > Messages > Filter Unknown Senders
and flip the toggle to ON. See the following image:
Enable Filter Unknown Senders
Now, you will no longer receive notifications when unknown senders text you.
Quote For the Day
If you don’t have a competitive advantage, don’t compete.
Jack Welch
That’s it. Please feel free to share this post! One way to share is via Twitter.
Just click the Tweet icon below. This will launch Twitter where you click its icon to post the Tweet.
Check out TechSavvy.Life for blog posts on smartphones, PCs, and Macs! You may email us at contact@techsavvy.life for comments or questions.
Please feel free to leave a comment. I would love to hear from you. Do you have a computer or smart device tech question? I will do my best to answer your inquiry. Just send an email to contact@techsavvy.life. Please mention the device, app, and version you are using. To help us out, you can send screenshots of your data related to your question.
Author’s E-book
You can access the e-book from a Kindle device, the Kindle App for the desktop or smartphone, which is a free app.
The author’s Vietnam eBook on the Battle for Tra Bong Vietnam: Events and Aftermath
Unsure which phone numbers you have blocked on your iPhone? You can easily check your blocked number list using Phone, Messages, and FaceTime settings on your phone.
Unsure which phone numbers you have blocked on your iPhone? You can easily check your blocked number list using Phone, Messages, and FaceTime settings on your phone. Let’s explore your blocked list.
Note: The list of blocked numbers will be the same no matter which app you use to view them.
This is for the iPhone
Copyright Scott Adams, Inc./Distributed by Universal Uclick for UFS
Blocked Numbers in Phone App
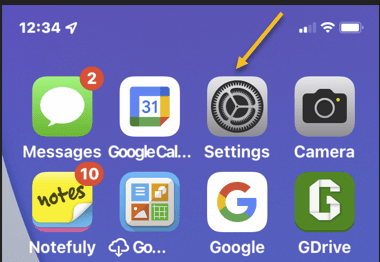
To see your blocked phone numbers list with Phone, first, open the Settings app (the gray gear icon) on your iPhone. Refer to the below image:
Accessing Settings
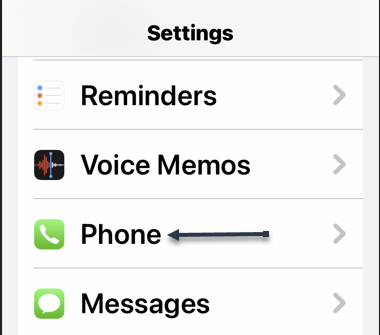
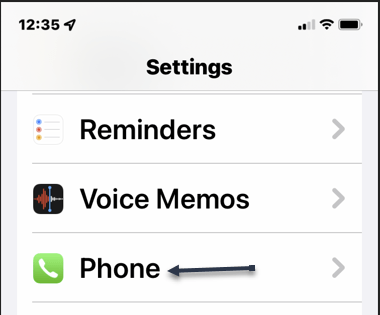
Next, in Settings, tap the Phone option. See the below image:
Accessing Phone option
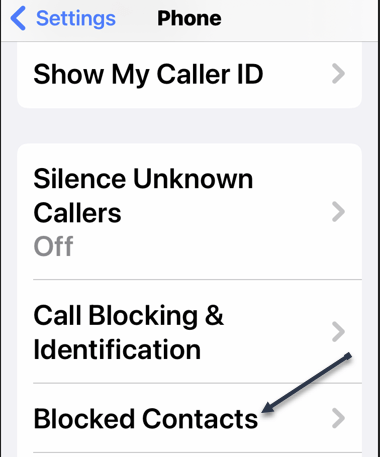
Now, on the Phone page, in the Calls section, tap Call Blocking & Identification or Blocked Contacts as shown in the following image:
Accessing Blocked Contacts option
Next, on the Call Blocking & Identification (or BlockedContacts) screen, you will see all your blocked numbers. Refer to the below image:
Your Blocked Contacts in the Phone app
Blocked Numbers in Messages App
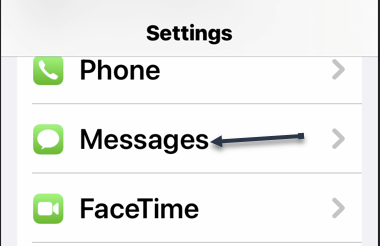
To use Messages to view your blocked numbers, first, open the Settings app on your iPhone and tap the Messages option. See the below image:
Accessing Messages option
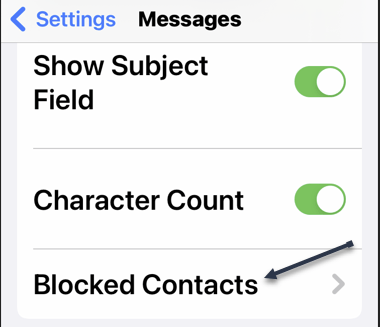
Next, in the Messages menu, from the SMS/MMS section, select BlockedContacts. See the following image:
Accessing Blocked Contacts option
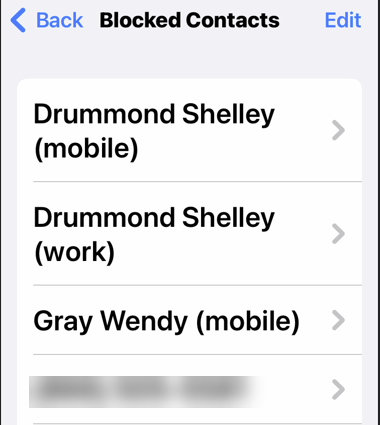
Now, the Blocked Contacts screen displays all your blocked numbers. Refer to the below image:
Your Blocked Contacts in the Messages app
Blocked Numbers in FaceTime App
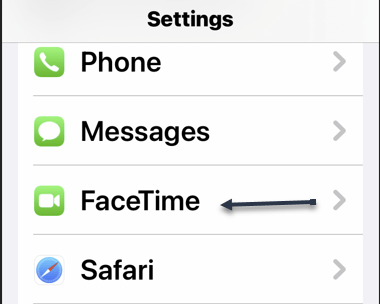
Checking the blocked numbers list with FaceTime is also easy. To do so, first, open the Settings app on your iPhone and tap FaceTime. See the below image:
Accessing FaceTime option
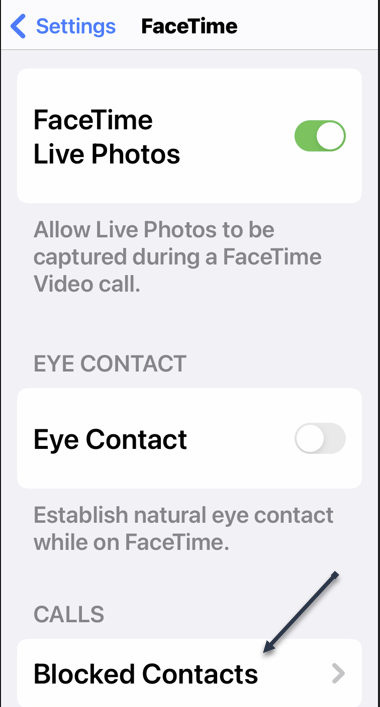
Next, on the FaceTime page, in the Calls section at the bottom, tap BlockedContacts. See the following image:
Accessing Blocked Contacts
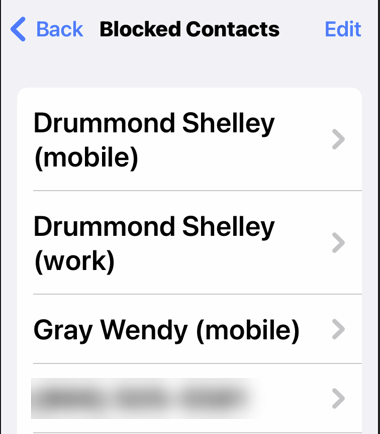
Now, on the screen that opens, you will see all your blocked numbers Refer to the below image:
Your Blocked Contacts in FaceTime app
Quote For the Day
Predicting rain doesn’t count. Building arks does.
Warren Buffett
That’s it. Please feel free to share this post! One way to share is via Twitter.
Just click the Tweet icon below. This will launch Twitter where you click its icon to post the Tweet.
Check out TechSavvy.Life for blogposts on smartphones, PCs, and Macs! You may email us at contact@techsavvy.life for comments or questions.
Please feel free to leave a comment. I would love to hear from you. Do you have a computer or smart device tech question? I will do my best to answer your inquiry. Just send an email to contact@techsavvy.life. Please mention the device, app, and version you are using. To help us out, you can send screenshots of your data related to your question.
The author’s Vietnam eBook on the Battle for Tra Bong Vietnam: Events and Aftermath
Netflix is going heavy on mobile games. The company added two more games to its service, bringing the total up to 12.
This is for the iPhone and Android
Copyright Scott Adams, Inc./Distributed by Universal Uclick for UFS
You do not need to do anything special to get these games on your Netflix account (which is good since Netflix just increased its price again. Maybe that’s why its stock value dropped). As long as you are a Netflix subscriber, you need to download the games on Android or iPhone, and you will be able to play them without spending anything extra.
Here’s a quick look at the games currently available as part of a Netflix subscription:
Arcanium: Rise of Akhan – Card battle game in the vane of Hearthstone
Krispee Street – Hidden Object game based on a popular webcomic
Asphalt Xtreme – Off-road racing game
Bowling Ballers – Endless runner meets bowling game
Card Blast – Poker-based card game
Dominoes Café – Dominoes game with various modes
Knittens – Cat-based match-three puzzle
Shooting Hoops – Basketball and dart hybrid game
Stranger Things: 1984 – Retro-styled adventure games based in Stranger Things universe
Stranger Things 3: The Game – Official game for the third season of Stranger Things
Teeter (Up) – Ball manipulating puzzle game
Wonderputt Forever – Mini golf game
If you are a Netflix subscriber with an Android or Apple device, you might as well download these games and see if any of them work for you, as they are included in the subscription you are already paying for.
Quote For the Day
Remember that failure is an event, not a person.
Zig Ziglar
That’s it. Please feel free to share this post! One way to share is via Twitter.
Just click the Tweet icon below. This will launch Twitter where you click its icon to post the Tweet.
Check out TechSavvy.Life for blog posts on smartphones, PCs, and Macs! You may email us at contact@techsavvy.life for comments or questions.
Please feel free to leave a comment. I would love to hear from you. Do you have a computer or smart device tech question? I will do my best to answer your inquiry. Just send an email to contact@techsavvy.life. Please mention the device, app, and version you are using. To help us out, you can send screenshots of your data related to your question.
Author’s E-book
You can access the e-book from a Kindle device, the Kindle App for the desktop or smartphone, which is a free app.
The author’s Vietnam eBook on the Battle for Tra Bong Vietnam: Events and Aftermath
Tired of getting robocalls all day long on your iPhone? Your iPhone lets you silence the harassment by turning on a feature called Silence Unknown Callers in Settings.
Tired of getting robocalls all day long on your iPhone? Your iPhone lets you silence the harassment by turning on a feature called Silence Unknown Callers in Settings. Let’s explore this nifty feature.
This is for the iPhone
Copyright Scott Adams, Inc./Distributed by Universal Uclick for UFS
What is an Unknown Caller
On your iPhone, an unknown caller is someone who is not in your Contacts list, which is an address book stored on your device that can be accessed through the Phone or Contacts apps. If you have called a number recently, your iPhone will not consider that number an unknown caller if they call you back.
Apple includes a feature with iOS 13 and up that allows you to silence rings and notifications from unknown callers, which is covered below. This does not include numbers you have called recently. Otherwise, if you want a caller not to be considered unknown (and thus not be silenced) you will need to add the number to your iPhone’s Contacts.
How to Silence Unknown Callers
First, to silence these calls, open Settings on your iPhone by tapping the grey gear icon on your Home screen. Refer to the below image:
Accessing Settings
Next, in Settings, scroll down and tap Phone. See the below image:
Accessing Phone option
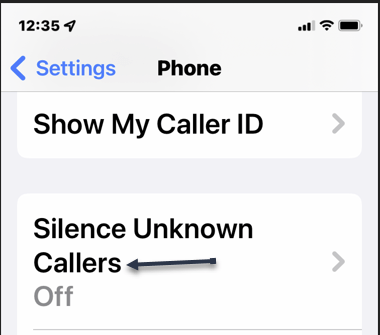
Now, in Phone settings, tap SilenceUnknown Callers. See the following image:
Accessing Silence Unknown Callers option
Next, in Silence Unknown Callers settings, enable the switch beside Silence Unknown Callers to ON. Refer to the below image:
Enable Silence Unknown Callers
Now, exit Settings. The next time you get a call from an unknown number, you will not hear a ring or a notification sound. The call will be sent to voicemail, and it will appear in your recent calls list in the Phone app. You may still get a notification if the caller leaves a voicemail.
If you are expecting an important call from an unknown number in the future, open
Settings > Phone > Silence Unknown Callers
and then switch Silence Unknown Callers to OFF. Incoming calls will no longer be silenced.
Quote For the Day
Only when the tide goes out do you discover who’s been swimming naked.
Warren Buffett
That was easy. Please feel free to share this post! One way to share is via Twitter.
Just click the Tweet icon below. This will launch Twitter where you click its icon to post the Tweet.
Checkout TechSavvy.Life for blog posts on smartphones, PCs, and Macs! You may email us at contact@techsavvy.life for comments or questions.
Please feel free to leave a comment. I would love to hear from you. Do you have a computer or smart device tech question? I will do my best to answer your inquiry. Just send an email to contact@techsavvy.life. Please mention the device, app, and version you are using. To help us out, you can send screenshots of your data related to your question.
The author’s Vietnam eBook on the Battle for Tra Bong Vietnam: Events and Aftermath
Instead of flipping photos after taking selfies, you can capture “mirror selfies” automatically as they appear in the preview on your iPhone. Let’s explore this feature.
The Camera app on the iPhone packs several features, including an option to automatically take mirror selfies. This feature is available on iPhones running at least iOS 14 or later.
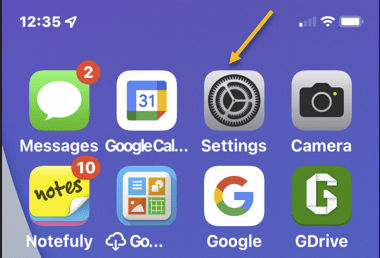
First, open the Settings app on your iPhone. Refer to the below image:
Accessing Settings
Next, in Settings, scroll down and tap Camera. See the below image:
Accessing the Camera
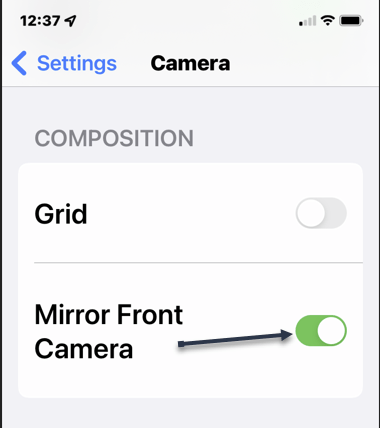
Now, scroll down to the Composition section and toggle the switch for Mirror Front Camera to ON. (On some iPhones, this option might be labeled Mirror Front Photos.) See the following image:
Enabling the Mirror Front Camera toggle
Next, open the Camera app on your iPhone. Turn the camera to face yourself and snap a selfie. The saved image will appear as you see yourself in the mirror, instead of flipped as it usually is. Note that your front camera automatically mirrors the front camera viewfinder, so this setting only affects the image that’s saved to your photo library.
Quote For the Day
To learn something but not to do is really not to learn. To know something but not to do is really not to know.
Stephen Covey
That was easy. Please feel free to share this post! One way to share is via Twitter.
Just click the Tweet icon below. This will launch Twitter where you click its icon to post the Tweet.
Check out TechSavvy.Life for blog posts on smartphones, PCs, and Macs! You may email us at techsavvy.life for comments or questions.
Please feel free to leave a comment. I would love to hear from you. Do you have a computer or smart device tech question? I will do my best to answer your inquiry. Just send an email to contact@techsavvy.life. Please mention the device, app, and version you are using. To help us out, you can send screenshots of your data related to your question.
Author’s E-book
You can access the e-book from a Kindle device, the Kindle App for the desktop or smartphone, which is a free app.
The author’s Vietnam eBook on the Battle for Tra Bong Vietnam: Events and Aftermath