Customize Back Tap Gestures on iPhone and iPad for Enhanced Accessibility

The post discusses the accessibility features on iPhone and iPad, emphasizing their importance for users with visual or audio impairments. It provides a detailed guide on enabling Accessibility Shortcut and Back Tap gestures, highlighting various options such as AssistiveTouch, Color Filters, and Voice Control.

RAYMOND OGLESBY @RaymondOglesby2
August 20, 2024 – 7 minutes read time

This is for iPhone and iPad. Screenshots are from iPhone 14 Pro running iOS 17+

Accessibility is always important since it makes devices easier for those with visual or audio impairments. Apple always does a great job with accessibility, and you will find plenty of accessibility options on your iPhone or iPad to make life easier. Perhaps you need to have more sound on one side of your favorite headphones, or you just need to make text easier to read. No matter what you need, iOS 17 and iPadOS 17 are very inclusive, so you will not feel left behind. And to make it even easier to access your favorite accessibility tools, there is the Accessibility Shortcut on your favorite iPhone or iPad.

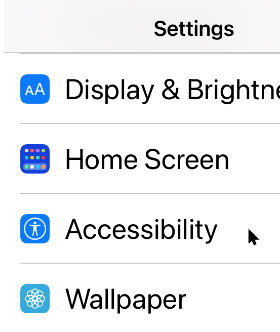
  1. Launch the Settings app on your iPhone or iPad.
  2. Tap on Accessibility.
  3. Tap on Accessibility Shortcut; it’s all the way to the bottom. Refer to the below image:
Accessibility 1
Selecting Accessibility Shortcut option
  1. Tap the action you would like to perform when you triple-click the Home or Side button so that a blue checkmark appears next to it. You can assign multiple functions to the shortcut.
  2. If you want to reorder the options, just drag and drop. Tap and hold the handle on the right side of each option to move it.
  3. Triple-click your Home button (Touch ID devices) or Side button (Face ID devices) to perform the action you have assigned to the shortcut.
  4. If you have assigned multiple options, simply choose the action you want to perform from the menu. See the below image:
Accessibility 2
Assigning multiple shortcuts and reordering them

Here’s a brief description of the options you have and what they are:

  • AssistiveTouch: Adds the ability to access many common hardware buttons and gesture controls with single taps; a useful feature for those with motor impairments.
  • Background Sounds: A new feature in iOS 15, Background Sounds lets you play soothing white noise to help you concentrate. Using the Accessibility Shortcut toggles your selected sound. First, you need to set up your Background Sounds.
  • Classic Invert Colors: A great option for anyone with a visual impairment such as color blindness. All colors across iOS will be inverted.
  • Color Filters: Changes the color layout of the screen for those with color blindness.
  • Full Keyboard Access: This allows you to navigate the iOS interface without using touch input. A physical keyboard is required to use this feature.
  • Increase Contrast: This will increase the contrast of visual elements on the screen, making it easier to see and read text.
  • Left/Right Balance: This turns on your custom audio balance setting if you have one set up. For example, if you want more sound on the left or right side of your earbuds or headphones, you will want to adjust that audio balance. Turning this off will go back to the default setting.
  • Magnifier: Triggers a camera-style viewfinder with sharp zoom controls so you can see small text. You will need the Magnifier enabled to have this option available.
  • People Detection: With People Detection, your iPhone 12 or iPhone 13 uses Machine Learning with the LiDAR scanner to determine if an object in the camera is a person. You will receive audio feedback to help you determine how far away or close a person is to you.
  • Reduce Motion: This turns on the Reduce Motion setting, which reduces motion in the user interface, including the parallax with app icons. This can also help conserve some battery power.
  • Reduce Transparency: This reduces the transparency used in apps and websites, including blurred backgrounds. Having this on improves the legibility of text.
  • Reduce White Point: Reduces the intensity of bright colors for those with sensitivities or color blindness.
  • Smart Invert Colors: Same as Classic Invert Colors, except it does not change photos, media, and some apps.
  • Switch Control: This lets you use external switches, or the screen itself, as a switch for motor accessibility.
  • Voice Control: This lets you speak commands to your iPhone or iPad.
  • VoiceOver: Allows your iPhone or iPad to speak to you when enabled. Commonly used by folks with visual impairments.
  • Zoom: Allows you to zoom your content for better visibility. You can then use two and three-finger gestures to tap and pan around.
  • Guided Access: This keeps the iPhone in a single app and allows you to control which features are available. You need the Guided Access feature enabled before it is available as an Accessibility Shortcut option.

Once you have made your selection for the Accessibility Shortcut on iPhone and iPad, you can simply triple-click the Home button or the Side button on iPhones and iPads with Face ID from anywhere, not just from Settings, and your iPhone or iPad will enable the function you have selected. To disable it, just triple-click the button again. If multiple functions are assigned, tap the option you want to use.

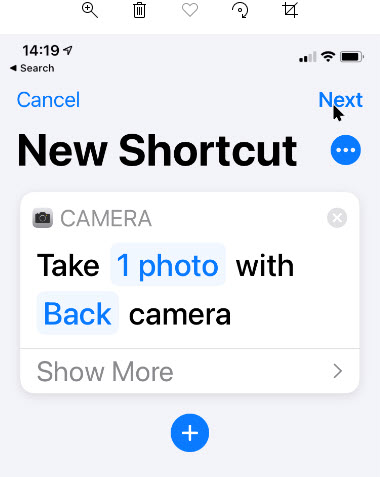
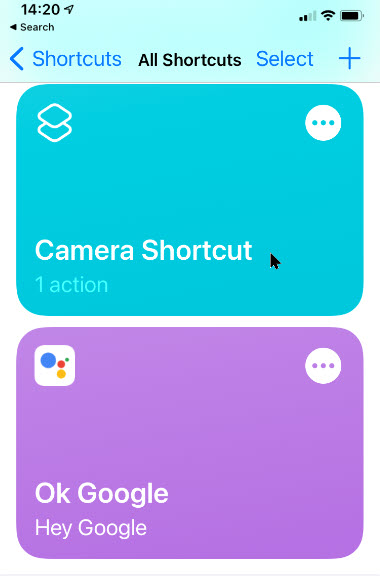
iOS 14 added a new Back Tap gesture. With the Back Tap, you can double-tap or even triple-tap the back of your iPhone for quicker access to some commonly used actions, such as accessing the Notification Center or Control Center. You can also use the Back Tap gesture to launch Shortcuts that you have created, opening up a whole new world of possibilities.

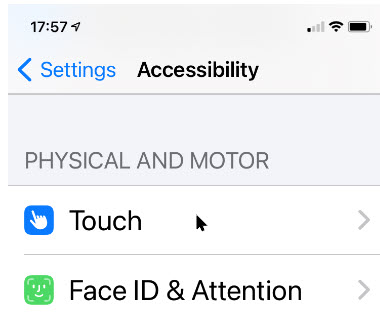
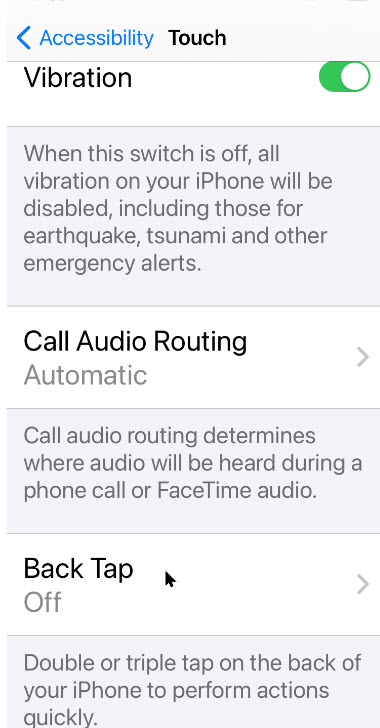
  1. Launch Settings on your iPhone or iPad.
  2. Tap Accessibility.
  3. Tap Touch. See the following image
Accessibility 3
Selecting the Touch option
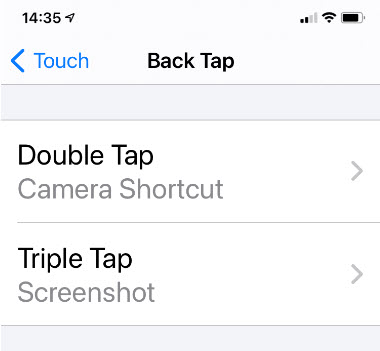
  1. Tap Back Tap at the bottom.
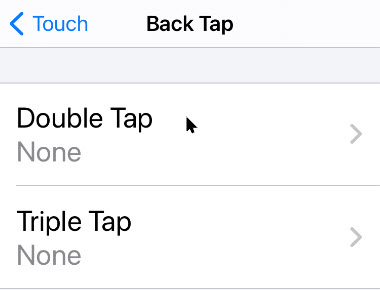
  2. Tap Double Tap or Triple Tap to choose an action. Refer to the below image:
Accessibility 4
Selecting Back Tap options
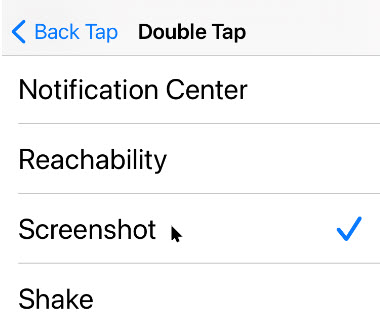
  1. Select an action for your chosen Back Tap. Options include the Accessibility Shortcut that we just created, or you can choose from System, Accessibility, Scroll Gestures, or your own Shortcuts actions. See the below image:
Accessibility 5
Selecting Double and TripleTtap functions.

As you can see, having an Accessibility Shortcut and Back Tap gestures can make your life easier. It adds another layer of customization to your device, and you do not need to fiddle around in the settings every time to get to certain accessibility actions. Even if you are not visually or hearing impaired, these accessibility features are handy for everyone.

Disclaimer

Technology is always changing. Rarely is there static tech for smartphones and desktops. Thus, the contents of this post are only valid at the time of writing. Blog posts older than six months may have directions incompatible with your device or OS. Hopefully, older post content will continue to work as advertised. Thank you for reading TechSavvy.Life for Technology at Work For You.

“Real work is completed in silence and strikes a chord in the minds of only a very few.”

CG Jung

That’s it. Please feel free to share this post! One way to share is via Twitter.

Just click the Tweet icon below. This will launch Twitter where you click its icon to post the Tweet.

Checkout TechSavvy.Life for blog posts on smartphones, PCs, and Macs! You may email us at contact@techsavvy.life for comments or questions.

Was this post helpful? We would love to hear your comments. Do you have a computer or smart device tech question? I will do my best to answer your inquiry. Just send an email to contact@techsavvy.life. Please mention the device, app, and version you are using. To help us out, you can send screenshots of the data related to your question.

The author’s Vietnam eBook on the “Battle for Tra Bong Vietnam: Events and Aftermath” can be accessed from a Kindle device or the Kindle App for a desktop or smartphone. The apps are free.

The author’s Vietnam eBook on the Battle for Tra Bong Vietnam: Events and Aftermath

How to Launch Actions by Tapping on Back of iPhone in iOS 14

One of the new features that has arrived with iOS 14 that didn’t make a big splash but will be super useful for all users is something called Back Tap. The new iPhone feature lets you customize Double and Triple taps on the back of your iPhone to use for Shortcuts automations, Accessibility features, and iOS system actions.

One of the new features that has arrived with iOS 14 that did not make a big splash but will be super useful for all users is something called Back Tap. The new iPhone feature lets you customize Double and Triple taps on the back of your iPhone to use for Shortcuts automations, Accessibility features, and iOS system actions.

Possibilities for iPhone Back Tap custom controls are pretty much only limited by your imagination since the feature works with Shortcuts app automations. But if you want to keep things simpler, you can assign a Double or Triple tap on the back of your iPhone to do things like open Control Center, take a screenshot, or enable Accessibility features like AssistiveTouch, VoiceOver, Zoom, etc.

How Does It Work

Back Tap uses the accelerometer in the iPhone 8 or higher to detect taps on the back side of your device running iOS 14. You assign the actions you want to launch upon tapping.

Back Tap works from the Home Screen, within apps (including third-party), and even from your your lock screen.

Let’s explore how to launch the built-in iOS 14 actions upon tapping.

RELATED

If inactive, coming soon!
How to Tap the Back of Your iPhoneto Take a Screenshot in iOS 14

This is for the iPhone running iOS 14

Dilbert and Estimate
Copyright Scott Adams, Inc./Distributed by Universal Uclick for UFS

To Tweet about this post, click the Tweet icon below to launch Twitter, then click its Tweet icon to post.

Check out TechSavvy.Life for their blog posts on smartphone apps, PCs. and Macs!

Setup Back Tap

First, open Settings (the gear icon). Refer to below image:

Tap 1
Accessing Settings

Now, scroll down and tap the Accessibility option. See below image:

Tap 2
Accessing Accessibility

Under Accessibility option, scroll down and tap the Touch option. See following image:

Tap 3
Accessing Touch

On the Touch Settings screen, scroll down until you see the Back Tap option, now tap it. Refer to below image:

Tap 4
Accessing Back Tap

Next, in Back Tap settings, you can set the an action to either Double Tap or Triple Tap on back of the iPhone. See below image:

Tap 5
Selecting your Back Tap option

Chose one of the list of available actions. At the bottom you will find the System actions. See following image for my example in selecting Screenshot for a Triple Tap.

Tap 6
Selecting your Back Tap action

Scroll to the bottom to see your shortcuts. If you don’t see any or you want to create one, follow along. Here is how you can build a Camera Shortcut, then attach it to the Back Tap iOS 14 accessibility gesture.

Create a Shortcut

Open Shortcuts on your iPhone by swiping past your first Home Screen, then enter Shortcuts in the Search Box and tap the app. Refer to below image:

Shortcut 1
Entering Shortcuts search

Tap the plus (+) button in the upper-right corner. See below image:

Shortcut 2
Selecting the Add icon

Tap Add Action. Refer to below image:

Shortcut 3
Selecting the Add Action option

Tap the Search Bar. Now ttype in Camera and tap the app. See below image:

Shortcut 4
Entering the Camera search

Tap your selection, Take Photo Or Take Video. See following image:

Shortcut 5
Selecting your Camera option

Tap Next in upper right-hand corner. Refer to below image:

Shortcut 6
Accessing the Next link

Enter a shortcut name, like Camera Shortcut and tap Done in upper right-hand corner. See below image:

Shortcut 7
Entering a Shortcut name

Your Shortcut(s) will be displayed. See following image;

Shortcut 8
Viewing your Shortcuts

Now exit Shortcuts. You’have now successfully created your Camera shortcut. Just follow the above steps and chose this as an action to be associated with Double or Triple Back Tap. Refer to below image for my example of assigning Camera Shortcut to Double Tap and Screenshot to Triple Tap:

Shortcut 9
Displaying your Back Tap actions

That’s it. In writing this blog post, I have found the Double Tap to be too sensitive; the associated action goes off accidentally.

I hope you have found this post helpful. If so, click the Tweet icon below. This will launch Twitter where you click its icon to post the Tweet.

I have found TechSavvy.Life blog posts extremely helpful. Check them out for posts on smart phone apps, Macs and PCs!

I Would Like to Hear From You

Please feel free to leave a comment. I would love hearing from you. Do you have a computer or smart device tech question? I will do my best to answer your inquiry. Please mention the device, app and version that you are using. To help us out, you can send screenshots of your data related to your question.

The author’s Vietnam eBook on the Battle for Tra Bong: Events and Aftermath

How to Tap the Back of Your iPhone to Take a Screenshot in iOS 14

If you want to take a screengrab on your iPhone you may be thinking you have to press the Up Volume and Side Button at the same time. This was the way ever since Apple introduced the iPhone X. But with iOS 14 and later, there’s a new way and it’s extremely handy.

If you want to take a screengrab on your iPhone you may be thinking you have to press the Up Volume and Side Button at the same time. This was the way ever since Apple introduced the iPhone X. But with iOS 14 and later, there’s a new way and it’s extremely handy.

You can now take a screenshot just by tapping its back, thanks to a new accessibility feature called Back Tap, Let’s explore how to set up this feature.

How Does This Work

Back Tap, first introduced in iOS 14, uses the accelerometer in an iPhone 8 or later to detect if you have tapped on the back side of your device. In Settings, you can configure two or three taps to launch certain actions. Apple considers this an accessibility feature, but it is for everyone. With this tip, a quick screenshot is only just two or three taps away.

Related

If inactive, coming soon!
How to Launch Actions by Tapping on Back ofiPhone in iOS 14

Dilbert and Interface
Copyright Scott Adams, Inc./Distributed by Universal Uclick for UFS

To Tweet about this post, click the Tweet icon below to launch Twitter, then click its Tweet icon to post.

Check out TechSavvy.Life for their blog posts on smartphone apps, PCs. and Macs!

Setup Back Tap

First, open Settings (the gear icon). Refer to below image:

Tap 1
Accessing Settings

Now, scroll down and tap the Accessibility option. See below image:

Tap 2
Accessing the Accessibility option

Under Accessibility option, scroll down and tap the Touch option. See following image:

Tap 3
Accessing the Touch option

On the Touch Settings screen, scroll down until you see the Back Tap option, now tap it. Refer to below image:

Tap 4
Accessing the Back Tap option

Next, in Back Tap settings, you can set the screenshot action to either Double Tap or Three Taps on back of the iPhone. See below image:

Tap 5
Selecting your Back Tap preference

Now, scroll down the pop-up list that appears and select the Screenshot option. See following image:

Tap 6
Selecting the Screenshot optiond

Next, go back one menu level to make sure your selection is saved, then exit Settings.

Now, the next time you tap two or three times on the back of your iPhone (according to your selection), you will capture the current screen and save it to an image file. These images can be later viewed in your photo album.

That’s it. This feature is one of several you can setup for using the Back Tap.

I hope you have found this post helpful. If so, click the Tweet icon below. This will launch Twitter where you click its icon to post the Tweet.

I have found TechSavvy.Life blog posts extremely helpful. Check them out for posts on smart phone apps, Macs and PCs!

I Would Like to Hear From You

Please feel free to leave a comment. I would love hearing from you. Do you have a computer or smart device tech question? I will do my best to answer your inquiry. Please mention the device, app and version that you are using. To help us out, you can send screenshots of your data related to your question.

The author’s Vietnam eBook on the Battle for Tra Bong: Events and Aftermath