

On Windows 10, the process to rename a single file is easy, but it can become troublesome quickly when trying to change the name (or extension) to a long list of files within a folder.
Although, you can always built-in Windows 10 various tools to change the name of files like File Explorer, Command Prompt, and PowerShell, we are going to use another Microsoft tool, the PowerRename module in PowerToys.
This is for Windows 10

PowerRename Module in PowerToys
The PowerRename module is part of the free PowerToys. To download PowerToys from the Microsoft website, visit this link in your favorite browser and look for the latest release toward the top of the page. Download that file and run it to install the app
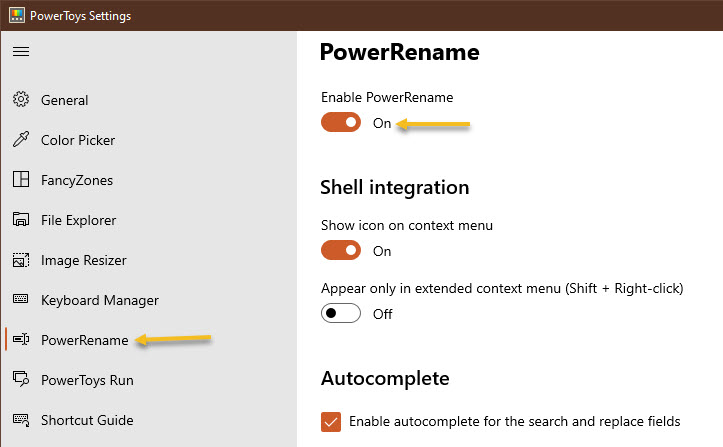
Once installed, an icon will be placed in your Tray Bar. Click on the icon to run PowerToys. Now, launch PowerToys Settings, and click PowerRename in the sidebar. Next, ensure that the switch beside Enable PowerRename is turned on. Refer to below image:
Now, close the PowerToys Settings window.
Renaming Options
Now that you have the app installed, renaming a bunch of files is as easy as a right-click a menu choice. First, locate the files that you want to rename in File Explorer or on the desktop and select them. See below image:

Then right-click the files and select PowerRename from the menu that appears. See following image:

The PowerRename pop-up window will open. Refer to below image:

First, enter the criteria that will determine what gets renamed. By default, PowerRename works with simple search-and-replace functionality. In the first text box, type a search term. On the next line, enter what you want to replace it with. PowerRename will replace the first occurrence (or every occurrence if you check a box) of that term in all of the file names you have selected with the replacement text.
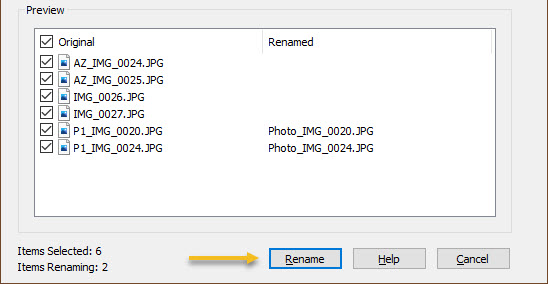
Here is an example where “P1_” in each file name has been replaced with “Photo_.” The neat thing is that PowerRename provides a preview of what the renamed files will look like right there in the window. That way, you do not have to guess what the result might be. See below image:

Near the middle of the window, you will see other options that change how PowerRename works. Consider each one and place a checkmark beside those that you want to use. Here is what each option does:
- Use Regular Expressions: This allows the use of powerful search strings known as regular expressions which can enable very in-depth or complex search-and-replace operations.
- Case Sensitive: This option makes searches sensitive, whether the letters are capital or lowercase. For example, the term “cat” would match different results than “Cat.”
- Match All Occurrences:Normally, only the first instance of the search term is replaced (from left to right). With this checked, all instances of the search term will be replaced.
- Exclude Files: If this is checked, the operation will only apply to folders and not files.
- Exclude Folders: If this is checked, the operation will only apply to files and not folders.
- Exclude Subfolder Items: This excludes items in selected sub-folders from rename operations. For example, if you select a directory that has files within sub-folders, those will not be affected.
- Enumerate Items: This will add a number, counting upward, to the end of each file that is renamed.
- Item Name Only: If checked, the operation will only apply to the file or folder’s name and not its extension.
- Item Extension Only: If checked, the operation will only apply to the file or folder’s extension and not its name.
When you are ready, click the Rename button, and PowerRename will perform the operation you have specified. See following image:
If you do not like the result, you can press Ctrl+Z in File Explorer to undo the rename process. A very handy shortcut to undo your change.
A Practical Example
What if you do not want to just replace a word in a file, but rather, you would like to replace the entire filename with something completely new? In that case, you would want a wildcard to match all of the files you have selected. To do that, you will need to use a very simple, regular expression, “.*”, which means “everything.”
In the below example, we are going to replace all file names selected with a base file name that gets progressively numbered. First, enter “.*” in the Search for box, then enter the name you would like to use in the Replace with box. Then check Use Regular Expressions, Enumerate Items, and Item Name Only. Refer to below image:

Now, you will end up with a series of similarly named files that are numbered in sequential order. When you are done setting it up, click Rename, and the operation will finish.
You are finioshed. Please feel free to share this post! One way to share is via Twitter.
Just click the Tweet icon below. This will launch Twitter where you click its icon to post the Tweet.
Check out TechSavvy.Life for blog posts on smartphones, PCs, and Macs! You may email us at contact@techsavvy.life for comments or questions.
Tweet
I Would Like to Hear From You
Please feel free to leave a comment. I would love hearing from you. Do you have a computer or smart device tech question? I will do my best to answer your inquiry. Just send an email to contact@techsavvy.life. Please mention the device, app and version that you are using. To help us out, you can send screenshots of your data related to your question.
