How to Identify Bird Calls On Your Phone

Listening to bird calls is a great, relaxing way to enjoy nature. If your curiosity gets the best of you, hearing the calls may not be enough.

RAYMOND OGLESBY @RaymondOglesby2
October 18, 2022

Listening to bird calls is a great, relaxing way to enjoy nature. If your curiosity gets the best of you, hearing the calls may not be enough. Let’s explore how to identify birds.

This is for the iPhone and Android. Screenshots are from iPhone XR running iOS 15.6+

Dilbert and Chips
Copyright Scott Adams, Inc./Distributed by Universal Uclick for UFS

There’s a good chance you take your phone with you when you are out for a nature walk. Did you know it can be a surprisingly accurate bird identification tool?

Merlin Bird ID by Cornell Lab

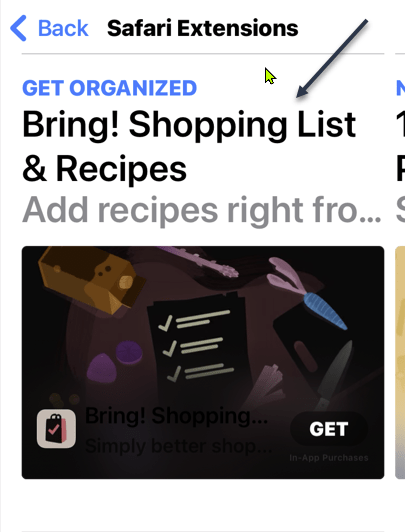
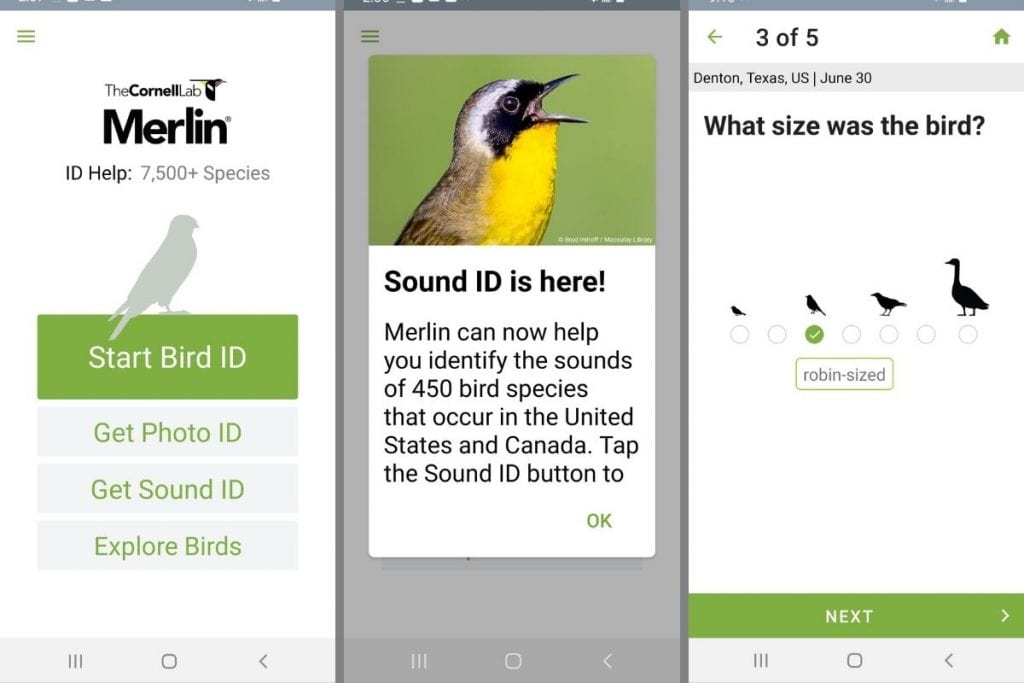
The Cornell Lab of Ornithology is one of the top resources for information about birds. The Merlin Bird ID app puts all of that great information at your fingertips. It’s available for Android and iPhone. First, access the App store and search for Merlin Bird ID.

Next, tap Get to download the app. Refer to the below image:

Merlin 1
Download the app from the App Store

Now, enter your email address and tap the Submit button. See the below image:

Merlin 2
Enter your email address

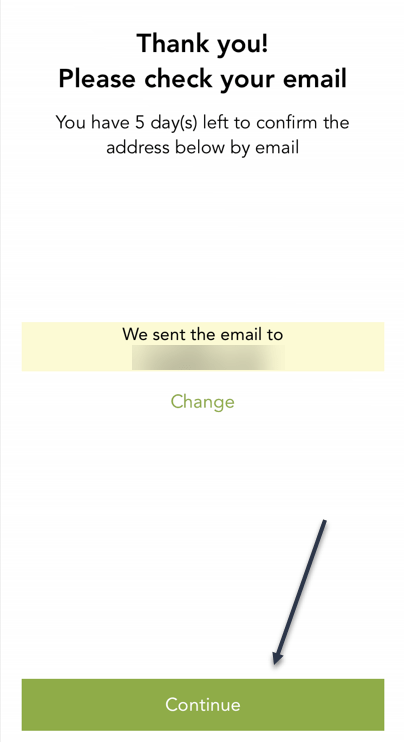
Next, check your email to confirm your address, then tap the Continue button. See the following image:

Merlin 3
Confirm your email

Now, the Merlin Bird ID app will open. Here, tap on View Suggested for Bird Packs. Refer to the below image:

Merlin 4
Select the View Suggested option

Next, we are selecting the Oklahoma and Texas Bird Pack since we live in Oklahoma, then tap the Install button. Note! check your phone’s remaining storage before downloading. See the below image:

Merlin 5
Install a Bird Pack

Now, when the app opens, you have a few options. Start Bird ID and Photo ID are for identifying birds based on their sound or appearance. The one we want to use is Sound ID, so tap it. See the following image:

Merlin 6
Select Sound ID

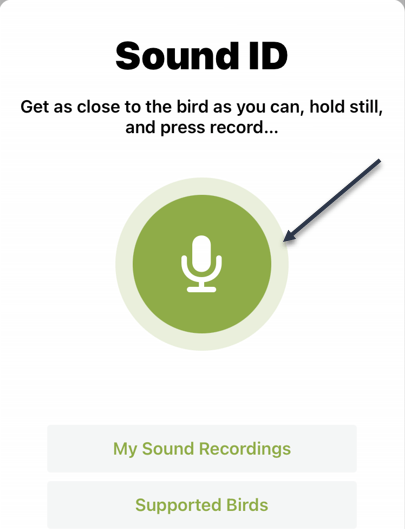
Next, a menu will appear with a few options. To immediately start listening for bird calls around you, tap the big Microphone button. Refer to the below image:

Merlin 7
Listen for birds

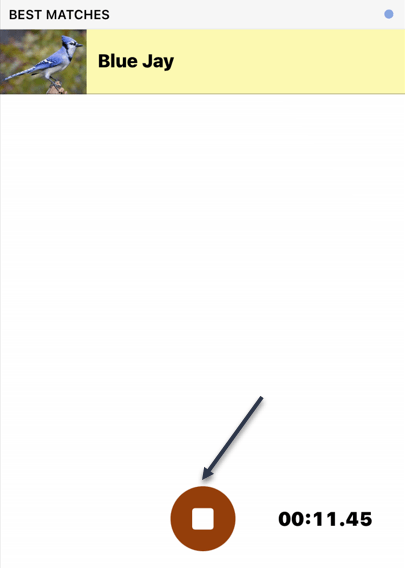
Now, the app will immediately start listening and populate the identified birds on the screen. The bird that is currently singing is highlighted in yellow. See the below image:

Merlin 8
The identified bird is highlighted in yellow

Next, tap the red Stop button when you are done. You will get a list of all the birds identified, and you can select any of them to read more information. See the following image:

Merlin 9
Stop recording

Your Bird Recordings

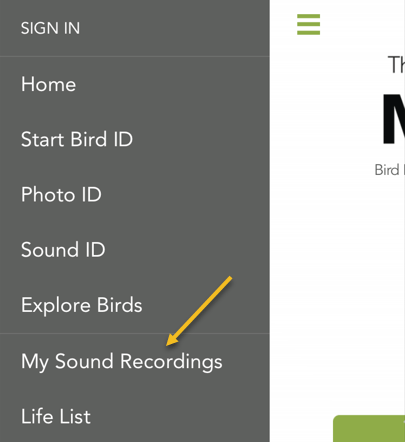
Now, go back to the Merlin Bird ID home page and tap the Menu icon in the upper left-hand corner. Refer to the below image:

Merlin10
Accessing the Menu

Next, on the menu that opens, tap the My Sound Recordings option. See the below image:

Merlin 11
Select the My Sound Recordings option

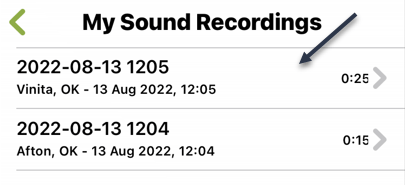
Now, tap the top listing for your latest bird sound recording. See the following image:

Merlin 12
Select a recording

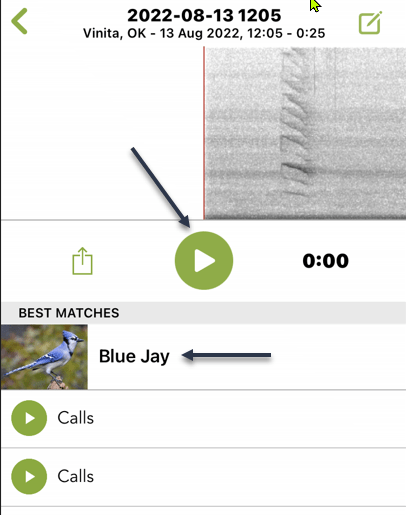
Next, once again, tap the top listing, then the Play button to hear the bird recording. Refer to the below image:

Merlin 13
Play the recording

You can simply let the app listen to your surroundings and watch the identified birds pop up on the screen. The Merlin Bird ID app is chock full of great information if you are curious about birds.

Quote For the Day

We live in a society exquistely dependent on science and technology, in which hardly anyone knows anything about science and technology.

Carl Sagan

Tweet Info

That’s it. Please feel free to share this post! One way to share is via Twitter.

Just click the Tweet icon below. This will launch Twitter where you click its icon to post the Tweet.

Checkout TechSavvy.Life for blog posts on smartphones, PCs, and Macs! You may email us at contact@techsavvy.life for comments or questions.

I Would Like to Hear From You

Please feel free to leave a comment. I would love to hear from you. Do you have a computer or smart device tech question? I will do my best to answer your inquiry. Just send an email to contact@techsavvy.life. Please mention the device, app, and version you are using. To help us out, you can send screenshots of your data related to your question.

Author’s E-Book

You can access the e-book from a Kindle device, the Kindle App for the desktop or smartphone, which is a free app.

The author’s Vietnam eBook on the Battle for Tra Bong Vietnam: Events and Aftermath

How to Use Picture-in-Picture from YouTube on iPhone

YouTube on Android has had Picture-in-Picture support for several years, but the iPhone app lagged behind. That finally changed, and you can now watch YouTube in a floating window on your iPhone or iPad, too.

RAYMOND OGLESBY @RaymondOglesby2
October 11, 2022

YouTube on Android has had Picture-in-Picture support for several years, but the iPhone app lagged behind. That finally changed, and you can now watch YouTube in a floating window on your iPhone or iPad, too. Let’s explore this feature.

This is for the iPhone and iPad. Screenshots are from iPhone XR running iOS 15.6+

Dilbert and Finance
Copyright Scott Adams, Inc./Distributedsfd by Universal Uclick for UFS

It was a long journey for iOS and iPadOS devices to get Picture-in-Picture for YouTube. The feature started out as an experiment for Premium subscribers in August 2021. A few months later, the experiment ended. In July 2022, Google started rolling it out for real.

Non-Premium Members: Everyone in the U.S. can use Picture-in-Picture in the YouTube app regardless of whether they have a Premium subscription or not. PiP only works with non-music videos.

Premium Members: Premium subscribers in all areas of the world can use Picture-in-Picture in the YouTube app for both music and non-music videos.

First, we need to make sure your iPhone or iPad has Start PiP Automatically enabled. To do so, open the Settings app. Refer to the below image:

PIP 1
Accessing Settings app

Next, go to General. See the below image:

PIP 2
Accessing General option

Now, select Picture in Picture. See the following image:

PIP 3
Accessing the Picture in Picture option

Next, make sure Start PiP Automatically is toggled to ON. Refer to the below image:

PIP 4
Enabling PiP

Using Picture-in-Picture

Using Picture-in-Picture mode is actually very easy. The feature is enabled by default once you get it. First, watch a video and swipe up on the bottom of the screen to go to your Home screen. The video will display the PiP mode. See the below image:

PIP 5
Your YouTube video

Next, if you want to double-check to make sure Picture-in-Picture is ON or turn it OFF, you can do so in the YouTube settings under:

Settings > General > Picture-in-Picture

and toggle it ON or OFF. See the following image:

PIP 6
Enabling Picture-in-Picture on YouTube

Picture-in-Picture is a great feature to have on a phone or tablet. Now you enjoy YouTube on your Apple device while being able to do other things at the same time.

Quote For the Day

Modern technology has become a total phenomenon for civilization, the defining force of a new social order in which efficiency is no longer an option but a neccisity imposed on all human activity.

Jacques Ellul

Tweet Info

You are finished. Please feel free to share this post! One way to share is via Twitter.

Just click the Tweet icon below. This will launch Twitter where you click its icon to post the Tweet.

Checkout TechSavvy.Life for blog posts on smartphones, PCs, and Macs! You may email us at contact@techsavvy.life for comments or questions.

I Would Like to Hear From You

Please feel free to leave a comment. I would love to hear from you. Do you have a computer or smart device tech question? I will do my best to answer your inquiry. Just send an email to contact@techsavvy.life. Please mention the device, app, and version you are using. To help us out, you can send screenshots of your data related to your question.

Author’s E-Book

You can access the e-book from a Kindle device, the Kindle App for the desktop or smartphone, which is a free app.

The author’s Vietnam eBook on the Battle for Tra Bong Vietnam: Events and Aftermath

How to Add Widgets on iPhone Lock Screen in iOS 16+

Your iPhone has Lock screen widgets that give you quick access to information regarding your schedule, the weather, and more. You can even tie these widgets to specific Focus Modes so that different widgets appear (or disappear) depending on what you are doing.

RAYMOND OGLESBY @RaymondOglesby2
October 6, 2022

Your iPhone has Lock screen widgets that give you quick access to information regarding your schedule, the weather, and more. You can even tie these widgets to specific Focus Modes so that different widgets appear (or disappear) depending on what you are doing. Let’s ex[ore this feature.

This is for the iPhone running iOS 16+. Screenshots are from iPhone XR

Dilbert and Age
Copyright Scott Adams, Inc./Distributed by Universal Uclick for UFS

Tip: It is recommended you view the post on “How to Use Lock and Home Screen Wallpapers on iPhone in iOS 16+” before implementing this post.

Using the Lock Screen Galleries

First, tap and hold your Lock screen anywhere to show the Lock screen gallery, then tap on the plus “+” icon to add a new Lock screen. Refer to the below image:

Lock 1
About to add a wallpaper

Next, select a wallpaper to appear on your Lock screen. Tap on the Photos option to use an image you have taken or saved to your device. You can also use emojis, the weather, the position of the planets, and more. See the below image:

Lock 3
Selecting a wallpaper from the gallery

Now, with your wallpaper chosen, modify your Lock screen by tapping on the various elements. You can tap on the date to change what information is displayed here, which will add more information to the date display like how much energy you have burned or upcoming calendar events. See the following image:

Widget 3
Browse your suggestions

Next, you can also tap on the time to choose a specific font and color scheme, and swipe left and right on the wallpaper to change how your background is displayed with filters. Refer to the below image:

Widget 4
Choosing elements

Finally, tap on the Add Widgets box to add a single row of widgets to your Lock screen. See the below image:

Widget 5
Selecting to add widgets

Choosing Widgets

Widgets are information that you can easily see from your Lock screen. Many of these appear as smaller circles, of which you can fit four on a single Lock screen. See the below image:

Widget 6
Adding the weather widget

Others take the form of double-length rectangles, including a more detailed weather forecast, upcoming reminders, news headlines, and information about markets and stocks. You can fit two of these, or one rectangular and two smaller circular widgets. See the following image:

Widget 7
The added weather widget

When you choose to use widgets, you forego the ability to use the Depth Effect with your wallpaper. This can be toggled using the “…” ellipsis button while customizing a wallpaper. Refer to the below image:

Widget 11
Adding Depth Effect

This effect makes it possible to overlay some elements of an image over the clock, for a more dynamic feel. It looks impressive, but it’s not particularly useful and widgets are arguably more useful.

At this point, save your newly created Lock screen wallpaper. Tap Done in the upper right-hand corner. See the below image:

Widget 8a
Save your wallpaper

Focus Modes

While selecting a Lock screen from the Lock screen gallery, tap on the Focus button to tie your chosen Lock screen to a particular Focus Mode. Assuming you have set up Focus Modes already, this lets you show relevant information while specific Focus Modes are active. See the following image:

Widget 9
Accessing Focus

You can set up a custom Focus that triggers a particular activity or use one of the common ones. Refer to the below image:

Widget 10
Selecting a Focus Mode

The Lock screen gallery and its associated widgets are available with the iOS 16 update. If you do not see these options, make sure you have updated your iPhone (and that your device is compatible with iOS 16).

Quote For the Day

Just because something doesn’t do what you planned it to do doesn’t mean it’s useless.

Thomas Edison

Tweet Info

That’s it. Please feel free to share this post! One way to share is via Twitter.

Just click the Tweet icon below. This will launch Twitter where you click its icon to post the Tweet.

Checkout TechSavvy.Life for blog posts on smartphones, PCs, and Macs! You may email us at contact@techsavvy.life for comments or questions.

I Would Like to Hear From You

Please feel free to leave a comment. I would love to hear from you. Do you have a computer or smart device tech question? I will do my best to answer your inquiry. Just send an email to contact@techsavvy.life. Please mention the device, app, and version you are using. To help us out, you can send screenshots of your data related to your question.

Author’s E-Book

You can access the e-book from a Kindle device, the Kindle App for the desktop or smartphone, which is a free app.

The author’s Vietnam eBook on the Battle for Tra Bong Vietnam: Events and Aftermath

How to Use Lock and Home Screen Wallpapers on iPhone in iOS 16+

Wallpaper is probably the easiest way to customize the look of your iPhone, and you have two areas to do it; the Home screen and the Lock screen.

RAYMOND OGLESBY @RaymondOglesby2
October 4, 2022

Wallpaper is probably the easiest way to customize the look of your iPhone, and you have two areas to do it; the Home screen and the Lock screen. Let’s explore this iOS 16+ feature.

This is for the iPhone. Screenshots are from iPhone XR running iOS 16+

Dilbert and Late
Copyright Scott Adams, Inc./Distributed by Universal Uclick for UFS

Tip: It is recommended you view the post on “How to Add Widgets on iPhone Lock Screen in iOS 16+” next.

The iPhone has supported separate wallpapers on the Home screen and Lock screen for a while, but iOS 16 introduced a big reworking of the process in 2022.

First, unlock your iPhone and tap and hold on a blank space on the Lock screen. The Lock screen will zoom out, and you will see a Customize and a plus button. Tap the plus button. Refer to the below image:

Lock 1
Selecting to add a wallpaper

If this is your first time playing with the Lock screen wallpaper in iOS 16, you will need to tap Add New when prompted. This will switch you over to the new Lock screen style. See the below image:

Lock 2
Add a new wallpaper

Next, you have a bunch of different options for wallpapers. At the top, you can select from a few categories. Scroll down to see a bunch of pre-made Lock screens. Choose a wallpaper for the Lock screen to proceed. See the following image:

Lock 3
Choosing a wallpaper

Now, once you have a wallpaper that you want to use for the Lock screen, tap the Add button in the top right-hand corner. Refer to the below image:

Lock 4
Selecting the Add button

Next, here’s where you have to option to use a different wallpaper for the Home screen. Tap Customize Home Screen to proceed. See the below image:

Lock 5
Selecting Customize Home Screen button

Now, you have a few options to choose from. You can blur the Lock screen wallpaper, choose a color based on the Lock screen wallpaper, a gradient based on the Lock screen wallpaper, or from your photos. After you have made your selection, tap Done in the top right-hand corner (if you choose a photo, you will need to tap Done twice). See the following image:

Lock 6
Adding a Home Screen wallpaper

Next, you will be brought back to the Lock screen preview screen. Tap the Lock screen to leave and see your new Lock screen and Home screen wallpapers! Refer to the below image:

Lock 7
Your Lock Screen

This is just a fraction of what you can do with the Lock screen on iOS 16+. You can also add widgets, customize the clock font, and apply a cool 3D depth effect to some wallpapers. More on this in another post as mentioned above.

Delete a Wallpaper

First, unlock your iPhone. Next, long-press anywhere on the unlocked Lock screen. See the below image:

Lock 8
Accessing the Lock Screen for deletion

Now, when the Lock screen goes into edit mode, you will see your current Lock screen as a preview among other Lock screens. Swipe to the wallpaper you want to delete. Then, swipe up on the wallpaper preview to reveal more options.

Note: The swipe-up gesture only works if you have another wallpaper added to your Lock screen collections. If you are trying to delete the only remaining Lock screen wallpaper from your iPhone, you will not be able to perform the swipe gesture on this wallpaper. 

Next, you will now see a red-colored Trash icon below the selected wallpaper. Tap on the Trash icon to delete this Lock screen wallpaper permanently from your iPhone. See the following image:

Lock 9
Selecting the Trash icon to delete

Now, to confirm your action, tap on Delete This Wallpaper in the prompt that appears at the bottom. Refer to the below image:

Lock 10
Confirming the deletion

The selected wallpaper will now be removed from the edit screen and iOS will now load up your previous wallpaper for your Lock screen. 

Quote For the Day

Technology like art is a soaring exercise of the human imagination.

Daniel Bell

Tweet Info

You are finished. Please feel free to share this post! One way to share is via Twitter.

Just click the Tweet icon below. This will launch Twitter where you click its icon to post the Tweet.

Checkout TechSavvy.Life for blog posts on smartphones, PCs, and Macs! You may email us at contact@techsavvy.life for comments or questions.

I Would Like to Hear From You

Please feel free to leave a comment. I would love to hear from you. Do you have a computer or smart device tech question? I will do my best to answer your inquiry. Just send an email to contact@techsavvy.life. Please mention the device, app, and version you are using. To help us out, you can send screenshots of your data related to your question.

Author’s E-Book

You can access the e-book from a Kindle device, the Kindle App for the desktop or smartphone, which is a free app.

The author’s Vietnam eBook on the Battle for Tra Bong Vietnam: Events and Aftermath

How to Reset Cellular Data Settings on iPhone

If you are looking at your cellular data usage in the Settings app on your iPhone, you might notice data usage statistics from a Current Period. But what exactly is the current period, and when did it start?

RAYMOND OGLESBY @RaymondOglesby2
September 27, 2022

If you are looking at your cellular data usage in the Settings app on your iPhone, you might notice data usage statistics from a Current Period. But what exactly is the current period, and when did it start? Let’s find out.

This is for the iPhone. Screenshots are from iPhone XR

Dilbert and Work
Copyright Scott Adams, Inc./Distributed by Universal Uclick for UFS

First, open the Settings app and tap Cellular in the list. Refer to the below image:

Cellular 1
Selecting Cellular option

Next, near the top of the Cellular Settings page, you will see a section titled Cellular Data. At the top of that, you will see the Current Period with a cumulative data count beside it. This is how much cellular data you have used in total during the current period.

If you have never checked this statistic in Settings before, this number can look frighteningly large. So the big question remains: How long is this current period, and when did it start? See the below image:

Cellular 2
Selecting Current Period

It turns out that, on some cellular carriers, this Current Period is tied to your actual cell phone billing cycle. On other carriers, the Current Period is an arbitrary length of time since you last reset your cellular statistics.

If you have hundreds of apps installed on your iPhone, you might never notice that you can scroll all the way to the bottom of the app list and see the date when the Current Period statistics were last reset. On our iPhone, this statistic has never been reset. See the following image:

Cellular 3
Your last reset date and time

Now, to reset the statistics for the current period, tap Reset Statistics. Refer to the below image:

Warning: You will lose all your stored Cellular data statistics, and the counts will reset to zero.

Cellular 4
Selecting Reset Statistics

With a tap of Reset Statistics, a new Current Period has just begun. Check back in:

Settings > Cellular

over time to see your statistics and which apps are using the most data.

Why and When to Reset Cellular Statistics

It is recommended to reset cellular data statistics every month to ensure that you will get a more accurate picture of your actual data usage that corresponds to the billing cycle of your current data plan or subscription.

The latest statistics reset data will be posted at the bottom of the screen.

Resetting your iPhone’s Cellular Data settings, on the other hand, can also be considered among the potential solutions when dealing with cellular data issues including no service or no signal. 

Quote For the Day

It’s impossible to move, to live, to operate at any level without leaving traces, bits, seemingly meaningless fragments of personal information.

William Gibson

Tweet Info

That’s it. Please feel free to share this post! One way to share is via Twitter.

Just click the Tweet icon below. This will launch Twitter where you click its icon to post the Tweet.

Checkout TechSavvy.Life for blog posts on smartphones, PCs, and Macs! You may email us at contact@techsavvy.life for comments or questions.

I Would Like to Hear From You

Please feel free to leave a comment. I would love to hear from you. Do you have a computer or smart device tech question? I will do my best to answer your inquiry. Just send an email to contact@techsavvy.life. Please mention the device, app, and version you are using. To help us out, you can send screenshots of your data related to your question.

Author’s E-book

You can access the e-book from a Kindle device, the Kindle App for the desktop or smartphone, which is a free app.

The author’s Vietnam eBook on the Battle for Tra Bong Vietnam: Events and Aftermath

How to Turn On iPhone’s Predictive Text

To help you type faster and more conveniently, your iPhone offers a Predictive Text feature that automatically suggests the words that you are likely to type. You can activate this feature from both Settings and your Keyboard menu on your iPhone.

RAYMOND OGLESBY @RaymondOglesby2
September 20, 2022

To help you type faster and more conveniently, your iPhone offers a Predictive Text feature that automatically suggests the words that you are likely to type. You can activate this feature from both Settings and your Keyboard menu on your iPhone. Let’s find out about this feature.

This is for the iPhone. Screenshots are from iPhone XR running iOS 15.6 +

Dilbert and Strongman
Copyright Scott Adams, Inc./Distributed by Universal Uclick for UFS

What Is Predictive Text

As the name implies, the Predictive Text feature predicts the words that you are likely going to type next. You can then tap those predicted words to add them to what you are already typing, which speeds up your input.

For example, if you start typing “How are,” the feature automatically suggests “you,” so your resulting sentence is “How are you?”

The feature predicts words based on the data it has gathered from your past conversations, writing style, and the sites you have visited in Safari. It may also use your other apps and recent activity to suggest words.

Enable Predictive Text from Settings

If you are not typing anything at the moment (meaning your keyboard is not open), use the Settings app to activate Predictive Text on your iPhone.

First, head to:

Settings > General > Keyboard.

Refer to the below image:

Predictive Text 1
Accessing the Keyboard option

Next, scroll down the Keyboards page that opens to the bottom. There, turn on the Predictive option. See the below image:

Tip: To disable Predictive Text later, toggle off the Predictive option in General > Keyboard.

Predictive Text 2
Enabling Predictive Text

You are done. From now on, your keyboard will suggest words that you should be using in your text when you’re typing something on your iPhone.


Enable Predictive Text From Keyboard Settings

If you are typing something and your iPhone’s keyboard is open, you can use an option on the keyboard itself to toggle on the Predictive Text feature.

First, open your iPhone’s keyboard, then tap and hold on to the globe icon (just beside the space bar). See the following image:

Predictive Text 3
Tap and hold the Globe icon

Next, in the menu that opens, select Keyboard Settings. Refer to the below image:

Predictive Text 4
Selecting the Keyboard Settings button

Now, on the Keyboards page, scroll down to the bottom. There, enable the Predictive feature. See the below image:

Predictive Text 5
Enabling Predictive Text

Your keyboard will now predict the words you are likely going to type. And that’s how you make typing faster and easier on your iPhone.

Quote For The Day

The real problem is not whether machines think but whether men do.

B.F. Skinner

Tweet Info

That’s it. Please feel free to share this post! One way to share is via Twitter.

Just click the Tweet icon below. This will launch Twitter where you click its icon to post the Tweet.

Checkout TechSavvy.Life for blog posts on smartphones, PCs, and Macs! You may email us at contact@techsavvy.life for comments or questions.

I Would Like To Hear From You

Please feel free to leave a comment. I would love to hear from you. Do you have a computer or smart device tech question? I will do my best to answer your inquiry. Just send an email to contact@techsavvy.life. Please mention the device, app, and version you are using. To help us out, you can send screenshots of your data related to your question.

Author’s E-Book

You can access the e-book from a Kindle device, the Kindle App for the desktop or smartphone, which is a free app.

The author’s Vietnam eBook on the Battle for Tra Bong Vietnam: Events and Aftermath

Two Little Known Safari Features for the iPhone

Apple’s mobile browser is packed with features. They make it easier to use extensions and protect your privacy.

RAYMOND OGLESBY @RaymondOglesby2
September 13, 2022

Apple’s mobile browser is packed with features. They make it easier to use extensions and protect your privacy. Let’s explore two little-known features that all iPhone owners need to know about.

Note! Technology is always changing. This means if you are implementing this post, your OS, iOS, iPadOS, and Android screens or text may not resemble this post’s contents, especially, if you are looking at a post years old.

This is for the iPhone. Screenshots are from iPhone XR running iOS 15.5+

Copyright Scott Adams, Inc./Distributed by Universal Uclick for UFS

Safari Extensions

Safari gained the ability to use extensions with the arrival of iOS 15. This allows you to vastly expand the capabilities of Apple’s browser with third-party add-ons, though you will need to go through Apple’s channels to do so.

The extensions are in the App Store. First, open the App Store. Refer to the below image:

Accessing the App Store

Next, tap on Apps at the bottom of the screen. See the below image:

Selecting Apps

Now, scroll way down to the bottom of the page and find the Safari Extensions category under Top Categories. Tap See All if it’s not visible. From here you can install extensions just as you would any other app. See the following image:

Accessing Top Categories

Next, scroll down and tap Safari Extensions. Refer to the below image:

Selecting Safari Extensions

Now, you can install extensions just as you would any other app. See the below image:

Install an extension by tapping GET

Next, many apps are bundled with Safari Extensions (just like Apple Watch apps and Home Screen widgets). To enable or disable these, head to:

Settings > Safari > Extensions

See the following image:

Safari Extensions

Advanced Privacy Features

Safari has a few privacy settings that you may have already enabled, but it’s worth checking they are on if you’re concerned about online privacy.

First, open Settings. Refer to the below image:

Accessing Settings

Now, tap Safari. See the below image:

Selecting Safari

Next, scroll down to the Privacy & Security section. You can enable or disable the listed options. We recommend enabling each option except Block All Cookies and Privacy Preserving Ad Measurement by turning their toggle to ON. See the following image:

Setting Privacy options

Now, tap the Hide IP Address and checkmark the From Trackers option. Refer to the below image:

Hide IP Address from Trackers

Quote For the Day

If you expect technology to solve your problems, you don’t understand technology or your problems.

Raymond Oglesby, author of TechSavvy.Life

Tweet Info

That’s it. Please feel free to share this post! One way to share is via Twitter.

Just click the Tweet icon below. This will launch Twitter where you click its icon to post the Tweet.

Checkout TechSavvy.Life for blog posts on smartphones, PCs, and Macs! You may email us at contact@techsavvy.life for comments or questions.

I Would Like to Hear From You

Please feel free to leave a comment. I would love to hear from you. Do you have a computer or smart device tech question? I will do my best to answer your inquiry. Just send an email to contact@techsavvy.life. Please mention the device, app, and version you are using. To help us out, you can send screenshots of your data related to your question.

Author’s E-Book

You can access the e-book from a Kindle device, the Kindle App for the desktop or smartphone, which is a free app.

The author’s Vietnam eBook on the Battle for Tra Bong Vietnam: Events and Aftermath

How to Delete Message(s) on iPhone

Your iPhone makes it super easy to remove individual text messages as well as entire conversations from the Messages app.

RAYMOND OGLESBY @RaymondOglesby2
August 30, 2022

Your iPhone makes it super easy to remove individual text messages as well as entire conversations from the Messages app. Let’s explore how to delete unwanted messages.

Warning: Once you have deleted a message or a conversation, you can not restore it, so make sure you are okay with losing your chats permanently.

This is for the iPhone. Screenshots are from iPhone XR running iOS 15.5+

Dilbert and Laser
Copyright Scott Adams, Inc./Distributed by Universal Uclick for UFS

Remove Individual Messages

To remove single or multiple select messages from your iPhone, first, launch the Messages app on your iPhone. Refer to the below image:

Message 1
Accessing Messages

Next, in the app, find and tap the conversation in which you want to delete a message.

Now, on the Message screen, tap and hold on to the message you want to remove. Then, from the menu that opens, choose More. If the conversation has only one message, you will not see More, instead, tap Delete. See the below image:

Message 2
Accessing More option

Next, beside each message on your screen, you will see a Select icon. Tap this icon for all messages that you want to remove.

Now, when you are done, in the bottom-left corner, tap the Trash icon. See the following image:

Message 3
Selecting to delete a message

Next, in the prompt that opens, select Delete Message. Refer to the below image:

Message 4
Delete a Message

Your iPhone will delete the selected messages.

Remove Entire Conversations

To remove an entire conversation from your iPhone, first, launch the Messages app on your iPhone. See the below image:

Message 5
Accessing Messages

Next, locate the conversation to delete but do not open it. On the conversation, you want to delete, swipe left. Then, from the options that appear, select Delete. See the following image:

Message 6
Selecting to delete a conversation

In the prompt that opens, choose Delete to confirm the deletion. Refer to the below image:

Message 7
Delete a conversation

Your iPhone will remove the entire chat from your Messages app.

Quote For The Day

Technology is a useful servant but a dangerous master.

Christian Lous Lange

Tweet Info

You are finished. Please feel free to share this post! One way to share is via Twitter.

Just click the Tweet icon below. This will launch Twitter where you click its icon to post the Tweet.

Checkout TechSavvy.Life for blog posts on smartphones, PCs, and Macs! You may email us at contact@techsavvy.life for comments or questions.

I Would Like to Hear From You

Please feel free to leave a comment. I would love to hear from you. Do you have a computer or smart device tech question? I will do my best to answer your inquiry. Just send an email to contact@techsavvy.life. Please mention the device, app, and version you are using. To help us out, you can send screenshots of your data related to your question.

Author’s E-Book

You can access the e-book from a Kindle device, the Kindle App for the desktop or smartphone, which is a free app.

The author’s Vietnam eBook on the Battle for Tra Bong Vietnam: Events and Aftermath

How to Turn Off Data Roaming on Smartphones

Roaming is a term that often gets mentioned in data plans for smartphones. Are you technically “roaming” when you’re out and about? Well, that’s not exactly what it means in the eyes of your mobile carrier.

RAYMOND OGLESBY @RaymondOglesby2
August 16, 2022

Roaming is a term that often gets mentioned in data plans for smartphones. Are you technically “roaming” when you are out and about? Well, that’s not exactly what it means in the eyes of your mobile carrier. Let’s explore data roaming.

This is for smartphones

Dilbert and Chip
Copyright Scott Adams, Inc./Distributed by Universal Uclick for UFS

Data Roaming

Data roaming is actually a very simple concept. You have a mobile carrier that provides data to your smartphone when it’s not connected to Wi-Fi. However, as you know, your carrier’s network is not limitless.

So what happens when you go somewhere not covered by your carrier’s network? That’s where data roaming comes in. Roaming allows you to hop on another network so you can still make calls, send texts, and use wireless data when your carrier’s network is disconnected.

This typically works through agreements between your carrier and other networks. The most common scenario in which data roaming comes into play is traveling to a country where your carrier does not have a presence. You can roam on the other network and not need to sign up for something new.

The Cost

Unfortunately, data roaming is not usually included for free as part of your data plan. If you want unlimited roaming you will need to pay for one of the more expensive plans. Roaming charges vary from carrier to carrier.

In general, if you do not pay extra for unlimited roaming, you will pay for how much you use. That could be around $0.25 per minute on calls, $0.10 per SMS, and $3 per MB of data. Needless to say, those numbers can add up quickly, so make sure to read the details of your data plan to find out what you could be charged.

Avoid the Charges

The good news is you probably do not have to worry about roaming charges. Your carrier may not have 5G or LTE coverage in all places, but there is almost always some lower-speed coverage everywhere in the country. Data roaming is primarily for traveling internationally.

That being said, there are some things you can do to be absolutely sure you are never roaming and being charged for it.

On the Android

On Android, go to:

Settings > Network & Internet > SIM

and toggle Roaming to OFF.

On the Samsung

On Samsung o to:

Settings > Connections > Mobile Networks

and toggle Data Roaming to OFF.

On the iPhone

On the iPhone, go to:

Settings > Cellular > Cellular Data Options

and toggle Data Roaming to OFF. Refer to the below image:

Roaming 1
Turn OFF Data Roaming

Tip: If you are not traveling internationally, you can also consider paying for an international data plan with your cellular carrier. You can also consider getting a SIM card and cellular data plan in the country you will be staying in. Both of these are good ways to avoid the usual pay-for-the-data-you-use roaming charges, which can be expensive.

That’s all there is to data roaming. It’s primarily a feature of mobile networks for traveling outside of your country of residence. In your day-to-day life, it’s not something to worry about. However, if you plan on traveling, you will want to see what your carrier has to offer.

Quote For The Day

In software systems it is often the early bird that makes the worm.

Alan Perlis

Tweet Info

That’s it. Please feel free to share this post! One way to share is via Twitter.

Just click the Tweet icon below. This will launch Twitter where you click its icon to post the Tweet.

Checkout TechSavvy.Life for blog posts on smartphones, PCs, and Macs! You may email us at contact@techsavvy.life for comments or questions.

I Would Like to Hear From You

Please feel free to leave a comment. I would love to hear from you. Do you have a computer or smart device tech question? I will do my best to answer your inquiry. Just send an email to contact@techsavvy.life. Please mention the device, app, and version you are using. To help us out, you can send screenshots of your data related to your question.

Author’s E-book

You can access the e-book from a Kindle device, the Kindle App for the desktop or smartphone, which is a free app.

The author’s Vietnam eBook on the Battle for Tra Bong Vietnam: Events and Aftermath

How to Make Text Shortcuts on iPhone

Typing things out on an iPhone keyboard can be tiresome, but it does not have to be that way for everything. You can make custom text shortcuts to automatically be replaced with longer words or phrases. It’s a super handy feature.

RAYMOND OGLESBY @RaymondOglesby2
August 9, 2022

Typing things out on an iPhone keyboard can be tiresome, but it does not have to be that way for everything. You can make custom text shortcuts to automatically be replaced with longer words or phrases. It’s a super handy feature. Let’s explore how to set up text shortcuts.

This is for the iPhone. Screenshots are from iPhone XR running iOS 15.6+

Dilbert and Fired
Copyright Scott Adams, Inc./Distributed by Universal Uclick for UFS

There’s a lot you can do with the iPhone’s Text Replacement feature. One example is included on every iPhone by default; omw is automatically replaced with On my way. You can use that same idea for anything. All you need is a shortcut and a phrase to go with it.

Note: The Text Replacement feature only works with the default iPhone keyboard, not third-party keyboards from the App Store.

First, open the Settings app on your iPhone (this is also available on iPad). Refer to the below image:

Text 1
Selecting the Settings app

Next, go to the General section. See the below image:

Text 2
Selecting the General option

Now, select the Keyboard settings. See the following image:

Text 3
Selecting the Keyboard option

Next, go to Text Replacement. Refer to the below image:

Text 4
Selecting the Text Replacement option

Now, tap the “+” icon in the top right-hand corner. See the below image:

Text 5
Selecting the add icon

Next, enter a Phrase and a Shortcut. The Phrase will replace the Shortcut. Tap Save when you are done. See the following image:

Text 6
Entering a Phrase and Shortcut

Now, your shortcut will be added. Refer to the below image:

Text 7
Your added shortcut

Next, you are ready to use it! We are using the Notes app for our example. Simply type the shortcut and you will see the full phrase appear above the keyboard. You can tap the phrase to insert it or continue typing by tapping the spacebar or return and it will automatically be inserted. Tap Done to finish in the Notes app. See the below image:

Text 8
Using your new text shortcut

This is a great time-saving feature for typing out longer phrases. One handy tip is to use your name as a shortcut for your entire address.

Quote For the Day

Technology should improve your life… not become your life.

Billy Cox

Tweet Info

You are finished. Please feel free to share this post! One way to share is via Twitter.

Just click the Tweet icon below. This will launch Twitter where you click its icon to post the Tweet.

Checkout TechSavvy.Life for blog posts on smartphones, PCs, and Macs! You may email us at contact@techsavvy.life for comments or questions.

I Would Like to Hear From You

Please feel free to leave a comment. I would love to hear from you. Do you have a computer or smart device tech question? I will do my best to answer your inquiry. Just send an email to contact@techsavvy.life. Please mention the device, app, and version you are using. To help us out, you can send screenshots of your data related to your question.

Author’s E-book

You can access the e-book from a Kindle device, the Kindle App for the desktop or smartphone, which is a free app.

The author’s Vietnam eBook on the Battle for Tra Bong Vietnam: Events and Aftermath