Six Best Shortcuts for iPhone

RAYMOND OGLESBY @RaymondOglesby2
October 3, 2023

This is for the iPhone. Screenshots are from iPhone 14 Pro running iOS 16+

Since the release of iOS 13, the Shortcuts app has come preinstalled on compatible devices, hosting useful automation and timesaving techniques ranging from automating texts to organizing your photos.

Making the most of these shortcuts can, however, feel a little foreign to first-time users. A lot of Apple device owners do not even know what the app is. It comes with a fairly extensive library of pre-existing shortcuts, but beyond this lies a world of user-generated shortcuts.

In principle, iOS Shortcuts are fairly simple, considering they are based on IFTTT (If This Then That) automation; trigger results in an action. However, in practice it is not always so simple; there are multitudes of triggers, and the debugging is entirely nonexistent.

The learning curve is staggeringly high. To help you get started, here are some of the most useful, easy-to-use Shortcuts you should have on your device, plus they are free.

Installing shortcuts has become simplified over the years. Previously, you had to go to the Settings app on your iPhone and allow to install shortcuts from third-party links. Now, there’s no such need. Just click on the download links we have provided and use the Add Shortcut button to add the shortcut to your library. You may be asked to set certain options for the Shortcuts to function, if so, just follow the shortcut instructions. Not mentioned in this post, is another favorite, Charge Time shortcut which can be opened in the link below.

Charge Time

If you do not want your iPhone or iPad to die at the most unfortunate times, Super-Low Battery v2.0 is the shortcut you should use. While the low-power mode on iOS devices does well enough job for normal days, sometimes you need that extra hour or two of usage off your iPhone, and the low-power mode does not cut it. Enter the Super-Low Battery v2.0 shortcut.

Using the Super-Low Battery v2.0 shortcut you can enable super low-power mode. When run, it not only stops background processes and activates native low-power mode, but also turns off WiFi, and Mobile Data. It also turns on Airplane Mode and sets both Brightness and Volume to 0.  It’s best to use when your iPhone’s battery falls below 10%. After running it, you should have a few hours left. If you want, you can make a call or send a text, deactivate it by running the shortcut, make that call or send a text, and run it again. Click this link to Download Super-Low Battery v2.0. Refer to the below image:

Best Shortcut 1
Super-Low Battery v2.0 shortcut

Another favorite to share is Dark Safari. Since the introduction of Dark Mode on iOS 13, it’s helpful at night. It reduces strain on your eyes and ensures you are not blinded by bright light when you open an app. That said, when reading articles on Safari, the dark mode fails. This shortcut will help you solve this problem.

It creates a black background with bold white text to make reading easier on the eyes. Unlike other similar shortcuts, it does not invert the colors, but rather actually changes the colors of a website. This will improve your late-night reading. Click this link to Download Dark Safari. See the below image:

Best Shortcut 2
Dark Safari shortcut

Another powerful shortcut created by Federico is Apple Frames. It allows you to apply frames to your iOS screenshots. I know most people will not need it, but if you are a writer, blogger, or content creator using screenshots, this is for you. (As for our blog posts, we use a subscription-based third-party screen capture program on the desktop). Click this link toDownload Apple Frames. See the following image:

Best Shortcut 3
Apple Frames shortcut

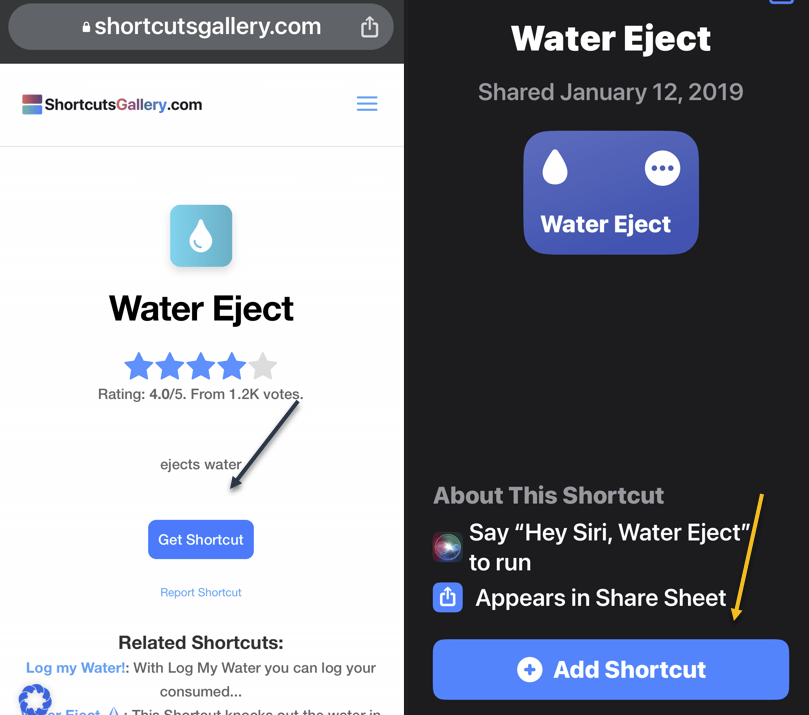
The iPhone has become water resistant since the iPhone 7, but your iPhone can get water damage. Sometimes water can get stuck inside the speakers and microphone grills of the iPhone, compromising the audio quality of the microphone speakers. You can solve this issue by using the Water Eject shortcut. When you tap the shortcut it plays a series of sounds that can eject water from the speaker grills. Click this link to Download Water Eject. Refer to the below image:

Best Shortcut 4
Water Eject shortcut

Calculating the tip on a bill is always harder than it should be, especially if you are in a hurry at the end of the meal. After running this shortcut, you simply enter the bill and choose the tip percent, such as 12%, 15%, 18%, or 20%. You will immediately see the tip amount and final bill total including the tip. Click this link to Download Calculate Tip. See the below image:

Best Shortcut 5
CalculatSe Tip shortcut

Ever since Apple integrated Shazam into iOS, it has been easy to find the name of whatever song is playing around you. But Shazam++ takes that a step further; this shortcut will use Shazam to identify the song and then offer you a menu of options that include sharing the song or playing it in your favorite music player such as Spotify or Apple Music.

Shazam++ presents a small yet significant addition to the tool, presenting you with various actions once it’s identified the song, including sharing the song or playing it directly in the music streaming service, from where you can easily add it to your playlists. Click this link to Download Shazam ++. See the following image:

Best Shortcut 6
Shazam ++ shortcut

Open your Shortcuts app and head to My Shortcuts gallery where your six shortcuts will be displayed as shown below:

Best Shortcut 7
Your shortcuts gallery

Disclaimer

Technology is always changing and rarely is there static tech for smartphones and desktops. Thus, the contents of this post are only valid at the time of writing. Blog posts older than six months may have directions incompatible with your device or OS. Hopefully, older post content will continue to work as advertised. Thank you for reading TechSavvy.Life for Technology at Work For You.

The only thing worse than starting something and failing is not starting something.

Seith Godin

You are finished. Please feel free to share this post! One way to share is via Twitter.

Just click the Tweet icon below. This will launch Twitter where you click its icon to post the Tweet.

Checkout TechSavvy.Life for blog posts on smartphones, PCs, and Macs! You may email us at contact@techsavvy.life for comments or questions.

Please feel free to leave a comment. I would love to hear from you. Do you have a computer or smart device tech question? I will do my best to answer your inquiry. Just send an email to contact@techsavvy.life. Please mention the device, app, and version you are using. To help us out, you can send screenshots of your data related to your question.

You can access the e-book from a Kindle device, the Kindle App for the desktop or smartphone, which is a free app.

The author’s Vietnam eBook on the Battle for Tra Bong Vietnam: Events and Aftermath

How to Hide and Unhide Spotify Songs

If you do not wish to listen to certain songs or hide those songs so they do not play when you are using Spotify, we will show you how. You can unhide your songs in the future if you change your mind.

RAYMOND OGLESBY @RaymondOglesby2
September 12, 2023

This is for iPhone and Android. Screenshots are from iPhone 14 Pro running iOS 16+ and Windows 10

If you do not wish to listen to certain songs or hide those songs so they do not play when you are using Spotify, we will show you how. You can unhide your songs in the future if you change your mind.

Note: You can not hide songs in your own playlists. If you do not want a specific song in your playlist, simply remove it from the list.

Hide Songs on Spotify

To hide a song so it does not play when you are listening to your music, use the following steps in the Spotify app on your iPhone or Android phone.

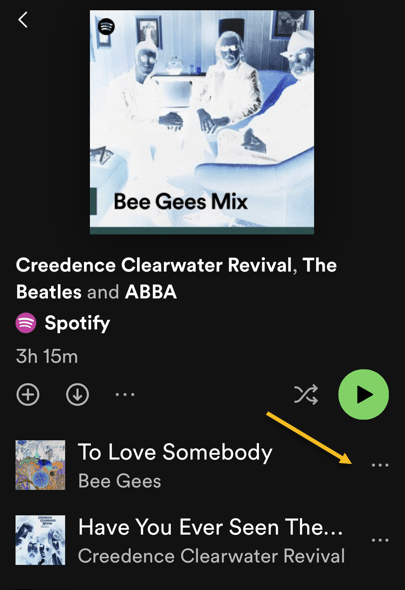
First, launch Spotify on your phone and find the music track to hide. Then, next to the song, tap the three dots (the Menu icon). Refer to the below image:

Spotify 1
Accessing the Menu of the song to Hide

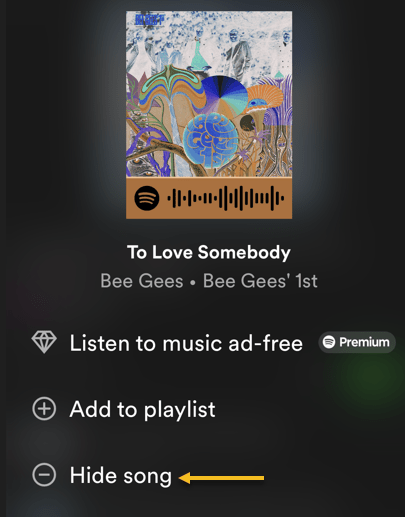
Next, in the menu that opens, select Hide Song. See the below image:

Spotify 2
Selecting the option to Hide your song

Now, Spotify will immediately hide your song in your list. See the following image:

Spotify 3
Your hidden song is greyed out

Unhide Songs on Spotify

If you have changed your mind about a song and want to unhide that song, follow the following steps to see your hidden songs and unhide them.

First, open Spotify on your phone. Then, find the playlist or album where you hid your song.

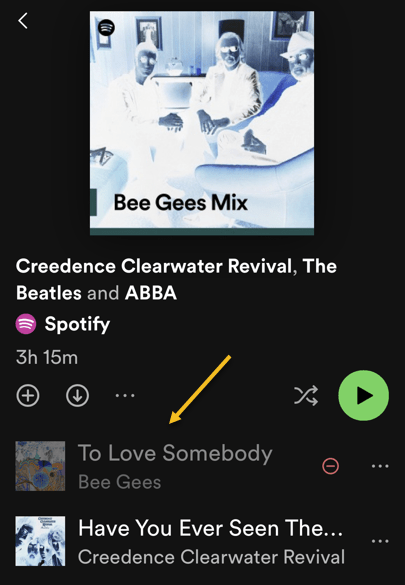
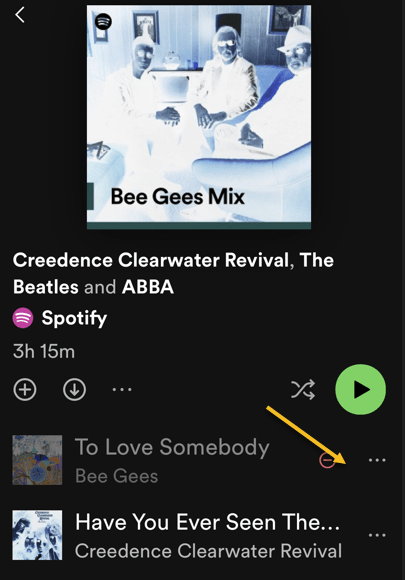
Next, find your hidden song (which will be grayed out), and next to that song, tap the three dots (the Menu icon). Refer to the below image:

Spotify 4
Accessing the Menu to unhide a song

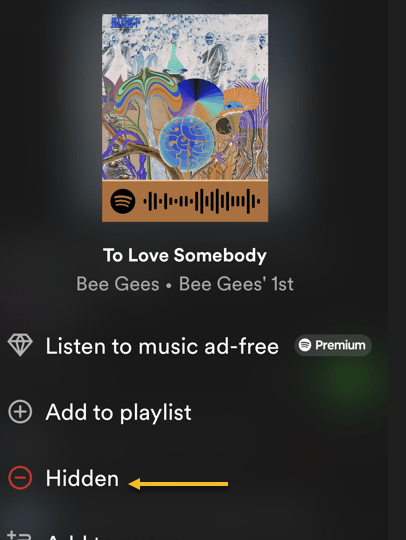
Now, in the open menu, select Hidden. See the below image:

Spotify 5
Selecting the option to unhide your song

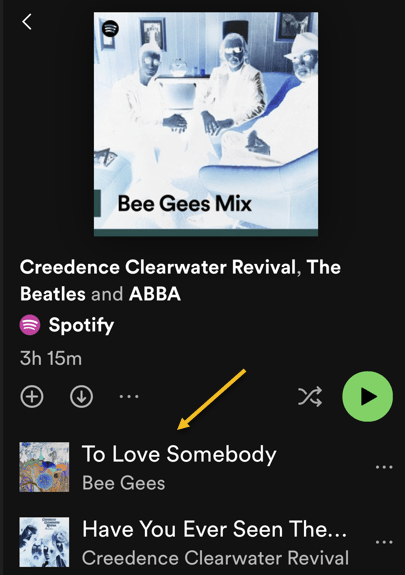
Now, Spotify will unhide your song, allowing you to tap and play it. See the following image:

Spotify 6
Your hidden song is now visible


For Desktop Only

You can not hide songs on Spotify’s desktop and web versions. Only the platform’s mobile app allows you to hide and unhide songs, as of this writing.

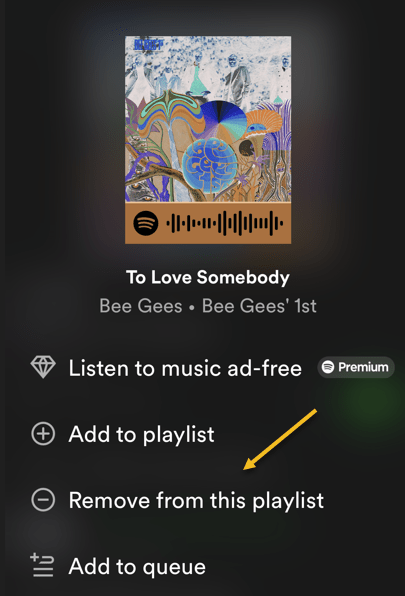
If you have an unwanted song in your playlist (not a Spotify sample playlist), remove it from your list and the app will not play it. To do that, access your playlist and find that song. Next to the song, click the three dots (the Menu icon) and choose Remove from this playlist. See the following image:

Spotify 7
Selecting to remove your song on the desktop

Spotify will remove the selected song from your playlist, and you are all done.

Disclaimer

Technology is always changing and rarely is there static tech for smartphones and desktops. Thus, the contents of this post are only valid at the time of writing. Blog posts older than six months may have directions incompatible with your device or OS. Hopefully, older post content will continue to work as advertised. Thank you for reading TechSavvy.Life for Technology at Work For You.

Quote For the Day

“Motivation is what gets you started. Habit is what keeps you going.

Jim Rohn

Tweet Info

That’s it. Please feel free to share this post! One way to share is via Twitter.

Just click the Tweet icon below. This will launch Twitter where you click its icon to post the Tweet.

Checkout TechSavvy.Life for blog posts on smartphones, PCs, and Macs! You may email us at contact@techsavvy.life for comments or questions.

I Would Love to Hear From You

Please feel free to leave a comment. I would love to hear from you. Do you have a computer or smart device tech question? I will do my best to answer your inquiry. Just send an email to contact@techsavvy.life. Please mention the device, app, and version you are using. To help us out, you can send screenshots of your data related to your question.

Author’s E-Book

You can access the e-book from a Kindle device, the Kindle App for the desktop or smartphone, which is a free app.
The author’s Vietnam eBook on the Battle for Tra Bong Vietnam: Events and Aftermath

Five Ways to Tell if Your iPhone or Android is Being Tapped

To see if your phone is being tapped, look for apps using too much battery or data, listen for weird noises in phone calls, and watch for weird behavior like random mic activation or redirected websites. You can also use MMI or USSD codes to check your call forwarding status.

RAYMOND OGLESBY @RaymondOglesby2
August 15, 2023

This is for the iPhone and Android. Screenshots are from iPhone 14 Pro running iOS 16+

For better or worse, our smartphones are always with us, so if someone taps into the camera or mic, it’s a serious problem. But how can you tell if your phone is being tapped, and how do you protect yourself?

How to Tell

If someone gains access to your phone they can potentially send fake emails, read your personal messages, record your calls, and all sorts of other nefarious behavior. But can you even tell if someone’s hacked your phone? Let’s explore a few ways to find out.

1) Battery Life is Failing

If your phone constantly overheats seemingly for no reason and the battery drains quickly without any apparent cause, your phone might be hacked. Malicious software running in the background can drain your battery without any apps running and can be anything from malware that’s reading your email to call-recording spyware.

If you are already a heavy phone user, your battery probably gets hot anyway. Streaming video or playing games for long periods of time, for example, will cause your phone to heat up which is pretty normal. If you have not been using your phone a lot and the battery still heats up or can no longer hold a charge, you might want to check for malicious software.

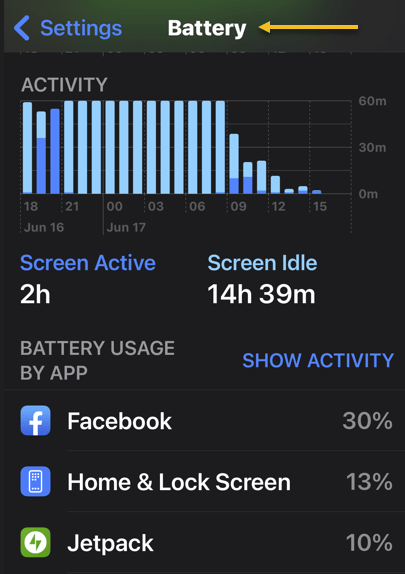
To do that, check your battery settings. On either an Android or iPhone you can see which apps are using the most battery by going to:

Settings > Battery

where you will see which apps are using the most power. If there are apps on that list you do not remember installing, or a third-party app that should not be using much power, uninstall them immediately. Refer to the below image:

iPhone Tapped 1
Battery Settings

2) Weird Noises

A high-pitched hum or strange, pulsating static on the line could be a sign your calls are being recorded. If you hear static or other strange sounds like clicking or beeping even when you are not calling someone, that’s another sign, especially when your phone’s been tapped by the police.

Hearing these sounds once or twice at random is probably okay, but if it happens consistently, check your phone. You can try using a sound-bandwidth sensor app from another phone set to a low frequency. If it picks up several sounds over a minute, your phone may be compromised.

3) High Data Use

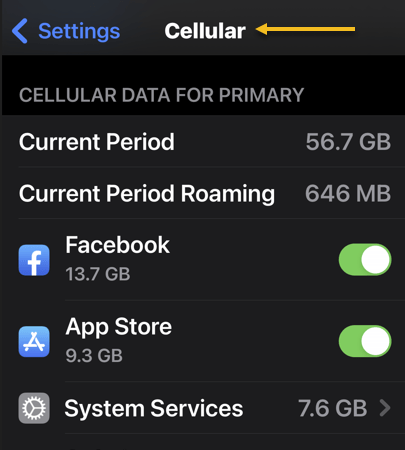
Spyware and malware will routinely use a lot of data; constantly sending information back to whoever hacked your device. If your location or data icons at the top of your screen regularly move or light up, that could be a sign someone is sending data from your phone or controlling it remotely. Higher than normal data use can also show up as a higher phone bill if you do not have an unlimited data plan.

iPhones and Android phones both let you check your data usage to see if your phone is (possibly) tapped. To do it on an iPhone, go to:

Settings > Cellular

See the below image:

iPhone Tapped 2
Cellular Settings

On Android, go to

Settings > Network & Internet

It may also be under:

Connections > Data usage or > Mobile data usage.

4) Unusual Activity

If your phone has trouble shutting down, that could be a sign it’s being tapped. Randomly shutting down on its own is another sign of trouble. When turning off your phone, check to see if the backlight stays on even when the phone is powered off or if the shutdown fails altogether.

Other strange behaviors your phone could exhibit if it’s been compromised include popup ads, the screen lighting up at random, and messages you do not recognize that push you to follow unfamiliar links. Also, performance often slows way down.

Watch out for your camera or mic turning on randomly. If you keep seeing the camera light go on when you did not open an app that uses the camera, it could be a sign your phone’s been hacked. Some malicious software lets hackers access your camera without turning the light on, so always dig deeper if you think something’s fishy.

5) Websites Look Strange

Some forms of malicious software can infiltrate your browser, showing you a fake web page that looks legitimate, then harvesting your login credentials when you type them in. If you are browsing on your phone and the web page you are looking at acts strange or does not look quite like it’s supposed to, close the browser and check your phone for malware by scanning it or taking it to a professional.

Protect Your Phone From Being Tapped

If you want to make sure your phone is never compromised, avoid downloading any apps that are not from the Google Play Store or Apple’s App Store. Even when using the mainstream app stores, though, do a Google search of the app and the developer to double-check that they are on the level before you download; bad apps can and do occasionally get past their vetting processes.

Download trusted anti-malware and antivirus apps and use them regularly. If you can afford a premium subscription, do it. If not, there are some great free options available.

Using a VPN to obscure your true IP address can make it harder for someone who’s trying to track you to pin down your location. If you can, try a few out and use one regularly when are in public or on an unsecured connection

.You can also check and see whether your calls and messages are being forwarded to other devices using Man-Machine Interface (MMI) codes. They will be different depending on the network but can allow you to discover and cut off any unauthorized forwarding. To use them, dial the desired MMI code with your keypad, then hit the call button.

If you are on a GSM network (like AT&T and T-Mobile):

  • *#002# — Lists all call and data forwarding settings
  • ##002# — Clears all call and data forwarding settings

If you’re on a CDMA network (like Verizon and US Cellular):

  • *72 — Lists all call and data forwarding settings
  • *73 — Clears all call and data forwarding settings

Unfortunately, MMI codes only work on Android devices, but you can use the USSD (Unstructured Supplementary Service Data) code *#21# on an iPhone to check your call forwarding status and see if your calls are being forwarded anywhere else.

If you are done your due diligence but you are still experiencing these symptoms, take your phone to a professional. Odds are they will have the tools to scan more deeply and remove any bad software that could be causing the problem.

Disclaimer

Technology is always changing and rarely is there static tech for smartphones and desktops. Thus, the contents of this post are only valid at the time of writing. Blog posts older than six months may have directions incompatible with your device or OS. Hopefully, older post content will continue to work as advertised. Thank you for reading TechSavvy.Life for Technology at Work For You.

Quote For the Day

Our inventions are wont to be pretty toys, which distract our attention from serious things. They are but improved means to an unimproved end.

David Thoreau

Tweet Info

That’s it. Please feel free to share this post! One way to share is via Twitter.

Just click the Tweet icon below. This will launch Twitter where you click its icon to post the Tweet.

Checkout TechSavvy.Life for blog posts on smartphones, PCs, and Macs! You may email us at contact@techsavvy.life for comments or questions.

I Would Like to Hear From You

Please feel free to leave a comment. I would love to hear from you. Do you have a computer or smart device tech question? I will do my best to answer your inquiry. Just send an email to contact@techsavvy.life. Please mention the device, app, and version you are using. To help us out, you can send screenshots of your data related to your question.

Author’s E-Book

You can access the e-book from a Kindle device, the Kindle App for the desktop or smartphone, which is a free app.

The author’s Vietnam eBook on the Battle for Tra Bong Vietnam: Events and Aftermath

How to Save iPhone Voicemails

The Visual Voicemail feature on iPhone makes it super easy to access and manage your voicemails, freeing you from the drudgery of dialing a number and doing it the old-fashioned way. Not only that, but it also lets you save important voicemails to your iPhone with just a few steps.

RAYMOND OGLESBY @RaymondOglesby2
July 4, 2023

This is for the iPhone. Screenshots from iPhone Pro 14 running iOS 16+

The Visual Voicemail feature on iPhone makes it super easy to access and manage your voicemails, freeing you from the drudgery of dialing a number and doing it the old-fashioned way. Not only that, but it also lets you save important voicemails to your iPhone with just a few steps. Let’s explore how this is done.

Save Voicemails on iPhone

First, open the Phone app and choose the Voicemail tab in the bottom right-hand corner. Refer to the below image:

Voicemail 1
Selecting the Voicemail tab

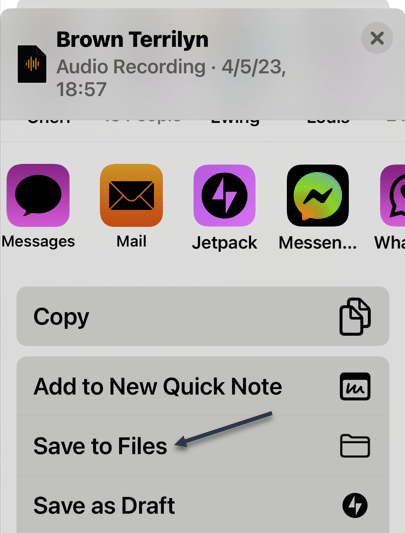
Next, you should see a list of your voicemails. Scroll to the message you want to save and tap it. This will bring up a pop-up window with several controls, including a play button, speaker icon, and phone button. On the top right, you will see a Share button that looks like a box with an arrow coming out of it. Tap it to bring up the share sheet and see all the possible ways you can save or share your voicemail. See the below image:

Voicemail 2
Selecting the Share button

Now, to save the voicemail locally on your iPhone,, select Save to Files and then On My iPhone. Choose a folder where you want to store the voicemail and hit Save.

Voicemails displayed here are stored on your cellular carrier’s servers until you download them.

You can also save the voicemail directly to a cloud storage service like iCloud. To do so, choose the Save to Files option (same as above) from the Share menu. See the following image:

Voicemail 3
Selecting the Save to Files option

Next, select iCloud Drive or Google Drive under the list of storage locations. Refer to the below image:

Voicemail 4
Choosing a location to save the voicemail

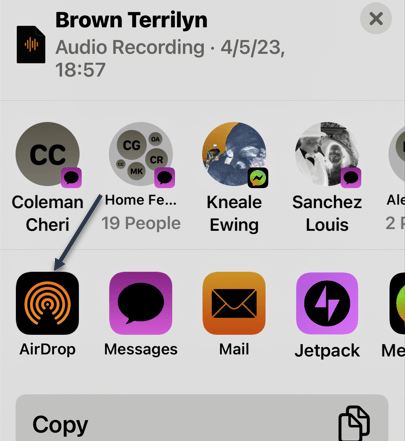
If you wish to export voicemails to your Mac or IPad, you can use AirDrop. From the Share menu, tap the AirDrop icon and choose your Mac or iPad. Ensure the receiving device has AirDrop set to receive from Contacts only. The file will be transferred instantly and saved to the Downloads folder on the receiving device. See the below image:

Voicemail 5
Selecting the Airdrop button

This approach only works if your carrier offers Visual Voicemails support. If you can see a list of voicemails when you open the Voicemail tab, your carrier supports the feature. On the other hand, if your carrier requires dialing in or other methods for accessing your messages, this method will not work.

Save Noicemails Without Visual Voicemail

You can also use Screen Recording to save and share voicemails. This is a great workaround if you do not have access to Visual Voicemail and thus can not save messages using the standard method discussed above. This method also comes in handy if you want to capture additional context along with the voicemail contents, such as caller ID and timestamps.

Tip: This will also let you save audio “voicemails” and video messages from apps that do not normally allow you to save or download those messages.

First, to screen record a voicemail, use the Screen Recorder. First, swipe down to reveal Control Center and tap the Screen Recording button. See the following image:

Voicemail 6
Selecting the Screen Recording button

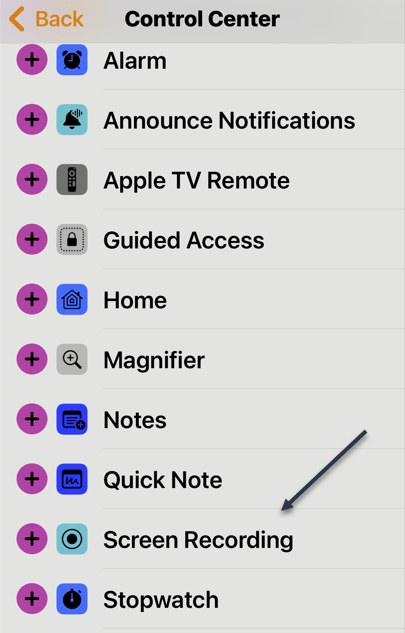
If you do not see the button, go to:

Settings > Control Center > More Controls

and add the Screen Recording toggle by clicking the green + icon. Refer to the below image:

Voicemail 7
Finding the Screen Recording option

Also, make sure you have turned on the microphone in the Screen Recording settings, or your recording will have no audio. You can check this by holding the Screen Recording toggle. Lastly, head to the Phone app, play the voicemail through the speaker, and let Screen Recording do its job.

Next, tap the Screen Recording button when you are done to finish saving the recording. The screen recording will be saved to the Photos app.

After exporting your voicemails to your iPhone, it’ll be a good idea to back them up to a cloud storage service such as iCloud or Google Drive. This will allow you to easily access your messages from other devices, and you will not have to worry about losing them if you ever lose or reset your iPhone.

Disclaimer

Technology is always changing and rarely is there static tech for smartphones and desktops. Thus, the contents of this post are only valid at the time of writing. Blog posts older than six months may have directions incompatible with your device or OS. Hopefully, older post content will continue to work as advertised. Thank you for reading TechSavvy.Life for Technology at Work For You.

Quote For the Day

Even in such technical lines as engineering, about 15% of one’s financial success is due one’s technical knowledge and about 85% is due to skill in human engineering, to personality and the ability to lead people.

Dale Carnegie

Tweet Info

You are finished. Please feel free to share this post! One way to share is via Twitter.

Just click the Tweet icon below. This will launch Twitter where you click its icon to post the Tweet.

Checkout TechSavvy.Life for blog posts on smartphones, PCs, and Macs! You may email us at contact@techsavvy.life for comments or questions.

I Would Like to Hear From You

Please feel free to leave a comment. I would love to hear from you. Do you have a computer or smart device tech question? I will do my best to answer your inquiry. Just send an email to contact@techsavvy.life. Please mention the device, app, and version you are using. To help us out, you can send screenshots of your data related to your question.

Author’s E-Book

You can access the e-book from a Kindle device, the Kindle App for the desktop or smartphone, which is a free app.
The author’s Vietnam eBook on the Battle for Tra Bong Vietnam: Events and Aftermath

What is the New Rapid Response from Apple

Rapid Security Responses are a new software release for iPhone, iPad, and Mac. They deliver important security improvements between software updates — for example, improvements to the Safari web browser, the WebKit framework stack, or other critical system libraries. They may also be used to mitigate some security issues more quickly, such as issues that might have been exploited or reported to exist “in the wild.”

RAYMOND OGLESBY @RaymondOglesby2
May 9, 2023

This is for iPhone, iPad, and Mac

Rapid Security Responses deliver significant security improvements between software updates.

Rapid Security Responses are a new software release for iPhone, iPad, and Mac. They deliver important security improvements between software updates; for example, improvements to the Safari web browser, the WebKit framework stack, or other critical system libraries. They may also be used to mitigate some security issues more quickly, such as issues that might have been exploited or reported to exist “in the wild.”

New Rapid Security Responses are delivered only for the latest version of iOS, iPadOS, and macOS — beginning with iOS 16.4.1, iPadOS 16.4.1, and macOS 13.3.1.

By default, your device allows Rapid Security Responses to be applied automatically and, if necessary, will prompt you to restart your device. To check your device settings:

On iPhone or iPad head to:

  • Settings > General > Software Update > Automatic Updates

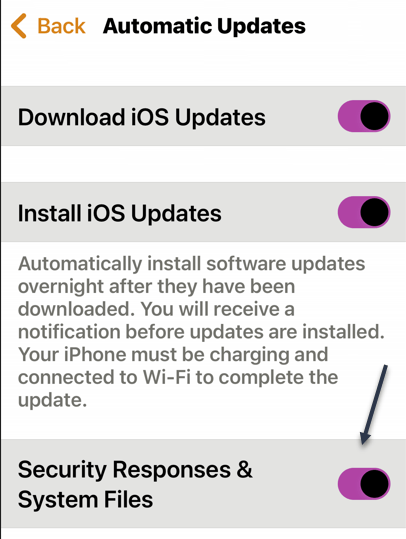
Then make sure that Security Responses & System Files are turned on. Refer to the below image:

Rapid 1
Security Responses enabled

On a Mac head to:

  • Apple menu  > System Settings >General > Software Update > Show Details button next to Automatic Updates

Then make sure that Install Security Responses and system files are turned on.

When a Rapid Security Response has been applied, a letter appears after the software version number, as in this example: iOS 16.4.1 (a).

Suppose you choose to turn off this setting or not to apply Rapid Security Responses when they are available. In that case, your device will receive relevant fixes or mitigations when they have included in a subsequent software update.

Source: Apple Support

Disclaimer

Technology is always changing and rarely is there static tech for smartphones and desktops. Thus, the contents of this post are only valid at the time of writing. Blog posts older than six months may have directions incompatible with your device or OS. Hopefully, older post content will continue to work as advertised. Thank you for reading TechSavvy.Life for Technology at Work For You.

Quote For the Date

Even in such technical lines as engineering, about 15% of one’s financial success is due one’s technical knowledge and about 85% is due to skill in human engineering, to personality and the ability to lead people.

Dale Carnegie

Tweet Info

That’s it. Please feel free to share this post! One way to share is via Twitter.

Just click the Tweet icon below. This will launch Twitter where you click its icon to post the Tweet.

Checkout TechSavvy.Life for blog posts on smartphones, PCs, and Macs! You may email us at contact@techsavvy.life for comments or questions.

I Would Like to Hear From You

Please feel free to leave a comment. I would love to hear from you. Do you have a computer or smart device tech question? I will do my best to answer your inquiry. Just send an email to contact@techsavvy.life. Please mention the device, app, and version you are using. To help us out, you can send screenshots of your data related to your question.

Author’s E-Book

You can access the e-book from a Kindle device, the Kindle App for the desktop or smartphone, which is a free app.
The author’s Vietnam eBook on the Battle for Tra Bong Vietnam: Events and Aftermath

How to Check if Your Smartphone Has 5G

With 5G frequently being portrayed as a game-changer in cellular technology, you may wonder: is my phone 5G?

RAYMOND OGLESBY @RaymondOglesby2
May 4, 2023

This is for Android and iPhone. Screenshots are from Android and iPhone Pro 14 running iOS 16+

With 5G frequently being portrayed as a game-changer in cellular technology, you may wonder: is my phone 5G? Let’s find out in a few simple steps.

5G Explained

5G, a successor to 4G, is a moniker used to describe the fifth-generation cellular network technologies used by carriers worldwide. It comes with a promise of faster data speeds, greater bandwidth, and reduced latency than previous-generation cell networks. So if you use 5G on your phone, you should be able to download content faster, stream high-definition movies and TVs without buffering, play online video games without connectivity issues, and do much more.

But like any new major technology, it needs new hardware. Carriers are upgrading hardware on their end to deliver 5G networks, and as a consumer, you need a 5G-compatible phone to enjoy its benefits. Any 5G compatible phone has specialized hardware, such as newer cellular modems that can connect to the 5G networks. So how do you check if you have a 5G phone?

How to Know if Your Smartphone Has 5G

As of March 2023, pretty much all new high-end and mid-range phones being launched can use a 5G network. And the same is true for quite a few budget phones as well. But if you are unsure whether your phone is 5G, it’s pretty easy to check.

But remember, apart from having 5G hardware, a phone must be certified to work on a carrier’s 5G network. So if your 5G phone did not come certified to work on your carrier, it would need that certification, which often accompanies a software update to enable carrier support. Otherwise, you will not be able to use 5G on your device.

Is My iPhone 5G Compatible

Apple has included 5G hardware in every iPhone shipped since iPhone 12 series, including the iPhone SE (3rd gen). So if you own iPhone 12 series or newer, your phone is 5G-compatible. Apple’s relatively simple iPhone lineup makes knowing if your iPhone is 5G compatible easy. But as mentioned earlier, it’s not as simple as having 5G hardware in the phone; you also need the necessary software to support your carrier.

To check if your iPhone can work with your carrier’s 5G networks, first, navigate to:

Settings > Mobile Data > Mobile Data Options > Voice & Data

Or

Settings > Cellular > Cellular Data

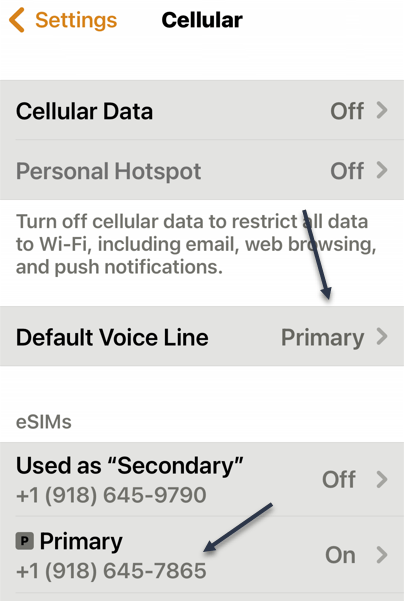
If you do not see either one, go back one screen. You may see that you have an eSIM. The Cellular Data option will point to Primary or Secondary. Under eSIMs section, tap the corresponding option. Refer to the below image:

iPhone 5G 1
Selecting your Primary option

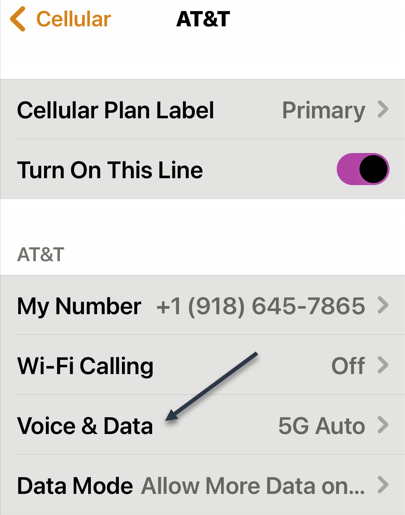
Next, tap the Voice & Data option. See the below image:

iPhone 5G 2
Selecting Voice & Data option

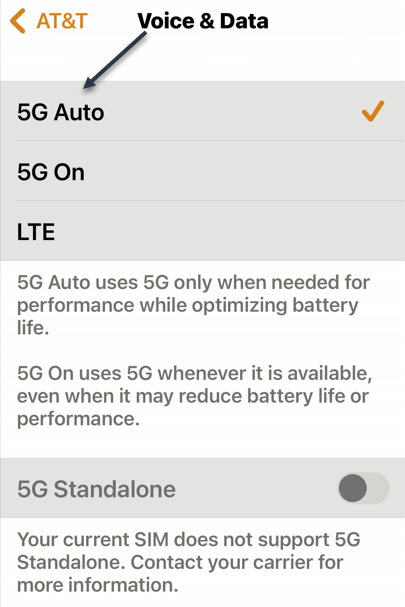
Now, if you see 5G Auto or 5G On options listed, your iPhone can work with your carrier’s 5G networks. But if only LTEor 3G options are listed, your iPhone will not work with your mobile operator’s 5G network. See the following image:

iPhone 5G 3
Your iPhone supports5G

In case you own an iPhone 12 series or newer iPhone, but there is no 5G on the Voice & Data page for your carrier, you will have to wait for Apple to update iOS to include the necessary support for your cell carrier.

What is 5G+

If you happen to be lucky enough to see this symbol in your status bar, you have access to a multi-gigabit connection. 5G+ indicates you’re connected to a mmWave 5G NR tower, short-range radios that deliver breakneck speeds. Performing a speed test will reveal download speeds of 1–3 Gbps.

Is My Android 4G or 5G Compatible

The process of checking 5G compatibility on an Android phone is similar to iPhone, but given the diverse nature of Android handsets, the options and their location in the phone software can differ depending on your device manufacturer.

So if you own an Android phone, you can confirm whether your phone is 4G or 5G by navigating to:

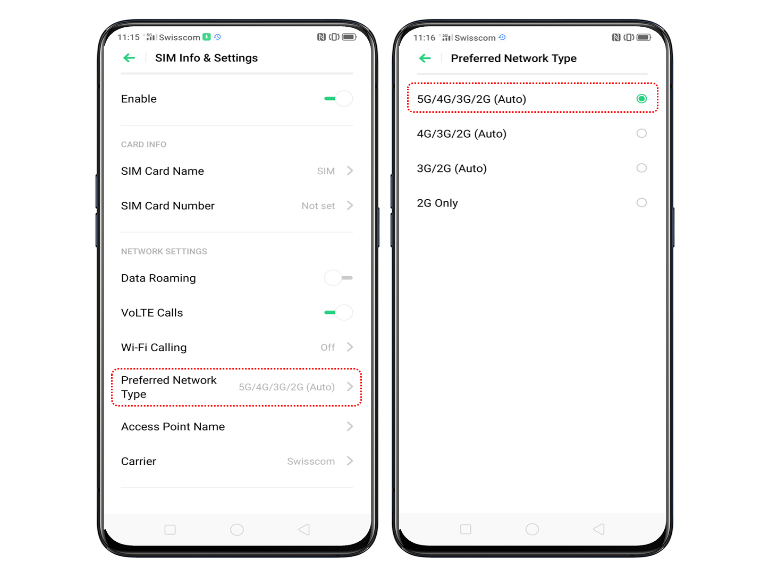
Settings > Network & internet > SIMs > Preferred Network Type

If you find 5G listed as one of the options, then your phone supports 5G. Otherwise, see if you have 4G or LTE listed; their presence will indicate support for 4G. Refer to the below image:

Android 5G
Your Android phone supports 5G

However, if you do not see 5G option on your phone even though it’s marketed as a 5G phone by the manufacturer, it’s not currently certified to support 5G on your carrier. You will have to wait for the phone manufacturer to release a software update adding the necessary support, or it’s possible your phone supports some 5G bands, but not the ones used by your mobile operator.

Another way to confirm 5G support on your Android phone is to check its specifications on the manufacturer’s website. But this will only tell you whether your phone has 5G hardware or not. For carrier-specific compatibility, the previously-mentioned method is the best way.

Is 5G In My Area

5G compatibility is only one part of the equation when it comes to enjoying 5G data speeds and other benefits. You will also need 5G network coverage at your location. As of 2023, 5G networks are still being deployed in the US, so not every city or town has extensive 5G coverage. But carriers are gradually rolling out 5G networks, so the places that do not have 5G coverage right now may get it in the coming months or years.

If you want to check if your carrier offers 5G in your area, the best way is to contact them directly. You can call their customer service or ask a representative at their store. Alternatively, you can check the network coverage maps available on their websites. All three major carriers in the US—AT&T, T-Mobile, and Verizon—allow you to check their 5G and 4G coverage on their website. You can even search your address or zip code for coverage information.

Disclaimer

Technology is always changing and rarely is there static tech for smartphones and desktops. Thus, the contents of this post are only valid at the time of writing. Blog posts older than six months may have directions incompatible with your device or OS. Hopefully, older post content will continue to work as advertised. Thank you for reading TechSavvy.Life for Technology at Work For You.

Quote For the Day

Technology is both a tool for helping humans and for destroying them. This is the paradox of our times which we’re compelled to face.

Frank Herbert

Tweet Info

That’s it. Please feel free to share this post! One way to share is via Twitter.

Note! WordPress has or will be stopping service with Twitter. So, the below Twitter button may not work.

Just click the Tweet icon below. This will launch Twitter where you click its icon to post the Tweet.

Checkout TechSavvy.Life for blog posts on smartphones, PCs, and Macs! You may email us at contact@techsavvy.life for comments or questions.

I Would Like to Hear From You

Please feel free to leave a comment. I would love to hear from you. Do you have a computer or smart device tech question? I will do my best to answer your inquiry. Just send an email to contact@techsavvy.life. Please mention the device, app, and version you are using. To help us out, you can send screenshots of your data related to your question.

Author’s E-Book

You can access the e-book from a Kindle device, the Kindle App for the desktop or smartphone, which is a free app.

The author’s Vietnam eBook on the Battle for Tra Bong Vietnam: Events and Aftermath

3 iPhone Settings to Check

Year after year, Apple rolls out new features and settings for its iPhones, adding more customization options that change how we use our phones.

RAYMOND OGLESBY @RaymondOglesby2
April 25, 2023

Year after year, Apple rolls out new features and settings for its iPhones, adding more customization options that change how we use our phones.

Now is a good time to review some settings. Take a few minutes to peruse these three settings and make sure you are getting the most out of your iPhone.

This is for the iPhone. Screenshots are from iPhone 14 Pro running iOS 16+

Check Individual Settings

First, if a factory reset is too drastic, you can handpick the settings that need a refresh. Head to:

Settings > General > Transfer or Reset iPhone > Reset

Next, tap Reset All Settings to refresh your iPhone’s network settings, keyboard dictionary, location settings, privacy settings, and Apple Pay cards all in one shot, without deleting your photos, contacts, or other data and media. Refer to the below image:

iPhone Check 1
Reset Settings

Or update them one by one (the preferred method).

  • Having connectivity problems? Choose Reset Network Settings to remove previously used networks and VPNs (that were not installed using a configuration profile).
  • If there’s an issue with your phone’s layout, try Reset Home Screen Layout to return Apple’s built-in apps to the Home screen, like they would be on a new phone out of the box.
  • Each time you tap on a word or spelling the phone does not know, it notes it and saves the information to your dictionary. If something goes wrong, try Reset Keyboard Dictionary to erase all the words you have added and reset the suggested words you see while typing.
  • To revoke location access for people or apps, tap Reset Location and Privacy to restore those settings to their default. (For people, this can also be managed from the Find My app.) When you re-open apps that used your location, like Uber or Google Maps, they will likely ask you to grant them access to your location again.

Enable Safety Check

In iOS 16, Apple added Safety Check to quickly disconnect from people and apps that may be tracking you, either with or without your knowledge. In the case of domestic abuse or other harmful situations, this feature can help restore control of the iPhone to its owner.

It can also be helpful to revisit share settings that you made in the past and forgot about to disconnect from anyone who may still have access to your content, location, or settings.

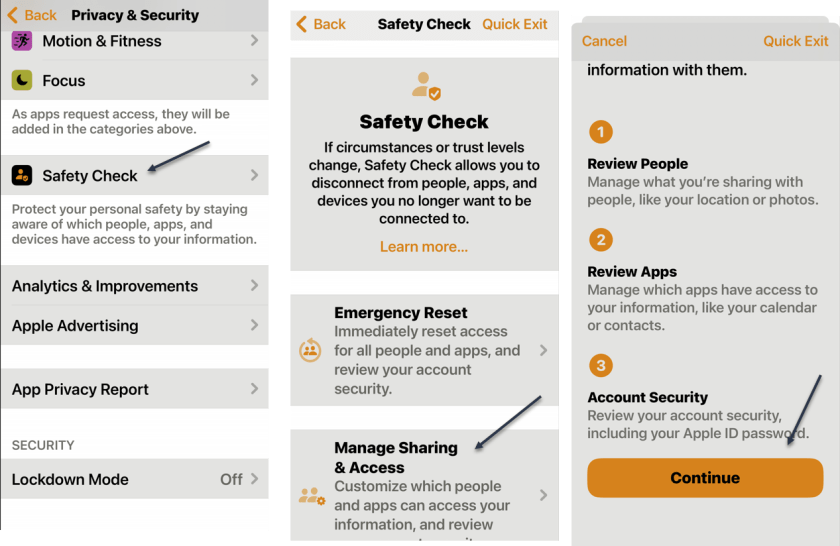
First, to review the people and apps you are sharing information with, head to

Settings > Privacy & Security > Safety Check > Manage Sharing & Access

to see your current settings and decide if you want to change anything or not. See the below image:

iPhone Check 4
Running Safety Check

Fix Notifications

If there are some apps that are not notifying you when you think they should be, there is no single solution to fix those settings. Instead, you will have to change things manually for individual apps: First, head to:

Settings > Notifications

to find a list of all the apps on your phone. Next, choose Scheduled Summary to see if any apps have been set to deliver notifications at a specific time.

You can also inspect an individual app. An app’s notifications can be enabled or disabled from the Allow Notifications toggle at the top of the screen. You can also decide whether the app notifies you on the Lock Screen, Notification Center, and uses Banners.

If you scroll to the bottom of the Notifications section, you can turn off, or back on, AMBER Alerts, Emergency Alerts, and Public Safety Alerts. See the following image:

iPhone Check 7
Fix Notifications
Disclaimer

Technology is always changing and rarely is there static tech for smartphones and desktops. Thus, the contents of this post are only valid at the time of writing. Blog posts older than six months may have directions incompatible with your device or OS. Hopefully, older post content will continue to work as advertised. Thank you for reading TechSavvy.Life for Technology at Work For You.

Quote For the Day

Science knows no country, because knowledge belongs to humanity, and is the torch which illuminates the world.

Louis Pastuer

Tweet Info

You are finished. Please feel free to share this post! One way to share is via Twitter.

Just click the Tweet icon below. This will launch Twitter where you click its icon to post the Tweet.

Checkout TechSavvy.Life for blog posts on smartphones, PCs, and Macs! You may email us at contact@techsavvy.life for comments or questions.

I Would Like to Hear From You

Please feel free to leave a comment. I would love to hear from you. Do you have a computer or smart device tech question? I will do my best to answer your inquiry. Just send an email to contact@techsavvy.life. Please mention the device, app, and version you are using. To help us out, you can send screenshots of your data related to your question.

Author’s E-Book

You can access the e-book from a Kindle device, the Kindle App for the desktop or smartphone, which is a free app.
The author’s Vietnam eBook on the Battle for Tra Bong Vietnam: Events and Aftermath

How to Play Secret Background Sounds for Sleeping on iPhone

You do not actually need a sleep machine or sound apps if you have an iPhone. There’s a hidden feature to play sleep sounds from your iPhone that includes rain sounds, white noise, and others. This feature was first introduced in iOS 15.

RAYMOND OGLESBY @RaymondOglesby2
April 4, 2023

You do not actually need a sleep machine or sound apps if you have an iPhone. There’s a hidden feature to play sleep sounds from your iPhone that includes rain sounds, white noise, and others. This feature was first introduced in iOS 15. Let’s explore this feature.

This is for the iPhone. Screenshots are from iPhone 14 Pro running iOS 16+

While not technically a “secret,” the sleep sounds built into iOS are not easy to find. Apple has them labeled as Background Sounds, and they are four levels deep in the Accessibility settings. Siri can not start the sleep sounds, so you are stuck navigating the Settings just to turn it on or off.

The good news is you can make a Shortcut to drastically improve the experience. The benefit is you do not need to rely on a third-party app that could have annoying ads or stream over the Internet all night.

Playing the Sleep Background Sounds

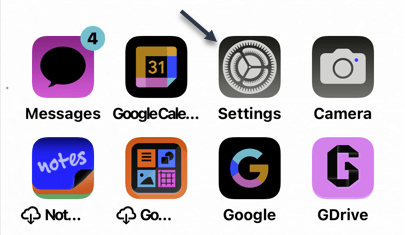
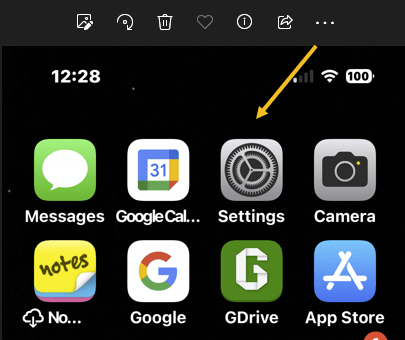
You will find these sounds in your iPhone’s Accessibility settings. First, open the Settings app on your iPhone or iPad. Refer to the below image:

Rain Sound 1
Accessing Settings

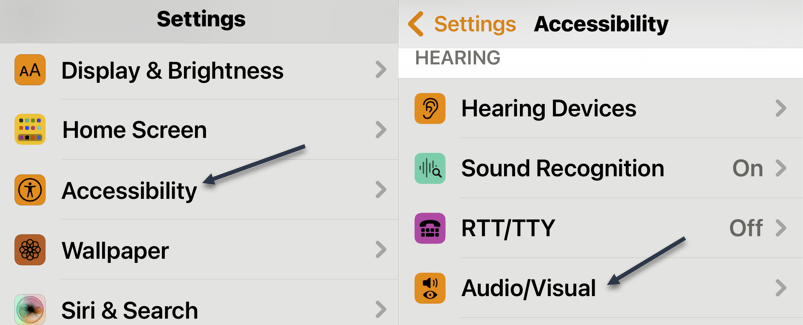
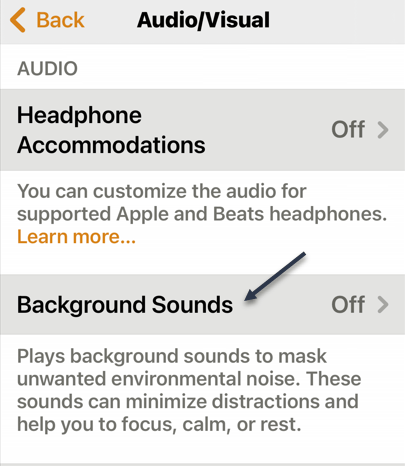
Next, scroll down and select Accessibility and then tap Audio/Visual. See the below image:

Rain Sound 2
Accessing Audio/Visual

Now. you can select Background Sounds. See the following image:

Rain Sound 4
Selecting Background Sounds

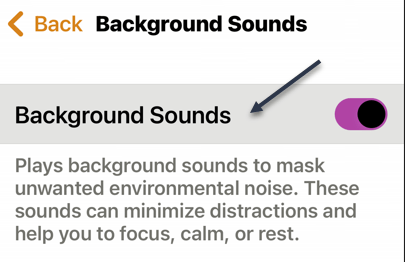
Next, to turn on the sounds, simply toggle the switch to ON at the top of the screen. See the below image:

Rain Sound 5
Toggle ON Background Sounds

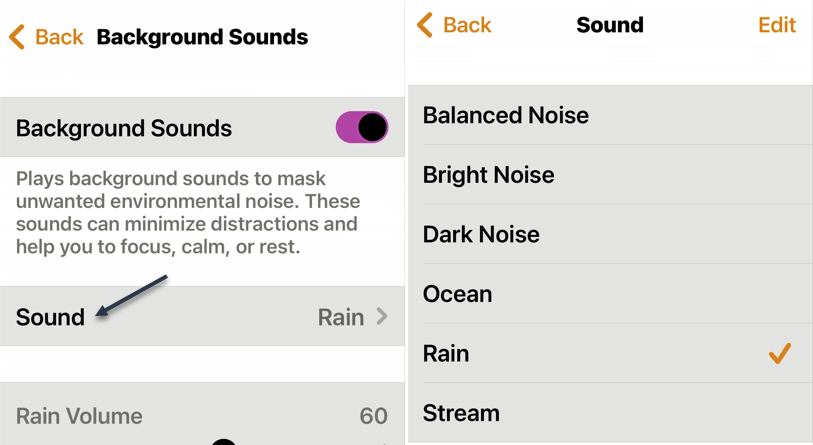
There are a few things to tweak on this page as well. Now, you can tap Sound to choose between a few white noise levels, ocean, rain, or stream. See the following image:

Rain Sound 6
Selecting a sound

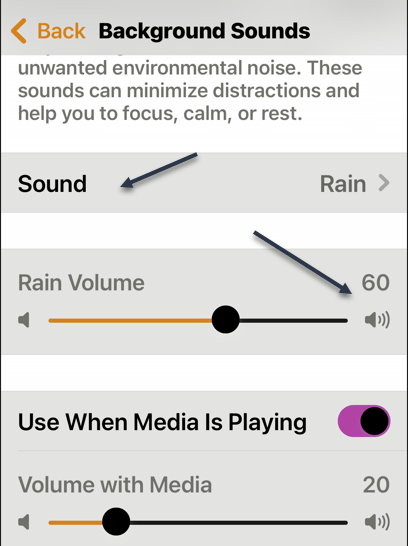
Next, you can adjust the volume level, choose if you want it to play while other media is playing, and adjust the volume level for that as well. The volume level defaults to 60% of the master volume you have set on your iPhone. See the following image:

Rain Sound 7
Adjusting the volume

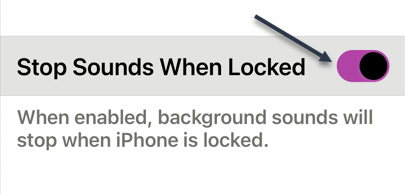
Lastly, decide if you want the sounds to stop when the device is locked. Refer to the below image:

Rain Sound 8
Toggle ON to stop Sounds on the Lock screen

That’s all there is to it. This is a nice feature, but it’s not easy to get to. Keep reading to fix this.

Create a Background Sounds Shortcut

We will be utilizing the iPhone’s Shortcuts app to create a shortcut that can toggle the Background Sounds on and off directly from the Home screen.

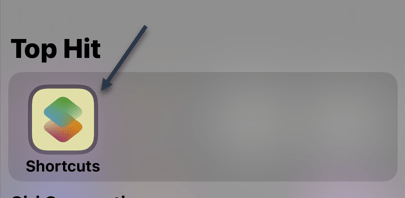
First, open the Shortcuts app. (You may have to Search for the app.). See the below image:

Rain Sound 9
Opening Shortcuts app

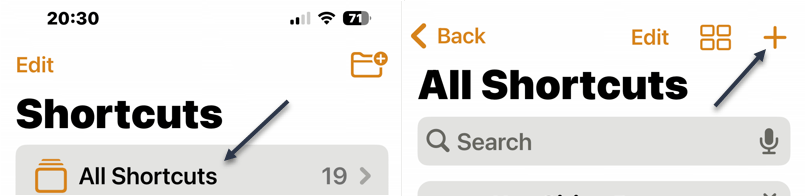
Next, tap the plus (+) icon in the top right to create a new shortcut. See the following image:

Rain Sound 10
Selecting to Add a Shortcut

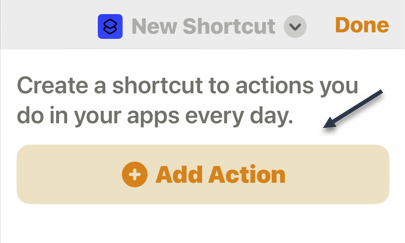
Now, tap Add Action. Refer to the below image:

Rain Sound 12
Selecting to Add an Action

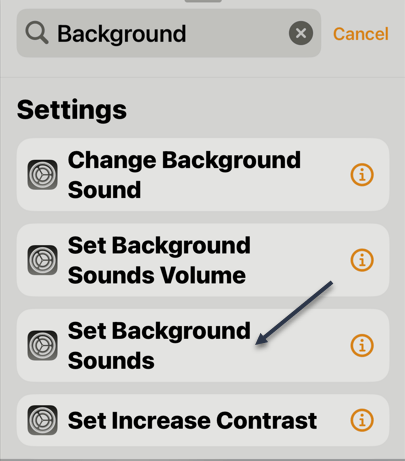
Next, use the search bar to find Set Background Sounds. See the below image:

Rain Sound 13
Selecting Set Background Sounds

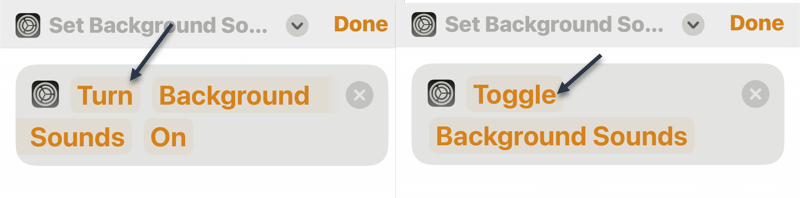
Now, tap Turn in the text box and switch it to tap Toggle. This can be tricky. See the below image:

Rain Sound 14
Your actions

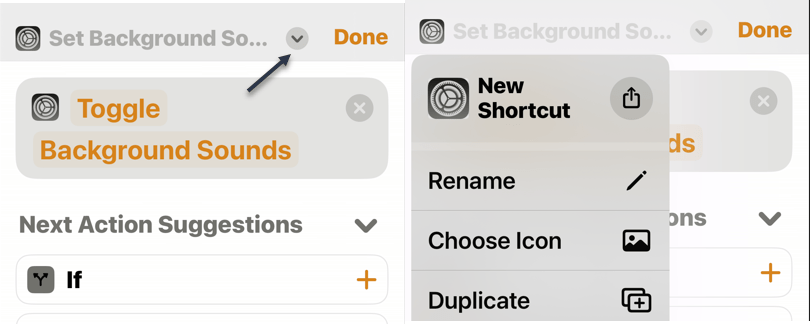
Next, you can rename the Shortcut and customize the color and icon. To do so, tap the drop-down arrow at the top of the screen. See the following image:

Rain Sound 16
Setting Background Sounds options

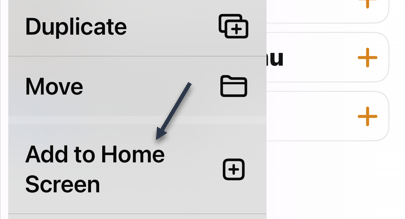
Now, select Add to Home Screen from the drop-down menu. Refer to the below image:

Rain Sound 17
Selecting Add to the Home screen

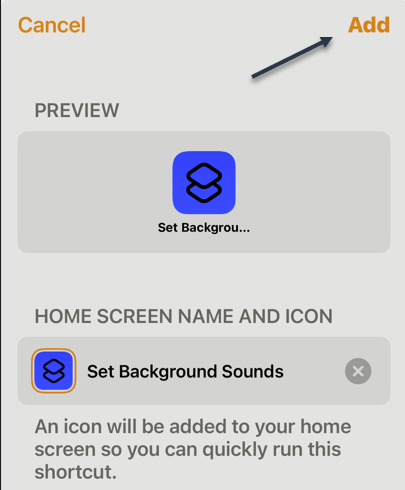
Next, tap Add on the next screen. See the below image:

Rain Sound 18
Adding to the Home screen

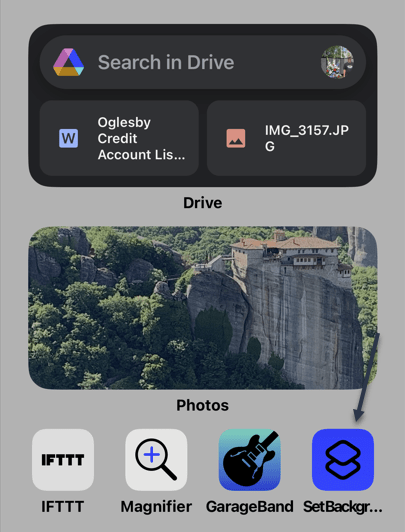
Now, when you tap the Shortcut on the Homepage screen, it will toggle the sleep sounds on or off. Note! The Shortcut volume is set to 100%. See the following image:

Rain Sound 19
Tapping to play the Shortcut

This is a much, much easier way to turn the sleep sounds on at night. It’s strange that Apple has this feature buried so deep in Settings. The fact that Siri can not even play them; when Google Assistant has the ability; is even more odd.

Disclaimer

Technology is always changing and rarely is their static tech for smartphones and desktops. Thus, the contents of this post are only valid at the time of writing. Blog posts older than six months may have directions incompatible with your device or OS. Hopefully, older post content will continue to work as advertised. Thank you for reading TechSavvy.Life for Technology at Work For You.

Quote for the Day

Not finance. Not strategy. Not technology. It is teamwork that remains the ultimate competitive advantage, both because it is so powerful and so rare.

Patrick Lencioni

Tweet Info

Yea! You are finished. Please feel free to share this post! One way to share is via Twitter.

Just click the Tweet icon below. This will launch Twitter where you click its icon to post the Tweet.

Checkout TechSavvy.Life for blog posts on smartphones, PCs, and Macs! You may email us at contact@techsavvy.life for comments or questions.

I Would Like to Hear From You

Please feel free to leave a comment. I would love to hear from you. Do you have a computer or smart device tech question? I will do my best to answer your inquiry. Just send an email to contact@techsavvy.life. Please mention the device, app, and version you are using. To help us out, you can send screenshots of your data related to your question.

Author’s E-Book

You can access the e-book from a Kindle device, the Kindle App for the desktop or smartphone, which is a free app.
The author’s Vietnam eBook on the Battle for Tra Bong Vietnam: Events and Aftermath

How to Backup Your iPhone to iCloud

Backing up your iPhone is just as important as backing up your computer. You have items stored on your device that you do not want to lose if your iPhone becomes lost, stolen, or inoperable. Fortunately, backing up to iCloud is easy.

RAYMOND OGLESBY @RaymondOglesby2
March 28, 2023

Backing up your iPhone is just as important as backing up your computer. You have items stored on your device that you do not want to lose if your iPhone becomes lost, stolen, or inoperable. Fortunately, backing up to iCloud is easy. Let’s explore how this is done.

This is for the iPhone. Screenshots are from iPhone 14 Pro running iOS 16+

Reasons to Backup

Having backups of your data is a good idea no matter where you store it. In fact, we recommend keeping multiple copies of anything you backup so that if one method fails for some reason you still have another. There is no such thing as having too many backups.

Even if you already have backups on multiple physical hard drives, backing up to iCloud gives you an all-important offsite backup. That makes backups one of the best uses of spare iCloud storage.

It’s also smart to make sure your data is all backed up when it’s time to upgrade phones so you can set it up in a snap from the data in iCloud. The same applies to upgrading to a new version of iOS, just in case something goes wrong.

Of course, you will have to make sure you have enough storage in your iCloud account. How much you need will depend on how much data you have stored on your iPhone, but you will get a notification if your storage is not big enough when you initiate the backup. There are a few things you can do to free up space, and if you can not make the room you do have a few options for saving money on an iCloud storage upgrade. Be prepared for some frustration, though, because iCloud’s tier scheme is in need of an update.

Your Backup Includes

Whether you perform a manual backup to iCloud or set up automatic backups that run each day, the same items normally stored on your physical device will back up to iCloud. These items are included in the backup:

  • App data
  • iPhone settings
  • Home screen and app layout
  • iMessage, SMS, and MMS messages
  • Photos and videos
  • Purchase history from the App Store, Books Store, and iTunes
  • Ringtones
  • Visual Voicemail

Additionally, if you use iOS 11 or earlier, voice memos are included. And, if you own an Apple Watch, those backups are also included unless you use Family Setup for your Watch.

Many other items on your iPhone already get backed up to iCloud by default, and they include contacts, calendars, notes, reminders, voice memos, bookmarks, iCloud messages, and iCloud photos.

Sync Your iPhone Backup to iCloud

You can perform a one-time, manual backup of your iPhone to iCloud. This is a good option if you just purchased a new iPhone or are preparing to update your version of iOS but do not want to have your data backed up every day. Even if you have already set up automatic updates, this will force iCloud to update.

First, ensure you are connected to Wi-Fi and then open the Settings on your iPhone. Select your name at the top and then tap iCloud. Refer to the below image:

Backup 1
Accessing iCloud

Next, select iCloud Backup and tap Back Up Now. See the below image:

Backup 2
Selecting Back Up Now

You may receive an alert before the backup begins. This can be from one of the following:

  • If you do not have enough iCloud storage space available for your backup, you will see a notification. You can then follow the prompts to upgrade your iCloud storage plan.
  • If you have iCloud backups turned off for any of your apps, you will see a notification. You can select iCloud Settings to turn on backups for those apps or Continue to back up without that app data.

See the following image:

Backup 3
Notification Message

It can take up to several minutes for the backup process to run, depending on the amount of data on your device. So be sure you stay connected to your Wi-Fi network during the process.

Once complete, you will see the date and time of the last successful backup below Back Up Now. Refer to the below image:

Backup 4
Backing up your iPhone

Automatically Backup Your iPhone

Performing regular backups of your iPhone is essential so that you do not lose any important items. You can set iCloud to automatically sync your data, purchases, and other items on a regular schedule. Go to the same spot in your Settings as above:

Your Name > iCloud > iCloud Backup

Then, turn ON the toggle at the top for Back Up This iPhone. See the below image:

Backup 5
Enable Back Up your iPhone

Optionally, you can enable the toggle to Back Up Over Cellular if you lose your Wi-Fi connection. Just note that it may affect your cellular data plan usage.

To ensure your device is ready for automatic backup, simply make sure you are on Wi-Fi, connect your iPhone to its power source, and enable the Lock screen. Your device will then automatically back up to iCloud. The ideal time for this is during your standard charging time, like when you are asleep.

Just like backing up your iPhone manually, you can then see the date and time for your last successful backup on the iCloud Backup screen. See the following image:

Backup 6
Backup success

View Backup Details

To see more than the date and time of the last backup update, such as the size and data from which apps were included, head back to the iCloud Backup screen. In Settings:

Your Name > iCloud > iCloud Backup

select your device at the bottom. You will then see a summary of details at the top and the app data backed up directly beneath. Refer to the below image:

Backup 8
Your backup details

You can also see the size of your next backup. This is a good time to confirm that you have enough iCloud storage space available and upgrade if necessary. Remember, you receive 5GB of free iCloud storage but can upgrade to obtain more directly from your device.

Disclaimer

Technology is always changing and rarely is their static tech for smartphones and desktops. Thus, the contents of this post are only valid at the time of writing. Blog posts older than six months may have directions incompatible with your device or OS. Hopefully, older post content will continue to work as advertised. Thank you for reading TechSavvy.Life for Technology at Work For You.

Quote For the Day

It’s not information overload. It’s filter failure.

Clay Shirky

Tweet Info

That’s it. Please feel free to share this post! One way to share is via Twitter.

Just click the Tweet icon below. This will launch Twitter where you click its icon to post the Tweet.

C

Checkout TechSavvy.Life for blog posts on smartphones, PCs, and Macs! You may email us at contact@techsavvy.life for comments or questions.

I Would Like to Hear From You

Please feel free to leave a comment. I would love to hear from you. Do you have a computer or smart device tech question? I will do my best to answer your inquiry. Just send an email to contact@techsavvy.life. Please mention the device, app, and version you are using. To help us out, you can send screenshots of your data related to your question.

Author’s E-Book

You can access the e-book from a Kindle device, the Kindle App for the desktop or smartphone, which is a free app.
The author’s Vietnam eBook on the Battle for Tra Bong Vietnam: Events and Aftermath

Buying Used Phones Is On the Rise

You do not always need the greatest, shiniest thing when it comes to smartphones. After all, a new phone is often a very expensive purchase.

RAYMOND OGLESBY @RaymondOglesby2
March 14, 2023

You do not always need the greatest, shiniest device for smartphones. After all, a new phone is often a very expensive purchase. More people are realizing that, as new numbers show used phones are more popular than ever.

Sales of used smartphones are higher than ever now, as over 282 million used phones were reportedly sold through 2022, according to data from the IDC. This represents an 11.5% year-on-year increase, and while new phones are still selling like hotcakes, it does show a growing trend of people buying second-hand instead. The second-hand market is full of great deals, letting you get old phones for really cheap or even knocking a few hundred bucks off a current, slightly used model.

The reason for this is not particularly hard to guess. Economic inflation was a problem for most of 2022 (and has not gone away), and buying a brand-new smartphone is probably not a priority for people with other bills to pay. The iPhone 14 Pro Max can start at $1,100, while you can get used iPhone 12 or 13 devices for as low as $300.

It’s considered good practice to buy a used, older flagship model than going for a new smartphone

Courtesy of: The Register

Disclaimer

Technology is always changing, and rarely is there static tech for smartphones and desktops. Thus, the contents of this post are only valid at the time of writing. Blog posts older than six months may have directions incompatible with your device or OS. Hopefully, older post content will continue to work as advertised. Thank you for reading TechSavvy.Life for Technology at Work For You.

Quote For the Day

What did people do when they went to the bathroom before smartphones?

Aaron Cobra

Tweet Info

That’s it. Please feel free to share this post! One way to share is via Twitter.

Just click the Tweet icon below. This will launch Twitter where you click its icon to post the Tweet.

Checkout TechSavvy.Life for blog posts on smartphones, PCs, and Macs! You may email us at contact@techsavvy.life for comments or questions.

I Would Like to Hear From You

Please feel free to leave a comment. I would love to hear from you. Do you have a computer or smart device tech question? I will do my best to answer your inquiry. Just send an email to contact@techsavvy.life. Please mention the device, app, and version you are using. To help us out, you can send screenshots of your data related to your question.

Author’s E-Book

You can access the e-book from a Kindle device, the Kindle App for the desktop or smartphone, which is a free app.

The author’s Vietnam eBook on the Battle for Tra Bong Vietnam: Events and Aftermath