This is an informational blog post about how an iPhone is designed, manufactured, tested, marketed and shipped. I learned a lot about one of the greatest achievements in technology and hope you will to.
This is for an iPhone

Did you know your iPhone screen is made up of eight layers? Each one plays an integral role in making sure users get the best experience every time the phone is used. Beyond the display, are many other layers, about 176 layers for iPhone 11 Pro Max.
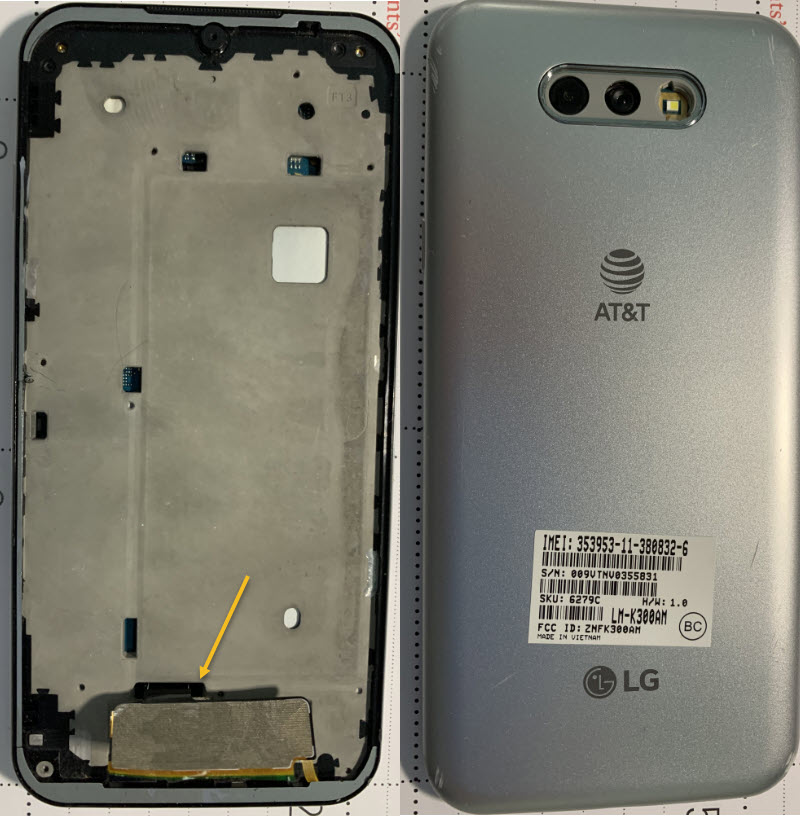
My wife and I were walking in our neighborhood. She noticed a smartphone on the ground so, I picked it up and noticed the display screen was missing. The arrow points to the ribbon connector for the missing display. Refer to below images of the AT&T LG smartphone we found made in Vietnam:
She said, “why not write a blog post about the making of a smartphone?” So, here are some snippets of information about the making of an iPhone. Read on if you want to learn more.
The cost to make the iPhone 11 Pro Max was $490.
The components manufactured by many companies around the world are ultimately sent to just two companies to assemble into iPods, iPhones, and iPads. Those companies are Foxconn and Pegatron, both of which are based in Taiwan.
Foxconn is Apple’s longest-running partner in building these devices. It currently assembles the majority of Apple’s iPhones in its Shenzen, China, location, although Foxconn maintains factories in countries across the world, including Thailand, Malaysia, the Czech Republic, South Korea, Singapore, and the Philippines.
Pegatron is a relatively recent addition to the iPhone assembly process. It is estimated that it builds around 30 percent of the orders.
Apple buys many of the components for iPhones — like the memory chip, the modem, the camera module, the microphone and the touch-screen controller — from more than 200 suppliers around the world. Foxconn, the Taiwanese company that runs the Zhengzhou facility, even produces some smaller parts, such as metal casings.
Foxconn’s facilities in Zhengzhou cover 2.2 square miles and can employ up to 350,000 workers, many of whom earn about $1.90 an hour. They work up to 12 hour shifts under intense pressure. The operation does what is called F.A.T.P., or final assembly, testing and packaging.
There are 94 production lines at the Zhengzhou manufacturing site, and it takes about 400 steps to assemble the iPhone, including polishing, soldering, drilling and fitting screws. The facility can produce 500,000 iPhones a day, or roughly 350 a minute.
After the iPhone rolls off the assembly line, it is placed in a sleek white fiberboard box, wrapped and put on a wooden pallet, and then wheeled out to waiting trucks.
As the final point of assembly for the iPhone, China also serves as a starting point for Apple’s global tax strategy. In Zhengzhou, often in the customs facility, Foxconn sells the completed iPhones to Apple, which in turn resells them to Apple affiliates around the world.
The process, most of which takes place electronically, allows Apple to assign a portion of its profits to an affiliate in Ireland, a tax-advantageous locale. The system is not unique to China.
Smartphones are small enough to be shipped by plane in huge quantities — and cost effectively. A single wide-body Boeing 747 can easily carry 150,000 iPhones tucked into its aluminum canisters.
From Zhengzhou, UPS, FedEx and other freight carriers typically fly United States-bound iPhones to Anchorage. There, they refuel, before going on to Louisville, Ky., a major logistics hub, or other points in the country.
Domestic-bound iPhones are typically loaded onto a large truck and taken on an 18-hour drive from Zhengzhou to Shanghai, in eastern China, where Apple has set up its national distribution center. A single tractor-trailer holds up to 36,000 iPhones. Because the vehicles have about $27 million worth of freight on board, they are equipped with cameras and sometimes accompanied by armed security guards.
After the iPhone leaves the Foxconn factory in Zhengzhou, it takes two days, on average, to get to a store in Shanghai, a 590-mile trip. It takes three days, on average, to get a store in San Francisco, some 6,300 miles away.
Apple does very little of its own manufacturing. Instead it relies on contract outsourcing companies like Foxconn (one of the largest employers in the world) to do this for them. This removes much of the headache of manufacturing for Apple while keeping production costs as low as possible. There is a significant market advantage to this approach and its one that many other electronics manufacturers are emulating now.
Like any good design company, the design process at Apple is not over when manufacturing begins. In fact, Apple iterates the design throughout manufacturing. The product is built, it’s tested and reviewed, then the design team improves on it and it’s built all over again. These cycles take 4-6 weeks at a time and may be run many times over a product’s development lifecycle.
This is a very costly approach but it’s one of the reasons that Apple has a reputation for quality. The more you invest in design, the more likely you are to build incredible market changing products. It’s the process that the iPod, the iPhone and the iPad go through.
The packaging room is a very-high security area in Apple and it’s where prototypes are unboxed. As you might expect, the security is to prevent leaks to the outside world. If you ever do see a leaked prototype for an Apple product – it won’t have come from here. It’s more likely to have vanished from a production line in China.
The final step in Apple’s product development is product launch. When the product is considered to be as good as it can be – it enters an action plan known as “the Rules of the Road”. This explains all the responsibilities and actions that must be taken prior to a commercial launch of the product. It is an extremely remarkable accomplishment to design, manufacture, market, and ship an iPhone.
It must be a nerve-wracking experience to be privy to the “Rules of the Road” because if you lose it or leak it, you are immediately fired.
Sources:
www.nytimes.com
www.lifewire.com
www.interaction-design.org
That’s it. I hope you learned something about what goes into making an iPhone. Please feel free to share this post! One way to share is via Twitter.
Just click the Tweet icon below. This will launch Twitter where you click its icon to post the Tweet.
Check out TechSavvy.Life for blog posts on smartphones, PCs, and Macs! You may email us at contact@techsavvy.life for comments or questions.
Tweet
I Would Like to Hear From You
Please feel free to leave a comment. I would love hearing from you. Do you have a computer or smart device tech question? I will do my best to answer your inquiry. Just send an email to contact@techsavvy.life. Please mention the device, app and version that you are using. To help us out, you can send screenshots of your data related to your question.