RAYMOND OGLESBY @RaymondOglesby2
October 20, 2022
Modern iPhones can withstand a splash of water, but you should not rely on Apple’s water-resistant rating and take too many chances. Let’s improve your device’s chances.
This is for the iPhone

Your iPhone is Water Resistant
If you have an iPhone 7 or newer, the good news is that your device has some level of water resistance. The bad news is that this rating may have waned over time, so it should not be taken for granted.
The following iPhone models are able to withstand a depth of 6 meters for up to 30 minutes:
- iPhone 13 (including mini, Pro, Pro Max)
- iPhone 12 ((including mini, Pro, Pro Max)
The following iPhone models can withstand 4 meters for up to 30 minutes:
- iPhone 11 Pro
- iPhone 11 Pro Max
The following iPhone models can withstand 2 meters for up to 30 minutes:
- iPhone 11
- iPhone XS
- iPhone XS Max
These remaining iPhone models can handle 1 meter for up to 30 minutes:
- iPhone SE (second-generation)
- iPhone XR
- iPhone X
- iPhone 8 (including 8 Plus)
- iPhone 7 (including 7 Plus)
If you have an older device, there is no guarantee of any water resistance. This does not equate to moisture meaning game over, but rather the chances of your device surviving a dunk are much slimmer.
Age and damage to the chassis may severely impact water resistance. Using compressed air to clean the charging port may also damage the seal (clean the charging port carefully instead). You should take care not to get your iPhone wet, even if you have a modern iPhone with a relatively high level of protection. Water damage is not covered by Apple’s standard warranty.
Turn Off Your iPhone If It Gets Wet
Water may damage your iPhone because it conducts electricity, so turning your iPhone off is a good idea if it gets wet. This is especially true if you have an iPhone model that lacks water resistance, is old, or has been damaged in some way that you believe may have jeopardized the water-resistant seal.
Drying your device out thoroughly before turning it back on will give it the best chance of survival. You should wait around 48 hours before powering it up and leaving it in a warm, dry place for the moisture to evaporate.
Dry Off
Most modern iPhone models can withstand a splash of water, whether that’s a heavy downpour, a spill at the dinner table, or being dropped in the bath. After turning your device off, dry out your iPhone thoroughly. Use a soft cloth to remove moisture, paying close attention to the charging port where droplets are harder to reach.
You should wait for your iPhone to dry out thoroughly before charging. Your iPhone may give you a warning about moisture being detected in the charging port. If so, it is recommended to wait 48 hours before charging again to make sure all moisture has evaporated.
If you are confident that your iPhone’s water-resistant rating has not been jeopardized you may decide to continue using it as normal during this time. If you are low on charge, consider charging wirelessly so that the charging port has time to dry out.
Remove Moisture From Speaker
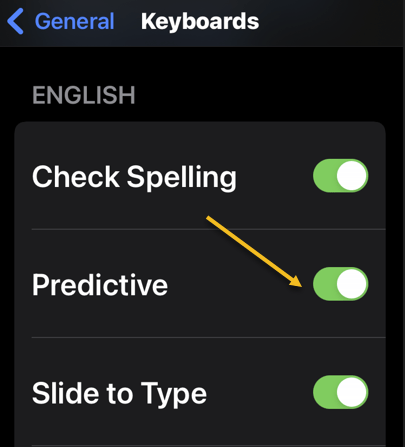
If you have decided to use your iPhone as normal, you may notice that the speaker does not work quite as it should. A muffled or crackling tone may sound, which is caused by moisture that has yet to evaporate. You can either wait for this to occur naturally or try using an app like Sonic Ⓥ from the App Store. Refer to the below image:

This app is a tone generator that has a dedicated button for generating a tone designed to remove moisture from an iPhone speaker. It’s ad-supported so you can experiment with a full range of tones from 0Hz to 25,000Hz to shift any moisture that’s causing issues. Just tap Stop when finished.
Use Fresh Water
Salt water causes corrosion at a much faster rate than fresh water, so it’s important to rinse your iPhone thoroughly if you drop it in the ocean. You should do this as soon as possible since the longer you wait the worse things can get. If you fail to get rid of the salt, corrosion may continue even in the absence of moisture.
Since salt water is so corrosive, the damage may already be done. The gold contacts in the charging port can quickly corrode, which will prevent your iPhone from charging at all using a cable. You will want to remove any salt residue using a soft brush and fresh water to give your iPhone the best chance of survival.
This advice goes for sugary and alcoholic drinks too, though they will not cause corrosion like salt water.
Using Rice Does Not Help
Putting your iPhone into rice will not help to dry it out, and may instead cause grains of rice to become stuck in the charging port.
You are far better off leaving your iPhone in a dry, warm place with plenty of airflow for around 48 hours to evaporate any remaining moisture.
Get a Waterproof Case
If there’s a good chance your iPhone is going to get wet, why not take the preemptive step of getting a waterproof case? These can provide peace of mind from water damage, with a range of designs to choose from.
There are waterproof cases to satisfy just about every kind of user. The LifeProof FRE all-rounder is a good choice and protects against drops and moisture at a depth of up to 2 meters.
LifeProof FRĒ Compatible with Magsafe SERIES Waterproof Case for iPhone 13 Pro Max (ONLY) – BLACK
Protect your iPhone against drops and moisture with the LifeProof FRE, a MagSafe-compatible case that now uses 60% recycled plastic in its construction.
| Model Number | 77-87690 |
| Brand | LifeProof |
| Compatible Phone Models | IPhone 13 Pro Max (ONLY) |
| Color | Black |
| Compatible Devices | IPhone 13 Pro Max (ONLY) |
If you are a recreational user who loves to boat or kayak, a floating dry bag may be a better choice. Something like the CaliCase Universal Waterproof Floating Case hangs around your neck and ensures your device will float should it drop in the water. You can spend a lot less on a case like this, but make sure it’s tough enough to withstand some wear and tear depending on your hobby.
CaliCase Universal Waterproof Floating Case – White
Protect your iPhone while out on the water with a floating case that you can hang around your neck. If the worst should happen you should be able to find your iPhone again because it will be floating on the water, not at the bottom of a lake.
Amazon: $29.99
| Model Number | 3311858 |
| Brand | CaliCase |
| Compatible Phone Models | Samsung Galaxy S8/S9, iPhone 8/Plus, iPhone X, Note 8, Pixel 2, IPhone X, IPhone 8, Samsung Galaxy Note 8Samsung Galaxy S8/S9, iPhone 8/Plus, iPhone X, Note 8, Pixel 2, IPhone X, IPhone 8, Samsung Galaxy Note 8 See more |
| Color | White |
| Compatible Devices | IPhone, Android |
If you are keen to take your iPhone a little deeper, a diving case will allow you to use it for underwater photography and videography. Look into the YOGRE Diving Case which can withstand depths of 15 meters (50 feet) and has a handy camera grip design.
YOGRE iPhone Samsung Diving Phone Case, Underwater Photography Video Housings Case with Lanyard[50ft/15m], Diving Waterproof Case for iPhone 13/13 Pro/13 Pro Max/12/12 Pro/12 Pro Max LG Google etc
Take your iPhone to new depths with the YOGRE Diving Case. Engage in underwater photography at depths of up to 15 meters (50 feet), just make sure your iPhone model is supported before you buy.
| Brand | YOGRE |
| Compatible Phone Models | Compatible with iPhone, Samsung, LG, Google, OPPO, vivo, Xiaomi, Redmi, Huawei Series One Plus etc |
| Color | Orange |
| Compatible Devices | Compatible with iPhone, Samsung, LG, Google, OPPO, vivo, Xiaomi, Redmi, Huawei Series One Plus etc |
| Material | Polycarbonate, Thermoplastic Polyurethane |
Even with a case, you should still take care to rinse the housing thoroughly before you remove your device.
iPhones Are Getting More Water Resistant
The good news is that your iPhone will probably be fine in most instances. Apple’s smartphones are more resistant to water ingress and drops than ever before. With that in mind, AppleCare+ might be a good idea if you are especially concerned.
Quote For the Day
The technology you use impresses no one. The experience you create with it is everything.
Sean Gerety
Tweet Info
That’s it. Please feel free to share this post! One way to share is via Twitter.
Just click the Tweet icon below. This will launch Twitter where you click its icon to post the Tweet.
Checkout TechSavvy.Life for blog posts on smartphones, PCs, and Macs! You may email us at contact@techsavvy.life for comments or questions.
Tweet
I Would Like to Hear From You
Please feel free to leave a comment. I would love to hear from you. Do you have a computer or smart device tech question? I will do my best to answer your inquiry. Just send an email to contact@techsavvy.life. Please mention the device, app, and version you are using. To help us out, you can send screenshots of your data related to your question.
Author’s E-Book
You can access the e-book from a Kindle device, the Kindle App for the desktop or smartphone, which is a free app.