How to Disable/Enable Google Search Dark Theme

Google Search’s Dark Theme looks great, but it’s not for everyone. If you would prefer performing your searches on a light theme, here’s how to turn off/on Dark Theme on Google Search on desktop and mobile.

RAYMOND OGLESBY @RaymondOglesby2
February 15, 2022

Google Search’s Dark Theme looks great, but it’s not for everyone. If you would prefer performing your searches on a light theme, here’s how to turn off/on Dark Theme on Google Search on desktop and mobile.

This is for devices using Google Search. Screenshots are from Windows 10 and iPhone XR

Dilbert and Murder
Copyright Scott Adams, Inc./Distributed by Universal Uclick for UFS

Turn Off on Desktop

To disable Google Search’s Dark theme on your Windows, Mac, Linux, or Chromebook computer, first, launch your web browser and access the Google site.

Next, in the bottom-right-hand corner of the Google site, click Settings. Refer to the below image:

Searvh 1
Accessing Settings

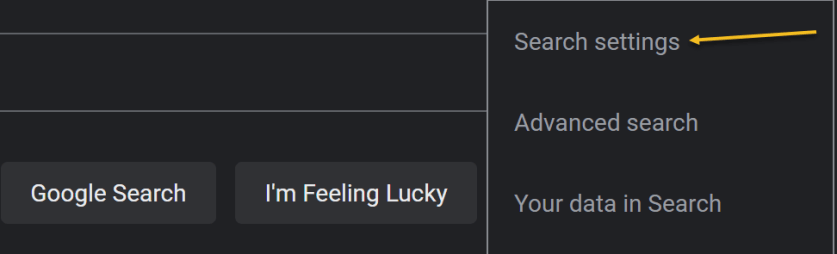
Now, in the menu that opens, select Search Settings. See the below image:

Search 2
Selecting Search settings option

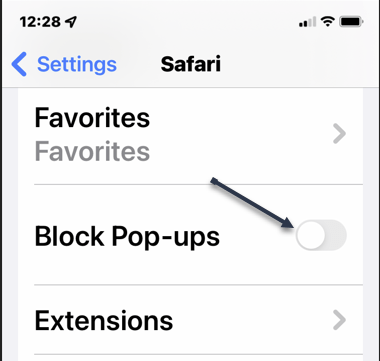
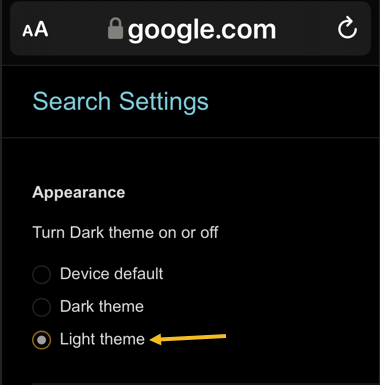
Next, on the Search Settings page, in the left sidebar, click Appearance. See the following image:

Search 3
Selecting Appearance option

Now, in the Appearance section on the right, enable the Light theme option. This disables the Dark theme and enables the Light theme. Simply do the opposite to re-enable the Dark theme.

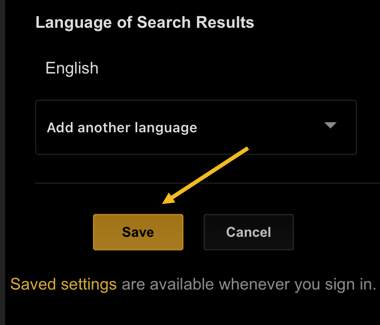
Next, to save your settings, at the bottom of the Appearance section, click Save. Refer to the below image:

Search 4
Save your change

Now, you will see a Your preferences have been saved prompt. Click OK. See the below image:

Search 5
Confirm your change

Next, your Google Search will be displayed in the Light theme. See the following image:

Search 6
Your Light theme

Turn Off on Mobile

To deactivate Dark theme on Google Search on your iPhone, iPad, or Android phone, first, launch your web browser and open the Google site.

Next, in Google’s top left-hand corner, tap the Hamburger menu (the three horizontal lines). Refer to the below image:

Search 7
Selecting the menu

Next, from the menu that opens, select Settings. See the below image:

Search 8
Accessing Settings

Now, on the Search Settings page, in the Appearance section, enable the Light theme option. See the following image:

Search 9
Selecting Light theme

Now, to save your changes, scroll the Search Settings page to the bottom. and tap Save. Refer to the below image:

Search 10
Save your change

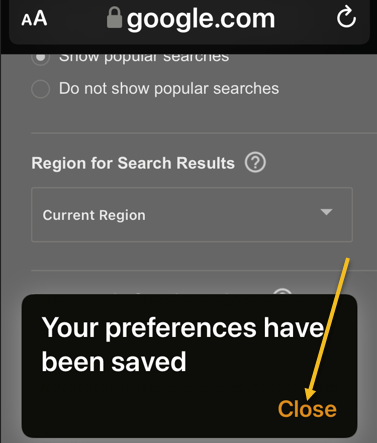
Next, in the Your preferences have been saved prompt, tap Close. See the below image:

Search 11
Close the dialog

And your favorite search engine is now back to Light theme. Simply do the opposite to re-enable the Dark theme.

Now, your Google Search will be displayed in the Light theme. See the following image:

Search 12
Your Light theme

Quote For the Day

When you combine ignorance and leverage, you get some pretty interesting results.

Warren Buffett

You are finished. Please feel free to share this post! One way to share is via Twitter.

Just click the Tweet icon below. This will launch Twitter where you click its icon to post the Tweet.

Check out TechSavvy.Life for blog posts on smartphones, PCs, and Macs! You may email us at contact@techsavvy.life for comments or questions.

I Would Like to Hear From You

Please feel free to leave a comment. I would love to hear from you. Do you have a computer or smart device tech question? I will do my best to answer your inquiry. Just send an email to contact@techsavvy.life. Please mention the device, app, and version you are using. To help us out, you can send screenshots of your data related to your question.

Author’s E-book

You can access the e-book from a Kindle device, the Kindle App for the desktop or smartphone, which is a free app.

The author’s Vietnam eBook on the Battle for Tra Bong Vietnam: Events and Aftermath

How to Clear Chrome Browsing History on iPhone and iPad

The browsing history in Google Chrome for iOS and iPadOS helps you easily get back to your favorite sites. But if you need to clear out a portion of the history on your iPhone or iPad, it’s easy.

RAYMOND OGLESBY @RaymondOglesby2
February 9, 2022

The browsing history in Google Chrome for iOS and iPadOS helps you easily get back to your favorite sites. But if you need to clear out a portion of the history on your iPhone or iPad, it’s easy. Let’s explore how to do this.

This is for the iPhone and iPad

Copyright Scott Adams, Inc./Distributed by Universal Uclick for UFS

Clear Chrome Browsing History

Clearing the browsing history in Safari, the browser for iPhone and iPad is relatively simple, but it is not exactly intuitive. Fortunately, clearing the browsing history in Google Chrome is even easier than in Safari, since you can do it directly within the browser.

First, tap the three-dot icon in the bottom right-hand corner of the browser and select History from the pop-up list. (If you are on the Start page, you can tap the History icon below the Search bar). Refer to the below image where we are selecting History from the pop-up list:

Clear 1
Accessing History option

Next, scroll down to the bottom of the screen and tap Clear Browsing Data… to begin clearing your history. See the below image:

Clear 2
Accessing Clear Browsing Data option

Now, select the time range at the top of the page. This ranges from the last hour to all of your browsing history. See the following image:

Clear 3
Setting a Time Range

Next, once you have selected the period you wish to delete, check over the data that you are going to delete. By default, Browsing History, Cookies and Site Data, and Cached Images are selected. You can select or deselect these as you see fit. Once you have made your selections, tap Clear Browsing Data at the bottom of the screen. Refer to the below image:

Clear 4
Selecting what information to clear

Now, select this option again in the pop-up dialog at the bottom of the screen to finish clearing your history. See the below image:

Clear 5
Selecting Clear Browsing Data once again

Keep in mind that clearing browsing history in Chrome for iPhone and iPad does not always clear browsing history in the desktop version of the browser. To make sure your history is fully clear, take a look at some guides on how to clear your browsing history in any browser.

Don’t Delete Everything

As we touched on above, you do not have to delete all of your browsing history. By selecting the right time range, you can delete your history only from the last hour or the last day. See the following image:

Clear 6
Selecting a Time Range

You also do not need to delete all the data selected by default. For example, you may want to delete all of your website history but do not want to log into sites over again. To accomplish this, just deselect Cookies, Site Data when you are clearing your history.

You can also choose to delete more than what is selected by default. For example, if you’re preparing an iPad for your kids, you might not want your passwords saved. In this case, check Saved Passwords when clearing your history.

Browse Incognito Mode

If you find yourself frequently clearing your browsing history, it could be that you are not making enough use of private browsing, or Incognito Mode.

For the desktop:

How to Easily Open Chrome to Incognito Mode

For the iPhone or iPad:
  • Open your Google App and sign in, if necessary
  • Tap your Profile icon
  • Select Turn on Incognito from the drop-down menu

Quote For the Day

It takes 20 years to build a reputation and five minutes to ruin it. If you think about that, you’ll do things differently.

Warren Buffett

That’s it. Please feel free to share this post! One way to share is via Twitter.

Just click the Tweet icon below. This will launch Twitter where you click its icon to post the Tweet.

Checkout TechSavvy.Life blog posts on smartphones, PCs, and Macs! You may email us at contact@techsavvy.life for comments or questions.

I Would Like to Hear From You

Please feel free to leave a comment. I would love to hear from you. Do you have a computer or smart device tech question? I will do my best to answer your inquiry. Just send an email to contact@techsavvy.life. Please mention the device, app, and version you are using. To help us out, you can send screenshots of your data related to your question.

Author’s E-book

You can access the e-book from a Kindle device, the Kindle App for the desktop or smartphone, which is a free app.

The author’s Vietnam eBook on the Battle for Tra Bong Vietnam: Events and Aftermath

How to Disable Pop-Up Blocker in Safari

By default, Safari on your iPhone and iPad blocks any website pop-ups. If a site requires these tiny windows to function, you can disable Safari’s built-in pop-up blocker.

RAYMOND OGLESBY @RaymondOglesby2
February 8, 2021

By default, Safari on your iPhone and iPad blocks any website pop-ups. If a site requires these tiny windows to function, you can disable Safari’s built-in pop-up blocker. Let’s explore how this is done.

This is for the iPhone and iPad

Dilbert and Covid
Copyright Scott Adams, Inc./Distributed by Universal Uclick for UFS

Why Enable Pop-Ups

One major reason to enable pop-ups in Safari is to allow websites, such as your bank’s website, to display pop-up windows they require to operate. On some sites, without these tiny windows, you can not do what you need to.

Later, when you have finished your task, you can re-enable the built-in pop-up blocker, as explained below.

By default, Safari disables pop-ups automatically in the browser.

Disable the Pop-Up Blocker

First, to disable Safari’s pop-up blocker on your iPhone or iPad, open the Settings app on your phone. Refer to the below image:

Pop Up 1
Accessing Settings

Next, on the Settings page, scroll down and tap Safari. See the below image:

Pop Up 2
Accessing Safari

Now, on the Safari page that opens, you have various options to configure for this web browser. Here, at the bottom of the General section, toggle OFF the Block Pop-ups option. See the following image:

Pop Up 3
Disable Block Pop-up option

To re-enable the built-in pop-up blocker, simply turn ON the Block Pop-ups option again.

Safari’s pop-up blocker is now disabled, and your sites can now launch those small windows while you are browsing in this browser.

Quote For the Day

Mind over mattress.

Stephen Covey

That was easy. Please feel free to share this post! One way to share is via Twitter.

Just click the Tweet icon below. This will launch Twitter where you click its icon to post the Tweet.

Checkout TechSavvy.Life for blog posts on smartphones, PCs, and Macs! You may email us at contact@techsavvy.life for comments or questions.

I Would Like to Hear From You

Please feel free to leave a comment. I would love to hear from you. Do you have a computer or smart device tech question? I will do my best to answer your inquiry. Just send an email to contact@techsavvy.life. Please mention the device, app, and version you are using. To help us out, you can send screenshots of your data related to your question.

Author’s E-book

You can access the e-book from a Kindle device, the Kindle App for the desktop or smartphone, which is a free app.

The author’s Vietnam eBook on the Battle for Tra Bong Vietnam: Events and Aftermath

How to Add a Cover Image to Twitter

Want to change your cover image or add one to your Twitter account? If you have not inserted an image, you will see a blue blank area at top of your account.

RAYMOND OGLESBY @RaymondOglesby2
January 25, 2022

Want to change your cover image or add one to your Twitter account? If you have not inserted an image, you will see a blue blank area at top of your account. Let’s explore how to add a cover image.

This is for devices using Twitter. Screenshots are from iPhone XR.

Dilbert and Work
Copyright Scott Adams, Inc./Distributed by Universal Uclick for UFS

First, log in to Twitter, if not already logged in, and open Twitter. Here, tap your Profile icon. Refer to the below image:

Twitter Header 1
Selecting your Profile icon

Next, in the pop-up window that opens, tap on Profile. See the below image:

Twitter Header 2
Selecting the Profile option

Now, in the upper right-hand corner, tap the Edit profile link. See the following image:

Twitter Header 3
Selecting Edit Profile link

Next, tap on the top of your screen or on an existing image to open your Photos. (On the desktop, click the Camera icon in the image area). Depending on your Twitter settings, you may not see any images. If so, tap on Manage to change your settings or the plus “+” sign to open your photos. Refer to the below image:

Twitter Header 4
Selected image from Photos

Now, position your image to your liking. Then in the upper right-hand corner, tap Apply. See the below image:

Twitter Header 5
Position your image and Apply

Next, in the upper right-hand corner, tap Done. See the following image:

Twitter Header 6
Finish your change

Now, tap Save in the upper right-hand corner. Refer to the below image:

Twitter Header 7
Save your change

Instantly, your saved image is now your cover photo. See the below image:

Twitter Header 8
Your finished image

Quote For the Day

We become what we repeatedly do.

Stephen Covey

That’s it. Please feel free to share this post! One way to share is via Twitter.

Just click the Tweet icon below. This will launch Twitter where you click its icon to post the Tweet.

Checkout TechSavvy.Life for blog posts on smartphones, PCs, and Macs! You may email us at contact@techsavvy.life for comments or questions.

I Would Like to Hear From You

Please feel free to leave a comment. I would love to hear from you. Do you have a computer or smart device tech question? I will do my best to answer your inquiry. Just send an email to contact@techsavvy.life. Please mention the device, app, and version you are using. To help us out, you can send screenshots of your data related to your question.

The author’s Vietnam eBook on the Battle for Tra Bong Vietnam: Events and Aftermath

How to Add Alt Text to Facebook Images

Facebook automatically adds alternative text (alt text) to images you upload, but the descriptions are not always accurate. You can make your images more accessible to visually impaired users by writing accurate alt text for your images.

RAYMOND OGLESBY @RaymondOglesby2
January 18, 2022

Facebook automatically adds alternative text (alt text) to images you upload, but the descriptions are not always accurate. You can make your images more accessible to visually impaired users by writing accurate alt text for your images. Let’s explore this feature.

This is for devices using Facebook. Screenshots are from iPhone XR.

Dilbert and Questions
Copyright Scott Adams, Inc./Distributed by Universal Uclick for UFS

Use the Mobile App

To add alt text to an image you are uploading using the Facebook mobile app, first, open the app on your smartphone, compose a new Facebook post, then select a photo from your device to upload. In the post preview, tap the three dots in the top right-hand corner of the image. Refer to the below image:

Alt Text 1
Selecting to edit a photo

Next, a menu will appear at the bottom of your screen. Here, tap the Edit Alt Text option. See the below image:

Alt Text 2
Selecting Edit Alt Text option

Now, you will be on the Change Alt Text screen. In the text box below your image, enter the text that accurately describes the image you are posting. Then, tap Done. See the following image:

Alt Text 3
Entering Alt Text and saving your change

The alt text is now added to the photo. Refer to the below image for our final image:

Alt Text 4
Your final image

Keep in mind that this alt text description can only be read if someone is using a Screen Reader to access Facebook; it will not be visible on the image.

Use the Desktop App

You can also add alt text to your images on Facebook from your computer. First, launch Facebook from any browser of your choice and then begin creating a new post with an image. Next, in the post preview, click Edit in the top left-hand corner of the image. Refer to the below image:

Alt Text 5
Selecting to edit a photo

Now, the Photo Detail window will appear. Here, click Alternative text at the bottom of the menu in the left-hand pane. See the below image:

Alt Text 6
Selecting Alternative Text option

Next, the Alternative text menu will expand. Click the bubble next to the Custom Alt Text option to select it, and then enter the alt text for your image in the text box. See the following image:

Alt Text 7
Entering your custom Alternative text

Now, click the blue Save button at the bottom of the window. Refer to the below image:

Alt Text 8
Saving your change

The alt text is now added to the photo. Refer to the below image for our final image:

Alt Text 9
Your final image

Keep in mind that this alt text description can only be read if someone is using a Screen Reader to access Facebook; it will not be visible on the image.

Quote For the Day

Management is efficiency in climbing the ladder of success; leadership determines whether the ladder is leaning against the right wall.

Stephen Covey

That’s it. Please feel free to share this post! One way to share is via Twitter.

Just click the Tweet icon below. This will launch Twitter where you click its icon to post the Tweet.

Check out TechSavvy.Life blog posts on smartphones, PCs, and Macs! You may email us at contact@techsavvy.life for comments or questions.

I Would Like to Hear From You

Please feel free to leave a comment. I would love to hear from you. Do you have a computer or smart device tech question? I will do my best to answer your inquiry. Just send an email to contact@techsavvy.life. Please mention the device, app, and version you are using. To help us out, you can send screenshots of your data related to your question.

Author’s E-book

You can access the e-book from a Kindle device, the Kindle App for the desktop or smartphone, which is a free app.

The author’s Vietnam eBook on the Battle for Tra Bong Vietnam: Events and Aftermath

How to Automatically Add Google Photos to an Album

Photo albums make it easy to keep everything organized, but that usually does not happen by itself. Google Photos can add photos to albums for you, making it even easier.

RAYMOND OGLESBY @RaymondOglesby2
January 4, 2022

Photo albums make it easy to keep everything organized, but that usually does not happen by itself. Google Photos can add photos to albums for you, making it even easier. Let’s explore this feature.

This is for iPhone, iPad, and Android using Google Photos

Dilbert and Phone
Copyright Scott Adams, Inc./Distributed by Universal Uclick for UFS

This feature is called Live Albums. It ties in with Google Photos’ ability to automatically detect people and pets in photos. That means you can have any photo of a person, multiple people, or pets automatically added to an album.

First, open Google Photos on your iPhone, iPad, or Android device and go to the Library tab. Refer to the below image:

Album 1

Accessing the Google Photos Library

Next, select an existing album or tap New Album (our choice). See the below image:

Album 2
Selecting to add an album

Now, if you create a new album, give it a title, and then tap Select People & Pets. See the following image:

Album 3
Giving the album a title and accessing the option to add people or pets

Next, you will be greeted with a list of people and pets that Google has identified in your photos. Select all that you want to automatically add to the album and tap Confirm. Refer to the below image:

Album 4
Selecting the people to add to your album

Now, for existing albums, tap the three-dot menu icon. See the below image:

Album 5
Accessing the menu option for an existing album

Next, in the menu pop-up screen, select Options. See the following image:

Album 6
Selecting Options

Now, tap the plus “+” button under Automatically Add Photos. Refer to the below image:

Album 7
Adding a new person or pet for your album

That’s all there is to it! Google Photos will immediately add old photos of the people or pets to the album. From this point forward, any new photos will also be automatically added.

Quote For the Day

We think coding should be required in every school because it’s as important as any kind of second language.

Tim Cook

You are finished. Please feel free to share this post! One way to share is via Twitter.

Just click the Tweet icon below. This will launch Twitter where you click its icon to post the Tweet.

Check out TechSavvy.Life for blog posts on smartphones, PCs, and Macs! You may email us at contact@techsavvy.life for comments or questions.

I Would Like to Hear From You

Please feel free to leave a comment. I would love to hear from you. Do you have a computer or smart device tech question? I will do my best to answer your inquiry. Just send an email to contact@techsavvy.life. Please mention the device, app, and version you are using. To help us out, you can send screenshots of your data related to your question.

Author’s E-book

You can access the e-book from a Kindle device, the Kindle App for the desktop or smartphone, which is a free app.

The author’s Vietnam eBook on the Battle for Tra Bong Vietnam: Events and Aftermath

How to Use Apple Notes in a Browser

Apple Notes syncs between devices for anyone with an Apple ID, which is required to use devices like the iPhone, iPad, and Mac computers. Unfortunately, there’s no native app for Windows or Android users, but the web version can make a suitable substitute.

RAYMOND OGLESBY @RaymondOglesby2
December 22, 2021

Apple Notes syncs between devices for anyone with an Apple ID, which is required to use devices like the iPhone, iPad, and Mac computers. Unfortunately, there’s no native app for Windows or Android users, but the web version can make a suitable substitute. Let’s explore how to use Apple Notes on the web.

This is for devices using Notes on iCloud

Dilbert and Time
Copyright Scott Adams, Inc./Distributed by Universal Uclick for UFS

Turn on iCloud Sync for Notes

If you use Apple Notes on an Apple device, first ensure you have iCloud sync enabled so that new notes and changes are pushed to all of your devices. This should be enabled by default, but it’s a good idea to check.

First, on an iPhone or iPad, you can do this under:

Settings > [Your Name] > iCloud

and enabling the Apple Notes setting. Refer to the below image:

Notes 1
Enabling iCloud Notes sync

On a Mac, this can be turned on under:

System Preferences > Apple ID

and checkmark the Notes setting.

When making notes, make sure that you are placing them in your iCloud folders since it’s possible to have offline folders too that are device-specific. See the below image:

Notes 2
Ensuring Notes are under iCloud

Once enabled, new notes will be placed in iCloud by default.

Access Notes in a Browser via iCloud

Next, with your Mac, iPhone, and iPad now syncing Apple Notes to iCloud, you can access them using a web browser by heading to iCloud.com and logging in with your Apple ID. See the following image:

Notes 3
Signing in to iCloud.com

Now, you may need to pass a two-factor authentication check, so make sure you choose to Trust this computer if you want to log in faster in the future. You should only trust personal computers and smartphones that you own, and never trust a computer or device that you share with others. Refer to the below image:

Notes 4
Trusting your device

Next, once you are in, click on Notes to see a web-based version of the Apple Notes app. You can use this to access and edit existing notes, create new ones, and share with other iCloud users. See the below image:

Notes 5
Selecting iCloud Notes on the web

While you can access locked notes by entering your Apple ID password, you can not apply a lock to existing or new notes. See the following image for a listing of your Notes:

Notes 6
Listing of your iCloud Notes

Turn iCloud Into an App on Windows or Android

Now, you can keep Apple Notes open in its own pinned tab, but it may be more convenient to turn the web app into an application or shortcut you can run from your Start menu or Android home screen.

  • Windows users can do this using Chrome or Edge, pin it to your Taskbar, and apply a custom icon if you like. You will need to log in from time to time, but as long as you Trust your browser when entering the two-factor authentication code this process will not be quite as tedious.
  • Android users can also do this using Chrome, which places a shortcut on your home screen.

Next, you will receive a message about signing in to iCloud from a browser. Refer to the below image:

Notes 7
Apple message

Apple Notes is just one service you can take advantage of using a browser thanks to iCloud’s web interface.

Quote For the Day

Every time you think the problem is ‘out there,’ that very thought is the problem.

Stephen Covey

You are finished. Please feel free to share this post! One way to share is via Twitter.

Just click the Tweet icon below. This will launch Twitter where you click its icon to post the Tweet.

Checkout TechSavvy.Life for blog posts on smartphones, PCs, and Macs! You may email us at contact@techsavvy.life for comments or questions.

I Would Like to Hear From You

Please feel free to leave a comment. I would love to hear from you. Do you have a computer or smart device tech question? I will do my best to answer your inquiry. Just send an email to contact@techsavvy.life. Please mention the device, app, and version you are using. To help us out, you can send screenshots of your data related to your question.

The author’s Vietnam eBook on the Battle for Tra Bong Vietnam: Events and Aftermath

How to Check Your Amazon Gift Card Balance

Not sure if you have sufficient funds to buy that item on Amazon? If so, it’s easy to check your gift card balance on both the Amazon website and the Amazon mobile app, as well as the history of cards you have redeemed. Let’s find out.

RAYMOND OGLESBY @RaymondOglesby2
December 21, 2021

Not sure if you have sufficient funds to buy that item on Amazon? If so, it’s easy to check your gift card balance on both the Amazon website and the Amazon mobile app, as well as the history of cards you have redeemed. Let’s find out.

This is for devices using Amazon

Dilbert and CEO
Copyright Scott Adams, Inc./Distributed by Universal Uclick for UFS

Use the Amazon Website

If you are on a Windows, Mac, Linux, or Chromebook computer, use the official Amazon website to see the available gift card balance in your account.

First, open a web browser on your computer and launch the Amazon site. Sign in to your account on the site.

Next, in Amazon’s top-right corner, hover your mouse over the Account & Lists menu to see an expanded menu. Refer to the below image:

Gift Card 1
Accessing Account & Lists menu option

Now, in the expanded menu, under Your Account, click Account. See the below image:

Gift Card 2
Accessing Your Account

Next, on the Your Account page that opens, click Gift cards. See the following image:

Gift Card 3
Accessing your Gift cards

Now, on the page that opens, right next to Your Gift Card Balance, you will see the gift card balance currently available in your account. Refer to the below image:

Gift Card 4
Viewing your Gift Card balance

Note! You can redeem a gift card by clicking the Redeem a Gift Card button, entering the key, and clicking Apply to your balance button.

If you would like to view the values of gift cards that you have redeemed in your account, scroll down the page to see that information. See the following image:

Gift Card 5
Viewing your Gift Card history

Use the Amazon Mobile App

If you are on an iPhone, iPad, or Android phone, use the Amazon mobile app to check your gift card balance.

First, launch the Amazon app on your phone. Sign in to your account if you have not already. Then, at the bottom of the app, tap the user icon. Refer to the below image:

Gift Card 6
Accessing the User icon

Next, on the account page that opens, scroll down to the Gift Card Balance section. Here, you will see the gift card balance available to use in your Amazon account. See the below image:

Gift Card 7
Viewing your Gift Card Balance

Now, to view the gift cards that you have added to your account so far, then next to Gift Card Balance, tap the Manage option. See the following image:

Gift Card 8
Accessing to Manage your Gift Card

Note! You can redeem a gift card by clicking the Redeem Gift Card button, entering the key, and taping Apply to your balance button.

Next, scroll down the page to the Your Balance activity section. Here, you will see all your redeemed gift cards along with their values. Refer to the below image:

Gift Card 9
Your Gift Card history

And that’s how you know if your gift card balance can buy a certain item on Amazon.

Quote For the Day

Faith is trust in ultimate meaning.

Viktor E Frankl

That’s it. Please feel free to share this post! One way to share is via Twitter.

Just click the Tweet icon below. This will launch Twitter where you click its icon to post the Tweet.

Checkout TechSavvy.LIfe blog posts on smartphones, PCs, and Macs! You may email us at contact@techsavvy.life for comments or questions.

I Would Like to Hear From You

Please feel free to leave a comment. I would love to hear from you. Do you have a computer or smart device tech question? I will do my best to answer your inquiry. Just send an email to contact@techsavvy.life. Please mention the device, app, and version you are using. To help us out, you can send screenshots of your data related to your question.

The author’s Vietnam eBook on the Battle for Tra Bong Vietnam: Events and Aftermath

How to Obtain a Link to a Photo or Video on Instagram

If you would like to share an Instagram photo or video outside the platform, you will have to get that item’s shareable link.

RAYMOND OGLESBY @RaymondOglesby2
December 16, 2021

If you would like to share an Instagram photo or video outside the platform, you will have to get that item’s shareable link. Let’s explore how to get these links from your Instagram account, on either desktop or mobile.

Note! You can not get links to photos or videos that are in a private Instagram account. For these accounts, Instagram does not offer the option to get a link.

This is for devices running Instagram

Dilbert and Security
Copyright Scott Adams, Inc./Distributed by Universal Uclick for UFS

The instructions to get a link to a photo or video on Instagram are the same for all Instagram-supported devices, including Windows, Mac, Linux, and Chromebook computers, as well as iPhones and Android smartphones.

First, open Instagram and find the photo or video for which you want to get a shareable link. At the top-right corner of that item, click or tap the three dots Menu. Refer to the below image:

Link 1
Accessing the Menu

Next, choose Link on an iPhone or Copy Link on other devices. See the below image:

Link 2
Accessing the Link icon

Now, the link to your selected photo or video on Instagram will be copied to your device’s clipboard. Use the Paste option in any text field on your device to view your link. In our example, we pasted the link to the iPhone Notes app.

Your shareable Instagram link should look something like the following image:

Link 3
Your Instagram link

You may now send this link to your friends and family. They can click or tap it to access the photo or video on Instagram.

Quote For the Day

The system is that there is no system. That doesn’t mean we don’t have process. Apple is a very disciplined company, and we have great processes. But that’s not what it’s about. Process makes you more efficient.

Steve Jobs

That was easy. Please feel free to share this post! One way to share is via Twitter.

Just click the Tweet icon below. This will launch Twitter where you click its icon to post the Tweet.

Check out TechSavvy.Life for blog posts on smartphones, PCs, and Macs! You may email us at contact@techsavvy.life for comments or questions.

I Would Like to Hear From You

Please feel free to leave a comment. I would love hearing from you. Do you have a computer or smart device tech question? I will do my best to answer your inquiry. Just send an email to contact@techsavvy.life. Please mention the device, app, and version you are using. To help us out, you can send screenshots of your data related to your question.

The author’s Vietnam eBook on the Battle for Tra Bong Vietnam: Events and Aftermath

How to Delete Specific History from Safari

It’s not always convenient to delete your entire history, but you can instead choose to delete specific websites from your history (and the data they leave behind on your device).

RAYMOND OGLESBY @RaymondOglesby2
December 15, 2021

It’s not always convenient to delete your entire history, but you can instead choose to delete specific websites from your history (and the data they leave behind on your device). Let’s explore how this is done.

This is for the iPhone and iPad using Safari

Dilbert and Covid
Copyright Scott Adams, Inc./Distributed by Universal Uclick for UFS

How to Remove Websites History

Safari will record any websites you visit unless you use Private Browsing. Once a website is in your history it will appear in the URL bar when you start typing a related term. There are all sorts of reasons you may want to prune specific websites, and it’s easy to do so.

First, open Safari and tap on the Bookmarks icon at the bottom of the screen that resembles an open book. Refer to the below image:

History 1
Accessing Bookmarks

Next, a pop-up will appear with three tabs for your BookmarksReading List, and History. Tap on the Clock icon to view your history. See the below image:

History 2
Accessing the Clock

Now, you can now swipe left on any entry in your history and tap Delete to remove it for good. See the following image:

History 3
Selecting a website to delete

Rather than scrolling through your entire history of visited websites, you can also search for specific terms or URLs using the on-screen search box. If you tap the Clear button at the bottom right-hand corner, you can remove website history based on a timeframe, like All time, Today and yesterday, Today, and The last hour. Refer to the below image:

History 4
Selecting to remove websites based on a timeframe

But that’s not the only evidence a website may have left behind on your device.

How to Delete Website Data

Websites leave all sorts of data on your device including cached images and cookies. If you want to remove all signs of a website, it’s important to remove website data as well.

First, launch:

Settings > Safari > Advanced > Website Data

This menu may take a little while to load as Safari fetches a full list of website data and estimates how much storage each entry takes up on your device. See the below image:

History 5
Your website data

Next, you can now follow the same procedure as above by swiping left on any websites you would like to remove and tapping the Delete button that appears. See the following image:

History 6
Selecting to delete website data

Now, you can also search for specific websites using the search bar at the top of the screen, or nuke everything using the Remove All Website Data button at the bottom of the list. Refer to the below image:

History 7
Selecting to remove all website data

Note! If you do remove website data (or wipe everything), there may be some drawbacks like having to log in again or having your shopping cart emptied.

Private Browsing Mode

You can use Private Browsing mode in Safari at any point to visit a website without it being recorded to your device. To do so, tap on the tab icon in the lower right corner of the screen followed by the number of tabs you have open at the bottom of the screen. From here tap Private to switch for a private browsing session. See the below image:

History 8
Entering Private mode

Note! All tabs in your private browsing session will remain open until you close them, so make sure you close anything that may compromise your privacy.

Quote For the Day

I’m excited about Augmented Reality because unlike Virtual Reality, which closes the world out, AR allows individuals to be present in the world but hopefully allows an improvement on what’s happening presently.

Tim Cook

You are finished. Please feel free to share this post! One way to share is via Twitter.

Just click the Tweet icon below. This will launch Twitter where you click its icon to post the Tweet.

Check out TechSavvy.Life for blog posts on smartphones, PCs, and Macs! You may email us at contact@techsavvy.life for comments or questions.

I Would Like to Hear From You

Please feel free to leave a comment. I would love to hear from you. Do you have a computer or smart device tech question? I will do my best to answer your inquiry. Just send an email to contact@techsavvy.life. Please mention the device, app, and version you are using. To help us out, you can send screenshots of your data related to your question.

The author’s Vietnam eBook on the Battle for Tra Bong Vietnam: Events and Aftermath