The Look Up feature on iPhones allows users to quickly access definitions, thesaurus entries, and related websites by highlighting text and selecting the option. Available on iOS 16 or later, it enhances vocabulary learning and information retrieval across apps.
RAYMOND OGLESBY @RaymondOglesby2 February 18, 2025 – 3 minutes read time
Overview
Sometimes, while browsing the internet, you will come across words you do not understand or subjects you want to learn more about.
The Look Up feature allows you to easily look up the definition of words. Its menu provides links to several options: Apple’s dictionary, other dictionaries, Siri-suggested websites, Wikipedia, the App Store, and more.
You can even use Look Up as a free thesaurus app, or use the Look Up feature in Safari to find additional references to a word or phrase on the internet.
Let’s explore looking up words on iPhone with the Look Up feature.
Why You Will Like This Feature
Quickly check the definition of words or phrases with just a few taps.
Easily find websites or apps related to specific words.
System Requirements
This tip works on iPhones running iOS 16 or later.
Screenshots are from iPhone 14 Pro running iOS 18.3
Click here to learn how to update your iPhone to the latest iOS version.
Using Look Up Feature
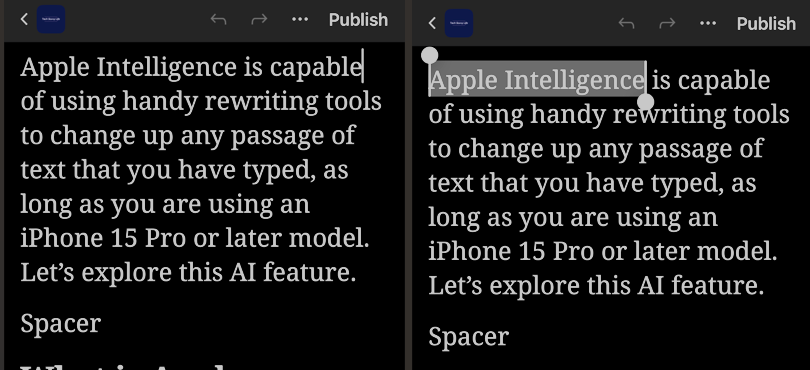
First, anywhere you can select text, tap and hold to highlight the text. Refer to the below image:
Highlight text to look up
Next, above the word or phrase, a horizontal menu or a drop down menu will appear depending on your iOS. Tap the arrow to the right or select the Look Up option (as shown). See the below image:
Selecting the Look Up option
Now the results will appear in a pop-up. Usually, you will see a dictionary definition of the word(s). Pull up on the window to see more results. See the following image:
The dictionary meaning of the highlighted text
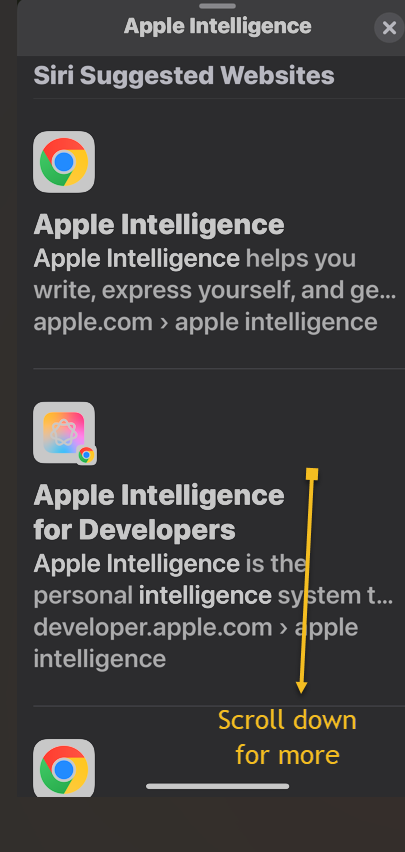
Bext, depending on the text you selected, you will see various results from different websites and apps. Scroll down to see more results. Refer to the below image:
Additional results for the highlighted text
That’s how to use the Look Up feature on your iPhone. While we demonstrated this feature from a WordPress blog, it can be used anywhere where you can select text.
Disclaimer
Technology is constantly evolving, and smartphone and desktop tech rarely remains static. Therefore, the information in this post is only accurate as of the date it was written. Blog posts that are older than six months may contain instructions that are no longer compatible with your device or operating system. We hope that the content from previous posts continues to function as intended. Thank you for reading TechSavvy.Life, where technology works for you.
Quote For the Day
Technology is nothing. What’s important is that you have faith in people, that they’re basically good and smart, and if you give them tools, they’ll do wonderful things with them.
– Steve Jobs
(X) Twitter Info
That’s it. Please feel free to share this post! One way to share is via Twitter.
Just click the Tweet icon below. This will launch Twitter where you click its icon to post the Tweet.
Checkout TechSavvy.Life for blog posts on smartphones, PCs, and Macs! You may email us at contact@techsavvy.life for comments or questions.
We value your feedback! Was this post helpful? Please share your comments with us. If you have a tech question related to your computer or smart device, feel free to reach out. Just send an email to contact@techsavvy.life, and be sure to include the device, app, and version you are using. To assist us further, you can also attach screenshots related to your inquiry.
The author’s Vietnam eBook on the “Battle for Tra Bong Vietnam: Events and Aftermath” can be accessed from a Kindle device or the Kindle App for a desktop or smartphone. The apps are free.
The author’s Vietnam eBook on the Battle for Tra Bong Vietnam: Events and Aftermath
This is for Android and iPhone. Screenshots are from Android and iPhone Pro 14 running iOS 16+
With 5G frequently being portrayed as a game-changer in cellular technology, you may wonder: is my phone 5G? Let’s find out in a few simple steps.
5G Explained
5G, a successor to 4G, is a moniker used to describe the fifth-generation cellular network technologies used by carriers worldwide. It comes with a promise of faster data speeds, greater bandwidth, and reduced latency than previous-generation cell networks. So if you use 5G on your phone, you should be able to download content faster, stream high-definition movies and TVs without buffering, play online video games without connectivity issues, and do much more.
But like any new major technology, it needs new hardware. Carriers are upgrading hardware on their end to deliver 5G networks, and as a consumer, you need a 5G-compatible phone to enjoy its benefits. Any 5G compatible phone has specialized hardware, such as newer cellular modems that can connect to the 5G networks. So how do you check if you have a 5G phone?
How to Know if Your Smartphone Has 5G
As of March 2023, pretty much all new high-end and mid-range phones being launched can use a 5G network. And the same is true for quite a few budget phones as well. But if you are unsure whether your phone is 5G, it’s pretty easy to check.
But remember, apart from having 5G hardware, a phone must be certified to work on a carrier’s 5G network. So if your 5G phone did not come certified to work on your carrier, it would need that certification, which often accompanies a software update to enable carrier support. Otherwise, you will not be able to use 5G on your device.
Is My iPhone 5G Compatible
Apple has included 5G hardware in every iPhone shipped since iPhone 12 series, including the iPhone SE (3rd gen). So if you own iPhone 12 series or newer, your phone is 5G-compatible. Apple’s relatively simple iPhone lineup makes knowing if your iPhone is 5G compatible easy. But as mentioned earlier, it’s not as simple as having 5G hardware in the phone; you also need the necessary software to support your carrier.
To check if your iPhone can work with your carrier’s 5G networks, first, navigate to:
Settings > Mobile Data > Mobile Data Options > Voice & Data
Or
Settings > Cellular > Cellular Data
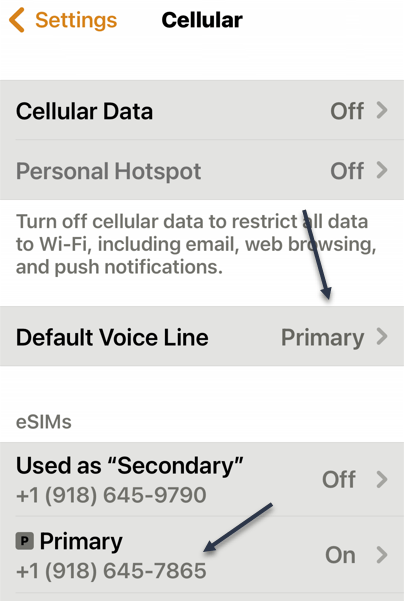
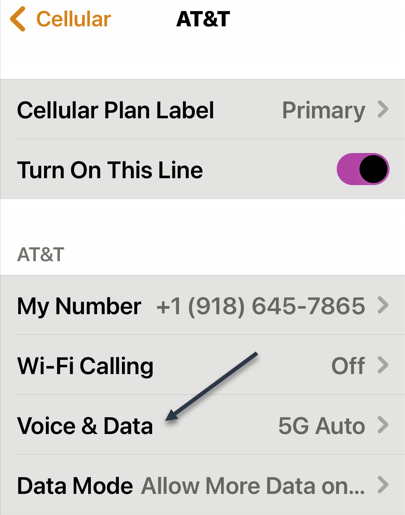
If you do not see either one, go back one screen. You may see that you have an eSIM. The Cellular Data option will point to Primary or Secondary. Under eSIMs section, tap the corresponding option. Refer to the below image:
Selecting your Primary option
Next, tap the Voice & Data option. See the below image:
Selecting Voice & Data option
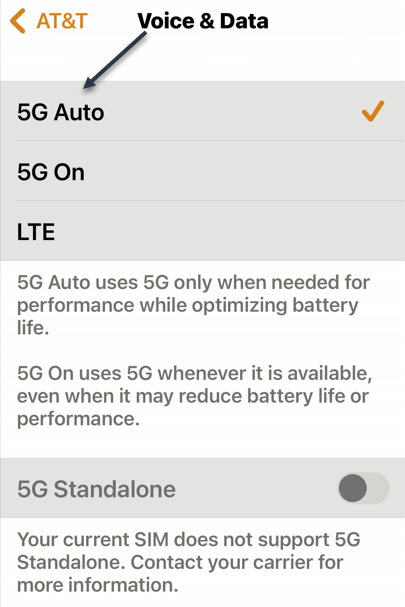
Now, if you see 5G Auto or 5G On options listed, your iPhone can work with your carrier’s 5G networks. But if only LTEor 3G options are listed, your iPhone will not work with your mobile operator’s 5G network. See the following image:
Your iPhone supports5G
In case you own an iPhone 12 series or newer iPhone, but there is no 5G on the Voice & Data page for your carrier, you will have to wait for Apple to update iOS to include the necessary support for your cell carrier.
What is 5G+
If you happen to be lucky enough to see this symbol in your status bar, you have access to a multi-gigabit connection. 5G+ indicates you’re connected to a mmWave 5G NR tower, short-range radios that deliver breakneck speeds. Performing a speed test will reveal download speeds of 1–3 Gbps.
Is My Android 4G or 5G Compatible
The process of checking 5G compatibility on an Android phone is similar to iPhone, but given the diverse nature of Android handsets, the options and their location in the phone software can differ depending on your device manufacturer.
So if you own an Android phone, you can confirm whether your phone is 4G or 5G by navigating to:
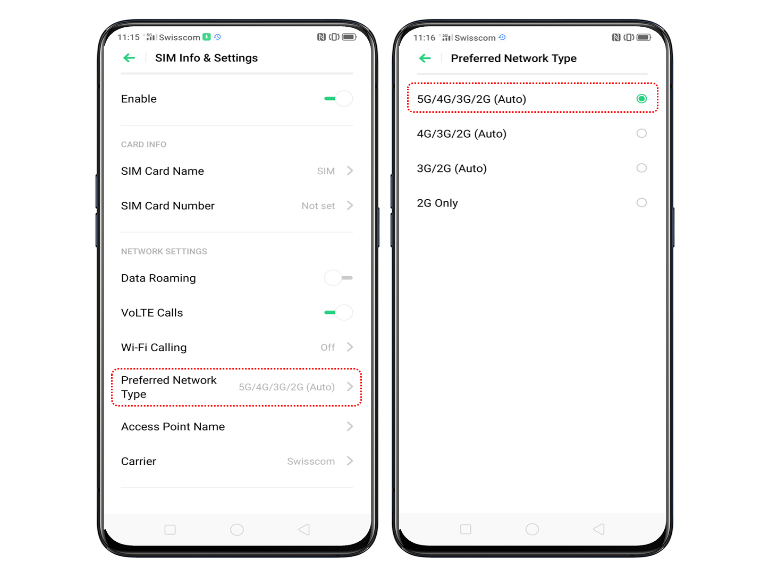
Settings > Network & internet > SIMs > Preferred Network Type
If you find 5G listed as one of the options, then your phone supports 5G. Otherwise, see if you have 4G or LTE listed; their presence will indicate support for 4G. Refer to the below image:
Your Android phone supports 5G
However, if you do not see 5G option on your phone even though it’s marketed as a 5G phone by the manufacturer, it’s not currently certified to support 5G on your carrier. You will have to wait for the phone manufacturer to release a software update adding the necessary support, or it’s possible your phone supports some 5G bands, but not the ones used by your mobile operator.
Another way to confirm 5G support on your Android phone is to check its specifications on the manufacturer’s website. But this will only tell you whether your phone has 5G hardware or not. For carrier-specific compatibility, the previously-mentioned method is the best way.
Is 5G In My Area
5G compatibility is only one part of the equation when it comes to enjoying 5G data speeds and other benefits. You will also need 5G network coverage at your location. As of 2023, 5G networks are still being deployed in the US, so not every city or town has extensive 5G coverage. But carriers are gradually rolling out 5G networks, so the places that do not have 5G coverage right now may get it in the coming months or years.
If you want to check if your carrier offers 5G in your area, the best way is to contact them directly. You can call their customer service or ask a representative at their store. Alternatively, you can check the network coverage maps available on their websites. All three major carriers in the US—AT&T, T-Mobile, and Verizon—allow you to check their 5G and 4G coverage on their website. You can even search your address or zip code for coverage information.
Disclaimer
Technology is always changing and rarely is there static tech for smartphones and desktops. Thus, the contents of this post are only valid at the time of writing. Blog posts older than six months may have directions incompatible with your device or OS. Hopefully, older post content will continue to work as advertised. Thank you for reading TechSavvy.Life for Technology at Work For You.
Quote For the Day
Technology is both a tool for helping humans and for destroying them. This is the paradox of our times which we’re compelled to face.
Frank Herbert
Tweet Info
That’s it. Please feel free to share this post! One way to share is via Twitter.
Note!WordPress has or will be stopping service with Twitter. So, the below Twitter button may not work.
Just click the Tweet icon below. This will launch Twitter where you click its icon to post the Tweet.
Checkout TechSavvy.Life for blog posts on smartphones, PCs, and Macs! You may email us at contact@techsavvy.life for comments or questions.
Please feel free to leave a comment. I would love to hear from you. Do you have a computer or smart device tech question? I will do my best to answer your inquiry. Just send an email to contact@techsavvy.life. Please mention the device, app, and version you are using. To help us out, you can send screenshots of your data related to your question.
Author’s E-Book
You can access the e-book from a Kindle device, the Kindle App for the desktop or smartphone, which is a free app.
The author’s Vietnam eBook on the Battle for Tra Bong Vietnam: Events and Aftermath
After blogging using WordPress for over a year, I would like to share with you some techniques. I have learned a lot about smart devices and their associated apps. My other area of blogging has been about PCs, software, and the Windows 10 operating system.
After blogging using WordPress for over a year, I would like to share with you some techniques. I have learned a lot about smart devices and their associated apps. My other area of blogging has been about PCs, software, and the Windows 10 operating system. Although this has been a no profit adventure, I hope it has been a help to you. I can make a “profit” by your donation of any amount; just access my Donate page.
I have a template that I follow for each post in regards to placement of text, images, and WordPress features. I use lots of “white space”, via the WordPressSpacer feature as well as color coded headings and sub headings.
This is for blogs using WordPress
Copyright Scott Adams, Inc./Distributed by Universal Uclick for UFS
To Tweet about this post, click the Tweet icon below to launch Twitter, then click its Tweet icon to post.
Check out TechSavvy.Life for their blog posts on smartphone apps, PCs. and Macs!
To engage the reader, you, I write in conversational style so you are reading, say, a book. I use personal pronouns like “you” or “your”. To grab your interest, the title of the post provides a summary of the blog. Instead of a title like “Add a Widget”, I would use a title “How to Add a Widget On iPhone in iOS 14”, a more descriptive title to engage you to read the post.
After developing the main introductory paragraph, I copy the paragraph to the Post Excerpt block.
Use of Tweet
At the beginning and ending of the post, I use the Click to Tweet feature of WordPress. I add the Twitter feature at the end so you can see how your Tweet will be displayed. If you find the post helpful, I am wanting you to share about the post.
Using Images and Sotware Tools
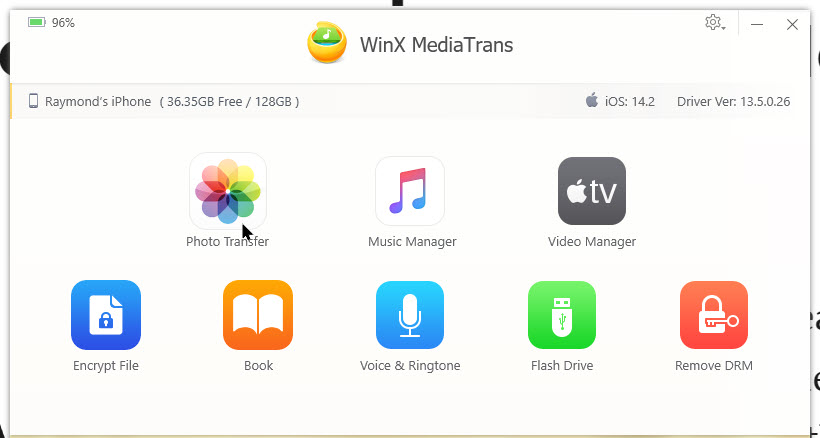
For images or screen-grabs, from an iPhone, I use the PC based WinX MediaTrans (click here) software to export photos to its directory. Refer to below image:
WinX main screen
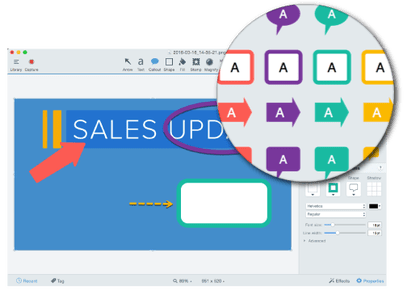
Then, I move or copy the images to the Techsmith Snagit (click here) directory; another application I use to resize, stack, annotate, capture the cursor, or blur an image. (Techsmith also has create/edit video software called Camtasia). See below image:
Snagit toolset
For Windows images, I only need the Snagit software. Both applications are feature rich and well worth the investment for blogging or other purposes..
Finally, I upload the images to WordPress Media library. To aid you, I caption each screenshot. I always refer you to the following image after describing the screen-grab. I have found it annoying on other blog posts not knowing what descriptive text goes with an image.
Using Copy and Paste for Resuable Blocks
Instead of using WordPress Reusable Block feature, I use the built-in “copy and paste” feature of Windows 10. I have each reusable block of text “pinned” to easily paste using Windows+V command to my blog without using WordPress; it’s faster and more efficient. You can have up to 25 entries “pinned” (or unpinned) in the “copy and paste” function of Windows 10. See following image:
Using “copy and paste” in Windows 10
A caveat, if you use special characters (such as emphasized letters or words) in a “pinned” item, you have to manually edit these out using WordPress Edit as HTML feature.
The Wrapup
In closing, I usually have a one sentence summary of the post.
At the very end of a post, I use the WordPress Embed feature to promote my Kindle formatted e-book available on Amazon about a Vietnam war battle I was in.
That’s it. I am sure some of these WordPress techniques can be of benefit on your next blog post. Happy blogging!
I hope you have found this post helpful. If so, click the Tweet icon below. This will launch Twitter where you click its icon to post the Tweet.
I have found TechSavvy.Life blog posts extremely helpful. Check them out for posts on smart phone apps, Macs and PCs!
Please feel free to leave a comment. I would love hearing from you. Do you have a computer or smart device tech question? I will do my best to answer your inquiry. Please mention the device, app and version that you are using. To help us out, you can send screenshots of your data related to your question.
The author’s Vietnam eBook on the Battle for Tra Bong: Events and Aftermath
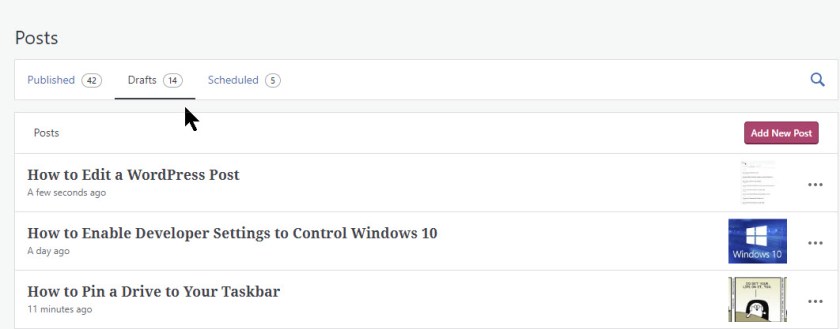
What has happen to WordPress? When you clicked on a Draft, Scheduled or Published post, WordPress would assume you wanted to View the blog post. In a recent update, WordPress now assumes you want to Edit the blog post. This is frustrating. I simply want to view a post and make changes “on the fly”. Now you have to click Save Draft, Update or Schedule the post regardless if you made a change or not. Refer to below image on how I used to view/edit by clicking on a post:
Viewing my Drafts posts in the Editor
Following is my exchanges with WordPress engineers.
My comment: “I go to Posts and click to open a draft. The Save Draft is displayed in upper right corner. All I do is view the post, I make no changes. I want to leave the post, I then have to save it. I go back into the post, sometimes it ask to Restore the backup.
But I made no changes. This is frustrating. Same thing happens to a Scheduled post. I always have to update. It didn’t use to work this way. If I made no changes, I just used the back arrow; now I always have to save and sometimes restore from a backup.”
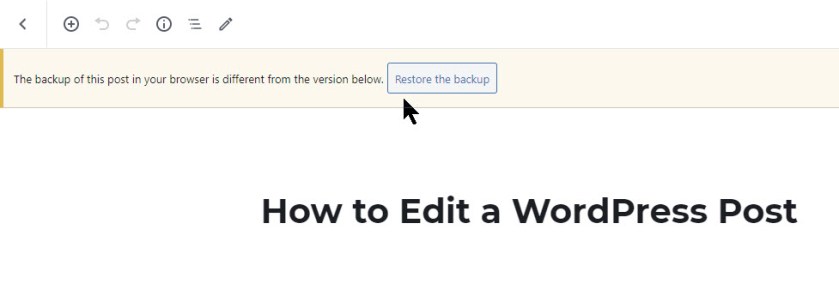
See following image asking me to Restore the backup when I made no changes:
Asking me to restore the backup when I made no changes
WordPress response: “I just ran a test on your site, and did find that if I open a post, and keep it open for more than 30 seconds, close it and then go back into it, it’s providing the message of restoring a backup, even though no changes were made.
Clicking Update on the unchanged post, before closing it, gets rid of the message and avoids it from appearing at all.
It’s not really a bug or a problem, it’s the result of opening a post for a period of time, even if no changes are made.
You can prevent it by clicking Update before exiting any post or page that you open.”
My response: “Microsoft products are smart enough to know if you have made a change. When you edit a document, and you don’t’ save it , Microsoft will prompt you if you want to save. WordPress should do the same. If all I am doing is viewing a post, it should not prompt me to save or update.”
WordPress response: “Thank you for the critical feedback! We are always working to improve our editing experience and feedback like this is helpful. One of our genuine concerns is that users do not lose their content while they are working on their post or page. With that said, we hope to ensure that users are prompted to save even the smallest changes made to their posts so that they don’t lose their work.
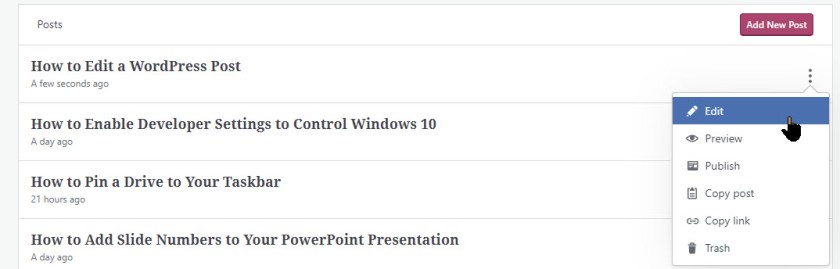
My best suggestion here is to view your published posts instead of the posts within the editor. This will give you a better sense of what your readers see as well and will ensure that no unwanted changes are made to the posts or pages. You can click on the three dots to the right of the post or page title and click “View” to see the published version of the post/page.”
Refer to below image on how to Edit or Preview a post:
How you must edit or preview a post
Are you experincing this behavior from your WordPress blog site?
I have done the usual like logging in and out of WordPress; clearing my Chrome cache and cookies at least twice. But I still have problems.
I Would Like to Hear from You
Please feel free to leave a comment. I would love hearing from you. Do you have a computer or smart device tech question? I will do my best to answer your inquiry. Please mention the device, app and version that you are using. To help me out, you can send screenshots of your data related to your question.
The author’s Vietnam eBook on the Battle for Tra Bong: Events and Aftermath
I have been blogging using WordPress as my hosting site for a couple of months. I have discovered a few tips and gotchas using WordPress that may be of interest to you.
First, if you noticed some strange highlighted text on your site, don’t panic. They will go away by exiting and relaunching your site. I had some highlighted text (in yellow) in my Categories section that I did not enter. After exiting and relaunching, the highlighted yellow text disappeared.
Second, if you have links in your posts, the linkage may add the words “opens in a new tab” at the end of your URL. This happens if you have the slider controlOpen in new tab turned off. This control is found in the drop down arrow next to the Return or the Edit (the pencil) icon). Your links will not work. You must remove the words (opens in a new tab) in the link URL. To open the link in a new tab, you must turn the slider control Open in new tab to the On position.
Third, when I am writing a post, I want to return to a previous block to add or change some text. I position the cursor in the text, but nothing happens. I am unable to add or change any text. I have to save whatever changes I have made, exit the post, then relaunch the post. Then I am able to make text changes. This is most frustrating aspect of WordPress.
Fourth, in my version of WordPress, the Dashboard does not automatically load. To get to the Dashboard, enter <your website name>/wp-admin in your browser search field. For my blog, I would enter the following in my browser: techsavvy.life/wp-admin.
I Would Like to Hear from You
Please feel free to leave a comment. I would love hearing from you. Do you have a computer or smart device tech question? I will do my best to answer your inquiry. Please mention the device, app and version that you are using. To help me out, you can send screenshots of your data related to your question.