

Just how big can a Microsoft Word document be? The short answer, it depends. The amount of text, photos, images and videos content determines the document size. Also, your computer system resources plays a part.
The maximum file size of an “all text” document in Microsoft Word 2007 or later is 32 MB. If you add photos, images or videos, the maximum file size jumps to 512 MB or a half of a gigabyte. Although Word can handle a very large file, it becomes more unmanageable as you approach the 512 MB limit.
Older file formats use the “.doc” file extension while the newer versions, Word 2007 and above, use the “.docx” extension.
This is for Word for Office 365 Windows and Mac versions. Other versions of Word will be similar.
If you are working with the old format, “.doc” extension, you can covert the file to the newer format as follows:
- Open Microsoft Word
- Locate the file with a “.doc” extension
- Click on File>Save As
- From the drop down box, select Word Document (*.docx)
- Click Save
Check Your Word Document File Size
There are several ways to check the size of your document. One way is as follows:
- Open File Explorer
- Locate the folder where the document resides
- Click on View>Details
- You will see the Size column denoting the file size
A second way is very similar.
- Open File Explorer
- Locate the file
- Right click on the file name
- Click on Properties
OR
- Open File Explorer
- Locate the file
- Click Home on the main menu
- Click Properties
- Click Properties from the sub menu
A third way is from the Word document itself as follows:
- Either using Word to locate and open the document or using File Explorer to locate the file; then double click to open
- From the main menu, click on File>Info
- Under Properties is the Size of the document
- Your screen should look like the below image:
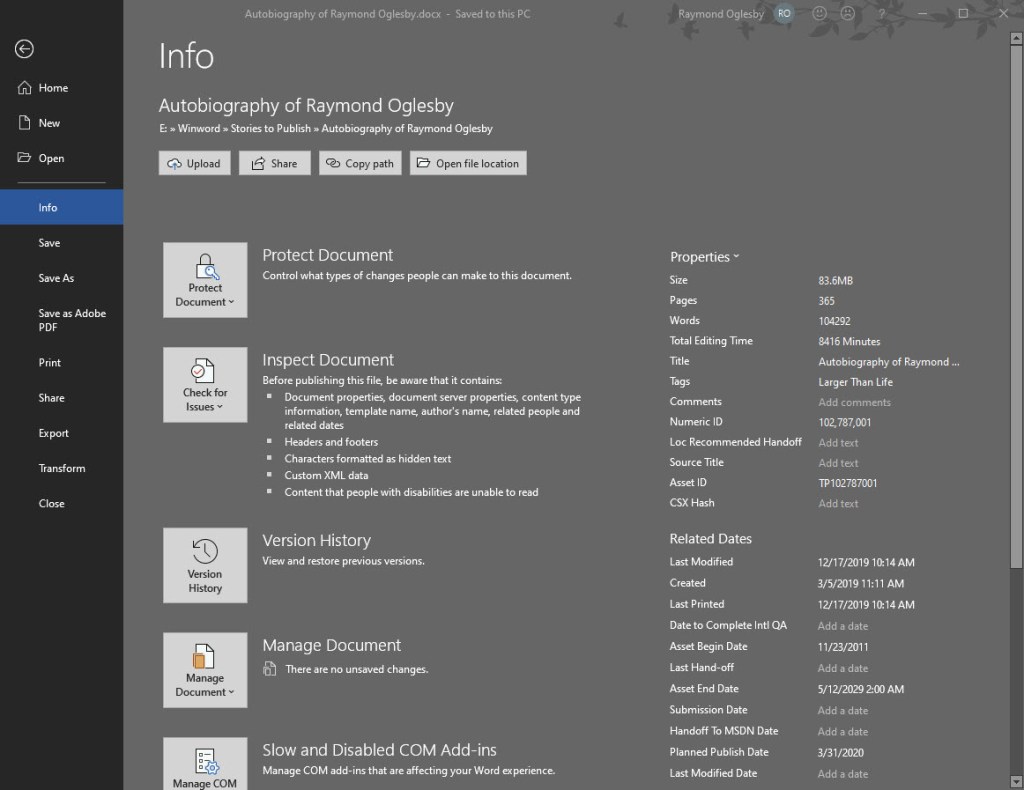
File Info Properties
Document properties, also known as metadata, are details about a file that describe or identify it. They include details such as title, author name, subject and keywords that identify the document’s topic or contents. You can use these keywords for searching Word documents. For example, in Word, you can use the Keywords property (also called Tags) to add the keyword “customers” to your sales documents. You can then search for all sales documents with that keyword.
Some entries can be changed. At the bottom of the File Info screen is the Show All Properties. Click on this to see more detail about your document. The grayed out options are the ones you can update.
Other properties are automatically updated. You can also search for these entries. For example, you can search for all files created after January 1, 2020, or for all files that were last changed yesterday.
A Personal Observation
I have an autobiography Word document that is 356 pages with 375 photos and images. The file size is only 83.6 MB (see above image). You should be able to manage a Word document with 1400 pages and 1400 images/photos and still not reach the 500 MB limit. Currently, I have no videos in the document. If I did, that would drastically increase the file size.
How to Reduce the Size of your Word Document
One way would be to split the document into two Word files. Of course, this would result in two Table of Contents, Bibliographies, etc. This may not be the right choice.
Another way is to compress the size of your images/photos. First, you should covert a “.doc” file extension document into the new “.docx” format as mentioned in this post.
To compress your images/photos, do the following:
- Make a backup copy of your original Word document. Although you are using the Save As option to Save the file with a new file name, I prefer working with a backup copy.
- Open your backup Word document
- Click on File>Save As>More Options at the top of the screen
A screenshot is below:

- In the Save As dialog box, click Tools>Compress Pictures at the bottom of the screen
In the latest version of Word, you are presented with four Options as shown below:
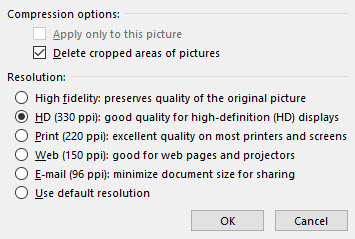
For the smallest possible size:
- Click “Email (96 ppi) …“
- Click OK
- Click Save
This option will result in the poorest image quality. All your images/photos will be automatically compressed. Choosing any other option will result in a larger Word document.
Take a look at the results of your compressed document. Do you like the results? If not, then repeat the above steps with another backup copy of your document.
Once you are satisfied, then rename the compressed document back to the original file (overwrite the original file) or rename to a different file name.
I Would Like to Hear from You
Please feel free to leave a comment. I would love hearing from you. Do you have a computer tech question? I will do my best to answer your inquiry. Please mention the app and version that you are using. To help me out, you can send screenshots of your data related to your question.
