
Creating and using custom AutoText entries for frequently used phrases is a great way to speed up your content creation in Microsoft Word. By default, Word has very few entries so you may want to add your own. The good news is you can set up these time-savers in just a few clicks!
The software does come with lots of AutoText Document fields, like Author, Company Info, Status and other built-in entries such as Headers, Footers, Tables, Watermarks, etc., that you can choose for your document. You can use these entries in addition to your own AutoText entries for your documents.
Note! Your AutoText entries maintain its formatting when inserted into a document.
This is for PCs, Macs and other platforms that support Word

Creating an AutoText Entry
To begin, highlight the text in your Word document that you’d like to use to create your new AutoText entry. Refer to below image:

Press Alt+F3 to open the Create New Building Block window. Then, type in a name (within the 32-character limit) for your AutoText entry. Next, click OK. See following image:
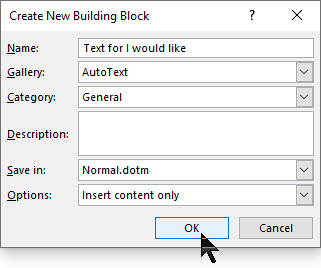
Your AutoText entry will be saved. Now that was easy.
Using an AutoText Entry
To use your AutoText entry, place your cursor where you want to insert the text in your Word document. Navigate to the Insert tab and click the Explore Quick Parts icon in the Text group. See below image:

A drop-down menu will be displayed. Hover your pointer over AutoText. Refer to below image:

A list of AutoText entries will appear. Select the one you want to use. See below image:

The entry you selected will be inserted into your document.
Deleting an AutoText Entry
If your AutoText list is getting crowded, or you made a mistake when you created a custom entry, you can delete them.
To do so, go back to the Insert tab and select the Text group. Then click the Explore Quick Parts icon, and then hover your pointer over AutoText.
From here, right-click the AutoText entry you want to delete. In the context pop-up menu that appears, click the option Organize and Delete. Refer to following image:

The Building Blocks Organizer window will be displayed with your AutoText entry highlighted. At the bottom of this dialog box, click on Delete. See below image:

A message box will appear asking you to confirm the deletion of your entry. To delete this entry, click Yes. Refer to below image:

Now your entry will be deleted. You have successfully adding, inserted and deleted an AutoText entry. That’s it.
I Would Like to Hear from You
Please feel free to leave a comment. I would love hearing from you. Do you have a computer or smart device tech question? I will do my best to answer your inquiry. Please mention the device, app and version that you are using. To help us out, you can send screenshots of your data related to your question.
