This is for the iPhone with a subscription to Apple Music. Screenshots are from iPhone 14 Pro running iOS 17+
Late Night is so titled because it enables you to hear sound better at a lower volume. So if you have Late Night selected for your EQ setting, you will notice a small but significant difference in the loudness of music on your iPhone when using the Apple Music app. This tip is ideal when you are without headphones or a speaker. Let’s explore this simple feature.
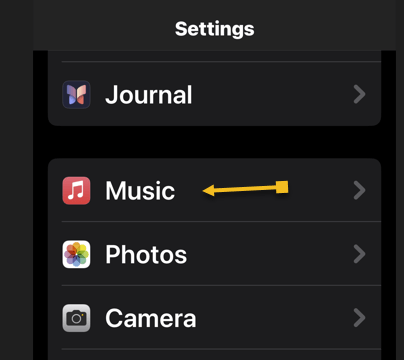
First, open the Settings app and select Music. Refer to the below image:
Selecting the Music option
Now, scroll down and tap EQ. See the below image;
Selecting the EQ option
Next, from the list, select Late Night. See the following image:
Selecting the Late Night sound
Just for fun, you may want to try out other EQ options.
Disclaimer
Technology is always changing. Rarely is there static tech for smartphones and desktops. Thus, the contents of this post are only valid at the time of writing. Blog posts older than six months may have directions incompatible with your device or OS. Hopefully, older post content will continue to work as advertised. Thank you for reading TechSavvy.Life for Technology at Work For You.
Quote For the Day
Make it happen now, not tomorrow. Tomorrow is a loser’s excuse.
Farrah Gray
Tweet Info
That’s it. Please feel free to share this post! One way to share is via Twitter.
Just click the Tweet icon below. This will launch Twitter where you click its icon to post the Tweet.
Checkout TechSavvy.Life for blog posts on smartphones, PCs, and Macs! You may email us at contact@techsavvy.life for comments or questions.
Please feel free to leave a comment. I would love to hear from you. Do you have a computer or smart device tech question? I will do my best to answer your inquiry. Just send an email to contact@techsavvy.life. Please mention the device, app, and version you are using. To help us out, you can send screenshots of your data related to your question.
Author’s E-Book
You can access the E-book from a Kindle device, or the Kindle App for a desktop or smartphone. The apps are free.
The author’s Vietnam eBook on the Battle for Tra Bong Vietnam: Events and Aftermath
This is for the iPhone. Screenshots are from iPhone 14 Pro running iOS 17+
Do you regularly call extensions for your work or personal phone calls? If so, you are probably sick of dialing through phone trees to reach the person you want to reach. We will show you how to dial an extension on iPhone to skip the whole phone-tree nonsense, and how to add an extension to a phone number in Contacts for later use.
We will start by showing you how to dial an extension on your iPhone. Then, in the next section, we will cover how to add an extension to a phone number in iPhone Contacts.
Dial an Extension
Open the Phone app, and tap the Keypad tab if it is not already selected.
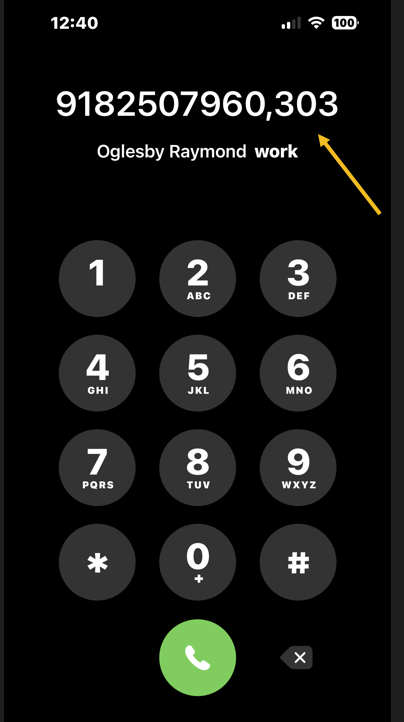
Dial the main number you are calling, then tap and HOLD the “*” key (asterisk) until a comma appears. The comma acts as a pause and lets your phone know it’s dialing an extension.
Now enter the extension number after the comma.
Tap the green phone Call button and you will dial straight to the person you are trying to reach.
Refer to the below image:
Dialing a phone number with an extension using the keypad
That’s all there is to it! Now, you know how to dial an extension on your iPhone.
Add Extension to a Contact
If you plan to regularly call a phone number extension, you can save it in your Contacts. That way, the next time you go to dial the extension, it will already be saved as it needs to be dialed.
Open the Contacts app.
Tap on the contact if you want to add an extension. If you do not already have the number saved, simply create a new contact by tapping the “+” plus icon.
Tap Edit in the upper-right corner.
Tap the number you are adding the extension to, or tap the “+” icon next to the phone to add a new phone number for the contact.
Tap the Symbols button on your keyboard.
Now tap the Pause button.
Now enter the extension.
Tap Done to save.
See the below image:
Adding a phone number with an extension to a Contact
Now you can dial an extension before you even get to the operator, and you can also add an extension to a phone number in your iPhone Contacts.
Disclaimer
Technology is always changing and rarely is there static tech for smartphones and desktops. Thus, the contents of this post are only valid at the time of writing. Blog posts older than six months may have directions incompatible with your device or OS. Hopefully, older post content will continue to work as advertised. Thank you for reading TechSavvy.Life for Technology at Work For You.
Quote For the Day
Be undeniably good. No marketing effort or social media buzzword can be a substitute for that.
Anthony Volodkin
Tweet Info
You are finished. Please feel free to share this post! One way to share is via Twitter.
Just click the Tweet icon below. This will launch Twitter where you click its icon to post the Tweet.
Checkout TechSavvy.Life for blog posts on smartphones, PCs, and Macs! You may email us at contact@techsavvy.life for comments or questions.
Please feel free to leave a comment. I would love to hear from you. Do you have a computer or smart device tech question? I will do my best to answer your inquiry. Just send an email to contact@techsavvy.life. Please mention the device, app, and version you are using. To help us out, you can send screenshots of your data related to your question.
Author’s E-Book
You can access the E-book from a Kindle device, the Kindle App for the desktop or smartphone, which is a free app.
The author’s Vietnam eBook on the Battle for Tra Bong Vietnam: Events and Aftermath
This is for the iPhone running iOS 16 or above. Screenshots are from iPhone 14 Pro running iOS 17+
For those who love printing physical documents instead of staring at them on their iPhones, this Reminders app trick is a must-have! We will show you how to print lists from the Reminders app on your iPhone so you can check things off your to-do list.
Select Your List
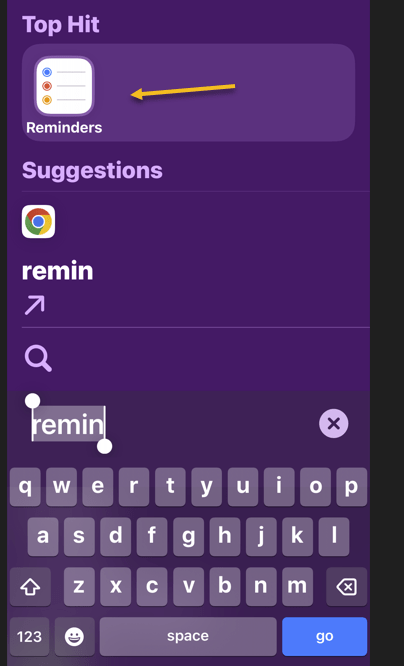
First, open the Reminders app. Refer to the below image:
Open your Reminders app
Next, select the list you would like to print. See the below image:
Select your list
Now, tap the Nenu icon (the three dots) in the top-right corner of your screen. See the following image:
Select the Menu option
Select Your Printer
Next, tap Print. Refer to the below image:
Select the Print option
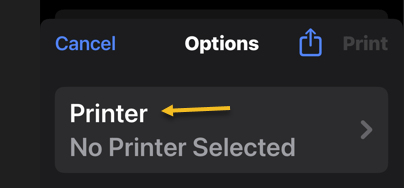
Now, if a printer is not already selected, tap Printer. See the below image:
Select the Printer option
Next, select the printer you would like to use. See the following image:
Select your Printer
Set Your Print Options and Print
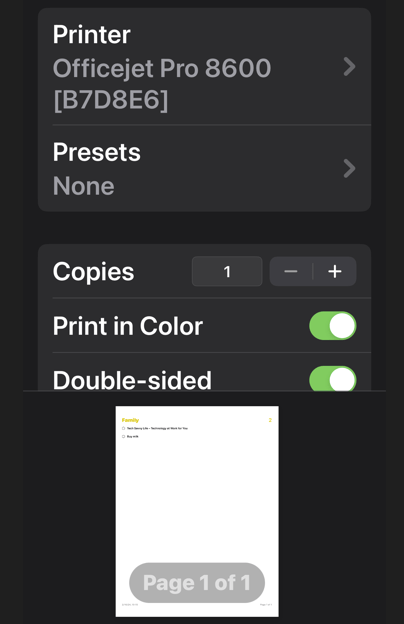
Now, set the options you want to use for printing. Refer to the below page:
Select your Print options
Next, tap Print. See the below image:
Print your Reminders list
You can now bring your list to the store or give out physical to-do lists to your family members as needed.
Additionally, you can use the Print option in the Notes app to print a note list.
Disclaimer
Technology is always changing. Rarely is there static tech for smartphones and desktops. Thus, the contents of this post are only valid at the time of writing. Blog posts older than six months may have directions incompatible with your device or OS. Hopefully, older post content will continue to work as advertised. Thank you for reading TechSavvy.Life for Technology at Work For You.
Quote For the Day
Make it happen now, not tomorrow. Tomorrow is a loser’s excuse.
Farrah Gray
Tweet Info
You ar finished. Please feel free to share this post! One way to share is via Twitter.
Just click the Tweet icon below. This will launch Twitter where you click its icon to post the Tweet.
Checkout TechSavvy.Life for blog posts on smartphones, PCs, and Macs! You may email us at contact@techsavvy.life for comments or questions.
Please feel free to leave a comment. I would love to hear from you. Do you have a computer or smart device tech question? I will do my best to answer your inquiry. Just send an email to contact@techsavvy.life. Please mention the device, app, and version you are using. To help us out, you can send screenshots of your data related to your question.
Author’s E-Book
You can access the E-book from a Kindle device, or the Kindle App for a desktop or smartphone. The apps are free.
The author’s Vietnam eBook on the Battle for Tra Bong Vietnam: Events and Aftermath
The post discusses methods for deleting Facebook Messenger chats on iPhone and desktop. It advises changing message retention settings on the iPhone and provides steps for deleting messages on both platforms. It also mentions using Chrome extensions for bulk deletion.
This is for the iPhone and desktop using Google. Screenshots are from iPhone 14 Pro running iOS 17.3 and Windows 10.
I was surprised at the number of Facebook Messenger chats on my iPhone. I started to delete them one at a time. But doing so was too time-consuming; there had to be a better way.
If you research this post, you will find articles that say bulk deletion of chats cannot be done. But with the help of Google Extensions, you can delete all your chats at once.
This blog post is one of my favorites, especially since I have thousands of chats that I want to delete. We had forgotten that the Forever option was selected, which as you may guess, saves your chats forever.
Where is a chat, a message, a conversation, or a thread used?
A chat is a term used in Messenger (owned by Facebook). A message is a term found on Facebook. In Facebook if there is more than one message with a person, group, or entity, that is labeled a conversation. For a thread, that is used in Reddit.
Check Your Settings
Why do you have hundreds or thousands of chats? On your iPhone head to:
Settings > Messages > Keep Messages
and tap the option. If the option is set to Forever you will have lots of chats. Refer to the below image:
Your Facebook Message time setting
We recommend you choose another option. When you do so, all older chats will be automatically deleted. We are selecting to delete messages older than one year. On the confirmation screen, tap Delete Older Messages. See the below image:
Selecting to delete messages older than one year
Your Keep Messages will now be set to the option you just chose. See the following image:
Your Keep Messages setting
Deleting Facebook messages does not have to be incredibly difficult. Whether you are deleting one or an entire history, there are options for you to do both with minimal effort.
Some users may find it easier to delete their entire Facebook account, although we do not recommend this. For now, let’s just clean up your messages/chats.
Using iPhone
Deleting messages on an iPhone or iPad one at a time:
Open the Facebook Messenger app.
Tap and hold the message that you no longer want, then swipe to the left.
When the menu appears, select Delete.
Confirm the selection by tapping Delete.
If you want to delete in bulk, it would be best to use a browser.
Using a Browser
Log into your Facebook account.
Click See all in Messenger.
Click on the 3-dot menu icon next to a conversation.
Click Delete Chat if you want to erase all the chats.
Confirm your deletion by clicking Delete Chat.
But what can you do about multiple messages and multiple conversations? For this, you have to install a third-party browser extension.
Using a Chrome Extension
Extensions become a part of your web browser and allow you to perform various functions on a website. To delete multiple or all of your Facebook message history, we need to install a web browser extension.
Whether it’s Chrome, Firefox, or Internet Explorer, we will begin by using Google to pull up the Web Store.
Note! You will find a lot of Chrome extensions for deletion of messages. We strongly recommend only using the following extensions from the Chrome web store, not from third-party web sites.
Extension: Delete Facebook Messages
You want to use Google Search to find the “Delete Facebook Messages” extension. Once you have found it, click Add to Chrome. Refer to the below image:
Adding Delete Facebook Messages Chrome extension
You will be prompted through various pop-ups until that extension is added. To view the added extension:
Click the 3-dot menu icon in the upper right-hand > Exenesions > Manage Extensions
See the below image:
Delete Facebook Messages Chrome extension
Now, let’s add the extension icon to the Chrome toolbar. Click the Details option. See the following image:
Selecting Details for the Chrome extension
Next, toggle the Pin to toolbar to ON. Refer to the below image:
Toggle Pin to toolbar to ON
Now, the Delete Facebook Messages icon will be in your toolbar. See the below image:
The Chrome extension icon
Next, click the Delete Facebook Messages icon and choose the Begin Deletion option. See the following image:
Launching the Chrome extension
Note! To use this extension more than once, there is a subscription fee.
Extension: Message Cleaner
To install the Chrome extension, search for Message Cleaner using Google Search, then select Add to Chrome. Refer to the below image:
Adding the Message Cleaner Chrome extension
Follow the directions above to add its icon to the toolbar.
The extension icon will be labeled Delete all Facebook Messages in your Chrome toolbar. When you click the extension icon you can Open Messages and Delete All Messages. For one-click deletion, press the F8 key. See the below image:
Launching the Message Cleaner Chrome extension
This extension works best if you scroll down to the bottom of the message list. Once you start the extension, it will recognize all the messages as being selected for removal. You can also then pick individual messages that you may want to save.
If you selected “all” before clicking “confirm,” the only way to get those messages back is to ask the person you sent them to for help or to use data recovery methods to retrieve backed-up information, assuming you have them backed up.
Disclaimer
Technology is always changing. Rarely is there static tech for smartphones and desktops. Thus, the contents of this post are only valid at the time of writing. Blog posts older than six months may have directions incompatible with your device or OS. Hopefully, older post content will continue to work as advertised. Thank you for reading TechSavvy.Life for Technology at Work For You.
Quote For the Day
Discipline is the bridge between goals and accomplishment.
Jim Rohn
Tweet Info
That’s it. Please feel free to share this post! One way to share is via Twitter.
Just click the Tweet icon below. This will launch Twitter where you click its icon to post the Tweet.
Checkout TechSavvy.Life for blog posts on smartphones, PCs, and Macs! You may email us at contact@techsavvy.life for comments or questions.
Please feel free to leave a comment. I would love to hear from you. Do you have a computer or smart device tech question? I will do my best to answer your inquiry. Just send an email to contact@techsavvy.life. Please mention the device, app, and version you are using. To help us out, you can send screenshots of your data related to your question.
Author’s E~Book
You can access the E-book from a Kindle device, or the Kindle App for a desktop or smartphone. The apps are free.
The author’s Vietnam eBook on the Battle for Tra Bong Vietnam: Events and Aftermath
This is for the iPhone. Screenshots are from iPhone 14 Pro running iOS 17+
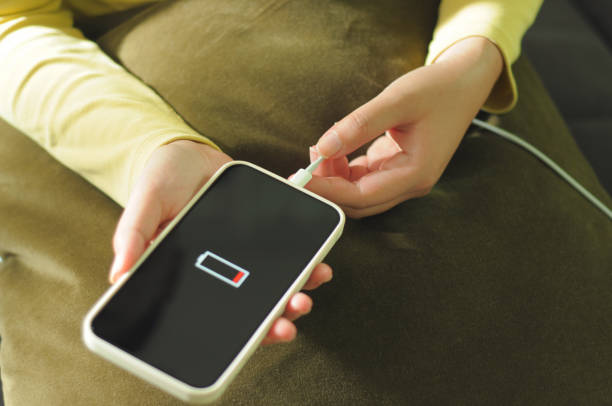
If you struggle to make it through the day or just want to improve your iPhone battery a little, here is one thing you can do.
It all comes down to your phone’s Wi-Fi settings.
Some settings can search for open wireless networks and even notify you when one is available. This setting allows you to connect to open Wi-Fi networks easily, but it does come with a huge disadvantage; it leaves your phone constantly searching for those open networks throughout the day.
While it is not going to drain your battery extremely fast, using the Ask to Join Networks feature can drain your battery a little. By default, Apple has the iPhone set up to Notify you when an open network is available. However, you can turn this off to save power and improve your iPhone battery.
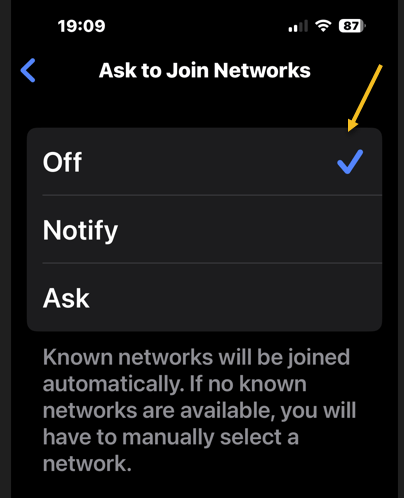
To turn off the Ask to Join Networks feature, head to:
Settings> Wi-Fi > Ask to Join Networks
This option is below the Other Networks section. If it is not set to off, tap on the option and then select OFF from the drop-down that appears to disable the feature. Refer to the below image:
Setting Ask to Join Networks to OFF
Disclaimer
Technology is always changing and rarely is there static tech for smartphones and desktops. Thus, the contents of this post are only valid at the time of writing. Blog posts older than six months may have directions incompatible with your device or OS. Hopefully, older post content will continue to work as advertised. Thank you for reading TechSavvy.Life for Technology at Work For You.
Quote For the Day
Should you find yourself in a chronically leaking boat, energy devoted to changing vessels is likely to be more productive than energy devoted to patching leaks.
Warren Buffett
Tweet Info
That’s it. Please feel free to share this post! One way to share is via Twitter.
Just click the Tweet icon below. This will launch Twitter where you click its icon to post the Tweet.
Checkout TechSavvy.Life for blog posts on smartphones, PCs, and Macs! You may email us at contact@techsavvy.life for comments or questions.
Please feel free to leave a comment. I would love to hear from you. Do you have a computer or smart device tech question? I will do my best to answer your inquiry. Just send an email to contact@techsavvy.life. Please mention the device, app, and version you are using. To help us out, you can send screenshots of your data related to your question.
Author’s E-Book
You can access the E-book from a Kindle device, the Kindle App for the desktop or smartphone, which is a free app.
The author’s Vietnam eBook on the Battle for Tra Bong Vietnam: Events and Aftermath
The latest iOS version introduced Visual Look Up, allowing iPhone users to easily identify car dashboard symbols by taking a picture. After snapping the photo, users can access the symbol’s meaning and further information. Visual Look Up can also identify objects in photos and videos, but may require adjusting angles and lighting.
This is for the iPhone. Screenshots are from iPhone 14 Pro running iOS 17+
Ever run into car trouble, and you are unsure what those symbols on your dashboard mean? Or, do you just want to know information about the symbols? Now, you can use your iPhone to easily identify car dashboard symbols and meanings by simply snapping a picture. Let’s explore how to use this cool new Visual Look Up feature.
With the latest version of iOS, you can now use Visual Look Up to easily identify your car dashboard’s symbols. This handy new feature makes diagnosing your car troubles a breeze.
First, open the Camera app, and snap a picture of the car dashboard symbols you want to identify. It’s best to take the photo in a dark environment. Refer to the below image:
Your dashboard symbols
Next, tap the Image Preview to open it. Then tap the Info icon at the bottom of the screen. It might change into a Steering Wheel icon. See the below image:
Accessing the Info icon
Now, tap Look Up Auto Symbol. See the following image:
Selecting the Look Up Symbol option
Next, your iPhone should display the meaning of the symbols. Refer to the below image:
Your car symbols result
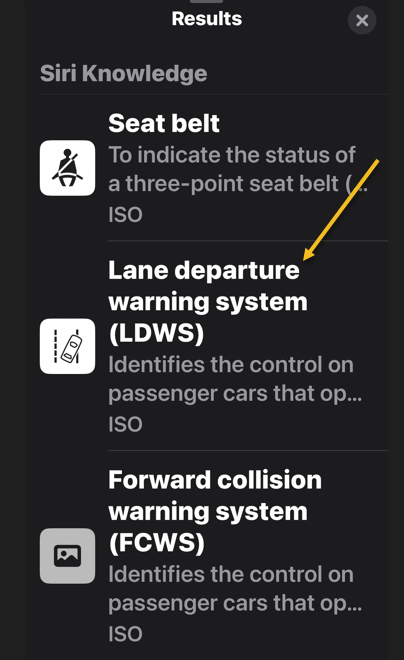
Now, tap on the result entry to see more information. See the below image:
More information about the car symbol you selected
Now you know how to use Visual Look Up to identify your car’s maintenance symbols! Visual Look Up can be a tricky feature to get working right. If your iPhone is having trouble identifying your car dashboard symbols, try a different angle, moving closer or further away, different lighting, etc.
Also, Visual Look Up can be used to identify various objects in photos and videos.
Disclaimer
Technology is always changing and rarely is there static tech for smartphones and desktops. Thus, the contents of this post are only valid at the time of writing. Blog posts older than six months may have directions incompatible with your device or OS. Hopefully, older post content will continue to work as advertised. Thank you for reading TechSavvy.Life for Technology at Work For You.
Quote For the Day
I insist on a lot of time being spent, almost every day, to just sit and think. That is very uncommon in American business. I read and think. So I do more reading and thinking, and make less impulse decisions than most people in business. I do it because I like this kind of life.
Warren Buffett
Tweet Info
You are finished Please feel free to share this post! One way to share is via Twitter.
Just click the Tweet icon below. This will launch Twitter where you click its icon to post the Tweet.
Checkout TechSavvy.Life for blog posts on smartphones, PCs, and Macs! You may email us at contact@techsavvy.life for comments or questions.
Please feel free to leave a comment. I would love to hear from you. Do you have a computer or smart device tech question? I will do my best to answer your inquiry. Just send an email to contact@techsavvy.life. Please mention the device, app, and version you are using. To help us out, you can send screenshots of your data related to your question.
Author’s E-Book
You can access the E-book from a Kindle device, the Kindle App for the desktop or smartphone, which is a free app.
The author’s Vietnam eBook on the Battle for Tra Bong Vietnam: Events and Aftermath
This post discusses a solution for showing digital tickets on an iPhone lock screen to avoid unlocking the phone for scanning. It describes how to set up a lock screen wallpaper displaying the ticket, enabling easy access without compromising security. The process involves taking a screenshot, setting the image as a wallpaper, and switching back afterward.
This is for the iPhone. Screenshots are from iPhone 14 Pro running iOS 17+
What to Know
Problem With Apple Wallet
Lock Screen Solution
Show Digital Tickets on the Lock Screen
Summary
We hate giving our iPhones to strangers asking to scan a digital ticket with an unlocked screen. Yes, it’s incredibly easy to pull up a barcode or QR code on the screen so you can prove you have a valid ticket, loyalty program membership, or discount. And it’s very easy to add most of these digital tickets to Apple Wallet. In fact, you should do that whenever you can.
There will be instances where you may not perform the scan yourself. In such cases, you will have to unlock the iPhone, open the app that contains the digital ticket, and show or hand your phone to your friend. Now, we know the person handling my iPhone has better things to do than swipe up and snoop on our texts and photos. But it’s the principle of the thing.
The iPhone’s security is only as good as the Lock Screen password. And who knows what else can happen in a crowded place with people waiting for their tickets to be scanned?
But the iPhone’s Lock Screen offers a brilliant solution. We can set temporary wallpapers that display whatever digital ticket we might have to show to gain entry to an event or place. And we will never have to unlock the iPhone when handing it over to others to have a ticket scanned.
It’s incredibly easy to set up, and it’s an easy way to have all your digital tickets and subscriptions ready, whether they support Apple Wallet or not.
Problem With Apple Wallet
We mentioned Apple Wallet a few times, which is the place to store your credit cards, digital keys, and tickets. But to access its contents, you would still have to authenticate via Face ID, Touch ID, or your PIN to unlock the screen.
Also, not all apps support Apple Wallet. Or you might not be using Apple Wallet to begin with. Maybe you are using a code you photographed in real life. In such scenarios, you will not be able to add your digital tickets to Apple Wallet.
We also would point out that you can use both the Apple Ballet and the Lock Screen trick at the same time.
Lock Screen Solution
After the iOS 16 upgrade, we could use the Lock Screen customization support to set up as many wallpapers as we wanted and then just switch between them.
That is, screenshots of the digital ticket were the only way to do it is to hand off our iPhones.
Show Digital Tickets on the Lock Screen
Longtime iPhone users may have realized how the whole thing works. But if you still do not know how to pull it off, we will describe the steps below.
First, go to the app that shows the digital ticket. Maybe it’s an email or an app for an airline. Or a ticket to a concert, or a loyalty card you have to scan often. Whatever it is, find the barcode or QR code and take a screenshot.
You can crop the code if there’s a lot of stuff in the screenshot you do not need. We usually take a few seconds to crop the image.
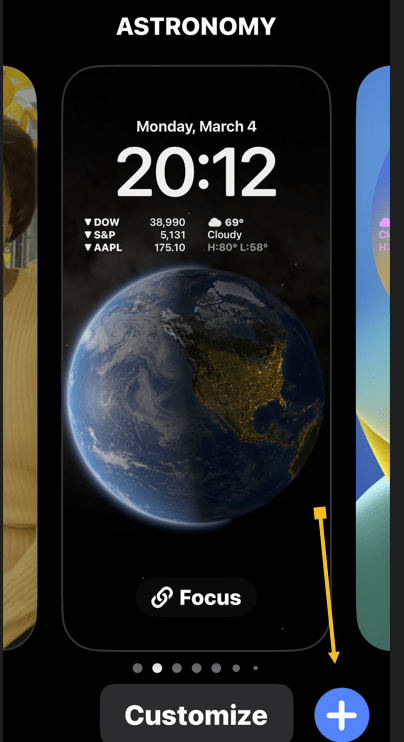
Next, go to the Lock Screen, tap, and hold it until the wallpaper carrousel pops into view. Refer to the below image:
Your lock screen
Now, tap on the Add New icon. See the below image:
Selecting to add a wallpaper
Next, go to Photos and tap All. See the following image:
Accessing your photos
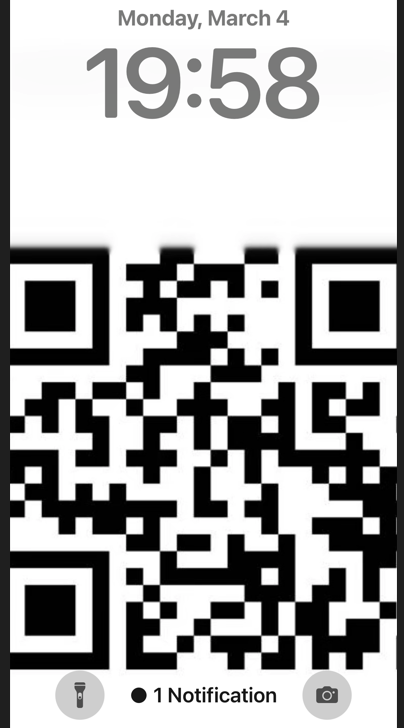
Now, select the screenshot of the digital ticket you have just saved. Refer to the below image:
Your QR screenshot
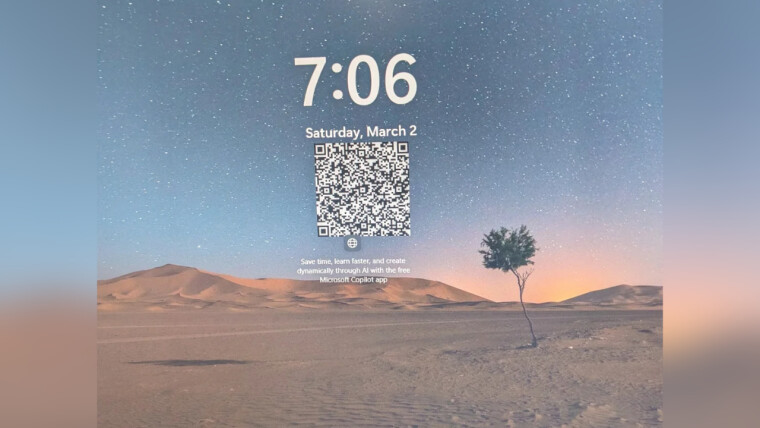
Next, comes the tricky part. Whether you have cropped the digital ticket in the screenshot or not, you will have to fit it on the Lock Screen. That means some cropping will follow as you will want to ensure that the code is not covered with any other elements, like screen widgets, the clock, or the Flashlight and Camera buttons. See the the below image:
Your finished lock screen with the QR code
As you can see, we have squeezed a QR code between the Flashlight and Camera buttons.
Now, once you have figured out the position of the digital ticket, save the wallpaper.
That’s it. You are now ready to have your ticket scanned.
Summary
Next time you give the phone to someone else to check their ticket, just hand them your iPhone without unlocking it. Tell them to tap the screen, and the ticket will come into view. Ask them to keep tapping the screen if they need more time because the screen will turn off quickly when your iPhone is locked.
Once you are done, switch back to the wallpaper you want to use.
You can repeat this for any type of digital ticket/membership you routinely have to show around. You can save as many Lock Screens as you want, so they cover all your memberships.
Remember, you should delete the Lock Screens once the digital tickets showing on them are no longer valid.
Disclaimer
Technology is always changing and rarely is there static tech for smartphones and desktops. Thus, the contents of this post are only valid at the time of writing. Blog posts older than six months may have directions incompatible with your device or OS. Hopefully, older post content will continue to work as advertised. Thank you for reading TechSavvy.Life for Technology at Work For You.
Quote For the Day
Don’t find customers for your products, find products for your customers.
Seth Godin
Tweet Info
That’s it. Please feel free to share this post! One way to share is via Twitter.
Just click the Tweet icon below. This will launch Twitter where you click its icon to post the Tweet.
Checkout TechSavvy.Life for blog posts on smartphones, PCs, and Macs! You may email us at contact@techsavvy.life for comments or questions.
Please feel free to leave a comment. I would love to hear from you. Do you have a computer or smart device tech question? I will do my best to answer your inquiry. Just send an email to contact@techsavvy.life. Please mention the device, app, and version you are using. To help us out, you can send screenshots of your data related to your question.
Author’s E-Book
You can access the e-book from a Kindle device, the Kindle App for the desktop or smartphone, which is a free app.
The author’s Vietnam eBook on the Battle for Tra Bong Vietnam: Events and Aftermath
This post provides a guide on clearing notifications on the iPhone, either individually or all at once. It also includes a disclaimer on the evolving nature of technology. The post ends with a quote and information on sharing the post and accessing the author’s eBook on the Battle of Tra Bong Vietnam.
This is for the iPhone. Screenshots are from iPhone 14 Pro running iOS 17+
Notifications on your iPhone provide important updates and information at a glance. However, if you are like us and do not dismiss or interact with your notifications, they can start to pile up. When your Notification Center becomes cluttered and clogged up, you can easily clear notifications on your iPhone simultaneously. Let’s explore this easy feature.
Clear All Your iPhone Notifications
If you are feeling overwhelmed by all the unread notifications in your Notification Center, clearing them might help.
Unlock your phone and swipe down from the top left of your screen
OR
swipe up from your Lock Screen to pull them up.to open the Notification Center.
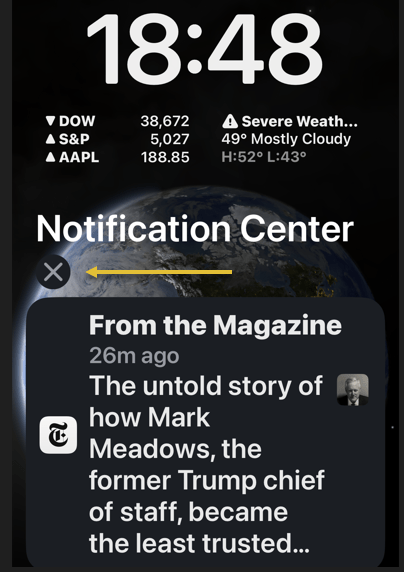
Tap and hold the “X” icon for a moment. Refer to the below image:
Selecting the icon to clear all notifications
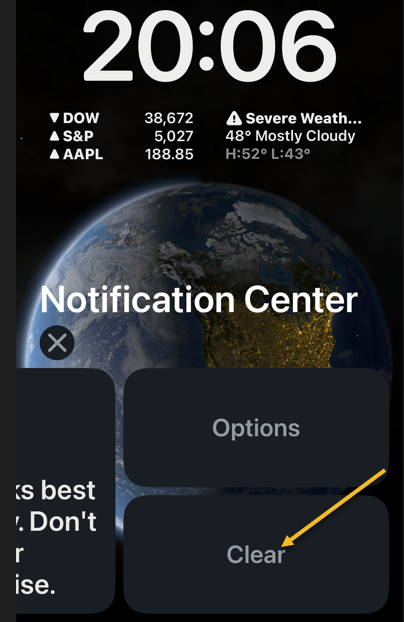
Tap Clear or Clear All Notifications when it pops up. See the below image:
Clear all notifications
Once you tap Clear or Clear All Notifications, all of your notifications will instantly disappear from the Notification Center. Now you do not have to deal with hundreds of notifications clogging up your phone every day!
Clear One
You can delete them one at a time by swiping the notification to the left, and then tap Clear or Clear All. See the following image:
Clear one notification
Disclaimer
Technology is always changing and rarely is there static tech for smartphones and desktops. Thus, the contents of this post are only valid at the time of writing. Blog posts older than six months may have directions incompatible with your device or OS. Hopefully, older post content will continue to work as advertised. Thank you for reading TechSavvy.Life for Technology at Work For You.
Quote for the Day
The way to get things done is not to mind who gets the credit for doing them.
Benjamin Jowett
spacer
Tweet Info
That’s it. Please feel free to share this post! One way to share is via Twitter.
Just click the Tweet icon below. This will launch Twitter where you click its icon to post the Tweet.
Checkout TechSavvy.Life for blog posts on smartphones, PCs, and Macs! You may email us at contact@techsavvy.life for comments or questions.
You can start Google Chrome to open a specific page, a new tab, or continue where you left off from the On starup option. We will show you how to set this option to load your Google Apps. You can use the same procedure to load any website at startup or create a bookmark.
This is for the Desktop and iPhone. Screenshots are from Windows 10 and iPhone 14 Pro running iOS 17+
You can start Google Chrome to open a specific page, a new tab, or continue where you left off from the On startup option. We will show you how to set this option to load your Google Apps. You can use the same procedure to load any website at startup or create a bookmark.
Setup the On Startup Option
Your Google Apps can be displayed using the On startup option. First, to set this option, open Chrome and click the Menu (the 3 dots) in the upper right corner, then navigate to:
Settings > On startup
Next, under the Open a specific page or set of pages option, enter the following:
chrome://apps/
Refer to the below image:
Setting On startup option to your Google Apps
Now whenever you start Chrome, your Google Apps page will be displayed.
By doing the above, you can just click the Home button next to the address bar to display your Google Apps anytime. See the below image:
Accessing the Home button to view your Google Apps page
Clicking the Home button next to the address bar will display the page you have set as the On startup page.
Setup the Google Apps Bookmark on Desktop
If you do not have the On startup option set to Google Apps, why not create a bookmark for it. Following are the steps to do this.
First, open the Google Apps page you want to bookmark in Chrome. See the following image:
Setting your Google Apps page to bookmark
Next, click the Star icon in the address bar. Refer to the below image:
Adding your Google Apps page as a bookmark
Now, choose a name and location for your bookmark then hit Done. See the below image:
Editing your Google Apps bookmark
Next, head to your saved bookmark to see your Google Apps entry. See the following image:
Your saved Google Apps bookmark
Setup the Google Apps Bookmark on iPhone
First, open the Google Apps page you want to bookmark in Chrome then tap the Share button. Refer to the below image:
Setting your Google Apps page
Next, tap the Add to Bookmarks option. See the below image:
Adding your Google Apps bookmark
Edit the Google Apps Bookmark on iPhone
First, tap the Menu (the 3 dots) at the bottom right corner. See the following image:
Accessing the Menu option
Next, tap the Edit Bookmark option. Refer to the below image:
Choosing to edit your Google Apps bookmark
Now, change as necessary, then tap Done. See the below image:
Editing your Google Apps bookmark
Not only do bookmarks save you time as you do not need to type in a URL or search for your most frequently visited sites on Google every time you visit, but they are also great for keeping track of articles and videos you plan to head back to later. If you do not have Google Apps set as your startup page, creating a bookmark allows you to easily display the page.
Disclaimer
Technology is constantly changing; there is rarely static tech for smartphones and desktops. Thus, the contents of this post are only valid at the time of writing. Blog posts older than six months may have directions incompatible with your device or OS. Hopefully, older post content will continue to work as advertised. Thank you for reading TechSavvy.Life for Technology at Work For You.
Quote for the Day
“The best vision is insight.”
Malcolm Forbes
Tweet Info
That’s it. Please feel free to share this post! One way to share is via Twitter.
Just click the Tweet icon below. This will launch Twitter where you click its icon to post the Tweet.
Checkout TechSavvy.Life for blog posts on smartphones, PCs, and Macs! You may email us at contact@techsavvy.life for comments or questions.
Please feel free to leave a comment. I would love to hear from you. Do you have a computer or smart device tech question? I will do my best to answer your inquiry. Just send an email to contact@techsavvy.life. Please mention the device, app, and version you are using. To help us out, you can send screenshots of your data related to your question.
Author’s E-Book
You can access the e-book from a Kindle device, the Kindle App for the desktop or smartphone, which is a free app.
The author’s Vietnam eBook on the Battle for Tra Bong Vietnam: Events and Aftermath
This post provides instructions on finding Wi-Fi passwords on Windows and iPhone devices. For Windows, it details how to access and reveal the password in plain text. For iPhone, it explains the steps to reveal the Wi-Fi password. The post also includes a disclaimer about technology changes and a quote by Thomas Sowell.
This is for Windows 10/11 and iPhone. Screenshots are from Windows 10 and iPhone 14 Pro running iOS 17+
Are you connected to Wi-Fi on one device, but need the password to log in on another? Here’s how to find Wi-Fi passwords in Windows and iOS.
Struggling to connect to Wi-Fi? Maybe your laptop is connected but your phone is not, or you need to share your network with a guest but can not remember the password. There are ways to wirelessly share passwords between devices, but that’s not always an option.
Below, we will outline how to grab a Wi-Fi password from already-connected devices by viewing it as plain text. This way you do not need to reset the network security or hack the Wi-Fi network so everyone can get online.
View Password Using Windows
Windows makes this easy, as long as you are connected to the network.
For Windows 10, open:
Settings > Network & Internet
then click the Change Adapter Options button. Refer to the below image:
Accessing your network
For Windows 11, open:
Advanced network settings > More network adapter options
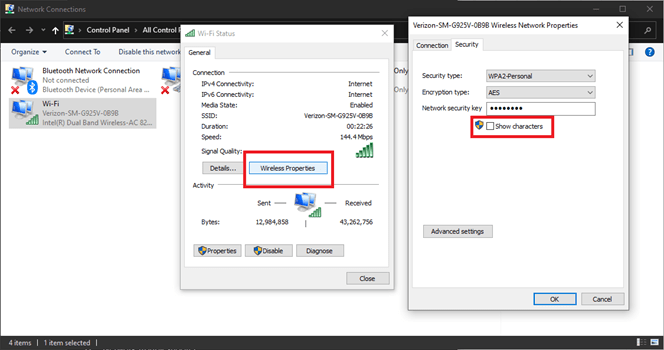
then right-click on your computer’s Wi-Fi adapter in the list and choose:
Status > Wireless Properties
Open the Security tab, and you should see a password box with dots in it. Click the Show Characters box to see the password in plain text. See the below image for Windows 10:
Viewing your password in plain text on Windows 10
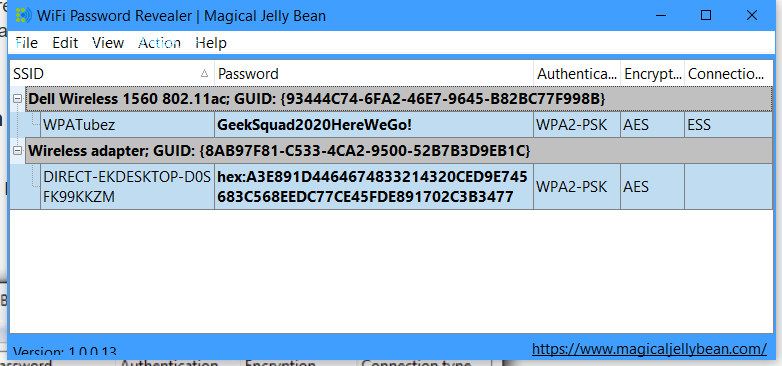
If you are trying to view the password for a network you are not currently connected to, things are a tad more complicated. You can download a third-party app like Wi-Fi Password Revealer which will show you the passwords of all saved networks. See the following image :
Viewing Password Revealer software
View Password Using iPhone
iPhone users could not view Wi-Fi passwords as plain text until iOS 16. First, open:
Settings > Wi-Fi
Refer to the below image:
Accessing your Wi-Fi network
Now, tap the “i” icon for the current network. See the below image:
Tapping the informational icon
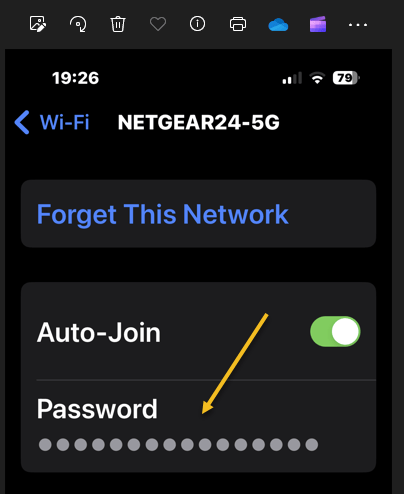
Next, select the Password entry and verify your identity with FaceID, Touch ID, or a Passcode. See the following image:
Tapping the hidden password
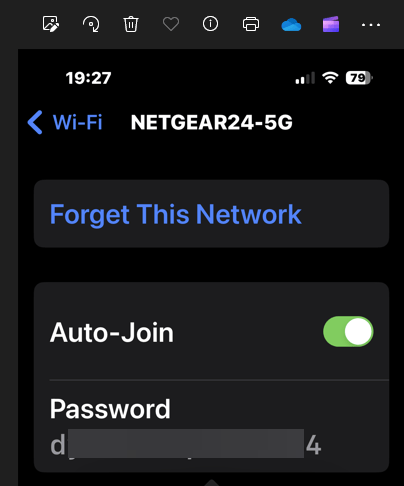
Now tap the password box with dots in it to reveal the password in plain text. Refer to the below image:
Revealing the hidden password in plain text
Disclaimer
Technology is always changing and rarely is there static tech for smartphones and desktops. Thus, the contents of this post are only valid at the time of writing. Blog posts older than six months may have directions incompatible with your device or OS. Hopefully, older post content will continue to work as advertised. Thank you for reading TechSavvy.Life for Technology at Work For You.
Quote For the Day
It is hard to imagine a more stupid or more dangerous way of making decisions than by putting those decisions in the hands of people who pay no price for being wrong.
Thomas Sowell
Tweet Info
That’s it. Please feel free to share this post! One way to share is via Twitter.
Just click the Tweet icon below. This will launch Twitter where you click its icon to post the Tweet.
Checkout TechSavvy.Life for blog posts on smartphones, PCs, and Macs! You may email us at contact@techsavvy.life for comments or questions.
Please feel free to leave a comment. I would love to hear from you. Do you have a computer or smart device tech question? I will do my best to answer your inquiry. Just send an email to contact@techsavvy.life. Please mention the device, app, and version you are using. To help us out, you can send screenshots of your data related to your question.
Author’s E-Book
You can access the e-book from a Kindle device, the Kindle App for the desktop or smartphone, which is a free app.
The author’s Vietnam eBook on the Battle for Tra Bong Vietnam: Events and Aftermath