RAYMOND OGLESBY @RaymondOglesby2
July 2, 2024
This is for the iPhone running iOS 17+. Screenshots are from iPhone 14 Pro
The iPhone has a hidden feature that lets you preserve your voice forever. You just need to read a few inquiries for 15 minutes, and you will always be able to hear your voice the way it was at that moment. While this function could be fun for some tech people, some lose the ability to speak for various reasons.
With that in mind, Apple introduced Personal Voice. Apple says this feature was made to assist those at risk of losing their voice.
The company explains: “Users can create a Personal Voice by reading along with a randomized set of text prompts to record 15 minutes of audio on iPhone or iPad. This speech accessibility feature uses on-device machine learning to keep users’ information private and secure. It integrates seamlessly with Live Speech so users can speak with their Personal Voice when connecting with loved ones.”
Live Voice, for example, allows users to type what they want to say and then have that spoken for them on a phone or FaceTime call. If you use Personal Voice, the person on the other end of the call will hear your actual voice, even though you simply typed a response.
Record Your Voice
Here are the steps:
- Open the Settings > Accessibility > Personal Voice.
- Tap Create a Personal Voice.
- Follow the onscreen instructions to record your voice.
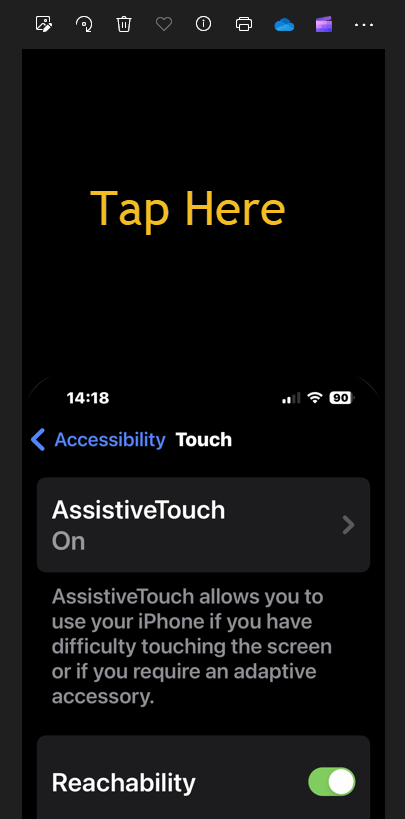
You must be in a quiet environment for your recording. We found it best to use pause after recording a phrase. Refer to the below image:

Tap Done in the upper-left corner or close the Settings app to pause your recording session. Your progress will be saved.
Resume Your Session
To resume your recording session, follow these steps:
- Go to Settings > Accessibility > Personal Voice.
- Tap the Personal Voice that you want to continue creating.
- Tap Continue Recording, then follow the onscreen instructions.
See the below image:

Use Your Recorded Voice
To use Live Voice, here are the steps:
- Open the Settings app > Accessibility > Live Speech.
- Toggle Live Speech to ON.
- Under the Voices section, tap your keyboard language, then select a voice to use. Samantha is the default voice. (You might need to tap the download a voice by tapping the Download button before you can select it.)
- Tap the Voice Settings button next to the voice to adjust a voice’s pitch or speed.
See the following image:

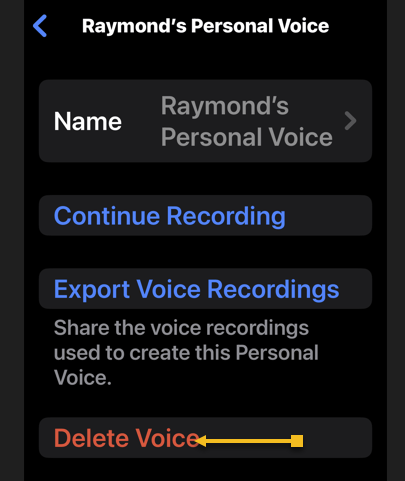
Delete a Personal Voice
Once you delete a recorded voice, you can not recover it.
- Open the Settings app > Accessibility > Personal Voice.
- Tap the Personal Voice that you want to delete.
- Authenticate with Face ID or Touch ID, or enter your passcode.
- Tap Delete Voice, then tap Delete Voice And Recordings to confirm.
Refer to the below image:
Disclaimer
Technology is always changing. Rarely is there static tech for smartphones and desktops. Thus, the contents of this post are only valid at the time of writing. Blog posts older than six months may have directions incompatible with your device or OS. Hopefully, older post content will continue to work as advertised. Thank you for reading TechSavvy.Life for Technology at Work For You.
Quote For the Day
An ounce of action is worth a ton of theory.
Friedrick Engels
X (Tweeter) Info
You are finished. Please feel free to share this post! One way to share is via Twitter.
Just click the Tweet icon below. This will launch Twitter where you click its icon to post the Tweet.
Checkout TechSavvy.Life for blog posts on smartphones, PCs, and Macs! You may email us at contact@techsavvy.life for comments or questions.
Tweet
I Would Like to Hear From You
Was this post helpful? We would love to hear your comments. Do you have a computer or smart device tech question? I will do my best to answer your inquiry. Just send an email to contact@techsavvy.life. Please mention the device, app, and version you are using. To help us out, you can send screenshots of your data related to your question.
You can access the E-book from a Kindle device, or the Kindle App for a desktop or smartphone. The apps are free.