How to Use Chrome Reading List on iPhone and iPad

Google Chrome’s Reading List feature can help you save articles for later, so you never miss something good.

Google Chrome’s Reading List feature can help you save articles for later, so you never miss something good.

This is for the iPhone and iPad

Dilbert and Hear
Copyright Scott Adams, Inc./Distributed by Universal Uclick for UFS

What Is the Reading List

The Reading List is exactly what it sounds like; a list of things to read. It’s a similar concept to the bookmarks that we have used in web browsers, but with a more focused purpose.

Instead of saving an article or story to a folder in your bookmarks, you can put it in the Reading List. The list syncs to your Google account if you are logged into Chrome, so it’s available on your desktop and smartphone. That makes it a little easier to access than bookmarks.

The other benefit over bookmarks is the offline feature. Pages saved to your Reading List can be read without an internet connection at your convenience. You do need an internet connection to add to the list.

First Method

Chrome for iPhone and iPad offers two ways to add pages to your Reading List. It can be done from Chrome or from another app.

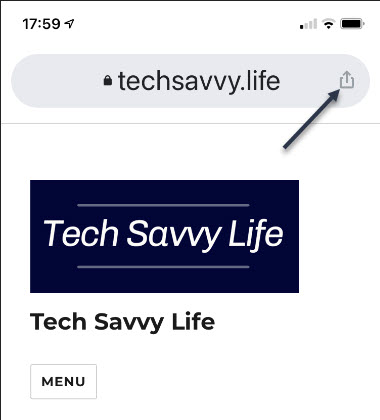
For the first method, first, open Chrome on your iPhone or iPad and find a page to save for later. Now, tap the Share icon in the upper right-hand corner. Refer to below image:

Reading 1
Accessing the Share icon

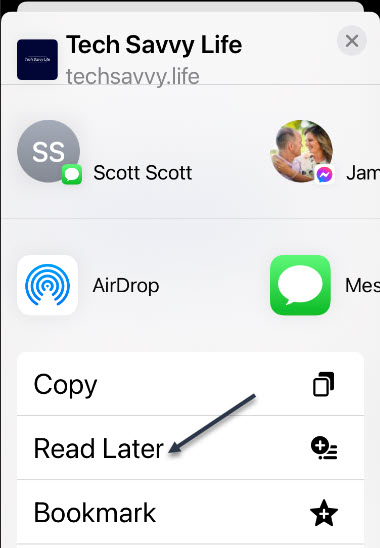
Next, select Read Later from the menu. See below image:

Reading 2
Selecting the Read Later option

That’s it! The page is in your Reading List.

Second Method

For the second method, find a web page or link that you would like to read later in any app. Now, tap the Share icon in upper right-hand corner. See following image:

Reading 3
Accessing the Share icon

Next, find Chrome in the app row and select it. Refer to below image:

Reading 4
Selecting the Chrome app

Now, from the Chrome menu, tap Read Later. See below image:

Reading 5
Selecting the Read Later option

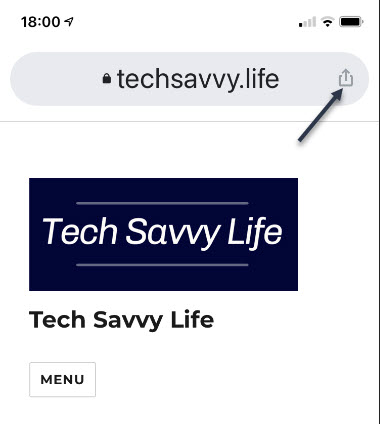
Next, to access the Reading List on your iPhone or iPad, open Chrome and tap the three-dot menu icon at the very bottom right-hand corner. See following image:

Reading 6
Accessing the menu icon

Accessing Your Reading List

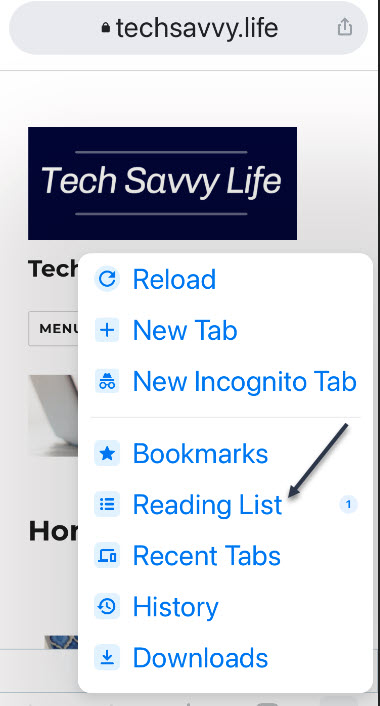
Now, select the Reading List option from the menu. The number indicates unread pages. Refer to below image:

Reading 7
Selecting your Reading List option

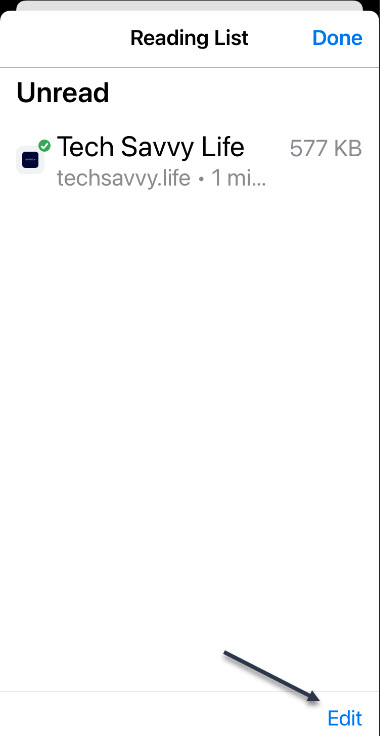
Next, the Reading List will open with Unread pages at the top and Pages You’ve Read (if any) at the bottom. Pages marked with a green check are ready to read offline. See below image where we have only one Unread page:

Reading 8
Viewing your Unread page(s)

Now, tap Edit in the bottom right-hand corner to manage the list. See following image:

Reading 9
Selecting the Edit link

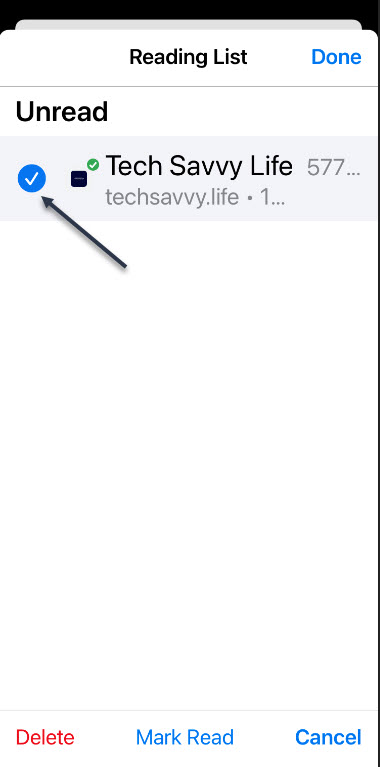
From here, you can select page(s) and delete or mark them as read. To mark them as read, checkmark an entry and tap the Mark Read blue link at the bottom of your screen. Refer to below image:

Reading 10
Marking page(s) as Read

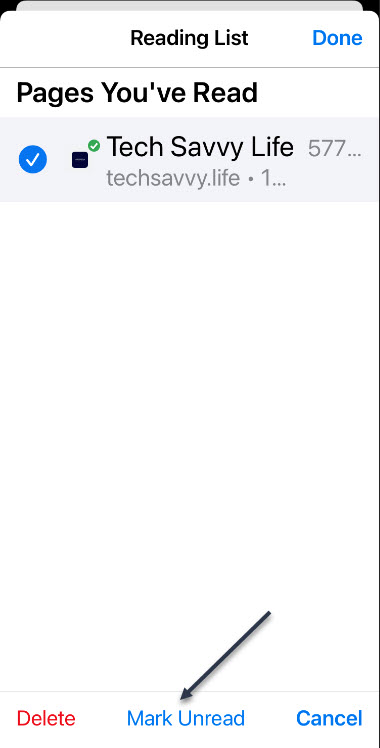
If you want to mark page(s) as Unread, checkmark an entry and tap the Mark Unread blue link at the bottom of your screen. See below image:

Reading 11
Marking page(s) as Unread

The Reading List is a great feature if you use Chrome on multiple devices. Rather than depending on a separate third-party app, you can save websites for later reading right inside the browser.

Quote For the Day

“The Web as I envisaged it, we have not seen it yet. The future is still so much bigger than the past.”

Tim Berners-Lee, Inventor of the World Wide Web

That’s it. Have fun with your Reading List. Please feel free to share this post! One way to share is via Twitter.

Just click the Tweet icon below. This will launch Twitter where you click its icon to post the Tweet.

Check out TechSavvy.Life for blog posts on smartphones, PCs, and Macs! You may email us at techsavvy.life for comments or questions.

I Would Like to Hear From You

Please feel free to leave a comment. I would love hearing from you. Do you have a computer or smart device tech question? I will do my best to answer your inquiry. Just send an email to contact@techsavvy.life. Please mention the device, app and version that you are using. To help us out, you can send screenshots of your data related to your question.

The author’s Vietnam eBook on the Battle for Tra Bong: Events and Aftermath

How to Make an Audio Call on FaceTime

Tired of low-quality cell phone calls? Thanks to FaceTime, you can make audio-only calls with crystal-clear high-resolution sound using an iPhone, iPad, iPod Touch, or Mac.

Tired of low-quality cell phone calls? Thanks to FaceTime, you can make audio-only calls with crystal-clear high-resolution sound using an iPhone, iPad, iPod Touch, or Mac. 

Facetime, the built-in video calling app on Apple devices, has an undisputed audience base. Besides its video calling services, users also count on it for making audio calls to their friends. Reason being, its seamless and error-free connectivity in a secured environment. 

This is for the iPhone, iPad, iPod Touch, and Mac. Screenshots are from an iPhone

Copyright Scott Adams, Inc./Distributed by Universal Uclick for UFS

FaceTime Audio Explained

Most people think of FaceTime as a video chat service, but it also supports audio calls that operate like regular phone calls. Your device’s video camera is not used, and it stays off during the call.

FaceTime Audio is a great alternative to regular phone calls because it uses the Internet to place free calls with crystal-clear high-definition audio compared to a regular phone call. Since it’s an Internet call, your Apple device can take advantage of the extra bandwidth to make the call sound much better. The only requirement is that both ends of the call own Apple devices that support FaceTime, which includes iPhones, iPads, iPod Touches, and Macs.

Make a FaceTime Audio Call

First, on your iPhone, iPad, or iPod Touch, launch Settings (the gear icon). Refer to below image:

Accessing Settings

Next, scroll down and tap the FaceTime option. See below image:

Accessing FaceTime option

In the FaceTime settings, toggle the switch beside the FaceTime option to turn it on. See following image:

Enabling FaceTime

Now, search for the FaceTime app from your Search screen (your first or last screen) or locate the app on a Home screen. Refer to below image where we are searching for the app:

Accessing FaceTime app

Next, launch the FaceTime app. On the main FaceTime screen, tap the plus button (+). See below image:

Selecting the add button for a FaceTime Audio call

In the To: field, enter the name or number of the person you are trying to call. As you type, your Contacts list will be searched and any matching contacts will appear below. Just tap to select the person you want to call. See following image:

Entering and selecting a person to call

Next, tap the Audio button. If the Audio button is greyed out or does not appear, the contact you are trying to call does not have ‌FaceTime‌ enabled or has not set up a ‌FaceTime‌ account. Refer to below image:

Selecting the Audio button to make a call

Your call will be placed. You will see a message at the top of your screen denoting this is a FaceTime Audio call. During the call, you can switch to a video FaceTime call using the FaceTime icon, or you can disconnect by tapping the red phone receiver icon. See below image:

Disconnecting the FaceTime Audio call

Making a FaceTime Audio call on the Mac is similar to the above steps. One of the coolest things about FaceTime is that it works between all major Apple devices, so you can use your Mac to call iPhones, iPads, and iPod Touches.

You are finished. Please feel free to share this post! One way to share is via Twitter.

Just click the Tweet icon below. This will launch Twitter where you click its icon to post the Tweet.

Check out TechSavvy.Life for blog posts on smartphones, PCs, and Macs! You may email us at contact@techsavvy.life for comments or questions.

I Would Like to Hear From You

Please feel free to leave a comment. I would love hearing from you. Do you have a computer or smart device tech question? I will do my best to answer your inquiry. Just send an email to contact@techsavvy.life. Please mention the device, app and version that you are using. To help us out, you can send screenshots of your data related to your question.

The author’s Vietnam eBook on the Battle for Tra Bong: Events and Aftermath

How to Turn On Safer Browsing in Google Chrome

Google has some built-in tools in Chrome that attempt to make browsing safer. Enhanced Safe Browsing is one such tool.

With Safe Browsing, you get alerts about malware, risky extensions, phishing, or sites on Google’s list of potentially unsafe sites.

Google has some built-in tools in Chrome that attempt to make browsing safer. Enhanced Safe Browsing is one such tool. Let’s explore how to turn on this feature.

This is for the desktop version of Chrome and Android. Screenshots are from Chrome on Windows 10.

Copyright Scott Adams, Inc./Distributed by Universal Uclick for UFS

Enhanced Safe Browsing Explained

Safe Browsing is a list of dangerous URLs that is maintained by Google and used to protect users from malicious sites. Enhanced Safe Browsing builds upon this feature with some additional tools.

With Enhanced Safe Browsing enabled, Chrome shares even more browsing data with Google. This allows for threat assessments to be more accurate and proactive, though it does present a privacy concern in itself. You are letting Google monitor your browsing.

Per Google’s description, Enhanced Safe Browsing enables the following:

  • It predicts and warns you about dangerous events before they happen.
  • It keeps you safe on Chrome and may be used to improve your security in other Google apps when you are signed in.
  • It improves security for you and everyone on the web.
  • It warns you if passwords are exposed in a data breach.

Enable This Feature

The feature is available for Chrome on the desktop and Android. It is not available for iPhone and iPad. The process for enabling it is very similar on both platforms.

First, launch Chrome. Next, select the three-dot menu (the hamburger) icon in the top-right corner of Chrome. Now, choose Settings from the menu. Refer to below image:

Selecting Settings

Next, go to the Privacy and Security section. See below image:

Accessing Privacy and security option

Now, on the desktop, click Security. On the Android, it is called Safe Browsing. See following image:

Browsing 3
Accessing the Security option

Next, click or tap on the radio button to enable Enhanced protection. Refer to below image:

Enabling Enhanced protection

Now, exit Settings. You are finished. You will not notice anything different in your everyday browsing, but you will now have better protection. In the event that something is amiss, Google Chrome will give you a warning.

Please feel free to share this post! One way to share is via Twitter.

Just click the Tweet icon below. This will launch Twitter where you click its icon to post the Tweet.

Check out TechSavvy.Life for blog possts on smartphones, PCs, and Macs! You may email us at contact@techsavvy.life for comments or questions.

I Would Like to Hear From You

Please feel free to leave a comment. I would love hearing from you. Do you have a computer or smart device tech question? I will do my best to answer your inquiry. Just send an email to contact@techsavvy.life. Please mention the device, app and version that you are using. To help us out, you can send screenshots of your data related to your question.

The author’s Vietnam eBook on the Battle for Tra Bong: Events and Aftermath

How to Check Your iPhone and iPad Warranty

In the USA, every iPhone and iPad comes with a one year warranty against manufacturing defects and hardware failures. Other jurisdictions, like the E.U. and Australia, come with two years. If you choose, you can also extend that warranty for two years with AppleCare+. Regardless of which warranty you have, you can easily find out whether or not your Apple device is currently covered.

In the USA, every iPhone and iPad comes with a one year warranty against manufacturing defects and hardware failures. Other jurisdictions, like the E.U. and Australia, come with two years. If you choose, you can also extend that warranty for two years with AppleCare+. Regardless of which warranty you have, you can easily find out whether or not your Apple device is currently covered. Let’s find out the warranty status for your iPhone and iPad.

This is for the iPhone and iPad

Copyright Scott Adams, Inc./Distributed by Universal Uclick for UFS

Check Your Warranty Status in Settings

You can check the warranty status of your iPhone and iPad using the Settings app. This will tell you whether you are covered by the basic one-year limited warranty, AppleCare+, or whether your coverage has expired.

First, launch the Settings app. Refer to below image:

Accessing the Settings app

Next, tap the General option. See below image:

Accessing the General option

Now, tap the About option. See following image:

Accessing the About option

Below your Serial Number you should see a description of your your current warranty status. It will either say “Limited Warranty,” “AppleCare+,” or “Coverage Expired.” Refer to below image:

Your Coverage from iPhone or iPad

Now, tap it to see more information. See below image:

More information about your Coverage from your iPhone or iiPad

If your device is no longer covered, like mine, you may still be able to get repairs and phone support from Apple, which will be listed on the above screen. Also, you should be able to find a link to the Apple Support app for getting help.

Check Your Warranty Status From Apple’s Website

If you would like to check your coverage using Apple’s website, you can do so for virtually any Apple device at check coverage here. Open the website, then enter the Serial Number into the box, (you can find this number by following the above steps for an iPhone and iPad). See following image:

Checking your Coverage on the web

Also, you might want to check your other Apple devices. Just click the blue link labeled Check another serial number. Each device has its own Serial Number, which you would enter as mentioned above. Refer to below image:

Your Coverage from the web

What’s In Your Warranty

Apple’s limited one-year warranty covers manufacturer defects, including poor battery performance or faults that arise from regular use. It does not cover accidental damage, such as a cracked screen caused by a drop. Apple will check certain markers (like strips that detect moisture inside the chassis) to determine whether any damage has been caused by user error.

AppleCare+ plan covers you for two incidents of accidental damage over two years. If you break your screen, then you will have to pay a service fee of $29. For other damages, the fee goes up to $99.

Now you know about your warranty for an iPhone and iPad. That’s it. Please feel free to share this post! One way to share is via Twitter.

Just click the Tweet icon below. This will launch Twitter where you click its icon to post the Tweet.

Check out TechSavvy.Life for blog posts on smartphones, PCs, and Macs! You may email us at contact@techsavvy.life for comments or questions.

I Would Like to Hear From You

Please feel free to leave a comment. I would love hearing from you. Do you have a computer or smart device tech question? I will do my best to answer your inquiry. Just send an email to contact@techsavvy.life. Please mention the device, app and version that you are using. To help us out, you can send screenshots of your data related to your question.

The author’s Vietnam eBook on the Battle for Tra Bong: Events and Aftermath

How to Find the Model Number for iPhone and iPad

How do you know which version you have? All you have to do is find the model number of your iPhone and iPad. But it’s a little tricky and hidden. Why, I do not know.

How do you know which version you have? All you have to do is find the model number of your iPhone and iPad. But it’s a little tricky and hidden. Why, I do not know. Let’s find out.

This is for the iPhone and iPad

Dilbert and Lunch
Copyright Scott Adams, Inc./Distributed by Universal Uclick for UFS

You can find the model number of your iPhone or iPad using the hardware or the software. The fastest way is using the Settings app.

First, open the Settings (the gear icon) app. Refer to below image:

Model 1
Accessing Settings app

Next, scroll down to the General option. See below image:

Model 2
Accessing General option

Now, select the About option. See following image:

Model 3
Accessing About option

Next, tap on the number next to the Model Number option. Refer to below image:

Model 3
Accessing Model Number option. This is really the Part Number

The number will change to reveal the real model number for your iPhone and iPad. The first number displayed is the part number and the second number is the model number. Tricky by the Apple engineers. See below image:

Model 5
Accessing the real Model Number

If your iPhone will not boot up, you can also check the model number from the device. If you are using an iPhone 8 or higher, remove the SIM tray. You will find the model number etched on top in very small letters.

If you are using an iPhone 7 or older, you will find the model number inscribed on the back of the case.

With your iPhone and iPad’s model number, you can determine the exact model name of your device, and the region it came from. Just perform a web search for the model number to find out which iPhone and iPad you have and where it came from.

That’s it. Please feel free to share this post! One way to share is via Twitter.

Just click the Tweet icon below. This will launch Twitter where you click its icon to post the Tweet.

Check out TechSavvy.Life for blog posts on smartphones, PCs, and Macs! You may email us at contact@techsavvy.life for comments or questions.

I Would Like to Hear From You

Please feel free to leave a comment. I would love hearing from you. Do you have a computer or smart device tech question? I will do my best to answer your inquiry. Just send an email to contact@techsavvy.life. Please mention the device, app and version that you are using. To help us out, you can send screenshots of your data related to your question.

The author’s Vietnam eBook on the Battle for Tra Bong: Events and Aftermath

How to Choose Your Safari Favorites Folder for iPhone and iPad

By default, Safari on iPhone and iPad displays a list of your Favorites when you open a new window or tab. We are going to choose another folder of bookmarks to display.

By default, Safari on iPhone and iPad displays a list of your Favorites when you open a new window or tab. We are going to choose another folder of bookmarks to display. Let’s explore how to do this.

This is for iPhone and iPad

Dilbert and Lunch
Copyright Scott Adams, Inc./Distributed by Universal Uclick for UFS

First, open Settings (the gear icon) app. Refer to below image:

Safari 1
Accessing Settings app

Next, scroll down and tap Safari. See below image:

Safari 2
Accessing Safari option

Now, tap Favorites. See following image:

Safari 3
Accessing Favorites option

Next, in the list that appears, choose another folder. (If no folders are present in the list, you can create a new folder in Safari by tapping the Bookmarks button, selecting Edit, then tapping the New Folder button.)

Note! Choosing a different folder here will also change your default Favorites folder. From now on, whenever you add a new bookmark to Favorites, it will appear in this folder. Refer to below image where we are choosing the Magazine folder for Favorites:

Safari 4
Selecting a bookmark folder

Now, tap back once, then exit Settings. The next time you open Safari to a New Tab page, you.will see a list of favorites pulled from the folder you just selected; in our case, the Magazine folder. See below image:

Safari 5
Your new Favorities folder

If you would prefer having nothing listed on your New Tab page, you can create an empty folder and select it instead. The next time you open a new tab, the page will be completely blank.

Related

How Do You Start Safari With a Blank Page

That’s it. Please feel free to share this post! One way to share is via Twitter.

Just click the Tweet icon below. This will launch Twitter where you click its icon to post the Tweet.

Check out TechSavvy.life for blog posts on smartphones, PCs, and Macs! You may email us at contact@techsavvy.life for comments or questions.

I Would Like to Hear From You

Please feel free to leave a comment. I would love hearing from you. Do you have a computer or smart device tech question? I will do my best to answer your inquiry. Just send an email to contact@techsavvy.life. Please mention the device, app and version that you are using. To help us out, you can send screenshots of your data related to your question.

The author’s Vietnam eBook on the Battle for Tra Bong: Events and Aftermath

How to Scan QR Codes from Control Center on iPhone

You can use the Code Scanner to scan Quick Response (QR) codes for links to websites, apps, coupons, tickets, and more. The iPhone camera automatically detects and highlights a QR code.

You can use the Code Scanner to scan Quick Response (QR) codes for links to websites, apps, coupons, tickets, and more. The iPhone camera automatically detects and highlights a QR code.

This is for the iPhone running iOS 11 and higher

Dilbert and Tweet
Copyright Scott Adams, Inc./Distributed by Universal Uclick for UFS

A QR code is a type of two-dimensional barcode that can be read by devices with camera or specialized barcode reader. Some QR codes even allow users to pay for goods, such as groceriess, as an alternative form of touchless payment.

The dedicated scanner is helpful for scanning QR codes in dark environments, as it enables you to use your camera’s flash as a light to illuminate the code.

First, open the Settings app (the gear icon). Refer to below image:

QR 1
Accessing Settings

Next, scroll down and choose the Control Center option. See below image:

QR 2
Accessing Control Center option

Now, scroll down and tap the “+” icon next to the Code Scanner option. See following image:

QR 3
About to add the Code Scanner option to the Control Center

Now, the Code Scanner control will be added to the bottom of the Control Center. You will see the Code Scanner option with a “” icon just above the More Controls section. This indicates that the Code Scanner is now embedded in the Control Center. Refer to below image:’

QR 4
The Code Scanner added to the Control Center

It’s now time to use the feature to scan a QR code.To open Control Center, swipe down from the top-right corner of your iPhone’s screen.

Next, tap the new Code Scanner control. See below image:

QR 5
The QR icon in the Control Center

This will open a dedicated QR code scanning interface. Just point your iPhone’s camera toward the QR code. See following image:

OR 6
Scanning a QR code with the iPhone camera

It will be scanned after a second, and your iPhone will automatically open the designated app to complete the action. In our example, we are opening the USPS website regarding a customer experience questionarre. Refer to below image:

OR 7
Opening the website corresponding to the QR code

You are finished. Also, you can use your iPhone to create your own QR code, like pointing to your website or Facebook page. Please feel free to share this post! One way to share is via Twitter.

Just click the Tweet icon below. This will launch Twitter where you click its icon to post the Tweet.

Check out TechSavvy.Life for blog posts on smartphones, PCs, and Macs! You may email us at contact@techsavvy.life for comments or questions.

I Would Like to Hear From You

Please feel free to leave a comment. I would love hearing from you. Do you have a computer or smart device tech question? I will do my best to answer your inquiry. Just send an email to contact@techsavvy.life. Please mention the device, app and version that you are using. To help us out, you can send screenshots of your data related to your question.

Copyright Scott Adams, Inc./Distributed by Universal Uclick for UFS

How to Setup Automatic Birthday Reminders on iPhone

It is easy to setup birthday alerts on iPhone and make sure that you never forget birthdays of important people in your life.

It is easy to setup birthday alerts on iPhone and make sure that you never forget birthdays of important people in your life. You first need to tell your iPhone the birthday dates of your family members, friends, and relatives. This can be done using the Contacts app on iPhone, which allows you to add Birthdays and important dates in its Contact details section. Your iPhone can alert you on the day of the occasion, 1 day early, 2 days early or a week before the birthday.

This is for the iPhone

Dilbert and Audio
Copyright Scott Adams, Inc./Distributed by Universal Uclick for UFS

Couple of Prelimanary Steps

First, you must have notifications enabled for your Calendar app. To turn this on, visit:

Settings > Notifications > Calendar

scroll down and set the toggle beside Allow Notifications to On. Now, exit Settings. Refer to below image:

Calendar 1
Enabling Allow Notifications for Calendar app

Also, you will need to have some birthdays defined in your Contacts app. To do this, open Contacts, tap a contact from the list, and select Edit. Next, tap add birthday. See below image:

Calendar 2
Selecting Add a Birthday option to a Contact

Set a Birthday Notification

Now, exit Contacts. To turn on automatic Calendar birthday reminders, open Settings, scroll down and tap your Calendar app. See following image:

Calendar 3
Selecting your Calendar app

Next, in Calendar settings, tap Default Alert Times. Refer to below image:

Calendar 4
Selecting Default Alert Times option

Now, in Default Alert times, select Birthdays. See below image:

Calendar 5
Seledting the Birthdays option

Next, on the Birthdays screen, you can pick a time when Calendar will alert you about upcoming birthdays. You can choose On day of event, 1 day before, 2 days before, or 1 week before. For the first three of those choices, your Calendar app will notify you at 9 a.m. on the day you selected. See following image:

Calendar 6
Setting a time for the Birthday notification

Now, exit Settings. When the proper alert time comes, your Calendar app will send you a notification about the birthday. Refer to below image:

Calendar 7
A birthday reminder

Depending on your notifications settings, you can potentially see this alert on your Lock Screen or Notification Center as well as via pop-ups on your screen.

That’s it. Please feel free to share this post! One way to share is via Twitter.

Just click the Tweet icon below. This will launch Twitter where you click its icon to post the Tweet.

Check out TechSavvy.Life for blog posts on smartphones, PCs, and Macs! You may email us at contact@techsavvy.life for comments or questions.

I Would Like To Here From You

Please feel free to leave a comment. I would love hearing from you. Do you have a computer or smart device tech question? I will do my best to answer your inquiry. Just send an email to contact@techsavvy.life. Please mention the device, app and version that you are using. To help us out, you can send screenshots of your data related to your question.

The author’s Vietnam eBook on the Battle for Tra Bong: Events and Aftermath

How to Easily Open Chrome to Incognito Mode

If you do not want Google Chrome to remember your activity, you can browse the web privately in Incognito mode.

If you do not want Google Chrome to remember your activity, you can browse the web privately in Incognito mode.

It is easy to quickly open an Incognito window using a keyboard shortcut. Lets explore how to do this.

This is devices running Google Chrome

Dilbert and Class
Copyright Scott Adams, Inc./Distributed by Universal Uclick for UFS

First, open Chrome. Next, with any Chrome browser window open, press the following keyboard combination to open a new Incognito window:

  • Windows, Linux, or Chrome OS: Press Ctrl + Shift + N.
  • Mac: Press ⌘ + Shift + N.

After pressing the keyboard shortcut, a special Incognito window will open. If you want to block third-party cookies, just toggle the switch to On, the default setting. Refer to below image:

Incognito 1
Your Incognito window

Whenever you are in Incognito mode, you will be able to tell because the Chrome browser window’s toolbar will have a darker color scheme and there will be a small Incognito icon beside the address bar in the toolbar. See below image:

Incognito 2
The icon and text telling you are in Incognito mode

You can switch between Incognito windows and regular Chrome windows. You will only browse in private when you are using an Incognito window.

While browsing within an Incognito window, Chrome will not locally store your browsing history, site data, cookies, or saved form data once you close the Incognito window. However, downloaded files and bookmarks will be saved unless you manually remove them.

At any time, you can press Ctrl+T (or ⌘ + T on Mac) to open a new tab within the Incognito window, and browsing activity within that tab will be locally private as well.

Remember that Incognito mode is not perfect, and it does not protect you from those who might view your activity on the web remotely, such as your employer, school, ISP, or the websites you visit. It is only to prevent local snooping of your browsing history.

If you see a number next to the Incognito text at the top right, you have more than one Incognito window open. See following image:

Incognito 3
Your number of Incognito windows open

When you are ready to stop private browsing, you will need to close the Incognito window(s). To do so using a keyboard shortcut:

  • Windows, Linux, or Chrome OS: Press Alt + F4
  • Mac: Press ⌘ + Shift + W

Or you can just click the “X” in the corner of the window with your mouse.

That’s it. Please feel free to share this post! One way to share is via Twitter, as mentioned below.

I hope you have found this post helpful. If so, click the Tweet icon below. This will launch Twitter where you click its icon to post the Tweet.

Check out TechSavvy.Life for blog posts on smartphones, PCs, and Macs! You may email us at contact@techsavvy.life for comments or questions.

I Would Like to Hear From You

Please feel free to leave a comment. I would love hearing from you. Do you have a computer or smart device tech question? I will do my best to answer your inquiry. Just send an email to contact@techsavvy.life. Please mention the device, app and version that you are using. To help us out, you can send screenshots of your data related to your question.

The author’s Vietnam eBook on the Battle for Tra Bong: Events and Aftermath

How to Easily Delete Old Text Messages on iPhone or iPad

You might want to delete plain text messages because of the storage space they use. Also, you may want to delete messages for privacy reasons or just because it keeps your Messages app better organized. Plus, texts with images actually can take up a fair bit of room.

You might want to delete plain text messages because of the storage space they use. Also, you may want to delete messages for privacy reasons or just because it keeps your Messages app better organized. Plus, texts with images actually can take up a fair amount of space.

By default, your iPhone and iPad save every iMessage and SMS text message that comes your way. As a result, you could have years of messages synced to iCloud that follow you for the rest of your life, taking up valuable space. Fortunately, there’s a way to delete old text messages automatically. Lets explore how this is done.

This is for the iPhone and iPad. Screenshots are from an iPhone

Dilbert and Done
Copyright Scott Adams, Inc./Distributed by Universal Uclick for UFS

First, lets check how much storage you are using for messages and attachments (like photos on an iPhone). Go to

Settings > General > iPhone Storage > (scroll down to) Messages

Notice the amount of storage used by Documents & Data, and tap on Review Large Attachments for more detail. Refer to below image where I can save 145 MB by deleting them:

Text 1
Viewing how much storage space is being used

Now, exit back to Settings (the gear icon) on your iPhone or iPad. See below image:

Text 2
Accessing Settings

Now, in Settings, scroll down and tap the Messages option. See following image:

Text 3
Accessing the Messages option

Next, in Messages, scroll down and tap the Keep Messages option. Refer to below image:

Text 4
Accessing the Keep Messages option. The default is Forever

By default, Messages is set to keep your SMS text messages and iMessages forever. Next, tap either 30 Days or 1 Year depending on how long you would like to keep your old text messages. See below image:

Text 5
Selecting your option on how long to keep text messages

After tapping your preference, you will see a pop-up dialog asking whether you want to delete all messages older than the time period you specified. If you are sure, just tap the Delete button. See following image:

Text 6
Pop-up window showing the option you selected

Next, exit Settings. From now on, Messages will automatically delete any messages once they hit the 30-day or 1-year mark, depending on which option you specified. Note! The default, Forever, will remain checked until you tap the Delete button.

Now, head back to

Settings > General > iPhone Storage > (scroll down to) Messages

and check your Messages storage for the amount of space you reclaimed.

That’s it. Please feel free to share this post! One way to share is via Twitter.

Just click the Tweet icon below. This will launch Twitter where you click its icon to post the Tweet.

Check out TechSavvy.Life for blog posts on smartphones, PCs, and Macs! You may email us at contact@techsavvy.life for comments or questions.

I Would Like to Hear From You

Please feel free to leave a comment. I would love hearing from you. Do you have a computer or smart device tech question? I will do my best to answer your inquiry. Just send an email to contact@techsavvy.life. Please mention the device, app and version that you are using. To help us out, you can send screenshots of your data related to your question.

The author’s Vietnam eBook on the Battle for Tra Bong: Events and Aftermath