Enhance Safety with iPhone’s Emergency SOS Feature

The Emergency SOS feature lets you call for help in many different ways, including discreetly by holding down a button, via satellite, and even automatically if

RAYMOND OGLESBY @RaymondOglesby2
February 4, 2025 – 4 minutes read time

The Emergency SOS feature lets you call for help in many different ways, including discreetly by holding down a button, via satellite, and even automatically if a car crash or fall is detected. After an Emergency SOS call ends, your iPhone will automatically send a message with your location to your Emergency contact(s). Add an extra layer of security to your life by adding your iPhone emergency contact(s).

  • Give your loved ones peace of mind by adding them as Emergency contacts.
  • Customize your Emergency SOS settings to suit your needs.

System Requirements

This tip works on iPhones 14 and above running iOS 18 or later.

Screenshots are from iPhone 14 Pro running iOS 18.3

Click here to learn how to update your iPhone to the latest iOS version.

There are many different ways to set up and activate Emergency SOS depending on what devices and device models you have. Only iPhone 14 and newer models can use Emergency SOS via satellite and have automatic Crash Detection (on by default.) iPhones running iOS 18 can use Live Video during emergency calls. You will need a newer Apple Watch model to use automatic Fall Detection. Here’s how to set your iPhone’s Emergency SOS contact(s). In this example, we are setting up Zoey Oglesby as an emergency contact,

First, open the Health app on your iPhone. Refer to the below image:

Add Emerg 1
Find and open the Health app

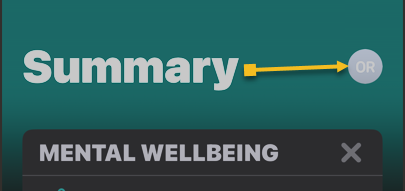
Next, tap your Profile icon in the to right corner. See the below image:

Add Emerg 2
Select your Profile icon

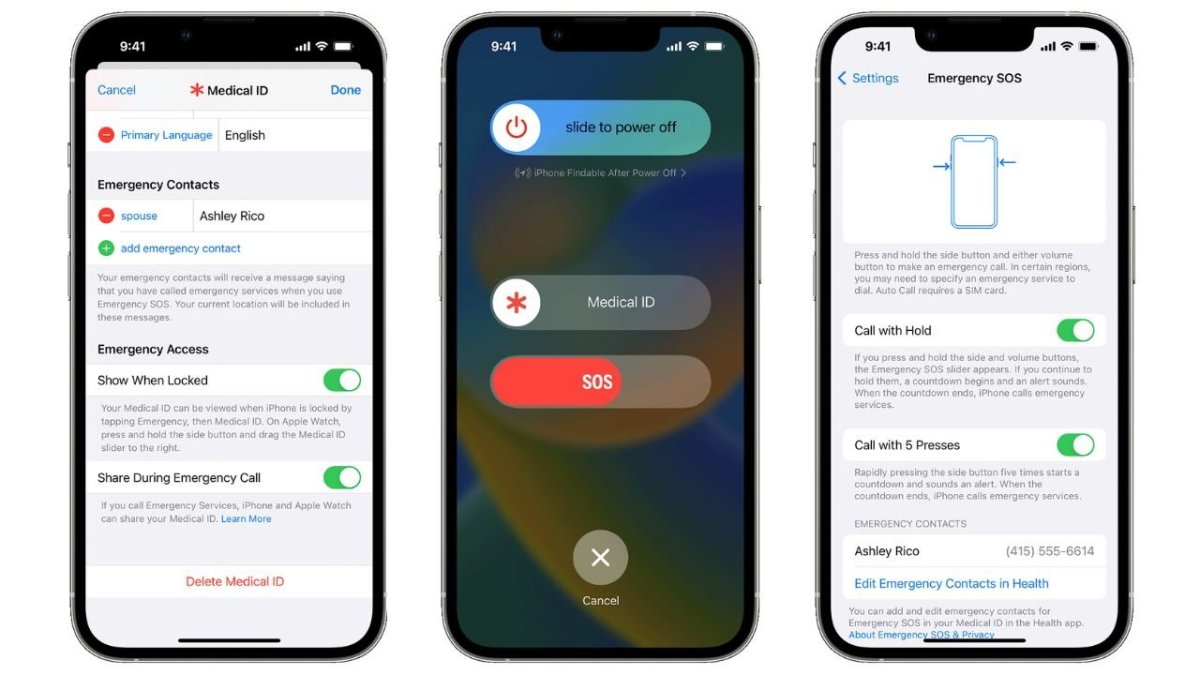
Now, select Medical ID. See the following image:

Add Emerg 3
Select the Medical ID option

Next, under Emergency Access section, toggle Show When Locked and Share During Emergency Call to ON. Refer to the below image:

Add Emerg 10
Toggle Show When Locked and Share During Emergency Call to ON

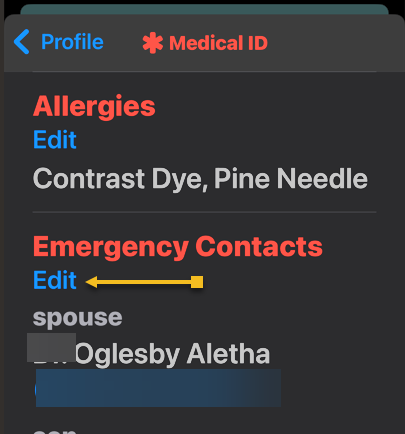
Now, scroll down to Emergency Contacts and tap Edit. See the below image:

Add Emergy 4
Select to Edit Emergency Contacts

Next, tap the green plus sign to add a new emergency contact. See the following image:

Add Emerg 5
Select the plus icon to Add Emergency Contact

Now, your Contacts will pop up. Find the contact you want and tap on their name. Refer to the below image:

Add Emerg 6
Select a contact

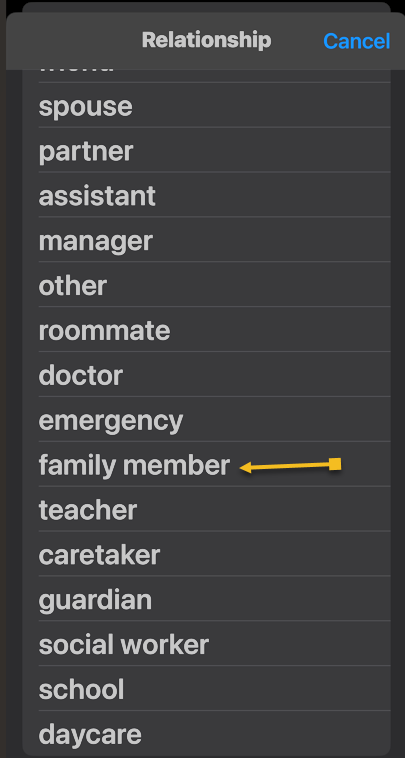
Next, select their relationship with you. See the below image:

Add Emerg 7
Select their Relationship with you

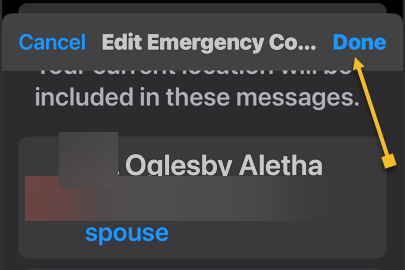
Next, tap Done. See the following image:

Add Emerg 8
Select Done to add the contact

Your emergency contact(s) will now receive a text message and your location should you make an emergency call using Emergency SOS on your iPhone. In your Contacts, the emergency contact(s) are indicated by an asterisk (*) next to their name. Refer to the image below, where four family members are indicated as emergency contacts (others are on a different contact page):

Add Emerg 9
Your added Emergency Contacts indicated by an asterisk (*)

Accessing your Medical ID within the Health app allows you to display only your emergency contacts. When the Show When Locked option is turned on, your emergency contact information will appear on the Lock screen.

Disclaimer

Technology is constantly evolving, and smartphone and desktop tech rarely remains static. Therefore, the information in this post is only accurate as of the date it was written. Blog posts that are older than six months may contain instructions that are no longer compatible with your device or operating system. We hope that the content from previous posts continues to function as intended. Thank you for reading TechSavvy.Life, where technology works for you.

The technology you use impresses no one. The experience you create with it is everything.

-Sean Gerety

That’s it. You have just setup emergency contacts that may save your life. Please feel free to share this post! One way to share is via Twitter.

Just click the Tweet icon below. This will launch Twitter where you click its icon to post the Tweet.

Checkout TechSavvy.Life for blog posts on smartphones, PCs, and Macs! You may email us at contact@techsavvy.life for comments or questions.

We value your feedback! Was this post helpful? Please share your comments with us. If you have a tech question related to your computer or smart device, feel free to reach out. Just send an email to contact@techsavvy.life, and be sure to include the device, app, and version you are using. To assist us further, you can also attach screenshots related to your inquiry.

Author’s eBook

The author’s Vietnam eBook on the “Battle for Tra Bong Vietnam: Events and Aftermath” can be accessed from a Kindle device or the Kindle App for a desktop or smartphone. The apps are free.

The author’s Vietnam eBook on the Battle for Tra Bong Vietnam: Events and Aftermath

How to Save Web Pages in iPhone Notes

The article explains how to save web pages to the iPhone Notes app for future reference. Users can share links with additional notes for better organization, particularly when managing projects.

RAYMOND OGLESBY @RaymondOglesby2
November 12, 2024 – 4 minutes read time

Did you find a web page you want to save for later? You can easily share it to the Notes app so that you can return to it again. Or if you find an article relevant to a project you are working on, you can share it with one of your notes, add text, and open your note anytime to find the link. Let’s explore how this is done.

  • Save articles to read at a later date.
  • Easily keep your thoughts about an important website in one place.
  • Keep related web pages together in one note when planning projects.

This tip works on iPhones running iOS 16 or later. The screenshots are from iPhone 14 Pro running iOS 18.

Click here to learn how to update your iPhone to the latest iOS version.

To share a webpage, you first need to open the page in Safari and tap the Share icon. Refer to the below image:

Notes 1
Selecting the Share icon

Next, scroll through the app list, and tap Notes. See the below image:

Notes 2
Selecting the Notes app

Now, tap a New Note to select whether you want to save this page to a new note or an existing one. See the following image:

Notes 3
Selecting a New note

Next, choose where to save the new note, then tap Choose Note or Folder. Refer to the below image:

Notes 4
Selecting a location for the new note and a folder

Now, tap the Search Bar to search for a specific one, or scroll and select one. In our example, we are selecting the Quick Notes folder. See the below image:

otes 5
Selecting the Search or scroll to find one

Next, tap Create New Note to create a new note and save the website to it. See the following image:

Notes 6
Selecting the Create New Note button

Next, tap Add text to your note… if there are any extra details you want to add. Refer to the below image:

Notes 7
Optional, add text for the new note

Now, tap Save. See the below image:

Notes 8
Save your note

If you save it as a new note, it will have the same title as the web page. You can tap the thumbnail to open the article when you open your Note. See the following image:

Notes 9
Your new note with a thumbnail of your page

That’s how to add a hyperlink in the iPhone Notes app for sharing. You can return to this note when you want to read that article.

Disclaimer

Technology is always changing. Rarely is there static tech for smartphones and desktops. Thus, the contents of this post are only valid at the time of writing. Blog posts older than six months may have directions incompatible with your device or OS. Hopefully, older post content will continue to work as advertised. Thank you for reading TechSavvy.Life for Technology at Work For You.

“Order is one of the needs of life which, when it is satisfied, produces a real happiness.”

-Maria Montessori

That’s it. Please feel free to share this post! One way to share is via Twitter.

Just click the Tweet icon below. This will launch Twitter where you click its icon to post the Tweet.

Checkout TechSavvy.Life for blog posts on smartphones, PCs, and Macs! You may email us at contact@techsavvy.life for comments or questions.

Was this post helpful? We would love to hear your comments. Do you have a computer or smart device tech question? I will do my best to answer your inquiry. Just send an email to contact@techsavvy.life. Please mention the device, app, and version you are using. To help us, you can send screenshots of the data related to your question.

The author’s Vietnam eBook on the “Battle for Tra Bong Vietnam: Events and Aftermath” can be accessed from a Kindle device or the Kindle App for a desktop or smartphone. The apps are free.

The author’s Vietnam eBook on the Battle for Tra Bong Vietnam: Events and Aftermath

Protect Your Privacy: How to Opt Out of Yahoo Data Selling

This post provides instructions for protecting your privacy on Yahoo Mail for iPhone and PC. It explains how to prevent Yahoo from selling your information and control personalized ads.

RAYMOND OGLESBY @RaymondOglesby2
October 1, 2024 – 4 minutes read time

This is for the iPhone and PC running Yahoo Mail. Screenshots are from iPhone 14 Pro running iOS 17.7

Most companies today are selling your information in some way or form. Luckily, most companies allow you to opt out of having your data sold; if you know how to ask for it.

While you would think the “do not sell my personal information” setting would be on the Yahoo security page, you will find it under a different menu. Let’s explore telling Yahoo, “Do not sell my personal information” and control personalized ads.

  • Yahoo Mail
  • iOS 16 or later
  • Browser
  • Windows 11/10
  • iPhone

Click here to learn how to update your iPhone to the latest iOS version.

  • Protect your privacy by stopping Yahoo from selling your information.
  • Make sure your data stays out of the hands of third parties.

First, open the Yahoo Mail app. Next, tap your profile icon in the upper left. Now, tap Settings. Refer to the below image:

Yahoo 1
Accessing Settings

First, scroll down and tap Manage account privacy. Next, tap Your Privacy controls. Now, tap the Yahoo logo. See the below image:

Yahoo 2
Accessing Privacy

First, you will be prompted to log into your Yahoo mail account. Enter your username/email address, tap Next, and follow the on-screen prompts to log in. Next, After logging in, scroll down to the Sale and sharing of personal information and tap the link. See the following image:

Yahoo 3
Accessing the Sale and Share link

First, tap the toggle. The default is set to Allow Yahoo to sell your data. Next, the page and its toggle will turn gray, indicating that the setting has been disabled. Refer to the below image:

Yahoo 4
Setting the Do Not Sale option

You may want to read the “fine print” about setting the option to Don’t Allow. If you clear cookies for your browser, the option is reset to Allow. See the below image:

Yahoo 5
The fine print

While here, go back to the Sale and sharing of personal information screen to control ads. Tap the Personalized ads link and turn off any option on delivering ads. See the following image on the first of four options:

Yahoo 6
Turning off Personalized ads
  • Open Yahoo Mail
  • Click the Gear icon in the upper left below the Home icon
  • Click the More settings link
  • Click About our Ads menu option. You would think of accessing the Security and Privacy menu option, but Yahoo wants to hide selling your data.
  • Under What choices do I have section, click View our other Privacy Controls
  • click the Yahoo logo, and sign in
  • Click the Sale and sharing personal information link
  • Click the toggle. The default is set to Allow Yahoo to sell your data. Next, the page and its toggle will turn gray, indicating that the setting has been disabled. If you have set the toggle to Don’t Allow on your iPhone first, the toggle will already be disabled.

Disclaimer

Technology is always changing. Rarely is there static tech for smartphones and desktops. Thus, the contents of this post are only valid at the time of writing. Blog posts older than six months may have directions incompatible with your device or OS. Hopefully, older post content will continue to work as advertised. Thank you for reading TechSavvy.Life for Technology at Work For You.

“I play to win, whether during practice or a real game.”

– Michael Jordan

That’s it. Please feel free to share this post! One way to share is via Twitter.

Just click the Tweet icon below. This will launch Twitter where you click its icon to post the Tweet.

Checkout TechSavvy.Life for blog posts on smartphones, PCs, and Macs! You may email us at contact@techsavvy.life for comments or questions.

Was this post helpful? We would love to hear your comments. Do you have a computer or smart device tech question? I will do my best to answer your inquiry. Just send an email to contact@techsavvy.life. Please mention the device, app, and version you are using. To help us out, you can send screenshots of the data related to your question.

The author’s Vietnam eBook on the “Battle for Tra Bong Vietnam: Events and Aftermath” can be accessed from a Kindle device or the Kindle App for a desktop or smartphone. The apps are free.

The author’s Vietnam eBook on the Battle for Tra Bong Vietnam: Events and Aftermath

Get Visual Alerts for Calls and Messages: iPhone Flash Notification Setup

This post provides a guide on turning on flash notifications for iPhone, especially beneficial for the deaf or hard of hearing. It includes system requirements, and step-by-step instructions.

RAYMOND OGLESBY @RaymondOglesby2
September 24, 2024 – 3 minutes read time

How do you turn on the flash notification on your iPhone? Sometimes we might need an extra alert if an important message or phone call is expected.

This feature is intended to be used by the deaf or hard of hearing, but it can be helpful for anyone who would rather receive visual alerts. Be aware that turning on this feature could deplete your battery life rather quickly, depending on how many notifications you get throughout the day. Let’s explore how to turn on flashlight notifications on iPhones.

This post works on iPhones running iOS 16 or later. Screenshots are from iPhone 14 Pro running iOS 17.6.1

Click here to learn how to update your iPhone to the latest iOS version.

  • Get an extra visual alert any time you receive notifications.
  • Make sure you never miss an important text or phone call.

Open the Settings app, and tap Accessibility. Refer to the below image:

Flash 1
Selecting Accessibility option

Tap Audio & Visual. See the below image:

Flash 2
Selecting the Audio & Visual option

Select LED Flash for Alerts. See the following image:

Flash 3
Selecting LED Flash for Alerts option

Tap the toggle next to LED Flash for Alerts to enable this feature. Refer to the below image:

Flash 4
Toggle to enable LED Flash for Alerts

By default, the LED will only flash if your iPhone is locked and the ringer is on. However, two toggles allow you to make it so that the flash will still go off when your device is unlocked or if Silent mode is enabled. See the below image:

Flash 5
Other options for flash alerts

That’s how to use your iPhone flashlight for notifications. Since the flash is on the back of your phone, placing your phone face down when you set it down is best. Just make sure you have a good scratch-protectant cover on the screen.

Disclaimer

Technology is always changing. Rarely is there static tech for smartphones and desktops. Thus, the contents of this post are only valid at the time of writing. Blog posts older than six months may have directions incompatible with your device or OS. Hopefully, older post content will continue to work as advertised. Thank you for reading TechSavvy.Life for Technology at Work For You.

When times are bad is when the real entrepreneurs emerge.

Robert T Kiyosaki

You are finished. Please feel free to share this post! One way to share is via Twitter.

Just click the Tweet icon below. This will launch Twitter where you click its icon to post the Tweet.

Checkout TechSavvy.Life for blog posts on smartphones, PCs, and Macs! You may email us at contact@techsavvy.life for comments or questions.

Was this post helpful? We would love to hear your comments. Do you have a computer or smart device tech question? I will do my best to answer your inquiry. Just send an email to contact@techsavvy.life. Please mention the device, app, and version you are using. To help us, you can send screenshots of the data related to your question.

The author’s Vietnam eBook on the “Battle for Tra Bong Vietnam: Events and Aftermath” can be accessed from a Kindle device or the Kindle App for a desktop or smartphone. The apps are free.

The author’s Vietnam eBook on the Battle for Tra Bong Vietnam: Events and Aftermath

How to Backup Your iPhone to iCloud

Backing up your iPhone is just as important as backing up your computer. You have items stored on your device that you do not want to lose if your iPhone becomes lost, stolen, or inoperable. Fortunately, backing up to iCloud is easy.

RAYMOND OGLESBY @RaymondOglesby2
March 28, 2023

Backing up your iPhone is just as important as backing up your computer. You have items stored on your device that you do not want to lose if your iPhone becomes lost, stolen, or inoperable. Fortunately, backing up to iCloud is easy. Let’s explore how this is done.

This is for the iPhone. Screenshots are from iPhone 14 Pro running iOS 16+

Reasons to Backup

Having backups of your data is a good idea no matter where you store it. In fact, we recommend keeping multiple copies of anything you backup so that if one method fails for some reason you still have another. There is no such thing as having too many backups.

Even if you already have backups on multiple physical hard drives, backing up to iCloud gives you an all-important offsite backup. That makes backups one of the best uses of spare iCloud storage.

It’s also smart to make sure your data is all backed up when it’s time to upgrade phones so you can set it up in a snap from the data in iCloud. The same applies to upgrading to a new version of iOS, just in case something goes wrong.

Of course, you will have to make sure you have enough storage in your iCloud account. How much you need will depend on how much data you have stored on your iPhone, but you will get a notification if your storage is not big enough when you initiate the backup. There are a few things you can do to free up space, and if you can not make the room you do have a few options for saving money on an iCloud storage upgrade. Be prepared for some frustration, though, because iCloud’s tier scheme is in need of an update.

Your Backup Includes

Whether you perform a manual backup to iCloud or set up automatic backups that run each day, the same items normally stored on your physical device will back up to iCloud. These items are included in the backup:

  • App data
  • iPhone settings
  • Home screen and app layout
  • iMessage, SMS, and MMS messages
  • Photos and videos
  • Purchase history from the App Store, Books Store, and iTunes
  • Ringtones
  • Visual Voicemail

Additionally, if you use iOS 11 or earlier, voice memos are included. And, if you own an Apple Watch, those backups are also included unless you use Family Setup for your Watch.

Many other items on your iPhone already get backed up to iCloud by default, and they include contacts, calendars, notes, reminders, voice memos, bookmarks, iCloud messages, and iCloud photos.

Sync Your iPhone Backup to iCloud

You can perform a one-time, manual backup of your iPhone to iCloud. This is a good option if you just purchased a new iPhone or are preparing to update your version of iOS but do not want to have your data backed up every day. Even if you have already set up automatic updates, this will force iCloud to update.

First, ensure you are connected to Wi-Fi and then open the Settings on your iPhone. Select your name at the top and then tap iCloud. Refer to the below image:

Backup 1
Accessing iCloud

Next, select iCloud Backup and tap Back Up Now. See the below image:

Backup 2
Selecting Back Up Now

You may receive an alert before the backup begins. This can be from one of the following:

  • If you do not have enough iCloud storage space available for your backup, you will see a notification. You can then follow the prompts to upgrade your iCloud storage plan.
  • If you have iCloud backups turned off for any of your apps, you will see a notification. You can select iCloud Settings to turn on backups for those apps or Continue to back up without that app data.

See the following image:

Backup 3
Notification Message

It can take up to several minutes for the backup process to run, depending on the amount of data on your device. So be sure you stay connected to your Wi-Fi network during the process.

Once complete, you will see the date and time of the last successful backup below Back Up Now. Refer to the below image:

Backup 4
Backing up your iPhone

Automatically Backup Your iPhone

Performing regular backups of your iPhone is essential so that you do not lose any important items. You can set iCloud to automatically sync your data, purchases, and other items on a regular schedule. Go to the same spot in your Settings as above:

Your Name > iCloud > iCloud Backup

Then, turn ON the toggle at the top for Back Up This iPhone. See the below image:

Backup 5
Enable Back Up your iPhone

Optionally, you can enable the toggle to Back Up Over Cellular if you lose your Wi-Fi connection. Just note that it may affect your cellular data plan usage.

To ensure your device is ready for automatic backup, simply make sure you are on Wi-Fi, connect your iPhone to its power source, and enable the Lock screen. Your device will then automatically back up to iCloud. The ideal time for this is during your standard charging time, like when you are asleep.

Just like backing up your iPhone manually, you can then see the date and time for your last successful backup on the iCloud Backup screen. See the following image:

Backup 6
Backup success

View Backup Details

To see more than the date and time of the last backup update, such as the size and data from which apps were included, head back to the iCloud Backup screen. In Settings:

Your Name > iCloud > iCloud Backup

select your device at the bottom. You will then see a summary of details at the top and the app data backed up directly beneath. Refer to the below image:

Backup 8
Your backup details

You can also see the size of your next backup. This is a good time to confirm that you have enough iCloud storage space available and upgrade if necessary. Remember, you receive 5GB of free iCloud storage but can upgrade to obtain more directly from your device.

Disclaimer

Technology is always changing and rarely is their static tech for smartphones and desktops. Thus, the contents of this post are only valid at the time of writing. Blog posts older than six months may have directions incompatible with your device or OS. Hopefully, older post content will continue to work as advertised. Thank you for reading TechSavvy.Life for Technology at Work For You.

Quote For the Day

It’s not information overload. It’s filter failure.

Clay Shirky

Tweet Info

That’s it. Please feel free to share this post! One way to share is via Twitter.

Just click the Tweet icon below. This will launch Twitter where you click its icon to post the Tweet.

C

Checkout TechSavvy.Life for blog posts on smartphones, PCs, and Macs! You may email us at contact@techsavvy.life for comments or questions.

I Would Like to Hear From You

Please feel free to leave a comment. I would love to hear from you. Do you have a computer or smart device tech question? I will do my best to answer your inquiry. Just send an email to contact@techsavvy.life. Please mention the device, app, and version you are using. To help us out, you can send screenshots of your data related to your question.

Author’s E-Book

You can access the e-book from a Kindle device, the Kindle App for the desktop or smartphone, which is a free app.

The author’s Vietnam eBook on the Battle for Tra Bong Vietnam: Events and Aftermath

How to Delete Duplicate Photos and Videos on iPhone

Duplicate photos and videos take up precious space on your iPhone. Since iOS 16, Apple has offered the ability to easily find and delete duplicates in the Photos app; no third-party app is required.

RAYMOND OGLESBY @RaymondOglesby2
December 13, 2022

Duplicate photos and videos take up precious space on your iPhone. Since iOS 16, Apple has offered the ability to easily find and delete duplicates in the Photos app; no third-party app is required. Let’s explore how to do this.

This is for the iPhone running iOS 16+. Screenshots are from iPhone XR

Dilbert and Network
Copyright Scott Adams, Inc./Distributed by Universal Uclick for UFS

iOS 16 Required

This feature was released with iOS 16. You can see your current iOS version under:

Settings > General > About > iOS Version

Refer to the below image:

Duplicates 1
Your iOS version

If you need to, you can upgrade to iOS 16 by going to

Settings > General > Software Update

Find and Delete Duplicates in Photos

Note! After updating the iOS. It could take anything from a few hours to a few days for the Duplicates album to appear.

First, to find duplicate photos and videos, open the Photos app on your iPhone and tap the Albums tab at the bottom of the screen. See the below image:

Du;licates 2
Selecting your Albums

Next, scroll down to the bottom of the page to the Utilities section where you will find the Duplicates album. See the following image:

Duplicates 3
Selecting Duplications option

Now, tap on Duplicates to see a list of all the duplicate photos and videos found on your iPhone. Refer to the below image:

Duplicates 4
Your Duplications total

Next, you will see a preview of each image and the relevant file size. You can review each duplicate entry individually, then tap on Merge to save one of the photos or videos. iOS will automatically keep the higher-quality version.

Now, you will need to confirm that you wish to merge the photos or videos in the pop-up window that opens. See the below image:

Duplicates 5
Merge the current Duplicate

Next, if you do not have time to merge each duplicate individually, you can merge everything at once. To do this, tap Select at the top of the screen followed by Select All. Then, tap Merge at the bottom of the screen. See the following image:

Duplicates 6
Merge all your Duplicates

Processing Your Photos

You might find that after merging all of your duplicates, more appear as your whole library finishes processing.

Apple states that the detection process requires your iPhone to be locked and connected to power. The size of your library and the tasks running on your device will influence the speed at which the process completes.

If your photos are stored in an iCloud Photo Library, removing duplicates is a good way of freeing up precious iCloud storage.

Quote For the Day

Cars will soon have the Internet on the dashboard. I worry that this will distract me from my texting.

Andy Borowitz

Tweet Info

That’s it. Please feel free to share this post! One way to share is via Twitter.

Just click the Tweet icon below. This will launch Twitter where you click its icon to post the Tweet.

Checkout TechSavvy.Life for blog posts on smartphones, PCs, and Macs! You may email us at contact@techsavvy.life for comments or questions.

I Would Like to Hear From You

Please feel free to leave a comment. I would love to hear from you. Do you have a computer or smart device tech question? I will do my best to answer your inquiry. Just send an email to contact@techsavvy.life. Please mention the device, app, and version you are using. To help us out, you can send screenshots of your data related to your question.

Author’s E-Book

You can access the e-book from a Kindle device, the Kindle App for the desktop or smartphone, which is a free app.

The author’s Vietnam eBook on the Battle for Tra Bong Vietnam: Events and Aftermath

How to Schedule Emails on iPhone

You can schedule emails on your iPhone using the default Mail app without the need for third-party services. Plus, it works with any email address you want to add to your phone.

RAYMOND OGLESBY @RaymondOglesby2
December 1, 2022

You can schedule emails on your iPhone using the default Mail app without the need for third-party services. Plus, it works with any email address you want to add to your phone. Let’s explore this feature in iOS 16+.

This is for the iPhone. Screenshots are from iPhone XR running iOS 16+

Dilbert and Quiet
Copyright Scott Adams, Inc./Distributed by Universal Uclick for UFS

iOS 16 Required

The ability to schedule email was added to the Mail app in iOS 16. If you do not see the option, make sure you have upgraded to iOS 16 under the:

Settings > General > Software Update

You can check your current software version under the:

Settings > General > About

Some third-party mail apps also offer this service (including Gmail for iPhone), but make sure you are in Apple’s stock Mail app if you are trying to follow these instructions.

Schedule Emails Using the Mail App

To schedule an email, first, launch the Mail app and tap the Compose button to start writing a new message. Once you have added a recipient, subject, and body to the email, you will notice the Send button (an upward arrow) turn blue. Refer to the below image:

Email 1
Compose your email

Next, to schedule the email, tap and hold the Send button. You will see a few options depending on the current time of day. See the below image:

Email 2
choosing the Send Later option

Now, we want to manually schedule the message. Tap Send Later… and enter a date and time manually. Hit Done to schedule the message. See the following image:

Email 3
Tapping Done to schedule your email

Next, you can always tap the Send button (without holding) to send the email immediately. And if you accidentally send an email when you meant to schedule it, you can tap the Undo option at the bottom of the screen within 10 seconds. Refer to the below image:

Email 4
Choosing to undo sending your email

Note! You can customize how long you have to undo sending an email under Settings > Mail. Inside these settings, you can choose between 10 seconds, 20 seconds, or 30 seconds.

Find Your Scheduled Email

Messages that have been scheduled will appear in a separate mailbox in the Mail app. First, launch Mail, then look at the top of the screen in the Mailboxes view.

Note! If you do not see a list of mailboxes, you are probably browsing a specific mailbox. You can use the back arrow in the top left-hand corner of the screen to get back to the main view.

Next, you should see the Send Later mailbox. If you do not, tap Edit in the top right-hand corner and tap the circle next to the Send Later inbox to enable it. Then, tap Done. You should now see the mailbox in your list. See the below image:

Email 5
Accessing your scheduled emails

Now, you can tap on the mailbox to see which messages are due to go out and the time they will be sent. See the following image:

Email 6
Viewing your scheduled email

Note! You are unable to edit a message once it has been scheduled. You will have to delete it and schedule a new one. To delete your email, swipe the message to the left and tap Trash.

Next, if you selected the scheduled email, you can tap Edit next to it to change the time the email will be sent. Refer to the below image:

Email 7
Notification on when the email will be sent

Warning! Be careful here, as tapping Edit will immediately change the scheduled time to now. That means if you hit Done instead of Cancel, your email will be sent immediately, with no option to undo it.

Quote For the Day

We are the children of a technological age. We have found streamlined ways of doing much of our routine work. Printing is no longer the only way of reproducing books. Reading them, however, has not changed.

Lawrence Clark Powell

Tweet Info

You are finished. Please feel free to share this post! One way to share is via Twitter.

Just click the Tweet icon below. This will launch Twitter where you click its icon to post the Tweet.

Checkout TechSavvy.Life for blog posts on smartphones, PCs, and Macs! You may email us at contact@techsavvy.life for comments or questions.

I Would Like to Hear From You

Please feel free to leave a comment. I would love to hear from you. Do you have a computer or smart device tech question? I will do my best to answer your inquiry. Just send an email to contact@techsavvy.life. Please mention the device, app, and version you are using. To help us out, you can send screenshots of your data related to your question.

Author’s E-Book

You can access the e-book from a Kindle device, the Kindle App for the desktop or smartphone, which is a free app.

The author’s Vietnam eBook on the Battle for Tra Bong Vietnam: Events and Aftermath

How to Make Custom Wallpapers on iPhone

Changing your iPhone Lock screen and Home screen wallpaper is probably the most effective way of making your phone look and feel unique.

RAYMOND OGLESBY @RaymondOglesby2
October 25, 2022

Changing your iPhone Lock screen and Home screen wallpaper is probably the most effective way of making your phone look and feel unique. Now you can take your wallpaper to the next level by creating or modifying your own designs in just a few taps; no app is required.

This is for the iPhone running iOS 16+. Screenshots are from iPhone XR

Dilbert and AI
Copyright Scott Adams, Inc./Distributed by Universal Uclick for UFS

iOS 16 Required

You can access the new wallpaper creation tools and Lock Screen gallery using iOS 16. If you do not see the Lock screen gallery when you long-press your Lock screen, you might need to update your iPhone to iOS 16.

If you need to, you can upgrade to iOS 16 by going to:

Settings > General > Software Update

Create a Wallpaper

You can create your own wallpapers using the Lock screen gallery. To access the gallery, first, tap and hold the Lock screen to reveal it.

Next, tap Customize to modify your existing Lock screen or tap the plus “+” icon to create a new Lock screen. Refer to the below image:

Customize Wallpaper 1
Customize or add a wallpaper

Now, creating a new Lock screen will take you straight to the wallpaper picker. You will then see a few options at the top of the screen that will allow you to create your own wallpaper:

  • Photos: Pick a photo from your media library, then customize it by swiping left and right to apply different filters.
  • Photo Shuffle: Using shuffle mode, you can choose more than one background image. These photos will then change throughout the day. You can also have your iPhone pick photos for you.
  • Emoji: Pick your favorite emoji, then choose from different patterns and background colors.
  • Weather: The weather option is a dynamic background that changes based on the weather conditions in your area.
  • Astronomy: This dynamic background changes based on the position of the earth, the moon, or the planets in our solar system.
  • Color: Pick a solid color, then swipe left and right to choose different effects like gradients and color intensity.

Next, you can create multiple wallpapers and save them to the Lock screen gallery, then switch between them as you please by tapping and holding your Lock screen at any time. See the below image:

Customize Wallpaper 2
Select a wallpaper

Now, the most fun you can have here is by creating custom Emoji and color wallpapers. Creating wallpapers using your own photos is easier using these tools too. There’s no need to edit or apply filters to your photos inside the Photos app first.

Next, some photos can even be used to create a Depth Effect that overlays subjects on top of the clock (though getting this to work is a bit hit-and-miss).

Using Existing Designs

You can also use the Lock screen gallery to pick from existing or featured designs. Now, take a look at the Featured and Collections areas to see some of Apple’s best offerings. See the following image :

Customize Wallpaper 3
Select template wallpapers

Next, iOS will also put photos in the Suggested Photos slider that should work well on a Lock screen, many of which are compatible with the Depth Effect mentioned above.

If you use Widgets on your Lock screen, you forgo the ability to use the Depth Effect.

There’s also a huge range of apps in the App Store for creating or downloading custom wallpapers, including, Vellum, Everpix, and Pixs. Unlike those apps, Apple’s built-in options are completely free to use.

Related

How to Use Lock and Home Screen Wallpapers

Quote For the Day

I’d rather check my Facebook than face my checkbook.

Craig Coelho

Tweet Info

That’s it. Please feel free to share this post! One way to share is via Twitter.

Just click the Tweet icon below. This will launch Twitter where you click its icon to post the Tweet.

Checkout TechSavvy.Life for blog posts on smartphones, PCs, and Macs! You may email us at contact@techsavvy.life for comments or questions.

I Would Like to Hear From You

Please feel free to leave a comment. I would love to hear from you. Do you have a computer or smart device tech question? I will do my best to answer your inquiry. Just send an email to contact@techsavvy.life. Please mention the device, app, and version you are using. To help us out, you can send screenshots of your data related to your question.

Author’s E-Book

You can access the e-book from a Kindle device, the Kindle App for the desktop or smartphone, which is a free app.

The author’s Vietnam eBook on the Battle for Tra Bong Vietnam: Events and Aftermath

How to Add Widgets on iPhone Lock Screen in iOS 16+

Your iPhone has Lock screen widgets that give you quick access to information regarding your schedule, the weather, and more. You can even tie these widgets to specific Focus Modes so that different widgets appear (or disappear) depending on what you are doing.

RAYMOND OGLESBY @RaymondOglesby2
October 6, 2022

Your iPhone has Lock screen widgets that give you quick access to information regarding your schedule, the weather, and more. You can even tie these widgets to specific Focus Modes so that different widgets appear (or disappear) depending on what you are doing. Let’s ex[ore this feature.

This is for the iPhone running iOS 16+. Screenshots are from iPhone XR

Dilbert and Age
Copyright Scott Adams, Inc./Distributed by Universal Uclick for UFS

Tip: It is recommended you view the post on “How to Use Lock and Home Screen Wallpapers on iPhone in iOS 16+” before implementing this post.

Using the Lock Screen Galleries

First, tap and hold your Lock screen anywhere to show the Lock screen gallery, then tap on the plus “+” icon to add a new Lock screen. Refer to the below image:

Lock 1
About to add a wallpaper

Next, select a wallpaper to appear on your Lock screen. Tap on the Photos option to use an image you have taken or saved to your device. You can also use emojis, the weather, the position of the planets, and more. See the below image:

Lock 3
Selecting a wallpaper from the gallery

Now, with your wallpaper chosen, modify your Lock screen by tapping on the various elements. You can tap on the date to change what information is displayed here, which will add more information to the date display like how much energy you have burned or upcoming calendar events. See the following image:

Widget 3
Browse your suggestions

Next, you can also tap on the time to choose a specific font and color scheme, and swipe left and right on the wallpaper to change how your background is displayed with filters. Refer to the below image:

Widget 4
Choosing elements

Finally, tap on the Add Widgets box to add a single row of widgets to your Lock screen. See the below image:

Widget 5
Selecting to add widgets

Choosing Widgets

Widgets are information that you can easily see from your Lock screen. Many of these appear as smaller circles, of which you can fit four on a single Lock screen. See the below image:

Widget 6
Adding the weather widget

Others take the form of double-length rectangles, including a more detailed weather forecast, upcoming reminders, news headlines, and information about markets and stocks. You can fit two of these, or one rectangular and two smaller circular widgets. See the following image:

Widget 7
The added weather widget

When you choose to use widgets, you forego the ability to use the Depth Effect with your wallpaper. This can be toggled using the “…” ellipsis button while customizing a wallpaper. Refer to the below image:

Widget 11
Adding Depth Effect

This effect makes it possible to overlay some elements of an image over the clock, for a more dynamic feel. It looks impressive, but it’s not particularly useful and widgets are arguably more useful.

At this point, save your newly created Lock screen wallpaper. Tap Done in the upper right-hand corner. See the below image:

Widget 8a
Save your wallpaper

Focus Modes

While selecting a Lock screen from the Lock screen gallery, tap on the Focus button to tie your chosen Lock screen to a particular Focus Mode. Assuming you have set up Focus Modes already, this lets you show relevant information while specific Focus Modes are active. See the following image:

Widget 9
Accessing Focus

You can set up a custom Focus that triggers a particular activity or use one of the common ones. Refer to the below image:

Widget 10
Selecting a Focus Mode

The Lock screen gallery and its associated widgets are available with the iOS 16 update. If you do not see these options, make sure you have updated your iPhone (and that your device is compatible with iOS 16).

Quote For the Day

Just because something doesn’t do what you planned it to do doesn’t mean it’s useless.

Thomas Edison

Tweet Info

That’s it. Please feel free to share this post! One way to share is via Twitter.

Just click the Tweet icon below. This will launch Twitter where you click its icon to post the Tweet.

Checkout TechSavvy.Life for blog posts on smartphones, PCs, and Macs! You may email us at contact@techsavvy.life for comments or questions.

I Would Like to Hear From You

Please feel free to leave a comment. I would love to hear from you. Do you have a computer or smart device tech question? I will do my best to answer your inquiry. Just send an email to contact@techsavvy.life. Please mention the device, app, and version you are using. To help us out, you can send screenshots of your data related to your question.

Author’s E-Book

You can access the e-book from a Kindle device, the Kindle App for the desktop or smartphone, which is a free app.

The author’s Vietnam eBook on the Battle for Tra Bong Vietnam: Events and Aftermath

How to Use Lock and Home Screen Wallpapers on iPhone in iOS 16+

Wallpaper is probably the easiest way to customize the look of your iPhone, and you have two areas to do it; the Home screen and the Lock screen.

RAYMOND OGLESBY @RaymondOglesby2
October 4, 2022

Wallpaper is probably the easiest way to customize the look of your iPhone, and you have two areas to do it; the Home screen and the Lock screen. Let’s explore this iOS 16+ feature.

This is for the iPhone. Screenshots are from iPhone XR running iOS 16+

Dilbert and Late
Copyright Scott Adams, Inc./Distributed by Universal Uclick for UFS

Tip: It is recommended you view the post on “How to Add Widgets on iPhone Lock Screen in iOS 16+” next.

The iPhone has supported separate wallpapers on the Home screen and Lock screen for a while, but iOS 16 introduced a big reworking of the process in 2022.

First, unlock your iPhone and tap and hold on a blank space on the Lock screen. The Lock screen will zoom out, and you will see a Customize and a plus button. Tap the plus button. Refer to the below image:

Lock 1
Selecting to add a wallpaper

If this is your first time playing with the Lock screen wallpaper in iOS 16, you will need to tap Add New when prompted. This will switch you over to the new Lock screen style. See the below image:

Lock 2
Add a new wallpaper

Next, you have a bunch of different options for wallpapers. At the top, you can select from a few categories. Scroll down to see a bunch of pre-made Lock screens. Choose a wallpaper for the Lock screen to proceed. See the following image:

Lock 3
Choosing a wallpaper

Now, once you have a wallpaper that you want to use for the Lock screen, tap the Add button in the top right-hand corner. Refer to the below image:

Lock 4
Selecting the Add button

Next, here’s where you have to option to use a different wallpaper for the Home screen. Tap Customize Home Screen to proceed. See the below image:

Lock 5
Selecting Customize Home Screen button

Now, you have a few options to choose from. You can blur the Lock screen wallpaper, choose a color based on the Lock screen wallpaper, a gradient based on the Lock screen wallpaper, or from your photos. After you have made your selection, tap Done in the top right-hand corner (if you choose a photo, you will need to tap Done twice). See the following image:

Lock 6
Adding a Home Screen wallpaper

Next, you will be brought back to the Lock screen preview screen. Tap the Lock screen to leave and see your new Lock screen and Home screen wallpapers! Refer to the below image:

Lock 7
Your Lock Screen

This is just a fraction of what you can do with the Lock screen on iOS 16+. You can also add widgets, customize the clock font, and apply a cool 3D depth effect to some wallpapers. More on this in another post as mentioned above.

Delete a Wallpaper

First, unlock your iPhone. Next, long-press anywhere on the unlocked Lock screen. See the below image:

Lock 8
Accessing the Lock Screen for deletion

Now, when the Lock screen goes into edit mode, you will see your current Lock screen as a preview among other Lock screens. Swipe to the wallpaper you want to delete. Then, swipe up on the wallpaper preview to reveal more options.

Note: The swipe-up gesture only works if you have another wallpaper added to your Lock screen collections. If you are trying to delete the only remaining Lock screen wallpaper from your iPhone, you will not be able to perform the swipe gesture on this wallpaper. 

Next, you will now see a red-colored Trash icon below the selected wallpaper. Tap on the Trash icon to delete this Lock screen wallpaper permanently from your iPhone. See the following image:

Lock 9
Selecting the Trash icon to delete

Now, to confirm your action, tap on Delete This Wallpaper in the prompt that appears at the bottom. Refer to the below image:

Lock 10
Confirming the deletion

The selected wallpaper will now be removed from the edit screen and iOS will now load up your previous wallpaper for your Lock screen. 

Quote For the Day

Technology like art is a soaring exercise of the human imagination.

Daniel Bell

Tweet Info

You are finished. Please feel free to share this post! One way to share is via Twitter.

Just click the Tweet icon below. This will launch Twitter where you click its icon to post the Tweet.

Checkout TechSavvy.Life for blog posts on smartphones, PCs, and Macs! You may email us at contact@techsavvy.life for comments or questions.

I Would Like to Hear From You

Please feel free to leave a comment. I would love to hear from you. Do you have a computer or smart device tech question? I will do my best to answer your inquiry. Just send an email to contact@techsavvy.life. Please mention the device, app, and version you are using. To help us out, you can send screenshots of your data related to your question.

Author’s E-Book

You can access the e-book from a Kindle device, the Kindle App for the desktop or smartphone, which is a free app.

The author’s Vietnam eBook on the Battle for Tra Bong Vietnam: Events and Aftermath