The Best Way to Type Numbers on iPhone Plus a Bonus Tip

This post highlights a helpful trick for iPhone users to type numbers and symbols without switching keyboards. By holding the 123 button, users can access numbers while continuing to type with the ABC keyboard. It also discusses a fun, less practical feature in iOS 17 that displays the time on-screen.

RAYMOND OGLESBY @RaymondOglesby2
March 25, 2025 – 5 minutes read time

It would be convenient if Apple added a numbers row to the standard iPhone keyboard, but it has not happened yet. If you want an iPhone keyboard with numbers, here’s an iPhone texting trick. This post shows how to access iOS keyboard symbols and numbers without leaving the standard keyboard.

  • Type numbers quickly and efficiently without having to switch to the number keyboard.
  • Impress your friends with your iPhone keyboard-shortcut knowledge.

While the steps below work on previous iOS software versions, the screenshots shown were captured using iOS 18.3.2 on iPhone 14 Pro.

Click here to learn how to update your iPhone to the latest iOS version.

Have you been wishing for an iPhone keyboard with numbers and symbols? Let’s go over how to access numbers and symbols without leaving the ABC keyboard on your iPhone.

First, open any app where you want to use a keypad with numbers, such as Messages or Notes.

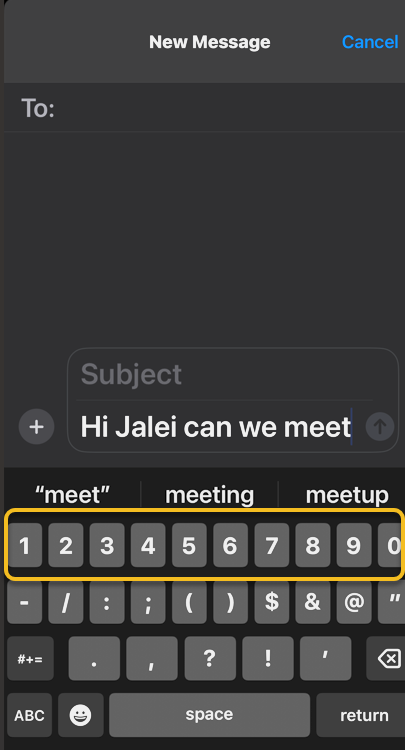
Next, when typing, touch and hold the 123 button to bring up the keypad with numbers. Since the button is on the left side of the screen, it works best to do this with your left hand. You will need to keep holding it while you type the numbers and/or symbols. Refer to the below image:

Numbers 1
Entering a new message

Now, while still holding the 123 buttons, type the numbers or symbols you need using the other hand. See the below image:

Numbers 2
Holding down the 123 button to display the numbers

Next, release the 123 button, which will automatically switch back to the ABC keys. You can then carry on typing in the standard iPhone keyboard to complete your text. See the following image:

Numbers 3
Release the 123 button to return the normal keyboard

That’s how to get numbers on an iPhone keyboard the quickest way! For those who already type with two hands, this will be a breeze. If you typically type with only one hand, this iPhone keyboard shortcut may take a little bit of getting used to, but it’s still faster than having to navigate from the ABC keyboard to the 123 keyboard and back!

This tip uses the StandBy feature introduced in iOS 17. It should be enabled by default in iOS 17 and higher, but you will still want to confirm that it’s set up for this tip to work.

This nameless tip will show the time in the middle of your screen upon a certain action.

First, head to:

Settings > StandBy 

and make sure StandBy and Always On (if you have that feature) are enabled.

Next, if you want to see notifications, turn on Show Notifications.

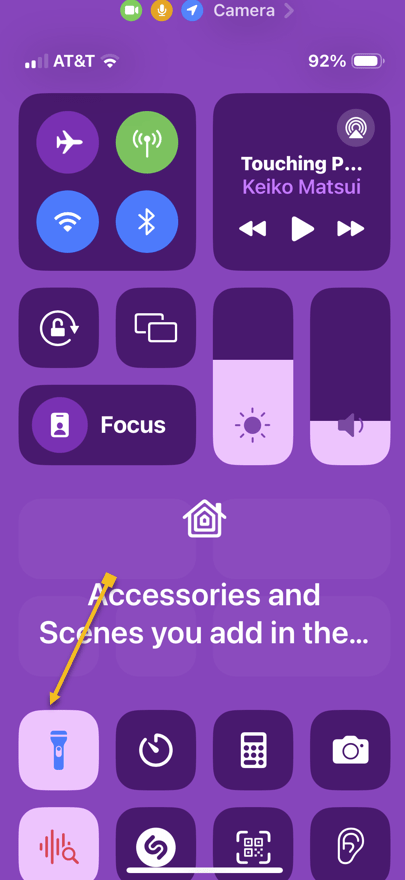
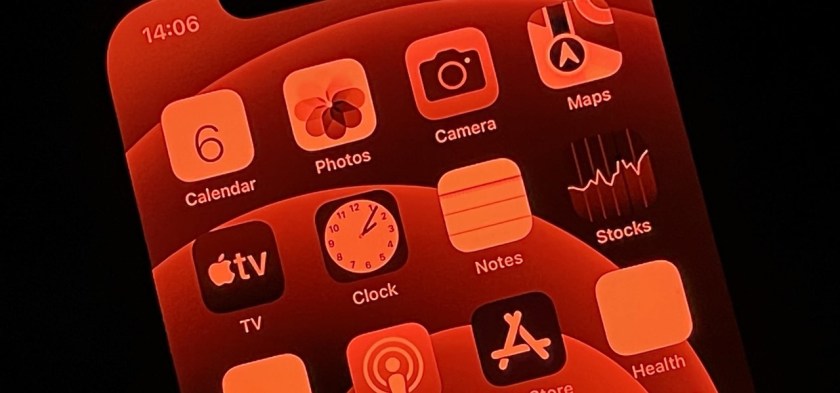
Now, tap the Display option, then enable the Night Mode switch if you want the screen to take on a red tint in reaction to low ambient light at night so it does not disturb your sleep. Refer to the below image:

Numbers 4
Enabling options

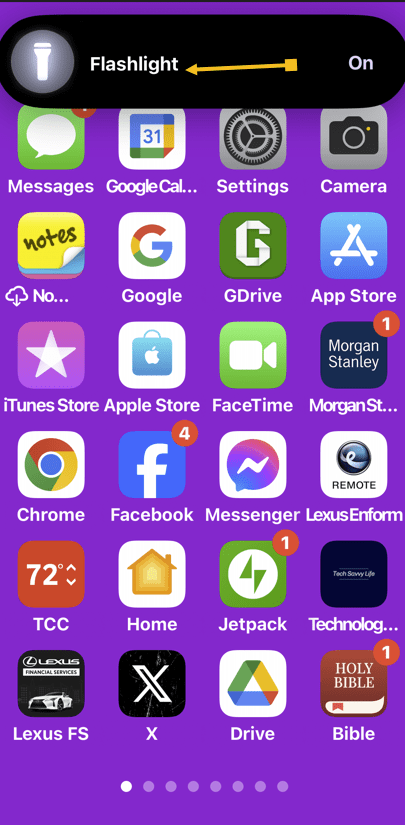
Bext, you simply press and hold down the Time indicator in the status bar (top left). The current time will be displayed in the middle of your screen and stay there until you release the Time indicator. We ask, why? Some Apple engineer had too much time on his hands. See the below image:

Numbers 5
Press and hold the Time indicator to display Time in the middle of the screen

Want more useless information? Press and hold the other indicators (signal strength, WiFi and Battery). See the following image:

Numbers 6
Display another useless indicators

Technology is constantly evolving, and smartphone and desktop tech rarely remains static. Therefore, the information in this post is only accurate as of the date it was written. Blog posts that are older than six months may contain instructions that are no longer compatible with your device or operating system. We hope that the content from previous posts continues to function as intended. Thank you for reading TechSavvy.Life, where technology works for you.

“Please, no matter how we advance technologically, please don’t abandon the book. There is nothing in our material world more beautiful than the book.”

-Patti Smith

That’s it. Please feel free to share this post! One way to share is via Twitter.

Just click the Tweet icon below. This will launch Twitter where you click its icon to post the Tweet.

Checkout TechSavvy.Life for blog posts on smartphones, PCs, and Macs! You may email us at contact@techsavvy.life for comments or questions.

We value your feedback! Was this post helpful? Please share your comments with us. If you have a tech question related to your computer or smart device, feel free to reach out. Just send an email to contact@techsavvy.life, and be sure to include the device, app, and version you are using. To assist us further, you can also attach screenshots related to your inquiry.

Author’s eBook

The author’s Vietnam eBook on the “Battle for Tra Bong Vietnam: Events and Aftermath” can be accessed from a Kindle device or the Kindle App for a desktop or smartphone. The apps are free.

The author’s Vietnam eBook on the Battle for Tra Bong Vietnam: Events and Aftermath

Protect Your Privacy: How to Opt Out of Yahoo Data Selling

This post provides instructions for protecting your privacy on Yahoo Mail for iPhone and PC. It explains how to prevent Yahoo from selling your information and control personalized ads.

RAYMOND OGLESBY @RaymondOglesby2
October 1, 2024 – 4 minutes read time

This is for the iPhone and PC running Yahoo Mail. Screenshots are from iPhone 14 Pro running iOS 17.7

Most companies today are selling your information in some way or form. Luckily, most companies allow you to opt out of having your data sold; if you know how to ask for it.

While you would think the “do not sell my personal information” setting would be on the Yahoo security page, you will find it under a different menu. Let’s explore telling Yahoo, “Do not sell my personal information” and control personalized ads.

  • Yahoo Mail
  • iOS 16 or later
  • Browser
  • Windows 11/10
  • iPhone

Click here to learn how to update your iPhone to the latest iOS version.

  • Protect your privacy by stopping Yahoo from selling your information.
  • Make sure your data stays out of the hands of third parties.

First, open the Yahoo Mail app. Next, tap your profile icon in the upper left. Now, tap Settings. Refer to the below image:

Yahoo 1
Accessing Settings

First, scroll down and tap Manage account privacy. Next, tap Your Privacy controls. Now, tap the Yahoo logo. See the below image:

Yahoo 2
Accessing Privacy

First, you will be prompted to log into your Yahoo mail account. Enter your username/email address, tap Next, and follow the on-screen prompts to log in. Next, After logging in, scroll down to the Sale and sharing of personal information and tap the link. See the following image:

Yahoo 3
Accessing the Sale and Share link

First, tap the toggle. The default is set to Allow Yahoo to sell your data. Next, the page and its toggle will turn gray, indicating that the setting has been disabled. Refer to the below image:

Yahoo 4
Setting the Do Not Sale option

You may want to read the “fine print” about setting the option to Don’t Allow. If you clear cookies for your browser, the option is reset to Allow. See the below image:

Yahoo 5
The fine print

While here, go back to the Sale and sharing of personal information screen to control ads. Tap the Personalized ads link and turn off any option on delivering ads. See the following image on the first of four options:

Yahoo 6
Turning off Personalized ads
  • Open Yahoo Mail
  • Click the Gear icon in the upper left below the Home icon
  • Click the More settings link
  • Click About our Ads menu option. You would think of accessing the Security and Privacy menu option, but Yahoo wants to hide selling your data.
  • Under What choices do I have section, click View our other Privacy Controls
  • click the Yahoo logo, and sign in
  • Click the Sale and sharing personal information link
  • Click the toggle. The default is set to Allow Yahoo to sell your data. Next, the page and its toggle will turn gray, indicating that the setting has been disabled. If you have set the toggle to Don’t Allow on your iPhone first, the toggle will already be disabled.

Disclaimer

Technology is always changing. Rarely is there static tech for smartphones and desktops. Thus, the contents of this post are only valid at the time of writing. Blog posts older than six months may have directions incompatible with your device or OS. Hopefully, older post content will continue to work as advertised. Thank you for reading TechSavvy.Life for Technology at Work For You.

“I play to win, whether during practice or a real game.”

– Michael Jordan

That’s it. Please feel free to share this post! One way to share is via Twitter.

Just click the Tweet icon below. This will launch Twitter where you click its icon to post the Tweet.

Checkout TechSavvy.Life for blog posts on smartphones, PCs, and Macs! You may email us at contact@techsavvy.life for comments or questions.

Was this post helpful? We would love to hear your comments. Do you have a computer or smart device tech question? I will do my best to answer your inquiry. Just send an email to contact@techsavvy.life. Please mention the device, app, and version you are using. To help us out, you can send screenshots of the data related to your question.

The author’s Vietnam eBook on the “Battle for Tra Bong Vietnam: Events and Aftermath” can be accessed from a Kindle device or the Kindle App for a desktop or smartphone. The apps are free.

The author’s Vietnam eBook on the Battle for Tra Bong Vietnam: Events and Aftermath

Get Visual Alerts for Calls and Messages: iPhone Flash Notification Setup

This post provides a guide on turning on flash notifications for iPhone, especially beneficial for the deaf or hard of hearing. It includes system requirements, and step-by-step instructions.

RAYMOND OGLESBY @RaymondOglesby2
September 24, 2024 – 3 minutes read time

How do you turn on the flash notification on your iPhone? Sometimes we might need an extra alert if an important message or phone call is expected.

This feature is intended to be used by the deaf or hard of hearing, but it can be helpful for anyone who would rather receive visual alerts. Be aware that turning on this feature could deplete your battery life rather quickly, depending on how many notifications you get throughout the day. Let’s explore how to turn on flashlight notifications on iPhones.

This post works on iPhones running iOS 16 or later. Screenshots are from iPhone 14 Pro running iOS 17.6.1

Click here to learn how to update your iPhone to the latest iOS version.

  • Get an extra visual alert any time you receive notifications.
  • Make sure you never miss an important text or phone call.

Open the Settings app, and tap Accessibility. Refer to the below image:

Flash 1
Selecting Accessibility option

Tap Audio & Visual. See the below image:

Flash 2
Selecting the Audio & Visual option

Select LED Flash for Alerts. See the following image:

Flash 3
Selecting LED Flash for Alerts option

Tap the toggle next to LED Flash for Alerts to enable this feature. Refer to the below image:

Flash 4
Toggle to enable LED Flash for Alerts

By default, the LED will only flash if your iPhone is locked and the ringer is on. However, two toggles allow you to make it so that the flash will still go off when your device is unlocked or if Silent mode is enabled. See the below image:

Flash 5
Other options for flash alerts

That’s how to use your iPhone flashlight for notifications. Since the flash is on the back of your phone, placing your phone face down when you set it down is best. Just make sure you have a good scratch-protectant cover on the screen.

Disclaimer

Technology is always changing. Rarely is there static tech for smartphones and desktops. Thus, the contents of this post are only valid at the time of writing. Blog posts older than six months may have directions incompatible with your device or OS. Hopefully, older post content will continue to work as advertised. Thank you for reading TechSavvy.Life for Technology at Work For You.

When times are bad is when the real entrepreneurs emerge.

Robert T Kiyosaki

You are finished. Please feel free to share this post! One way to share is via Twitter.

Just click the Tweet icon below. This will launch Twitter where you click its icon to post the Tweet.

Checkout TechSavvy.Life for blog posts on smartphones, PCs, and Macs! You may email us at contact@techsavvy.life for comments or questions.

Was this post helpful? We would love to hear your comments. Do you have a computer or smart device tech question? I will do my best to answer your inquiry. Just send an email to contact@techsavvy.life. Please mention the device, app, and version you are using. To help us, you can send screenshots of the data related to your question.

The author’s Vietnam eBook on the “Battle for Tra Bong Vietnam: Events and Aftermath” can be accessed from a Kindle device or the Kindle App for a desktop or smartphone. The apps are free.

The author’s Vietnam eBook on the Battle for Tra Bong Vietnam: Events and Aftermath

iPhone Battery Health: Monitoring, Optimization, and Maintenance Tips

Apple faced backlash for slowing down older iPhone models to preserve battery life. Users can now monitor battery health and enable optimized battery charging to prolong battery lifespan. Additionally, they can track battery usage by app and learn to conserve battery and prevent overheating.

RAYMOND OGLESBY @RaymondOglesby2
September 17, 2024 – 4 minutes read time

Apple landed in hot water with customers several years ago when a feature designed to slow the processors of older iPhone models to keep them from suddenly shutting down came to light. Critics maintained that Apple was throttling the speed of earlier iPhone models to push customers toward newer devices. At the same time, Apple insisted that the feature was necessary to cope with aging batteries. Now, Apple lets users monitor the health of their iPhones’ battery. Let’s explore this feature.

This post works on iPhones running iOS 15 or later

Click here to learn how to update your iPhone to the latest iOS version.

First, open the Settings app, and tap on Battery. Refer to the below image:

Battery 8
Accessing the Battery option

Next, tap on Battery Health & Charging. See the below image:

Battery 7
Accessing the Battery Health option

Now, you will see your battery capacity next to Maximum Capacity. See the following image:

Battery 6
Viewing the Maximum Capacity of the battery

The Maximum Capacity tells you your iPhone battery’s capacity compared to its capacity when it was brand new. For example, if your Maximum Capacity is 85%, that is all your battery can charge. On this screen, you can also enable Optimized Battery Charging, which reduces aging by optimizing how your battery behaves when charging. Refer to the below image:

Battery 5
Enabling Optimized Battery Charging

If your battery’s Maximum Capacity has dropped below 80%, a message like this will pop up on your screen if you experience an unexpected shutdown. See the below image:

Battery 1
Viewing Battery Health degradation warning message

You can tap Disable to turn off battery throttling on your iPhone or you may want to consider replacing your battery to improve your iPhone’s performance and the amount of time it can operate between charges.

To view your battery usage by app, go back to:

Settings > Battery

Swipe down on the Battery settings screen and you will discover battery usage by app, starting with the biggest battery hogs. By default, the tool shows you the percentage of battery charge by each app. Tap Show Activity or a specific app, and the information changes to display the time the app has used the battery, both in the foreground and background. See the following image:

Battery 4
Viewing Battery Usage

Besides Optimized Battery Charging you can conserve your battery, turning down the brightness of your screen will increase battery health. To adjust the screen brightness, head to:

Settings > Display & Brightness 

and moving the slider. Refer to the below image:

Battery 3
Turning down Brightness to conserve battery usage

 Using your iPhone in hot conditions can permanently shorten battery life. Store your device where the temperature is between -20º and 45º C (-4º to 113º F). Do not leave your device in your car, because temperatures in parked cars can exceed this range.

If your device gets too warm or too cold, certain features might become temporarily disabled. In extreme conditions, your device might become temporarily disabled. A temperature warning screen will be displayed. See the below image:

Battery 2
iPhone is too hot warning message

Technology is always changing. Rarely is there static tech for smartphones and desktops. Thus, the contents of this post are only valid at the time of writing. Blog posts older than six months may have directions incompatible with your device or OS. Hopefully, older post content will continue to work as advertised. Thank you for reading TechSavvy.Life for Technology at Work For You.

The real secret to a life of abundance is to stop spending your days searching for security and to start spending your time pursuing opportunity.

Robin S. Charma

That’s it. Please feel free to share this post! One way to share is via Twitter.

Just click the Tweet icon below. This will launch Twitter where you click its icon to post the Tweet.

Checkout TechSavvy.Life for blog posts on smartphones, PCs, and Macs! You may email us at contact@techsavvy.life for comments or questions.

Was this post helpful? We would love to hear your comments. Do you have a computer or smart device tech question? I will do my best to answer your inquiry. Just send an email to contact@techsavvy.life. Please mention the device, app, and version you are using. To help us, you can send screenshots of the data related to your question.

The author’s Vietnam eBook on the “Battle for Tra Bong Vietnam: Events and Aftermath” can be accessed from a Kindle device or the Kindle App for a desktop or smartphone. The apps are free.

The author’s Vietnam eBook on the Battle for Tra Bong Vietnam: Events and Aftermath

iPhone Call and Text Blocking: Practical Steps for Contacts and Numbers

The post provides instructions for blocking contacts and numbers. It covers blocking contacts in the phone app and blocking numbers from recent calls.

RAYMOND OGLESBY @RaymondOglesby2
September 10, 2024 – 3 minutes read time

You can easily block any number if you receive texts and calls from a saved contact or a random number. Let’s explore how this is accomplished.

This post works on iPhones running iOS 15 or later. Screenshots are from iPhone 14 Pro running iOS 17.6.1

Click here to learn how to update your iPhone to the latest iOS version.

If the person you want to block is already saved in your iPhone’s contact list, you can block them via the contacts tab in the Phone app. 

First, open your Phone app. Refer to the below image:

Block Caller 1
Accessing your Phone app

Next, tap the Contacts icon. See the below image:

Block Caller 2
Selecting your Contacts icon

Now, tap the contact you want to block. See the following image:

Block Caller 3
Selecting a Contact to block

Next, tap the Block Caller option. Refer to the below image:

Block Caller 4
Selecting the Block Caller option

Now, tap the Block Contact menu option. See the below image:

Block Caller 5
Selecting the Block Contact option

If the number you want to block is not saved in your iPhone contact list, you can still block it in the Phone app.

First, open the Phone app. Refer to the below image:

Block Caller 1
Accessing your Phone app

Next, tap the Recents icon. See below image:

Block Caller 7
Selecting your Recents icon

Now, fund the number you want to block and tap the Info button. See the following image:

Block Caller 8
Selecting the Info button of the number to block

Next, tap the Block Caller option. Refer to the below image:

Block Caller 9
Selecting the Block Caller option

Now, tap the Block Contact menu option. See the below image:

Block Caller 10
Selecting the Block Contact option

And that’s how you block a number or a contact on your iPhone. You can always unblock a caller by the above steps and tapping the Unblock Caller option.

Disclaimer

Technology is always changing. Rarely is there static tech for smartphones and desktops. Thus, the contents of this post are only valid at the time of writing. Blog posts older than six months may have directions incompatible with your device or OS. Hopefully, older post content will continue to work as advertised. Thank you for reading TechSavvy.Life for Technology at Work For You.

 “Success is not achieved by winning all the time. Real success comes when we rise after we fall. Some mountains are higher than others. Some roads steeper than the next. There are hardships and setbacks but you cannot let them stop you. Even on the steepest road you must not turn back.”

Muhammad Ali

Yea, you are finished. Please feel free to share this post! One way to share is via Twitter.

Just click the Tweet icon below. This will launch Twitter where you click its icon to post the Tweet.

Checkout TechSavvy.Life for blog posts on smartphones, PCs, and Macs! You may email us at contact@techsavvy.life for comments or questions.

Was this post helpful? We would love to hear your comments. Do you have a computer or smart device tech question? I will do my best to answer your inquiry. Just send an email to contact@techsavvy.life. Please mention the device, app, and version you are using. To help us, you can send screenshots of the data related to your question.

The author’s Vietnam eBook on the “Battle for Tra Bong Vietnam: Events and Aftermath” can be accessed from a Kindle device or the Kindle App for a desktop or smartphone. The apps are free.

The author’s Vietnam eBook on the Battle for Tra Bong Vietnam: Events and Aftermath

How to Use Dynamic Island for iPhone Flashlight Control | TechSavvy.Life

This post provides instructions for using the Dynamic Island feature to control the flashlight on iPhone 14 Pro and iPhone 15 models. The upcoming iOS 18 update will introduce new features for controlling the flashlight.

RAYMOND OGLESBY @RaymondOglesby2
September 3, 2024 – 3 minutes read

This is for iPhone 14 Pro, iPhone 14 Max, and iPhone 15 running iOS 17+. Screenshots are from iPhone 14 Pro running iOS 17.5.1.

Click here to learn how to update your iPhone to the latest iOS version.

Did you know you can use the Dynamic Island to control your iPhone’s flashlight? The Dynamic Island is one of the most useful features, thanks to shortcuts like this.

There are many different ways to turn off the flashlight on your iPhone. The iPhone 14 Pro and any iPhone 15 models introduced an extra option for switching off your flashlight with Dynamic Island. Let’s explore this feature.

The Dynamic Island is a relatively new interactive iOS 16 feature housing the TrueDepth front camera notch.

Dynamic Island is a pill-shaped zone on the upper side of the ‌iPhone‌ display. It adapts the camera hardware and is a shape-shifting hub for vital iPhone alerts or your ongoing activity. Since the feature is triggered automatically, you can view a multitasking bar within seconds without additional actions.

This UI area displays;

  • Alerts and Notifications
  • Background Activity
  • Access to Controls
  • Real-Time Updates

First, access the Flashlight by swiping down on your Home Screen from the upper right. Refer to the below image:

Flashlight 1
Swiping down to reveal the Control Panel

Now, the Control Center will be displayed. See the below image:

Flashlight 2
Your Control Panel

Next, tap the Flashlight icon. See the following image:

Flashlight 3
Selecting the Flashlight icon

Now, you will see a tiny flashlight icon in the Dynamic Island. Tap it. Refer to the below image:

Flashlight 4
Taping the Flashlight icon in the Dynamic Island

Next, your Flashlight status will be shown in the Dynamic Island. Tap the icon to turn off the Flashlight. See the below image:

Flashlight 5
Taping the Flashlight icon to turn it off

In the September 2024 iOS 18 update Apple will add swipe capabilities to control the Flashlight beam and brightness.

Disclaimer

Technology is always changing. Rarely is there static tech for smartphones and desktops. Thus, the contents of this post are only valid at the time of writing. Blog posts older than six months may have directions incompatible with your device or OS. Hopefully, older post content will continue to work as advertised. Thank you for reading TechSavvy.Life for Technology at Work For You.

. “Real science can be far stranger than science fiction and much more satisfying.”

– Stephen Hawking

You are finished. Please feel free to share this post! One way to share is via Twitter.

Just click the Tweet icon below. This will launch Twitter where you click its icon to post the Tweet.

Checkout TechSavvy.Life for blog posts on smartphones, PCs, and Macs! You may email us at contact@techsavvy.life for comments or questions.

Was this post helpful? We would love to hear your comments. Do you have a computer or smart device tech question? I will do my best to answer your inquiry. Just send an email to contact@techsavvy.life. Please mention the device, app, and version you are using. To help us out, you can send screenshots of the data related to your question.

The author’s Vietnam eBook on the “Battle for Tra Bong Vietnam: Events and Aftermath” can be accessed from a Kindle device or the Kindle App for a desktop or smartphone. The apps are free.

The author’s Vietnam eBook on the Battle for Tra Bong Vietnam: Events and Aftermath

Customize Back Tap Gestures on iPhone and iPad for Enhanced Accessibility

The post discusses the accessibility features on iPhone and iPad, emphasizing their importance for users with visual or audio impairments. It provides a detailed guide on enabling Accessibility Shortcut and Back Tap gestures, highlighting various options such as AssistiveTouch, Color Filters, and Voice Control.

RAYMOND OGLESBY @RaymondOglesby2
August 20, 2024 – 7 minutes read time

This is for iPhone and iPad. Screenshots are from iPhone 14 Pro running iOS 17+

Accessibility is always important since it makes devices easier for those with visual or audio impairments. Apple always does a great job with accessibility, and you will find plenty of accessibility options on your iPhone or iPad to make life easier. Perhaps you need to have more sound on one side of your favorite headphones, or you just need to make text easier to read. No matter what you need, iOS 17 and iPadOS 17 are very inclusive, so you will not feel left behind. And to make it even easier to access your favorite accessibility tools, there is the Accessibility Shortcut on your favorite iPhone or iPad.

  1. Launch the Settings app on your iPhone or iPad.
  2. Tap on Accessibility.
  3. Tap on Accessibility Shortcut; it’s all the way to the bottom. Refer to the below image:
Accessibility 1
Selecting Accessibility Shortcut option
  1. Tap the action you would like to perform when you triple-click the Home or Side button so that a blue checkmark appears next to it. You can assign multiple functions to the shortcut.
  2. If you want to reorder the options, just drag and drop. Tap and hold the handle on the right side of each option to move it.
  3. Triple-click your Home button (Touch ID devices) or Side button (Face ID devices) to perform the action you have assigned to the shortcut.
  4. If you have assigned multiple options, simply choose the action you want to perform from the menu. See the below image:
Accessibility 2
Assigning multiple shortcuts and reordering them

Here’s a brief description of the options you have and what they are:

  • AssistiveTouch: Adds the ability to access many common hardware buttons and gesture controls with single taps; a useful feature for those with motor impairments.
  • Background Sounds: A new feature in iOS 15, Background Sounds lets you play soothing white noise to help you concentrate. Using the Accessibility Shortcut toggles your selected sound. First, you need to set up your Background Sounds.
  • Classic Invert Colors: A great option for anyone with a visual impairment such as color blindness. All colors across iOS will be inverted.
  • Color Filters: Changes the color layout of the screen for those with color blindness.
  • Full Keyboard Access: This allows you to navigate the iOS interface without using touch input. A physical keyboard is required to use this feature.
  • Increase Contrast: This will increase the contrast of visual elements on the screen, making it easier to see and read text.
  • Left/Right Balance: This turns on your custom audio balance setting if you have one set up. For example, if you want more sound on the left or right side of your earbuds or headphones, you will want to adjust that audio balance. Turning this off will go back to the default setting.
  • Magnifier: Triggers a camera-style viewfinder with sharp zoom controls so you can see small text. You will need the Magnifier enabled to have this option available.
  • People Detection: With People Detection, your iPhone 12 or iPhone 13 uses Machine Learning with the LiDAR scanner to determine if an object in the camera is a person. You will receive audio feedback to help you determine how far away or close a person is to you.
  • Reduce Motion: This turns on the Reduce Motion setting, which reduces motion in the user interface, including the parallax with app icons. This can also help conserve some battery power.
  • Reduce Transparency: This reduces the transparency used in apps and websites, including blurred backgrounds. Having this on improves the legibility of text.
  • Reduce White Point: Reduces the intensity of bright colors for those with sensitivities or color blindness.
  • Smart Invert Colors: Same as Classic Invert Colors, except it does not change photos, media, and some apps.
  • Switch Control: This lets you use external switches, or the screen itself, as a switch for motor accessibility.
  • Voice Control: This lets you speak commands to your iPhone or iPad.
  • VoiceOver: Allows your iPhone or iPad to speak to you when enabled. Commonly used by folks with visual impairments.
  • Zoom: Allows you to zoom your content for better visibility. You can then use two and three-finger gestures to tap and pan around.
  • Guided Access: This keeps the iPhone in a single app and allows you to control which features are available. You need the Guided Access feature enabled before it is available as an Accessibility Shortcut option.

Once you have made your selection for the Accessibility Shortcut on iPhone and iPad, you can simply triple-click the Home button or the Side button on iPhones and iPads with Face ID from anywhere, not just from Settings, and your iPhone or iPad will enable the function you have selected. To disable it, just triple-click the button again. If multiple functions are assigned, tap the option you want to use.

iOS 14 added a new Back Tap gesture. With the Back Tap, you can double-tap or even triple-tap the back of your iPhone for quicker access to some commonly used actions, such as accessing the Notification Center or Control Center. You can also use the Back Tap gesture to launch Shortcuts that you have created, opening up a whole new world of possibilities.

  1. Launch Settings on your iPhone or iPad.
  2. Tap Accessibility.
  3. Tap Touch. See the following image
Accessibility 3
Selecting the Touch option
  1. Tap Back Tap at the bottom.
  2. Tap Double Tap or Triple Tap to choose an action. Refer to the below image:
Accessibility 4
Selecting Back Tap options
  1. Select an action for your chosen Back Tap. Options include the Accessibility Shortcut that we just created, or you can choose from System, Accessibility, Scroll Gestures, or your own Shortcuts actions. See the below image:
Accessibility 5
Selecting Double and TripleTtap functions.

As you can see, having an Accessibility Shortcut and Back Tap gestures can make your life easier. It adds another layer of customization to your device, and you do not need to fiddle around in the settings every time to get to certain accessibility actions. Even if you are not visually or hearing impaired, these accessibility features are handy for everyone.

Disclaimer

Technology is always changing. Rarely is there static tech for smartphones and desktops. Thus, the contents of this post are only valid at the time of writing. Blog posts older than six months may have directions incompatible with your device or OS. Hopefully, older post content will continue to work as advertised. Thank you for reading TechSavvy.Life for Technology at Work For You.

“Real work is completed in silence and strikes a chord in the minds of only a very few.”

CG Jung

That’s it. Please feel free to share this post! One way to share is via Twitter.

Just click the Tweet icon below. This will launch Twitter where you click its icon to post the Tweet.

Checkout TechSavvy.Life for blog posts on smartphones, PCs, and Macs! You may email us at contact@techsavvy.life for comments or questions.

Was this post helpful? We would love to hear your comments. Do you have a computer or smart device tech question? I will do my best to answer your inquiry. Just send an email to contact@techsavvy.life. Please mention the device, app, and version you are using. To help us out, you can send screenshots of the data related to your question.

The author’s Vietnam eBook on the “Battle for Tra Bong Vietnam: Events and Aftermath” can be accessed from a Kindle device or the Kindle App for a desktop or smartphone. The apps are free.

The author’s Vietnam eBook on the Battle for Tra Bong Vietnam: Events and Aftermath

How to Enable Night Vision Mode on iPhone for Enhanced Visibility

The iPhone’s night vision mode turns the screen red to reduce eye strain. This feature is beneficial for low-light environments and can be enabled in the device’s settings. The red screen helps with quicker eye adaptation in the dark and can be useful for various activities such as stargazing and viewing smartphones discreetly in dark environments.

RAYMOND OGLESBY @RaymondOglesby2
July 30, 2024 – 3 minute read

This is for the iPhone. Screenshots are from iPhone 14 Pro running iOS 17.5.1+

The iPhone has a “night vision” feature that turns your screen red. More than giving a spy movie vibe, a red screen could help sharpen people’s night vision by reducing the harmful effect of the bright displays we stare at all day.

Night vision mode is helpful at night and when we first wake up, since the regular light the iPhone displays can cause fatigue and harm our eyes. Apple already offers some built-in options to protect our eyes, such as:

  • Warn that the iPhone is too close to your face.
  • Night Mode, which reduces blue light and reduces fatigue.
  • True Tone, which adjusts the display color based on your environment.
  • Dark Mode, which switches the bright whites to black or dark gray colors, puts less stress on your eyes.

Still, there are benefits to turning your iPhone screen red. The color is more difficult to see than other light frequencies, so it tricks our eyes into thinking it’s less bright than it actually is. In a dark room, for example, your pupils will not have to adjust as much to the light. Also, when you look away, your eyes adapt quicker to the darkness around you. Refer to the below image:

iPhone Red Screen
iPhone Red Screen for Night Vision

In addition, this iPhone feature can also help you use star map apps for astronomy, sneaking your phone at the theaters, eyesight animals, or when you check your phone in the middle of the night.

With that in mind, Apple has this Night Vision mode. Here’s how you can enable it.

  • On your iPhone, open Settings
  • In the Accessibility tab, search for Display & Text Size
  • Turn on Color Filters
  • Move Intensity to the far-right position for the full red-screen effect.
  • Select Color Tint

Now that you know how to turn on this iPhone’s feature, there are three options to make turning it on and off more straightforward.

Triple click: 

On Settings, Accessibility, Accessibility Shortcut, choose Color Filters to triple-click the side button and activate this setting.

Control Center:

On Settings, Control Center, and Accessibility Shortcuts, you can add this shortcut to your Control Center, so it’s just one tap away from changing your display from bright white to red.

Siri:

You can ask Siri to either enable or disable color filters.

Technology is always changing. Rarely is there static tech for smartphones and desktops. Thus, the contents of this post are only valid at the time of writing. Blog posts older than six months may have directions incompatible with your device or OS. Hopefully, older post content will continue to work as advertised. Thank you for reading TechSavvy.Life for Technology at Work For You.

An ounce of action is worth a ton of theory.

Friedrick Engels

That’s it. Please feel free to share this post! One way to share is via Twitter.

Just click the Tweet icon below. This will launch Twitter where you click its icon to post the Tweet.

Checkout TechSavvy.Life for blog posts on smartphones, PCs, and Macs! You may email us at contact@techsavvy.life for comments or questions.

Was this post helpful? We would love to hear your comments. Do you have a computer or smart device tech question? I will do my best to answer your inquiry. Just send an email to contact@techsavvy.life. Please mention the device, app, and version you are using. To help us out, you can send screenshots of your data related to your question.

The author’s Vietnam eBook on the “Battle for Tra Bong Vietnam: Events and Aftermath” can be accessed from a Kindle device or the Kindle App for a desktop or smartphone. The apps are free.

The author’s Vietnam eBook on the Battle for Tra Bong Vietnam: Events and Aftermath

How to Route iPhone Calls to Your Speaker and Set Auto-Answer

This post provides guidance for iPhone users on enabling the speaker for all calls and setting up the Auto-Answer feature.

RAYMOND OGLESBY @RaymondOglesby2
June 18, 2024 -3 minutes read time

This is for the iPhone with iOS 17 or above. Screenshots are from iPhone 14 Pro running iOS 17+

If you like talking on the phone for long periods but do not love holding the iPhone to your face for hours, you may prefer to use the speaker. You can turn on a setting that automatically makes all calls through your speaker. Also, you can set the Auto-Answer feature to answer your phone within a certain time frame. This is useful for those working using a headset. Let’s explore these features.

First, head to

Settings > Accessibility > Touch

Refer to the below image:

Accessing the Touch option

Next, select Call Audio Routing. See the below image:

Selecting the Call Audio Routing option

Now, tap the Speaker option. See the following image:

Selecting the Speaker for all calls

Next, when you get a phone call, it will automatically use the speaker when you answer!

If you have paired your iPhone to your car audio system, we recommend leaving the Speaker setting to Automatic. This will send/receive your calls through your audio system speakers.

While you are here, you can set the Auto-Answer feature and the time to pick up a call.

First, tap the Auto-Answer Calls option. Refer to the below image:

Accessing the Auto-Answer Calls option

Next, tap the Auto-Answer Calls toggle to ON. See the below image:

Toggle the Auto-Answer Calls to ON

Now, set your time duration to auto-answer a call (default is 3 seconds). See the following image:

Setting time duration for Auto-Answer

Disclaimer

Technology is always changing. Rarely is there static tech for smartphones and desktops. Thus, the contents of this post are only valid at the time of writing. Blog posts older than six months may have directions incompatible with your device or OS. Hopefully, older post content will continue to work as advertised. Thank you for reading TechSavvy.Life for Technology at Work For You.

Logic will get you from A to B. Imagination will take you everywhere.

Albert Einstein

Just click the Tweet icon below. This will launch Twitter where you click its icon to post the Tweet.

Just click the Tweet icon below. This will launch Twitter where you click its icon to post the Tweet.

Checkout TechSavvy.Life for blog posts on smartphones, PCs, and Macs! You may email us at contact@techsavvy.life for comments or questions.

Was this post helpful? We would love to hear your comments. Do you have a computer or smart device tech question? I will do my best to answer your inquiry. Just send an email to contact@techsavvy.life. Please mention the device, app, and version you are using. To help us out, you can send screenshots of your data related to your question.

You can access the E-book from a Kindle device, or the Kindle App for a desktop or smartphone. The apps are free.

The author’s Vietnam eBook on the Battle for Tra Bong Vietnam: Events and Aftermath

How to Jump to the Top in iPhone Apps

This post provides tips for iPhone users to quickly navigate to the top of any screen using simple gestures. It also explains how to use Reachability to access the top half of the screen with one hand.

This is for the iPhone. Screenshots are from iPhone 14 Pro running iOS 17.4

Did you know that a simple iPhone gesture can save your thumb the workout of scrolling back to the top of most apps? Across all apps, pages, and platforms, this simple tip will automatically return you to the top of any screen. Whether you have been scrolling Instagram or Facebook, or you have been searching in the Settings app, just tap once at the top of the iPhone’s screen to snap back to the beginning.

We are unsure why we forgot this hidden gesture. This is the BEST iPhone post we have written out of 100-plus posts on the iPhone.

First, open any app, and simply tap the top of the iPhone screen anywhere from the Time to Battery Indicator, known as the Dynamic Island area. We are using the Settings app for our example. Refer to the below image:

Top Screen 2
Tapping to jump to the top of the Settings screen

Next, it should return you back to the top immediately. Be sure when you are doing this, you are tapping at the level of the Time or Battery Indicator. If you tap just below, nothing will happen. See the below image:

Top Screen 1
You are now at the top of the Settings screen

Now, based on your iPhone model:, here is where to tap:

  • iPhone 15 or iPhone 14 Pro — you can tap on either side of the Dynamic Island and the phone will instantly scroll up. 
  • iPhone X or any of the models with the notch—you can tap on either side of the notch.  
  • If you have an older iPhone without Dynamic Island or a notch, you can achieve the same thing by tapping the Clock on the status bar.

It’s that simple! This works in nearly any app with screens you can scroll down on, whether you’ve scrolled through endless emails, a playlist in music, or photos. etc. Now go give that poor thumb a massage.

When you use an iPhone with one hand in Portrait orientation, you can use Reachability to lower the top half of the screen so it’s within easy reach of your thumb.

Head to:

Settings > Accessibility > Touch > Reachability

and toggle to ON. See the following image:

Top Screen 3
Turning on the Reachability option

To lower the top half of the screen, do one of the following:

  • On an iPhone with Face ID: Swipe down on the bottom edge of the screen.
  • On an iPhone with a Home button: Lightly double-tap the Home button.

Refer to the below image:

Top Screen 4
Swiping down to reveal the top half of the screen

To return to the full screen, tap the upper half of the screen or just wait a few seconds and the screen will return to full screen. See the below image:

Top Screen 5
Tapping the upper part of the screen to return to the full screen

In the Photos app, use the above to jump to the top. To return to the bottom, tap the Library icon or the All Photos button.

Note! If you have thousands of photos, tapping the All Photos button is faster.

See the following image:

Top Screen 6
Tapping the Library icon or All Photos button to return to the bottom

Disclaimer

Technology is always changing. Rarely is there static tech for smartphones and desktops. Thus, the contents of this post are only valid at the time of writing. Blog posts older than six months may have directions incompatible with your device or OS. Hopefully, older post content will continue to work as advertised. Thank you for reading TechSavvy.Life for Technology at Work For You.

Success is liking yourself, liking what you do, and liking how you do it.

-Maya Angelou

You are finished. Please feel free to share this post! One way to share is via Twitter.

Just click the Tweet icon below. This will launch Twitter where you click its icon to post the Tweet.

Checkout TechSavvy.Life for blog posts on smartphones, PCs, and Macs! You may email us at contact@techsavvy.life for comments or questions.

Was this post helpful? We would love to hear your comments. Do you have a computer or smart device tech question? I will do my best to answer your inquiry. Just send an email to contact@techsavvy.life. Please mention the device, app, and version you are using. To help us out, you can send screenshots of your data related to your question.

You can access the E-book from a Kindle device, or the Kindle App for a desktop or smartphone. The apps are free.

The author’s Vietnam eBook on the Battle for Tra Bong Vietnam: Events and Aftermath