

This is the first post in a series on “cleaning” your machine. The instructions are for a PC using the program CCleaner. There is a Mac version of CCleaner.
Your desktop and/or laptop needs a regular cleaning, like washing your car. When your system crashes, programs crash, your Internet browser fails to work properly, you perform lots of searches on the Internet; these issues leave junk files and traces of information on your Solid State Device (SSD) or hard drive(s). The more of these situations you experience, the slower your PC.
CCleaner can delete temporary files for Microsoft Edge, Internet Explorer, Google Chrome and Firefox. Some of the major options are built into Windows 10 latest update; you just have to find them. Some experts say that CCleaner is no longer needed. But I still find it useful. The details on how to use Windows 10 features similar to CCleaner will be available in a later post.
This tip explains how to get rid of these Junk files. You can do this manually or setup a schedule (Professional version only). I recommend you run this program for your PC desktop and/or laptop at least once a month.
The basic steps are to install the CCleaner program. The program is free or you can upgrade to a professional version for a price. Once installed (you only have to do this once), you can let the program Analyze your PC. Then you can Clean your machine.
I have used this program in many countries on all types of PCs. CCleaner has been in existence since 2004. By running this program at least once a month, your PC will be faster and smoother.
This is for Windows based operating systems
Install the program CCleaner (you only have to do this once).
- Close all running programs
- Empty your Recycle Bin
- Click here for CCleaner Download at from Piriform
- For the Mac version, click here
- Scroll down till you see the Download button (this is the Free version)
- Click on Download
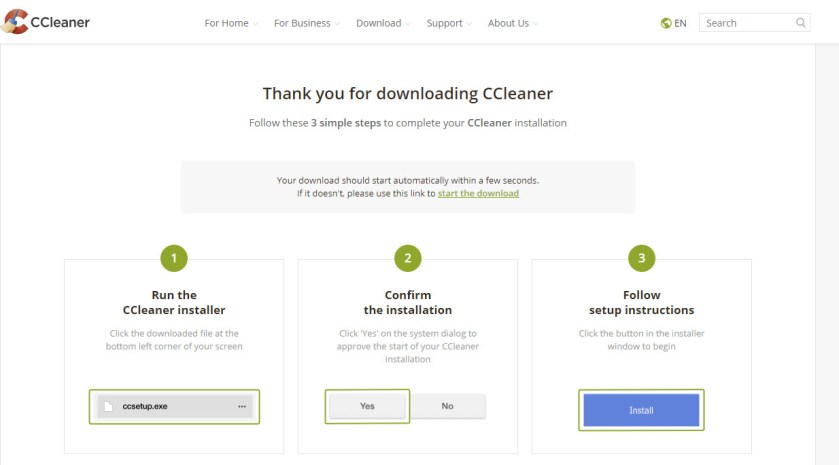
- Follow the download instructions. Below is an image of what to expect:
On your initial install you can immediately run the program. You are doing the Easy Clean option of CCleaner.
- After downloading, click the Install button
- Click the Run CCleaner button
- Click the Start button
- CCleaner may want you to close some programs. If so, click on the Close All button
- The program analyzes your machine and presents you with the following screen:
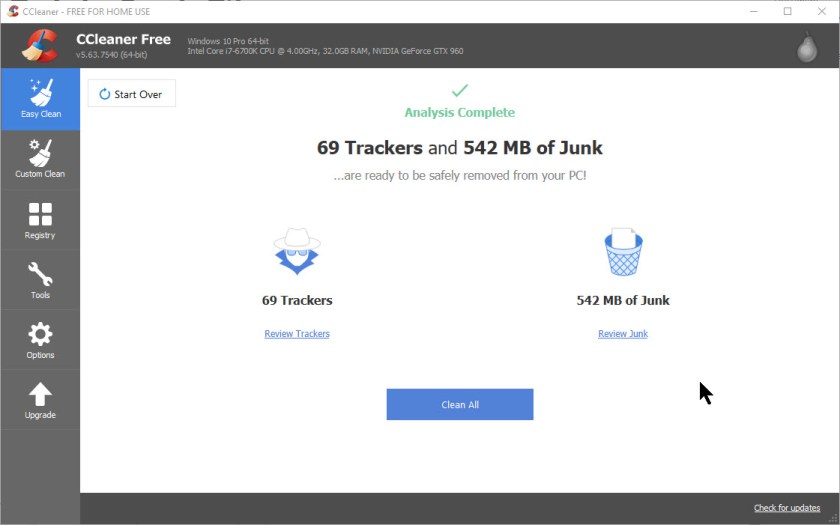
Do not be surprised if you see tens of thousands of Junk files.
Now you are ready to click the Clean All button. When the program has finished you will be presented with the following screen:

Now close CCleaner and restart your machine.
That’s it. You are done! CCleaner will add a shortcut to your desktop.
There are other options available:
- Custom Clean for a more robust cleaning by changing the settings. I do not recommend changing any of these settings. If you do change them, they will remain set for subsequent runs of CCleaner or until you download a new version.
- Registry allows you to find and fix Registry issues (always backup the registry first). I do not recommend you use this feature.
- Tools has many sub options. The most useful for me is the Uninstall option which allows you to uninstall a program. If you highlight and right-click on a program name, you are presented with other options. I recommend only using the Uninstall option or click on the Uninstall button.
- Options has many sub options as well. Sadly the Scheduling option is only available in the Professional version. I use none of these options.
- Upgrade option is for updating the Free version to the Professional version.
On any screen you can Check for Updates. Just click to check.
My next post with be a will cover the topic of disk fragmentation; how to check and resolve the issue.
I Would Like to Hear from You
Please feel free to leave a comment. I would love hearing from you. Do you have a computer tech question? I will do my best to answer your inquiry. Please mention the app and version that you are using. To help me out, you can send screenshots of your data related to your question.
Related:
Defrag Hard Drive(s) and Partitions
Wise Disk Cleaner
