How to Find Out Who Is Calling You

This post discusses how to identify legitimate calls and avoid scammers, addressing phone verification, spoofed numbers, and web searching. It provides options like reverse phone lookup websites and tools like WhoCallsMe, Spy Dialer, PeopleFinders, and USPhoneBook. It also suggests utilizing mobile carrier solutions, reporting to the FTC, and the National Do Not Call Registry to combat spam calls.

RAYMOND OGLESBY @RaymondOglesby2
June 11, 2024

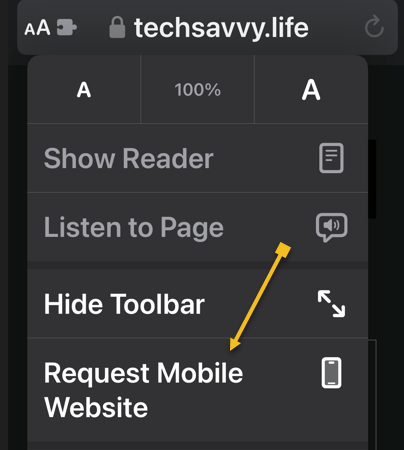
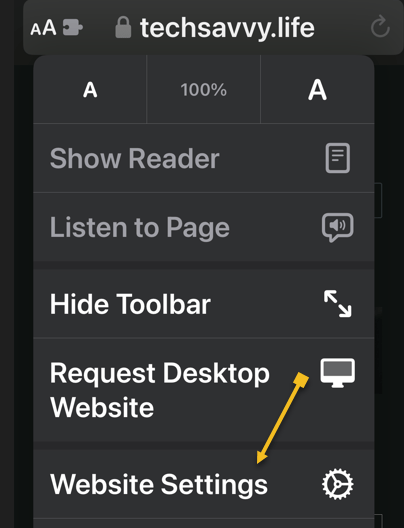
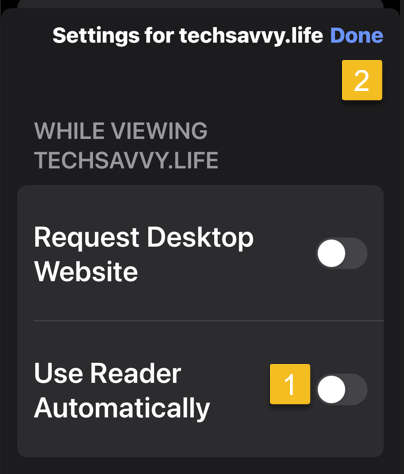
This is for any browser on a desktop, laptop, or smartphone. Screenshots are from Google Chrome on Windows 10

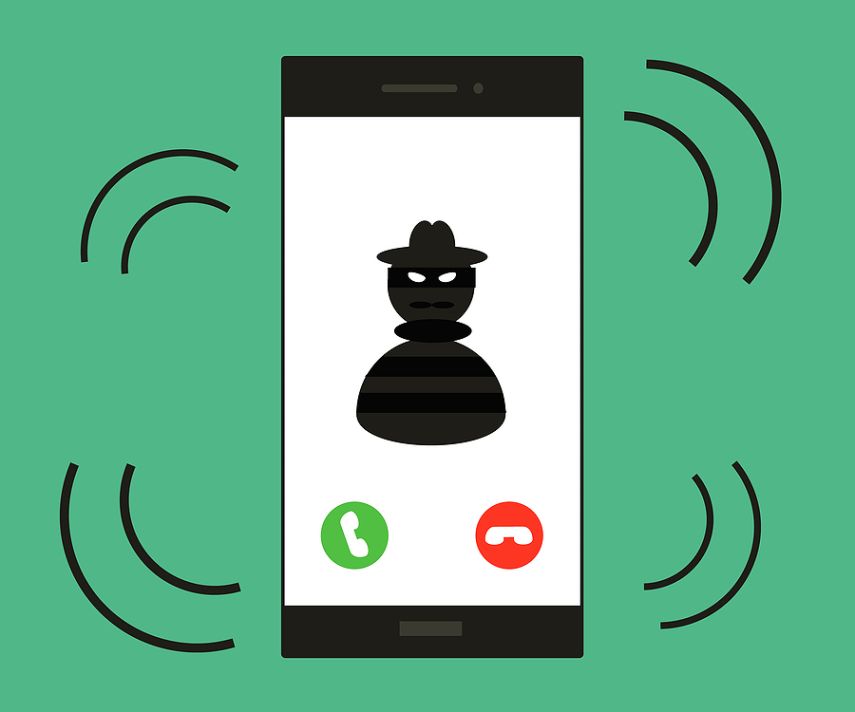
The phone rings and it’s a number you do not recognize. Or perhaps an unknown number shows up in your missed calls. You are curious but do not want to pick up or call back if it’s a telemarketer or scammer. Instead of playing robocall roulette let’s explore five ways to see who is calling before you engage.

You may have noticed that America has a problem with scam calls. Scammers took $10 billion from unsuspecting victims in 2023, and it’s hard to see the problem going away anytime soon. If you get a call, there are a few ways to tell if it’s legit or not.

  • What does the phone say? When a call comes in, look for a displayed number and location. If your phone is not showing any information and says something like Unknown, chances are there’s a scammer on the other end. Anyone can hide their number, but it’s best to let this one go to voicemail and call back if it’s someone you know. If the phone says Scam Likely, it’s typically correct; just ignore the call.
  • Look for verification. Carriers have started verifying phone numbers when you receive a call. Google’s phone app also adds a badge on incoming calls that can be attached to a business. Unfortunately, this does not verify every call from a legitimate business or weed out legitimate businesses that use robocalls.
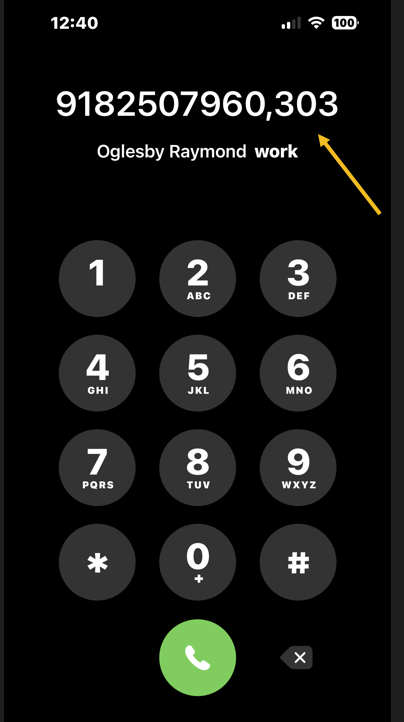
  • Watch out for spoofed numbers. Have you ever gotten a call from what looks to be your own phone number, only it’s a few numbers off? Do not pick those calls up; scammers like to spoof phone numbers and trick you into picking up. They think you are more likely to pick up if the call is from your area code or someone you know.

Note! We recommend ou not click or tap on any icon off the main screen. These buttons launch web sites that may introduce malware or be blocked by your browser security. Also, any screen that has flashing items, immediately exit the screen.

If you click or tap on a button that starts a scanning process for addresses,emails, public information, criminal records, etc., the process will take several minutes. On the desktop, you can stop the process by hitting Cntl-Alt-Del keys, then select Task Manger. Next, right=-click on your browser entry and select End Task. Your browser will exit stopping the scanning process.

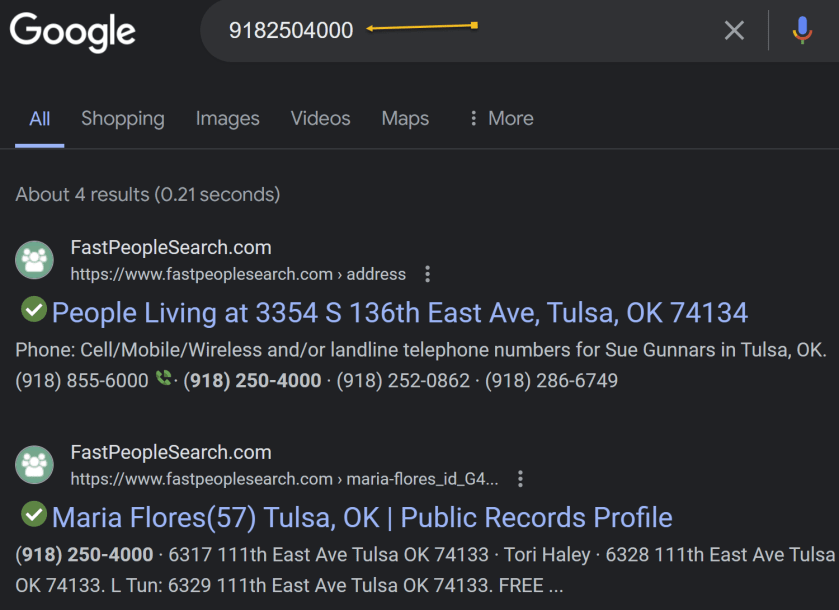
If you want to quickly know whether a caller is legit or a scammer, do a quick web search. As a rule of thumb, if the search results are primarily reverse phone lookup websites, it’s safe to say other people have received unwarranted calls from that same number and are reporting it to warn others. Refer to the below image:

Calls You 1
Search the web

Speaking of reverse phone lookups, if you want to do some digging about a certain phone number, many websites can help you. You usually have to pay to get any worthwhile information, but there are a few tools that can help you for free. Even though they are free if you want additional information about the phone number, the sites charge for their service.
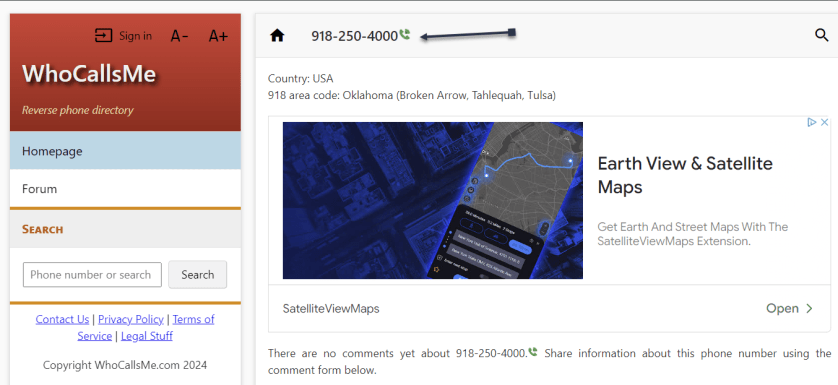
At WhoCallsMe, users can report their experiences with specific phone numbers. Enter a number and the website will tell you where the area code is from. You can then enter your own report or view what others say about it. See the below image:

Calls You 2
WhoCallsMe main screen

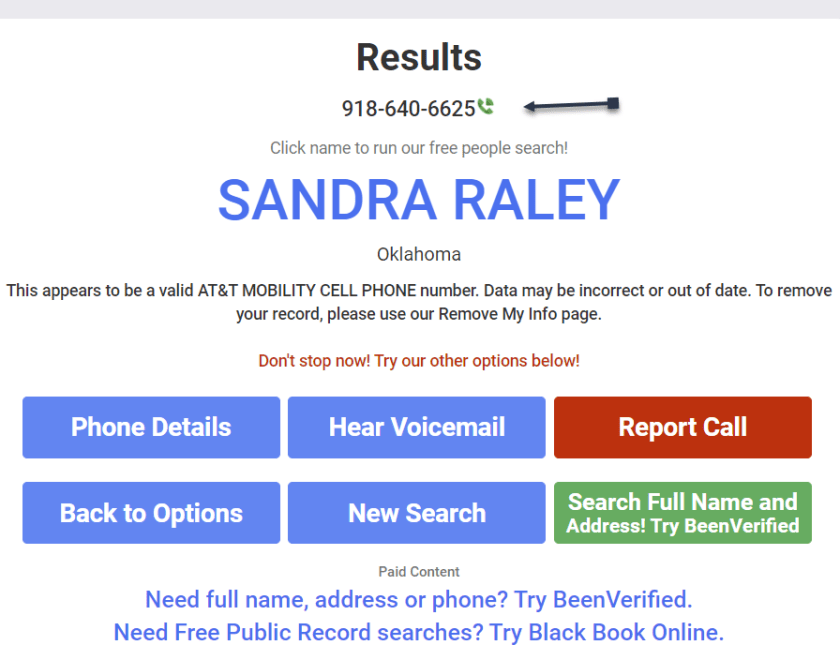
Spy Dialer allows you to search for phone numbers, names, addresses, and emails. Enter a phone number, then choose if you want to look up any linked names or photos, listen to the number’s outbound voicemail, or confirm if the number is spam or not. Spy Dialer can tell you with whom the number is registered, their general location, and whether or not the number has been reported as spam before.

For more information, click Phone Details to see how long the line has been in service and if the number is spoofed. Choose Hear Voicemail to get the caller’s outbound voicemail, if available. You can click Report Call to file a complaint with Spy Dialer.

We recommend this site over the others because it’s faster and offers more information. See the following image:

Calls You 3
Spy Dialer main screen

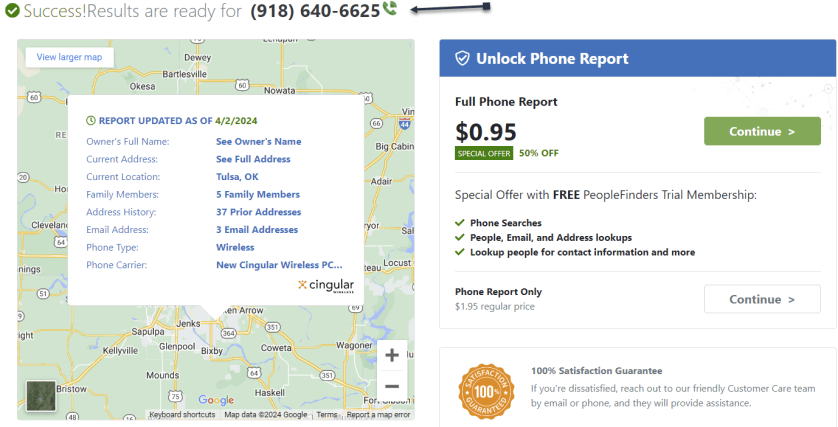
PeopleFinders allows you to look up a phone number, name, address, or email. Enter a phone number into the search bar to get the caller’s general location, carrier, and phone type. More revealing information, such as the caller’s full name and address, is hidden requiring a fee. Refer to the below image:

Calls You 4
PeopleFinders main screen

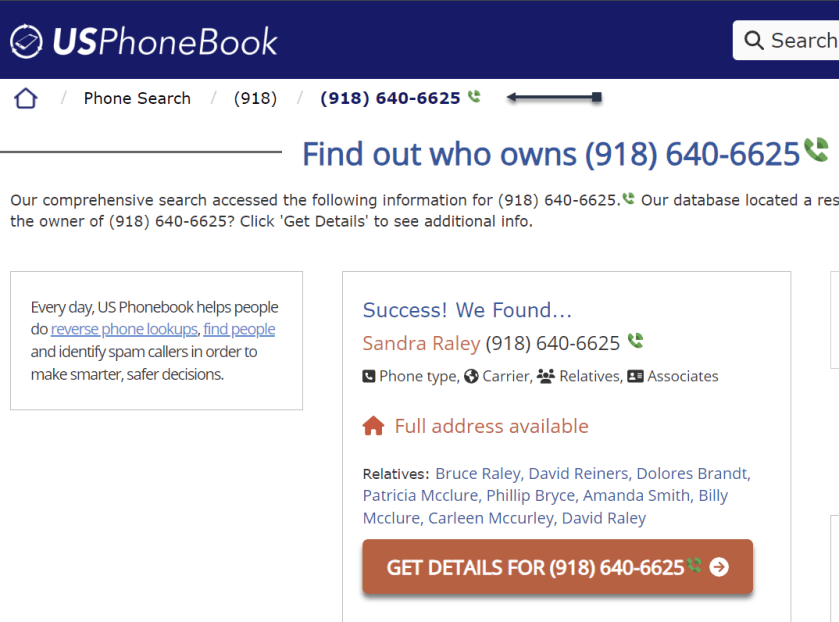
You can look up phone numbers, names, and addresses at USPhoneBook, though this works better for identifying individuals rather than businesses. Enter a number to find the person connected to it. The site will display a list of people who may be related to the person. You can then mark the number as safe or spam. Keep in mind that these listings can be outdated.

Click Get Details to view extra information about the person. This will include their age, current (and former) addresses, phone numbers associated with them, a list of relatives and associates, and even related email addresses. See the below image:

Calls You 5
USPhoneBook main screen

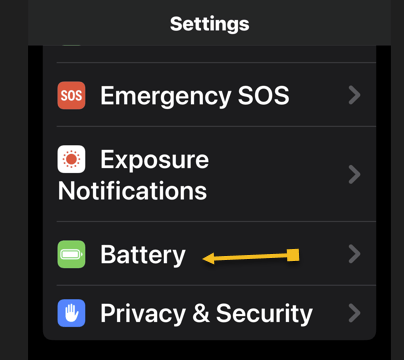
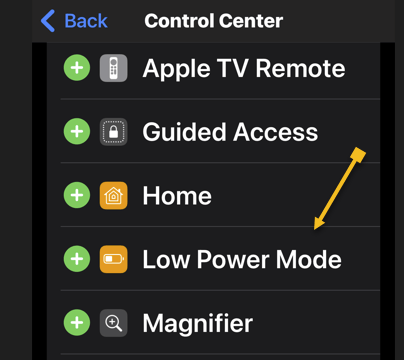
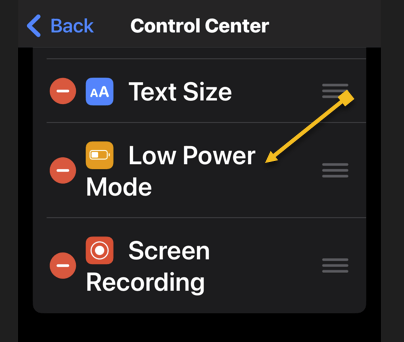
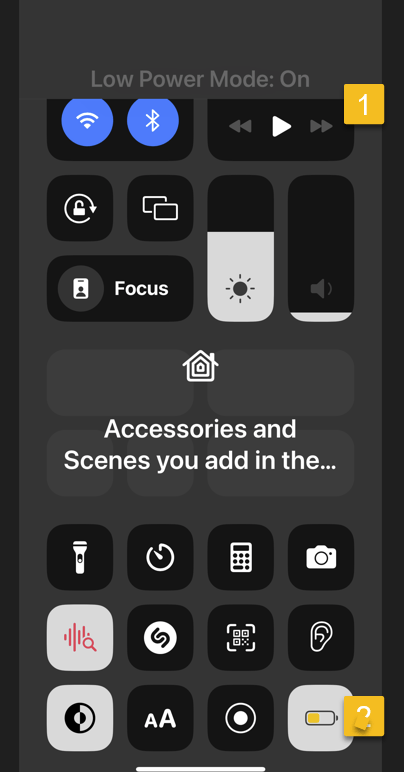
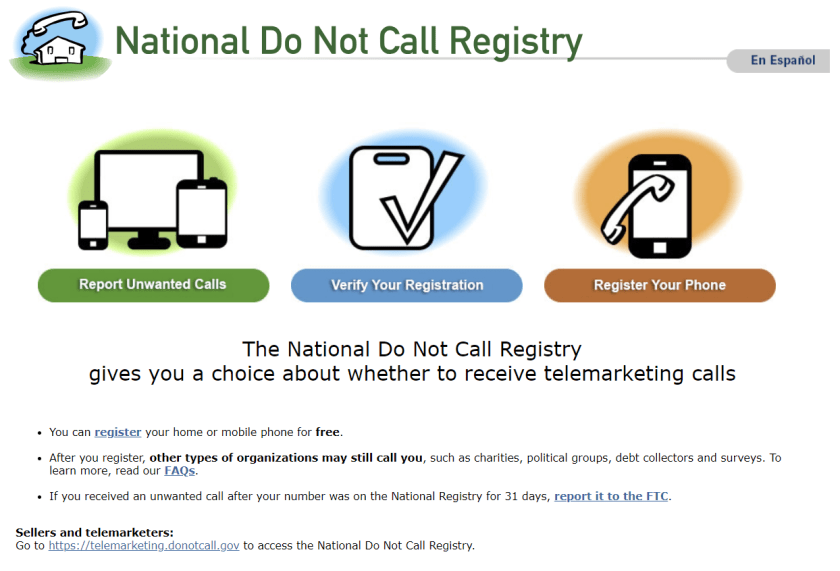
One option is to look at your mobile carrier’s anti-spam solutions for stopping spam calls and robo texts. Additionally, apps likeRoboKiller and Truecaller help keep the spam callers at bay. You can also report unwanted calls to the FTC and register your number with the National Do Not Call Registry, though those wishing to do you harm will undoubtedly ignore this. See the following image:

Calls You 6
National Do Not Call Registry main screen

Disclaimer

Technology is always changing. Rarely is there static tech for smartphones and desktops. Thus, the contents of this post are only valid at the time of writing. Blog posts older than six months may have directions incompatible with your device or OS. Hopefully, older post content will continue to work as advertised. Thank you for reading TechSavvy.Life for Technology at Work For You.

. Motivation is what gets you started. Habit is what keeps you going.

Jim Rohn

You are finished. Please feel free to share this post! One way to share is via Twitter.

Just click the Tweet icon below. This will launch Twitter where you click its icon to post the Tweet.

Checkout TechSavvy.Life for blog posts on smartphones, PCs, and Macs! You may email us at contact@techsavvy.life for comments or questions.

Was this post helpful? We would love to hear your comments. Do you have a computer or smart device tech question? I will do my best to answer your inquiry. Just send an email to contact@techsavvy.life. Please mention the device, app, and version you are using. To help us out, you can send screenshots of your data related to your question.

You can access the E-book from a Kindle device, or the Kindle App for a desktop or smartphone. The apps are free.

The author’s Vietnam eBook on the Battle for Tra Bong Vietnam: Events and Aftermath

How to Turn on iPhone Low Battery Mode

Low Power Mode on iPhone reduces features to save battery. To enable, go to Settings>Battery and toggle Low Power Mode on, or add it to Control Center for quick access.

RAYMOND OGLESBY @RaymondOglesby2
June 4, 2024

This is for the iPhone. Screenshots are from iPhone 14 Pro running iOS 17.5+

When Low Power Mode is enabled, the Battery icon at the top of your phone will appear yellow, and features like mail fetch, background app refresh, automatic downloads, and some visual effects will be reduced or disabled until it is turned off. There are two primary ways to turn on Low Power Mode.

First, open Settings and tap the Battery option. Refer to the below image:

Low Power 1
Selecting the Battery option

Now, toggle the Low Power Mode to ON. See the below image:

Low Power 2
Turning the Low Power Mode to ON

If you want quick and easy access to the Low Power Mode setting but do not want to go into your Settings and scroll to access it, let’s add it to your Control Center.

First, open Settings and tap the Control Center option. See the following image:

Low Power 3
Selecting the Control Center option

Next, tap Low Power Mode to add it to your Control Center. (If you see a red minus sign instead of a green plus side here, it means Low Power Mode is already in your Control Center.) Refer to the below image:

Low Power 4
Selecting to add Low Power Mode to Control Center

When added, the option will be in your Control Center. See the below image:

Low Power 5
Low Power Mode added to Control Center

Next, swipe down from the top right of the screen. See the following image:

Low Power 6
Accessing the Control Center by swiping down

Now, tap the Battery icon to toggle Low Power Mode ON or OFF. At the top of your screen, you will see the option status. Refer to the below image:

Low Power 7
Toggle on pr pff Low Power Mode from the Control Center

Your iPhone’s Low Power Mode does many things to save battery power. It automatically changes some settings to save battery power, like disabling the automatic fetching of new mail, reducing your screen brightness, and automatically locking the phone and powering off its display more quickly. Apps can detect low power mode is enabled and choose to disable animations and other battery-hungry features, too.

Motion effects and animated wallpapers are also disabled. Background activities and networking are paused to prevent unnecessary power drain in the background. Your iPhone even automatically reduces the performance of its CPU and GPU, which makes it perform a bit slower but saves battery life. Tests have found that this slows iPhones by about 40 percent when Low Power Mode is enabled.

By entering Low Power Mode you will save some battery life until you can get to your charger. 

Disclaimer

Technology is always changing. Rarely is there static tech for smartphones and desktops. Thus, the contents of this post are only valid at the time of writing. Blog posts older than six months may have directions incompatible with your device or OS. Hopefully, older post content will continue to work as advertised. Thank you for reading TechSavvy.Life for Technology at Work For You.

If you can’t do great things, do small things in a great way.

 Napoleon Hill

That’s it. Please feel free to share this post! One way to share is via Twitter.

Just click the Tweet icon below. This will launch Twitter where you click its icon to post the Tweet.

Checkout TechSavvy.Life for blog posts on smartphones, PCs, and Macs! You may email us at contact@techsavvy.life for comments or questions.

Was this post helpful? We would love to hear your comments. Do you have a computer or smart device tech question? I will do my best to answer your inquiry. Just send an email to contact@techsavvy.life. Please mention the device, app, and version you are using. To help us out, you can send screenshots of your data related to your question.

You can access the E-book from a Kindle device, or the Kindle App for a desktop or smartphone. The apps are free.

The author’s Vietnam eBook on the Battle for Tra Bong Vietnam: Events and Aftermath

How to Jump to the Top in iPhone Apps

This post provides tips for iPhone users to quickly navigate to the top of any screen using simple gestures. It also explains how to use Reachability to access the top half of the screen with one hand.

This is for the iPhone. Screenshots are from iPhone 14 Pro running iOS 17.4

Did you know that a simple iPhone gesture can save your thumb the workout of scrolling back to the top of most apps? Across all apps, pages, and platforms, this simple tip will automatically return you to the top of any screen. Whether you have been scrolling Instagram or Facebook, or you have been searching in the Settings app, just tap once at the top of the iPhone’s screen to snap back to the beginning.

We are unsure why we forgot this hidden gesture. This is the BEST iPhone post we have written out of 100-plus posts on the iPhone.

First, open any app, and simply tap the top of the iPhone screen anywhere from the Time to Battery Indicator, known as the Dynamic Island area. We are using the Settings app for our example. Refer to the below image:

Top Screen 2
Tapping to jump to the top of the Settings screen

Next, it should return you back to the top immediately. Be sure when you are doing this, you are tapping at the level of the Time or Battery Indicator. If you tap just below, nothing will happen. See the below image:

Top Screen 1
You are now at the top of the Settings screen

Now, based on your iPhone model:, here is where to tap:

  • iPhone 15 or iPhone 14 Pro — you can tap on either side of the Dynamic Island and the phone will instantly scroll up. 
  • iPhone X or any of the models with the notch—you can tap on either side of the notch.  
  • If you have an older iPhone without Dynamic Island or a notch, you can achieve the same thing by tapping the Clock on the status bar.

It’s that simple! This works in nearly any app with screens you can scroll down on, whether you’ve scrolled through endless emails, a playlist in music, or photos. etc. Now go give that poor thumb a massage.

When you use an iPhone with one hand in Portrait orientation, you can use Reachability to lower the top half of the screen so it’s within easy reach of your thumb.

Head to:

Settings > Accessibility > Touch > Reachability

and toggle to ON. See the following image:

Top Screen 3
Turning on the Reachability option

To lower the top half of the screen, do one of the following:

  • On an iPhone with Face ID: Swipe down on the bottom edge of the screen.
  • On an iPhone with a Home button: Lightly double-tap the Home button.

Refer to the below image:

Top Screen 4
Swiping down to reveal the top half of the screen

To return to the full screen, tap the upper half of the screen or just wait a few seconds and the screen will return to full screen. See the below image:

Top Screen 5
Tapping the upper part of the screen to return to the full screen

In the Photos app, use the above to jump to the top. To return to the bottom, tap the Library icon or the All Photos button.

Note! If you have thousands of photos, tapping the All Photos button is faster.

See the following image:

Top Screen 6
Tapping the Library icon or All Photos button to return to the bottom

Disclaimer

Technology is always changing. Rarely is there static tech for smartphones and desktops. Thus, the contents of this post are only valid at the time of writing. Blog posts older than six months may have directions incompatible with your device or OS. Hopefully, older post content will continue to work as advertised. Thank you for reading TechSavvy.Life for Technology at Work For You.

Success is liking yourself, liking what you do, and liking how you do it.

-Maya Angelou

You are finished. Please feel free to share this post! One way to share is via Twitter.

Just click the Tweet icon below. This will launch Twitter where you click its icon to post the Tweet.

Checkout TechSavvy.Life for blog posts on smartphones, PCs, and Macs! You may email us at contact@techsavvy.life for comments or questions.

Was this post helpful? We would love to hear your comments. Do you have a computer or smart device tech question? I will do my best to answer your inquiry. Just send an email to contact@techsavvy.life. Please mention the device, app, and version you are using. To help us out, you can send screenshots of your data related to your question.

You can access the E-book from a Kindle device, or the Kindle App for a desktop or smartphone. The apps are free.

The author’s Vietnam eBook on the Battle for Tra Bong Vietnam: Events and Aftermath

How to Request a Desktop View of a Webpage on iPhone

This post provides a guide to viewing the desktop version of a website on an iPhone, including how to switch between desktop and mobile versions and enabling Reader Mode.

RAYMOND OGLESBY @RaymondOglesby2
May 21, 2024

Viewing the desktop version of a website can sometimes help you find something unavailable on the mobile version. Of course, the iPhone always defaults to the mobile site, but there is a way to force Safari to load the desktop version. Let’s check out how to request a desktop site on iPhone.

This is for the iPhone running iOS 17+. Screenshots are from iPhone 14 Pro running iOS 17+

First, open Safari. Refer to the below image:

Request Desktop1
Selecting the Safari app

Next, search and open a webpage. We are opening TechSavvy.Life. See the below image:

Request Desktop 2
Opening a webpage in Safari

Now, tap the Reader Mode icon (the aA icon) in the upper left corner.

Note! For whatever reason. not all websites support the Reader view. Most likely because they do not want you to miss their advertisements.

See the following image:

Request Desktop 3
Selecting the Reader Mode icon

Next, tap the Request Desktop Website option. Refer to the below image:

Request Desktop 4
Selecting the Request Desktop Website option

You can now browse the desktop version of the website, taking advantage of any features that do not exist on the mobile site.

Now, if you want to switch back to the mobile site, with the webpage open, tap the Request Mobile Website option. See the below page:

Request Desktop 5
Selecting the Request Mobile Website option

Next, you may want to view the webpage automatically in Reader Mode. If so, while viewing the webpage, tap the Website Settings option. See the following image:

Request Desktop 6
Selecting the Website Settings option

Now, toggle Use Reader Automatically to ON then tap Done, Refer to the below image:

Request Desktop 7
Setting the Use Reader Automatically toggle to ON

Disclaimer

Technology is always changing. Rarely is there static tech for smartphones and desktops. Thus, the contents of this post are only valid at the time of writing. Blog posts older than six months may have directions incompatible with your device or OS. Hopefully, older post content will continue to work as advertised. Thank you for reading TechSavvy.Life for Technology at Work For You.

Success is not final, failure is not fatal: it is the courage to continue that counts.

Winston Churchill

You are finished. Please feel free to share this post! One way to share is via Twitter.

Just click the Tweet icon below. This will launch Twitter where you click its icon to post the Tweet.

Checkout TechSavvy.Life for blog posts on smartphones, PCs, and Macs! You may email us at contact@techsavvy.life for comments or questions.

Please feel free to leave a comment. I would love to hear from you. Do you have a computer or smart device tech question? I will do my best to answer your inquiry. Just send an email to contact@techsavvy.life. Please mention the device, app, and version you are using. To help us out, you can send screenshots of your data related to your question.

You can access the E-book from a Kindle device, or the Kindle App for a desktop or smartphone. The apps are free.

The author’s Vietnam eBook on the Battle for Tra Bong Vietnam: Events and Aftermath

How to Remove Your Personal Information From Google Search

The content provides a guide on safeguarding personal information from appearing in Google search results. Users can monitor their information’s visibility and request removal if necessary. Specific steps are outlined for monitoring, requesting removal, and reporting illegal content. .

RAYMOND OGLESBY @RaymondOglesby2
May 14, 2024

This is for devices using Google Search. Works best on a desktop/laptop. Screenshots are from Windows 10

Table of Contents

Learn When Your Information Appears
Submit a Manual Request
Illegal Activity
Find Your Results
Step 1: Find Results About You
Step 2: Review the Results About You
Step 3: Request Removal of Results About You
View Your Results
Step 1: Report URLs on Google Search
Step 2: Check for Email Confirmation
Step 3: Monitor the Status of Your Requests
Policy Requirements for Removal Requests
Invisible? Not!
Email Notifications
Related

Looking for more privacy? Here’s how to remove your phone number, email, physical address, and lots of other personal data about yourself from Google’s search results.

Personally Identifiable Information (PII) is what every bad actor wants. If they get their hands on it, it can be used to rob, impersonate, or even endanger you on the internet and in the real world. One of the prime places to find it is via Google, and while Google can not stop that info from appearing on other websites, you can try to remove it from search results. 

Let’s explore how to get notified when your PII appears in a search and how to tell Google to stop it from happening again. Like with other endless settings and features in Google, this is a complex process.

You are unable to tell Google to delete your info if the search is not even finding and displaying it. Google has an option to notify you when that happens. 

The spot to visit is called the Results About You activity page. You have to be logged into Google for it to work. Follow the prompts on the screen as Google asks you for your physical addresses, emails, and phone numbers. Tell Google how you want to be notified (email or push notification via the Google app). Then wait. Refer to the below images:

Search Removal 1
Your Get Started page
Search Removal 2
Fill in your criteria
Search Removal 3
How to be notified
Search Removal 4
Google Search is working

After a few hours, you should receive a report from Google on what’s turning up that’s yours PII-wise. You can also just go back to the Results About You page to check it. Plus, you can tick off the boxes next to any result you want to make sure is removed from the search. The status of your request will also be displayed (eventually). Just be patient.

The above is just your address/contact Info. Google will also let you request to remove other things online that you may find harmful. That includes:

  • National/government ID numbers
  • Bank accounts
  • Credit card numbers
  • Personal signatures
  • Login info and credentials
  • Medical records
  • “Irrelevant pornography” (that is, explicit material somehow tied to your name)
  • Login credentials
  • Deepfake porn you may appear in against your will

You can request this without even having to prove that the data floating out there is a problem (with some exceptions).

The first stop is this Google Search Help page, which has a rundown of the options above but also shows the direct link to the request to remove your personal information from search. See the below image:

Search Removal 5
Your manual request

If you own the website displaying the information you do not want to show, Google spells out how to block a URL or specific site pages from Google search results.

Removing info requires that you know if it is appearing only in Google search results or in results on a separate website. If the latter, Google may not be very effective, and it asks whether you have contacted the site’s owner first to remove the information. It also suggests ways to get in touch with a site.

Maybe you do not want to get in touch with a site or you have already tried and were unsuccessful. Google asks you a series of questions, such as what type of info you would like removed, narrowing it down to one specific thing when possible. It will also ask whether the content is being shared with the intent of doxing you; that’s when someone shares your PII with the intent to harm you. You may need to enter a lot of data, but the more detail you provide, the less likely it is that Google will have to follow up with you before nuking the PII in search results.

Google says if your PII appears on a live page you control and you have already updated it to remove the information, it should eventually go away. But the page might be cached by the search engine, so you should request to remove outdated web pages. You will need specific URLs for the pages; you can submit up to 1,000 on the form. See the following images:

Search Removal 6
Request to refresh outdated content
Search Removal 7
Submit your request

If you see something in a Google search that’s illegal, such as potentially criminal content, intellectual property infringement, or Child Sexual Abuse Material (CSAM), Refer to the below image:

Search Removal 8
Reporting illegal activity

You can also go to Google’s Report Content for Legal Reasons. Google has a whole video about it.

When you use Results about you, you can find out if your personal contact info, like your home address, phone number, or email address shows up in search results.

Step 1: Find Results About You

  1. Go to the Results about you page.
  • In the Google App:
  1. Log in to the Google app.
  2. To open the menu, click your Google Account avatar.
  3. From the menu, select Results about you.
  • From the mobile web or desktop:
  1. Log in to your Google Account.
  2. To open the menu, click your Google Account avatar.
  3. From the menu, select Manage your Google Account > Data & privacy.
  4. In the History settings, select My Activity >  Other activity.
  5. Scroll down to the Results about you section, and select Manage results about you.
  6. Select Get started or Settings.
  7. Enter your name and the contact info that you want to find in search results.
  8. Google uses this information to check for search results that show this info.
  • You can also enter these types of contact info in the form:
  1. Nickname
  2. Maiden Name
  3. Multiple personal phone numbers
  4. Multiple addresses
  5. Multiple email addresses
  6. Set up notifications

You can choose to receive email notifications if Google finds results with your contact info. You can also receive push notifications through the Google app. If you have notifications on, you will receive a notification to let you know if the results match your info. After that, you will receive a new notification when new results are found that match your contact info.

Step 2: Review the Results About You

If you have notifications on, you will get a notification within a few hours to let you know if any search results match your name and personal contact info. You can also check directly from the Results about you page.

To view your results, from the Results about you page, go to the Results to review tab.

When you select a result, you can learn more about it, like the website it’s from, or the contact info it contains.

Step 3: Request Removal of Results About You

If you see a result that you would rather keep private, you can request to remove it from search results.

To remove more than one result, select the checkbox next to each result, then click Request to remove.

To remove a single result, select the result to expand, then click Request to remove.

If you do not want to start a removal request, you can also choose Mark as reviewed.

Google considers some results valuable to the public. These can include government or educational websites, online newspapers, or business websites. If your result is from a website like this, you won’t find a Remove result option.

To confirm your removal request and for status updates when your request has been reviewed, you will get an email. You can check the status of your requests anytime from Results about you under Removal requests.

Step 1: Report URLs on Google Search

  1. On desktop or mobile, log in with your Google Account.
  • You will get an update on the status of your requests through the email address associated with your account.
  • If you want to request the removal of a result for someone else, or if you do not want to log in, you can use the detailed removal request form instead.
  1. On Google Search, search for your name.
  • To find results that show your personal contact info, you can search for your name and your home city, or your name and your home address.
  1. To reach About this result panel, click More.
  2. Select Remove result > It shows my personal contact info.
  3. Go through the reporting flow.
  4. Submit your request.
  5. After you submit your request, select I’m done.

Tip: Make sure to enter your name and the personal contact info shown on the result page exactly as they appear on the result. For example, if the result shows:

Additional Information

  • Your nickname: Enter your nickname in the form.
  • An old home address: Enter the old home address in the form.
  • More than one type of contact info: You only need to include one type of contact info in your request form. This includes your phone number and your home address.
  • More than one type of contact info: You do not need to submit multiple removal requests for the same URL.

Step 2: Check for Email Confirmation

Within the next few hours, you will receive an email confirmation that your request was submitted.

Step 3: Monitor the Status of Your Requests

Click the Results about you page, to check if your request is:

  • In progress
  • Approved
  • Denied
  • Undone

After you select a specific request, you can check details like the:

  • Link to the page you flagged
  • Submission day and time
  • Request ID
  • Contact info you flagged on the page

Tip: There may be a delay between when a request is approved and the result is removed from search results. You can check if your info is already removed within a few hours after it was approved.

After you submit a request, Google will review it to make sure it meets policy requirements for removal. Requests must meet the following policy requirements:

  • The contact info displayed on the result has to be your personal info. To request to remove professional info that’s been posted with the intent to harm you, use the detailed removal request form.
  • You do not control the info yourself. This means contact info that you can remove from the internet yourself, like info on a social media page or a personal blog that you own.
  • As Google Search seeks to provide users with useful info, it won’t remove info that’s valuable to the public. For example, Google won’t remove results for web pages that are owned by:
    • Educational or government institutions
    • Newspapers

See the following image for your request being processed:

Search Removal 9
Your removal request is in process

For now, just wait while Google processes the request. When Google has finished the Removal requests status will change. Refer to the below image:

Search Removal 10
Your removal request is approved

You will receive a Request approved notification. Just click the See details button for additional information. Refer to the below image:

Search Removal 11
Confirmation of your removal request

Your removal request details are now displayed. See the following image:

Search Removal 12
Details of your removal request

Scrubbing the search engines of your digital footprint is not the same as taking it off the internet. Search engines did not put the info out there; they indexed it, grabbing the data from some other source. They might snag it again from a different source.

You are never going to be completely free of search engine results unless you delete any traces of yourself and get offline entirely. You could always try services such as Abine’s DeleteMe or other personal data removal services and many others, which do what they can to prevent your information from being used by data brokers, though for a subscription fee.

Until you delete all your old email accounts, stop using mobile apps and location services, quit social media, stop online shopping, and never sign into anything ever again, some entity will have something on you. Trying to hide something only makes it easier to find.

Once you have set up Google Search based on your criteria, you will receive emails regarding new search results about you. Refer to the below image:

Search Removal 13
Email notification of new results about you

-Source: Google

Related

Set Up a Dark Web Monitoring Profile

Disclaimer

Technology is always changing. Rarely is there static tech for smartphones and desktops. Thus, the contents of this post are only valid at the time of writing. Blog posts older than six months may have directions incompatible with your device or OS. Hopefully, older post content will continue to work as advertised. Thank you for reading TechSavvy.Life for Technology at Work For You.

You don’t learn to walk by following rules. You learn by doing and falling over.

-Richard Branson

That’s it. Please feel free to share this post! One way to share is via Twitter.

Just click the Tweet icon below. This will launch Twitter where you click its icon to post the Tweet.

Checkout TechSavvy.Life for blog posts on smartphones, PCs, and Macs! You may email us at contact@techsavvy.life for comments or questions.

Please feel free to leave a comment. I would love to hear from you. Do you have a computer or smart device tech question? I will do my best to answer your inquiry. Just send an email to contact@techsavvy.life. Please mention the device, app, and version you are using. To help us out, you can send screenshots of your data related to your question.

You can access the E-book from a Kindle device, or the Kindle App for a desktop or smartphone. The apps are free.

The author’s Vietnam eBook on the Battle for Tra Bong Vietnam: Events and Aftermath

How to Setup a Dark Web Monitoring Profile and View the Web Report

Google One offers Dark Web Monitoring to track personal information in the hidden internet, aiming to provide proactive protection, convenience, and comprehensive monitoring. Users with a Google One membership can set up a monitoring profile to check for breached data. The feature is designed to help users stay informed and take action to protect their digital identity.

RAYMOND OGLESBY @RaymondOglesby2
May 7, 2024

This is for the desktop using Google One. Screenshots are from Windows 10

Table of Contents

  • What is the Dark Web
  • Personal Information on the Dark Web
  • Who is Eligible
  • Set Up Monitoring Profile
  • How to Use Your Monitoring Profile
  • Dark Web Monitoring Feature
  • Enabling Dark Web Monitoring
  • Viewing Your Dark Web Report
  • Why Does Dark Web Monitoring Matter?
  • Not a Google One Member?
  • Availability of Dark Web Report
  • Conclusion

The dark web is a hidden part of the internet not indexed by traditional search engines like Google, Bing, or Yahoo. It is intentionally designed to be anonymous, making it a haven for illegal activities such as the sale of stolen data, drugs, weapons, and more stuff of nightmares. It’s where cybercriminals often trade in stolen personal information like credit card numbers, login credentials, and social security numbers. It’s also where lots of stolen personal data from breaches end up for sale.

With a Google One membership, you can set up a profile to monitor the dark web to see if your info is found in breaches.

You can check for data on the dark web that might be associated with your email address or other info you add to your monitoring profile. Breach results may contain information including:

  • Your name
  • Address
  • Phone number
  • Email
  • Social Security Number (SSN)
  • Username
  • Password

Tip: only accounts with a US billing method can add a Social Security Number to their monitoring profile.

Any information in the breach results will be displayed in redacted form to maintain data privacy.

With the results, you can review your information and make informed decisions about how to protect yourself.

You can set up a monitoring profile with a paid Google One membership. Click here for help on signing up for a Google One account.

You do not need a paid Google One membership to run a dark web report for the email address associated with your Google AccountClick here for help on scanning the dark web with your email address.

You can monitor your Google Account email address or add other information to your monitoring profile.

  1. On your computer, click here if you have a Google One account.
  2. Under Dark web report, click Set up and then Start monitoring.
    • To include additional Google Account personal information in your monitoring profile:
      1. Select the desired checkboxes.
      2. Click Allow.
    • Confirm your selections and add any additional data you want to monitor.
    • Click Done.

When you set up your monitoring profile in Google One, your profile info is used to check whether a match was found on the dark web. If matching info is found, we will email or notify you. You can find guidance to protect your personal information on the Google One website and app.

Learn how Google One protects your privacy and keeps you in control.

Google’s Dark Web Monitoring feature is designed to help users stay informed about the presence of their personal information on the dark web. Here’s how it works:

  1. Continuous Scanning: One of Google’s many sophisticated algorithms scans the dark web continuously, looking for any signs of your personal information, such as email addresses, passwords, or financial details. The best part is you are in control of what it scans for.
  2. Alerts: If Google’s monitoring system detects any of your information on the dark web, it will send you an alert. This alert will prompt you to secure your accounts and data.
  3. Reporting: Once set up, you can view the report right away from your Google One homepage

First, we need to set up the feature. Fortunately, Google has made this process relatively straightforward:

  1. Access Your Google Account: Start by logging into your Google account.  Click here to log in.
  2. Security Tab: Once logged in, click the Security tab at the top of the page. This section contains various settings related to your account’s security.
  3. Dark Web Monitoring: Scroll down to find the Dark Web Monitoring section. If it’s your first time accessing this feature, you might need to provide your password for verification.
  4. Turn On Dark Web Monitoring: Click the Turn On button to activate the feature. Google will ask you to confirm your choice.
  5. Verification: To ensure the security of this feature, Google may prompt you to re-enter your Google Account password.
  6. Confirmation: Once you have completed the above steps, you should receive a confirmation message that Dark Web Monitoring is active for your account.

Refer to the below image:

Dark Web 1
Accessing the Security tab

s

To view your report, click the Security tab, and scroll down to the Dark web report section. Now, click the link See results with Google One. See the below Image:

Dark Web 2
Selecting to view your results

You will see a summary of your results. You can click an individual breech (or the All button; we have 29 breeches) to view detailed information and recommended actions. See the following image:

Dark Web 4
Selecting a single breach

The selected breech details are now displayed. Refer to the below image:

Dark Web 5
Viewing details of a single breach
  1. Proactive Protection: With this feature, Google aims to provide proactive protection. Instead of waiting until a data breach occurs, you can take action as soon as your information appears on the dark web, reducing the potential impact of cyberattacks.
  2. User Convenience: Google’s Dark Web Monitoring is seamlessly integrated into the user experience, making monitoring their online security easier for everyday users. You need not be a cybersecurity expert to benefit from this feature.
  3. Comprehensive Monitoring: Google’s vast resources and expertise allow for comprehensive dark web monitoring. It can scan many sources, increasing the likelihood of detecting compromised information.
  4. Data Privacy: Google emphasizes data privacy and security. The company ensures that your personal data is protected while providing this service, addressing concerns about potential privacy breaches.

You can still access some features without the membership, it essentially boils down to whether you want continuous monitoring or not and if the other Google One features are enough to justify the monthly costs (depending on the plan you choose) Here’s a breakdown of what Google One members and non-members get. See the below image:

Dark Web 6
Google One and non-menbers features

The Dark Web Report is available in the following countries or regions.

  • Albania
  • Algeria
  • Argentina
  • Austria
  • Australia
  • Bangladesh
  • Belgium
  • Bolivia
  • Brazil
  • Canada
  • Chile
  • Colombia
  • Denmark
  • Ecuador
  • Finland
  • France
  • Germany
  • Greece
  • Iceland
  • India
  • Indonesia
  • Ireland
  • Israel
  • Italy
  • Japan
  • Mexico
  • Morocco
  • Netherlands
  • Nicaragua
  • Norway
  • Pakistan
  • Philippines
  • Senegal
  • Slovenia
  • South Korea
  • Spain
  • Sri Lanka
  • Sweden
  • Switzerland
  • Taiwan
  • Türkiye
  • Ukraine
  • United Kingdom
  • United States
  • Venezuela
  • Vietnam

Your personal data is constantly under threat. Google’s Dark Web Monitoring feature represents a significant step toward enhancing online security and protecting your digital identity. By providing continuous scanning, timely alerts, and actionable recommendations, Google empowers users to take control of their online safety. While no security measure is foolproof, this feature is a valuable addition to Google’s suite of tools aimed at helping users stay one step ahead of cybercriminals. Your digital identity is worth safeguarding, and it appears Google is here to help you.

Source: Google Help

Disclaimer

Technology is always changing. Rarely is there static tech for smartphones and desktops. Thus, the contents of this post are only valid at the time of writing. Blog posts older than six months may have directions incompatible with your device or OS. Hopefully, older post content will continue to work as advertised. Thank you for reading TechSavvy.Life for Technology at Work For You.

Visualize this thing you want. See it, feel it, believe in it. Make your mental blueprint and begin.

Robert Collier

That’s it. Please feel free to share this post! One way to share is via Twitter.

Just click the Tweet icon below. This will launch Twitter where you click its icon to post the Tweet.

Checkout TechSavvy.Life for blog posts on smartphones, PCs, and Macs! You may email us at contact@techsavvy.life for comments or questions.

Please feel free to leave a comment. I would love to hear from you. Do you have a computer or smart device tech question? I will do my best to answer your inquiry. Just send an email to contact@techsavvy.life. Please mention the device, app, and version you are using. To help us out, you can send screenshots of your data related to your question.

You can access the E-book from a Kindle device, or the Kindle App for a desktop or smartphone. The apps are free.

The author’s Vietnam eBook on the Battle for Tra Bong Vietnam: Events and Aftermath

How to Use Apple Maps For a City Flyover Tour on iPhone

The Apple Maps app’s Flyover feature provides an immersive 3D city tour experience. Users can select a city, initiate the tour, pause, and exit at will. This augmented reality feature offers a unique way to explore cities worldwide from the comfort of your home, with new cities continually being added.

RAYMOND OGLESBY @RaymondOglesby2
April 30, 2024

This is for the iPhone running iOS 17.3+. Screenshots are from iPhone 14 Pro running iOS 17.4

Did you know you can take a city tour from the comfort of your home with the Apple Maps app? Apple has a Flyover feature which allows you to view 3D modeling of large worldwide cities.

Flyover is an AR (augmented reality) feature to view a city in various ways as you move your iPhone around. For example, if you position your iPhone parallel to the floor, you can see a complete bird’s-eye view of cities such as New York, Florence, Paris, or Rome.

First, locate and open the Maps app. Refer to the below page:

Flyover 1
Selecting the Maps app

Next, search for a city, such as Paris, France. See the below image:

Flyover 2
Entering a City to flyover

Now, tap the Flyover button. See the following image:

Flyover 3
Selecting the Flyover option

Next, you will see an AR of the City! You can look around by turning your iPhone or by swiping the screen. Refer to the below image:

Flyover 4
AR view of your city

Now, tap Start Tour. See the below image:

Flyover 5
Selecting the Start Tour button

Next, you will view a tour around the city, stopping at various monuments and landmarks with the names listed at the bottom. See the following image:

Flyover 6
Viewing a specific site in your city

Now, you can pause the tour by tapping Pause Tour. Refer to the below image:

Flyover 7
Selecting the Pause Tour button

Next, you can also deviate from the tour if you would like to see something better. When you let go of the screen, the tour will continue. See the below image:

Flyover 8
A different view

You can exit the tour at any time by tapping the “X.” Icon. See the following image:

Flyover 9
Selecting to Exit the tour

Apple should continue adding more cities to the Flyover feature. You can also click to view the complete list of cities set up for the Flyover feature. 

Disclaimer

Technology is always changing. Rarely is there static tech for smartphones and desktops. Thus, the contents of this post are only valid at the time of writing. Blog posts older than six months may have directions incompatible with your device or OS. Hopefully, older post content will continue to work as advertised. Thank you for reading TechSavvy.Life for Technology at Work For You.

The true entrepreneur is a doer, not a dreamer.

Jan Bushnell

That’s it. Please feel free to share this post! One way to share is via Twitter.

Just click the Tweet icon below. This will launch Twitter where you click its icon to post the Tweet.

Checkout TechSavvy.Life for blog posts on smartphones, PCs, and Macs! You may email us at contact@techsavvy.life for comments or questions.

Please feel free to leave a comment. I would love to hear from you. Do you have a computer or smart device tech question? I will do my best to answer your inquiry. Just send an email to contact@techsavvy.life. Please mention the device, app, and version you are using. To help us out, you can send screenshots of your data related to your question.

You can access the E-book from a Kindle device, or the Kindle App for a desktop or smartphone. The apps are free.

The author’s Vietnam eBook on the Battle for Tra Bong Vietnam: Events and Aftermath

How to Get More Sound From Your iPhone

The feature “Late Night” enhances sound at lower volumes in Apple Music with iOS 17+ from the Settings app.

RAYMOND OGLESBY @RaymondOglesby2
April 23, 2024

This is for the iPhone with a subscription to Apple Music. Screenshots are from iPhone 14 Pro running iOS 17+

Late Night is so titled because it enables you to hear sound better at a lower volume. So if you have Late Night selected for your EQ setting, you will notice a small but significant difference in the loudness of music on your iPhone when using the Apple Music app. This tip is ideal when you are without headphones or a speaker. Let’s explore this simple feature.

First, open the Settings app and select Music. Refer to the below image:

Music 1
Selecting the Music option

Now, scroll down and tap EQ. See the below image;

Music 2
Selecting the EQ option

Next, from the list, select Late Night. See the following image:

Music 3
Selecting the Late Night sound

Just for fun, you may want to try out other EQ options.

Disclaimer

Technology is always changing. Rarely is there static tech for smartphones and desktops. Thus, the contents of this post are only valid at the time of writing. Blog posts older than six months may have directions incompatible with your device or OS. Hopefully, older post content will continue to work as advertised. Thank you for reading TechSavvy.Life for Technology at Work For You.

Farrah Gray

That’s it. Please feel free to share this post! One way to share is via Twitter.

Just click the Tweet icon below. This will launch Twitter where you click its icon to post the Tweet.

Checkout TechSavvy.Life for blog posts on smartphones, PCs, and Macs! You may email us at contact@techsavvy.life for comments or questions.

Please feel free to leave a comment. I would love to hear from you. Do you have a computer or smart device tech question? I will do my best to answer your inquiry. Just send an email to contact@techsavvy.life. Please mention the device, app, and version you are using. To help us out, you can send screenshots of your data related to your question.

You can access the E-book from a Kindle device, or the Kindle App for a desktop or smartphone. The apps are free.

The author’s Vietnam eBook on the Battle for Tra Bong Vietnam: Events and Aftermath

How to Dial an Extension and Save to Contacts on iPhone

This post provides instructions on how to dial an extension on an iPhone and how to add an extension to a phone number in iPhone Contacts.

RAYMOND OGLESBY @RaymondOglesby2
April 16, 2024

This is for the iPhone. Screenshots are from iPhone 14 Pro running iOS 17+

Do you regularly call extensions for your work or personal phone calls? If so, you are probably sick of dialing through phone trees to reach the person you want to reach. We will show you how to dial an extension on iPhone to skip the whole phone-tree nonsense, and how to add an extension to a phone number in Contacts for later use.

We will start by showing you how to dial an extension on your iPhone. Then, in the next section, we will cover how to add an extension to a phone number in iPhone Contacts.

  1. Open the Phone app, and tap the Keypad tab if it is not already selected.
  2. Dial the main number you are calling, then tap and HOLD the “*” key (asterisk) until a comma appears. The comma acts as a pause and lets your phone know it’s dialing an extension.
  3. Now enter the extension number after the comma.
  4. Tap the green phone Call button and you will dial straight to the person you are trying to reach.

Refer to the below image:

Extension 1
Dialing a phone number with an extension using the keypad

That’s all there is to it! Now, you know how to dial an extension on your iPhone.

If you plan to regularly call a phone number extension, you can save it in your Contacts. That way, the next time you go to dial the extension, it will already be saved as it needs to be dialed.

  1. Open the Contacts app.
  2. Tap on the contact if you want to add an extension. If you do not already have the number saved, simply create a new contact by tapping the “+” plus icon.
  3. Tap Edit in the upper-right corner.
  4. Tap the number you are adding the extension to, or tap the “+” icon next to the phone to add a new phone number for the contact.
  5. Tap the Symbols button on your keyboard.
  6. Now tap the Pause button.
  7. Now enter the extension.
  8. Tap Done to save.

See the below image:

Extension 2
Adding a phone number with an extension to a Contact

Now you can dial an extension before you even get to the operator, and you can also add an extension to a phone number in your iPhone Contacts.

Disclaimer

Technology is always changing and rarely is there static tech for smartphones and desktops. Thus, the contents of this post are only valid at the time of writing. Blog posts older than six months may have directions incompatible with your device or OS. Hopefully, older post content will continue to work as advertised. Thank you for reading TechSavvy.Life for Technology at Work For You.

Be undeniably good. No marketing effort or social media buzzword can be a substitute for that.

Anthony Volodkin

You are finished. Please feel free to share this post! One way to share is via Twitter.

Just click the Tweet icon below. This will launch Twitter where you click its icon to post the Tweet.

Checkout TechSavvy.Life for blog posts on smartphones, PCs, and Macs! You may email us at contact@techsavvy.life for comments or questions.

Please feel free to leave a comment. I would love to hear from you. Do you have a computer or smart device tech question? I will do my best to answer your inquiry. Just send an email to contact@techsavvy.life. Please mention the device, app, and version you are using. To help us out, you can send screenshots of your data related to your question.

You can access the E-book from a Kindle device, the Kindle App for the desktop or smartphone, which is a free app.

The author’s Vietnam eBook on the Battle for Tra Bong Vietnam: Events and Aftermath

How to Print Lists in iOS Reminders App

The post provides a tutorial for iPhone users on how to print lists from the Reminders app. It includes step-by-step instructions with images.

RAYMOND OGLESBY @RaymondOglesby2
April 9, 2024

This is for the iPhone running iOS 16 or above. Screenshots are from iPhone 14 Pro running iOS 17+

For those who love printing physical documents instead of staring at them on their iPhones, this Reminders app trick is a must-have! We will show you how to print lists from the Reminders app on your iPhone so you can check things off your to-do list.

First, open the Reminders app. Refer to the below image:

Print Notes 1
Open your Reminders app

Next, select the list you would like to print. See the below image:

Print Notes 2
Select your list

Now, tap the Nenu icon (the three dots) in the top-right corner of your screen. See the following image:

Print Notes 3
Select the Menu option

Next, tap Print. Refer to the below image:

Print Notes 4
Select the Print option

Now, if a printer is not already selected, tap Printer. See the below image:

Print Notes 5
Select the Printer option

Next, select the printer you would like to use. See the following image:

Print Notes 6
Select your Printer

Now, set the options you want to use for printing. Refer to the below page:

Print Notes 7
Select your Print options

Next, tap Print. See the below image:

Print Notes 8
Print your Reminders list

You can now bring your list to the store or give out physical to-do lists to your family members as needed.

Additionally, you can use the Print option in the Notes app to print a note list.

Disclaimer

Technology is always changing. Rarely is there static tech for smartphones and desktops. Thus, the contents of this post are only valid at the time of writing. Blog posts older than six months may have directions incompatible with your device or OS. Hopefully, older post content will continue to work as advertised. Thank you for reading TechSavvy.Life for Technology at Work For You.

 Make it happen now, not tomorrow. Tomorrow is a loser’s excuse.

Farrah Gray

You ar finished. Please feel free to share this post! One way to share is via Twitter.

Just click the Tweet icon below. This will launch Twitter where you click its icon to post the Tweet.

Checkout TechSavvy.Life for blog posts on smartphones, PCs, and Macs! You may email us at contact@techsavvy.life for comments or questions.

Please feel free to leave a comment. I would love to hear from you. Do you have a computer or smart device tech question? I will do my best to answer your inquiry. Just send an email to contact@techsavvy.life. Please mention the device, app, and version you are using. To help us out, you can send screenshots of your data related to your question.

You can access the E-book from a Kindle device, or the Kindle App for a desktop or smartphone. The apps are free.

The author’s Vietnam eBook on the Battle for Tra Bong Vietnam: Events and Aftermath