How to use Secret Conversations on Messenger

Using Facebook Messenger’s “Secret Conversations” feature, you can ensure your messages and calls are end-to-end encrypted so that only the sender and the receiver can access them.

RAYMOND OGLESBY @RaymondOglesby2
October 27, 2022

Using Facebook Messenger’s “Secret Conversations” feature, you can ensure your messages and calls are end-to-end encrypted so that only the sender and the receiver can access them. Let’s explore how to utilize this feature on your iPhone and Android phone.

Note: Facebook Messenger’s “Secret Conversations” feature is only available on iPhone and Android. You can not use it in Messenger on the web.

This is for iPhone and Android. screenshots are from iPhone XR running iOS 16+

Dilbert and Office
Copyright Scott Adams, Inc./Distributed by Universal Uclick for UFS

How Does the Secret Conversations Feature Work

When you enable the “Secret Conversations” feature with a user, Messenger encrypts your messages and calls as soon as you send them. Then, these contents are only decrypted on the receiver’s phone. This ensures no one can access your chat content, not even Meta without physical access.

That encryption is the difference between a regular chat and a secret one. If any bad actors gain access to Meta’s servers, they can not see your encrypted messages. Any of your regular chats might be visible, as they remain unencrypted on Meta’s servers.

However, Meta restricts who you can have secret chats with. At the time of writing in September 2022, you can not start such a chat with businesses, professional accounts, Instagram accounts from Messenger, and people you have not messaged before. Also, both you and your chatting partner need to be using the latest version of the app, so make sure you both update Messenger on your respective devices.

Additionally, certain features you might be used to will not work while in one of these chats. Meta states that group messages and money payments are not supported in secret conversations. If those limitations create problems for you, look into alternative secure communication methods that might offer the features you need.

Start a Secret Chat

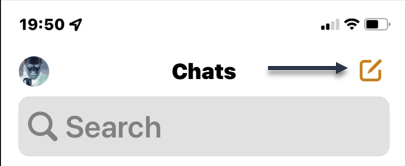
First, launch the Messenger app on your phone. In the Messenger app’s top-right corner, tap the Edit icon. Refer to the below image:

Messenger 1
Accessing Edit mode

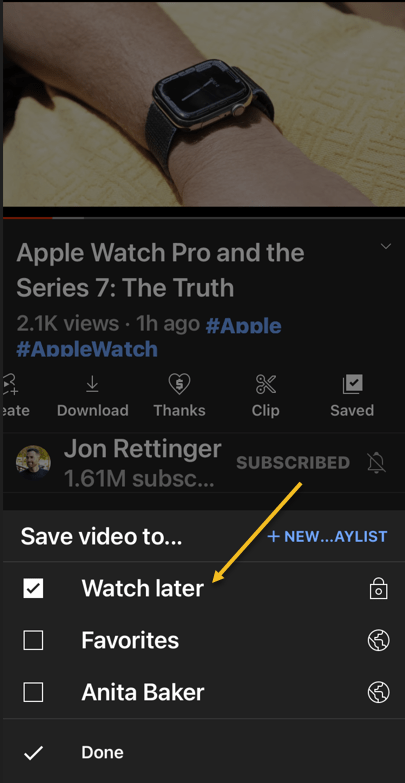
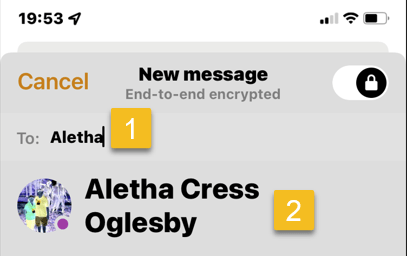
Next, in the New Message screen, at the top-right-hand corner, enable the “Secret Conversations” (the lock icon) option. See the below image:

Messenger 2
Selecting the Lock icon

Now, on the same page, in the To field, enter the name of the person you want to have a secret chat with. Then, select that person from the list. See the following image:

Messenger 3
Selecting a person to Chat with

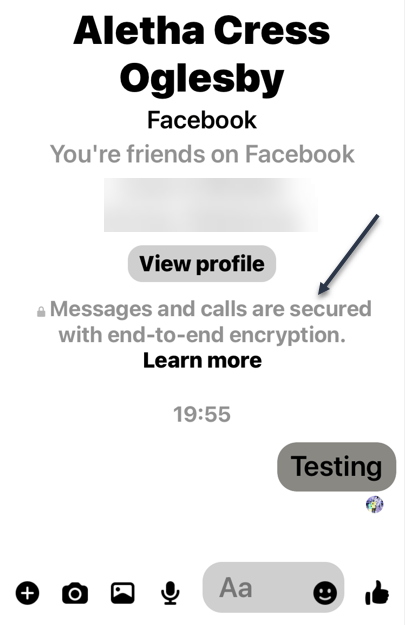
Next, a new chat will start with your chosen person. Any messages or calls you make in this conversation will be end-to-end encrypted. You can start sending messages as usual. Refer to the below image:

Messenger 4
Sending your encrypted message

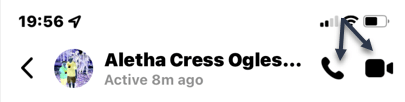
Now, to make a voice or video call, at the top of the chat screen, tap the appropriate icon. See the below image:

Messenger 5
Making a voice or video call

Delete a Chat

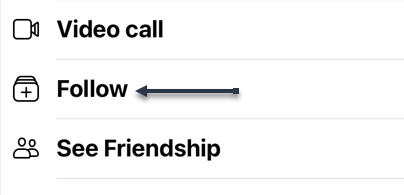
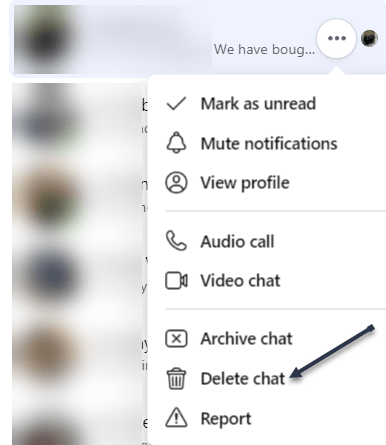
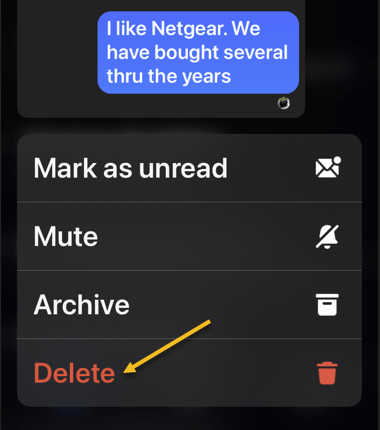
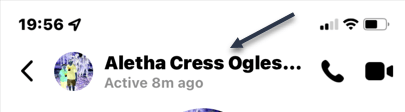
Next, to delete your secret chat with someone, tap the person’s name at the top. See the following image:

Messenger 6
Selecting a person to delete the Chat

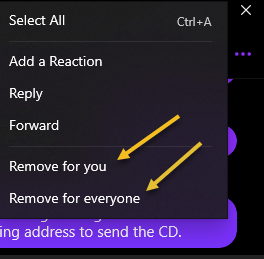
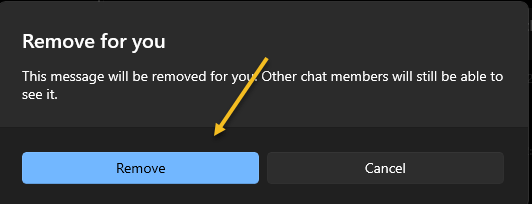
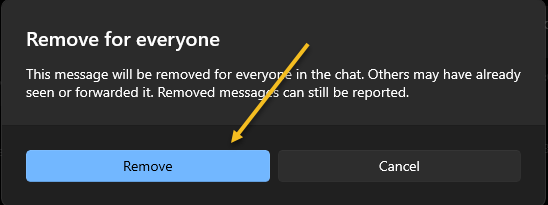
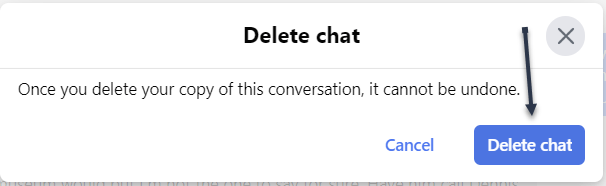
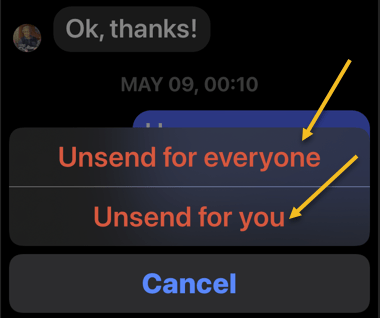
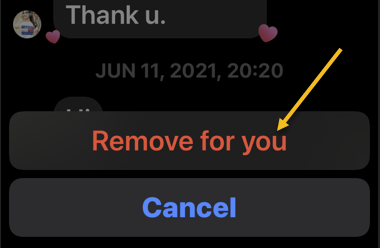
Now, in the menu that opens, choose Delete Chat. Refer to the below image:

Messenger 7
Deleting the Chat

Quote For the Day

We take the highest and best of human faculties, and, exalting them in our imagination to an unlimited extent, endeavour to attain an imperfect conception of that Infinite Power which created everything around us.

Charles Babbage (1791-1871), pioneer of modern computer

Tweet Info

That’s it. Please feel free to share this post! One way to share is via Twitter.

Just click the Tweet icon below. This will launch Twitter where you click its icon to post the Tweet.

Checkout TechSavvy.Life for blog posts on smartphones, PCs, and Macs! You may email us at contact@techsavvy.life for comments or questions.

I Would Like to Hear From You

Please feel free to leave a comment. I would love to hear from you. Do you have a computer or smart device tech question? I will do my best to answer your inquiry. Just send an email to contact@techsavvy.life. Please mention the device, app, and version you are using. To help us out, you can send screenshots of your data related to your question.

Author’s E-Book

You can access the e-book from a Kindle device, the Kindle App for the desktop or smartphone, which is a free app.

The author’s Vietnam eBook on the Battle for Tra Bong Vietnam: Events and Aftermath

How to Identify Bird Calls On Your Phone

Listening to bird calls is a great, relaxing way to enjoy nature. If your curiosity gets the best of you, hearing the calls may not be enough.

RAYMOND OGLESBY @RaymondOglesby2
October 18, 2022

Listening to bird calls is a great, relaxing way to enjoy nature. If your curiosity gets the best of you, hearing the calls may not be enough. Let’s explore how to identify birds.

This is for the iPhone and Android. Screenshots are from iPhone XR running iOS 15.6+

Dilbert and Chips
Copyright Scott Adams, Inc./Distributed by Universal Uclick for UFS

There’s a good chance you take your phone with you when you are out for a nature walk. Did you know it can be a surprisingly accurate bird identification tool?

Merlin Bird ID by Cornell Lab

The Cornell Lab of Ornithology is one of the top resources for information about birds. The Merlin Bird ID app puts all of that great information at your fingertips. It’s available for Android and iPhone. First, access the App store and search for Merlin Bird ID.

Next, tap Get to download the app. Refer to the below image:

Merlin 1
Download the app from the App Store

Now, enter your email address and tap the Submit button. See the below image:

Merlin 2
Enter your email address

Next, check your email to confirm your address, then tap the Continue button. See the following image:

Merlin 3
Confirm your email

Now, the Merlin Bird ID app will open. Here, tap on View Suggested for Bird Packs. Refer to the below image:

Merlin 4
Select the View Suggested option

Next, we are selecting the Oklahoma and Texas Bird Pack since we live in Oklahoma, then tap the Install button. Note! check your phone’s remaining storage before downloading. See the below image:

Merlin 5
Install a Bird Pack

Now, when the app opens, you have a few options. Start Bird ID and Photo ID are for identifying birds based on their sound or appearance. The one we want to use is Sound ID, so tap it. See the following image:

Merlin 6
Select Sound ID

Next, a menu will appear with a few options. To immediately start listening for bird calls around you, tap the big Microphone button. Refer to the below image:

Merlin 7
Listen for birds

Now, the app will immediately start listening and populate the identified birds on the screen. The bird that is currently singing is highlighted in yellow. See the below image:

Merlin 8
The identified bird is highlighted in yellow

Next, tap the red Stop button when you are done. You will get a list of all the birds identified, and you can select any of them to read more information. See the following image:

Merlin 9
Stop recording

Your Bird Recordings

Now, go back to the Merlin Bird ID home page and tap the Menu icon in the upper left-hand corner. Refer to the below image:

Merlin10
Accessing the Menu

Next, on the menu that opens, tap the My Sound Recordings option. See the below image:

Merlin 11
Select the My Sound Recordings option

Now, tap the top listing for your latest bird sound recording. See the following image:

Merlin 12
Select a recording

Next, once again, tap the top listing, then the Play button to hear the bird recording. Refer to the below image:

Merlin 13
Play the recording

You can simply let the app listen to your surroundings and watch the identified birds pop up on the screen. The Merlin Bird ID app is chock full of great information if you are curious about birds.

Quote For the Day

We live in a society exquistely dependent on science and technology, in which hardly anyone knows anything about science and technology.

Carl Sagan

Tweet Info

That’s it. Please feel free to share this post! One way to share is via Twitter.

Just click the Tweet icon below. This will launch Twitter where you click its icon to post the Tweet.

Checkout TechSavvy.Life for blog posts on smartphones, PCs, and Macs! You may email us at contact@techsavvy.life for comments or questions.

I Would Like to Hear From You

Please feel free to leave a comment. I would love to hear from you. Do you have a computer or smart device tech question? I will do my best to answer your inquiry. Just send an email to contact@techsavvy.life. Please mention the device, app, and version you are using. To help us out, you can send screenshots of your data related to your question.

Author’s E-Book

You can access the e-book from a Kindle device, the Kindle App for the desktop or smartphone, which is a free app.

The author’s Vietnam eBook on the Battle for Tra Bong Vietnam: Events and Aftermath

Five Useful YouTube Features

YouTube has been around since 2005, and it’s one of the most visited websites in the world. Tons of features have been added to the YouTube website and apps over the years.

RAYMOND OGLESBY @RaymondOglesby2
October 13, 2022

YouTube has been around since 2005, and it’s one of the most visited websites in the world. Tons of features have been added to the YouTube website and apps over the years. Here are some features you may not know about.

This is for devices using YouTube. Screenshots are from iPhone XR running iOS 15.6+

Dilbert and Dilbert
Copyright Scott Adams, Inc./Distributed by Universal Uclick for UFS

Save Videos to Watch Later

You have probably been browsing YouTube and come across a video that looks interesting. What if you do not have the time to watch it right at that moment? The Watch Later feature is perfect for this.

Watch Later is essentially just a playlist that you can add videos to for watching later. It’s great for saving videos that you do not want to forget about, and it works everywhere you can access the YouTube website or app.

First, find a YouTube video you want to watch later. Next, tap the Save icon in the toolbar below the video. Now, from the Menu that opens, select the Watch Later option. Refer to the below image:

YouTube Features 1
Selecting Watch Later option

Set YouTube Videos to Fill Your iPhone Screen

It’s pretty common for your phone’s display to have a different aspect ratio than YouTube videos. You can pinch to zoom to fill the full screen when watching a video, but you have to do that every time.

You can actually make it so videos will always fill the full screen. You will not have to pinch-to-zoom every time, but you will be able to zoom out if too much of the video is being cut off.

First, open the YouTube app on your iPhone or iPad device. Next, double-tap your profile icon in the top right-hand corner. Now, from the Manu that opens, select

Settings > General

and toggle Zoom to Fill Screen to ON. See the below image:

YouTube Features 2
Enabling Zoom to fill the screen

Skip Forward/Backward Fast

Here’s a quick tip that will save you a lot of time watching videos on the YouTube mobile app. Rather than using the seek bar to skip forward and back in the video, simply double-tap the left or right side of the video. See the following image:

YouTube Features 5
Skip Forward or Backward

Change the Double-Tap Skip Time

Speaking of double-tapping to skip forward or back in a video, you can adjust the length of these skips. By default, it’s 10-seconds. You can customize this length from 5 to 60 seconds. It’s a great thing to do if you find yourself tapping the video too much.

First, open the YouTube app on your iPhone or iPad, device. Next, double-tap your profile icon in the top right-hand corner. Now, from the Manu that opens, select

Settings > General

and select the Skip Forward and Back option. Next, choose one of the time increments from the Menu. Refer to the below image:

YouTube features 3
Set timer for Skip Forward and Backward

Speed Up or Slow Down a Video

YouTube videos do not have to be played at the speed of how they were uploaded. You can speed up or slow down any video you want. This is super handy for rewatching moments in slow motion or getting through long videos a little faster.

The Playback Speed controls can be accessed on the web and mobile apps. You can select a speed anywhere between 0.25- 2 times the normal speed, with 1 being the normal speed.

First, open the YouTube app and play a video. Next, tap the screen once to bring up the toolbar, Now, tap the Settings icon located in the upper right-hand corner of the video frame.

Next, in the Menu that pops up, select Playback speed. In the list that appears, select the speed you would like. See the below image:

YouTube Features 4
Set timer for Playback speed

Now, close the Menu, and the video will resume at the selected speed. If you need to change it back to the regular speed, repeat the above and change the speed to 1 for normal speed.

Quote For the Day

An outlook… at the vast mysteries of the universe should only confirm our belief in the certainty of its Creator.

Wernher Von Braun

Tweet Info

That’s it. Please feel free to share this post! One way to share is via Twitter.

Just click the Tweet icon below. This will launch Twitter where you click its icon to post the Tweet.

Checkout TechSavvy.Life for blog posts on smartphones, PCs, and Macs! You may email us at contact@techsavvy.life for comments or questions.

I Would Like to Hear From You

Please feel free to leave a comment. I would love to hear from you. Do you have a computer or smart device tech question? I will do my best to answer your inquiry. Just send an email to contact@techsavvy.life. Please mention the device, app, and version you are using. To help us out, you can send screenshots of your data related to your question.

Author’s E-Book

You can access the e-book from a Kindle device, the Kindle App for the desktop or smartphone, which is a free app.

The author’s Vietnam eBook on the Battle for Tra Bong Vietnam: Events and Aftermath

How to Use Quiet Mode on Facebook

If you are having trouble stepping away from Facebook’s endless scroll, Quiet Mode can help silence the chatter, memes, and misinformation.

RAYMOND OGLESBY @RaymondOglesby2
August 25, 2022

If you are having trouble stepping away from Facebook’s endless scroll, Quiet Mode can help silence the chatter, memes, and misinformation. Let’s explore this Facebook feature.

This is for devices using Facebook on mobile. Screenshots are from iPhone XR

Dilbert and Management
Copyright Scott Adams, Inc./Distributed by Universal Uclick for UFS

Social media is designed to keep you hooked. The endless scrolling. A constant stream of notifications. The temptation of opening an app. It all works together to suck you in and keep your attention for longer than what could be considered a harmless distraction.

If you feel like you are ready to pull back without fully unplugging, Facebook offers a built-in tool called Quiet Mode that can help you manage your time on the platform.

To get started, first, open Facebook, tap the Menu (the Hamburger icon) in the mobile app, and head to:

Settings & privacy > Settings > Your Time on Facebook under the Preferences section.

Time You Spend on Facebook

Next, tap See Time on the Your Time on Facebook page. Here you can view several graphs that show app usage. Swipe the screen to view total time, daytime versus nighttime hours, and how many times you opened the app over the last week. Refer to the below image:

FB Time 1
Your time on Facebook

Now, if you simply want to be mindful of your usage and not change anything, enable Weekly Update, which will send you a weekly email reviewing your Facebook usage from the last seven days. You can also tap Activity Log to view all your recent actions on the platform.

Setup Daily Reminder

Next, tap the See Tools button on the Your Time on Facebook page. You can start off slow by setting a reminder that will tell you to stop using the app after a set amount of time.

Now, from the Manage Your Time page, enable Daily Time Reminder at the bottom of the page, and then set the timer to a specific amount of hours and minutes. The app will tell you how much time you average per day so you can set the timer to something under that number. Tap Set Reminder, then continue using the app until your time is up. See the below image:

FB Time 2
Daily Reminder

Set Quiet Mode

Next, if you need a little help cutting down on Facebook usage, Quiet Mode is here to help. When enabled, this feature will mute push notifications to your phone, limit the notification dots that appear in the app, and stop you from using the app the next time you open it. Enable Quiet Mode from the Manage Your Time page, and then set how long you want it to stay on.

Now, you can also schedule Quiet Mode to turn on at a specific time each day. Enable Scheduled Quiet Mode, then tap Add Schedule to set the start and end time, as well as which days the feature should be used. TapDelete Schedule to remove or redo it. See the following image:

FB Time 3

Quiet Mode

Manage Quiet Mode

Next, when you open the app while Quiet Mode is enabled, you will be greeted by a reminder that shows you how long you have left. If you really need to do something in the app, tap Manage Quiet Mode and either end Quiet Mode immediately or get a 15-minute reprieve. Or choose Edit Settings to change how Quiet Mode works for you. Refer to the below image:

FB Time 4
Manage Quiet Mode

Quote For the Day

Innovation is the outcome of a habit, not a random act.

Sukant Ratnakar

Tweet Info

That’s it. Please feel free to share this post! One way to share is via Twitter.

Just click the Tweet icon below. This will launch Twitter where you click its icon to post the Tweet.

Checkout TechSavvy.Life for blog posts on smartphones, PCs, and Macs! You may email us at contact@techsavvy.life for comments or questions.

I Would Like to Hear From You

Please feel free to leave a comment. I would love to hear from you. Do you have a computer or smart device tech question? I will do my best to answer your inquiry. Just send an email to contact@techsavvy.life. Please mention the device, app, and version you are using. To help us out, you can send screenshots of your data related to your question.

Author’s E-Book

You can access the e-book from a Kindle device, the Kindle App for the desktop or smartphone, which is a free app.

The author’s Vietnam eBook on the Battle for Tra Bong Vietnam: Events and Aftermath

How to Follow Someone on Facebook

Once you follow a personal account or a page on Facebook, you start seeing that entity’s posts in your News feed. This is a great way to get updates from your favorite people or brands without being friends.

RAYMOND OGLESBY @RaymondOglesby2
August 23, 2022

Once you follow a personal account or a page on Facebook, you start seeing that entity’s posts in your News feed. This is a great way to get updates from your favorite people or brands without being friends. Let’s explore following a person on Facebook.

This is for devices using Facebook. Screenshots are from Windows 10 and iPhone XR

Dilbert and Crypto
Copyright Scott Adams, Inc./Distributed by Universal Uclick for UFS

Following vs Friending

When you follow someone, you do not have to add them as a friend. You can see that entity’s posts and other content in your News feed while not becoming a part of their friend’s list. This option is usually used to follow celebrities and the pages that interest you on this social platform.

To follow someone and to add someone as a friend are two different things on Facebook.

The convention on Facebook is that when you add someone as a friend, it’s likely you know that person personally. You add people like your real-life friends, colleagues, and family as “friends” on Facebook.

Know that while Facebook allows you to have up to 5,000 friends at a time, there’s no such limit for followers. Also, keep in mind that people and pages can choose not to allow themselves to be followed. In such cases, you will not see the Follow button on these entities’ pages on Facebook.

Follow People

To follow a personal account on Facebook, all you have to do is visit that person’s profile page and click or tap an option.

On Desktop

On your computer, first, launch a web browser and open Facebook. Log in to your account if you have not already.

Next, after logging in, access the profile page of the person you want to follow. On this page, in the tab list beneath the person’s name, click the three dots (the Menu icon) or the Friends button. Refer to the below image:

Accessing the Menu

Now, in the three-dot Menu, choose Follow. If you do not see the Follow option, that person has yet to enable others to follow them. See the below image:

Selecting to Follow

Tip: Later, to unfollow this person, click Following followed by Unfollow on the person’s profile page.

You are now following the selected person in your Facebook account. The person’s posts will appear in your News feed.

On Mobile

To follow a person from your phone or tablet, first, launch the Facebook app on your mobile device. Then, open the profile page of the person you want to follow.

Next, on the profile page, beneath the person’s name, tap the three dots (the Menu icon). See the following image:

Accessing the Menu

Now, in the Profile Settings menu, choose Follow. Refer to the below image:

Selecting to Follow

Tip: In the future, to unfollow this person, tap Following followed by Unfollow.

You are now following the selected person in your Facebook account. The person’s posts will appear in your News feed.

Follow Pages

Following a page is as easy as doing so for a personal account.

On Desktop

On your computer, first, launch a web browser and open Facebook. Log in to your account if you have not already.

Next, open the page you wish to follow. On the page screen, at the far right of the tab list, click the three lines or the three dots (the Menu icon), whichever is shown. See the below image:

Accessing the Menu

Now, in the Menu, choose Follow. If you do not see the Follow option, that person has yet to enable others to follow their page. See the following image:

Selecting to Follow

Tip: Later, to unfollow a page, visit the page, click the three lines or the three dots (the Menu icon), and choose Follow Settings. Then enable Unfollow This Page and click Update.

You are now following the selected person’s page posts in your Facebook account. The person’s page posts will appear in your News feed.

On Mobile

On your mobile phone or tablet, first, launch the Facebook app. Access the page to follow, then tap the three lines or three dots (the Menu icon). Refer to the below image:

Accessing the Menu

Next, from the Menu that opens, select Follow. See the below image:

Selecting to Follow

Tip: To unfollow a page, tap the three lines or three dots (the Menu icon) and select Manage Follow Settings. Then tap Unfollow.

You are now following your favorite page on Facebook.

Quote For the Day

Let’s go invent tomorrow instead of worrying about what happen yesterday.

Steve Jobs

Tweet Info

That’s it. Please feel free to share this post! One way to share is via Twitter.

Just click the Tweet icon below. This will launch Twitter where you click its icon to post the Tweet.

Checkout TechSavvy.Life for blog posts on smartphones, PCs, and Macs! You may email us at contact@techsavvy.life for comments or questions.

I Would Like to Hear From You

Please feel free to leave a comment. I would love to hear from you. Do you have a computer or smart device tech question? I will do my best to answer your inquiry. Just send an email to contact@techsavvy.life. Please mention the device, app, and version you are using. To help us out, you can send screenshots of your data related to your question.

Author’s E-book

You can access the e-book from a Kindle device, the Kindle App for the desktop or smartphone, which is a free app.

The author’s Vietnam eBook on the Battle for Tra Bong Vietnam: Events and Aftermath

How to Turn Off Data Roaming on Smartphones

Roaming is a term that often gets mentioned in data plans for smartphones. Are you technically “roaming” when you’re out and about? Well, that’s not exactly what it means in the eyes of your mobile carrier.

RAYMOND OGLESBY @RaymondOglesby2
August 16, 2022

Roaming is a term that often gets mentioned in data plans for smartphones. Are you technically “roaming” when you are out and about? Well, that’s not exactly what it means in the eyes of your mobile carrier. Let’s explore data roaming.

This is for smartphones

Dilbert and Chip
Copyright Scott Adams, Inc./Distributed by Universal Uclick for UFS

Data Roaming

Data roaming is actually a very simple concept. You have a mobile carrier that provides data to your smartphone when it’s not connected to Wi-Fi. However, as you know, your carrier’s network is not limitless.

So what happens when you go somewhere not covered by your carrier’s network? That’s where data roaming comes in. Roaming allows you to hop on another network so you can still make calls, send texts, and use wireless data when your carrier’s network is disconnected.

This typically works through agreements between your carrier and other networks. The most common scenario in which data roaming comes into play is traveling to a country where your carrier does not have a presence. You can roam on the other network and not need to sign up for something new.

The Cost

Unfortunately, data roaming is not usually included for free as part of your data plan. If you want unlimited roaming you will need to pay for one of the more expensive plans. Roaming charges vary from carrier to carrier.

In general, if you do not pay extra for unlimited roaming, you will pay for how much you use. That could be around $0.25 per minute on calls, $0.10 per SMS, and $3 per MB of data. Needless to say, those numbers can add up quickly, so make sure to read the details of your data plan to find out what you could be charged.

Avoid the Charges

The good news is you probably do not have to worry about roaming charges. Your carrier may not have 5G or LTE coverage in all places, but there is almost always some lower-speed coverage everywhere in the country. Data roaming is primarily for traveling internationally.

That being said, there are some things you can do to be absolutely sure you are never roaming and being charged for it.

On the Android

On Android, go to:

Settings > Network & Internet > SIM

and toggle Roaming to OFF.

On the Samsung

On Samsung o to:

Settings > Connections > Mobile Networks

and toggle Data Roaming to OFF.

On the iPhone

On the iPhone, go to:

Settings > Cellular > Cellular Data Options

and toggle Data Roaming to OFF. Refer to the below image:

Roaming 1
Turn OFF Data Roaming

Tip: If you are not traveling internationally, you can also consider paying for an international data plan with your cellular carrier. You can also consider getting a SIM card and cellular data plan in the country you will be staying in. Both of these are good ways to avoid the usual pay-for-the-data-you-use roaming charges, which can be expensive.

That’s all there is to data roaming. It’s primarily a feature of mobile networks for traveling outside of your country of residence. In your day-to-day life, it’s not something to worry about. However, if you plan on traveling, you will want to see what your carrier has to offer.

Quote For The Day

In software systems it is often the early bird that makes the worm.

Alan Perlis

Tweet Info

That’s it. Please feel free to share this post! One way to share is via Twitter.

Just click the Tweet icon below. This will launch Twitter where you click its icon to post the Tweet.

Checkout TechSavvy.Life for blog posts on smartphones, PCs, and Macs! You may email us at contact@techsavvy.life for comments or questions.

I Would Like to Hear From You

Please feel free to leave a comment. I would love to hear from you. Do you have a computer or smart device tech question? I will do my best to answer your inquiry. Just send an email to contact@techsavvy.life. Please mention the device, app, and version you are using. To help us out, you can send screenshots of your data related to your question.

Author’s E-book

You can access the e-book from a Kindle device, the Kindle App for the desktop or smartphone, which is a free app.

The author’s Vietnam eBook on the Battle for Tra Bong Vietnam: Events and Aftermath

Five Ways to Damage Your Smartphone Battery

There’s a lot of information out there about how to treat smartphone batteries. We can argue about the best practices, but there are some clearly bad things that can ruin batteries quickly.

RAYMOND OGLESBY @RaymondOglesby2
July 26, 2022

There’s a lot of information out there about how to treat smartphone batteries. We can argue about the best practices, but there are some clearly bad things that can ruin batteries quickly. Let’s find out.

This is for the smartphone

Copyright Scott Adams, Inc./Distributed by Universal Uclick for UFS

Smartphone batteries get worse over time, it’s inevitable. There are systems in place to slow it down as much as possible, but some things speed up that process and can even skip right to the end of it.

Damaged Cables

One of the worst and most dangerous things you can do is use cheap or incompatible cables with your phone. If you have ever heard a story about a phone spontaneously catching fire, it’s usually the fault of the cable.

It’s best to stick with charging accessories from the manufacturer of your phone or trusted brands. Avoid super low-cost accessories that do not have a lot of reviews. iPhone users can look for the Made for iPhone sticker to feel safe. All of this applies to wireless chargers as well. Refer to the below image:

Smartphone Battery 1
Damaged cables

Down to Zero

Charging cycles are what impact the lifespan of a battery the most. The constant cycle of charging and discharging slowly degrades the battery’s health. What makes it even worse is when your phone is frequently starting the cycle from 0%.

It’s best to keep your phone charged between 20-80% as much as possible. Some phones have features to help you do this, but they can only do so much. Shorter charge cycles are better for the battery, so try not to let it get below 20% as much. See the below image:

Smartphone Battery 2

Battery at zero charge

Keeping It Plugged In

It goes the opposite direction, too. Keeping your phone plugged in at 100% all the time is just as bad as letting it get to 0%. Charging your phone overnight is not necessarily bad, but you should not charge it more than you need to.

When the battery reaches 100% charge will protect itself by stopping charging. However, as soon as it drops back down to 99% it will charge back up to 100% again. This small cycle repeats itself over and over and it’s not good for the battery.

The good news is the iPhone and some Android phones now have Adaptive or Optimized charging features to reduce these charging cycles overnight. They keep the battery at around 80% most of the night and then finish the last 20% around your usual wake-up time. See the following image:

Smartphone Battery 3
Plugged in all the time

Extreme Heat

Most electronics do not like heat. This is especially true for batteries, including the ones in your phone. Excessive heat can shorten the lifespan of the battery. That’s another reason why it’s not great to keep your phone plugged in all the time.

Heat can come from other sources as well. Playing games that require a lot of resources, leaving your phone in a hot car, or letting it bake in the sun at the beach. All of these things can overheat your phone and damage the battery in the process. Refer to the below image:

Smartphone Battery 4
Smartphones in extreme heat

Screen Brightness

We have noticed this the most amongst adults, and their phone brightness levels are blinding. They are not only causing hurt to the eyes but also to the humble battery. Screens use the most amount of resources on the phone. That means, the higher the brightness level, the more battery drainage will occur. So, keep your brightness levels to a minimum, but also not to a point where you have to squint! See the below image:

Smartphone Battery 5
Screen brightness

The good news is you probably do not have to worry about ruining your smartphone’s battery. Most of these things are common sense. Stick with name-brand charging accessories, do not overly exhaust or juice up, and keep the device at a comfortable temperature. You will get the best you can out of your battery. Regardless, over time, your battery will slowly deplete, no longer charging to 100%.

Quote For the Day

Globalization, as defined by rich people like us, is a very nice thing… you are talking about the Internet, you are talking about cell phones, you are talking about computers. This doesn’t affect two-thirds of the people of the world.

Jimmy Carter

Tweet Info

That’s it. Please feel free to share this post! One way to share is via Twitter.

Just click the Tweet icon below. This will launch Twitter where you click its icon to post the Tweet.

Check out TechSavvy.Life for blog posts on smartphones, PCs, and Macs! You may email us at contact@techsavvy.life for comments or questions.

I Would Like to Hear From You

Please feel free to leave a comment. I would love to hear from you. Do you have a computer or smart device tech question? I will do my best to answer your inquiry. Just send an email to contact@techsavvy.life. Please mention the device, app, and version you are using. To help us out, you can send screenshots of your data related to your question.

Author’s E-Book

You can access the e-book from a Kindle device, the Kindle App for the desktop or smartphone, which is a free app.

The author’s Vietnam eBook on the Battle for Tra Bong Vietnam: Events and Aftermath

How to Delete Messages in Facebook Messenger

If you do not wish to keep a single or an entire chat in your Facebook Messenger, the company allows you to delete individual or all your messages at once.

RAYMOND OGLESBY @RaymondOglesby2
June 28, 2022

If you do not wish to keep a single or an entire chat in your Facebook Messenger, the company allows you to delete individual or all your messages at once. Let’s find out on your desktop and mobile.

Note! Your deleted messages can not be restored, so make sure you really want to get rid of your messages.

This is for devices using Facebook Messenger. Screenshots are from iPhone XR and Windows 10. Messenger’s latest version is 2022 so screenshots may be different from your device.

Dilbert and Simulation
Copyright Scott Adams, Inc./Distributed by Universal Uclick for UFS

You can remove, unsend, or delete messages or chats. This post gives you different methods on how to “back out” your messages or chats. This means you can “undo” mistakenly sent messages. For the Unsend, you have 10 minutes to retract the original message. The Remove feature deletes the message.

Delete Messages on the Desktop

If you are on a desktop computer like Windows, Mac, Linux, or Chromebook, use the Facebook website to delete individual or all messages from your account.

First, launch a web browser on your computer and access Facebook. Log in to your account on the site if you are not already logged in.

Next, in Facebook’s top right-hand corner, click the Messenger icon. Refer to the below image:

Messenger 1
Accessing Messenger

Now, in the Messenger panel, at the bottom, click See All in Messenger. See the below image:

Messenger 2
Selecting all messages

Next, in the Chats sidebar on the left, you will see all your conversations. Select the chat in which you want to delete messages.

Now, on the right pane, find the individual message to delete. Then hover over that message, click the Menu icon (the three vertical dots), and choose Remove. See the following image:

Messenger 3
Remove a message in a chat

Next, depending on the message you select, click either Remove for you or Remove for everyone. Refer to the below image:

Messenger 4
Selecting your option

Now, if you have selected your own message, select Remove For You.

In the window’s bottom left-hand corner, click Remove and your message will be deleted. See the below image:

Messenger 5
Removing only for you

Next, if you have selected an everybody message, select Remove for everyone.

In the window’s bottom left-hand corner, click Remove and your message will be deleted. See the following image:

Messenger 5a
Removing for everyone

Now, if you would like to delete an entire conversation, then in the left sidebar, find that conversation. Then hover over that chat, click the Menu icon (the three vertical dots), and choose Delete Chat. Refer to the below image:

Messenger 6
Selecting to delete a chat

Next, in the prompt that opens, click Delete Chat. See the below image:

Messenger 7
Confirming to delete a chat

Now, Facebook will delete your selected chat on the desktop.

Delete Messages on Mobile

On your iPhone, iPad, or Android phone, make use of the Messenger app to delete your individual messages or entire chats.

First, launch the Facebook Messenger app.

Next, tap the conversation from which you want to remove messages.

Now, on the conversation page, tap and hold on to the message to remove. If you have selected the other party’s message, then in the menu that opens, select More > Remove. If you have selected your own message, then tap Remove. The message is deleted on your end, but the other party can still access it. See the following image:

Messenger 8
Remove a message

Next, To delete the message from everyone involved in the chat, choose Unsend. Refer to the below image:

Messenger 9
Unsend a message

Now, you can choose Unsend for everyone or Unsend for you. See the below image:

Messenger 11
Selecting an option to Unsend

Next, to remove the message only from your own chat history, select Remove For You. See the following image:

Messenger 10
Selecting Remove for you option

Now, you can also delete entire chats with someone. To do so, tap and hold on to the chat to delete. Then, in the menu that opens, select Delete. Refer to the below image:

Messenger 12
Delete a chat

Next, in the prompt that opens, tap Delete. See the below image:

Messenger 13
Confirm the delete

Now, you have successfully deleted your messages from Facebook Messenger on mobile.

Quote For the Day

People are stunned to hear that one company has data files on 185 million Americans.

Ralph Nader

Tweet Info

You are finished. Please feel free to share this post! One way to share is via Twitter.

Just click the Tweet icon below. This will launch Twitter where you click its icon to post the Tweet.

Check out TechSavvy.Life for blog posts on smartphones, PCs, and Macs! You may email us at contact@techsavvy.life for comments or questions.

I Would Like to Hear From You

Please feel free to leave a comment. I would love to hear from you. Do you have a computer or smart device tech question? I will do my best to answer your inquiry. Just send an email to contact@techsavvy.life. Please mention the device, app, and version you are using. To help us out, you can send screenshots of your data related to your question.


Author’s E-book

You can access the e-book from a Kindle device, the Kindle App for the desktop or smartphone, which is a free app.

The author’s Vietnam eBook on the Battle for Tra Bong Vietnam: Events and Aftermath

How to Use Text to Speech Tools

Reading is great, but sometimes you want or need to listen. Let your computer or phone do the reading for you.

RAYMOND OGLESBY @RaymondOglesby2
June 23, 2022

Reading is great, but sometimes you want or need to listen. Let your computer or phone do the reading for you. Let’s explore some tools to do this.

This is for the mobile or desktop

Dilbert and White
Copyright Scott Adams, Inc./Distributed by Universal Uclick for UFS

Some people struggle with reading text on a screen, or physically can not. Others might want their computer to read something to them aloud while they do something else. There are plenty of reasons to use a text-to-speech tool, also called a “screen reader”.

Although there are standalone text-to-speech apps, you probably do not need them. That’s because every operating system, and several well-known pieces of software, offer a text-to-speech feature, and they are all quite good.

Spoken Content for iPhone

The iPhone’s text-to-speech feature is very easy to use. First, to turn it on, head to:

Settings > Accessibiltu > Spoken Content

and enable Speak Selection and Speak Screen. Once enabled, any text you highlight in any application will have a Speak option, which you tap to activate. We have highlighted some text from the Notes app to be read to us. Refer to the below image:

Spoken Content for iPhone

Read Aloud for Browsers

Read Aloud is an extension for Chrome, Firefox, and Edge that can read whatever website you currently have open. First, you will need to download the extension. After downloading, in Chrome, right-click on some highlighted text and choose the Read aloud selected text option. See the below image:

Text to Speech 3
Read Aloud for browsers

Immersive Reader for Office and Edge

Microsoft Office applications have a built-in text-to-speech feature but it’s a little hard to find. First, in any document, click the Immersive Reader tab. If you do not see it, search for it, and from then on it should appear in your interface permanently. Highlight some text, then right-click and select Read Aloud to hear your document read back to you with the corresponding word highlighted as it goes. Immersive Reader is perfect for copy editing and reviewing long documents. See the following image:

Text to Speech 3
Immersive Reader for Office

Microsoft Edge has this feature, too. Highlight some text, then right-click and select Real aloud selection. Refer to the below image:

Text to Speech 4
Immersive Reader for Edge

Natural Reader

First, download the mobile version (ours is for the iPhone). Then head to

NaturalReaders.com/online (note the plural in the URL)

and paste some text, highlighting it to hear it read on a mobile device. See the below image:

Text to Speech 5
Natural Reader on mobile

You can also drag documents into your browser window if you prefer. Natural Reader has a variety of voices, and you can control the speed of reading. Just click the Gear icon on the upper right-hand corner for options. See the following image:

Text to Speech 6
Natural Reader options

You can upgrade for features like a Chrome extension, OCR for scanned documents, higher quality voices, and the ability to create MP3 files; these features cost $9.99 a month. The paid version also supports uploading documents, including Microsoft Word, Apple’s Pages, and even image files with text on them. The free version is perfect for quick listening. Refer to the below image for an example of listening to a webpage:

Text to Speech 7
Natural Reader for web pages

Quote For the Day

Technology is so much fun but we can drown in our technology. The fog of information can drive out knowledge.

Daniel J Boorstin

Tweet Info

That’s it. Please feel free to share this post! One way to share is via Twitter.

Just click the Tweet icon below. This will launch Twitter where you click its icon to post the Tweet.

Check out TechSavvy.Life for blog posts on smartphones, PCs, and Macs! You may email us at contact@techsavvy.life for comments or questions.

I Would Like to Hear From You

Please feel free to leave a comment. I would love to hear from you. Do you have a computer or smart device tech question? I will do my best to answer your inquiry. Just send an email to contact@techsavvy.life. Please mention the device, app, and version you are using. To help us out, you can send screenshots of your data related to your question.

Author’s E-book

You can access the e-book from a Kindle device, the Kindle App for the desktop or smartphone, which is a free app.

The author’s Vietnam eBook on the Battle for Tra Bong Vietnam: Events and Aftermath

How to Turn Off/On Live Captions in Google Chrome

Are you not a big fan of Google Chrome’s Live Captions, which displays the text version of your media files? If so, it’s easy to turn this feature off/on both temporarily and permanently.

RAYMOND OGLESBY @RaymondOglesby2
June 16, 2022

Are you not a big fan of Google Chrome’s Live Captions, which displays the text version of your media files? If so, it’s easy to turn this feature off/on both temporarily and permanently. Let’s explore this feature.

This is for devices using Google Chrome. Screenshots are from Windows 10

Dilbert and Key
Copyright Scott Adams, Inc./Distributed by Universal Uclick for UFS

Temporary Disable Live Captions

You can turn off Chrome’s Live Captions for a specific playback session while keeping it enabled for all other sessions.

First, open a video containing a voice. The speaker’s voice will be displayed as Live Captions. To close this Live Captions, in the top right-hand corner of Chrome’s Live Captions box, click the “X” icon. Note! We are assuming the Live Captions option has been disabled (see below section). Refer to the below image:

Live Text 1
Live Caption being displayed

Live Captions will immediately disappear from your screen, and you can enjoy your media playback without any interruptions.

Permanently Stop Live Captions

If you do not wish to see live captions for any of your media playbacks in Chrome, turn the feature OFF permanently and it will not bother you anymore.

First, from Chrome’s top right-hand corner, select the three dots icon (the Menu icon). See the below image:

Live Text 2
Selecting the Menu icon

Next, in the Menu box, click Settings. See the following image:

Live Text 3
Selecting Settings

Now, on the Settings screen, from the left sidebar, select Advanced. Refer to the below image:

Live Text 4
Selecting Advanced

Next, in the expanded Advanced menu, click Accessibility. See the below image:

Live Text 5
Selecting Accessibility

Now, on the right, in the Accessibility pane, toggle the Live Caption option to OFF. See the following image:

Live Text 6
Disable Live Caption

If you want to enable the option again, toggle the Live Caption option to ON. You may see the message “Speech files downloaded” below the Live Caption. Refer to the below image:

Live Text 7
Enable Live Caption

Going forward, Chrome will not display any captions for your media playbacks in the browser.

Quote For the Day

Technology is supposed to make our lives easier, allowing us to do things more quickly and efficiently. But too often it seems to make things harder, leaving us with fifty-button remote controls, digital cameras with hundreds of mysterious features and book-length manuals, and cars with dashboard systems worthy of the space shuttle.

James Surowiecki

Tweet Info

You are finished. Please feel free to share this post! One way to share is via Twitter.

Just click the Tweet icon below. This will launch Twitter where you click its icon to post the Tweet.

Check out TechSavvy.Life for blog posts on smartphones, PCs, and Macs! You may email us at contact@techsavvy.life for comments or questions.

I Would Like to Hear From You

Please feel free to leave a comment. I would love to hear from you. Do you have a computer or smart device tech question? I will do my best to answer your inquiry. Just send an email to contact@techsavvy.life. Please mention the device, app, and version you are using. To help us out, you can send screenshots of your data related to your question.

Author’s E-book

You can access the e-book from a Kindle device, the Kindle App for the desktop or smartphone, which is a free app.

The author’s Vietnam eBook on the Battle for Tra Bong Vietnam: Events and Aftermath