How to Use Bionic Reading in Chrome

We are all constantly absorbing information online. Bionic Reading is an approach to reading that can help you read faster, retain more information, and boost your productivity in your favorite web browser, like Chrome.

RAYMOND OGLESBY @RaymondOglesby2
June 6, 2023

This is for desktops using Chrome or other browsers. Screenshots are from Windows 10

We are all constantly absorbing information online. Bionic Reading is an approach to reading that can help you read faster, retain more information, and boost your productivity in your favorite web browser, like Chrome.

Bionic Reading Explained

Bionic reading is a method of reading that combines traditional reading with technology-assisted tools. This helps readers increase their reading speed, improve their comprehension and retention, and ultimately become more productive in their reading activities.

Was the above paragraph easier and quicker to read? If you said yes, then you have just experienced some of the benefits of Bionic Reading. Now, imagine that but for a whole article, essay, or book.

Your brain does not always read every letter of every word. It only intakes enough information for you to understand a word, and then it moves on to the next one. The bolding of the first half of each word lets your mind fast-track through paragraphs.

The bolding aspect is the most notable factor in Bionic Reading, but there’s more as well. A lot of apps and extensions also remove colors from images and change white or black backgrounds to gray. These changes help your eyes focus on the text.

Why Use Bionic Reading

Using Bionic Reading in Chrome, or any other web browser, can offer several benefits.

It can help you read faster and more efficiently, which allows you to cover more material in less time.

Bionic Reading can also help you retain more information by training your brain to focus on the most important parts of any text.

As a result of the two above-mentioned benefits, it can improve your productivity by allowing you to process information more effectively. This can be particularly useful in academic or work-related settings.

Bionic Reading in any browser can be a valuable tool for anyone looking to optimize their online reading experience.

Think of Bionic Reading as akin to Speed Reading but they are different in their approach. Speed Reading is the process of rapidly recognizing and absorbing phrases or sentences on a page all at once, rather than identifying individual words.

How Bionic Reading Helps You

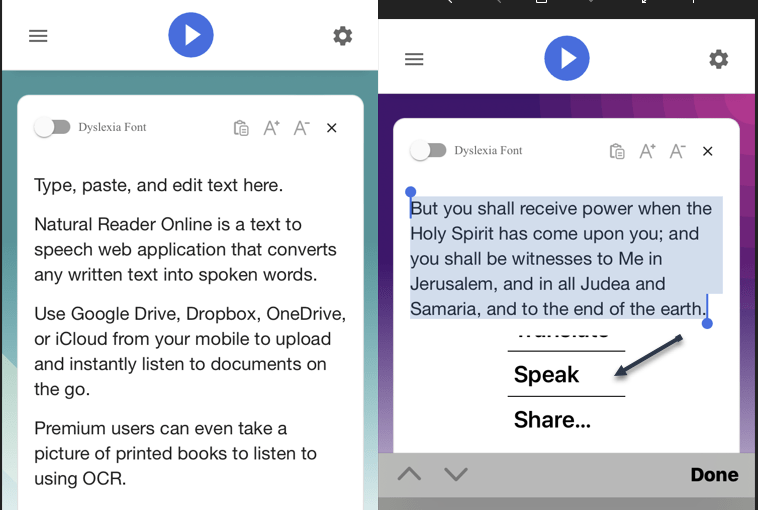
Bionic Reading helps you read faster and more efficiently with techniques including skimming, scanning, chunking, and altering images to be easier on the eye. Refer to the below image:

Bionic Reader 1
Bionic Reading example from Chrome Web Store

For example, when you skim a text, you quickly glance through it to get a general idea of the content without reading every word. Similarly, when you scan a text, you search for specific keywords or phrases that are relevant to your reading goals.

By using these techniques, you can save time and energy. Bionic Reading tools like web browser extensions or apps can help automate some of these techniques.

Bionic Reading Trains Your Brain to Retain Information

By using Bionic Reading, you can begin to retain more information by training your brain to focus on the most crucial parts of any text, such as key concepts, arguments, or evidence.

Through using techniques like skimming or scanning (as mentioned above), you can quickly identify the main points of the text and decide what information is relevant to your reading goals. In turn, this uses less mental energy.

By consistently applying these techniques, you can train your brain to become more efficient at processing and retaining information. Studying, researching, and editing your own work can become easier as a result.

Bionic Reading Improves Your Productivity

Before we go into how Bionic Reading increases your productivity, you need a frame of reference for how your productivity can suffer through everyday means.

Using your eyes takes up about 50% of your brain power. That’s more than any of your other senses. We, as humans, heavily rely on our vision for pretty much everything we do.

As your brain becomes able to retain more information, you will need to re-read the same text less often.

Reading faster and more efficiently drastically cuts down on the stress your eyes and brain suffer while researching, writing, and doing similar work, especially when you are mentally digesting new information.

To summarize, by improving your reading efficiency and training your brain to better retain information, your productivity should increase.

Bionic Reading Chrome Extension

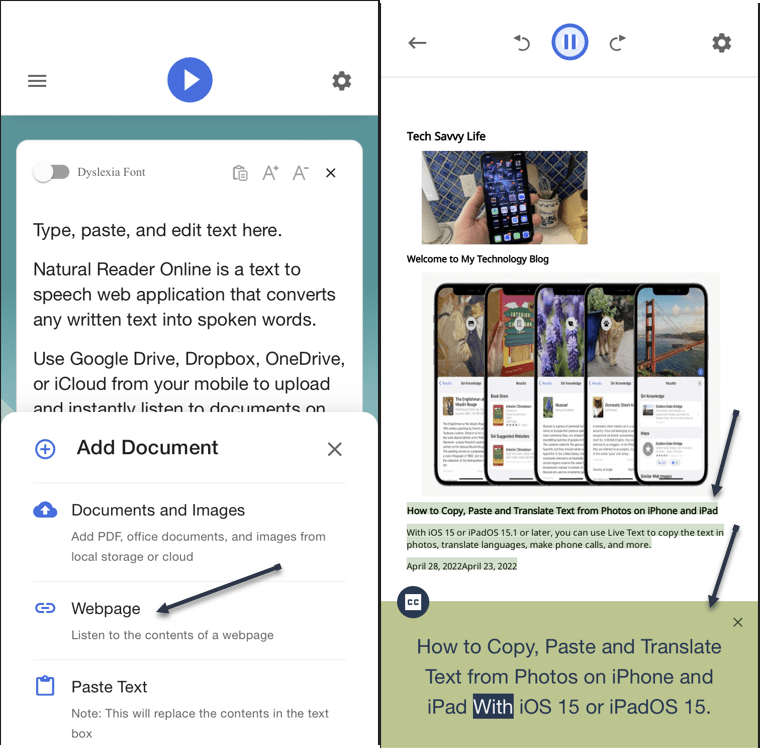
You can get the Bionic Reading extension for Chrome on the Chrome Web Store. See the below image:

Bionic Reader 2
Adding Bionic Reading Chrome extension

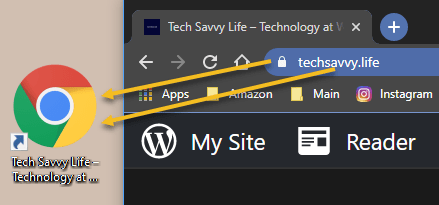
At the top of a Chrome window, click the Menu icon (the 3 dots) to open the Menu. Now, click More Tools > Extensions to view the extension. See the following image:

Bionic Reader 3
Bionic Reading Chrome extension

After installing it, you can manage the Bionic Reading extension through the Extensions menu at the top-right of your window (click the little jigsaw piece icon). Refer to the below image:

Bionic Reader 4

Activate Bionic Reading

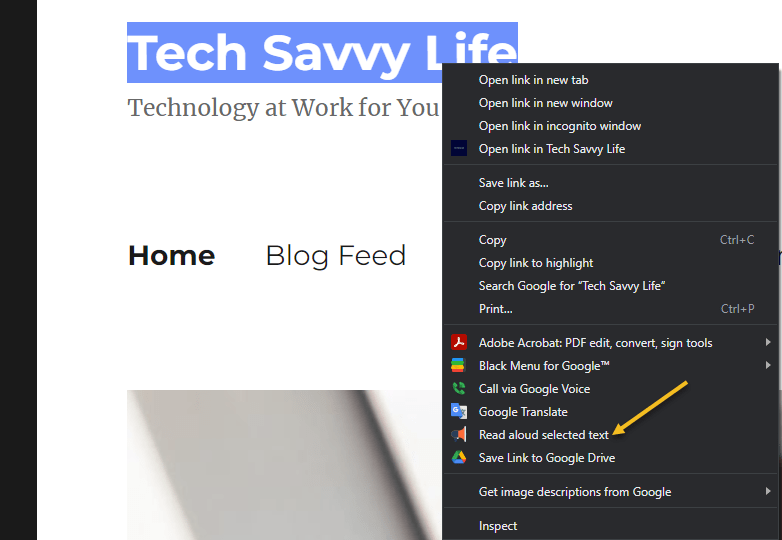
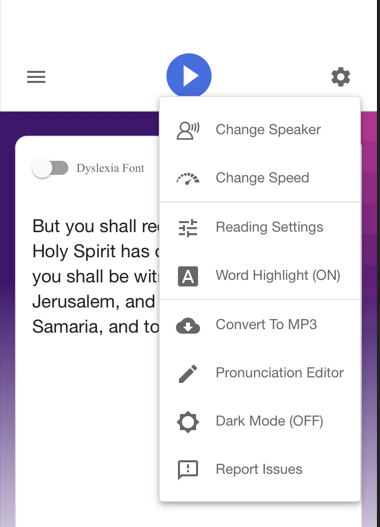
You are now ready to begin using the Bionic Reading extension! When you want to activate it on any given webpage, all you need to do is click the jigsaw piece icon at the top-right of your window and then click the Bionic Reading icon. To turn Bionic Reading off, do the same thing again. See the below image:

Bionic Reader 5
Bionic Reading example

Everything is removed from the web page but the text. That’s all there is to it! Start saving your energy for tougher tasks by letting Bionic Reading do the heavy visual lifting.

Disclaimer

Technology is always changing and rarely is there static tech for smartphones and desktops. Thus, the contents of this post are only valid at the time of writing. Blog posts older than six months may have directions incompatible with your device or OS. Hopefully, older post content will continue to work as advertised. Thank you for reading TechSavvy.Life for Technology at Work For You.

Quote For the Day

I would like to die on Mars. Just not on impact.

Elon Musk

Tweet Info

That’s it. Please feel free to share this post! One way to share is via Twitter.

Just click the Tweet icon below. This will launch Twitter where you click its icon to post the Tweet.

Checkout TechSavvy.Life for blog posts on smartphones, PCs, and Macs! You may email us at contact@techsavvy.life for comments or questions.

I Would Like to Hear From You

Please feel free to leave a comment. I would love to hear from you. Do you have a computer or smart device tech question? I will do my best to answer your inquiry. Just send an email to contact@techsavvy.life. Please mention the device, app, and version you are using. To help us out, you can send screenshots of your data related to your question.

Author’s E-Book

You can access the e-book from a Kindle device, the Kindle App for the desktop or smartphone, which is a free app.

The author’s Vietnam eBook on the Battle for Tra Bong Vietnam: Events and Aftermath
Advertisement

Using a Keyboard Shortcut to Clear Your Browser History

Want to clear your browser history quickly? There’s a keyboard shortcut for that. It works in any browser, including Google Chrome, Apple Safari, Microsoft Edge, and Mozilla Firefox (on both Windows PCs and Macs.)

RAYMOND OGLESBY @RaymondOglesby2
May 30, 2023

This is for popular browsers on a PC or Mac

Want to clear your browser history quickly? There’s a keyboard shortcut for that. It works in any browser, including Google Chrome, Apple Safari, Microsoft Edge, and Mozilla Firefox (on both Windows PCs and Macs.)

Depending on your web browser of choice, you can speed things up in the future by activating the Clear button with a few keystrokes. You may have to tab through the interface to select the Clear button before hitting Enter.

Here’s how it works on a few popular browsers on a Windows 10 or Windows 11 PC:

  • Google Chrome: Press Ctrl+Shift+Delete and press Enter.
  • Mozilla Firefox: Press Ctrl+Shift+Delete and press Enter.
  • Microsoft Edge: Press Ctrl+Shift+Delete and press Enter.

You can now configure exactly what you want to delete. Your browser will remember the settings you pick here, so you will only have to set this up once.

You can pick a time range, or history from a time period like the last hour, last 24 hours, last week, or from all time. You can also pick the types of data: browsing history, download history, cookies, cached files, and more.

When you are done, click the Clear data or Clear now button. Refer to the below image for Chrome:

Clear Chrome 1
Selecting to Clear data in Chrome

Incognito Mode

In the future, you can eliminate the need to clear your browser history by browsing in a private-browsing mode, like Incognito Mode in Chrome. You will just have to close the private-browsing window, and your browser will immediately forget the history associated with your private browsing.

You can use keyboard shortcuts to open and close a private-browsing mode window, too.

  • Google Chrome: Press Ctrl+Shift+N
  • Mozilla Firefox: Press Ctrl+Shift+P
  • Safari or Chrome on a Mac: Press Command instead of Ctrl; for example, press Shift+Command+N.

When you are done, press Ctrl+W to close a single tab or Ctrl+Shift+W to close an entire window. (On a Mac, press Command instead of Ctrl.)

Just remember that Incognito Mode does not offer complete privacy online. It only prevents your web browser from storing your browsing history locally. You may want to combine it with a VPN to boost your online privacy.

Disclaimer

Technology is always changing and rarely is there static tech for smartphones and desktops. Thus, the contents of this post are only valid at the time of writing. Blog posts older than six months may have directions incompatible with your device or OS. Hopefully, older post content will continue to work as advertised. Thank you for reading TechSavvy.Life for Technology at Work For You.

Quote For the Day

Knowledge is of no value unless you put it into practice.

Anton Chekhov

Tweet Info

That was easy. Please feel free to share this post! One way to share is via Twitter.

Just click the Tweet icon below. This will launch Twitter where you click its icon to post the Tweet.

Checkout TechSavvy.Life for blog posts on smartphones, PCs, and Macs! You may email us at contact@techsavvy.life for comments or questions.

I Would Like to Hear From You

Please feel free to leave a comment. I would love to hear from you. Do you have a computer or smart device tech question? I will do my best to answer your inquiry. Just send an email to contact@techsavvy.life. Please mention the device, app, and version you are using. To help us out, you can send screenshots of your data related to your question.

Author’s E-Book

You can access the e-book from a Kindle device, the Kindle App for the desktop or smartphone, which is a free app.

The author’s Vietnam eBook on the Battle for Tra Bong Vietnam: Events and Aftermath

How to Use Text to Speech Tools

Reading is great, but sometimes you want or need to listen. Let your computer or phone do the reading for you.

RAYMOND OGLESBY @RaymondOglesby2
June 23, 2022

Reading is great, but sometimes you want or need to listen. Let your computer or phone do the reading for you. Let’s explore some tools to do this.

This is for the mobile or desktop

Dilbert and White
Copyright Scott Adams, Inc./Distributed by Universal Uclick for UFS

Some people struggle with reading text on a screen, or physically can not. Others might want their computer to read something to them aloud while they do something else. There are plenty of reasons to use a text-to-speech tool, also called a “screen reader”.

Although there are standalone text-to-speech apps, you probably do not need them. That’s because every operating system, and several well-known pieces of software, offer a text-to-speech feature, and they are all quite good.

Spoken Content for iPhone

The iPhone’s text-to-speech feature is very easy to use. First, to turn it on, head to:

Settings > Accessibiltu > Spoken Content

and enable Speak Selection and Speak Screen. Once enabled, any text you highlight in any application will have a Speak option, which you tap to activate. We have highlighted some text from the Notes app to be read to us. Refer to the below image:

Spoken Content for iPhone

Read Aloud for Browsers

Read Aloud is an extension for Chrome, Firefox, and Edge that can read whatever website you currently have open. First, you will need to download the extension. After downloading, in Chrome, right-click on some highlighted text and choose the Read aloud selected text option. See the below image:

Text to Speech 3
Read Aloud for browsers

Immersive Reader for Office and Edge

Microsoft Office applications have a built-in text-to-speech feature but it’s a little hard to find. First, in any document, click the Immersive Reader tab. If you do not see it, search for it, and from then on it should appear in your interface permanently. Highlight some text, then right-click and select Read Aloud to hear your document read back to you with the corresponding word highlighted as it goes. Immersive Reader is perfect for copy editing and reviewing long documents. See the following image:

Text to Speech 3
Immersive Reader for Office

Microsoft Edge has this feature, too. Highlight some text, then right-click and select Real aloud selection. Refer to the below image:

Text to Speech 4
Immersive Reader for Edge

Natural Reader

First, download the mobile version (ours is for the iPhone). Then head to

NaturalReaders.com/online (note the plural in the URL)

and paste some text, highlighting it to hear it read on a mobile device. See the below image:

Text to Speech 5
Natural Reader on mobile

You can also drag documents into your browser window if you prefer. Natural Reader has a variety of voices, and you can control the speed of reading. Just click the Gear icon on the upper right-hand corner for options. See the following image:

Text to Speech 6
Natural Reader options

You can upgrade for features like a Chrome extension, OCR for scanned documents, higher quality voices, and the ability to create MP3 files; these features cost $9.99 a month. The paid version also supports uploading documents, including Microsoft Word, Apple’s Pages, and even image files with text on them. The free version is perfect for quick listening. Refer to the below image for an example of listening to a webpage:

Text to Speech 7
Natural Reader for web pages

Quote For the Day

Technology is so much fun but we can drown in our technology. The fog of information can drive out knowledge.

Daniel J Boorstin

Tweet Info

That’s it. Please feel free to share this post! One way to share is via Twitter.

Just click the Tweet icon below. This will launch Twitter where you click its icon to post the Tweet.

Check out TechSavvy.Life for blog posts on smartphones, PCs, and Macs! You may email us at contact@techsavvy.life for comments or questions.

I Would Like to Hear From You

Please feel free to leave a comment. I would love to hear from you. Do you have a computer or smart device tech question? I will do my best to answer your inquiry. Just send an email to contact@techsavvy.life. Please mention the device, app, and version you are using. To help us out, you can send screenshots of your data related to your question.

Author’s E-book

You can access the e-book from a Kindle device, the Kindle App for the desktop or smartphone, which is a free app.

The author’s Vietnam eBook on the Battle for Tra Bong Vietnam: Events and Aftermath

How to Drag and Drop Browser Links to Desktop

In four major browsers; Chrome, Edge, Firefox, and Safari; on Windows, Mac, and Linux, you can easily drag and drop a shortcut link to a website straight to your desktop.

RAYMOND OGLESBY @RaymondOglesby2
JMarch 1, 2022

In four major browsers; Chrome, Edge, Firefox, and Safari; on Windows, Mac, and Linux, you can easily drag and drop a shortcut link to a website straight to your desktop. Let’s see how easily this is done.

This is for PCs, Macs, and web browsers. Screenshots are from Windows 10

Dilbert and Plan
Copyright Scott Adams, Inc./Distributed by Universal Uclick for UFS

Create Shortcut Using Chrome, Edge, and Firefox

To create a desktop web shortcut, first open a Chrome, Edge, or Firefox browser window and navigate to the site you want to create a shortcut from. In the address bar at the top of the window, click and drag the Padlock icon (located to the left of the address) out of the browser window, or drag and drop the URL address onto your desktop. Refer to the below image:

Links 1
Drag to create a shortcut on the desktop

Next, as soon as you click and drag, you will see the title or address of the website besides your pointer. When you are hovering over the desktop, release your mouse button, and a shortcut icon will be created. To use the shortcut, double-click it at any time, and the site will open in your default browser.

This shortcut does not have to stay on your desktop either; you can move it to any folder on your PC.

Create Shortcut Using Safari on Mac

To make a desktop web shortcut on a Mac, first, open a Safari browser window and navigate to the site you want to create a shortcut to.

Next, in that window, hover your mouse cursor over the address bar at the top of the window, and a small Plus (“+”) icon will appear on the far left side. Click and drag the Plus icon onto your desktop and release your mouse or trackpad button. A shortcut icon will appear. See the below image:

Links 2
Drag to create a shortcut on Mac

Now, you can double-click the shortcut icon, and your default browser app will open and automatically load the website stored in the link.

By the way, this is not the only drag-and-drop trick you can do with browsers. Most browsers also allow you to drag tabs between open windows of the same browser.

How to Drag Tabs Between Browser Windows

Quote For the Day

If you learn from defeat, you haven’t really lost.

Zig Ziglar

That’s it. Please feel free to share this post! One way to share is via Twitter.

Just click the Tweet icon below. This will launch Twitter where you click its icon to post the Tweet.

Check out TechSavvy.Life for blog posts on smartphones, PCs, and Macs! You may email us at contact@techsavvy.life for comments or questions.

I Would Like to Hear From You

Please feel free to leave a comment. I would love to hear from you. Do you have a computer or smart device tech question? I will do my best to answer your inquiry. Just send an email to contact@techsavvy.life. Please mention the device, app, and version you are using. To help us out, you can send screenshots of your data related to your question.

Author’s E-book

You can access the e-book from a Kindle device, the Kindle App for the desktop or smartphone, which is a free app.

The author’s Vietnam eBook on the Battle for Tra Bong Vietnam: Events and Aftermath

How to Drag Tabs Between Browser Windows

Did you know you can drag tabs between browser windows within Chrome, Edge, Firefox, and Safari on Windows, Linux, and Mac? (But not between different browser types.) It seems obvious in retrospect, but many people never notice.

Did you know you can drag tabs between browser windows within Chrome, Edge, Firefox, and Safari on Windows, Linux, and Mac? (But not between different browser types.) It seems obvious in retrospect, but many people never notice. Let’s explore how this is done.

This is for modern browsers. Screenshots are from Chrome in Windows 10

Dilbert and Press
Copyright Scott Adams, Inc./Distributed by Universal Uclick for UFS

First, open Google Chrome, Microsoft Edge, Apple Safari, or Mozilla Firefox on a Mac or PC. Open a few tabs in one browser window and then press Ctrl+n (or Command+n on a Mac) to open another browser window.

To move a tab between browser windows, click and drag the tab from the tab bar in one window onto the tab bar in another window.

(In Safari, you can alternatively just drag a tab and drop it anywhere on top of another Safari browser window.) Refer to below image for using Chrome:

Tabs 1

Once you drag the tab into the other window’s tab bar, you will see that tab appear in the tab list of the destination window. See below image:

Tabs 2

In Chrome, Edge, and Firefox, you can select multiple tabs. Just hold down Ctrl (or Command on a Mac) and click on multiple tabs. Once they are selected, you can drag them off into a new window, or you can close all of them by pressing any tab’s X button.

Quote For the Day

Part of the inhumanity of the computer is that, once it is competently programmed and working smoothly, it is completely honest.

Isaac Asimov

That’s it. Please feel free to share this post! One way to share is via Twitter.

Just click the Tweet icon below. This will launch Twitter where you click its icon to post the Tweet.

Check out TechSavvy.Life for blog posts on smartphones, PCs, and Macs. You may email us at contact@techsavvy.life for comments or questions.

I Would Like to Hear From You

Please feel free to leave a comment. I would love hearing from you. Do you have a computer or smart device tech question? I will do my best to answer your inquiry. Just send an email to contact@techsavvy.life. Please mention the device, app and version that you are using. To help us out, you can send screenshots of your data related to your question.

The author’s Vietnam eBook on the Battle for Tra Bong: Events and Aftermath
%d bloggers like this: