RAYMOND OGLESBY @RaymondOglesby2
May 12, 2022
You can not really hide apps on an iPhone, but you can make them hard to find. If you can not find an app on your iPhone’s Home Screen, it might still be available in your App Library. Also, some hidden app purchases can be revealed. Let’s explore this feature.
This is for the iPhone. Screenshots are from iPhone XR

Reveal “Hiding” Apps
Starting with iOS 14, Apple introduced an App Library page to your iPhone that shows an organized list of all the apps installed on your device. An app can be installed on your iPhone that is not listed on your Home Screen but is still accessible in your App Library. If that’s the case, you can easily add the app to your Home Screen.
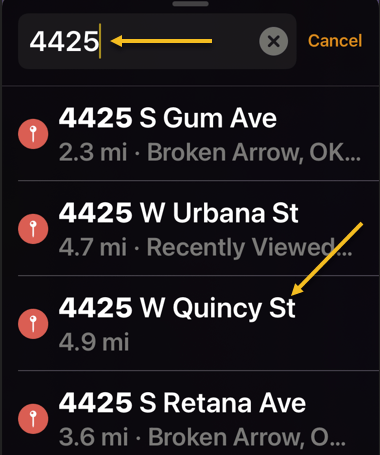
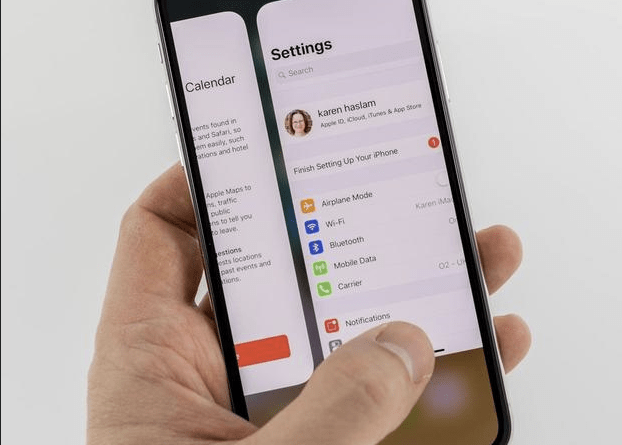
To open your App Library, first, repeatedly swipe to the left on your home screen of icons or swipe the page icons until you reach the last page, then swipe once more, and the App Library will open. You will see a grid of icons in different categories representing apps you have installed. Tap the Search bar at the top of the screen and type in the name of the app you are looking for. Refer to the below image:
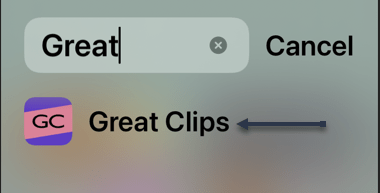
Next, when you find it, tap and hold your finger on its icon in the results list. In the menu that appears, select Add to Home Screen. See the below image:

Now, you can go back to your Home Screen, and you will see the app icon you just added to your Home Screen on one of the pages.
In the future, if you want all newly downloaded apps to appear on your Home Screen automatically, head to:
Settings > Home Screen
and place a checkmark beside Add to Home Screen. See the following image:

Reveal “Hidden” App Purchases
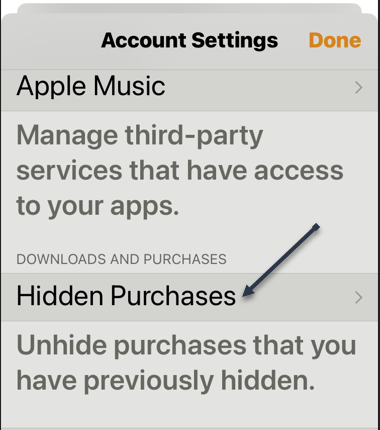
Next, using your Apple ID settings, it’s possible to hide previous purchases of items such as apps. If you can not find an app you want to download in your Purchase History, head to:
Settings > Apple ID > Media & Purchases > View Account > Hidden Purchase
Refer to the below image:
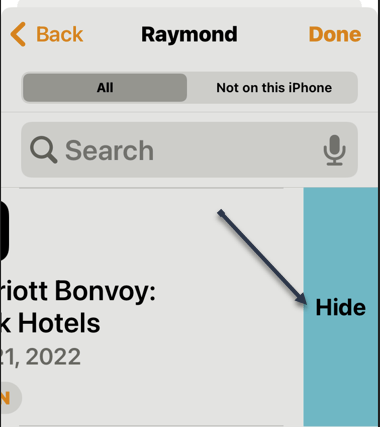
Now, on the next screen, you will see a list of purchases you have previously hidden. Tap Unhide behind any app you would like to reveal again. See the below image:

Next, the app will appear in your Purchase History.
Head to:
Settings> Apple ID > Media & Purchases > Purchase History
See the following image:

If the app is not already installed on your iPhone, you will need to re-download it from the App Store.
“Hide” a Purchase App
Now, to “hide” an app, navigate to:
App Store > Your Initials (in upper right-hand corner) > Purchased > My Purchases
and you will see a listing of your purchased apps (some may be free). Swipe left on an app, then tap Hide and your app will be “hidden”. Refer to the below image:
Quote For the Day
The thirst for powerful sensations takes the upper hand both over fear and over compassion for the grief of others.
Anton Chekhov
Tweet Info
You are finished. Please feel free to share this post! One way to share is via Twitter.
Just click the Tweet icon below. This will launch Twitter where you click its icon to post the Tweet.
Check out TechSavvy.Life for blog posts on smartphones, PCs, and Macs! You may email us at techsavvy.life for comments or questions.
Tweet
I Would Like to Hear From You
Please feel free to leave a comment. I would love to hear from you. Do you have a computer or smart device tech question? I will do my best to answer your inquiry. Just send an email to contact@techsavvy.life. Please mention the device, app, and version you are using. To help us out, you can send screenshots of your data related to your question.
Author’s E-book
You can access the e-book from a Kindle device, the Kindle App for the desktop or smartphone, which is a free app.