Opt-Out Guide for National Public Data: Regain Your Privacy

The article discusses the resurgence of National Public Data, a site previously infamous for leaking millions of Social Security numbers. It offers users the ability to search personal information and opt out of data display. Caution is advised regarding online privacy, as data security on the web remains a significant concern.

RAYMOND OGLESBY @RaymondOglesby2
September 2, 2025 – 8 minutes read time

Note! Although we recommend you use this tip, we are NOT responsible for what happens to your data. Also, remember there is no such thing as “privacy” on the web. If major USA companies get hacked, so will you. But this tip will help protect your data.

National Public Data is back with new owners, joining the ranks of other creepy, people-finding services. The website, infamous for its role in leaking millions of Social Security numbers in 2024, has returned with the ability to look up anyone’s personal information. 

The site shut down in December amid a wave of lawsuits against parent company Jericho Pictures after a breach exposed an estimated 272 million unique SSNs and 600 million phone numbers. Since then, the site has been relatively dormant. But recently, we spotted it springing back to life with a new interface.

It looks like the domain has changed hands:. In a page about last year’s breach, the site’s new owners write: “Important Notice: Jericho Pictures, Inc., the Florida company that suffered a major data breach in 2024, no longer operates this site. We have zero affiliation with them. We are keeping this page, originally posted by Jericho Pictures, Inc., intact so its history remains traceable.”

  • Protect your privacy from others or companies
  • View and/or remove your personal data from pubic searches
  • Be in control of your data

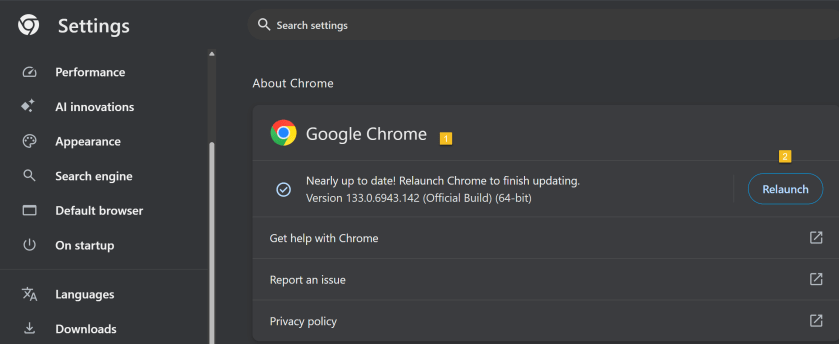
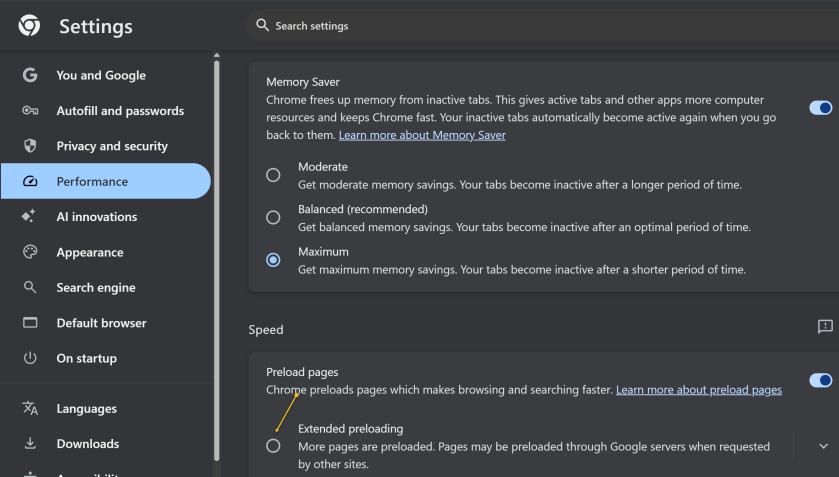
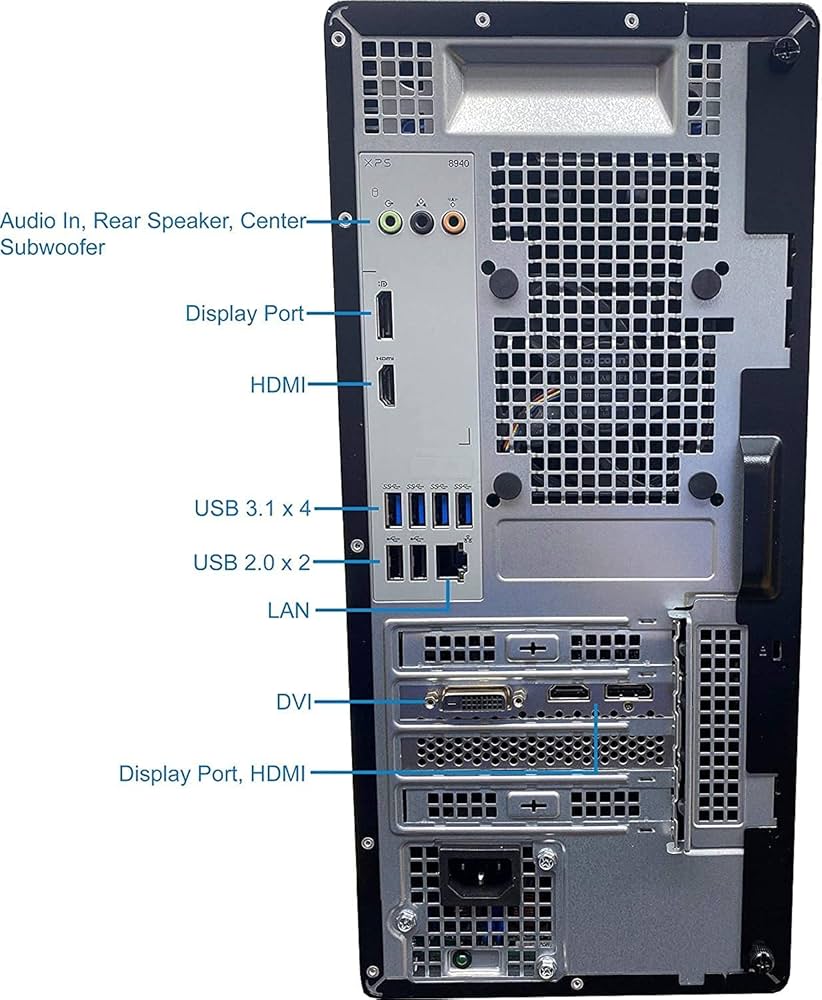
This tip was performed on a Dell XPS desktop running Windows 11 Pro. Screenshots are from the latest update for the Google Chrome browser.

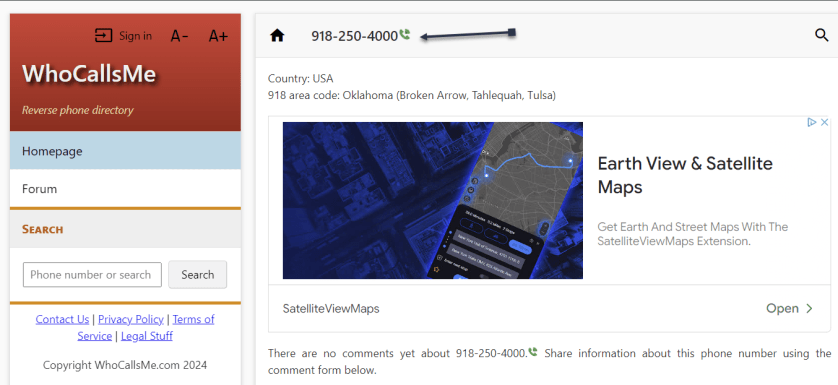
First, it’s relatively easy to look up anybody’s information using their website. Click here to access their interface. Refer to the image below:

SSN Leak 1
National Public Data website

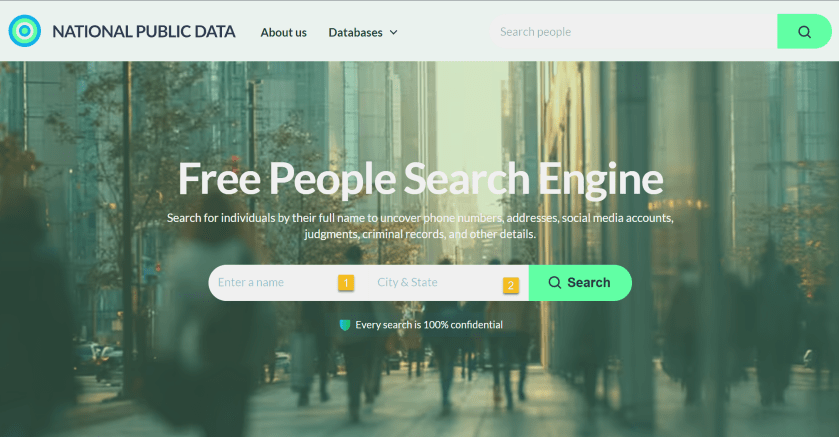
The site does not explain who the new owners are, but a domain lookup shows that it’s registered to Florida-based “Perfect Privacy,” (what an oxymoron), a brand name associated with a VPN service. However, Perfect Privacy VPN has no affiliation with National Public Data.

The new site functions as a “free people search engine,” which might alarm the public since National Public Data housed a huge trove of sensitive data on Americans.

It is unclear where the site is getting its data. But the new National Public Data says: “We collect the data you find on our people search engine from publicly available sources, including federal, state, and local government agencies, social media pages, property ownership databases, and other reliable platforms. After the data is in our hands, we verify and filter it to make sure it is indeed accurate and up-to-date.”

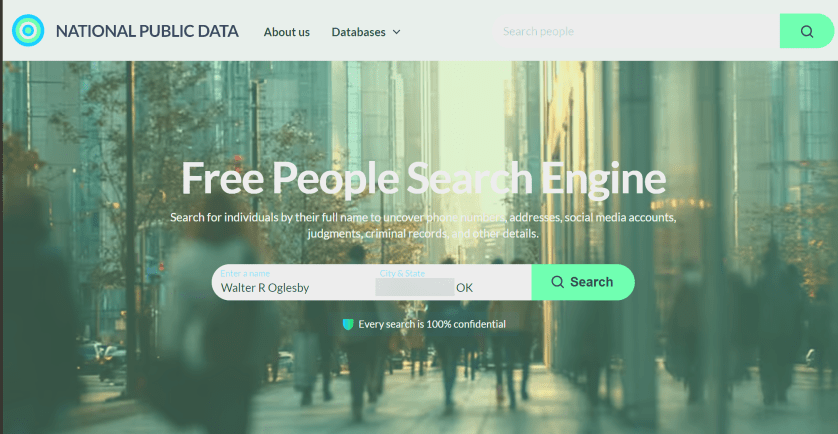
Next, key in your full name, City/State. Both fields are autofill. As you enter the information, it pops up with matching criteria. Then tap the Search button. The search is extremely FAST. I tried both of my names and got the same results.

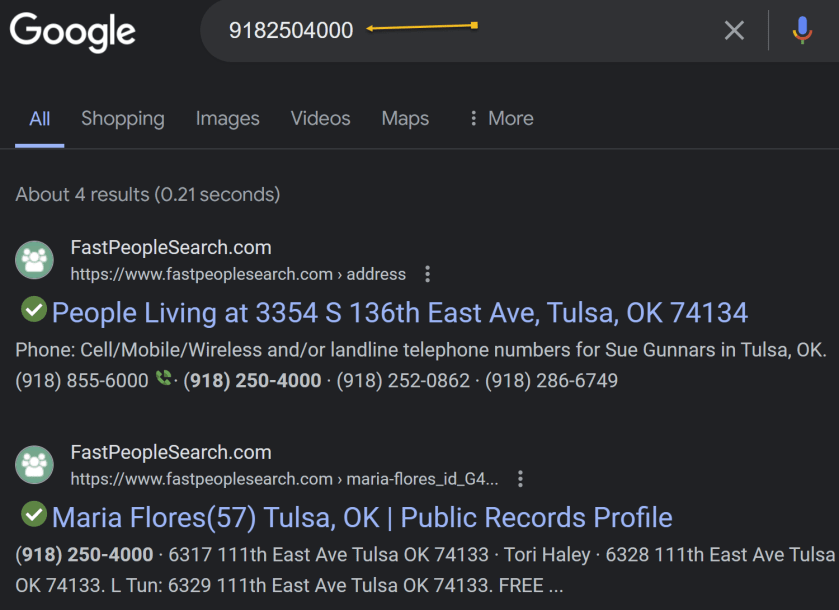
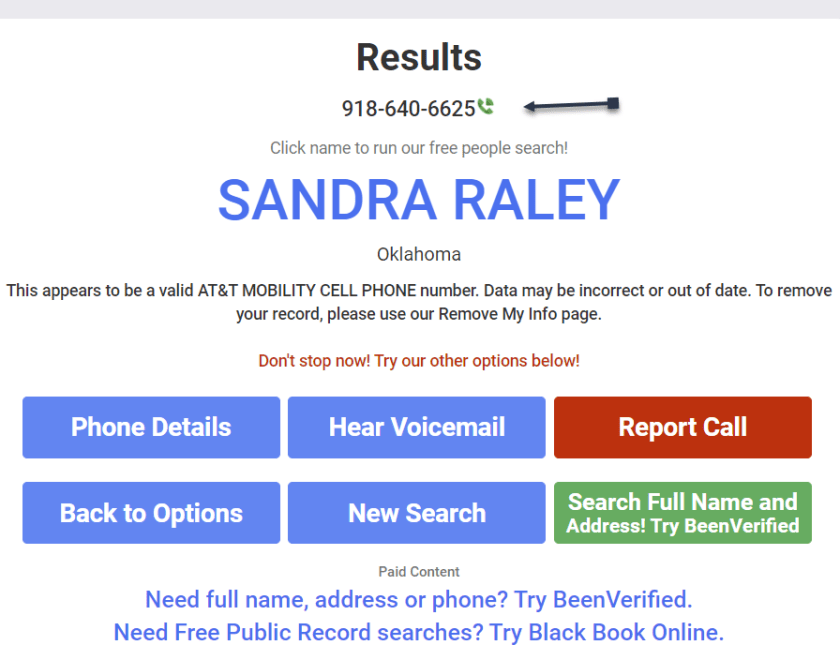
My wife used the site in her genealogy research to find a distant cousin’s phone number and contacted him. See the image below:

SSN Leak 2
Enter your data

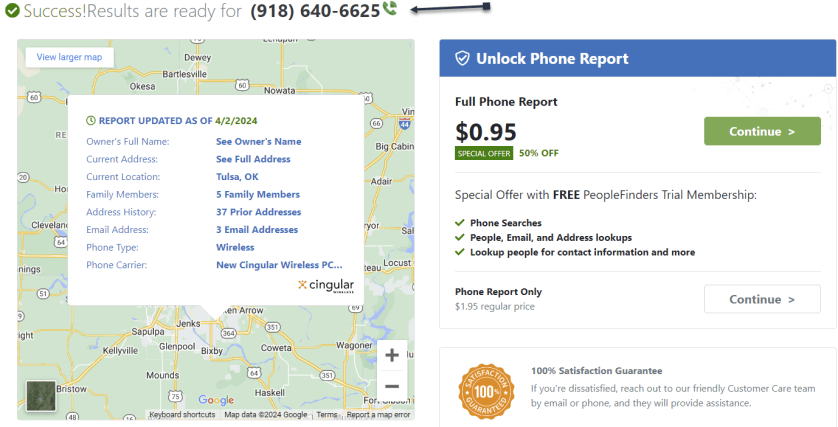
Now, your basic profile information will be displayed. We have redacted specific fields for privacy. We noted that the basic profile information was correct except for the landline phone number, which we no longer have. When I clicked on my relatives, the data was incorrect. To view more information, click the View Full Profile button. See the following image for basic details about myself:

SSN Leak 3
Your basic profile data

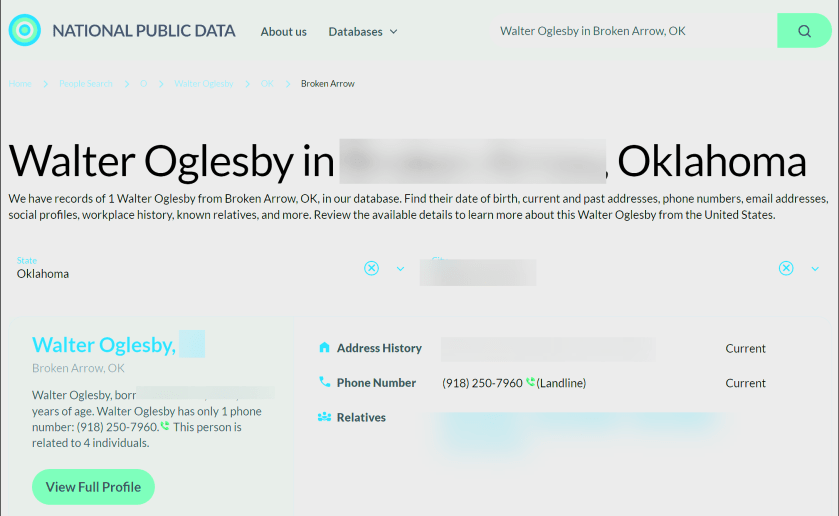
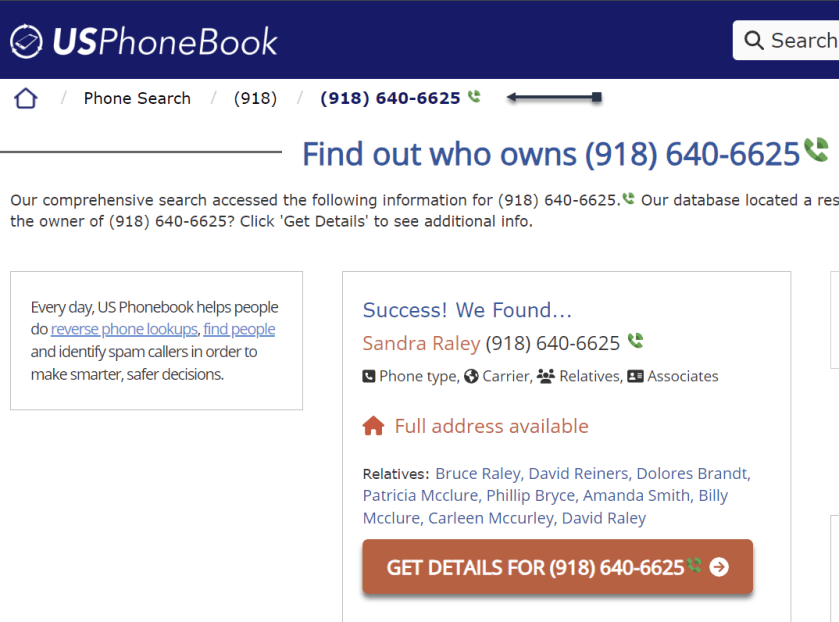
Still, what makes the site disturbing is how you can freely look up people’s data, including neighbors, and sometimes find accurate addresses, phone numbers, and dates of birth, along with a person’s relatives. None of the data is behind a paywall. That said, the new site is not much different from other people-finding services, which serve up similar data for free. 

The new National Public Data adds: “On our people search website, you can find pretty much anything you need, from someone’s contact info, location, age, and birthday to workplace, relatives, and criminal records. No need to sift through different web pages.” It does not reveal your SSN.

Next, the data it reveals is a lot. Refer to the image below about the data it finds:

SSN Leak 4
Listing of what the website searches

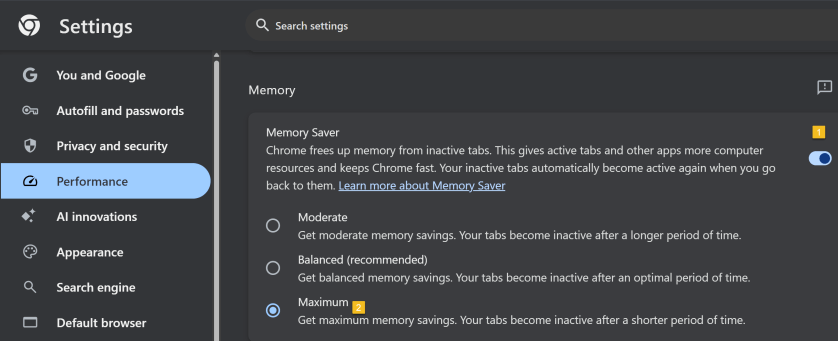
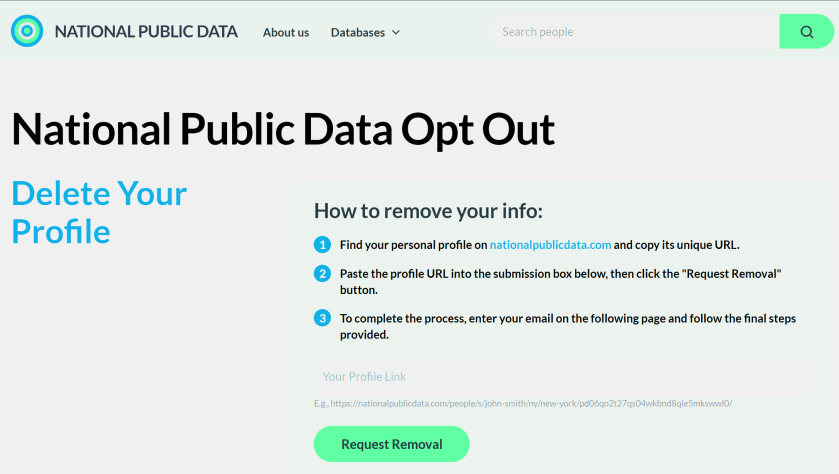
Now, the new National Public Data site has an opt-out form to delete your profile data. However, many users are likely unaware of such an option, enabling these types of sites to continue trafficking their information. See the image below:

SSN Leak 5
Opt-Out form

Remember, proactively managing your online privacy and staying informed about potential data breaches are crucial steps in protecting your personal information.

 Here’s how to delete your data:

  • Search your name on nationalpublicdata.com
  • When you find your profile, click View Full Profile
  • Copy that URL
  • Go to nationalpublicdata.com/optout.html
  • Drop the URL into the Your Profile Link field and click Request Removal
  • Enter an email address, and the site will send you a message and ask you to click to confirm deletion. You need a separate email address for each profile you want to delete.

We tried the opt-out function, and the site appears to remove our data immediately. Some commenters say they have not received the confirmation email. Check your Spam folder and make sure you are dropping the full URL for your profile into the Link box, not just the search results page.

Sites such as Atlas Privacy have emerged to help people remove their data from the open web and people-finding services. Note: we did not try their service.

Atlas Privacy focuses on removing your personal information from data broker websites and other online sources, NOT your own website. They help you regain control of your data by removing it from places where it’s being collected and shared without your consent.

They scan over 150 sites to remove your information and help protect your privacy by removing your name, age, address, phone number, and other personal details from these sources. Atlas Privacy does not have its own list of websites it searches, but rather, it targets specific data brokers and people finder sites. 

Unlike the National Public Data, you must create an account to use their service. There are both free and paid services.

After you have removed your data, recheck to see if it’s actually deleted!

Note! Remember you are responsible for your own data. Acting proactivity by removing your data allows you to be in control.

If your data has been removed from Natural Public Data sources, it is generally not possible to get it back in the same way it was stored. Once data is deleted, it is often permanently removed from the system or archived in a way that is not easily accessible. However, the possibility of data restoration depends on the specific circumstances of the removal and d the policies of the data provider.

If your data has been removed from Atlas Privacy, in some cases, you may be able to restore data that has been removed.

Sources: National Public Data, Perfect Privacy, Jericho pictures, Microsoft, PCMag, Atlas Prvacy, Meta

Disclaimer

Technology is constantly evolving, and smartphone and desktop tech rarely remains static. Therefore, the information in this post is only accurate as of the date it was written. Blog posts that are older than six months may contain instructions that are no longer compatible with your device or operating system. We hope that the content from previous posts continues to function as intended. Thank you for reading TechSavvy.Life, where technology works for you.

“The art challenges the technology, and the technology inspires the art.”

– John Lasseter, Co-founder of Pixar

That’s it. Please feel free to share this post! One way to share is via Twitter.

Just click the Tweet icon below. This will launch Twitter where you click its icon to post the Tweet.

Checkout TechSavvy.Life for blog posts on smartphones, PCs, and Macs! You may email us at contact@techsavvy.life for comments or questions.

We value your feedback! Was this post helpful? Please share your comments with us. If you have a tech question related to your computer or smart device, feel free to reach out. Just send an email to contact@techsavvy.life, and be sure to include the device, app, and version you are using. To assist us further, you can also attach screenshots related to your inquiry.

Author’s eBook

The author’s Vietnam eBook on the “Battle for Tra Bong Vietnam: Events and Aftermath” can be accessed from a Kindle device or the Kindle App for a desktop or smartphone. The apps are free.

The author’s Vietnam eBook on the Battle for Tra Bong Vietnam: Events and Aftermath

Essential Tips for Cleaning Your Keyboard

The article provides a comprehensive guide on how to clean your keyboard effectively. It emphasizes that keyboards harbor numerous germs, making cleaning essential for functionality. Key tips include shaking out debris, brushing between keys, using compressed air, and wiping surfaces. For mechanical keyboards, washing removable keycaps is also recommended.

RAYMOND OGLESBY @RaymondOglesby2
April 8, 2025 – 5 minutes read time

From the classic shakedown to bathing your keycaps, these easy tips will help restore order to the most important peripheral on your desk.

We have to talk about your keyboard. It likely has more germs than a toilet seat, which is gross but can also disrupt your device’s functionality. With spring upon us, now is the perfect time to clean things up. Disconnect or turn off your keyboard, and clear off a work area. Now, let’s explore how to properly clean your keyboard.

  • A clean keyboard means clean fingers.
  • Increase of typing speed and accuracy, no sticky keys.

Any device with a physical keyboard.

Place the keyboard on a large cloth or clear surface and turn it upside down, giving it a few good shakes. With the keys facing down, tap the back, then hold the board at different angles and pat it firmly but gently across the entire surface to knock free additional loose particles. Expect a cascade of debris. If you’re using a keyboard with removable keycaps (a mechanical keyboard, for instance), carefully pull those off and give the panel another upside-down shake. Refer to the image below:

2Keyboard 1
Shaking your keyboard

To remove even more from your keyboard, grab a keyboard brush or even just a toothbrush or bottle brush and run it through the spaces between your keys. See the image below:

2Keyboard 2
Brushing your keyboard

Now to get those particles even a brush can miss. Compressed canned air dislodges dust and dirt with a pressurized blast. Before inserting the straw-like plastic hose and blasting away, though, make sure there are no items nearby that will take on whatever gets knocked out of your keyboard.

You might even want to take this part outside or do it over a bathtub or sink. Just remember that canned air tends to create condensation, so be sure to leave some room between the keyboard and hose to avoid any moisture that could damage inner circuitry.

Prop the keyboard sideways on a steady surface, then, using the duster as directed, aim the straw at an angle along the crevices for a series of short bursts. Give the keyboard another few taps, and repeat the process until you are satisfied. You may be surprised at just how much flies out, even if you do not eat at your desk or have pets who climb across your keyboard at the most inopportune times. Removing the keycaps will make this process all the more effective.

On our humanitarian trips to South America and Southeast Asia, we would always carry 1-2 canisters of compressed air, called Blaster. This item was extremely hard to find. But airport customs, especially in Southeast Asia, would confiscate the canisters. The customs agents thought they were a bomb. See the following image:

Keyboard 3
Using a compressed air canister

Take a microfiber cloth and dampen it with the tiniest bit of water and wipe down your entire keyboard. Go over it with a dry part of the same cloth. Make sure the keyboard is completely dry before plugging it back in or powering it on. Refer to the image below:

Keyboard 4
Wiping your keyboard

This tip is not for everyone; only those with a mechanical keyboard and removable keytops should follow these instructions. Start by snapping a quick picture of your fully assembled keyboard to avoid mixing up letters, numbers, and commands later. Then simply soak the keycaps in a container of water with a bit of dish soap. After a few minutes, give the keys a scrub with a small brush or rag and set them out to air dry.

If you have a lot of dirty keycaps, our recommendation is to purchase a new keyboard. See the image below:

Keyboard 5
Bathing your keycaps

Disclaimer

Technology is constantly evolving, and smartphone and desktop tech rarely remains static. Therefore, the information in this post is only accurate as of the date it was written. Blog posts that are older than six months may contain instructions that are no longer compatible with your device or operating system. We hope that the content from previous posts continues to function as intended. Thank you for reading TechSavvy.Life, where technology works for you.

. “Man is a slow, sloppy, and brilliant thinker; computers are fast, accurate, and stupid.”

― John Pfeiffer

That’s it. Please feel free to share this post! One way to share is via Twitter.

Just click the Tweet icon below. This will launch Twitter where you click its icon to post the Tweet.

Checkout TechSavvy.Life for blog posts on smartphones, PCs, and Macs! You may email us at contact@techsavvy.life for comments or questions.

We value your feedback! Was this post helpful? Please share your comments with us. If you have a tech question related to your computer or smart device, feel free to reach out. Just send an email to contact@techsavvy.life, and be sure to include the device, app, and version you are using. To assist us further, you can also attach screenshots related to your inquiry.

Author’s eBook

The author’s Vietnam eBook on the “Battle for Tra Bong Vietnam: Events and Aftermath” can be accessed from a Kindle device or the Kindle App for a desktop or smartphone. The apps are free.

The author’s Vietnam eBook on the Battle for Tra Bong Vietnam: Events and Aftermath

Enable Advanced Data Protection for Your Apple Devices

Apple has disabled Advanced Data Protection (ADP) for iCloud in the UK due to government demands for law enforcement access. This compromises data security, as backdoor access could be exploited. In contrast, ADP offers end-to-end encryption unavailable to Apple, ensuring only users can access their data. Users outside the UK retain this protection.

Insert dRAYMOND OGLESBY @RaymondOglesby2
April 1, 2025 – 6 minutes read time

Recently. Apple took the unusual step of turning off its highest level of iCloud encryption, Advanced Data Protection (ADP) for customers in the UK. The British government has reportedly demanded that Apple provide a method for law enforcement to access encrypted data as part of criminal investigations. But that creates a serious security problem, because this type of backdoor access can also be exploited by criminals or untrustworthy governments.

  • Have the best encryption for your Apple devices.
  • Prevent hackers from accessing and viewing your data.

See below for the Apple software versions. These screenshots were captured using iOS 18.3.2 on iPhone 14 Pro.

Click here to learn how to update your iPhone to the latest iOS version.

For people in the UK, ADP can no longer be enabled. If you are currently using ADP, you will need to turn off the feature at a future date.

If you are outside the UK and concerned about who can see your data, ADP adds an extra layer of security by making it unreadable even by Apple. If ADP is disabled, your data could be at risk because it can still be unlocked by Apple, a legal request or a data breach. 

Let’s explore how to turn Advanced Data Protection on, and how it differs from the default iCloud encryption methods.

The key difference between ADP and how Apple encrypts data by default is how accessible your information is when stored on Apple’s servers.

In what Apple calls standard data protection, information sent between points, such as files stored on iCloud Drive and iCloud backups of your devices, is encrypted and transmitted securely. If someone intercepts that data between the two points, they will see only gibberish.

That data remains encrypted when it’s stored on Apple’s servers, so you can access it from other devices, for instance. However, Apple can still access the encryption keys to unscramble and read the data; and provide it to law enforcement following a legal request.

By contrast, when you enable Advanced Data Protection for iCloud, the data is end-to-end encrypted, meaning only your trusted devices possess the encryption keys to read it. The information remains encrypted on the servers, and not even Apple can access its contents. (Not all iCloud data can be end-to-end encrypted. Apple breaks out-which types of information, such as iCloud Mail messages, that remain covered by standard data protection even when ADP is turned on.)

The UK’s Investigatory Powers Act, the “Snooperd’s Charter”, makes that inaccessibility illegal, which is why Apple is turning the feature off for UK customers.

Some services are end-to-end encrypted regardless due to the sensitivity of the data, such as passwords, information stored in the Health app and payment information.

Note! Setting up ADP applies to all devices in your Apple account.

To set up ADP on your account, first make sure you have met all the prerequisites for the feature:

  • Your Apple Account must use two-factor authentication.
  • You must have a recovery method set up in case you lose access to your account. That can be a 28-character Recovery Key or a person you have designated as a Trusted Contact.
  • Every device connected with your Apple Account must be able to run at least
  • iOS 16.2, iPadOS 16.2, MacOS 13.1
  • WatchOS 9.2
  • TVOS 16.2
  • HomePod 16.0
  • For Windows computers, make sure iCloud for Windows is at version 14.1 or later.
  • If any of your devices do not qualify, you will be warned during the ADP setup process. If any of those are too old or you no longer have access to them, head to:
  • Settings > Remove Devices and delete them from your list.

Refer to the below image:

adp 1_2
Update your Devices

To turn on ADP on an iPhone, iPad or Mac do the following:

1. Go to Settings > [Your Name] > iCloud. On a Mac, open System Settings > [Your Name] > iCloud.

2. Scroll down to Advanced Data Protection, which likely says Off, and tap that to enable. This will take some time, and the screen will appear to be unresponsive; Just be patient. Later, if you want to disable ADP, repeat the above steps and select the Turn Off button.

See the below image:

adp 3_4
Turn on ADP

3, If there are any of the aforementioned impediments to setting up ADP, such as needing to update other devices on your account, you will review them on the next screen.

4. In the following screen, tap Review Recovery Options. You need to have a Recovery Key, Recovery Contact or both to ensure that you can get your data if you lose access to your iCloud account.

5. Enter your device’s passcode to finish.

See the following image:

adp 5_6
ADP is Enables

Activating ADP on one device means it’s on for all of your devices using the same Apple account, so you only need to set it up once.

Disclaimer

Technology is constantly evolving, and smartphone and desktop tech rarely remains static. Therefore, the information in this post is only accurate as of the date it was written. Blog posts that are older than six months may contain instructions that are no longer compatible with your device or operating system. We hope that the content from previous posts continues to function as intended. Thank you for reading TechSavvy.Life, where technology works for you.

. “Imagination is more important than knowledge. For knowledge is limited, whereas imagination embraces the entire world, stimulating progress, giving birth to evolution.”

-Albert Einstein

That’s it. Please feel free to share this post! One way to share is via Twitter.

Just click the Tweet icon below. This will launch Twitter where you click its icon to post the Tweet.

Checkout TechSavvy.Life for blog posts on smartphones, PCs, and Macs! You may email us at contact@techsavvy.life for comments or questions.

We value your feedback! Was this post helpful? Please share your comments with us. If you have a tech question related to your computer or smart device, feel free to reach out. Just send an email to contact@techsavvy.life, and be sure to include the device, app, and version you are using. To assist us further, you can also attach screenshots related to your inquiry.

Author’s eBook

The author’s Vietnam eBook on the “Battle for Tra Bong Vietnam: Events and Aftermath” can be accessed from a Kindle device or the Kindle App for a desktop or smartphone. The apps are free.

The author’s Vietnam eBook on the Battle for Tra Bong Vietnam: Events and Aftermath

4 Tips to Speed Up Google Chrome for Better Performance

The article emphasizes the importance of a web browser, specifically Google Chrome, in daily online activities. It provides four methods to enhance its performance: updating Chrome, clearing the cache, upgrading security settings, and managing performance settings like using Memory Saver. These steps aim to ensure a smoother browsing experience.

RAYMOND OGLESBY @RaymondOglesby2
March 11, 2025 – 6 minutes read time

In many ways, your web browser is as important as, if not more so than, your computer’s operating system. Think about it: Nearly everything you do, from writing emails and posting on social media to editing documents and streaming videos, can happen inside a browser. So when Chrome starts feeling sluggish, it can affect your whole online experience, professionally and personally. Do not get bogged down by your browser. Here are four ways to speed it up.

This tip works on devices running Google Chrome. Screenshots are from Windows 11 Pro running Chrome Version 134.0.6998.36 (Official Build) (64-bit).

Each new version of Chrome contains fresh features, security fixes, and performance improvements. So, it’s possible that updating to the latest version may help your speed woes. Even if it does not, it will keep you safer from online threats. When a new version is available, Chrome automatically updates in the background, when you close and re-open the browser.

First, open Chrome and click the Menu icon (the 3 dots) in the upper right. From the Menu, click the Settings option. Next, on the left side, scroll down to the bottom and click on the About Chrome option.

If Chrome is not up-to-date, Chrome will automatically download. Now, click the Relaunch button to update Chrome and reopen the browser. Your Chrome browser is now up-to-date. Refer to the below image:

Chrome 1
Updating Google Chrome

To check which version of Chrome you are running, repeat the above. Chrome will show the version and indicate it is up-to-date. See the below image:

Chrome 2
Google Chrome up to date

To clear your cache in Google Chrome, you clear your browsing data. This will clear your cache, cookies, and other browsing history. 

Clearing your cache can fix problems with loading or formatting on websites.

In the Chrome browser:

  1. Open Chrome and click the Menu icon (the 3 dots) in the upper right.
  2. From the Menu, click the Settings option.
  3. On the left side, click Privacy and security option.
  4. Under the Privacy and security section click the Delete browsing data button. See the following image:
Chrome 3
Accessing Privacy and security options
  1. A new dialogue box will open.
  2. Click the Basic menu option.
  3. Select the period to delete from in the Time range drop down menu
    (To clear all cached data and cookies, select All time, this is recommended).
  4. Ensure check boxes for Browsing history. Cookies and other site data and Cached images and files are ticked.
  5. Click on Delete data and wait for that dialogue box to exit. 
  6. Close all open Chrome tabs.
  7. Restart Chrome.

Refer to the below image:

Chrome 5
Selecting what data and when to delete

Once upon a time, Google developed the Chrome Cleanup Tool, an application that helps find and remove unwanted software (UwS), toolbars, and other automatically installed extensions that antivirus probes may miss from Windows devices. These types of programs can slow down your browser, so checking it for unwanted add-ons every so often is a must.

Unfortunately, the program was shut down in 2023. However, Google says users will remain “automatically protected” by its Safe Browsing features in Chrome. For extra protection, navigate to:

Settings >Privacy and security > Security, > Enhanced Protection

And enable which offers “real-time, AI-powered protection against dangerous sites, downloads, and extensions that’s based on your browsing data getting sent to Google.” See the below image:

Chrome 6
Enable Enhanced protection

There are two types of people in the world: Those who open just a few tabs at a time, then close them, and those who hoard tabs like they have never heard of bookmarking. If you are the latter, it’s a safe bet what’s causing your slowdown, and you should take action. Not sure which tabs to close? Hover over a tab, and the pop-up preview shows how much memory it’s taking up.

For something more automatic, Google introduced Memory Saver mode in 2022. This feature frees up resources from unused tabs in order to improve performance on tabs that are in use. While this feature should be enabled by default, you can open:

Settings > Performance > Memory Saver

and set to Maximum so tabs become inactive sooner. See the following image:

Chrome 7
Setting Memory Saver to Maximum

While you are here, go one further and scroll down to the Speed section. Make sure Preload pagesis enabled so websites and search results load faster. For an extra boost, enable Extended preloading for an even faster experience, though Google will be able to see what sites are being preloaded for you. Refer to the below image:

Chrome 8
Enable Preload and Extended preloading

Technology is constantly evolving, and smartphone and desktop tech rarely remains static. Therefore, the information in this post is only accurate as of the date it was written. Blog posts that are older than six months may contain instructions that are no longer compatible with your device or operating system. We hope that the content from previous posts continues to function as intended. Thank you for reading TechSavvy.Life, where technology works for you.

“Technology is nothing. What’s important is that you have faith in people, that they’re basically good and smart, and if you give them tools, they’ll do wonderful things with them.”

-Steve Jobs

You are finished. Please feel free to share this post! One way to share is via Twitter.

Just click the Tweet icon below. This will launch Twitter where you click its icon to post the Tweet.

Checkout TechSavvy.Life for blog posts on smartphones, PCs, and Macs! You may email us at contact@techsavvy.life for comments or questions.

We value your feedback! Was this post helpful? Please share your comments with us. If you have a tech question related to your computer or smart device, feel free to reach out. Just send an email to contact@techsavvy.life, and be sure to include the device, app, and version you are using. To assist us further, you can also attach screenshots related to your inquiry.

Author’s eBook

The author’s Vietnam eBook on the “Battle for Tra Bong Vietnam: Events and Aftermath” can be accessed from a Kindle device or the Kindle App for a desktop or smartphone. The apps are free.

The author’s Vietnam eBook on the Battle for Tra Bong Vietnam: Events and Aftermath

HDMI vs DisplayPort: Which Should You Choose for Your Monitor?

RAYMOND OGLESBY @RaymondOglesby2
February 25, 2025 – 7 minutes read time

Not sure whether to hook your new monitor up to your computer using HDMI or DisplayPort? Different ports have different capabilities and compatibilities. Let’s find out which is best.

One often overlooked consideration when choosing your PC monitor is the ports that come with it. The two primary standards are HDMI and DisplayPort, which offer different features and capabilities. Displays often use one over the other, while some even feature both options. But which should you use? The answer, as always, is “it depends.”

Let’s break down the major differences between standards, and help you identify which will better suit your individual needs and setup. Refer to the below image for the rear view of our Dell 8960 PC which supports both:

Dell 8960 Rear View
Rear View of Dell 8960 PC

Let’s start by talking about HDMI, the standard with which you are probably most familiar. See the below image:

Display Cable HDMI
HDMI cable

HDMI is most commonly used on TVs, sending high-definition video and audio signals over one cable for an easy, clean setup. There have been multiple versions of HDMI, each improving on the last. On modern monitors, you will find any combination of the following:

  • HDMI 1.4: Supports up to 4K (4,096 by 2,160) at 24Hz, 4K (3,840 by 2,160) at 30Hz, or 1080p at 120Hz.
  • HDMI 2.0: Supports up to 4K at 60Hz, and later versions (HDMI 2.0a and 2.0b) include support for HDR.
  • HDMI 2.1: Supports up to 10K resolution at 120Hz, adds improved HDR with dynamic metadata and enhanced Audio Return Channel (eARC) to send Dolby Atmos and DTS:X audio from display to receiver. HDMI 2.1 includes a variable refresh rate, like FreeSync, though some HDMI 2.0 monitors also support it.
    • HDMI 2.1a: Adds Source-Based Tone Mapping (SBTM).
    • HDMI 2.1b: Adds up to 48Gbps in bandwidth.
  • HDMI 2.2: Introduced at CES 2025, it supports 96Gbps data-transfer speeds, 12K resolution, and a Latency Indication Protocol (LIP) specification that assists in synchronizing audio and video signals between devices. However, it will take years before devices and media catch up to this new standard.

These are somewhat simplified explanations of each HDMI version, as there are other feature improvements in each standard, but they are the things most users will care about. If you want to take full advantage of those specifications, you will also need an HDMI cable capable of the correct bandwidth.

For example, if you are running 4K at 60Hz with HDR, you will want a cable labeled Premium High Speed or 18Gbps (or better). For 8K at high refresh rates, you may need even more bandwidth, so check the description and reviews of any cable you plan to buy. Lower-spec cables may still work under certain circumstances, but can be finicky, adding “snow” to the image or not routing your surround sound audio properly. If you ever experience issues, make sure the cable is up to snuff.

In addition to the above, all modern HDMI ports should support AMD’s FreeSync technology, which eliminates screen tearing in games by matching the monitor’s refresh rate to your video card’s output framerate (with newer HDMI versions supporting FreeSync at higher refresh rates). Nvidia’s similar G-Sync technology, however, does not always work over HDMI; on many monitors, it’s DisplayPort only.

DisplayPort looks similar to HDMI but is a connector more common on PCs than TVs. See the following image:

Display Cable Display Port
DisplayPort cable

It still allows for high-definition video and (in many cases) audio, but its standards are a bit different. On modern monitors, you will likely find any of the following:

  • DisplayPort 1.2: Supports up to 4K at 60Hz, some 1.2a ports may also support AMD’s FreeSync
  • DisplayPort 1.3: Supports up to 4K at 120Hz or 8K at 30Hz
  • DisplayPort 1.4: Supports up to 8K at 60Hz and HDR
  • DisplayPort 2.0: Supports 16K with HDR at 60Hz and 10K without HDR at 80Hz. 
  • DisplayPort 2.1: Adds USB4 compatibility.

When shopping for a DisplayPort cable,we recommend picking one from DisplayPort’s certified cables list to ensure it performs as advertised. In addition, DisplayPort has a few other useful features. First, it supports AMD’s FreeSync and Nvidia’s G-Sync, so you can have a tear-free gaming experience no matter which brand of card you use (as long as your monitor supports the technology, of course). 

You can also drive multiple monitors from one DisplayPort connection, rather than having to use multiple ports, which is handy. Laptops can even send DisplayPort signals through a USB-C port. Similarly, some modern laptops feature Thunderbolt 2/3/4, which can route DisplayPort signals over a different connection. Many DisplayPort cables also have clips to keep them securely in your monitor, which is both a pro and a con because they can sometimes be tough to get out!

One cable is not better than the other across the board, but each has its place. Refer to the below image:

Display Cables
Both display cables

First, you will need an output on your GPU that matches the desired input on your monitor, as well as an appropriate cable. If you are choosing between DisplayPort 1.4 and IDMI 2.0, DisplayPort would be the better option. If a monitor only gives you the choice between, say, HDMI 2.0 and DisplayPort 1.2, HDMI could be the way to go for HDR support, as long as all your devices support the HDMI version.

Ultimately, if you are a gamer looking for the highest-end performance and the most future-proofed standard, DisplayPort 2.1 is the best option. It offers the highest maximum data transfer rate (at 77.37 Gbps, it’s nearly double HDMI 2.1’s 42.6 Gbps maximum), much higher refresh rates at both 4K and 8K than HDMI (240 Hz and 85 Hz vs.144 Hz and 30 Hz), as well as higher Display Stream Compression (DSC) resolutions and refresh rates than IDMI. This is especially important for monitors that require compression to reach their highest resolution/frame rate specs.

That said, DisplayPort 2.1 adoption is far from universal on the monitor side, and many GPUs do not provide the bandwidth required to properly make full use of it regardless. DisplayPort 2.1 supports three different transmission modes, called Ultra High Bit Rate: UHBR10, UHBR13.5 and UHBR20. Only UHBR20 takes full advantage of the full bandwidth potential of DisplayPort 2.1, and only the most recent graphics cards support it. The best choice you can make is what’s best for your particular setup. Check every link in the chain before you buy a cable, so you can pick the best combination for optimal performance.

Source: Various PC manufacturers

Technology is constantly evolving, and smartphone and desktop tech rarely remains static. Therefore, the information in this post is only accurate as of the date it was written. Blog posts that are older than six months may contain instructions that are no longer compatible with your device or operating system. We hope that the content from previous posts continues to function as intended. Thank you for reading TechSavvy.Life, where technology works for you.

Don’t become a slave to technology – manage your phone, don’t let it manage you.

-Richard Branson

That’s it. Please feel free to share this post! One way to share is via Twitter.

Just click the Tweet icon below. This will launch Twitter where you click its icon to post the Tweet.

Checkout TechSavvy.Life for blog posts on smartphones, PCs, and Macs! You may email us at contact@techsavvy.life for comments or questions.

We value your feedback! Was this post helpful? Please share your comments with us. If you have a tech question related to your computer or smart device, feel free to reach out. Just send an email to contact@techsavvy.life, and be sure to include the device, app, and version you are using. To assist us further, you can also attach screenshots related to your inquiry.

Author’s eBook

The author’s Vietnam eBook on the “Battle for Tra Bong Vietnam: Events and Aftermath” can be accessed from a Kindle device or the Kindle App for a desktop or smartphone. The apps are free.

The author’s Vietnam eBook on the Battle for Tra Bong Vietnam: Events and Aftermath

How to Send eBooks to Your Kindle: A Step-by-Step Guide

The Amazon Kindle is an effective ebook reader, linked closely to Amazon’s ecosystem. Users can send various ebook formats to their Kindle via methods like the Send to Kindle tool, Kindle app, or email. Free ebooks are readily available through various platforms, enhancing Kindle’s reading options.

RAYMOND OGLESBY @RaymondOglesby2
January 28, 2025 – 7 minutes read time

The Amazon Kindle is a great ebook reader, but it’s tightly tied to Amazon’s ecosystem. If you have a Fire tablet or a smartphone, you can download other e-reading apps to beef up your library, but with the Kindle hardware, you are pretty much tied to getting your content directly from Amazon. Well, sort of. Using some free software, you can take ebooks in various formats and zap them over to your Kindle.

Let’s explore how to send other ebook formats to your e-reader, and where to get free ebooks.

  • Of course, we all like free stuff.
  • A large variety of free ebooks to choose from.
  • Download in a variety of formats for reading on your Kindle.

This is for the Amazon Kindle. It uses the iPhone, Android, PC, and Mac. The screenshots are from Windows 10 and iPhone 14 Pro.

Amazon offers a Send to Kindle page where you can upload ebook files saved on your device. First, on amazon.com/sendtokindle, click Select files from device. Refer to the below image:

Kindle 1
Selecting files to send

Next, select the book you want on your Kindle. This tool supports PDF, DOC, DOCX, TXT, RTF, HTM, HTML, PNG, GIF, JPG, JPEG, BMP, and EPUB formats on ebooks up to 200MB in size. (Amazon no longer supports sending new Mobi files.) Ensure the Add to your library toggle is ON, then click Send. See the below image:

Kindle 2
Send your files

Now, a status bar will appear, letting you keep tabs on the upload. You will see a checkmark and an In Library notice when it’s ready. See the following image:

Kindle 3
Status of sending to Kindle

Amazon also has an app for Windows and macOS that lets you do the same thing. Chrome has an extension you can enable though results are mixed.

If you have the Kindle app installed on your iPhone or Android device, you can add ebooks to your library with a few taps. In the example below we downloaded an ebook from Project Gutenberg on the iPhone.

First, open your Kindle app on your iPhone and search for an ebook. Next, tap the ebook. From here, you can Download sample to see a preview or tap the Share icon. Now, locate the Kindle app and tap it. Refer to the below image:

Kindle 5
Selecting a file to send to Kindle

Next, ensure the Add to your library toggle is ON, then tap Send. Now, the ebook will be saved in your library in the Kindle app and on our Kindle device. The process is similar for Android. See the below image:

Kindle 5
Send your file

Amazon also lets you email ebooks to your Kindle account via a specially crafted email address. First, to get your Kindle’s email address, go to:

amazon.com/myk 

or go to:

Account & Lists > Content Library > Devices

Next, in the list below, find your Kindle device and click it. In the drop-down window, click [your name’s] Kindle. See the following image:

Kindle 7
Find your Kindle

On the next page, you will see a Device Summary that lists your @kindle.com email address. (It’s set to a default address, but you can change it by clicking Edit.)  Refer to the below page:

Kindle 7
Your Kindle information

Back up top, click the Preferences tab, and scroll down to Personal Document Settings. Click the down arrow on the right and scroll to Approved Personal Document E-mail List. The email attached to your Amazon account should be listed here. If that’s the email address you will be using to send ebooks to your Kindle, you are all set. To use a different email, click:

Add a new approved e-mail address and enter the address you want to use.

Remember, your Kindle needs to be attached to a Wi-Fi network for this to work.

Amazon can automatically convert PDFs into the Kindle format, but you get two formatting choices. If you want your Kindle to display every page in the PDF as if it were a graphic, just email the .pdf file to your Kindle’s address without a subject line, upload it via the Send to Kindle website, or drag and drop the file onto a Kindle that’s attached to your PC with a USB cable.

That will maintain the formatting and graphics; it will appear on your Kindle like on your laptop. However, the font size may be too small to read.

Your other option is to attach the PDF file to an email and make the subject line “convert”—just that word. Send it to your Kindle email address and your PDF will be converted into a Kindle version that will let you mark it up and change the formatting. The graphics will still be in there as well, but you will lose the layout of the original PDF.

Third-party software, such as MiniTool PDF Editor – Kindle format converter, can also convert PDF files to Kindle formats like Word, image, TXT, and HTML.

Once you have emailed your ebook, on your Kindle head to:

Home > From Your Library

It might take a few minutes, but if your Kindle is connected to Wi-Fi, it should update automatically and the ebook will appear.

Want to delete the ebook? Tap the Menu icon (the three-dots) on the bottom right of your ebook in Your Library and select Remove download to remove it from your Kindle or Permanently Delete to remove it from your Amazon account.

  • Amazon hosts periodic Stuff Your Kindle Days, where select ebooks are free for a 24-hour period. They are usually grouped by theme.
  • To hook into public library catalogs and send ebooks to your Kindle, check out the Libby app from OverDrive. (Hoopla offers a similar service.)
  • If you want classics, Project Gutenberg has 70,000+ copyright-free ebooks.
  • For historical and academic texts, check out archive.org.
  • ManyBooks.net has a mix of free and paid classics and self-published titles.
  • Free-Ebooks.net has a large collection of self-published ebooks and classics; provide your email address to get five free ebooks per month.
  • If you like science fiction, the publisher Baen also has a set of free ebooks.
  • BookBub has a free ebook section filled with romance novels and other casual reads.

Source: Amazon, PC Mag

Disclaimer

Technology is always changing. Rarely is there static tech for smartphones and desktops. Thus, the contents of this post are only valid at the time of writing. Blog posts older than six months may have directions incompatible with your device or OS. Hopefully, older post content will continue to work as advertised. Thank you for reading TechSavvy.Life for Technology at Work For You.

Technology is just a tool. In terms of getting the kids working together and motivating them, the teacher is the most important.

-Bill Gates

That’s it. Please feel free to share this post! One way to share is via Twitter.

Just click the Tweet icon below. This will launch Twitter where you click its icon to post the Tweet.

Checkout TechSavvy.Life for blog posts on smartphones, PCs, and Macs! You may email us at contact@techsavvy.life for comments or questions.

Was this post helpful? We would love to hear your comments. Do you have a computer or smart device tech question? I will do my best to answer your inquiry. Just send an email to contact@techsavvy.life. Please mention the device, app, and version you are using. To help us, you can send screenshots of the data related to your question.

Author’s eBook

The author’s Vietnam eBook on the “Battle for Tra Bong Vietnam: Events and Aftermath” can be accessed from a Kindle device or the Kindle App for a desktop or smartphone. The apps are free.

The author’s Vietnam eBook on the Battle for Tra Bong Vietnam: Events and Aftermath

How to Disable AI Overviews in Google Search

This post provides tips for handling AI-generated summaries in Google search results. It explains how to disable these overviews using specific search modifiers.

RAYMOND OGLESBY @RaymondOglesby2
July 23, 2024 – 3 minutes read time

This is for devices running Google or Bing. Screenshots are from Windows 10 desktop

Open Google, click the 3-dot menu icon (upper right corner), then click the Settings option. If Google is outdated, it will automatically update.

  • View your Google or Bing search results without an AI-generated summary.
  • Narrow your search results to what you just want to preview.

We rely on Google every day to provide us information. But what happens when our source of knowledge becomes messy and unreliable? AI Overviews utilize Google’s Gemini AI to provide an answer to your query right on the search page; no need to click.

Still in its infancy, this feature occasionally surfaces incorrect information, so some web surfers look to disable it entirely. There are a few ways to make an AI Overview go away, but no method is as simple as tricking Google itself into getting rid of it. Google uses search modifiers, named operators, which help narrow search results. Here are a few examples:

  • Use quotations (” “) to search for the exact phrase
  • Add site: to search a single website
  • Search for a certain type of file with filetype:
  • Exclude terms with a minus (-) symbol. The minus symbol stands for NOT.

If we ask “who owns Facebook” an AI-generated summary will be displayed. Refer to the below image:

Google Tip 1
With AI-generated summary

And if you add the term -AI at the end of the query, an overview is not generated. It’s a very simple solution to the AI Overview problem that can be quickly repeated on subsequent queries without needing multiple steps. See the below image:

Google Tip 2
Without AI-generated summary

However, it’s worth noting that this does not work because of the -AI modifier. On subsequent tests, we found that putting pretty much anything in there (Ex: -isports, -farm) also did the same thing.

So, no, Google did not add a secret AI kill switch to its search engine. Instead, AI Overviews are likely only available under certain conditions, and by using a search modifier, you circumvent those parameters. Still, it’s an easy way to game the system until we get an easier way to disable these overlays.

Technology is always changing. Rarely is there static tech for smartphones and desktops. Thus, the contents of this post are only valid at the time of writing. Blog posts older than six months may have directions incompatible with your device or OS. Hopefully, older post content will continue to work as advertised. Thank you for reading TechSavvy.Life for Technology at Work For You.

“Real gs move in silence like lasagna.”

Lil Wayne

That was easy. Please feel free to share this post! One way to share is via Twitter.

Just click the Tweet icon below. This will launch Twitter where you click its icon to post the Tweet.

Checkout TechSavvy.Life for blog posts on smartphones, PCs, and Macs! You may email us at contact@techsavvy.life for comments or questions.

Was this post helpful? We would love to hear your comments. Do you have a computer or smart device tech question? I will do my best to answer your inquiry. Just send an email to contact@techsavvy.life. Please mention the device, app, and version you are using. To help us, you can send screenshots of the data related to your question.

The author’s Vietnam eBook on the “Battle for Tra Bong Vietnam: Events and Aftermath” can be accessed from a Kindle device or the Kindle App for a desktop or smartphone. The apps are free.

The author’s Vietnam eBook on the Battle for Tra Bong Vietnam: Events and Aftermath

Take Control of Your Social Media Feed with These Tips

Social media feeds are controlled by algorithms that track user interactions to serve content. Although helpful, they can misinterpret preferences. To regain control, users can reset their watch history on YouTube, adjust settings on Facebook and Instagram, and modify interests on LinkedIn and Twitter, or even create new accounts for a fresh start.

RAYMOND OGLESBY @RaymondOglesby2
October 15, 2024 – 9 minutes read time

This is for devices using Social Media. Screenshots are from iPhone 14 Pro running iOS 17.6.1

Click here to learn how to update your iPhone to the latest iOS version.

Almost everything you see in your social media feeds today is governed by algorithms. Think of them as the digital rules and intelligence that social media companies use to deliver a steady stream of interesting content to your eyes. They are invisible conductors that note everything you like, click, or comment on and use that information to serve up more content you likely engage with.

Algorithms are far from perfect, though. Sometimes, they pick up on the wrong signals and stuff your feed with things you do not care about. If you find yourself increasingly uninterested in the posts you see in your feed, it’s often possible to reset those algorithms. Doing it correctly can completely change what your social networks show when you log in. 

Let’s explore how to take back control of your social media.

YouTube feeds you content based on what you watch, search for, and subscribe to. As YouTube says on some pages (accessible below), “Keeping your history makes YouTube more personal.” But familiarity can breed contempt. 

First, reset your Watch History. On the mobile app:

Tap your name > Cog icon > Settings > Manage All History

Refer to the below image:

YOUTUBE WATCH HISTORY IMAGE
Manage YouTube history

From here, you have a few options. You likely have Auto-Delete (Off) set up; click that, and you can tell YouTube to delete the tracked history of anything older than 36, 18, or 3 months. The shorter the time frame, the bigger the reset to your suggestions will be. 

Alternatively, click where it says DELETE with a down arrow to access a menu to delete what you have seen today, in a custom range of time, or everything for all time. That final one is the nuclear option. Your suggestions will be totally fresh. 

While here, click the Saving Your YouTube History link to change what YouTube saves. You may not want it to save searches because you may look for some wacky stuff. Or set it to turn off any YouTube history saving whatsoever. Scroll down the page to YouTube Customize Your Feed Feedback and click Delete to get rid of videos you specifically picked for your home feed in the past. 

(On the desktop, click your avatar at the upper right and select Your Data in YouTube. Scroll down to YouTube Watch History and toggle the On button to Off so your history storage is paused. Click Manage your YouTube Watch History to access the menus as mentioned above, like Auto-Delete).

Clicking “Not Interested” under select videos can also impact the algorithm. 

For a genuinely full reset, unsubscribe to every YouTube channel you follow.

On mobile, click Subscriptions at the bottom, then click All at the top, and you will see the full list. Click the bell icon to the right of each for a menu that includes Unsubscribe. (On Desktop, use Subscriptions> Manage to get to the list with the menus.)

Facebook’s main display is called the Feed. It features updates, photos, videos, and more from people, Pages, and groups you follow.  posts based on what it believes you will like. 

Thankfully, there are plenty of ways to adjust the Facebook Feed. Click your avatar profile pic at the upper right on the desktop and go to 

Settings and Privacy > Feed

You will see options here to manage your favorites (people/groups you want to see the most), unfollows (people you do not want to dump, but do not want to see as much of), snoozes (people you want to temporarily unfollow), and reconnect (it lets you turn off unfollows). See the below image:

Facebook Feed Settings
Manage Facebook feed

You can also opt to avoid looking at Facebook’s main page. Go right to Feeds (via the left-hand navigation), and then you can view only the Favorites, Friends, Groups, or Pages you want to see. 

As you use Facebook daily, be sure to perform hides, snoozes, and unfollows on posts as you encounter them to “train” the algorithm and steer it toward the kinds of content you actually want to see. 

You also can and should go into Facebook Ad Preferences and change things so you can impact the advertising in your Feed. You can also do this with ads as they pop up. Click the X to hide an ad immediately, or use the three-dot menu to hide or report it. You can also limit advertising topics you see by going to:

Settings & Privacy > Settings > Account Center > Ad Preferences > Customize ads

then click “See All” next to Ad Topics

You can use Page Moderation to block certain words or phrases so they do not appear, at least in the comments. Go to:

Settings > Followers and Public Content > Hide comments containing specific words

You choose the list of words to block.  

Since everything you see on Facebook is tied entirely to who you friend and follow, a complete reset would require you to unfriend everyone. Starting a new profile is more manageable. This is also pretty easy; click your profile pic to see a button that says See all profiles. In the following menu, it shows + Create new profile or Page. A personal profile is just for individuals, but you can make a new one to get a fresh, clean feed. A page is more for a business or organization, that multiple people can control. No matter what you create, you can easily switch back and forth between the profiles/pages. See the following image:

FACEBOOK NEW PROFILE.
Create Facebook profile

Instagram is part of Meta, just like Facebook, so many of the same rules we listed above apply. For example, the Ad Preferences/Ad Topics are similar. Access them by clicking:

Menu > Settings > Account Center > Ad Preferences

Again, there’s no direct way to reset the algorithm, but you can manipulate things by clicking the three-dot menu on posts to set the person as an unfollow or to add to favorites. Click into the account of someone you see, and on the following menu, you can add a person as Close Friend, Favorite, Mute (Posts and/or Stories), Restrict (which limits interaction without a complete block), or Unfollow.

Under Settings, you will find Muted accounts, Blocked accounts, Close Friends, and other lists you can change as desired. 

The best reset is to open a new account. You can do that by logging out of Instagram and creating a new user profile. After that, log in to either account, go to:

Settings > Account Center > Accounts > Add Account

and log into the second one. You can link the two accounts (or even a Facebook account) and switch between them. Remember, if you follow all the same people on the new account, it will look like the previous one. 

Twitter gives you so little control over your feed that if you want to reset the type of content that the platform serves you, your best bet is to start a totally new account. If that’s a bit too drastic for you, try to adjust your existing feed by going to

Settings & Privacy > Privacy and Safety > Content You See

This will let you uncheck topics and interests the service believes you are into. Sadly, you can not uncheck them all at once. Also, under Privacy and Safety, scroll down to Ads Preferences, and uncheck all that. 

When using the service, click the 3-dot ellipsis menu on any ads you do not like to block them. Same with anyone you follow that you have lost interest in. If you want to really get rid of everyone you follow to start fresh, go to Following and click the Following button (it will turn to a red Unfollow) next to every name to unfollow; this will take a while if there are a lot of them. If you do not want to do it manually, there’s a Chrome extension called X (Twitter) Mass Unfollow.

Microsoft’s social network for businesspeople (or those looking for work) does a pretty good job of just showing you the people you follow, but likes to sneak in a few ads based on what it thinks you like. Under your profile, pick:

Settings & Privacy > Advertising Data > Interests and traits

uncheck anything you are not into. Or turn them all off, but of course, then your ads are less relevant.  In fact, go through all the “Data collected on LinkedIn” and “Third-party data” entries. If you turn them all off, you will get a totally new feed, albeit probably irrelevant.

Source: Social Media platforms

Technology is always changing. Rarely is there static tech for smartphones and desktops. Thus, the contents of this post are only valid at the time of writing. Blog posts older than six months may have directions incompatible with your device or OS. Hopefully, older post content will continue to work as advertised. Thank you for reading TechSavvy.Life for Technology at Work For You.

“Proverbs are all very fine when there’s nothing to worry you, but when you’re in real trouble, they’re not a bit of help.”

LM Montgomery

That’s it. Please feel free to share this post! One way to share is via Twitter.

Just click the Tweet icon below. This will launch Twitter where you click its icon to post the Tweet.

Checkout TechSavvy.Life for blog posts on smartphones, PCs, and Macs! You may email us at contact@techsavvy.life for comments or questions.

Was this post helpful? We would love to hear your comments. Do you have a computer or smart device tech question? I will do my best to answer your inquiry. Just send an email to contact@techsavvy.life. Please mention the device, app, and version you are using. To help us, you can send screenshots of the data related to your question.

The author’s Vietnam eBook on the “Battle for Tra Bong Vietnam: Events and Aftermath” can be accessed from a Kindle device or the Kindle App for a desktop or smartphone. The apps are free.

The author’s Vietnam eBook on the Battle for Tra Bong Vietnam: Events and Aftermath

Maximize Online Protection: The Power of Password Managers and Unique Access Codes

This post emphasizes the importance of strong, unique passwords and the use of password managers to enhance security. It highlights the risks of using common or personal information-based passwords and provides tips for creating and managing secure passwords.

RAYMOND OGLESBY @RaymondOglesby2
August 13, 2024 -9 minutes read time

This is for devices using passwords. Screenshots are from iPhone 14 Pro running iOS 17.5.1+

If you are still using “qwerty” or “starwars” as a password, you should stop doing this. Let’s find out what makes a bad password, why you should care, and how to make a good one.

Don’t have the password to get into your bank account? You are out of luck unless you can trick the bouncer into telling you the password is “kangaroo.” A simple password like that would be a terrible choice to protect your access to a bank site. And yet, chances are good you are using something just as bad, because stronger passwords are too hard to remember.

The only safe way to store proper passwords is in a password manager. If you are not using one, you probably rely on a highly crackable password like “baseball” or “12345”, or you have memorized one complex password, like “Jazz2day4Me!” and use it everywhere. Password security is no small matter. Given the enormous risk, you need to keep your passwords safe.

Even the best password manager does not guarantee the safety of your accounts; not if you use it to store the same old, tired passwords. You have to switch out your old and weak passwords for new and stronger ones.

Once you have replaced all your lame passwords with strong, unique ones, you can relax, at least until a data breach forces a change. The National Institute of Standards and Technology (NST) no longer recommends changing passwords every 90 days. NIST now recommends using long phrases like “Correct-Horse-Battery-Staple” and changing them only when necessary. If you have terrible passwords, “when necessary” means right now.

Passwords 1
Bad passwords

Just what makes a bad password? Let’s look at some of the attributes of terrible passwords, and then some pointers on improving them.

Every few months a news outlet posts a list of the worst passwords. We see a lot of easy-to-type options, like“12345” and “qwerty”. Easy for you to type? Sure. But also easy for hackers to crack. Other common (and poor) passwords consist of simple dictionary words, like “baseball”, “monkey”, and “starwars” in the list of worst passwords. These, too, are easy to crack.

A few of the best password managers (tap or click a button to view):

Some secure websites lock down after a given number of wrong password attempts, but many do not. For those with no bad guess lockout, hackers can cross a list of email addresses with a list of popular passwords and set up an automated process to keep trying combinations until they get in.

A properly secured website does not store your password anywhere. Instead, it runs the password through a hashing algorithm, a one-way encryption. The same input always produces the same output, but there’s no way to return to the original password from the resulting hash. If the password you type hashes to the same one that’s stored, you gain access. Even if hackers capture the site’s user data, they do not get passwords, just hashes.

But smart hackers can crack weak passwords if they know the site’s hashing function. They start by running a huge dictionary of common passwords through the hashing function. Then they look for the resulting hashes in the captured data. Each match is a cracked password. Sites with the best security enhance the hash function with password salting, which makes table-based cracking impossible, but why take the risk? Just stay out of the dictionary.

What about this perfect password: 1qaz2wsx3edc4rfv. You just “type” it by sliding a finger down four slanted columns of the keyboard. You think it’s so perfect, that you use it everywhere. And that is a big mistake.

Hardly a week goes by without news of a breach at some company or website, exposing thousands or millions of usernames and passwords. Smart victims change their passwords immediately. Those who ignore the problem may find themselves locked out of their accounts after the hackers have reset your passwords.

Those hackers know that all too many people recycle their passwords. Once they find a working username and password pair, they try the same credentials on other sites. You may not be so worried about losing access to your old Dropbox account, but if you used the same login on your bank’s website, you are in big trouble.

Passwords 2
Using the same credentials on websites

It gets worse. If someone else takes control of your email account, they can lock you out by changing the password. Then they can break into your other accounts by having a password reset link emailed to that account. Worried yet? You should be!!!!

Using personal information as the basis for your passwords is awfully tempting, but it’s a bad idea. Whether your dog’s name is Fifi or Khaleesi, that name probably appears in the dictionaries hackers use for brute-force attacks. Other possibilities such as the initials and birthdate of a family member probably will not fall to a brute-force attack. If someone wants to hack your account specifically, that personal data can fuel a trial-and-error guessing attack.

Do not think for a minute that your personal details are private. There are dozens of sites people can use to find details about anybody: address, birthdate, marital status, and more. Your social media posts can be another source of personal info, especially if you have not properly secured your accounts. A determined hacker (or a nosy neighbor) can probably guess any password you build based on your data.

If you are not using a password manager, you have surely experienced forgetting the password for a site. It’s all too common. That is why virtually every login page includes a “Forgot your password?” link. Some sites send a reset link to your email address, while others let you reset the password after answering your security questions. And that opens a back door to anyone wanting to hack your account.

Most sites offer abysmal options for security questions like:

  • What is your mother’s maiden name?
  • Where did you go to high school?
  • What was your first job?

As noted, your personal life is an open book to anyone with internet searching skills. When possible, ignore the preset questions. Create your own question, with a unique answer you will always remember but nobody else could guess.

It’s harder when the site does not let you define your own questions. In that case, your best bet is to use a memorable answer that’s a total LIE like:

  • My mother’s maiden name is Fauci.
  • I went to school at More Science High School.
  • For my first job, I was a linotype operator.

There is an element of risk since you might forget which lie you chose. We suggest storing these oddball answers in the iPhone Notes app or on Google Drive.

We hope we have convinced you that using common passwords is a rotten idea, as is building passwords from personal information. Even the best strong, random password becomes a liability if you use it everywhere. If you are ready to spring into action, here are some starting points:

  • Use a password manager
  • Switch to a better password manager
  • Remember an extremely secure master password for your password manager and keep it on another app. Better yet, just remember the master password.
  • Take advantage of a random password generator to upgrade your old, bad passwords
  • You could even create your own random password generator in Excel
  • Enable multi-factor authentication wherever available

If a secure site does not take care of security, you could still lose that site’s credentials to a data breach, but by making all your passwords long, strong, and unique, you can rest assured that you have done everything you can to protect your online accounts from password-based attacks.

Passwords 3
Risky password behavior

You may want to switch to using Passkeys or Passphrases.

Source: PC Mag

Disclaimer

Technology is always changing. Rarely is there static tech for smartphones and desktops. Thus, the contents of this post are only valid at the time of writing. Blog posts older than six months may have directions incompatible with your device or OS. Hopefully, older post content will continue to work as advertised. Thank you for reading TechSavvy.Life for Technology at Work For You.

“Try and keep on trying until that which seems difficult becomes possible and that which seems only possible becomes habit and a real part of you.”

Dieter F Uchtdorf

That’s it. Please feel free to share this post! One way to share is via Twitter.

Just click the Tweet icon below. This will launch Twitter where you click its icon to post the Tweet.

Checkout TechSavvy.Life for blog posts on smartphones, PCs, and Macs! You may email us at contact@techsavvy.life for comments or questions.

Was this post helpful? We would love to hear your comments. Do you have a computer or smart device tech question? I will do my best to answer your inquiry. Just send an email to contact@techsavvy.life. Please mention the device, app, and version you are using. To help us, you can send screenshots of the data related to your question.

You can access the E-book from a Kindle device, or the Kindle App for a desktop or smartphone. The apps are free.

The author’s Vietnam eBook on the Battle for Tra Bong Vietnam: Events and Aftermath

How to Find Out Who Is Calling You

This post discusses how to identify legitimate calls and avoid scammers, addressing phone verification, spoofed numbers, and web searching. It provides options like reverse phone lookup websites and tools like WhoCallsMe, Spy Dialer, PeopleFinders, and USPhoneBook. It also suggests utilizing mobile carrier solutions, reporting to the FTC, and the National Do Not Call Registry to combat spam calls.

RAYMOND OGLESBY @RaymondOglesby2
June 11, 2024

This is for any browser on a desktop, laptop, or smartphone. Screenshots are from Google Chrome on Windows 10

The phone rings and it’s a number you do not recognize. Or perhaps an unknown number shows up in your missed calls. You are curious but do not want to pick up or call back if it’s a telemarketer or scammer. Instead of playing robocall roulette let’s explore five ways to see who is calling before you engage.

You may have noticed that America has a problem with scam calls. Scammers took $10 billion from unsuspecting victims in 2023, and it’s hard to see the problem going away anytime soon. If you get a call, there are a few ways to tell if it’s legit or not.

  • What does the phone say? When a call comes in, look for a displayed number and location. If your phone is not showing any information and says something like Unknown, chances are there’s a scammer on the other end. Anyone can hide their number, but it’s best to let this one go to voicemail and call back if it’s someone you know. If the phone says Scam Likely, it’s typically correct; just ignore the call.
  • Look for verification. Carriers have started verifying phone numbers when you receive a call. Google’s phone app also adds a badge on incoming calls that can be attached to a business. Unfortunately, this does not verify every call from a legitimate business or weed out legitimate businesses that use robocalls.
  • Watch out for spoofed numbers. Have you ever gotten a call from what looks to be your own phone number, only it’s a few numbers off? Do not pick those calls up; scammers like to spoof phone numbers and trick you into picking up. They think you are more likely to pick up if the call is from your area code or someone you know.

Note! We recommend ou not click or tap on any icon off the main screen. These buttons launch web sites that may introduce malware or be blocked by your browser security. Also, any screen that has flashing items, immediately exit the screen.

If you click or tap on a button that starts a scanning process for addresses,emails, public information, criminal records, etc., the process will take several minutes. On the desktop, you can stop the process by hitting Cntl-Alt-Del keys, then select Task Manger. Next, right=-click on your browser entry and select End Task. Your browser will exit stopping the scanning process.

If you want to quickly know whether a caller is legit or a scammer, do a quick web search. As a rule of thumb, if the search results are primarily reverse phone lookup websites, it’s safe to say other people have received unwarranted calls from that same number and are reporting it to warn others. Refer to the below image:

Calls You 1
Search the web

Speaking of reverse phone lookups, if you want to do some digging about a certain phone number, many websites can help you. You usually have to pay to get any worthwhile information, but there are a few tools that can help you for free. Even though they are free if you want additional information about the phone number, the sites charge for their service.

At WhoCallsMe, users can report their experiences with specific phone numbers. Enter a number and the website will tell you where the area code is from. You can then enter your own report or view what others say about it. See the below image:

Calls You 2
WhoCallsMe main screen

Spy Dialer allows you to search for phone numbers, names, addresses, and emails. Enter a phone number, then choose if you want to look up any linked names or photos, listen to the number’s outbound voicemail, or confirm if the number is spam or not. Spy Dialer can tell you with whom the number is registered, their general location, and whether or not the number has been reported as spam before.

For more information, click Phone Details to see how long the line has been in service and if the number is spoofed. Choose Hear Voicemail to get the caller’s outbound voicemail, if available. You can click Report Call to file a complaint with Spy Dialer.

We recommend this site over the others because it’s faster and offers more information. See the following image:

Calls You 3
Spy Dialer main screen

PeopleFinders allows you to look up a phone number, name, address, or email. Enter a phone number into the search bar to get the caller’s general location, carrier, and phone type. More revealing information, such as the caller’s full name and address, is hidden requiring a fee. Refer to the below image:

Calls You 4
PeopleFinders main screen

You can look up phone numbers, names, and addresses at USPhoneBook, though this works better for identifying individuals rather than businesses. Enter a number to find the person connected to it. The site will display a list of people who may be related to the person. You can then mark the number as safe or spam. Keep in mind that these listings can be outdated.

Click Get Details to view extra information about the person. This will include their age, current (and former) addresses, phone numbers associated with them, a list of relatives and associates, and even related email addresses. See the below image:

Calls You 5
USPhoneBook main screen

One option is to look at your mobile carrier’s anti-spam solutions for stopping spam calls and robo texts. Additionally, apps likeRoboKiller and Truecaller help keep the spam callers at bay. You can also report unwanted calls to the FTC and register your number with the National Do Not Call Registry, though those wishing to do you harm will undoubtedly ignore this. See the following image:

Calls You 6
National Do Not Call Registry main screen

Disclaimer

Technology is always changing. Rarely is there static tech for smartphones and desktops. Thus, the contents of this post are only valid at the time of writing. Blog posts older than six months may have directions incompatible with your device or OS. Hopefully, older post content will continue to work as advertised. Thank you for reading TechSavvy.Life for Technology at Work For You.

. Motivation is what gets you started. Habit is what keeps you going.

Jim Rohn

You are finished. Please feel free to share this post! One way to share is via Twitter.

Just click the Tweet icon below. This will launch Twitter where you click its icon to post the Tweet.

Checkout TechSavvy.Life for blog posts on smartphones, PCs, and Macs! You may email us at contact@techsavvy.life for comments or questions.

Was this post helpful? We would love to hear your comments. Do you have a computer or smart device tech question? I will do my best to answer your inquiry. Just send an email to contact@techsavvy.life. Please mention the device, app, and version you are using. To help us out, you can send screenshots of your data related to your question.

You can access the E-book from a Kindle device, or the Kindle App for a desktop or smartphone. The apps are free.

The author’s Vietnam eBook on the Battle for Tra Bong Vietnam: Events and Aftermath