At times you would like to “grab” a copy of a web page in Google Chrome without printing it out on paper. This is not obvious but easily to do on various devices.
At times you would like to “grab” a copy of a web page in Google Chrome without printing it out on paper. This is not obvious but easily to do on various devices.
This is for Windows 10 PCs, Macs and other devices that support Google Chrome
Copyright Scott Adams, Inc./Distributed by Universal Uclick for UFS
First, open Chrome and navigate to a web page you would like to save as a PDF. In the upper right hand corner, click on the hamburger icon (the one with three dots). Refer to below image:
The Hamburger icon
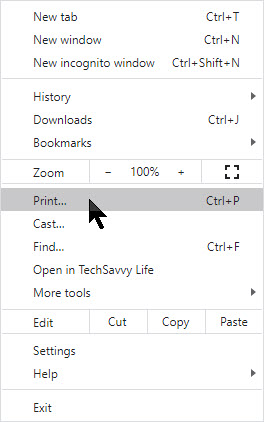
In the pop-up menu, select Print. See below image:
The Chrome Print option
The Print window will open. From here, select Destination, then click on Save as PDF. See following image:
Chrome’s Save as PDF option
Use the Pages option to save certain pages (for example, only the first page like in my example or a range of pages). If you would like to change the orientation of the PDF file from portrait (the default) to landscape, click on the Layout option.
When you are done with your options, click on the Save button at the bottom of the page. Refer to below image:
Chrome’s Save your changes option
The Save As dialog box will open. Enter the path where you want to save your PDF file and rename the file, if necessary. Click Save to save your file. See following image:
Chrome’s Save the PDF file
Your web page(s) will be saved as a PDF file in the location you have chosen.
It’s possible to save documents to PDF files other than Chrome. Whether its a Window 10 or a Mac computer, print-to-PDF functionally will be similar.
Please feel free to leave a comment. I would love hearing from you. Do you have a computer or smart device tech question? I will do my best to answer your inquiry. Please mention the device, app and version that you are using. To help us out, you can send screenshots of your data related to your question.
The author’s Vietnam eBook on the Battle for Tra Bong: Events and Aftermath
Outlook lets you add an expiration date to email you send or receive. Once the expiration date has passed the email will be displayed with different formatting, a strikethrough, and you can use Outlook’s built-in tools to manage expired email automatically.
Outlook lets you add an expiration date to email you send or receive. Once the expiration date has passed the email will be displayed with different formatting, a strikethrough, and you can use Outlook’s built-in tools to manage expired email automatically.
This is for Microsoft Outlook 2010 and later. Screenshots are from Microsoft 365 Outlook
Copyright Scott Adams, Inc./Distributed by Universal Uclick for UFS
To add an expiration date to an email you’re sending, you need to open the Properties window for the email.
Open Outlook and compose a message. Then click on Options. Next, in the More Options Group click on Message Options. The Propeties window will be displayed. Now, in the Delivery Options Group, checkmark Expires after and set the Date and Time you wish for the email to expire. Refer to below image:
Settring Expire Date for a sent email
Outlook has a formatting rule for expired emails. This rule can be found under the Conditional Formatting dialog. The dialog box is displayed from the View tab, then select View Settings. Next, select Conditional Formatting option. The email that has expired has a grey font and the text has a strikethrough. See below image:
Setting Expire date formatting
This formatting rule will be applied to the receiptents’s Outlook as well as other web apps, like GMail. Now, click OK twice to close the dialog boxes.
For demonstration purposes, I am backdating the email to show the strikethrough formatting when I open the email. Now, close the Properties window and send the email. You will get a prompt saying the Expire Date has passed if backdating or if the date has actually passed, just click Yes. It can still be opened but the strikethrough gives a visual indication that the email is no longer relevant. See following image:
The sent email with formatting
Set an Expire Date for All Messages You Send
You can setup Outlook to automatically add an expiration date of some number of days after the message is sent.
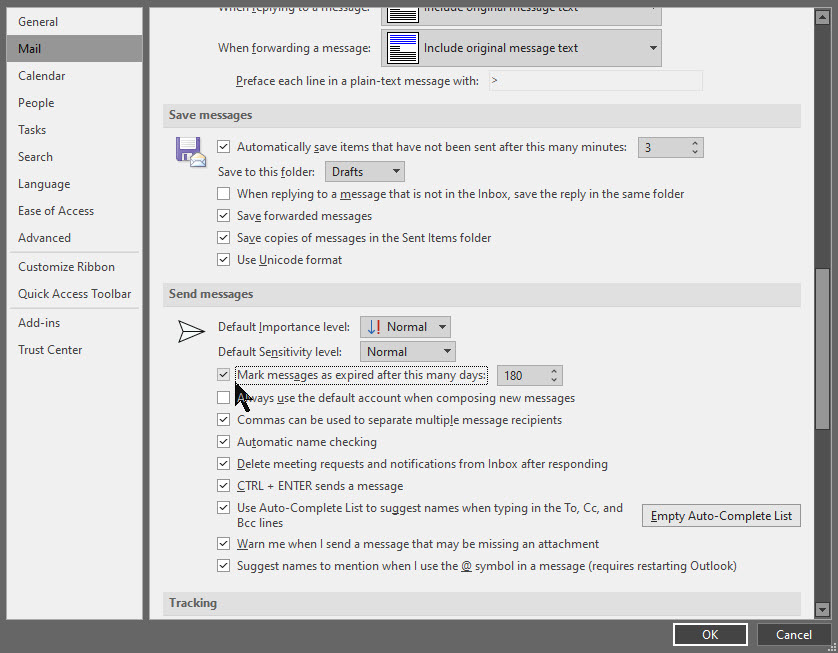
Double-click to open the message. Next, click on File then Options. Next, click on the Mail tab. Under the Send Messages Group, checkmark Mark messages as expired after this many days and set the days you wish for the email to expire. Click OK to save your change. Refer to below image:
Setting the Expire Date for all emails you send
Delete An Expired Email
To delete an expired email. Just select the strikethrough emails and click the Delete icon in the ribbon or press the Del key. You could also show the expired emails by adding a column to a folder that shows the expiration date.
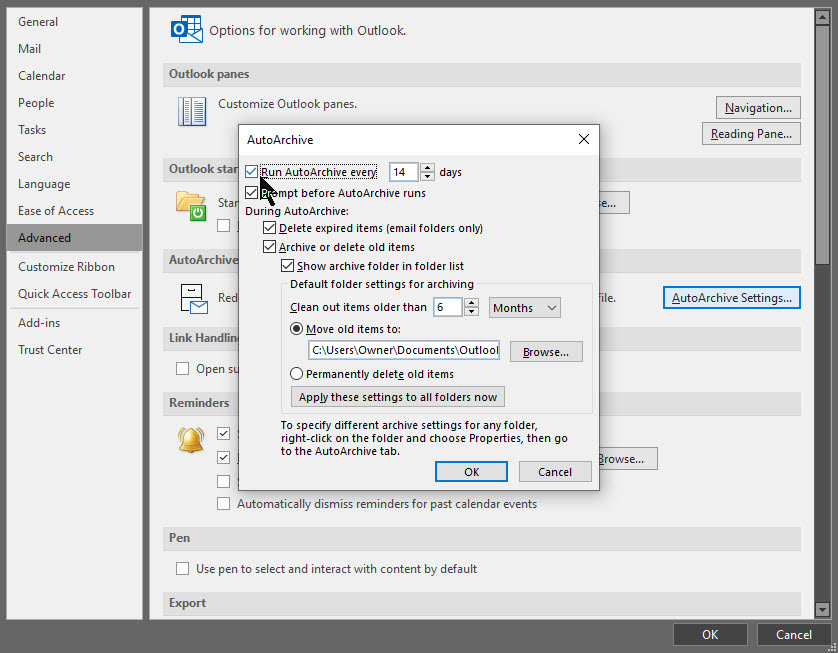
If you have turned on Outlook auto archive feature, then you can delete emails automatically based on expire date.
Open the AutoArchives window by File > Options > Advanced. Select the option AutoArchive Settings. Checkmark the option Run AutoArchive every 14 days (the default). Select OK twice to save your change. See following image:
Setting the AutoArchive feature
When this option is enabled, emails will be deleted or moved (depending on other settings) when the date has passed.
Set an Expire Date for Received Email
You can set an expiration date for a message you have received.
Double-click to open the message. You can not set an expiration date from the Reading Pane.
Select File then Properties. Under Delivery Options, checkmark the box Expires after amd se;ect a date and time for your message to expire. Then, click Close and the Save icon in the upper left hand corner of your message or click File > Save to save your change. Refer to below image:
Setting Expire Date for received email
I have found TechSavvy.Life blog posts extremely helpful. Check them out for posts on smart phone apps, Macs and PCs!
Please feel free to leave a comment. I would love hearing from you. Do you have a computer or smart device tech question? I will do my best to answer your inquiry. Please mention the device, app and version that you are using. To help us out, you can send screenshots of your data related to your question.
The author’s Vietnam eBook on the Battle for Tra Bong: Events and Aftermath
Oops! You just sent a Google Gmail message that you did not want to send. You realize for one reason or another that the message has a mistake or that it shouldn’t have been sent at all. Using Gmail, you have a small window of time in which to undo your mistake.
Oops! You just sent a Google Gmail message that you did not want to send. You realize for one reason or another that the message has a mistake or that it shouldn’t have been sent at all. Using Gmail, you have a small window of time in which to undo your mistake.
By default, Gmail only gives you a 5 second delay in which to recall an email after you hit the Send button. If this is too short, you’ll need to extend the length of time Gmail will keep emails pending before it sends them. Once an email(s) are sent, you are unable to recall them.
This is for Windows 10 PCs, Macs and other devices that support Google Gmail
Copyright Scott Adams, Inc./Distributed by Universal Uclick for UFS
Unfortunately, you can’t change the length of this cancellation period in the Gmail app. You’ll need to do this in the Settings menu of Web based Gmail using your Windows 10 PC or Mac.
First, open Gmail using your browser and click Settings (the gear icon) in upper right-hand corner. Next, click the See all settings option. Refer to below image:
Open Web based Gmail Settings
In the General tab, you’ll see an option for Undo Send with a default 5 seconds delay. You can change this to periods of 10, 20, and 30 seconds from the drop-down list. It is recommended you set a 30 second delay. See below image:
Setting the Cancellation Period in Web based Gmail Settings
Scroll way down till you see the Save Changes button at the bottom of the screen. Press this button to save your change. The Settings window will then close.
The cancellation period you’ve selected will be applied to your Google account across all your devices.
How to Recall a Web Email in Gmail
If you want to recall a message sent by a Web based Gmail, you’ll need to do so within the cancellation period that applies to your account. This period begins from the moment you press the Send button. If you followed my recommendation, you have 30 seconds.
To recall an email, press the Undo button that appears in the black Message Sent pop-up. It is visible in the bottom-left corner of the Web based Gmail window. See following image:
Undo your email in Web based Gmail
This is your only chance to recall the email. If you miss it, or you click the “X” button to close the pop-up, you won’t be able to recall it. Once the cancellation period has passed, the Undo button will disappear and the email will be sent.
How to Recall a Mobile Device Email in Gmail
The process for recalling a mobile device email is similar to using the Web based Gmail. Your cancellation period you setup above for your Google account applies.
Go ahead an send an email using the Gmail app. A black pop-up box will appear at the bottom of your screen, telling you that the email has been sent.
The Undo button will appear on the right-hand side of this pop-up. If you want to stop the email, tap this button within the cancellation period or 30 seconds if following my recommendation. Refer to below image:
Undo your email using Gmail app
Pressing Undo will recall the email, returning you to the Compose draft screen in the Gmail app. At this point, you can then make changes to your email, save it as a draft or delete it.
Please feel free to leave a comment. I would love hearing from you. Do you have a computer or smart device tech question? I will do my best to answer your inquiry. Please mention the device, app and version that you are using. To help us out, you can send screenshots of your data related to your question.
The author’s Vietnam eBook on the Battle for Tra Bong: Events and Aftermath
Oops! You just sent a Microsoft Outlook message that you did not want to send. You realize for one reason or another that the message has a mistake or that it shouldn’t have been sent at all. You can fix your mistake by recalling the message. Using the recall feature, under the right conditions, your email is deleted without the recipient ever seeing the message. You can also send the recipient a replacement email with the correct information.
Oops! You just sent a Microsoft Outlook message that you did not want to send. You realize for one reason or another that the message has a mistake or that it shouldn’t have been sent at all. You can fix your mistake by recalling the message. Using the recall feature, under the right conditions, your email is deleted without the recipient ever seeing the message. You can also send the recipient a replacement email with the correct information.
For a message to be recalled, both you and the recipient must have a Microsoft 365 Business Account or Microsoft Exchange email account in the same organization. The email must not not have been read by the recipient.
However, even if you and the recipient use different email accounts, the recall feature is useful. Though the initial email won’t be deleted, the recipient receives a follow-up message indicating that you want to recall the previous email. That tells them that your initial one is incorrect for some reason. You should then follow-up your initial email and recall message with another email that contains the right information or corrects the initial one.
To summarize, three emails are involved. The initial email with incorrect information, the recall message email, then the follow-up email with the correct information.
This is for Windows 10 PCs, Macs and other devices that support Microsoft Outlook
Copyright Scott Adams, Inc./Distributed by Universal Uclick for UFS
Let’s send an email. Open Outlook, start new email and address to a recipient, then send the email. Refer to below image:
Initial Outlook email
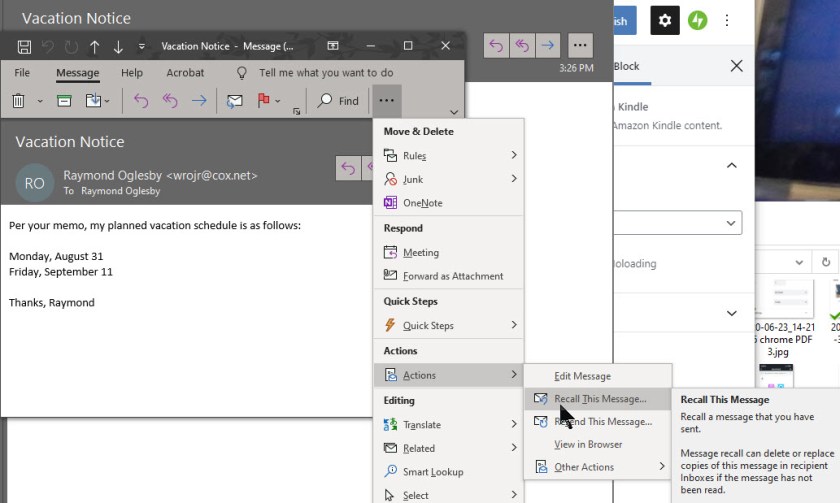
Now, let’s say you notice an error in your email and want to recall it. In our example, the vacation dates are incorrect.
Open the email from your Sent Items folder. Select the Actions icon and click the option Recall This Message. See following image:
Recall initial Outlook email
The Recall This Message window opens to offer two options. Choosing Delete unread copies of this message tries to remove the message with no follow-up. Choosing Delete unread copies and replace with a new message provides the opportunity to send a follow-up message with the correct information. To learn of the recall’s success, ensure the box is checked for Tell me if the recall succeeds or fails for each recipient then click OK. Refer to below image:
Options for recalling initial Outlook email
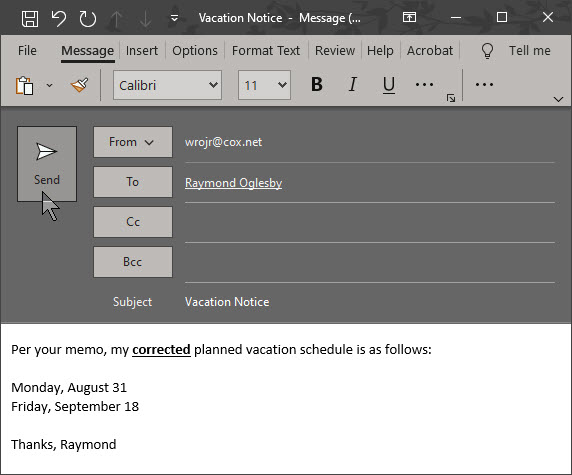
If you chose the option to replace with a new message, a new email appears with the text from the initial email. You can fix any errors and send a corrected replacement message or a follow-up email with the corrected information. In my example, the recall message failed because I had already read the message. See following image:
Recall of initial Outlook email failed because recipent (me) had read the message
If you and the recipient use the same Microsoft 365 Business or Exchange, then the initial email should be deleted automatically. If so, you will receive an email saying the recall was successful for that recipient.
If you and the recipient use different email accounts, the initial emails remains in that person’s inbox. A follow-up email arrives that tells the recipient you would like to recall the message. You then have to rely on the recipient to delete or ignore the initial message. At this point, a third email could be sent with the corrected information. Refer to below image:
Please feel free to leave a comment. I would love hearing from you. Do you have a computer or smart device tech question? I will do my best to answer your inquiry. Please mention the device, app and version that you are using. To help us out, you can send screenshots of your data related to your question.
The author’s Vietnam eBook on the Battle for Tra Bong: Events and Aftermath
In the “old days”, back to iPhone 4, Safari was slooooow to load. By default, Safari either loads the last page you visited or your bookmarks. This tip will start Safari with a blank page. Then you can immediately begin searching for a particular topic without having to wait for graphics and text to load or for installed apps.
This is the second post in a series on Apple iPhone and its Safari web browser. I am updating and republishing this post. I just read another long blog about how to stop Safari from opening apps upon startup. All you have to do is start Safari with a blank page. Here’s how to do this.
In the “old days”, back to iPhone 4, Safari was slooooow to load. By default, Safari either loads the last page you visited or your bookmarks. This tip will start Safari with a blank page. Then you can immediately begin searching for a particular topic without having to wait for graphics and text to load or for installed apps.
This is for iPhone, iPad, and Mac using Safari web browser
Following are the steps to do this:
Tap on Safari, usually located in bottom right of your Home page
Tap on URL field and type “about:blank” (without quotation marks)
Tap Go (for iOS13 or higher)
Tap on the bottom Share arrow icon and scroll
Select Add to Home Screen to create a bookmark
Label the bookmark to something like “Blank Safari” (without any quotation marks)
Tap Add (for iOS13 or higher)
You will see a white blank Safari icon on your Home page. If you have several pages, it will appear on an empty icon space
You can drag this icon to wherever you want
When you tap this icon, Safari will instantly load a blank page
Your blank Safari screen should look like the following image:
Just highlight the about:blank URL and enter your search criteria.
I Would Like to Hear from You
Please feel free to leave a comment. I would love to hear from you. Do you have a computer tech question? I will do my best to answer your inquiry. Please mention the app and version that you are using. To help me out, you can send screenshots of your data related to your question.
The author’s Vietnam eBook on the Battle for Tra Bong Vietnam: Events and Aftermath
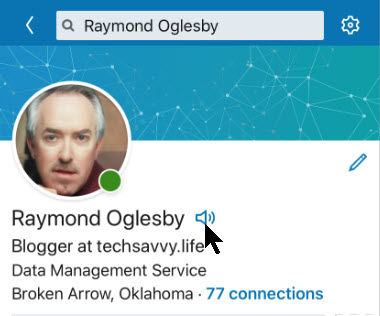
Pronouncing a name correctly isn’t just polite. It’s a way of recognizing someone’s identity. LinkedIn has introduced a new feature that lets members add a 10-second audio recording of their name pronunciation. Other users will be able to hear the clip by pressing a small speaker icon on a member’s profile.
Pronouncing a name correctly isn’t just polite. It’s a way of recognizing someone’s identity. LinkedIn has introduced a new feature that lets members add a 10-second audio recording of their name pronunciation. Other users will be able to hear the clip by pressing a small speaker icon on a member’s profile.
To use the feature, you’ll have to record your name on a mobile device (iOS or Android), but you’ll be able to play name pronunciations on mobile or a desktop. Let’s explore how to enable this feature.
This is for devices supporting LinkedIn
Copyright Scott Adams, Inc./Distributed by Universal Uclick for UFS
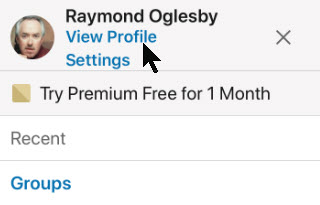
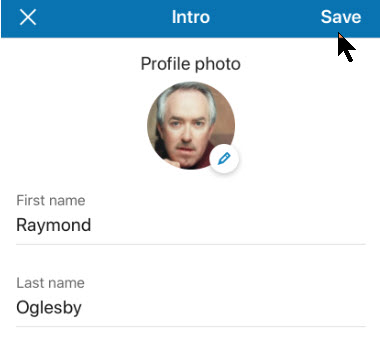
First, open the LinkedIn app on your smart device (iOS or Android). Next, from the the upper left hand corner, tap your Profile Photo. Refer to below image:
Accessing your Profile
Now, in the top menu, select the View Profile blue link . See below image
Selecting viewing your Profile
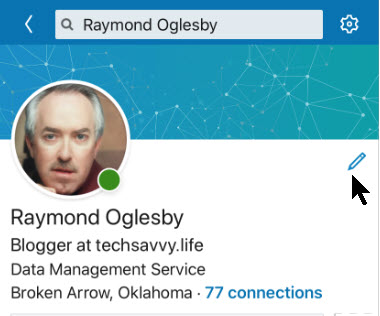
Next, tap on the Pencil icon next to your photo to edit your Profile. See following image:
Selecting edit your Profile
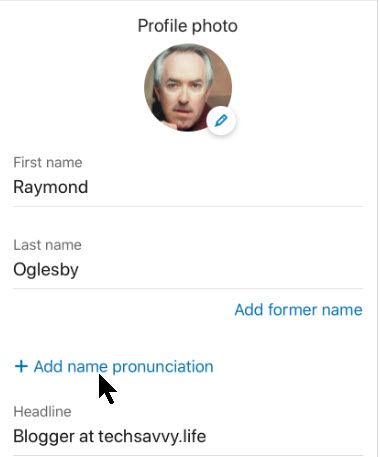
Next, tap on the Add Name Pronunciation blue link found under your First and Last name sections. Refer to below image:
Selecting add a recording of your name
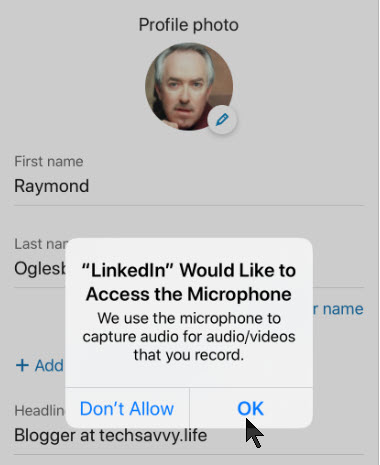
Now, grant the LinkedIn app permission to access your smart device’s microphone. See below image:
Giving permission to access your microphone
Recording Your Name
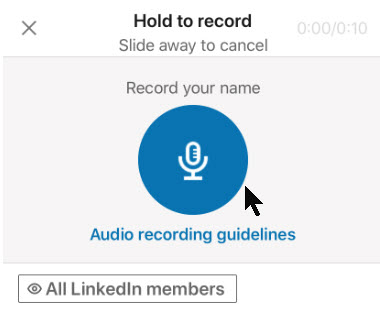
Press and hold on the blue microphone button to record your name. You have up to 10 seconds to record your first and last name. LinkedIn recommends that you limit background noise, speak slowly and pronounce clearly. Also, hold your phone about four inches from your mouth. See following image:
Recording your name
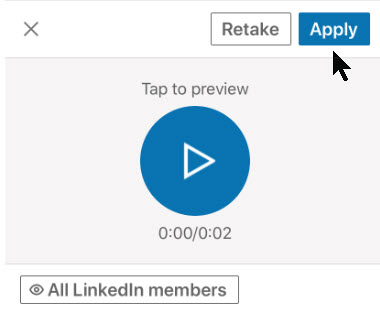
Tap the Play button to hear your audio recording played back to you. If you aren’t happy with it, select the Retake button. When you are satisfied with the recording, tap the Apply button. Refer to below image:
Saving your name recording
Choosing Your Audience
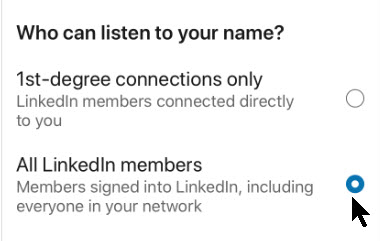
Before you leave the editing page, you can modify who can listen to your name pronunciation recording. To do so, tap the Visible To blue link at the bottom of the screen. See below image:
Accessing your audience
Here you have two sharing options to choose from. Either all Linkedin members can listen to your name (the default option) or only 1st-degree connections only. See following image:
Selecting your audience
Saving Your Changes
When you’re all set to exit the LinkedIn profile editing process, in the top right hand corner, tap the Save button. Refer to below image:
Saving your changes
View and Test Your Recording
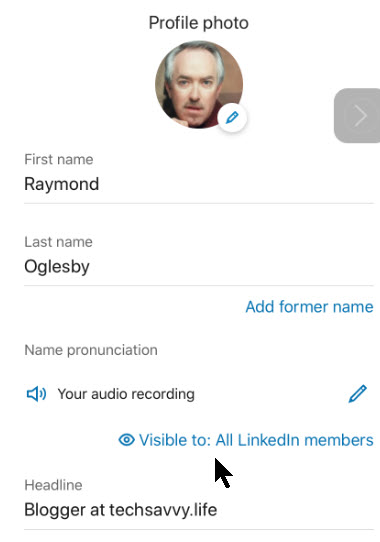
Now, you (or someone else) should see the tiny Audio icon next to your profile name. Select the icon to hear your name pronunciation. See following image:
Testing your name recording
That its. You and those you have selected can now hear the proper annunciation of your name.
I find TechSavvy.Life blog posts extremely helpful!
Please feel free to leave a comment. I would love hearing from you. Do you have a computer or smart device tech question? I will do my best to answer your inquiry. Please mention the device, app and version that you are using. To help us out, you can send screenshots of your data related to your question.
The author’s Vietnam eBook on the Battle for Tra Bong: Events and Aftermath
Microsoft Word will auto adjust table column widths to fit the content you are entering. This is the default setting for a Word table. There are times you may not want this, instead, you want to control the column widths.
The default setting may push the table beyond the right margin or a column widens unnecessarily.
So, let’s see how to turn off AutoFit option and do table adjustments yourself.
This is for Office 365 Microsoft Word on PCs, Macs and similar platforms. Other versions of Word will be similar.
Copyright Scott Adams, Inc./Distributed by Universal Uclick for UFS
Turn Off AutoFit Feature
To turn off this feature, first, place your cursor anywhere in the table you want to change.
Next, go to the Layout tab located in right hand side, not to be confused with the other Layout tab to the left side of the screen. Note! This option only appears when you are in a table. Refer to below image:
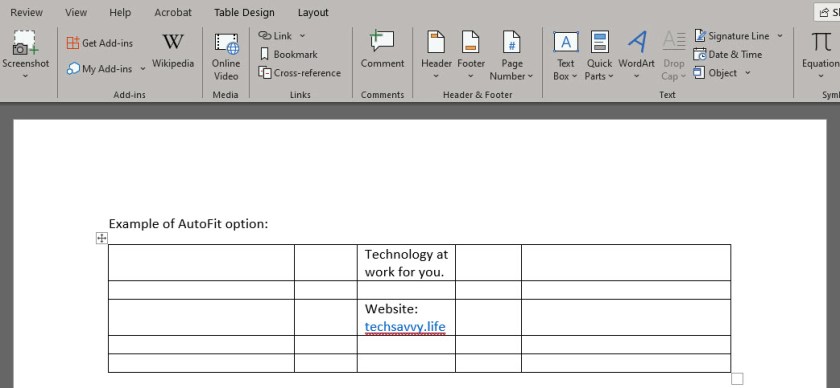
Now, click AutoFit and select the Fixed Column Width option. See below image:
You can now drag the column borders to your desired width. The column borders you set will stay that way even if you enter longer text into them. See following image:
Now, you can control Word’s table column widths. That’s it.
I Would Like to Hear From You
Please feel free to leave a comment. I would love hearing from you. Do you have a computer or smart device tech question? I will do my best to answer your inquiry. Please mention the device, app and version that you are using. To help us out, you can send screenshots of your data related to your question.
The author’s Vietnam eBook on the Battle for Tra Bong: Events and Aftermath
By using Google Maps you can find the location of a restaurant, store or some other company. How about asking the business a question? In some cases, you can do so through Google Maps. If the entity supports Google Maps messaging feature, you can send a message to that company. If the company responds, you can carry on a back-and-forth conversation; like texting, but instead you are using Google Maps.
To date, this is the most unusual post I have written. Its relatively unknown to the business community. I recommend you try out my example before searching for a business in your area that uses Google Maps for messaging.
This feature is for your iOS (iPhone/iPad) or Android device or whatever smart device supports Google Maps
If you haven’t already done so, download and install Google Maps to your device.
Copyright Scott Adams, Inc./Distributed by Universal Uclick for UFS
Search for a Business
Launch Google Maps
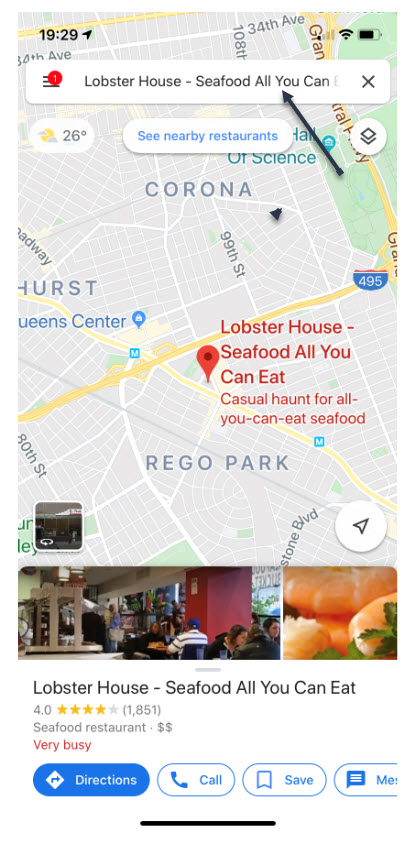
Search for a business you want to use or visit. In my example, I am searching for “Lobster House”. Refer to following image:
Search for Lobster House
If using my example, select the first entry. Refer to following screenshot:
Selecting First Entry for Lobster House
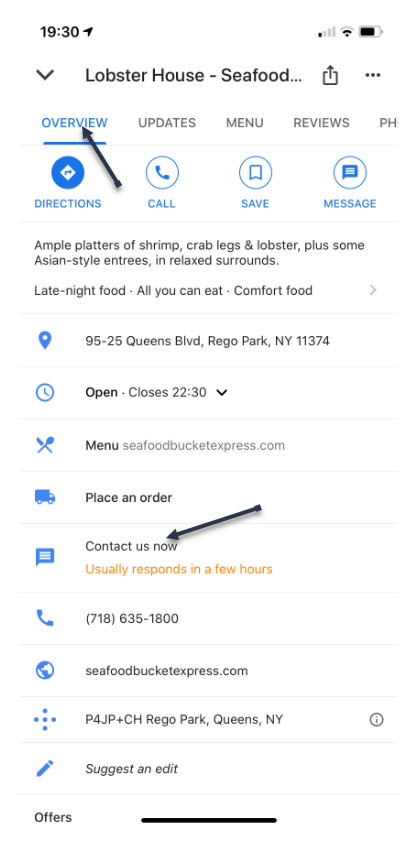
View the Overview Tab
Swipe Up below the map till you see the Overview tab, like the following image:
Overview Tab for Lobster House
If the company supports Google Maps messaging, in the center of the screen you will see a link that says “Contact us now“
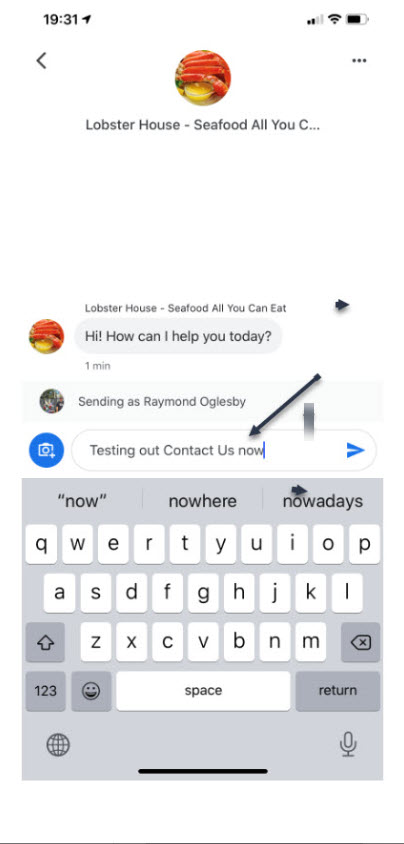
Type in Your Message
Tap on this link
Type in your message and tap the Send icon. A pertinent question might be reserving a table at a certain time instead of my example. Refer to following screen:
Messaging Lobster House
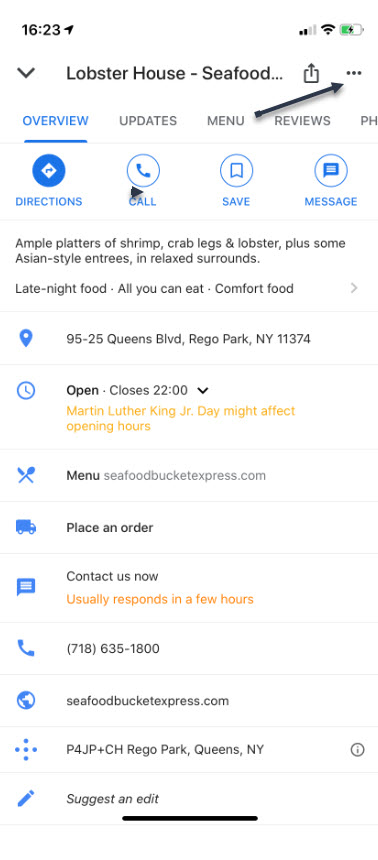
In my example of the “Lobster House”, they usually respond within a few hours. So, revisit the “Lobster House” for their reply by:
Search for Messages
Searching for the business
Swipe Up to view the Overview Tab
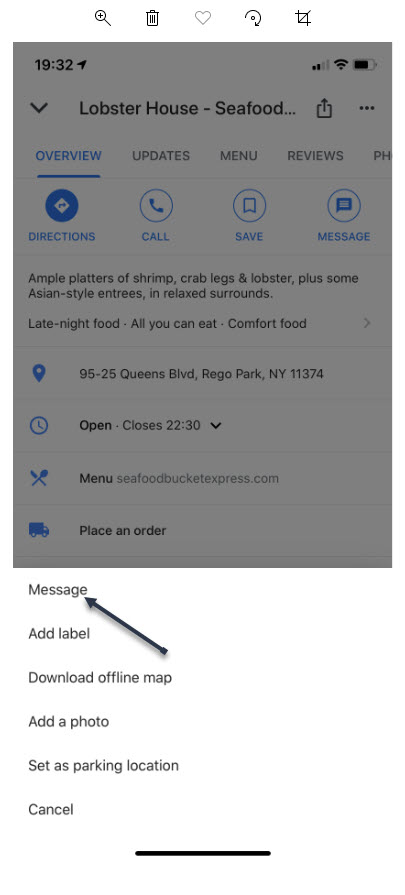
Tap the 3 dots in upper right hand corner. Refer to following image:
Check for a Response
Reply to Messages
You will see the following screen. Tap on Message to view their reply. You can then reply back to the business if you need to.
The Message Screen
Whats challenging about this feature is finding a business that supports Google Maps messaging. Unfortunately, many do not. But, if a business of interest does offer messaging, you can use this feature to obtain more information about the company or perhaps, setup a reservation.
I Would Like to Hear from You
Please feel free to leave a comment. I would love hearing from you. Do you have a computer or smart device tech question? I will do my best to answer your inquiry. Please mention the device, app and version that you are using. To help us out, you can send screenshots of your data related to your question.
The author’s Vietnam eBook on the Battle for Tra Bong: Events and Aftermath
Word’s Caption feature allows you to insert captions after figures, tables or equations in your document. You can choose to have Word insert them automatically or do it yourself manually. Lets learn how to add and edit captions to set apart elements in your document.
You are not limited to figures, tables or equations; you can create a new label like Picture or Photo. If you are using Chapters in your document, you can add the Chapter number to your caption. Almost any object or inserted item in Word can be captioned.
This is for PCs, Macs and similar platforms that support Microsoft Word
Copyright Scott Adams, Inc./Distributed by Universal Uclick for UFS
Add a Caption
There are two ways to add a caption:
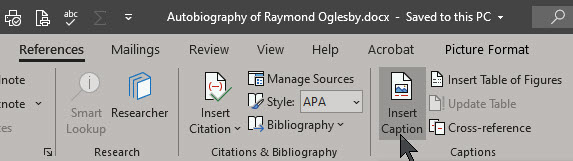
Select the figure/table/equation, right click and select Insert Caption. (Note! This method works only for figures and tables, not equations.)
Select the figure/table/equation, go to the References tab on the ribbon and select Insert Caption. See below image:
If you don’t select the object and choose References > Insert Caption the caption will be inserted where the cursor is placed.
Your Caption Options
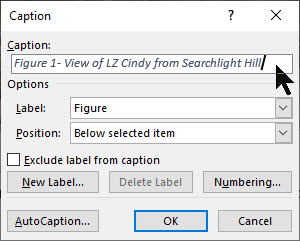
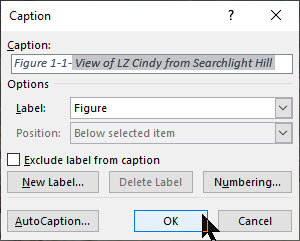
The Caption dialog box will now open, with a number of options for you to set. Refer to below image;
Below are the options to chose from:
Captions – type in the label you want
Label – or more correctly caption prefix. Choose table, equation or figure. This will automatically add that label to the caption.
New Label – If you want your captions to have a label other than the ones provided, you can add a new one from the New Label option. (For example, Word provides the options Equation, Figure and Table, but if you are including photos in your document, you may prefer to label them Picture or Photo.)
Exclude Label from Captions – check this box and no label/prefix will be included. The caption will just contain the number and the text that you enter.
Position – caption to appear above or below the object. Only works if the object is selected before Insert Caption. Otherwise this field will be disabled and the caption placed where you have set your cursor.
AutoCaption certain types of objects can be automatically captioned when they are included in a document.
The caption will now appear in the specified location, with its number automatically allocated. See following image:
Figure 1- View of LZ Cindy from Searchlight Hill
Numbering Options for Your Captions
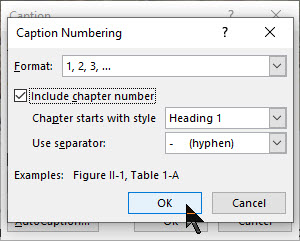
If you want to change the format of the numbering system on your captions, do this by clicking the Numbering button in the Caption dialog box. Refer to below image:
The Caption Numbering dialog box will open. See below image:
Format: Choose the numbering format you want to use:
Numerals (1, 2, 3, 4…)
Lowercase letters (a, b, c, d…)
Uppercase letters (A, B, C, D…)
Lowercase Roman numerals (i, ii, iii, iv…)
Uppercase Roman numerals (I, II, III, IV…)
And others depending on the installed language packs.
Include Chapter Number: If your document contains chapters, you can choose to have the numbering restart for each chapter and have the chapter number included in the caption numbering system.
First select the Caption in your Word document. Then you need to link the Style (e.g. Heading 1) with a multi-level list at Home > Paragraph > Multi-Level List > Define Multi-Level List > More. This adds automatic numbering to each style so the captions have a number to show. See following image;
Chapter Starts with Style: Select what level of heading you would like to signify a new chapter.
Use Separator: Choose the separator that you would like to use between the chapter number and the caption number (hyphen, period, colon or em-dash).
Change Your Caption Settings
Changing the caption settings isn’t obvious because right-clicking doesn’t show an option to open the Caption dialog.
The trick is to select the whole caption then References > Captions > Insert Caption. Refer to below image:
This opens the Caption dialog with the current settings.
Updating Your Caption Numbering
At the core of captions are field codes. Updating the caption numbering is the same as any other field code updates.
Select the whole document with Ctrl+A then update fields with F9 (or right-click to choose Update Field).
Change Your Caption Text
The text after the caption label can be edited in the document. Just click in the caption text and type as usual. See following image;
I Would Like to Hear From You
Please feel free to leave a comment. I would love hearing from you. Do you have a computer or smart device tech question? I will do my best to answer your inquiry. Please mention the device, app and version that you are using. To help us out, you can send screenshots of your data related to your question.
The author’s Vietnam eBook on the Battle for Tra Bong: Events and Aftermath
You have searched for a favorite photo or video on Facebook but are unable to locate it. Facebook has an option to backup most anything saved through its app. This would allow for easier searching instead of scrolling endlessly through Facebook posts.
You may have decided to deactivate your account for health reasons or you just want a backup. There is no such thing as “too many backups”. In my IT career, I have been “burned” by not having adequate backups resulting in lost time in recreating them.
Depending on how long you have been a Facebook user, the backup file can be quite large. If you have limited storage or on a free storage plan for your mobile device, you might consider backing up to a PC or Mac.
Using this post as a guide, I am backing up thirteen years of Facebook photos and videos on a Windows 10 PC. My backup file, in Zip format, was a 1.4 GB file.
This is for PCs, Mac, mobile devices and similar platforms using Facebook
Copyright Scott Adams, Inc./Distributed by Universal Uclick for UFS
Accessing Facebook Settings
Launch Facebook. in the upper right hand corner, click on the Account icon. Next, click the Settings & Privacy option. See below image
The Settings and Privacy option
Next, click on the Settings option. Refer to below image:
The Settings option
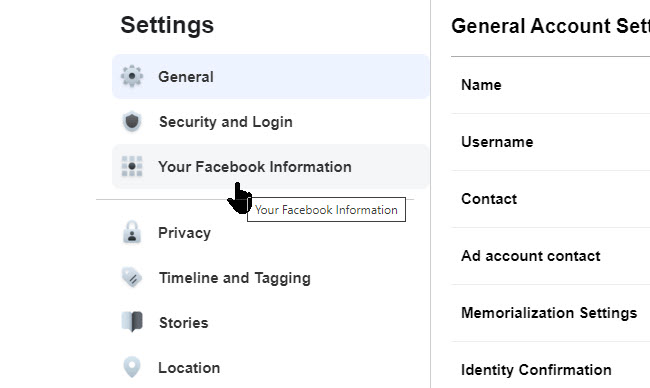
Downloading Your Facebook Information
Then click on Your Facebook Information. See following image:
The Facebook Information option
Next, click on Download Your Information. See below image:
Download your information option
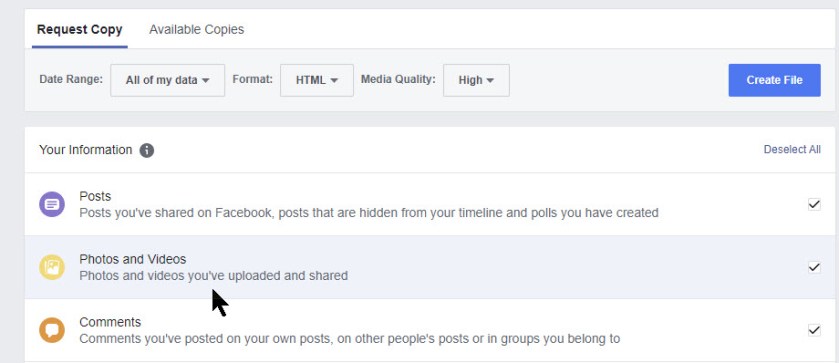
Selecting ONLY Photos and Videos
From here, click on Deselect All link. Then select only Photos and Videos option. From this screen there are many options on what to backup. For our purposes, we only want photos and videos. Refer to below image:
Deselecting all, then selecting only photos and videos option
Once photos and videos have been selected and all other option are unselected, click the Create File button. See below image:
Clicking the Create File option
Messages and Emails From Facebook
You will receive a pop-up message regarding the creation of your Facebook backup for photos and videos. Refer to below image:
Facebook response to iyour request
Check your email that is associated with your Facebook account for the file request. See below image:
Email from Facebook about your request
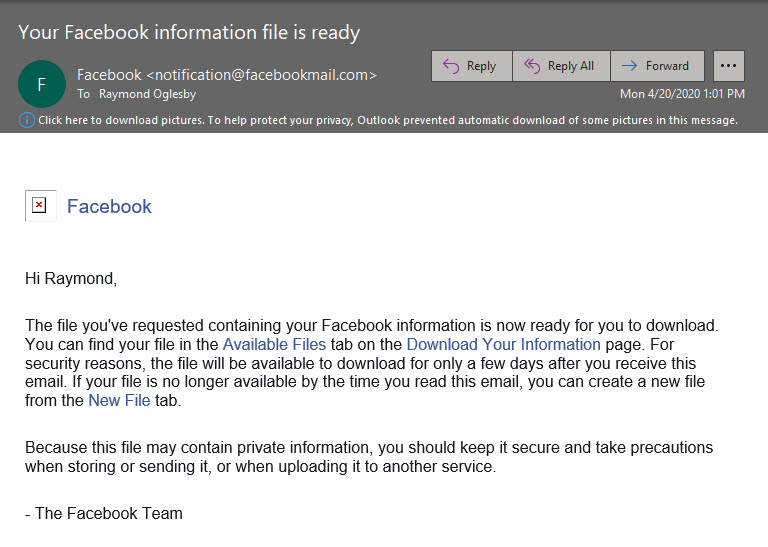
It may take several hours for Facebook to process your request. When the file is ready, you will receive an email that your file is ready. Follow the directions in the message. Refer to below image:
Email from Facebook that your backup file is ready
Downloading Your Photos and Videos Backup
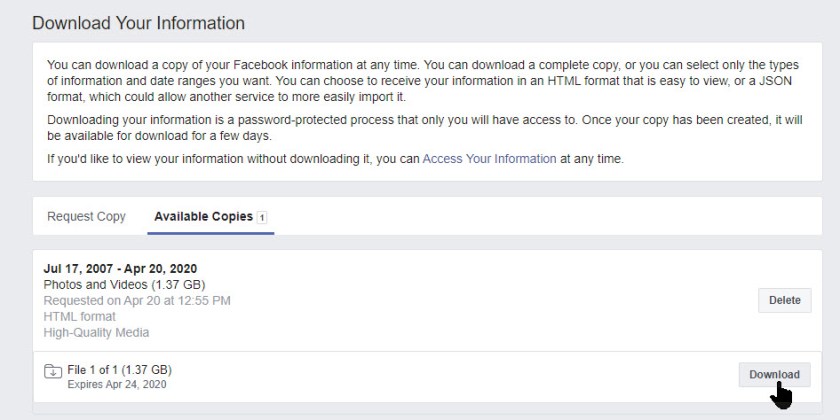
Click on the link for Download Your Information. Then, click the Available Copies tab. You should see information about your download file. Now, click the Download button. See following image:
Download option to your Downloads folder
Facebook will ask you to enter your Password, then click Submit. See below image:
Submitting your password
Viewing Your Downloaded Zip File via File Explorer
Your photos and videos backup file will be in your Downloads folder in Zip format. Below is a screenshot of my backup file. Notice it contains over 3000 files. Your backuped file number will depend on how often you post photos and videos and how many years on Facebook. Refer to below image:
An example of your downloaded Facebook photos and videos file
What I would like to see is an option to select a date range for the backup instead of everything.
I Would Like to Hear From You
Please feel free to leave a comment. I would love hearing from you. Do you have a computer or smart device tech question? I will do my best to answer your inquiry. Please mention the device, app and version that you are using. To help us out, you can send screenshots of your data related to your question.
The author’s Vietnam eBook on the Battle for Tra Bong: Events and Aftermath