IOS 13 or higher allows you to automatically close tabs in Safari after a specified period of time, which helps to keep your iPhone running smoothly.
IOS 13 or higher allows you to automatically close tabs in Safari after a specified period of time, which helps to keep your iPhone running smoothly.
You can have up to 500 open tabs. This number of active browser tabs can quickly get out of hand. It gets to be kind of a pain to go swiping through all your open tabs every few weeks to clean out the ones you no longer use.
Fortunately, in the Safari settings on your iPhone or iPad, you can set how long your tabs stay open before they automatically close; after one day, after one week or after one month. Let’s explore how to set this feature.
This is for the iPhone and iPad
Copyright Scott Adams, Inc./Distributed by Universal Uclick for UFS
To Tweet about this post, click the Tweet icon below to launch Twitter, then click its Tweet icon to post.
Check out TechSavvy.Life for their blog posts on smartphone apps, PCs. and Macs!
One solution is using the Close All Tabs option revealed by a long press on Done. But it’ is no good if you have a handful of newer tabs that are still useful to have open. Refer to below image:
Close All Tabs option
The Settings Solution
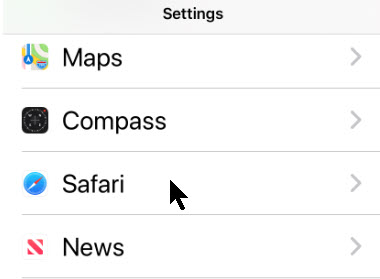
First, open Settings. Next, scroll down until you see the Safari option and tap it. See below image:
Safari option under Settings
Now, swipe down to the Tabs section, then tap Close Tabs. See following image:
Close Tabs option under Safari
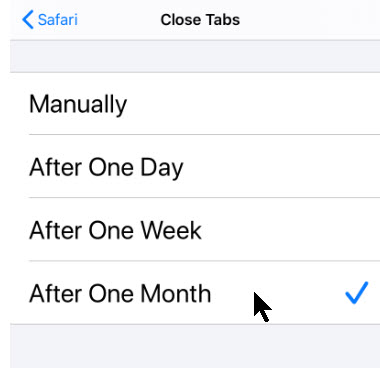
On this screen, you have the option to set the duration of open Safari browser tabs. When set, Safari will close tabs that have not been viewed within the period of time you set. The options are Manually, After One Day, After One Week or After One Month. This setting applies to Private tabs as well.
Checkmark an option that suits you. Refer to below image:
Select an option to automatically close Safari tabs
Now, you can exit Settings.
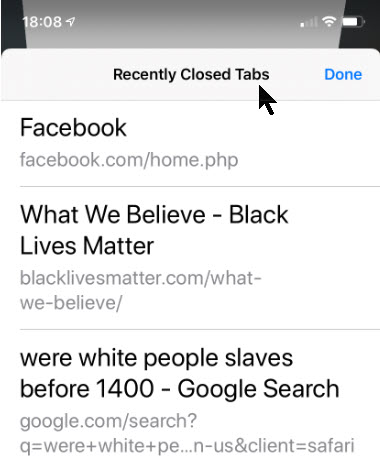
However, you can still find the automatically closed tabs as well as Private tabs in the Recently Closed Tabs menu by holding down the + (plus) button on the tab management screen in Safari. See below image:
Viewing Recently Closed Tabs
This is a potential downfall in using this feature. If you want to fully conceal recent browsing activity, it may be best to manually close the tabs.
I hope you have found this post helpful. If so, click the Tweet icon below. This will launch Twitter where you click its icon to post the Tweet.
I have found TechSavvy.Life blog posts extremely helpful. Check them out for posts on smart phone apps, Macs and PCs!
Please feel free to leave a comment. I would love hearing from you. Do you have a computer or smart device tech question? I will do my best to answer your inquiry. Please mention the device, app and version that you are using. To help us out, you can send screenshots of your data related to your question.
The author’s Vietnam eBook on the Battle for Tra Bong: Events and Aftermath
The decision to listen to Autoplay videos should be in your control. Fortunately, with iOS 13+ you are able to control Autoplay. Whether you want to enjoy Autoplay videos as you browse or you want to shut them down until you’re ready, here is a way you can finally control the noise.
The decision to listen to Autoplay videos should be in your control. Fortunately, with iOS 13+ you are able to control Autoplay. Whether you want to enjoy Autoplay videos as you browse or you want to shut them down until you’re ready, here is a way you can finally control the noise.
By default, Apple mutes your personal photos and videos in iOS 13+. What’s particularly annoying about this feature is that your iPhone will still Autoplay videos, but it won’t enable the volume by default.
The bad news is that there doesn’t currently seem to be a way to Autoplay with volume via your phone’s settings. The good news is that there is a way to get around this feature. Let’s explore how to do this.
This is for the iPhone and iPad running iOS 13 and above
Copyright Scott Adams, Inc./Distributed by Universal Uclick for UFS
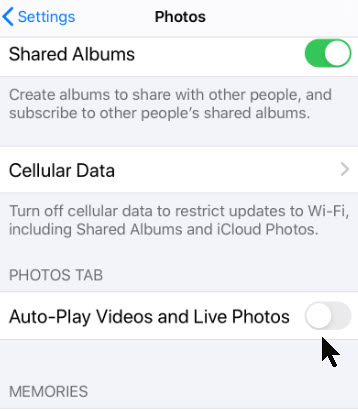
On your IPhone or iPad, open Settings. Next, scroll down to the Photos tab. Refer to below image:
Accessing the Photos option
Now, toggle off Auto-Play Videos and Live Photos.
Turning off Autoplay
It’s important to understand what this actually does. Basically, your personal collection of live photos and videos will no longer play automatically when you load them. The good news is that when you do choose to play them, the volume will be enabled. This is the best way to enjoy audio from the start without having to manually toggle it each time.
That’s it. I hope you like this post. If so, please let us know by leaving a comment.
I have found TechSavvy.Life blog posts extremely helpful. Check them out for posts on smart phone apps, Macs and PCs!
Please feel free to leave a comment. I would love hearing from you. Do you have a computer or smart device tech question? I will do my best to answer your inquiry. Please mention the device, app and version that you are using. To help us out, you can send screenshots of your data related to your question.
The author’s Vietnam eBook on the Battle for Tra Bong: Events and Aftermath
There’s a hidden feature to view the weather report on your iPhone lock screen. This feature is built-in on an Android device.
There’s a hidden feature to view the weather report on your iPhone lock screen. This feature is built-in on an Android device. Let’s explore how to enable this on your iPhone.
We are going to use the Do Not Disturb Scheduled option available in iOS 12 and later. When enabled, you will see the weather report on the first tap of the lock screen after the Do Not Disturb time has passed. The Do Not Disturb feature automatically mutes all incoming notifications.
This is for the iPhone with iOS 12+
Copyright Scott Adams, Inc./Distributed by Universal Uclick for UFS
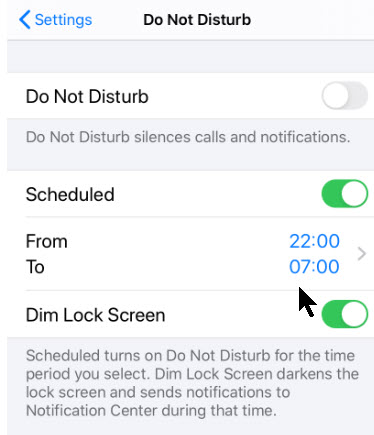
Open the Settings app, go to Do Not Disturb section. Next, toggle the Scheduled option. Set the From and To time. Important! You want to set the “To” time frame to 10-15 minutes before you wake up. Finally, toggle the Dim Lock Screen. Refer to below image:
Setting the Do Not Disturb time frame
We are dimming the lock screen and sending all new notifications to the Notifications Center until the Do Not Disturb schedule is over.
Let’s go back to Settings and tap the Privacy option. Now, tap the Location Services option. Next, scroll down to the Weather app. See below image:
The Weather app
Now, tap the While Using the App button to enable. This gives the Weather app permission to see your location, so it show you the weather report. See following image:
Setting permission for the Weather app
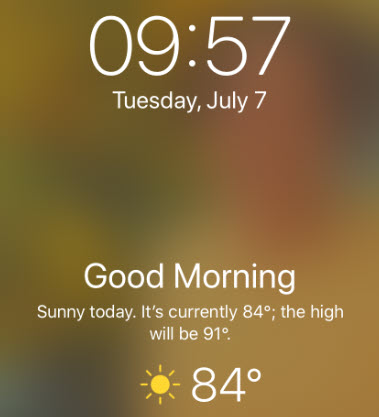
The next morning, after the Do Not Disturb time has passed, you will see the day’s weather report on your lock screen. Refer to below image:
The Weather screenshot
I have found TechSavvy.Life blog posts extremely helpful. Check them out for posts on smart phone apps, Macs and PCs!
Please feel free to leave a comment. I would love hearing from you. Do you have a computer or smart device tech question? I will do my best to answer your inquiry. Please mention the device, app and version that you are using. To help us out, you can send screenshots of your data related to your question.
The author’s Vietnam eBook on the Battle for Tra Bong: Events and Aftermath
When you swipe right on your iPhone Lock or Home screen, you are presented with the Today View screen. On this screen are widgets from Apple main apps. If you want to customize this screen, you can add and customize widgets from Apple and/or third-party apps. Also, you can rearrange these widgets to your liking.
By default, Apple shows you the widgets from the Calendar, Siri App Suggestions, News, Weather and more. But that’s not all. When you go into the editing mode, you’ll discover that many of the apps that you have installed (whether they’re popular apps or not) include useful widgets.
You can add extra functionality to your iPhone using third-party app widgets. Here are a couple of recommendations:
This is for iPhone and iPad devices. Text and screenshots are for the iPhone.
Copyright Scott Adams, Inc./Distributed by Universal Uclick for UFS
Accessing Your Widgets
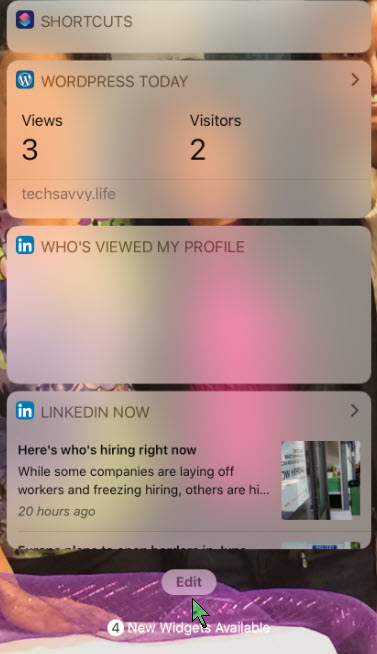
Lets get started. First, swipe right when you’re on your iPhone’s Lock or Home screen to access the Today View. Here, you can swipe up to view more widgets and tap on any of the arrow buttons (to the right of the widget name) to expand or contract a widget. Refer to below image:
Your Widgets screenshot
Editing a Widget
If we want to edit a widget, swipe all the way down to the bottom of the widgets screen and tap on the Edit button. See below image:
Accessing the Edit button
At the top of the list are the widgets installed on your iPhone, they have a “-“ sign next to the widget name. See following image:
Displaying your Widgets
Scroll down till you see the More Widgets listing, denoted by the “+” sign. Refer to below image:
Listing of Widges you can add
Adding a Widget
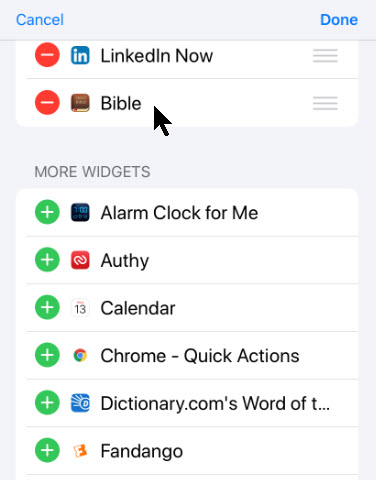
When you see a widget you want to add, tap on that “+” sign next to the widget label. It will be added to the bottom of the enabled widgets list. Simply do this for each widget you want to add. In my example, I added the Bible widget. See following screen:
Selecting a Widget to add
Remove a Widget
To remove a widget, navigate to the top of the list for the enabled widgets. Tap the “-“ sign left of the widget name, then tap the Remove option. Refer to below image for my removal of the Dropbox widget:
Selecting a Widget to remove
This does not delete the iPhone app, only the widget associated with it.
Reorder Widgets
To reorder widgets, tap on the Hamburger icon to the right of the widget name and drag each item to a new location. See following image where I moved Siri App Suggestions to the top of the list:
Rearrange a Widget
Saving Your Changes
To save all your changes, tap Done in upper right hand corner at the top of your enabled widgets list. Refer to below image:
Saving all your changes
Note: Your must tap the Done option, if not, all your changes will be lost.
You will be taken back to the Today View with your saved changes.
When you add new apps, you can go back to the Edit screen and add new widgets to the Today View by following the above steps.
Checking if an App Has a Widget
To see if a widget is available for an app, press and hold the app icon. If it supports widgets, you will see the Add Widget link. Tap on it to add the widget to the bottom of Today View screen. See following image where I added back the Dropbox widget:
Checking if your app has a Widget
As a confirmation, the Add Widget link will be replaced with a check mark. Refer to below image:
Confirming your Widget has been added
That’s it. You have learned how to add, remove and rearrange your iPhone widgets. The process is similar for an iPad.
Feel free to tweet me. Thanks for reading this post and others.
Please feel free to leave a comment. I would love hearing from you. Do you have a computer or smart device tech question? I will do my best to answer your inquiry. Please mention the device, app and version that you are using. To help us out, you can send screenshots of your data related to your question.
The author’s Vietnam eBook on the Battle for Tra Bong: Events and Aftermath
With the release of iOS 13.4 and above, you can now share files and folders using your favorite share connection. This feature is built into the Files app.
Apple engineers took a long time in releasing this feature. It’s about time. Let’s see how this is done.
This is for iPhone and iPad running iOS 13.4 or higher
Copyright Scott Adams, Inc./Distributed by Universal Uclick for UFS
Sharing a Folder
First, launch the Files app. Navigate to the iCloud folder you would like to share. Next, press and hold the folder until a menu appears. Now, select Share. See below image:
Selecting the Share option for a folder
Next, select Add People. Refer to below image:
Selecting the Add People option for the folder to be shared
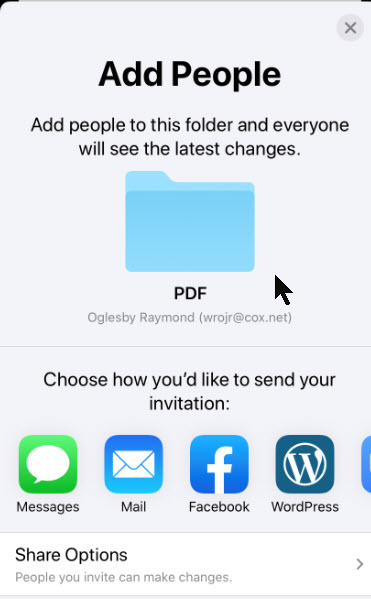
Now, select a share method from the options like Mail, Messages, Messenger and so on. See following image:
Selecting the share connection for the folder
Type in your subject and message, if necessary, then select your audience. When finished, Send your message. See below image:
Selecting the recipient(s) for sharing the folder
Change Access Rights
First, launch the Files app. Navigate to the shared iCloud folder. Next, press and hold the folder until a menu appears. Select Share then select Show People. Refer to below image:
Accessing the Show People option
Tap a person in the list. Refer below to my list:
Selecting the recipient(s) to change access rights
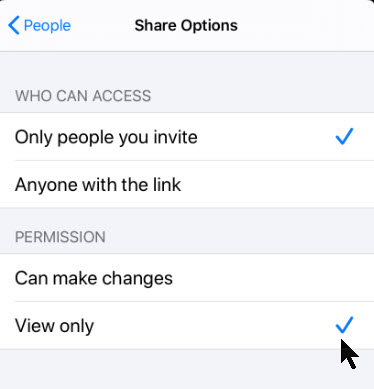
You are given two options for Permission: Can make changes and View only. You can also change Who Can Access options for the folder by selecting Only people you invite and Anyone with the link. See below image:
Setting the access rights
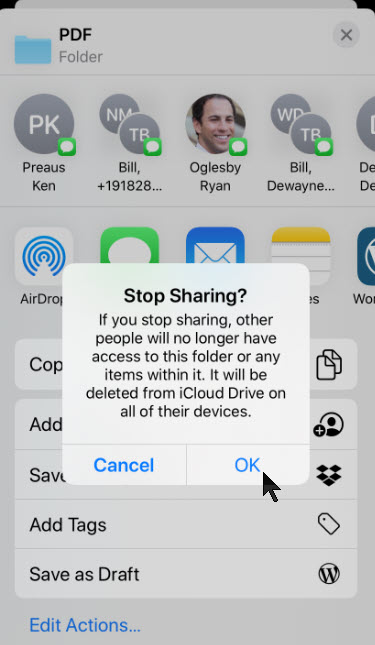
There is the option to remove the user’s access, just tap Stop Sharing and tap OK. See following image:
Cancelling the sharing
I Would Like to Hear From You
Please feel free to leave a comment. I would love hearing from you. Do you have a computer or smart device tech question? I will do my best to answer your inquiry. Please mention the device, app and version that you are using. To help us out, you can send screenshots of your data related to your question.
The author’s Vietnam eBook on the Battle for Tra Bong: Events and Aftermath
By using Google Maps you can find the location of a restaurant, store or some other company. How about asking the business a question? In some cases, you can do so through Google Maps. If the entity supports Google Maps messaging feature, you can send a message to that company. If the company responds, you can carry on a back-and-forth conversation; like texting, but instead you are using Google Maps.
To date, this is the most unusual post I have written. Its relatively unknown to the business community. I recommend you try out my example before searching for a business in your area that uses Google Maps for messaging.
This feature is for your iOS (iPhone/iPad) or Android device or whatever smart device supports Google Maps
If you haven’t already done so, download and install Google Maps to your device.
Copyright Scott Adams, Inc./Distributed by Universal Uclick for UFS
Search for a Business
Launch Google Maps
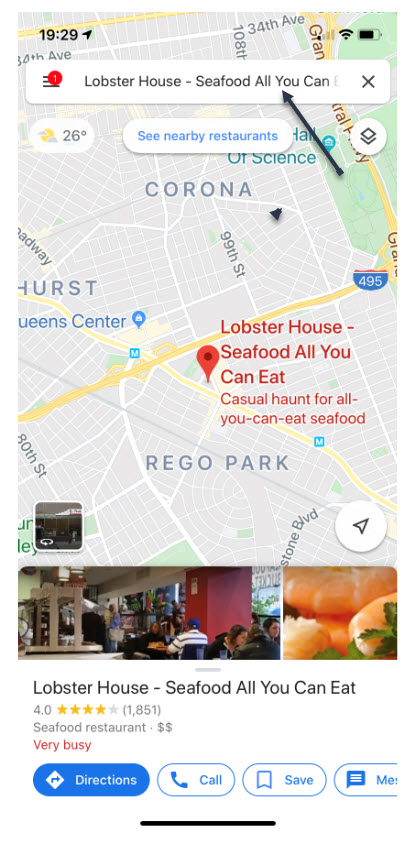
Search for a business you want to use or visit. In my example, I am searching for “Lobster House”. Refer to following image:
Search for Lobster House
If using my example, select the first entry. Refer to following screenshot:
Selecting First Entry for Lobster House
View the Overview Tab
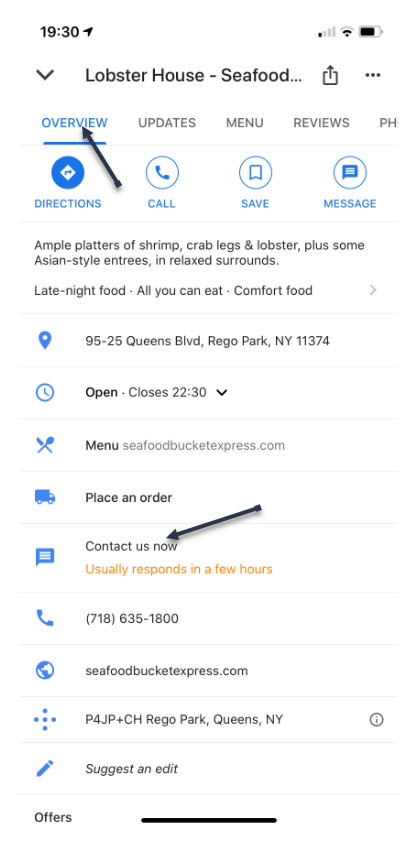
Swipe Up below the map till you see the Overview tab, like the following image:
Overview Tab for Lobster House
If the company supports Google Maps messaging, in the center of the screen you will see a link that says “Contact us now“
Type in Your Message
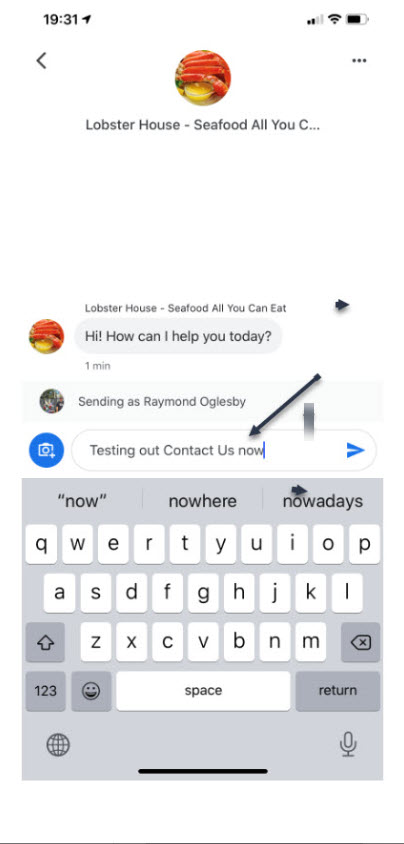
Tap on this link
Type in your message and tap the Send icon. A pertinent question might be reserving a table at a certain time instead of my example. Refer to following screen:
Messaging Lobster House
In my example of the “Lobster House”, they usually respond within a few hours. So, revisit the “Lobster House” for their reply by:
Search for Messages
Searching for the business
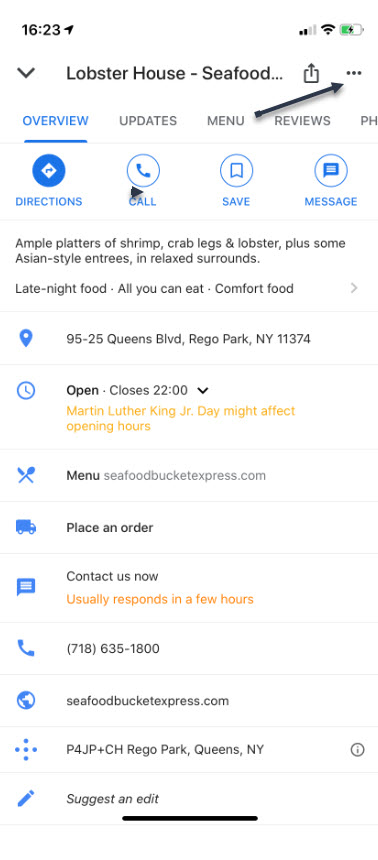
Swipe Up to view the Overview Tab
Tap the 3 dots in upper right hand corner. Refer to following image:
Check for a Response
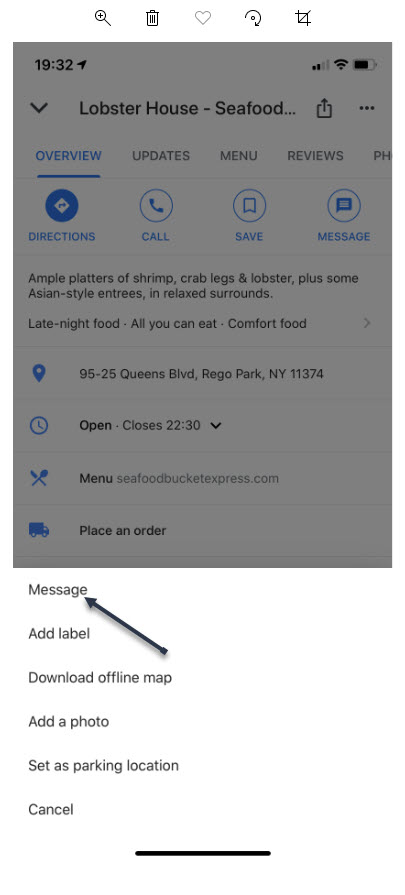
Reply to Messages
You will see the following screen. Tap on Message to view their reply. You can then reply back to the business if you need to.
The Message Screen
Whats challenging about this feature is finding a business that supports Google Maps messaging. Unfortunately, many do not. But, if a business of interest does offer messaging, you can use this feature to obtain more information about the company or perhaps, setup a reservation.
I Would Like to Hear from You
Please feel free to leave a comment. I would love hearing from you. Do you have a computer or smart device tech question? I will do my best to answer your inquiry. Please mention the device, app and version that you are using. To help us out, you can send screenshots of your data related to your question.
The author’s Vietnam eBook on the Battle for Tra Bong: Events and Aftermath
You’ve received or need to send a PDF through email that must be signed and sent to the other party. If you’re working with the email on your iPhone or iPad, you can sign the document directly from your mobile device. This handy capability is possible due to the Markup feature. With iOS 13, you can use a variety of tools. In this post, we will look at the SignatureMarkup tool.
This is for iPhone/iPad or similar devices using iOS 13 or above
Copyright Scott Adams, Inc./Distributed by Universal Uclick for UFS
How to Add a Signature
Follow these steps when you want to email someone a PDF from your iPhone or iPad but need to sign it before sending it.
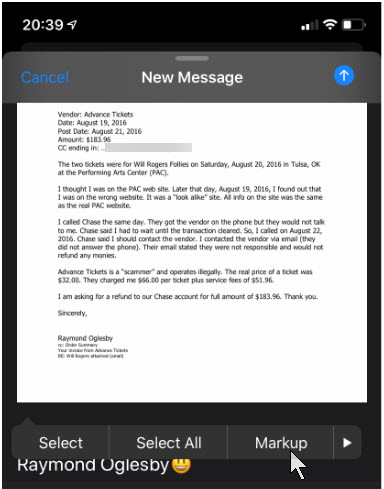
1. Make sure the PDF is stored in a convenient location, such as OneDrive, iCloud Drive or other online service accessible from your iPhone or iPad 2. Attach the file to your email 3. Tap the attachment and select Markup from the toolbar. Refer to below image:
Selecting the Markup option
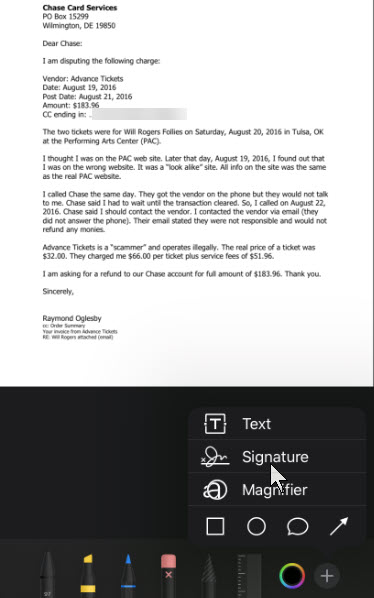
4. Swipe down to the area where you need to sign. If not, the Signature will be placed in the middle. 5. On the Markup toolbar at the bottom, tap the “+” icon and select Signature. See below image:
Selecting the Signature option
Drawing Your Signature
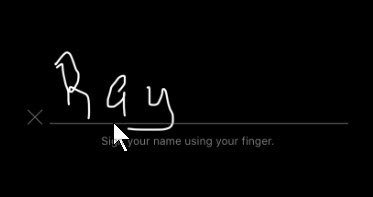
6. If you’re doing this for the first time, write your Signature via your finger tip or a stylus 7. Tap Clear if you wish to start over. See following image:
Writing your Signature
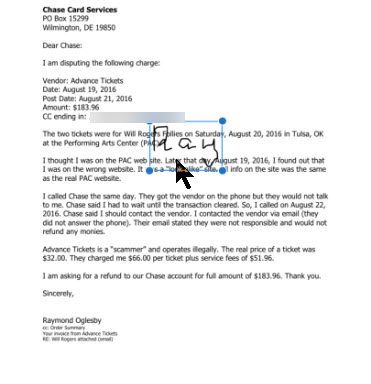
8. When you’re satisfied with your Signature, tap Done. See below image:
Your Signature in the document
Position Your Signature
9. Move the text box for your Signature to the right spot. You can also resize the box by dragging any of the corners. Refer to below image:
Positioning your Signature
Email Your Signed Document
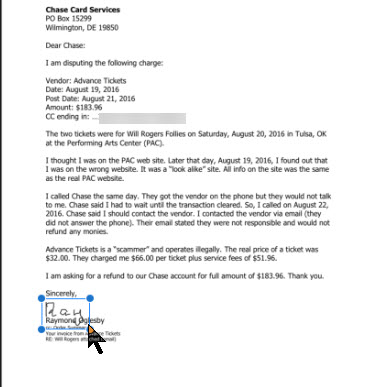
10. When the Signature is sized and positioned correctly, tap Done at the upper left corner for the new Signature. Now you are ready to send your email by tapping on the Up Arrow icon. See following image:
Email your signed document
How to Reply With Your Signature
If you receive an attachment that you need to sign and send back to the sender, the process is similar.
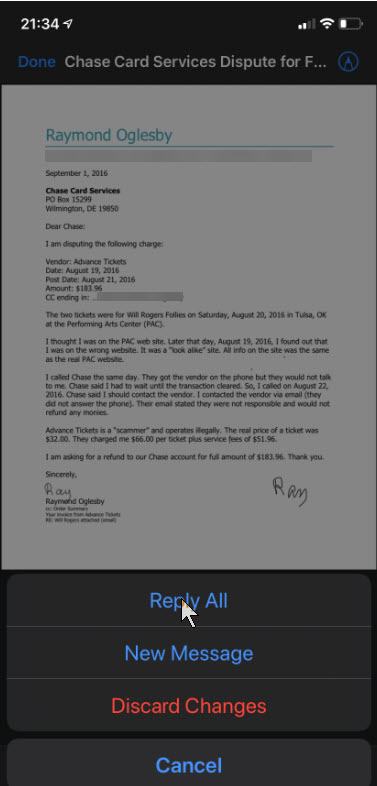
1. Tap the PDF to open it and swipe down to the area that requires your Signature 2. Tap the Markup icon in the upper right (the one that resumbles a pen tip) 3. Tap the “+” icon on the Markup toolbar at bottom righ hand corner and select Signature. Your Signature will automatically appear if you already created it via Markup. 4. Tap your Signature, position and resize it accordingly 5. When finished, tap Done 6, Tap New Message or Reply All and send the signed document back to the sender. For demonstration purposes, I just placed my Signature again, this time in lower right hand corner. Refer to below image:
Selecting the Reply All option
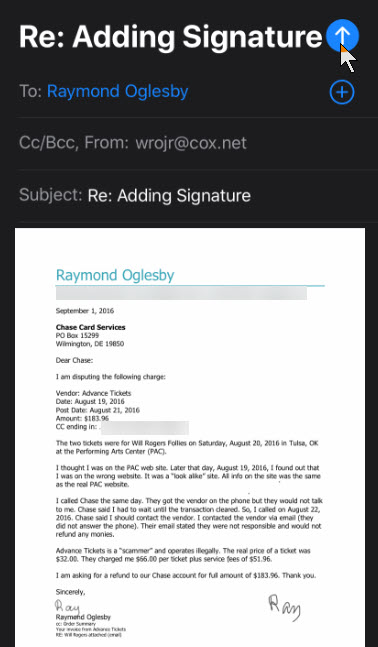
7. Tap the Up Arrow icon to send your return message. See below image:
Returing your signed document back to the sender
You have successfully adding your Signature to a PDF file, emailed the attachment and replied to the other party with your Signature.
I Would Like to Hear From You
Please feel free to leave a comment. I would love hearing from you. Do you have a computer or smart device tech question? I will do my best to answer your inquiry. Please mention the device, app and version that you are using. To help us out, you can send screenshots of your data related to your question.
The author’s Vietnam eBook on the Battle for Tra Bong: Events and Aftermath
For most users, battery life can last most all day on modern iOS devices. However, you can change some iOS 13 settings to maximize the most of your battery usage.
This is for iOS devices iPhone and iPad running iOS 13 and above. Some tips can be applied in earlier versions.
Copyright Scott Adams, Inc./Distributed by Universal Uclick for UFS
Disable Dynamic Wallpapers on Your iOS Device
Dynamic Wallpapers was a fun UI feature that was added to iOS 7, but it drains battery life. If you use Dynamic Wallpapers and experience issues with battery life, you might want to disable the app and pick a standard background image by following these steps:
Open the Settings app
Select Wallpaper > Choose a New Wallpaper > Stills
Select a solid color, then set it as the Home Screen background and Lock Screen background.
Note: Selecting the solid black wallpaper on an OLED screen will cause the device to use less power. Solid black pixels do not use power to display the screen.
Use Dark Mode on Your Device
Using Dark Mode can increase the battery life on OLED devices because it swaps out the white backgrounds for dark backgrounds that use less battery life as mentioned above. To enable Dark Mode follow these steps:
Open the Settings app
Select Display & Brightness
Change the Appearance from Light to Dark
Disable Raise to Wake
Raise to Wake was introduced with the iPhone X as a way to view the Lock Screen Notifications by raising your iPhone into portrait mode. This is a great feature, but it can cause your screen to turn on throughout the day and drain your battery life. To disable this feature, perform the following steps:
Open the Settings app
Navigate to Display & Brightness
Disable the option for Raise To Wake
With this feature disabled, you can still tap the screen to turn it on, but raising it will not cause the screen to turn on.
Disable Background App Refresh on Cellular
Background App Refresh is a great feature in iOS that allows apps to update in the background so that the next time you launch an app, everything is already loaded.
While you shouldn’t disable this feature for all apps, it’s good to review the apps that do use it and disable any that aren’t regularly used so they aren’t wasting battery life.
To check which apps are using Background App Refresh, follow these steps:
Open the Settings app
Navigate to General > Background App Refresh
Disable this feature for any apps in this list that aren’t frequently used
When Background App Refresh is disabled and you quit an app that’s in this list, it will no longer download data in the backgroud; instead, you must open the app for it to download new content.
Background App Refresh has a feature that allows apps to use it only when you’re connected to Wi-Fi, not when you’re running on cellular data. To enable Wi-Fi-only Background App Refresh, complete the following steps:
Open the Settings app
Navigate to General > Background App Refresh > Background App Refresh
Select Wi-Fi instead of the default Wi-Fi & Cellular
Ensuring that apps use Background App Refresh only when on Wi-Fi means it will not use battery-draining cellular data to perform the requests.
Disable Motion Effects on Your iOS Device
Disabling motion effects means that the cute animations throughout iOS and third-party apps won’t be as prominent, but if you can live without them, you can save battery life.
To disable motion effects, perform the following steps:
Open the Settings app
Navigate to Accessibility > Motion
Enable the option for Reduce Motion
Manage Bluetooth Connections on Your iOS Device
If you have multiple Bluetooth devices connected to your iOS device and are not using them, it may be a good opportunity to review the items and remove any you’re not currently using.
Follow these steps to review and remove Bluetooth devices:
Open the Settings app
Select Bluetooth, and tap the “i” next to the connected devices you wish to disconnect
Tap Forget This Device (or Disconnect), if available
You can also turn Bluetooth off completely by following these steps\:
Open the Settings app
Select Bluetooth
Toggle the switch to OFF
Manage Location Settings on Your iOS Device
Location and the use of GPS to track your device for various apps can be a huge battery hog, and iOS 13 includes a new way to manage these settings.
It’s worthwhile to manage your loccation settings in apps to ensure only those that need to use your location have access to do so.
To review and manage location tracking follow the below steps:
Open the Settings app
Select Privacy
Tap Location Services
You should check and control the location tracking for each individual app. Remember that disabling Location Services may hinder the apps functionally.
Place Your iPhone Face Down When Not in Use
This is more of a tip than a setting change. Starting with the iPhone 6, Apple made its iPhones so that if you turn one face down it will keep the screen from lighting up upon notifications, which helps prevent battery drain.
I Would Like to Hear from You
Please feel free to leave a comment. I would love hearing from you. Do you have a computer or smart device tech question? I will do my best to answer your inquiry. Please mention the device, app and version that you are using. To help us out, you can send screenshots of your data related to your question.
The author’s Vietnam eBook on the Battle for Tra Bong: Events and Aftermath
Did you recently obtain a new iPhone? Are you concerned about losing the device? Apple owners can find the device with the Find My app for iOS 13 and above or Find My iPhone for older iOS. We are going to use iCloud to tract down your device.
Before your iPhone goes missing, there are a few options to turn on. For iOS 13+, do the following:
Tap on Settings
Tap on <Your Name>
Tap on Find My
Tap on Find My iPhone
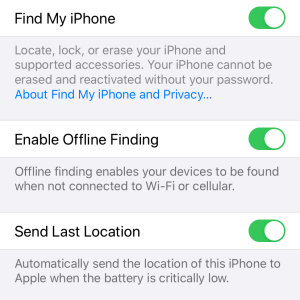
Enable all three slider controls by tap and hold, then slide until the option is lit (highlighted in green)
For older iOS, tap on Settings, <Your Name>, iCloud, Find My iPhone and enable all three slider controls
Your screen should look like the image below:
Find My iPhone Screenshot
First, using another device, try calling your number. If that doesn’t work, lets try using your browser to locate your device.
Once again, the following is for iOS 13+. The steps are similar for older iOS.
If you don’t have an iCloud account, you can download iCloud for Windows
Signin using your Apple ID and password
Your screen should look like the below image:
Signin to iCloud
Click the Find iPhone icon
Select the All Devices drop down box at the top of the screen and find your iPhone
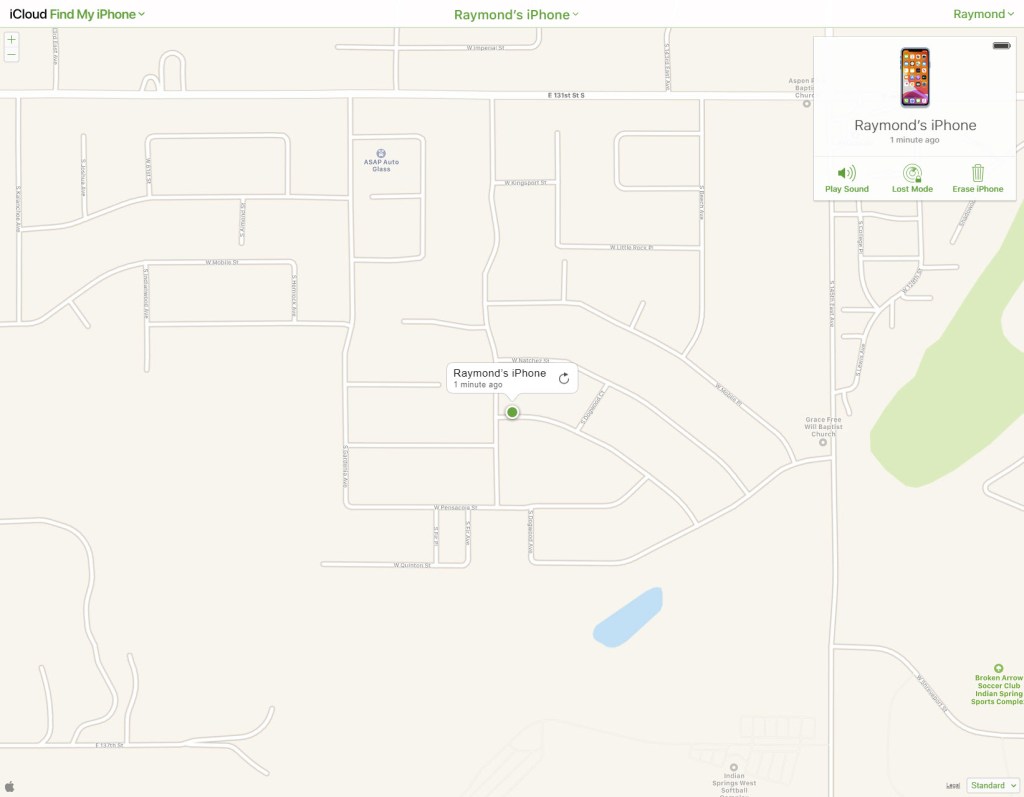
Select your iPhone on the map, its a green dot
Your results should look like the below image:
Screenshot of my iPhone location
You now have three options:
Play Sound on your iPhone
Place the iPhone in Lost Mode which locks the iPhone so no one can access it. If someone finds its, the device will display your contact information.
Erase iPhone. Please do not do this unless all hope is gone of recovering the device. Once the iPhone is erased, all personal information is gone. Your device can no longer be tracked through the app.
Locate Other Lost Devices
You may want to find any lost device like Airpods, headphones, Fitbit tracker, Apple Pencil, iPad, Apple Watch and others. As of this post, Wunderfind is a free iPhone app from the Apple Store. It is worth a look. Click here for a preview.
I Would Like to Hear from You
Please feel free to leave a comment. I would love hearing from you. Do you have a computer tech question? I will do my best to answer your inquiry. Please mention the app and version that you are using. To help me out, you can send screenshots of your data related to your question.