How to Find iPhone’s Hidden Photos

Did you hide some photos on your iPhone but you are not sure where those photos are? It’s easy to see those hidden photos on an iPhone.

RAYMOND OGLESBY @RaymondOglesby2
March 2, 2022

Did you hide some photos on your iPhone but you are not sure where those photos are? It’s easy to see those hidden photos on an iPhone. Let’s explore how this is done.

Note: Respect other people’s privacy when using this knowledge, as they have their own reasons for hiding photos on their iPhones.

This is for the iPhone

Dilbert and Chair
Copyright Scott Adams, Inc./Distributed by Universal Uclick for UFS

View iPhone’s Hidden Photos

To view your hidden photos, first, launch the Photos app on your iPhone. At the bottom of the Photos app, tap Albums. Refer to the below image:

Hidden 1
Accessing photo Albums

Next, on the Albums page, scroll down to the bottom. There, in the Other Albums section, tap Hidden.

On certain iOS versions, the Hidden album is located in the Utilities section as shown below.

Note: If you do not see the Hidden album option, the album itself might be hidden. To enable it, follow the steps in the section below.

See the below image:

Hidden 2
Accessing the Hidden option

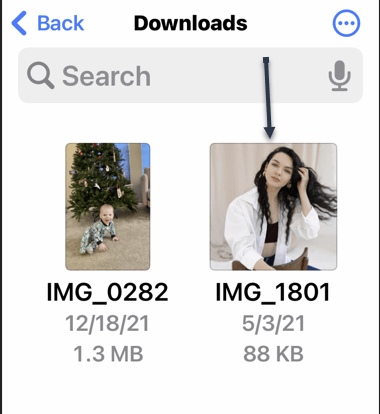
Now, the Hidden album screen shows all your hidden photos and videos. If none is displayed, you have no hidden photos or videos. See the following image:

Hidden 3
Selecting a hidden photo

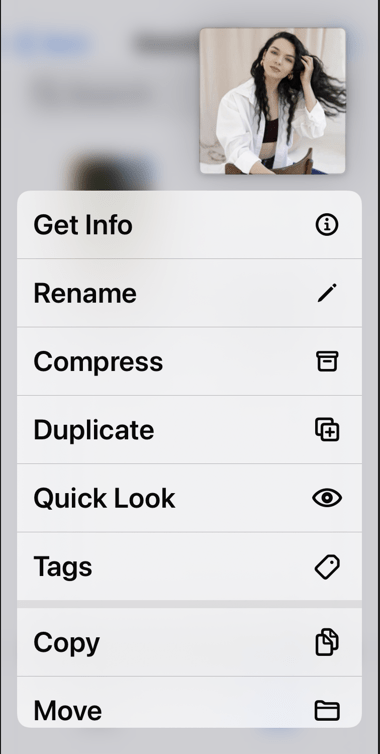
Next, to unhide a photo or video, tap that item on the list. When the item opens in full-screen, in the bottom left-hand corner, tap the Share icon. Refer to the below image:

Hidden 4
Accessing the Share icon

Now, in the Share menu, tap Unhide. See the below image:

Hidden 5
Unhide your photo

Next, your selected photo or video is now visible to everyone in Photos.

If you are not finding the photos you were looking for, consider trying to recover deleted photos on your iPhone or iPad.

Enable the Hidden Album

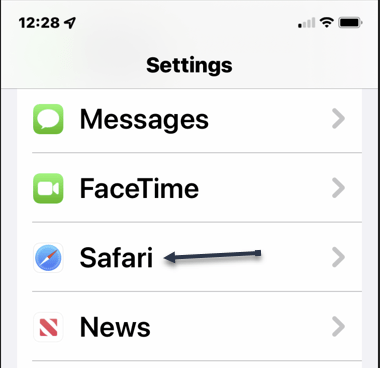
On iOS 14 and later, you can turn off the Hidden album in the Photos app. To re-enable that album, you will have to change an option in your iPhone’s Settings.

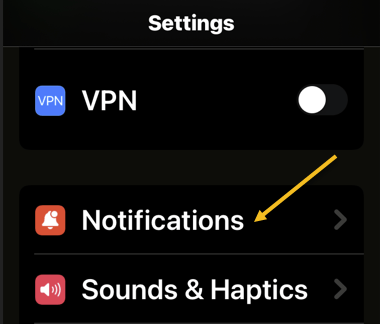
To do so, first, open the Settings app on your iPhone and tap Photos. See the following image:

Hidden 6
Accessing Photos

Next, toggle the Hidden Album option to ON. Refer to the below image:

Hidden 7
Enable Hidden Album option

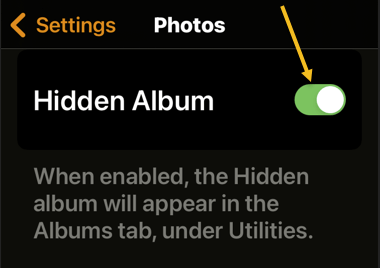
Now, your album is now visible in the Photos app, and you can access your hidden photo(s).

Quote For the Day

Your attitude, not your aptitude, will determine your altitude.

Zig Zigler

That’s it. Please feel free to share this post! One way to share is via Twitter.

Just click the Tweet icon below. This will launch Twitter where you click its icon to post the Tweet.

Check out TechSavvy.Life for blog posts on smartphones, PCs, and Macs! You may email us at contact@techsavvy.life for comments or questions.

I Would Like to Hear From You

Please feel free to leave a comment. I would love to hear from you. Do you have a computer or smart device tech question? I will do my best to answer your inquiry. Just send an email to contact@techsavvy.life. Please mention the device, app, and version you are using. To help us out, you can send screenshots of your data related to your question.

Author’s E-book

You can access the e-book from a Kindle device, the Kindle App for the desktop or smartphone, which is a free app.

The author’s Vietnam eBook on the Battle for Tra Bong Vietnam: Events and Aftermath

How to Drag and Drop Browser Links to Desktop

In four major browsers; Chrome, Edge, Firefox, and Safari; on Windows, Mac, and Linux, you can easily drag and drop a shortcut link to a website straight to your desktop.

RAYMOND OGLESBY @RaymondOglesby2
JMarch 1, 2022

In four major browsers; Chrome, Edge, Firefox, and Safari; on Windows, Mac, and Linux, you can easily drag and drop a shortcut link to a website straight to your desktop. Let’s see how easily this is done.

This is for PCs, Macs, and web browsers. Screenshots are from Windows 10

Dilbert and Plan
Copyright Scott Adams, Inc./Distributed by Universal Uclick for UFS

Create Shortcut Using Chrome, Edge, and Firefox

To create a desktop web shortcut, first open a Chrome, Edge, or Firefox browser window and navigate to the site you want to create a shortcut from. In the address bar at the top of the window, click and drag the Padlock icon (located to the left of the address) out of the browser window, or drag and drop the URL address onto your desktop. Refer to the below image:

Links 1
Drag to create a shortcut on the desktop

Next, as soon as you click and drag, you will see the title or address of the website besides your pointer. When you are hovering over the desktop, release your mouse button, and a shortcut icon will be created. To use the shortcut, double-click it at any time, and the site will open in your default browser.

This shortcut does not have to stay on your desktop either; you can move it to any folder on your PC.

Create Shortcut Using Safari on Mac

To make a desktop web shortcut on a Mac, first, open a Safari browser window and navigate to the site you want to create a shortcut to.

Next, in that window, hover your mouse cursor over the address bar at the top of the window, and a small Plus (“+”) icon will appear on the far left side. Click and drag the Plus icon onto your desktop and release your mouse or trackpad button. A shortcut icon will appear. See the below image:

Links 2
Drag to create a shortcut on Mac

Now, you can double-click the shortcut icon, and your default browser app will open and automatically load the website stored in the link.

By the way, this is not the only drag-and-drop trick you can do with browsers. Most browsers also allow you to drag tabs between open windows of the same browser.

How to Drag Tabs Between Browser Windows

Quote For the Day

If you learn from defeat, you haven’t really lost.

Zig Ziglar

That’s it. Please feel free to share this post! One way to share is via Twitter.

Just click the Tweet icon below. This will launch Twitter where you click its icon to post the Tweet.

Check out TechSavvy.Life for blog posts on smartphones, PCs, and Macs! You may email us at contact@techsavvy.life for comments or questions.

I Would Like to Hear From You

Please feel free to leave a comment. I would love to hear from you. Do you have a computer or smart device tech question? I will do my best to answer your inquiry. Just send an email to contact@techsavvy.life. Please mention the device, app, and version you are using. To help us out, you can send screenshots of your data related to your question.

Author’s E-book

You can access the e-book from a Kindle device, the Kindle App for the desktop or smartphone, which is a free app.

The author’s Vietnam eBook on the Battle for Tra Bong Vietnam: Events and Aftermath

How to Block iPhone Text Message Notifications from Unknown Senders

Even if you are already filtering unknown senders in Messages on iPhone, you still might see notifications every time you get a text from an unknown number. To stop that and silence the annoying notifications, you will need to make a change in Settings.

RAYMOND OGLESBY @RaymondOglesby2
February 24, 2022

Even if you are already filtering unknown senders in Messages on iPhone, you still might see notifications every time you get a text from an unknown number. To stop that and silence the annoying notifications, you will need to make a change in Settings. Let’s explore how to do this.

This is for the iPhone. Screenshots are from iPhone XR

Dilbert and Years
Copyright Scott Adams, Inc./Distributed by Universal Uclick for UFS

First, open Settings (the grey gear icon, usually on your Home Screen). Refer to the below image:

Block 1
Accessing Settings

Next, on Settings, scroll down and tap Notifications. See the below image:

Block 2
Accessing Notifications

Now, in Notifications, tap Messages. See the following image:

Block 3
Accessing Messages

Next, in Messages notification settings, scroll down to the very bottom and tap Customize Notifications. Refer to the below image:

Block 4
Selecting Customize Notifications

Now, in Customize Notifications, flip the toggle beside Unknown Senders to the OFF position. See the below image:

Block 5
Disable Unknown Senders

Next, exit Settings. Now, we want to enable Filter Unknown Senders. Head to:

Settings > Messages > Filter Unknown Senders

and flip the toggle to ON. See the following image:

Block 6
Enable Filter Unknown Senders

Now, you will no longer receive notifications when unknown senders text you.

Quote For the Day

If you don’t have a competitive advantage, don’t compete.

Jack Welch

That’s it. Please feel free to share this post! One way to share is via Twitter.

Just click the Tweet icon below. This will launch Twitter where you click its icon to post the Tweet.

Check out TechSavvy.Life for blog posts on smartphones, PCs, and Macs! You may email us at contact@techsavvy.life for comments or questions.

I Would Like to Hear From You

Please feel free to leave a comment. I would love to hear from you. Do you have a computer or smart device tech question? I will do my best to answer your inquiry. Just send an email to contact@techsavvy.life. Please mention the device, app, and version you are using. To help us out, you can send screenshots of your data related to your question.

Author’s E-book

You can access the e-book from a Kindle device, the Kindle App for the desktop or smartphone, which is a free app.

The author’s Vietnam eBook on the Battle for Tra Bong Vietnam: Events and Aftermath

How to Locate Downloaded Files on iPhone or iPad

If you have downloaded files to your iPhone or iPad, accessing them might be confusing. There’s a special folder where iOS and iPadOS store downloads, and you can find it via the Files app.

RAYMOND OGLESBY @RaymondOglesby2
February 23, 2022

If you have downloaded files to your iPhone or iPad, accessing them might be confusing. There’s a special folder where iOS and iPadOS store downloads, and you can find it via the Files app. Let’s find out how to locate downloaded files.

This is for the iPhone and iPad. Screenshots are from iPhone XR

Dilbert and Honest
Copyright Scott Adams, Inc./Distributed by Universal Uclick for UFS

First, locate the Files app on your iPhone or iPad. The quickest way to do this is with Spotlight Search. Swipe one finger down from the middle of the Home screen, and then type Files. In the search results, then tap the Files icon. Refer to the below image:

Files 1
Locating the Files app

Next, select the Browse tab at the bottom. See the below image:

Files 2
Accessing the Browse tab

Now, tap On My iPhone or On My iPad, depending on which device you are using. The list under Locations will vary depending on which apps you have installed, but your device will always have an On My [Device] listing. See the following image:

Files 3
Selecting On My iPhone option

Next, you will see a list of folders which will vary depending on what apps you have installed. Generally, most people save files to the Downloads folder, so tap this folder. Refer to the below image:

Files 4
Selecting the Downloads folder

Now, you will see a list of all the files you have downloaded. During the download process, you can save a file to a folder other than Downloads. If you do not see the file you are looking for, tap the Back arrow at the upper left-hand corner, and then tap another folder. See the below image:

Files 5
Selecting a downloaded image

Next, once you locate the file you want, you can tap it to preview it, or tap and hold it to open a pop-up menu. Then, you can move, copy, or rename the file, along with other operations. See the following image:

Files 6
The image options

Quote For the Day

Beware of geeks bearing formulas.

Warren Buffett

That’s it. Please feel free to share this post! One way to share is via Twitter.

Just click the Tweet icon below. This will launch Twitter where you click its icon to post the Tweet.

Checkout TechSavvy.Life for blog posts on smartphones, PCs, and Macs! You may email us at contact@techsavvy.life for comments or questions.

I Would Like to Hear From You

Please feel free to leave a comment. I would love to hear from you. Do you have a computer or smart device tech question? I will do my best to answer your inquiry. Just send an email to contact@techsavvy.life. Please mention the device, app, and version you are using. To help us out, you can send screenshots of your data related to your question.

Author’s E-book

You can access the e-book from a Kindle device, the Kindle App for the desktop or smartphone, which is a free app.

The author’s Vietnam eBook on the Battle for Tra Bong Vietnam: Events and Aftermath

How to Stop Websites Asking For Your Location in Safari

Websites in Safari often bug you to let them access your location services to detect where you are. You can turn off those prompts on iPhone and iPad and even prevent the browser from accessing location services altogether.

RAYMOND OGLESBY @RaymondOglesby2
February 22, 2022

Websites in Safari often bug you to let them access your location services to detect where you are. You can turn off those prompts on iPhone and iPad and even prevent the browser from accessing location services altogether. Let’s explore this feature.

This is for iPhone and iPad using Safari. Screenshots are from iPhone XR

Dilbert and Option
Copyright Scott Adams, Inc./Distributed by Universal Uclick for UFS

Disable Location Requests in Safari

First, open the Settings app on your iPhone or iPad, then scroll down and select Safari. Refer to the below image:

Location 1
Accessing Safari

Next, scroll down till you see the Settings For Websites section then tap on Location See the below image:

Location 2
Accessing Location

Now, select Deny. See the following image:

Location 3
Disable using Safari Location

Next, Safari will automatically block websites from pushing those prompts that ask for your location.

Disable Location Services in Safari

If you want to prevent Safari from accessing location services entirely for all websites, you can disable its access.

Note: Keep in mind that you will not get to use your iPhone’s location at all in Safari. You may want instead to disable precise location services and allow apps to see only your approximate location.

First, open the Settings app on your iPhone or iPad and select Privacy. Refer to the below image:

Location 4
Accessing Privacy

Next, tap Location Services. See the below image:

Location 5
Accessing Location Services

Now, select Safari Websites. See the following image:

Location 6
Accessing Safari Websites

Next, select the Never option under the Allow Location Access. Refer to the below image:

Location 7
Disable Safari Websites

After disabling this, websites will not get to use location services in Safari on your iPhone or iPad.

Quote For the Day

Do more than you are being paid to do, and you’ll eventually be paid more for what you do.

Zig Ziglar

That’s it. Please feel free to share this post! One way to share is via Twitter.

Just click the Tweet icon below. This will launch Twitter where you click its icon to post the Tweet.

Check out TechSavvy.Life for blog posts on smartphones, PCs, and Macs! You may email us at contact@techsavvy.life for comments or questions.

I Would Like to Hear From You

Please feel free to leave a comment. I would love to hear from you. Do you have a computer or smart device tech question? I will do my best to answer your inquiry. Just send an email to contact@techsavvy.life. Please mention the device, app, and version you are using. To help us out, you can send screenshots of your data related to your question.

Author’s E-book

You can access the e-book from a Kindle device, the Kindle App for the desktop or smartphone, which is a free app.

The author’s Vietnam eBook on the Battle for Tra Bong Vietnam: Events and Aftermath

Want to Change Your LinkedIn Profile URL?

Your LinkedIn profile‘s web address (URL) is customizable, which means you can set it to whatever you want.

RAYMOND OGLESBY @RaymondOglesby2
February 17, 2022

Your LinkedIn profile‘s web address (URL) is customizable, which means you can set it to whatever you want. Let’s see how to change your profile URL on LinkedIn on a desktop and mobile.

This is for devices using LinkedIn. Screenshots are from Windows 10 and iPhone XR

Dilbert and Doom
Copyright Scott Adams, Inc./Distributed by Universal Uclick for UFS

When you change your URL, it will always start with the following:

www.linkedin.com/in/

After the in/ is where your custom URL will appear. The new URL must have a minimum of 3 and a maximum of 300 characters. You can not use spaces, symbols, or special characters in your URL.

You will likely want to change it to your name in some fashion. Keep in mind, though, that your profile URL is not case-sensitive, which means both “RaymondOglesby” and “raymondoglesby” are the same.

While changing the URL, also keep in mind that you can only do this five times in a six months period.

Change on the Desktop

On a Windows, Mac, Linux, or Chromebook computer, use the LinkedIn site to customize your profile URL.

First, launch a web browser on your computer and open LinkedIn. Sign in to your account, if not already.

Next, in LinkedIn’s top right-hand corner, click:

Me > View Profile

Refer to the below image:

Linkedin 1
Accessing View Profile

Now, on the right sidebar, at the top, click Edit public profile & URL. See the below image:

Linkedin 2
Accessing your Profile URL

Next, at the top of the right sidebar, in the Edit your custom URL section, click Edit (the pencil icon). See the following image:

Linkedin 3
Edit your Profile URL

Your profile URL is now editable. Next, clear the existing URL, type in a new URL of your choice, then click Save. Refer to the below image:

Linkedin 4
Changing your Profile URL and Save

And your LinkedIn profile URL has been successfully changed. Compared to changing your profile URL on a mobile device, this method is much easier. People will now need to use the new URL to access your profile. Be sure to update your other social media with your new link.

If you would like to revert back to the previous URL, you can do so using the above steps.

Change on Mobile

On your iPhone, iPad, or Android phone, use the LinkedIn app to change your Linkedin web address.

First, launch the LinkedIn app on your phone. In the app’s top left-hand corner, tap your profile icon. See the below image:

Linkedin 5
Accessing your Profile icon

Next, in the menu that opens, at the top, tap View Profile. See the following image:

Linkedin 6
Accessing View Profile

Now, your profile page will open. Next to your profile image, tap the Edit (the pencil icon). Refer to the below image:

Linkedin 7
Accessing Edit

Next, your profile page will open. Scroll down the page to the Contact info section, then tap Edit contact info. See the below image:

Linkedin 8
Accessing Edit contact info link

Now, in the Edit contact info section, tap your current profile URL. See the following image:

Linkedin 9
Accessing your current Profile link

Next, in the Edit My Public Profile section, tap the Edit (the pencil icon) below Edit your custom URL

Linkedin 10
Accessing to Edit your Profile URL

Your profile URL is now editable. Now, clear the existing URL, type in a new URL of your choice, then click Save. Refer to the below image:

Linkedin 11
Changing your Profile URL and Save

And that’s all. Your LinkedIn profile URL is now changed.

Quote For the Day

Move fast and break things. Unless you are breaking stuff, you are not moving fast enough.

Mark Zuckerberg

That’s it. Please feel free to share this post! One way to share is via Twitter.

Just click the Tweet icon below. This will launch Twitter where you click its icon to post the Tweet.

Check out TechSavvy.Life for blog posts on smartphones, PCs, and Macs! You may email us at contact@techsavvy.life for comments or questions.

I Would Like to Hear From You

Please feel free to leave a comment. I would love to hear from you. Do you have a computer or smart device tech question? I will do my best to answer your inquiry. Just send an email to contact@techsavvy.life. Please mention the device, app, and version you are using. To help us out, you can send screenshots of your data related to your question.

Author’s E-book

You can access the e-book from a Kindle device, the Kindle App for the desktop or smartphone, which is a free app.

The author’s Vietnam eBook on the Battle for Tra Bong Vietnam: Events and Aftermath


How to Turn Off Auto Brightness on iPhone

Thanks to light sensors, your iPhone or iPad can automatically adjust the display brightness to match the ambient lighting. If you prefer manual controls, it’s possible to turn off Auto-Brightness, but Apple put the option in an unusual place.

RAYMOND OGLESBY @RaymondOglesby2
February 16, 2022

Thanks to light sensors, your iPhone or iPad can automatically adjust the display brightness to match the ambient lighting. If you prefer manual controls, it’s possible to turn off Auto-Brightness, but Apple put the option in an unusual place.

This is for the iPhone and iPad. Screenshots are from iPhone XR

Dilbert and Boss
Copyright Scott Adams, Inc./Distributed by Universal Uclick for UFS

At one of my consultant assignments, I actually had a boss who told me “not to think, just do what I tell you”. I left his office and started calling companies for a new assignment. I left that company as soon as I could.

Strangely, the iPhone and iPad’s automatic brightness option is not in the Display & Brightness settings like you would expect. You will find the True Tone toggle, but nothing for Auto-Brightness. We just need to look somewhere else.

What is Auto-Brightness

In brighter rooms or outdoors, iOS increases the display brightness. In darker environments or at night, it will lower the brightness.

This is handy because it generally keeps your iPhone or iPad screen’s brightness appropriate for the lighting conditions without requiring you to go into Settings or visit the Control Center.

It also helps save battery life, as your device’s display is often the largest battery life eater and Auto-Brightness prevents the screen from being brighter than it needs to be.

But sometimes iOS’s “guess” at what the iPhone’s brightness should be and this is not what you want. For example, it may be quite dark in a room but you want to have maximum brightness for a particular app or movie. Or you may want to reduce screen brightness to save on battery life in an otherwise bright room.

Disable Auto-Brightness

First, open the Settings app from the Home screen. Refer to the below image:

Auto 1
Accessing Settings app

Here’s where Apple throws the curveball. You actually want to go to Accessibility, not the Display settings. See the below image:

Auto 2
Accessing Accessibility option

Now, tap the Display & Text Size category within Accessibility. See the following image:

Auto 3
Accessing Display & Text Size option

Next, scroll down to the bottom and toggle off the switch for Auto-Brightness. Refer to the below image:

Auto 4
Enable/Disable Auto-Brightness toggle

That’s it! Now when you adjust the brightness it will stay at the level you set until you change it again. This can be a good trick to save battery life; if you keep the brightness low; or it can drain the battery quickly if you leave it on high brightness a lot.

Quote For the Day

A public-opinion poll is no substitute for thought.

Warren Buffett

That’s it. Please feel free to share this post! One way to share is via Twitter.

Just click the Tweet icon below. This will launch Twitter where you click its icon to post the Tweet.

Check out TechSavvy.Life for blog posts on smartphones, PCs, and Macs! You may email us at contact@techsavvy.life for comments or questions.

I Would Like to Hear From You

Please feel free to leave a comment. I would love to hear from you. Do you have a computer or smart device tech question? I will do my best to answer your inquiry. Just send an email to contact@techsavvy.life. Please mention the device, app, and version you are using. To help us out, you can send screenshots of your data related to your question.

Author’s E-book

You can access the e-book from a Kindle device, the Kindle App for the desktop or smartphone, which is a free app.

The author’s Vietnam eBook on the Battle for Tra Bong Vietnam: Events and Aftermath

How to Disable/Enable Google Search Dark Theme

Google Search’s Dark Theme looks great, but it’s not for everyone. If you would prefer performing your searches on a light theme, here’s how to turn off/on Dark Theme on Google Search on desktop and mobile.

RAYMOND OGLESBY @RaymondOglesby2
February 15, 2022

Google Search’s Dark Theme looks great, but it’s not for everyone. If you would prefer performing your searches on a light theme, here’s how to turn off/on Dark Theme on Google Search on desktop and mobile.

This is for devices using Google Search. Screenshots are from Windows 10 and iPhone XR

Dilbert and Murder
Copyright Scott Adams, Inc./Distributed by Universal Uclick for UFS

Turn Off on Desktop

To disable Google Search’s Dark theme on your Windows, Mac, Linux, or Chromebook computer, first, launch your web browser and access the Google site.

Next, in the bottom-right-hand corner of the Google site, click Settings. Refer to the below image:

Searvh 1
Accessing Settings

Now, in the menu that opens, select Search Settings. See the below image:

Search 2
Selecting Search settings option

Next, on the Search Settings page, in the left sidebar, click Appearance. See the following image:

Search 3
Selecting Appearance option

Now, in the Appearance section on the right, enable the Light theme option. This disables the Dark theme and enables the Light theme. Simply do the opposite to re-enable the Dark theme.

Next, to save your settings, at the bottom of the Appearance section, click Save. Refer to the below image:

Search 4
Save your change

Now, you will see a Your preferences have been saved prompt. Click OK. See the below image:

Search 5
Confirm your change

Next, your Google Search will be displayed in the Light theme. See the following image:

Search 6
Your Light theme

Turn Off on Mobile

To deactivate Dark theme on Google Search on your iPhone, iPad, or Android phone, first, launch your web browser and open the Google site.

Next, in Google’s top left-hand corner, tap the Hamburger menu (the three horizontal lines). Refer to the below image:

Search 7
Selecting the menu

Next, from the menu that opens, select Settings. See the below image:

Search 8
Accessing Settings

Now, on the Search Settings page, in the Appearance section, enable the Light theme option. See the following image:

Search 9
Selecting Light theme

Now, to save your changes, scroll the Search Settings page to the bottom. and tap Save. Refer to the below image:

Search 10
Save your change

Next, in the Your preferences have been saved prompt, tap Close. See the below image:

Search 11
Close the dialog

And your favorite search engine is now back to Light theme. Simply do the opposite to re-enable the Dark theme.

Now, your Google Search will be displayed in the Light theme. See the following image:

Search 12
Your Light theme

Quote For the Day

When you combine ignorance and leverage, you get some pretty interesting results.

Warren Buffett

You are finished. Please feel free to share this post! One way to share is via Twitter.

Just click the Tweet icon below. This will launch Twitter where you click its icon to post the Tweet.

Check out TechSavvy.Life for blog posts on smartphones, PCs, and Macs! You may email us at contact@techsavvy.life for comments or questions.

I Would Like to Hear From You

Please feel free to leave a comment. I would love to hear from you. Do you have a computer or smart device tech question? I will do my best to answer your inquiry. Just send an email to contact@techsavvy.life. Please mention the device, app, and version you are using. To help us out, you can send screenshots of your data related to your question.

Author’s E-book

You can access the e-book from a Kindle device, the Kindle App for the desktop or smartphone, which is a free app.

The author’s Vietnam eBook on the Battle for Tra Bong Vietnam: Events and Aftermath

How to Clear Chrome Browsing History on iPhone and iPad

The browsing history in Google Chrome for iOS and iPadOS helps you easily get back to your favorite sites. But if you need to clear out a portion of the history on your iPhone or iPad, it’s easy.

RAYMOND OGLESBY @RaymondOglesby2
February 9, 2022

The browsing history in Google Chrome for iOS and iPadOS helps you easily get back to your favorite sites. But if you need to clear out a portion of the history on your iPhone or iPad, it’s easy. Let’s explore how to do this.

This is for the iPhone and iPad

Copyright Scott Adams, Inc./Distributed by Universal Uclick for UFS

Clear Chrome Browsing History

Clearing the browsing history in Safari, the browser for iPhone and iPad is relatively simple, but it is not exactly intuitive. Fortunately, clearing the browsing history in Google Chrome is even easier than in Safari, since you can do it directly within the browser.

First, tap the three-dot icon in the bottom right-hand corner of the browser and select History from the pop-up list. (If you are on the Start page, you can tap the History icon below the Search bar). Refer to the below image where we are selecting History from the pop-up list:

Clear 1
Accessing History option

Next, scroll down to the bottom of the screen and tap Clear Browsing Data… to begin clearing your history. See the below image:

Clear 2
Accessing Clear Browsing Data option

Now, select the time range at the top of the page. This ranges from the last hour to all of your browsing history. See the following image:

Clear 3
Setting a Time Range

Next, once you have selected the period you wish to delete, check over the data that you are going to delete. By default, Browsing History, Cookies and Site Data, and Cached Images are selected. You can select or deselect these as you see fit. Once you have made your selections, tap Clear Browsing Data at the bottom of the screen. Refer to the below image:

Clear 4
Selecting what information to clear

Now, select this option again in the pop-up dialog at the bottom of the screen to finish clearing your history. See the below image:

Clear 5
Selecting Clear Browsing Data once again

Keep in mind that clearing browsing history in Chrome for iPhone and iPad does not always clear browsing history in the desktop version of the browser. To make sure your history is fully clear, take a look at some guides on how to clear your browsing history in any browser.

Don’t Delete Everything

As we touched on above, you do not have to delete all of your browsing history. By selecting the right time range, you can delete your history only from the last hour or the last day. See the following image:

Clear 6
Selecting a Time Range

You also do not need to delete all the data selected by default. For example, you may want to delete all of your website history but do not want to log into sites over again. To accomplish this, just deselect Cookies, Site Data when you are clearing your history.

You can also choose to delete more than what is selected by default. For example, if you’re preparing an iPad for your kids, you might not want your passwords saved. In this case, check Saved Passwords when clearing your history.

Browse Incognito Mode

If you find yourself frequently clearing your browsing history, it could be that you are not making enough use of private browsing, or Incognito Mode.

For the desktop:

How to Easily Open Chrome to Incognito Mode

For the iPhone or iPad:
  • Open your Google App and sign in, if necessary
  • Tap your Profile icon
  • Select Turn on Incognito from the drop-down menu

Quote For the Day

It takes 20 years to build a reputation and five minutes to ruin it. If you think about that, you’ll do things differently.

Warren Buffett

That’s it. Please feel free to share this post! One way to share is via Twitter.

Just click the Tweet icon below. This will launch Twitter where you click its icon to post the Tweet.

Checkout TechSavvy.Life blog posts on smartphones, PCs, and Macs! You may email us at contact@techsavvy.life for comments or questions.

I Would Like to Hear From You

Please feel free to leave a comment. I would love to hear from you. Do you have a computer or smart device tech question? I will do my best to answer your inquiry. Just send an email to contact@techsavvy.life. Please mention the device, app, and version you are using. To help us out, you can send screenshots of your data related to your question.

Author’s E-book

You can access the e-book from a Kindle device, the Kindle App for the desktop or smartphone, which is a free app.

The author’s Vietnam eBook on the Battle for Tra Bong Vietnam: Events and Aftermath

How to Disable Pop-Up Blocker in Safari

By default, Safari on your iPhone and iPad blocks any website pop-ups. If a site requires these tiny windows to function, you can disable Safari’s built-in pop-up blocker.

RAYMOND OGLESBY @RaymondOglesby2
February 8, 2021

By default, Safari on your iPhone and iPad blocks any website pop-ups. If a site requires these tiny windows to function, you can disable Safari’s built-in pop-up blocker. Let’s explore how this is done.

This is for the iPhone and iPad

Dilbert and Covid
Copyright Scott Adams, Inc./Distributed by Universal Uclick for UFS

Why Enable Pop-Ups

One major reason to enable pop-ups in Safari is to allow websites, such as your bank’s website, to display pop-up windows they require to operate. On some sites, without these tiny windows, you can not do what you need to.

Later, when you have finished your task, you can re-enable the built-in pop-up blocker, as explained below.

By default, Safari disables pop-ups automatically in the browser.

Disable the Pop-Up Blocker

First, to disable Safari’s pop-up blocker on your iPhone or iPad, open the Settings app on your phone. Refer to the below image:

Pop Up 1
Accessing Settings

Next, on the Settings page, scroll down and tap Safari. See the below image:

Pop Up 2
Accessing Safari

Now, on the Safari page that opens, you have various options to configure for this web browser. Here, at the bottom of the General section, toggle OFF the Block Pop-ups option. See the following image:

Pop Up 3
Disable Block Pop-up option

To re-enable the built-in pop-up blocker, simply turn ON the Block Pop-ups option again.

Safari’s pop-up blocker is now disabled, and your sites can now launch those small windows while you are browsing in this browser.

Quote For the Day

Mind over mattress.

Stephen Covey

That was easy. Please feel free to share this post! One way to share is via Twitter.

Just click the Tweet icon below. This will launch Twitter where you click its icon to post the Tweet.

Checkout TechSavvy.Life for blog posts on smartphones, PCs, and Macs! You may email us at contact@techsavvy.life for comments or questions.

I Would Like to Hear From You

Please feel free to leave a comment. I would love to hear from you. Do you have a computer or smart device tech question? I will do my best to answer your inquiry. Just send an email to contact@techsavvy.life. Please mention the device, app, and version you are using. To help us out, you can send screenshots of your data related to your question.

Author’s E-book

You can access the e-book from a Kindle device, the Kindle App for the desktop or smartphone, which is a free app.

The author’s Vietnam eBook on the Battle for Tra Bong Vietnam: Events and Aftermath