If you want even more flair with your Microsoft Word drop cap letters, why not take advantage of the Microsoft online images. Let’s explore how this is done.
This is for devices using Microsoft Word
Copyright Scott Adams, Inc./Distributed by Universal Uclick for UFS
First, open Word and click where you want a drop cap letter to appear and navigate to
Insert | Pictures | Online Pictures
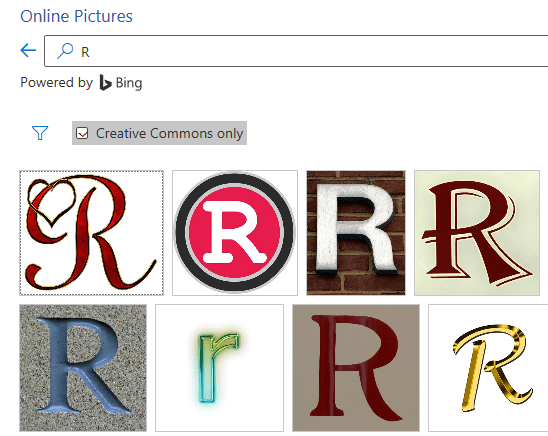
Next, you will see the Online Pictures box. Search for the letter you want to use (e.g. type “R” into the Search for box and hit Enter). Simply select your image and click Insert. Refer to the below image:
The letter “R” Drop Caps
The letter may appear very large or very small within your document, so resize it if necessary.
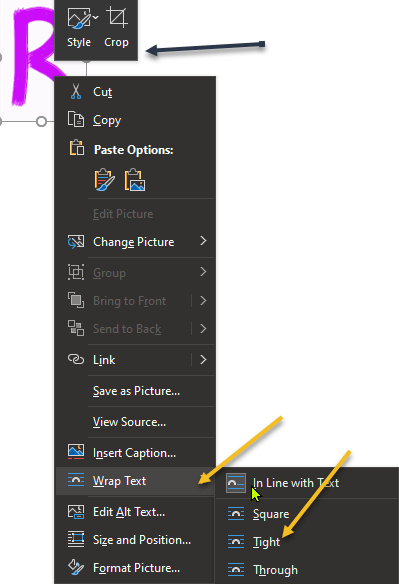
Now, right-click the image of your letter to format it. For example, Crop the image slightly, setting Wrap Text to ‘tight’ or ‘square’. See the below image:
Selecting omg options for the Drop Cap
Next, you will see your drop cap in your Word document. See the following image:
Your finished Drop Cap
Quote For the Day
The key is not to prioritize what’s on your schedule, but to schedule your priorities.
Stephen Covey
That was easy. Please feel free to share this post! One way to share is via Twitter.
Just click the Tweet icon below. This will launch Twitter where you click its icon to post the Tweet.
Check out TechSavvy.Life for blog posts on smartphones, PCs, and Macs! You may email us at contact@techsavvy.life for comments or questions.
Please feel free to leave a comment. I would love to hear from you. Do you have a computer or smart device tech question? I will do my best to answer your inquiry. Just send an email to contact@techsavvy.life. Please mention the device, app, and version you are using. To help us out, you can send screenshots of your data related to your question.
The author’s Vietnam eBook on the Battle for Tra Bong Vietnam: Events and Aftermath
Unsure which phone numbers you have blocked on your iPhone? You can easily check your blocked number list using Phone, Messages, and FaceTime settings on your phone.
Unsure which phone numbers you have blocked on your iPhone? You can easily check your blocked number list using Phone, Messages, and FaceTime settings on your phone. Let’s explore your blocked list.
Note: The list of blocked numbers will be the same no matter which app you use to view them.
This is for the iPhone
Copyright Scott Adams, Inc./Distributed by Universal Uclick for UFS
Blocked Numbers in Phone App
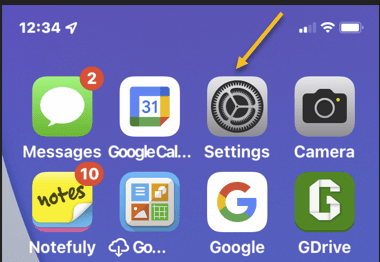
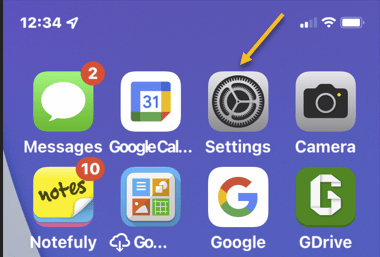
To see your blocked phone numbers list with Phone, first, open the Settings app (the gray gear icon) on your iPhone. Refer to the below image:
Accessing Settings
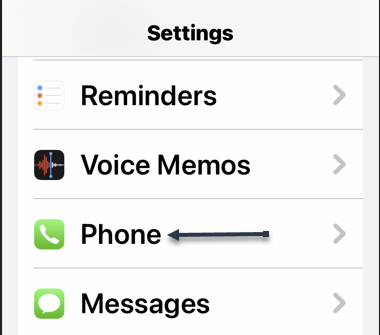
Next, in Settings, tap the Phone option. See the below image:
Accessing Phone option
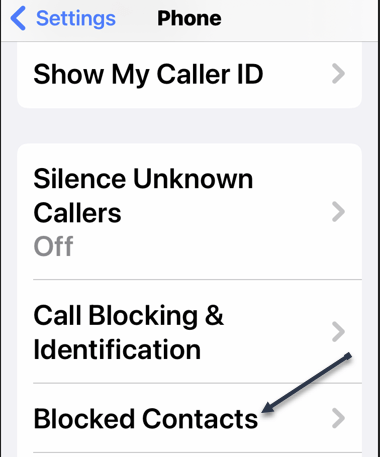
Now, on the Phone page, in the Calls section, tap Call Blocking & Identification or Blocked Contacts as shown in the following image:
Accessing Blocked Contacts option
Next, on the Call Blocking & Identification (or BlockedContacts) screen, you will see all your blocked numbers. Refer to the below image:
Your Blocked Contacts in the Phone app
Blocked Numbers in Messages App
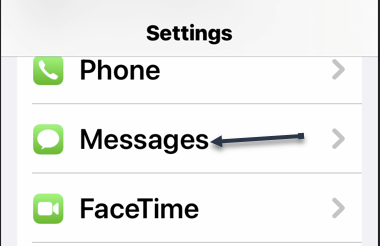
To use Messages to view your blocked numbers, first, open the Settings app on your iPhone and tap the Messages option. See the below image:
Accessing Messages option
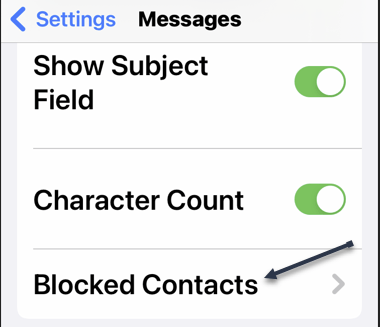
Next, in the Messages menu, from the SMS/MMS section, select BlockedContacts. See the following image:
Accessing Blocked Contacts option
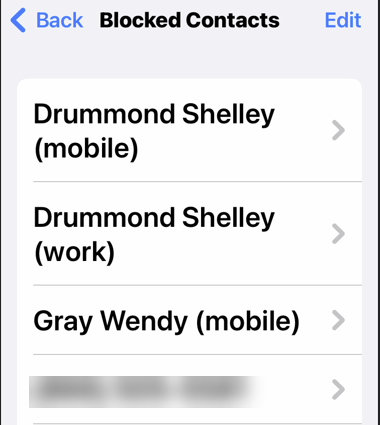
Now, the Blocked Contacts screen displays all your blocked numbers. Refer to the below image:
Your Blocked Contacts in the Messages app
Blocked Numbers in FaceTime App
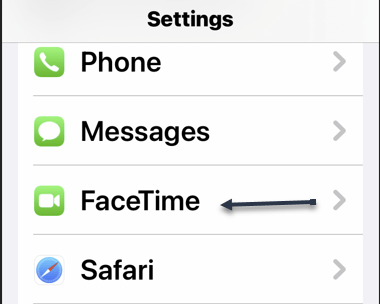
Checking the blocked numbers list with FaceTime is also easy. To do so, first, open the Settings app on your iPhone and tap FaceTime. See the below image:
Accessing FaceTime option
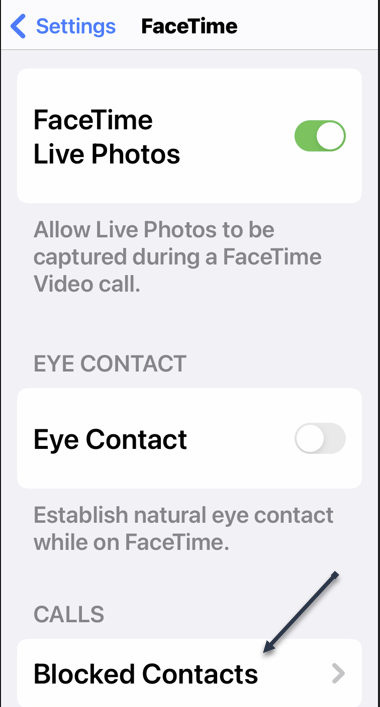
Next, on the FaceTime page, in the Calls section at the bottom, tap BlockedContacts. See the following image:
Accessing Blocked Contacts
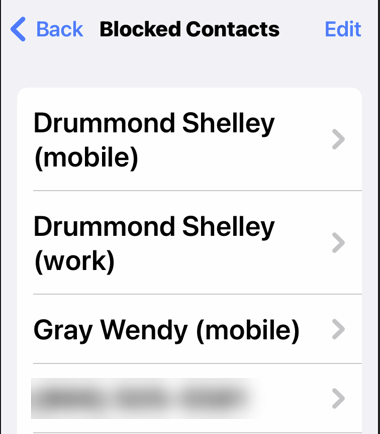
Now, on the screen that opens, you will see all your blocked numbers Refer to the below image:
Your Blocked Contacts in FaceTime app
Quote For the Day
Predicting rain doesn’t count. Building arks does.
Warren Buffett
That’s it. Please feel free to share this post! One way to share is via Twitter.
Just click the Tweet icon below. This will launch Twitter where you click its icon to post the Tweet.
Check out TechSavvy.Life for blogposts on smartphones, PCs, and Macs! You may email us at contact@techsavvy.life for comments or questions.
Please feel free to leave a comment. I would love to hear from you. Do you have a computer or smart device tech question? I will do my best to answer your inquiry. Just send an email to contact@techsavvy.life. Please mention the device, app, and version you are using. To help us out, you can send screenshots of your data related to your question.
The author’s Vietnam eBook on the Battle for Tra Bong Vietnam: Events and Aftermath
Netflix is going heavy on mobile games. The company added two more games to its service, bringing the total up to 12.
This is for the iPhone and Android
Copyright Scott Adams, Inc./Distributed by Universal Uclick for UFS
You do not need to do anything special to get these games on your Netflix account (which is good since Netflix just increased its price again. Maybe that’s why its stock value dropped). As long as you are a Netflix subscriber, you need to download the games on Android or iPhone, and you will be able to play them without spending anything extra.
Here’s a quick look at the games currently available as part of a Netflix subscription:
Arcanium: Rise of Akhan – Card battle game in the vane of Hearthstone
Krispee Street – Hidden Object game based on a popular webcomic
Asphalt Xtreme – Off-road racing game
Bowling Ballers – Endless runner meets bowling game
Card Blast – Poker-based card game
Dominoes Café – Dominoes game with various modes
Knittens – Cat-based match-three puzzle
Shooting Hoops – Basketball and dart hybrid game
Stranger Things: 1984 – Retro-styled adventure games based in Stranger Things universe
Stranger Things 3: The Game – Official game for the third season of Stranger Things
Teeter (Up) – Ball manipulating puzzle game
Wonderputt Forever – Mini golf game
If you are a Netflix subscriber with an Android or Apple device, you might as well download these games and see if any of them work for you, as they are included in the subscription you are already paying for.
Quote For the Day
Remember that failure is an event, not a person.
Zig Ziglar
That’s it. Please feel free to share this post! One way to share is via Twitter.
Just click the Tweet icon below. This will launch Twitter where you click its icon to post the Tweet.
Check out TechSavvy.Life for blog posts on smartphones, PCs, and Macs! You may email us at contact@techsavvy.life for comments or questions.
Please feel free to leave a comment. I would love to hear from you. Do you have a computer or smart device tech question? I will do my best to answer your inquiry. Just send an email to contact@techsavvy.life. Please mention the device, app, and version you are using. To help us out, you can send screenshots of your data related to your question.
Author’s E-book
You can access the e-book from a Kindle device, the Kindle App for the desktop or smartphone, which is a free app.
The author’s Vietnam eBook on the Battle for Tra Bong Vietnam: Events and Aftermath
Tired of getting robocalls all day long on your iPhone? Your iPhone lets you silence the harassment by turning on a feature called Silence Unknown Callers in Settings.
Tired of getting robocalls all day long on your iPhone? Your iPhone lets you silence the harassment by turning on a feature called Silence Unknown Callers in Settings. Let’s explore this nifty feature.
This is for the iPhone
Copyright Scott Adams, Inc./Distributed by Universal Uclick for UFS
What is an Unknown Caller
On your iPhone, an unknown caller is someone who is not in your Contacts list, which is an address book stored on your device that can be accessed through the Phone or Contacts apps. If you have called a number recently, your iPhone will not consider that number an unknown caller if they call you back.
Apple includes a feature with iOS 13 and up that allows you to silence rings and notifications from unknown callers, which is covered below. This does not include numbers you have called recently. Otherwise, if you want a caller not to be considered unknown (and thus not be silenced) you will need to add the number to your iPhone’s Contacts.
How to Silence Unknown Callers
First, to silence these calls, open Settings on your iPhone by tapping the grey gear icon on your Home screen. Refer to the below image:
Accessing Settings
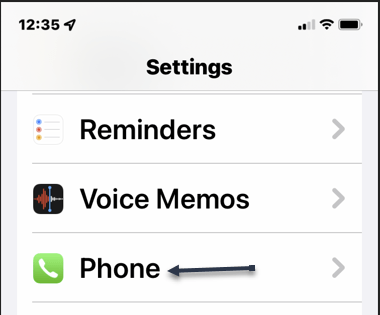
Next, in Settings, scroll down and tap Phone. See the below image:
Accessing Phone option
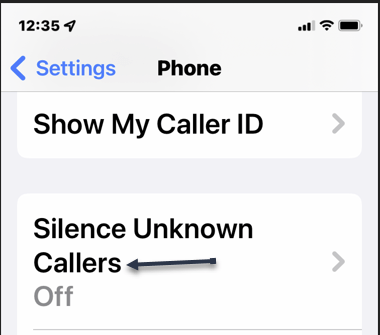
Now, in Phone settings, tap SilenceUnknown Callers. See the following image:
Accessing Silence Unknown Callers option
Next, in Silence Unknown Callers settings, enable the switch beside Silence Unknown Callers to ON. Refer to the below image:
Enable Silence Unknown Callers
Now, exit Settings. The next time you get a call from an unknown number, you will not hear a ring or a notification sound. The call will be sent to voicemail, and it will appear in your recent calls list in the Phone app. You may still get a notification if the caller leaves a voicemail.
If you are expecting an important call from an unknown number in the future, open
Settings > Phone > Silence Unknown Callers
and then switch Silence Unknown Callers to OFF. Incoming calls will no longer be silenced.
Quote For the Day
Only when the tide goes out do you discover who’s been swimming naked.
Warren Buffett
That was easy. Please feel free to share this post! One way to share is via Twitter.
Just click the Tweet icon below. This will launch Twitter where you click its icon to post the Tweet.
Checkout TechSavvy.Life for blog posts on smartphones, PCs, and Macs! You may email us at contact@techsavvy.life for comments or questions.
Please feel free to leave a comment. I would love to hear from you. Do you have a computer or smart device tech question? I will do my best to answer your inquiry. Just send an email to contact@techsavvy.life. Please mention the device, app, and version you are using. To help us out, you can send screenshots of your data related to your question.
The author’s Vietnam eBook on the Battle for Tra Bong Vietnam: Events and Aftermath
Want to change your cover image or add one to your Twitter account? If you have not inserted an image, you will see a blue blank area at top of your account.
Want to change your cover image or add one to your Twitter account? If you have not inserted an image, you will see a blue blank area at top of your account. Let’s explore how to add a cover image.
This is for devices using Twitter. Screenshots are from iPhone XR.
Copyright Scott Adams, Inc./Distributed by Universal Uclick for UFS
First, log in to Twitter, if not already logged in, and open Twitter. Here, tap your Profile icon. Refer to the below image:
Selecting your Profile icon
Next, in the pop-up window that opens, tap on Profile. See the below image:
Selecting the Profile option
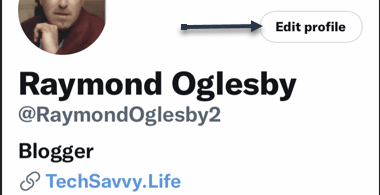
Now, in the upper right-hand corner, tap the Edit profile link. See the following image:
Selecting Edit Profile link
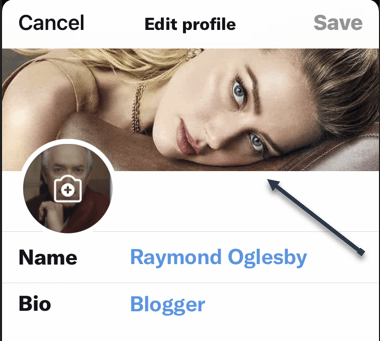
Next, tap on the top of your screen or on an existing image to open your Photos. (On the desktop, click the Camera icon in the image area). Depending on your Twitter settings, you may not see any images. If so, tap on Manage to change your settings or the plus “+” sign to open your photos. Refer to the below image:
Selected image from Photos
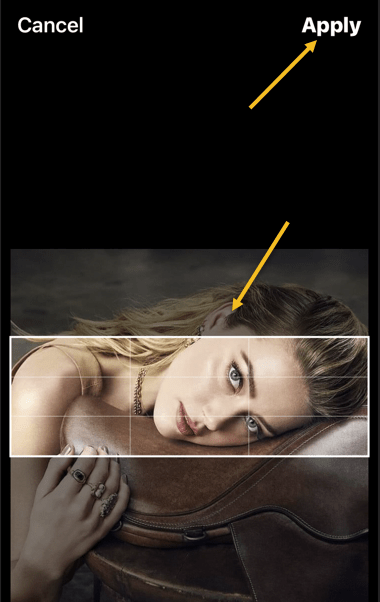
Now, position your image to your liking. Then in the upper right-hand corner, tap Apply. See the below image:
Position your image and Apply
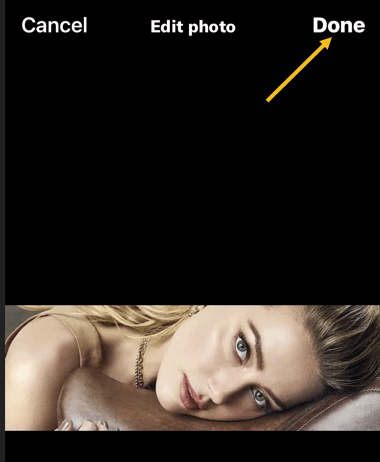
Next, in the upper right-hand corner, tap Done. See the following image:
Finish your change
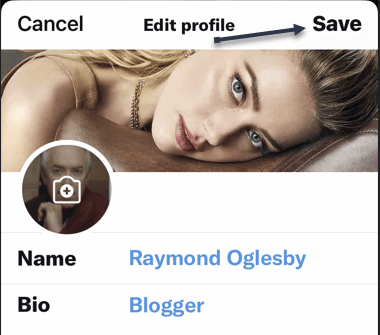
Now, tap Save in the upper right-hand corner. Refer to the below image:
Save your change
Instantly, your saved image is now your cover photo. See the below image:
Your finished image
Quote For the Day
We become what we repeatedly do.
Stephen Covey
That’s it. Please feel free to share this post! One way to share is via Twitter.
Just click the Tweet icon below. This will launch Twitter where you click its icon to post the Tweet.
Checkout TechSavvy.Life for blog posts on smartphones, PCs, and Macs! You may email us at contact@techsavvy.life for comments or questions.
Please feel free to leave a comment. I would love to hear from you. Do you have a computer or smart device tech question? I will do my best to answer your inquiry. Just send an email to contact@techsavvy.life. Please mention the device, app, and version you are using. To help us out, you can send screenshots of your data related to your question.
The author’s Vietnam eBook on the Battle for Tra Bong Vietnam: Events and Aftermath
You may already be familiar with Microsoft Word’s built-in spelling and grammar checker, flagging incorrect spelling, and (sometimes) bad grammar. If you are reviewing a document that’s riddled with errors, you can use these keyboard shortcuts to speed up the process.
RAYMOND OGLESBY @RaymondOglesby2 January 20, 2022 Updated: January 21, 2022
You may already be familiar with Microsoft Word’s built-in spelling and grammar checker, flagging incorrect spelling, and (sometimes) bad grammar. If you are reviewing a document that’s riddled with errors, you can use these keyboard shortcuts to speed up the process. Let’s explore using these shortcuts.
This is for devices using Microsoft Word
Copyright Scott Adams, Inc./Distributed by Universal Uclick for UFS
What the Checker Can and Can Not Do
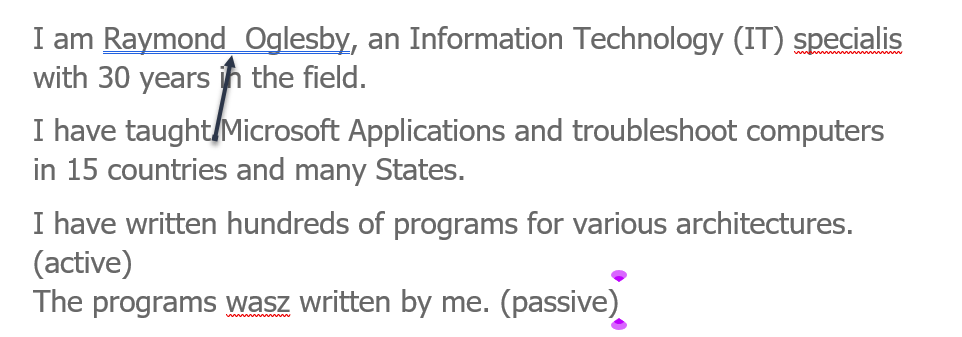
Word’s spelling and grammar checker is enabled by default. When a word is misspelled, Word flags it with a wavy, red underline. When there’s incorrect grammar or formatting, Word flags it with two blue underlines. Refer to the below image:
Spelling and Grammar example
In the above example, Word detected two spaces between “Raymond” and “Oglesby,” so it flagged it as a grammar issue. It also detected “specialist” was misspelled as “specialis,” so it flagged that as a spelling error.
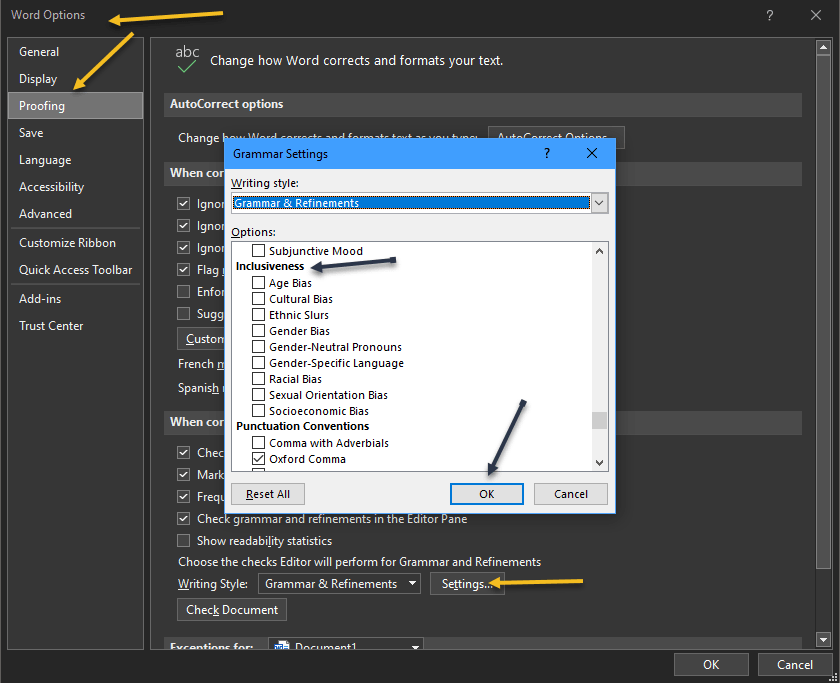
These are the basics that Word checks for by default. However, you can make Word’s spelling and grammar checker work harder by enabling some additional features in its Settings menu. Head to:
File > Options > Proofing > Settings
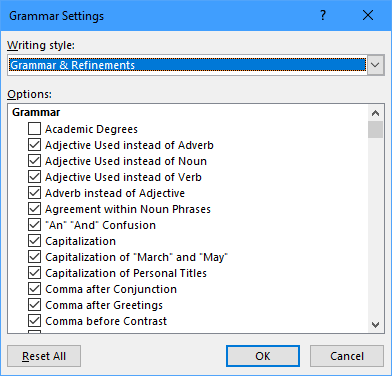
For example, you can have Word check for passive voice, split infinitives, superfluous expressions, and so on. See the below image:
Grammar Settings
If you scroll down, you can check for more grammar options, such as Inclusiveness:
More Grammar settings
You can also do things like, exclude specific words from the checker, check for inclusive language, ignore URLs, and much more.
So what can Word’s spelling and grammar checker not do? As comprehensive as it may seem, it often fails when it comes to noticing the incorrect usage of a properly spelled word. For example, “troubleshoot.” See the following image:
Grammar error
In this case, Word failed to catch the incorrect usage of “troubleshoot,” it should be “troubleshot.” That said, you can count on Word to detect a lot of issues in a document, but you can not rely on it 100%. As a matter of good practice, always re-review your document before sending it out.
Using the Keyboard Shortcut
In Word, you can use the Alt+F7 shortcut to jump straight to the first error behind where the cursor currently is in the document. So, if you want to start with the first error, you will need to place your cursor at the beginning of the document, or in front of the first error. Refer to the below image:
Spelling error
When you press Alt+F7, Word highlights the spelling or grammar error and gives you the option to either correct or ignore the issue. Press the up or down arrow keys to highlight the desired option, and then press Enter to select it.
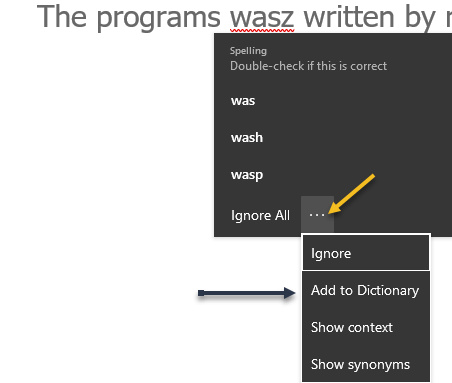
Note! you can only highlight spelling and grammar suggestions with your arrow keys. If you want to ignore the suggestion, you must click that option with your mouse. See the below image:
Highlight the Spelling error
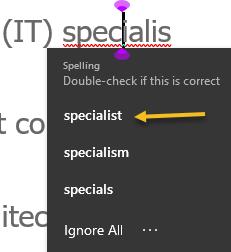
Spelling errors generally have more suggested corrections to choose from. See the following image:
Correction for the Spelling error
You can also ignore the spelling error, just as you would with the grammar error. The only difference is, with spelling, you can choose to:
Ignore every instance of that same error
Ignore just the specific error (even if it also exists elsewhere in the document)
Refer to the below image:
Ignore the Spelling error
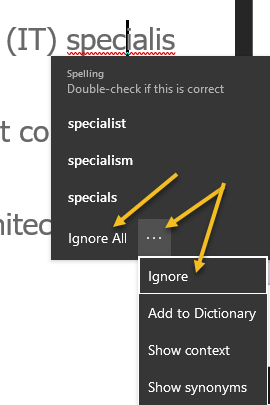
In addition, you can also add that word to the dictionary. When you do this, Word will no longer flag the word as an error. This is useful if the word happens to be a part of an in-house style guide or something similar.
Click the three dots to the right of Ignore All and then click Add to Dictionary from the drop-down menu. See the below image:
Add to the Dictionary
When you are ready to move on to the next error, just press Alt+F7 again. Continue doing this until all of the issues within the document have been checked.
Word’s grammar and spell checker is very useful for reviewing the content within a document, but it can be quite distracting when it’s throwing back errors while you are writing. If it’s too distracting for you, you can turn it off as you type.
Quote For the Day
Synergy is what happens when one plus one equals ten or a hundred or even a thousand! It’s the profound result when two or more respectful human beings determine to go beyond their preconceived ideas to meet a great challenge.
Stephen Covey
That’s it. Please feel free to share this post! One way to share is via Twitter.
Just click the Tweet icon below. This will launch Twitter where you click its icon to post the Tweet.
Check out TechSavvy.Life blog posts for smartphones, PCs, and Macs! You may emails us at contact@techsavvy.life for comments or questions.
Please feel free to leave a comment. I would love to hear from you. Do you have a computer or smart device tech question? I will do my best to answer your inquiry. Just send an email to contact@techsavvy.life. Please mention the device, app, and version you are using. To help us out, you can send screenshots of your data related to your question.
Author’s E-book
You can access the e-book from a Kindle device, the Kindle App for the desktop or smartphone, which is a free app.
The author’s Vietnam eBook on the Battle for Tra Bong Vietnam: Events and Aftermath
Instead of flipping photos after taking selfies, you can capture “mirror selfies” automatically as they appear in the preview on your iPhone. Let’s explore this feature.
The Camera app on the iPhone packs several features, including an option to automatically take mirror selfies. This feature is available on iPhones running at least iOS 14 or later.
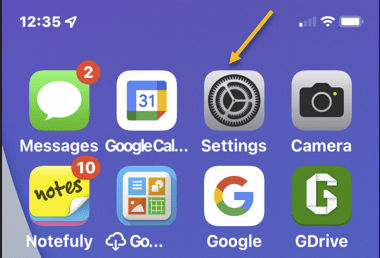
First, open the Settings app on your iPhone. Refer to the below image:
Accessing Settings
Next, in Settings, scroll down and tap Camera. See the below image:
Accessing the Camera
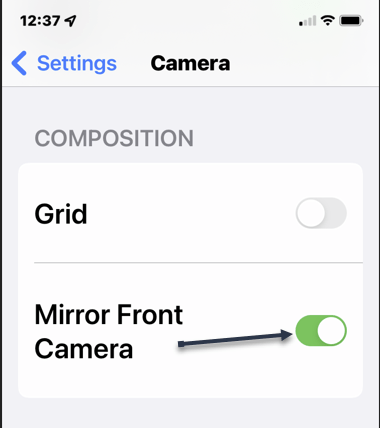
Now, scroll down to the Composition section and toggle the switch for Mirror Front Camera to ON. (On some iPhones, this option might be labeled Mirror Front Photos.) See the following image:
Enabling the Mirror Front Camera toggle
Next, open the Camera app on your iPhone. Turn the camera to face yourself and snap a selfie. The saved image will appear as you see yourself in the mirror, instead of flipped as it usually is. Note that your front camera automatically mirrors the front camera viewfinder, so this setting only affects the image that’s saved to your photo library.
Quote For the Day
To learn something but not to do is really not to learn. To know something but not to do is really not to know.
Stephen Covey
That was easy. Please feel free to share this post! One way to share is via Twitter.
Just click the Tweet icon below. This will launch Twitter where you click its icon to post the Tweet.
Check out TechSavvy.Life for blog posts on smartphones, PCs, and Macs! You may email us at techsavvy.life for comments or questions.
Please feel free to leave a comment. I would love to hear from you. Do you have a computer or smart device tech question? I will do my best to answer your inquiry. Just send an email to contact@techsavvy.life. Please mention the device, app, and version you are using. To help us out, you can send screenshots of your data related to your question.
Author’s E-book
You can access the e-book from a Kindle device, the Kindle App for the desktop or smartphone, which is a free app.
The author’s Vietnam eBook on the Battle for Tra Bong Vietnam: Events and Aftermath
Facebook automatically adds alternative text (alt text) to images you upload, but the descriptions are not always accurate. You can make your images more accessible to visually impaired users by writing accurate alt text for your images.
Facebook automatically adds alternative text (alt text) to images you upload, but the descriptions are not always accurate. You can make your images more accessible to visually impaired users by writing accurate alt text for your images. Let’s explore this feature.
This is for devices using Facebook. Screenshots are from iPhone XR.
Copyright Scott Adams, Inc./Distributed by Universal Uclick for UFS
Use the Mobile App
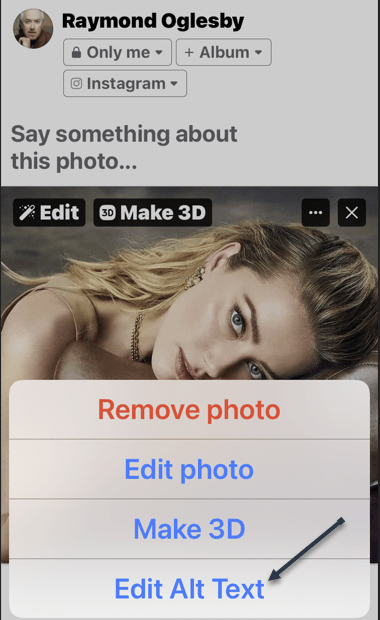
To add alt text to an image you are uploading using the Facebook mobile app, first, open the app on your smartphone, compose a new Facebook post, then select a photo from your device to upload. In the post preview, tap the three dots in the top right-hand corner of the image. Refer to the below image:
Selecting to edit a photo
Next, a menu will appear at the bottom of your screen. Here, tap the Edit Alt Text option. See the below image:
Selecting Edit Alt Text option
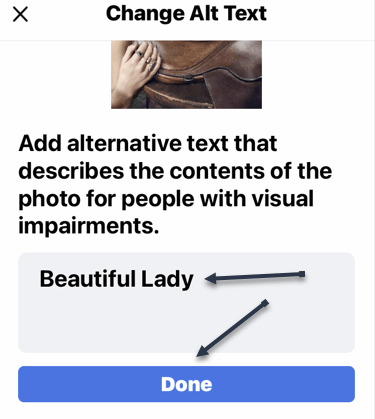
Now, you will be on the Change Alt Text screen. In the text box below your image, enter the text that accurately describes the image you are posting. Then, tap Done. See the following image:
Entering Alt Text and saving your change
The alt text is now added to the photo. Refer to the below image for our final image:
Your final image
Keep in mind that this alt text description can only be read if someone is using a Screen Reader to access Facebook; it will not be visible on the image.
Use the Desktop App
You can also add alt text to your images on Facebook from your computer. First, launch Facebook from any browser of your choice and then begin creating a new post with an image. Next, in the post preview, click Edit in the top left-hand corner of the image. Refer to the below image:
Selecting to edit a photo
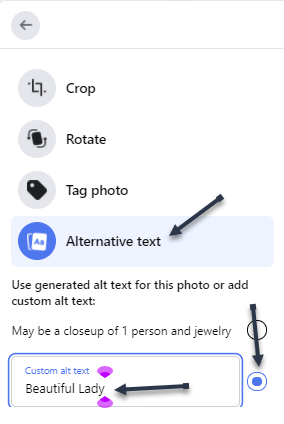
Now, the Photo Detail window will appear. Here, click Alternative text at the bottom of the menu in the left-hand pane. See the below image:
Selecting Alternative Text option
Next, the Alternative text menu will expand. Click the bubble next to the Custom Alt Text option to select it, and then enter the alt text for your image in the text box. See the following image:
Entering your custom Alternative text
Now, click the blue Save button at the bottom of the window. Refer to the below image:
Saving your change
The alt text is now added to the photo. Refer to the below image for our final image:
Your final image
Keep in mind that this alt text description can only be read if someone is using a Screen Reader to access Facebook; it will not be visible on the image.
Quote For the Day
Management is efficiency in climbing the ladder of success; leadership determines whether the ladder is leaning against the right wall.
Stephen Covey
That’s it. Please feel free to share this post! One way to share is via Twitter.
Just click the Tweet icon below. This will launch Twitter where you click its icon to post the Tweet.
Check out TechSavvy.Life blog posts on smartphones, PCs, and Macs! You may email us at contact@techsavvy.life for comments or questions.
Please feel free to leave a comment. I would love to hear from you. Do you have a computer or smart device tech question? I will do my best to answer your inquiry. Just send an email to contact@techsavvy.life. Please mention the device, app, and version you are using. To help us out, you can send screenshots of your data related to your question.
Author’s E-book
You can access the e-book from a Kindle device, the Kindle App for the desktop or smartphone, which is a free app.
The author’s Vietnam eBook on the Battle for Tra Bong Vietnam: Events and Aftermath
Working with images in Microsoft Word is not necessarily difficult, but there are some tricks to positioning your pictures. If you have two or more images that you want to overlap with each other, this post will show you how.
Working with images in Microsoft Word is not necessarily difficult, but there are some tricks to positioning your pictures. If you have two or more images that you want to overlap with each other, this post will show you how.
This is for devices using Microsoft Word
Copyright Scott Adams, Inc./Distributed by Universal Uclick for UFS
Adjust Image Layout
First, launch Microsoft Word and insert an image. You must be sure you are using a supported layout option. You can check this in three different ways.
Select the image and click the Layout Options icon that appears to the right of it.
Select the image, go to the Picture Format tab that appears, and click the Wrap Text drop-down arrow.
Right-click the image and move your cursor to Wrap Text to display the options in the pop-out menu.
Refer to the below image :
Selecting Wrap Text option
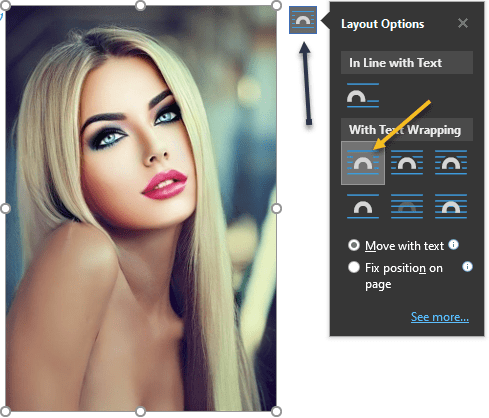
Next, as to layout options, select Square, Tight, Through, or one of the others; whichever works best for your document. Note! In Line with Text will not work. See the below image:
Selecting a Layout
Allow Images to Overlap
Now, you may notice when you drag an image close to another in your Word document, you cannot place it on top of another. The other picture may suddenly move out of the way to make room for the one you are dragging.
In order to overlay images in Word, you need to enable this option for each picture you want in the group.
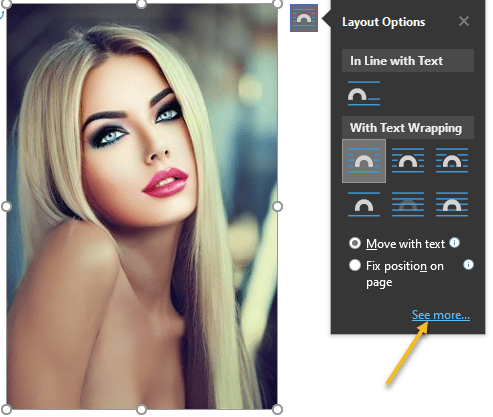
Select the image, click the Layout Options icon on the right, and click See More at the bottom.
Select the image, go to the Picture Format tab, click Position, and pick More Layout Options.
See the following image:
Selecting See more options
Next, when the Layout window opens, you should be on the Position tab. But if not, select it. At the bottom of the window below Options, check the box to Allow Overlap, then click OK. Refer to the below image:
Enabling Allow overlap
Now, insert another image(s) and place it next to or below the original image. Make sure you enable the overlap option for each image that you want to overlay.
Overlay Images
Once all of the above is in place, simply drag your images and overlap them as you please.
If you want a particular picture to be on top, right-click or go to the Picture Format tab and choose to Bring Forward or Bring to Front depending on the number of images you are using and how you want them positioned. See the below image:
Selecting Bring to Front option
You can take similar action if you want an image in the back. Right-click or go to the Picture Format tab and choose to Send Backward or Send to Back. See the following image:
Selecting Send to Back option
Next, your final overlapped images will look similar to the below image where we are using the Bring to Front option:
The finished overlapping images
Overlapping images in Word is not too hard, as you can see. But it’s one of those hidden tricks that can make working with pictures much easier just like placing text on top of an image. I wish I knew about this trick before now.
Quote For the Day
Listen with the intent to understand, not the intent to reply.
Stephen Covey
You are finished. Please feel free to share this post! One way to share is via Twitter.
Just click the Tweet icon below. This will launch Twitter where you click its icon to post the Tweet.
Checkout TechSavvy.Life for blog posts on smartphones, PCs, and Macs! You may email us at contact@techsavvy.life for comments or questions.
Please feel free to leave a comment. I would love to hear from you. Do you have a computer or smart device tech question? I will do my best to answer your inquiry. Just send an email to contact@techsavvy.life. Please mention the device, app, and version you are using. To help us out, you can send screenshots of your data related to your question.
Author’s E-book
You can access the e-book from a Kindle device, the Kindle App for the desktop or smartphone, which is a free app.
The author’s Vietnam eBook on the Battle for Tra Bong Vietnam: Events and Aftermath
While using apps on your iPhone, these apps are often busy behind the scenes, using sensors and contacting internet domains without your knowledge. With iOS 15.2 or later, you can see a detailed report of these activities with the App Privacy Report.
While using apps on your iPhone, these apps are often busy behind the scenes, using sensors and contacting internet domains without your knowledge. With iOS 15.2 or later, you can see a detailed report of these activities with the App Privacy Report. Let’s find out.
This is for the iPhone running iOS 15.2 or higher
Copyright Scott Adams, Inc./Distributed by Universal Uclick for UFS
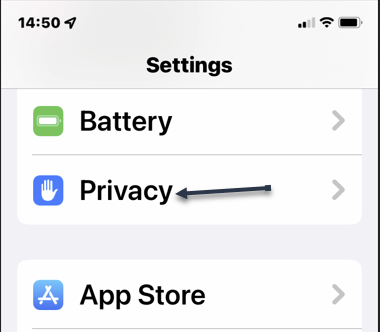
First, open Settings by tapping the grey gear icon. Refer to the below image:
Accessing Settings
Next, on the Settings screen, tap Privacy. See the below image:
Accessing Privacy option
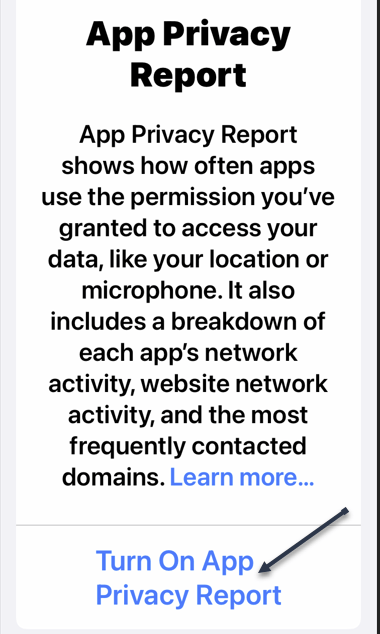
Now, in the Privacy settings, scroll down to the very bottom and tap App Privacy Report. See the following image:
Accessing App Privacy Report option
If you have not enabled Record App Activity, tap Turn On App Privacy Report link. Refer to the below image:
Enabling App Privacy Report
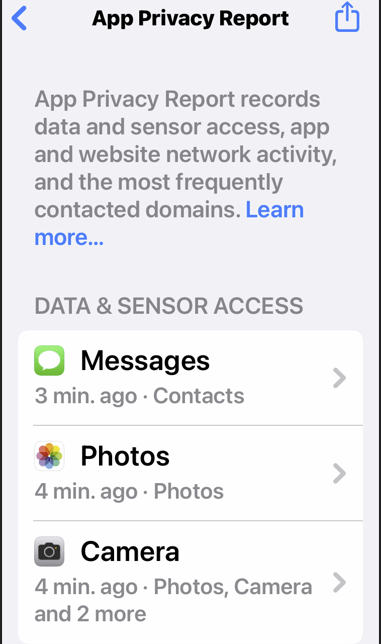
If you just enabled App Privacy Report, you will need to use your iPhone for a few days and let the App Privacy Report feature gather data. After that time (or if you have been using the Record App Activity feature in earlier versions of iOS 15), you will see a detailed report about Data & Sensor Access, App Network Activity, Website Network Activity, and Most Contacted Domains. Here’s what each section means:
Data & Sensor Access: This shows how many times an app accessed your iPhone’s sensors (and when), such as camera, location, contacts, screen recording, media library, photo library, or microphone.
App Network Activity: This shows how many internet domains an app has contacted and when each contact took place. It includes domains contacted directly by the app and those referenced by content within the app, such as websites that might pull in content from other domains.
Website Network Activity: This section shows the internet domains that have been contacted by websites you visited through a web browser within an app.
Most Contacted Domains: This shows a ranking of the internet domains that have been contacted the most by your apps. On the internal App Privacy Report details page in iOS 15.2 or higher, Apple notes that high-ranking domains on this list might be used by multiple apps to build a profile of you across different apps or services.
See the below image:
Your report
Next, at any time, you can tap any entry on the list to see more details. Tap Show All at the bottom of each privacy report section to get a complete list. See the following image:
Accessing Show All option
App Privacy Report Can Be a Risk
Enabling App Privacy Report on your iPhone will keep a detailed record of your internet activities on your iPhone (that is stored on your device). If you allow another person to access your iPhone, they can get a very detailed look at what you have been doing with your iPhone on the
Settings > Privacy > App Privacy
report page. If that’s the case, you might want to make sure that App Privacy Report is disabled.
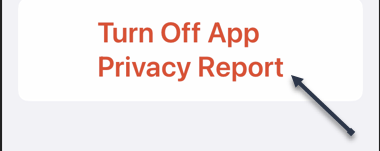
Turn Off App Privacy Report
To disable App Privacy Report, navigate to
Settings > Privacy > App Privacy
then scroll down to the bottom of the page and tap Turn Off App Privacy Report. Refer to the below image:
Disabling App Privacy Report
After that, click OK in the pop-up message, and all existing privacy report activity will be deleted.
If your iPhone is locked down and never shared, App Privacy Report is a great tool to keep an eye on what apps have been doing behind the scenes.
Quote For the Day
Fear may come true that which one is afraid of.
Viktor E Frankl
You are finished. Please feel free to share this post! One way to share is via Twitter.
Just click the Tweet icon below. This will launch Twitter where you click its icon to post the Tweet.
Checkout TechSavvy.Life blog posts on smartphones, PCs, and Macs! You may email us at contact@techsavvy.life for comments or questions.
Please feel free to leave a comment. I would love to hear from you. Do you have a computer or smart device tech question? I will do my best to answer your inquiry. Just send an email to contact@techsavvy.life. Please mention the device, app, and version you are using. To help us out, you can send screenshots of your data related to your question.
Author’s E-book
You can access the e-book from a Kindle device, the Kindle App for the desktop or smartphone, which is a free app.
The author’s Vietnam eBook on the Battle for Tra Bong Vietnam: Events and Aftermath