

RAYMOND OGLESBY @RaymondOglesby2
January 13, 2022
Working with images in Microsoft Word is not necessarily difficult, but there are some tricks to positioning your pictures. If you have two or more images that you want to overlap with each other, this post will show you how.
This is for devices using Microsoft Word

Adjust Image Layout
First, launch Microsoft Word and insert an image. You must be sure you are using a supported layout option. You can check this in three different ways.
- Select the image and click the Layout Options icon that appears to the right of it.
- Select the image, go to the Picture Format tab that appears, and click the Wrap Text drop-down arrow.
- Right-click the image and move your cursor to Wrap Text to display the options in the pop-out menu.
Refer to the below image :

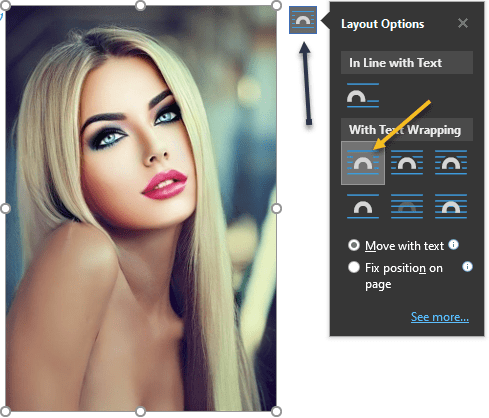
Next, as to layout options, select Square, Tight, Through, or one of the others; whichever works best for your document. Note! In Line with Text will not work. See the below image:
Allow Images to Overlap
Now, you may notice when you drag an image close to another in your Word document, you cannot place it on top of another. The other picture may suddenly move out of the way to make room for the one you are dragging.
In order to overlay images in Word, you need to enable this option for each picture you want in the group.
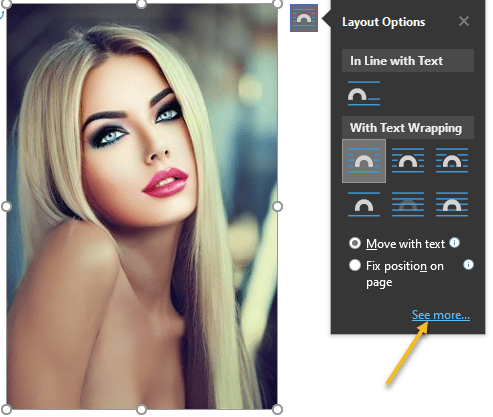
- Select the image, click the Layout Options icon on the right, and click See More at the bottom.
- Select the image, go to the Picture Format tab, click Position, and pick More Layout Options.
See the following image:
Next, when the Layout window opens, you should be on the Position tab. But if not, select it. At the bottom of the window below Options, check the box to Allow Overlap, then click OK. Refer to the below image:

Now, insert another image(s) and place it next to or below the original image. Make sure you enable the overlap option for each image that you want to overlay.
Overlay Images
Once all of the above is in place, simply drag your images and overlap them as you please.
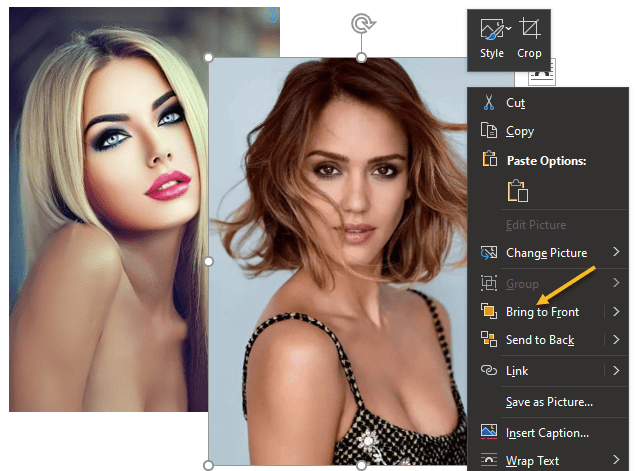
If you want a particular picture to be on top, right-click or go to the Picture Format tab and choose to Bring Forward or Bring to Front depending on the number of images you are using and how you want them positioned. See the below image:
You can take similar action if you want an image in the back. Right-click or go to the Picture Format tab and choose to Send Backward or Send to Back. See the following image:

Next, your final overlapped images will look similar to the below image where we are using the Bring to Front option:

Overlapping images in Word is not too hard, as you can see. But it’s one of those hidden tricks that can make working with pictures much easier just like placing text on top of an image. I wish I knew about this trick before now.
Quote For the Day
Listen with the intent to understand, not the intent to reply.
Stephen Covey
You are finished. Please feel free to share this post! One way to share is via Twitter.
Just click the Tweet icon below. This will launch Twitter where you click its icon to post the Tweet.
Checkout TechSavvy.Life for blog posts on smartphones, PCs, and Macs! You may email us at contact@techsavvy.life for comments or questions.
Tweet
I Would Like to Hear From You
Please feel free to leave a comment. I would love to hear from you. Do you have a computer or smart device tech question? I will do my best to answer your inquiry. Just send an email to contact@techsavvy.life. Please mention the device, app, and version you are using. To help us out, you can send screenshots of your data related to your question.
Author’s E-book
You can access the e-book from a Kindle device, the Kindle App for the desktop or smartphone, which is a free app.
