How to Ask iPhone and iPad Apps Not to Track You

With a software update that arrived recently, called iOS 14.5 and iPadOS 14.5, Apple is finally forcing apps to come clean about a kind of surveillance they have been conducting on us for the past decade. Behind the scenes, apps can probe your phone for personal information that helps them target you with ads or even sell data about you to others. Now. marketers and data brokers can not access a valuable way to identify your phone unless you explicitly say it’s okay.

With a software update that arrived recently, called iOS 14.5 and iPadOS 14.5, Apple is finally forcing apps to come clean about a kind of surveillance they have been conducting on us for the past decade. Behind the scenes, apps can probe your phone for personal information that helps them target you with ads or even sell data about you to others. Now. marketers and data brokers can not access a valuable way to identify your phone unless you explicitly say it’s okay.

This is for the iPhone and iPad running iOS or iPadOS 14.5 or higher

Copyright Scott Adams, Inc./Distributed by Universal Uclick for UFS

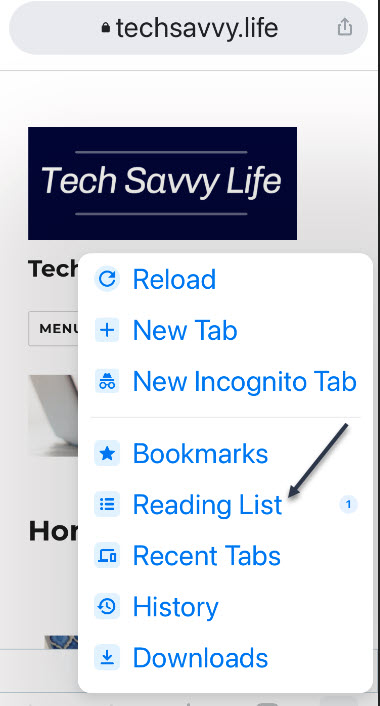
A feature on your iPhone or iPad called “App Tracking Transparency” allows you to ask apps not to track you across the internet for advertising and data brokering purposes.

Facebook, and its sister app Instagram, has begun asking permission and the company says it will roll out a screen arguing why you should allow it to track you.

Why Am I Tracked

To get the most out of their advertising budgets, advertisers want their ads to be seen by customers who will buy the product or service they are offering. That way, they do not spend money advertising to the wrong audience. To increase the effectiveness of ads, companies build advertising profiles on individuals, and these profiles can follow you across services run by different companies on the internet.

Apple began to fight back against this practice, building privacy controls. As of the 14.5 update, Apple requires app developers to ask your permission before adding information from that app or data from your iPhone or iPad to an advertising profile that would track you beyond its own app.

Facebook says by tapping “Ask App not to Track“, you are hurting small businesses and free apps that depend on its targeted advertising. In addition to targeting your interests, tracking also helps advertisers learn whether their ads work.

The decision to fight app tracking now is pretty self-serving on the part of Apple. The iPhone maker has a financial interest to push apps to make money from subscriptions rather than advertising, because it gets to take a percentage cut of any in-app purchases.

How Not to be Tracked

Whenever you use an iPhone or iPad app that wants to track you in iOS 14.5, iPadOS 14.5, or higher, you will see a pop-up message that reads “Allow [app name] to track your activity across other companies’ apps and websites?” Just below that, you will find a line about what exactly the app wants to do with your data, such as “deliver personalized ads” or “measure advertising efficiency“.

If you do not want data from this app to go toward building a tracking profile that goes beyond the company that makes the app, tap “Ask App Not to Track“. Refer to below image:

Disallow app to track you option

By clicking “Ask App Not to Track“, you’re trusting the app vendor to follow through and honor this request. You are also hoping that Apple’s pressure on these app developers; and its future app screening process; will hold.

How to See Which Apps Track You

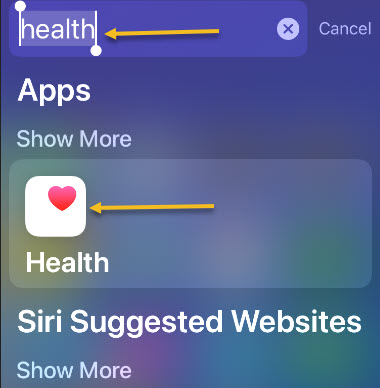
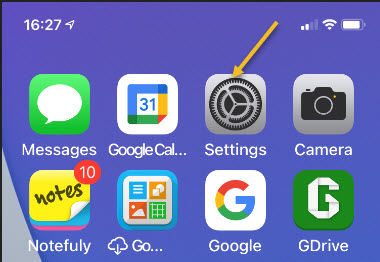
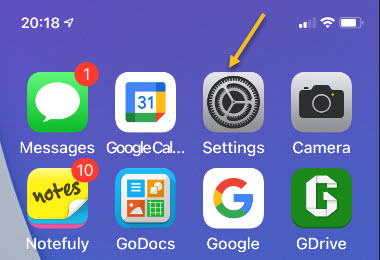
If you would like to see which apps you have allowed to track you, first open Settings (the gear icon) app on your iPhone or iPad. See below image:

Accessing Settings

In the Settings menu, tap Privacy. See following image:

Accessing Privacy option

In Privacy settings, select Tracking. Refer to below image:

Accessing Tracking option

There, you will see a list of apps that have asked for permission to track you. To change an option for an individual app, tap the toggle beside it. See below image:

Disallow an app to track you

After that, exit Settings. Any time you need to revisit information on which apps you have allowed to track you, just visit:

Settings > Privacy > Tracking

How to Stop Apps From Asking Permission

If you are frequently seeing “Ask App Not to Track” pop-ups, you can disable them entirely in Settings. Doing this means that you decline all requests to track you by default, but it does not ensure that apps will not ever try to track you.

First, open the Settings app and navigate to:

Privacy > Tracking

See following image:

Accessing Tracking option

At the top of the Tracking page, toggle the switch beside “Allow Apps to Request to Track to turn it Off. Refer to below image:

Disallow apps to track you

After this, exit Settings.

Quote For the Day

I believe the world is increasingly in danger of becoming split into groups which cannot communicate with each other, which no longer think of each other as members of the same species.

Carrie Snow

You are finished. Please feel free to share this post! One way to share is via Twitter.

Just click the Tweet icon below. This will launch Twitter where you click its icon to post the Tweet.

Check out TechSavvy.Life for blog posts on smartphones, PCs, and Macs! You may email us at contact@techsavvy.life for comments or questions.

I Would Like to Hear From You

Please feel free to leave a comment. I would love hearing from you. Do you have a computer or smart device tech question? I will do my best to answer your inquiry. Just send an email to contact@techsavvy.life. Please mention the device, app and version that you are using. To help us out, you can send screenshots of your data related to your question.

The author’s Vietnam eBook on the Battle for Tra Bong: Events and Aftermath

Browser Extensions May Be Looking At Your Data

Have you ever noticed the message you see when you install a browser extension in Chrome, for example? For most browser extensions, a message appears stating that the extension can “Read and modify all of your information on the websites you visit.”

Have you ever noticed the message you see when you install a browser extension in Chrome, for example? For most browser extensions, a message appears stating that the extension can “Read and modify all of your information on the websites you visit.” Refer to below image where we are looking at DuckDuckGo Privacy Essentials extension, an Internet privacy company, on their permissions:

Extension 1
Viewing a Chrome extension for permissions

What! Does not look secure to me as it reads all data on your device. You want to remove this browser extension and similar extensions for privacy issues.

To review your Chrome browser extensions:

  • Open Chrome, and click the 3-dot hamburger icon in upper-right hand corner.
  • Click on More Tools, then Extensions. They will be listed alphabetically.
  • Find a browser Extension that is enabled. Click on its Details button. Now, scroll down to the Permissions and Site Access sections to view how it is accessing your data.

You may be surprised as to the information the Extension is collecting on you. Let’s explore what this is about.

This is for modern day browsers like Edge, Chrome, Firefox, and Safari. Screenshots are from Chrome desktop version

Dilbert and Credits
Copyright Scott Adams, Inc./Distributed by Universal Uclick for UFS

This means that the browser extension has full access to all web pages you visit. It can see which web pages you are browsing, read their content and look at everything you write. It can even modify the web pages; for example by inserting additional ads. If the extension is malicious, it can collect all your private information; from web activity and emails you write to your passwords and financial information; and send it to a remote server on the Internet.

I am tired of receiving fake emails, texts, tweets, posts, and so on. Recently I have been receiving media from Thank You, USPS, Wells Fargo, Cox Communications, and so on.

This is primarily due to my accounts being compromised and sold. Another reason is some browser extensions is watching my activity.

If a browser extension is completely reliable and trustworthy, that’s fine. The browser extension may behave responsibly and not capture any data or interfere with your banking information.

We do not say that you have to uninstall every browser extension you have. Instead, you just realize the enormous access you give to the browser extensions you install and act on accordingly.

See below image for a popular Chrome extension, Todolist, permissions allowing access to its web site:

Extensions 2
Viewing a Chrome extension for permissions

But keep this in mind; if you do not trust the add-on, you may not want to run it in the first place. We recommend you click the Remove button to delete any extension you do not trust. See following image:

Extensions 3
Removing a Chrome extension

That’s it. Please feel free to share this post! One way to share is via Twitter.

Just click the Tweet icon below. This will launch Twitter where you click its icon to post the Tweet.

Check our TechSavvy.Life for blog posts on smartphones, PCs, and Macs! You may email us at contact@techsavvy.life for comments or questions.

I Would Like to Hear From You

Please feel free to leave a comment. I would love hearing from you. Do you have a computer or smart device tech question? I will do my best to answer your inquiry. Just send an email to contact@techsavvy.life. Please mention the device, app and version that you are using. To help us out, you can send screenshots of your data related to your question.

The author’s Vietnam eBook on the Battle for Tra Bong: Events and Aftermath

How to Enable Two Important Features on iPhone

On the iPhone, there are two features you should be using; the SOS Contacts and Comprised Passwords.

On the iPhone, there are two features you should be using; the SOS Contacts and Comprised Psswords. Let’s explore how to use these two features.

This is for iPhone running iOS 14+

Dilbert and Hackers
Copyright Scott Adams, Inc./Distributed by Universal Uclick for UFS

Create a SOS Contact

First, ensure that your most important people are in your Contacts. Now, search for your Health app either from your App Library (your last screen) or the Spotlight Search (your first screen). We are using the Spotlight Search. Just type the name “health” in the search box (without the quotes) and click the result. Refer to below image:

Features 1
Accessing your Health app

Next, the Summary screen will be displayed. Now, click the Review Medical ID Access link. See Below image:

Features 2
Displaying your Health Summary screen

Next, the Emergency Access to Medical ID screen will be displayed. Click on the Review Medical ID button at the bottom. See following image:

Features 3
Displaying your Medical ID screen

Now, your Emergency Contacts will be shown (if any). Click on add emergency contact to add a SOS contact you want notified in case of an emergency. Refer to below image:

Features 4
Displaying your Emergency Contacts and add one

SOS also contacts emergency services. A red asterisk icon will now appear next to Emergency Contacts in your Contacts list.

To send an SOS, hold down the power button on the right and one of the volume buttons on the left at same time. You can either use the Emergency SOS slider, or keep holding the button. A countdown will start, an alert will sound, and when the call goes through to 911, messages are sent to your Emergency Contacts. See below image:

Features 5
Accessing your Emergency SOS slider

Security Recommendations

iOS 14 features Security Recommendations, which are handy if you store a lot of passwords in iOS, be it for apps or website visits. It will tell you if a password appeared in a known data breach/leak, and suggest you make changes if you have repeated passwords (because that is a big no-no).

First, launch your Settings (the gear icon) app. See following image:

Features 6
Your Settings app

Next, scroll down and tap the Passwords option. Refer to below image:

Features 7
Accessing your Passwords option

Now, the Security Recommendations screen will be shown. The number to the right indicates security risks found. Next, tap on the label. See below image:

Features 8
Your number of security risks

Now, on the Security Recommendations screen, toggle Detected Comprised Passwords to On. Next, go through your list of compromised passwords and click the Change Password link as necessary. See following image:

Features 9
Enabling the Detect Comprised Passwords toggle and reviewing your risks

Note! Some of your comprised passwords may be from old leaks. You know you have changed it since the date of the leak. If so, click the label to open the entry, then click Delete Password.

Next, go back to your Security Recommendations screen to check if your comprised passwords has been resolved. Now, exit Settings.

Quote For the Day

Civilization advances by extending the number of important operations which we can perform without thinking of them.

Alfred North Whitehead

That’s it. You have now setup two important features on the iPhone. Please feel free to share this post! One way to share is via Twitter.

Just click the Tweet icon below. This will launch Twitter where you click its icon to post the Tweet.

Check out TechSavvy.Life for blog posts on smartphones, PCs, and Macs! You may email us at contact@techsavvy.life for comments or questions.

I Would Like to Hear From You

Please feel free to leave a comment. I would love hearing from you. Do you have a computer or smart device tech question? I will do my best to answer your inquiry. Just send an email to contact@techsavvy.life. Please mention the device, app and version that you are using. To help us out, you can send screenshots of your data related to your question.d

The author’s Vietnam eBook on the Battle for Tra Bong: Events and Aftermath

How to Reinstall Missing or Deleted Canned iPhone Apps

Every iPhone, iPad, and iPod touch comes pre-loaded with a ton of useful apps from Apple, but sometimes those apps can go missing. If that happens, you may wonder where they went, why they disappeared, and how to get them back.

Every iPhone, iPad, and iPod touch comes pre-loaded with a ton of useful apps from Apple, but sometimes those apps can go missing. If that happens, you may wonder where they went, why they disappeared, and how to get them back. Let’s explore how to do this.

This is for the iPhone

Dilbert and Projects
Copyright Scott Adams, Inc./Distributed by Universal Uclick for UFS

The apps that this can happen to include iTunes, FaceTime, Reminders, Stocks, Calendar, Music, Calculator, News, Notes, and many others; in fact 27 apps can be deleted. There are a number of possible reasons why an app has disappeared. It could have been moved or deleted. That’s obvious. Less obvious is that “missing” apps may still be on your device but have been hidden.

Find App Using Spotlight Searcn

First, before you try to reinstall a missing app, make sure that it’s not simply hiding on your device. On your Home screen, swipe downward with one finger near the middle of the screen, and your Spotlight Search bar will appear. Now, type in the name of the app to see whether its icon appears in the results. In our example, we are searching for the Stocks app. Although Stocks appears in the results list, it’s not the right icon. Refer to below image:

Apps 1
Using Spotlight Search

If you see the app in the results, then the app is installed. But where is it? It’s possible that you can not see it on a cluttered screen full of apps, or it might be hidden in a folder somewhere. Also, with iOS 14 and higher, the app could be in your App Library but not present on your Home screen.

Find App Using App Library

To check your App Library, swipe all the way to the left (to the last page) and look for it. In my case, it’s in the Recently Added box because I just added it in creating this blog post. See below image:

Apps 2
Using the App Librtary

Download App From App Store

If you do not see the app you are looking for in the Spotlight Search results or the App Library, then the app is not on your device. Fortunately, every removable iPhone app is available for free download again from the App Store. To get it back, open the App Store app. See following image:

Apps 3
Accessing the App Store

Next, when the App Store opens, type the name of the app you are looking for in the search bar and tap the Search button. Refer to below image:

Apps 4
Searching for the Stocks app

Some third-party apps have similar names to the built-in apps and may show up in the results. To confirm it’s the real app you are looking for, tap on its entry in the results list to see if it’s from Apple. See below image:

Apps 5
Finding the Stocks app

Now, the app you want will be free to download; you will see Apple’s iCloud download icon in the listing instead of a Get or Buy button. If you see an Open button, you already have the app on your device. See following image:

Apps 6
Download the Stocks app from iCloud

Check if App is From Apple

Next, when you are ready to download, just tap the iCloud download button and the app will be downloaded to your device. Once downloaded, you may ccheck if this is the correct app. Open the app and tap the blue link at the bottom labeled, in our example, About Stocks and Privacy… Refer to below image:

Apps 7
Check to see if we have the correct Stocks app

Now, read the verbage for mentioning of Apple. In the below image, a reference is made to Stocks are provided by Apple News:

Apps 8
Verifying the Stocks app is from Apple

Repeat the above process with any other missing Apple apps you want restored. Next, exit out of all open screens.

You are finished restoring a missing or deleted app. Please feel free to share this post! One way to share is via Twitter.

Just click the Tweet icon below. This will launch Twitter where you click its icon to post the Tweet.

Check out TechSavvy.Life for blog posts on smartphones, PCs, and Macs! You may email us at contact@techsavvy.life for comments or questions.

I Would Like to Hear From You

Please feel free to leave a comment. I would love hearing from you. Do you have a computer or smart device tech question? I will do my best to answer your inquiry. Just send an email to contact@techsavvy.life. Please mention the device, app and version that you are using. To help us out, you can send screenshots of your data related to your question.

The author’s Vietnam eBook on the Battle for Tra Bong: Events and Aftermath

How to Use Chrome Reading List on iPhone and iPad

Google Chrome’s Reading List feature can help you save articles for later, so you never miss something good.

Google Chrome’s Reading List feature can help you save articles for later, so you never miss something good.

This is for the iPhone and iPad

Dilbert and Hear
Copyright Scott Adams, Inc./Distributed by Universal Uclick for UFS

What Is the Reading List

The Reading List is exactly what it sounds like; a list of things to read. It’s a similar concept to the bookmarks that we have used in web browsers, but with a more focused purpose.

Instead of saving an article or story to a folder in your bookmarks, you can put it in the Reading List. The list syncs to your Google account if you are logged into Chrome, so it’s available on your desktop and smartphone. That makes it a little easier to access than bookmarks.

The other benefit over bookmarks is the offline feature. Pages saved to your Reading List can be read without an internet connection at your convenience. You do need an internet connection to add to the list.

First Method

Chrome for iPhone and iPad offers two ways to add pages to your Reading List. It can be done from Chrome or from another app.

For the first method, first, open Chrome on your iPhone or iPad and find a page to save for later. Now, tap the Share icon in the upper right-hand corner. Refer to below image:

Reading 1
Accessing the Share icon

Next, select Read Later from the menu. See below image:

Reading 2
Selecting the Read Later option

That’s it! The page is in your Reading List.

Second Method

For the second method, find a web page or link that you would like to read later in any app. Now, tap the Share icon in upper right-hand corner. See following image:

Reading 3
Accessing the Share icon

Next, find Chrome in the app row and select it. Refer to below image:

Reading 4
Selecting the Chrome app

Now, from the Chrome menu, tap Read Later. See below image:

Reading 5
Selecting the Read Later option

Next, to access the Reading List on your iPhone or iPad, open Chrome and tap the three-dot menu icon at the very bottom right-hand corner. See following image:

Reading 6
Accessing the menu icon

Accessing Your Reading List

Now, select the Reading List option from the menu. The number indicates unread pages. Refer to below image:

Reading 7
Selecting your Reading List option

Next, the Reading List will open with Unread pages at the top and Pages You’ve Read (if any) at the bottom. Pages marked with a green check are ready to read offline. See below image where we have only one Unread page:

Reading 8
Viewing your Unread page(s)

Now, tap Edit in the bottom right-hand corner to manage the list. See following image:

Reading 9
Selecting the Edit link

From here, you can select page(s) and delete or mark them as read. To mark them as read, checkmark an entry and tap the Mark Read blue link at the bottom of your screen. Refer to below image:

Reading 10
Marking page(s) as Read

If you want to mark page(s) as Unread, checkmark an entry and tap the Mark Unread blue link at the bottom of your screen. See below image:

Reading 11
Marking page(s) as Unread

The Reading List is a great feature if you use Chrome on multiple devices. Rather than depending on a separate third-party app, you can save websites for later reading right inside the browser.

Quote For the Day

“The Web as I envisaged it, we have not seen it yet. The future is still so much bigger than the past.”

Tim Berners-Lee, Inventor of the World Wide Web

That’s it. Have fun with your Reading List. Please feel free to share this post! One way to share is via Twitter.

Just click the Tweet icon below. This will launch Twitter where you click its icon to post the Tweet.

Check out TechSavvy.Life for blog posts on smartphones, PCs, and Macs! You may email us at techsavvy.life for comments or questions.

I Would Like to Hear From You

Please feel free to leave a comment. I would love hearing from you. Do you have a computer or smart device tech question? I will do my best to answer your inquiry. Just send an email to contact@techsavvy.life. Please mention the device, app and version that you are using. To help us out, you can send screenshots of your data related to your question.

The author’s Vietnam eBook on the Battle for Tra Bong: Events and Aftermath

How to Make an Audio Call on FaceTime

Tired of low-quality cell phone calls? Thanks to FaceTime, you can make audio-only calls with crystal-clear high-resolution sound using an iPhone, iPad, iPod Touch, or Mac.

Tired of low-quality cell phone calls? Thanks to FaceTime, you can make audio-only calls with crystal-clear high-resolution sound using an iPhone, iPad, iPod Touch, or Mac. 

Facetime, the built-in video calling app on Apple devices, has an undisputed audience base. Besides its video calling services, users also count on it for making audio calls to their friends. Reason being, its seamless and error-free connectivity in a secured environment. 

This is for the iPhone, iPad, iPod Touch, and Mac. Screenshots are from an iPhone

Copyright Scott Adams, Inc./Distributed by Universal Uclick for UFS

FaceTime Audio Explained

Most people think of FaceTime as a video chat service, but it also supports audio calls that operate like regular phone calls. Your device’s video camera is not used, and it stays off during the call.

FaceTime Audio is a great alternative to regular phone calls because it uses the Internet to place free calls with crystal-clear high-definition audio compared to a regular phone call. Since it’s an Internet call, your Apple device can take advantage of the extra bandwidth to make the call sound much better. The only requirement is that both ends of the call own Apple devices that support FaceTime, which includes iPhones, iPads, iPod Touches, and Macs.

Make a FaceTime Audio Call

First, on your iPhone, iPad, or iPod Touch, launch Settings (the gear icon). Refer to below image:

Accessing Settings

Next, scroll down and tap the FaceTime option. See below image:

Accessing FaceTime option

In the FaceTime settings, toggle the switch beside the FaceTime option to turn it on. See following image:

Enabling FaceTime

Now, search for the FaceTime app from your Search screen (your first or last screen) or locate the app on a Home screen. Refer to below image where we are searching for the app:

Accessing FaceTime app

Next, launch the FaceTime app. On the main FaceTime screen, tap the plus button (+). See below image:

Selecting the add button for a FaceTime Audio call

In the To: field, enter the name or number of the person you are trying to call. As you type, your Contacts list will be searched and any matching contacts will appear below. Just tap to select the person you want to call. See following image:

Entering and selecting a person to call

Next, tap the Audio button. If the Audio button is greyed out or does not appear, the contact you are trying to call does not have ‌FaceTime‌ enabled or has not set up a ‌FaceTime‌ account. Refer to below image:

Selecting the Audio button to make a call

Your call will be placed. You will see a message at the top of your screen denoting this is a FaceTime Audio call. During the call, you can switch to a video FaceTime call using the FaceTime icon, or you can disconnect by tapping the red phone receiver icon. See below image:

Disconnecting the FaceTime Audio call

Making a FaceTime Audio call on the Mac is similar to the above steps. One of the coolest things about FaceTime is that it works between all major Apple devices, so you can use your Mac to call iPhones, iPads, and iPod Touches.

You are finished. Please feel free to share this post! One way to share is via Twitter.

Just click the Tweet icon below. This will launch Twitter where you click its icon to post the Tweet.

Check out TechSavvy.Life for blog posts on smartphones, PCs, and Macs! You may email us at contact@techsavvy.life for comments or questions.

I Would Like to Hear From You

Please feel free to leave a comment. I would love hearing from you. Do you have a computer or smart device tech question? I will do my best to answer your inquiry. Just send an email to contact@techsavvy.life. Please mention the device, app and version that you are using. To help us out, you can send screenshots of your data related to your question.

The author’s Vietnam eBook on the Battle for Tra Bong: Events and Aftermath

How to Turn On Safer Browsing in Google Chrome

Google has some built-in tools in Chrome that attempt to make browsing safer. Enhanced Safe Browsing is one such tool.

With Safe Browsing, you get alerts about malware, risky extensions, phishing, or sites on Google’s list of potentially unsafe sites.

Google has some built-in tools in Chrome that attempt to make browsing safer. Enhanced Safe Browsing is one such tool. Let’s explore how to turn on this feature.

This is for the desktop version of Chrome and Android. Screenshots are from Chrome on Windows 10.

Copyright Scott Adams, Inc./Distributed by Universal Uclick for UFS

Enhanced Safe Browsing Explained

Safe Browsing is a list of dangerous URLs that is maintained by Google and used to protect users from malicious sites. Enhanced Safe Browsing builds upon this feature with some additional tools.

With Enhanced Safe Browsing enabled, Chrome shares even more browsing data with Google. This allows for threat assessments to be more accurate and proactive, though it does present a privacy concern in itself. You are letting Google monitor your browsing.

Per Google’s description, Enhanced Safe Browsing enables the following:

  • It predicts and warns you about dangerous events before they happen.
  • It keeps you safe on Chrome and may be used to improve your security in other Google apps when you are signed in.
  • It improves security for you and everyone on the web.
  • It warns you if passwords are exposed in a data breach.

Enable This Feature

The feature is available for Chrome on the desktop and Android. It is not available for iPhone and iPad. The process for enabling it is very similar on both platforms.

First, launch Chrome. Next, select the three-dot menu (the hamburger) icon in the top-right corner of Chrome. Now, choose Settings from the menu. Refer to below image:

Selecting Settings

Next, go to the Privacy and Security section. See below image:

Accessing Privacy and security option

Now, on the desktop, click Security. On the Android, it is called Safe Browsing. See following image:

Browsing 3
Accessing the Security option

Next, click or tap on the radio button to enable Enhanced protection. Refer to below image:

Enabling Enhanced protection

Now, exit Settings. You are finished. You will not notice anything different in your everyday browsing, but you will now have better protection. In the event that something is amiss, Google Chrome will give you a warning.

Please feel free to share this post! One way to share is via Twitter.

Just click the Tweet icon below. This will launch Twitter where you click its icon to post the Tweet.

Check out TechSavvy.Life for blog possts on smartphones, PCs, and Macs! You may email us at contact@techsavvy.life for comments or questions.

I Would Like to Hear From You

Please feel free to leave a comment. I would love hearing from you. Do you have a computer or smart device tech question? I will do my best to answer your inquiry. Just send an email to contact@techsavvy.life. Please mention the device, app and version that you are using. To help us out, you can send screenshots of your data related to your question.

The author’s Vietnam eBook on the Battle for Tra Bong: Events and Aftermath

How to Check Your iPhone and iPad Warranty

In the USA, every iPhone and iPad comes with a one year warranty against manufacturing defects and hardware failures. Other jurisdictions, like the E.U. and Australia, come with two years. If you choose, you can also extend that warranty for two years with AppleCare+. Regardless of which warranty you have, you can easily find out whether or not your Apple device is currently covered.

In the USA, every iPhone and iPad comes with a one year warranty against manufacturing defects and hardware failures. Other jurisdictions, like the E.U. and Australia, come with two years. If you choose, you can also extend that warranty for two years with AppleCare+. Regardless of which warranty you have, you can easily find out whether or not your Apple device is currently covered. Let’s find out the warranty status for your iPhone and iPad.

This is for the iPhone and iPad

Copyright Scott Adams, Inc./Distributed by Universal Uclick for UFS

Check Your Warranty Status in Settings

You can check the warranty status of your iPhone and iPad using the Settings app. This will tell you whether you are covered by the basic one-year limited warranty, AppleCare+, or whether your coverage has expired.

First, launch the Settings app. Refer to below image:

Accessing the Settings app

Next, tap the General option. See below image:

Accessing the General option

Now, tap the About option. See following image:

Accessing the About option

Below your Serial Number you should see a description of your your current warranty status. It will either say “Limited Warranty,” “AppleCare+,” or “Coverage Expired.” Refer to below image:

Your Coverage from iPhone or iPad

Now, tap it to see more information. See below image:

More information about your Coverage from your iPhone or iiPad

If your device is no longer covered, like mine, you may still be able to get repairs and phone support from Apple, which will be listed on the above screen. Also, you should be able to find a link to the Apple Support app for getting help.

Check Your Warranty Status From Apple’s Website

If you would like to check your coverage using Apple’s website, you can do so for virtually any Apple device at check coverage here. Open the website, then enter the Serial Number into the box, (you can find this number by following the above steps for an iPhone and iPad). See following image:

Checking your Coverage on the web

Also, you might want to check your other Apple devices. Just click the blue link labeled Check another serial number. Each device has its own Serial Number, which you would enter as mentioned above. Refer to below image:

Your Coverage from the web

What’s In Your Warranty

Apple’s limited one-year warranty covers manufacturer defects, including poor battery performance or faults that arise from regular use. It does not cover accidental damage, such as a cracked screen caused by a drop. Apple will check certain markers (like strips that detect moisture inside the chassis) to determine whether any damage has been caused by user error.

AppleCare+ plan covers you for two incidents of accidental damage over two years. If you break your screen, then you will have to pay a service fee of $29. For other damages, the fee goes up to $99.

Now you know about your warranty for an iPhone and iPad. That’s it. Please feel free to share this post! One way to share is via Twitter.

Just click the Tweet icon below. This will launch Twitter where you click its icon to post the Tweet.

Check out TechSavvy.Life for blog posts on smartphones, PCs, and Macs! You may email us at contact@techsavvy.life for comments or questions.

I Would Like to Hear From You

Please feel free to leave a comment. I would love hearing from you. Do you have a computer or smart device tech question? I will do my best to answer your inquiry. Just send an email to contact@techsavvy.life. Please mention the device, app and version that you are using. To help us out, you can send screenshots of your data related to your question.

The author’s Vietnam eBook on the Battle for Tra Bong: Events and Aftermath

How to Find the Model Number for iPhone and iPad

How do you know which version you have? All you have to do is find the model number of your iPhone and iPad. But it’s a little tricky and hidden. Why, I do not know.

How do you know which version you have? All you have to do is find the model number of your iPhone and iPad. But it’s a little tricky and hidden. Why, I do not know. Let’s find out.

This is for the iPhone and iPad

Dilbert and Lunch
Copyright Scott Adams, Inc./Distributed by Universal Uclick for UFS

You can find the model number of your iPhone or iPad using the hardware or the software. The fastest way is using the Settings app.

First, open the Settings (the gear icon) app. Refer to below image:

Model 1
Accessing Settings app

Next, scroll down to the General option. See below image:

Model 2
Accessing General option

Now, select the About option. See following image:

Model 3
Accessing About option

Next, tap on the number next to the Model Number option. Refer to below image:

Model 3
Accessing Model Number option. This is really the Part Number

The number will change to reveal the real model number for your iPhone and iPad. The first number displayed is the part number and the second number is the model number. Tricky by the Apple engineers. See below image:

Model 5
Accessing the real Model Number

If your iPhone will not boot up, you can also check the model number from the device. If you are using an iPhone 8 or higher, remove the SIM tray. You will find the model number etched on top in very small letters.

If you are using an iPhone 7 or older, you will find the model number inscribed on the back of the case.

With your iPhone and iPad’s model number, you can determine the exact model name of your device, and the region it came from. Just perform a web search for the model number to find out which iPhone and iPad you have and where it came from.

That’s it. Please feel free to share this post! One way to share is via Twitter.

Just click the Tweet icon below. This will launch Twitter where you click its icon to post the Tweet.

Check out TechSavvy.Life for blog posts on smartphones, PCs, and Macs! You may email us at contact@techsavvy.life for comments or questions.

I Would Like to Hear From You

Please feel free to leave a comment. I would love hearing from you. Do you have a computer or smart device tech question? I will do my best to answer your inquiry. Just send an email to contact@techsavvy.life. Please mention the device, app and version that you are using. To help us out, you can send screenshots of your data related to your question.

The author’s Vietnam eBook on the Battle for Tra Bong: Events and Aftermath

How to Force Chrome to Always Open Previously Open Tabs

Let’s say you are in the middle of a complex task in Chrome but you need to restart, log out, or Chrome has crashed. With one quick settings change, Chrome can remember all of your open tabs and reload them automatically the next time you start Chrome. Let’s explore how to setup this feature.

Let’s say you are in the middle of a complex task in Chrome but you need to restart, log out, or Chrome has crashed. With one quick settings change, Chrome can remember all of your open tabs and reload them automatically the next time you start Chrome. Let’s explore how to setup this feature.

This is for devices running Google Chrome. Screenshots are from Windows 10

Copyright Scott Adams, Inc./Distributed by Universal Uclick for UFS

First, launch Chrome. In any window, click the three vertical dots button (the hamburger icon) in the upper right-hand corner and select Settings from the menu. Refer to below image:

Accessing Settings

Next, select On startup option in the sidebar. See below image:

Selecting On startup option

Now, in the On startup section, select the radio button beside Continue where you left off. See following image:

Enabling opening your previous tabs

You can also force Chrome to launch with a set of your favorite pages. In the same On startup page in Chrome Settings just select Open a specific page or set of pages instead. Refer to below image where you can open the browser to Chrome apps using the text of chrome://apps/.

Enabling open to a specific page

Here you will see your Google (and non Google) apps. Yes, you can add third party apps to your opening Chrome apps page. See below image:

Your Google apps screen

If you want Chrome to always open with a fresh, empty browser state, you can head back to this screen and select Open the New Tab page instead.

After that, close Settings, The next time you restart Chrome, all of your tabs will open again exactly where you left off.

Note! If you were browsing through Incognito (private mode) and you lose your tabs, Chrome will not remember them.

That’s it. Please feel free to share this post! One way to share is via Twitter.

Just click the Tweet icon below. This will launch Twitter where you click its icon to post the Tweet.

Check out TechSavvy.Life for blog posts on smartphones, PCs, and Macs! You may email us at contact@techsavvy.life for comments or questions.

I Would Like to Hear From You

Please feel free to leave a comment. I would love hearing from you. Do you have a computer or smart device tech question? I will do my best to answer your inquiry. Just send an email to contact@techsavvy.life. Please mention the device, app and version that you are using. To help us out, you can send screenshots of your data related to your question.

The author’s Vietnam eBook on the Battle for Tra Bong: Events and Aftermath