How to Switch to the New Facebook Interface

Facebook’s new website interface change is not well known. At some point, it will probably be the new standard. The interface is getting a visual overhaul that almost everyone can access. You can now update to this brand new, less cluttered design with the click of a button. If you don’t like the change, you can easily switch back to the classic interface.

This if for a desktop/laptop, Macs and smartphones supporting Facebook

Dilbert and Human Interaction
Copyright Scott Adams, Inc./Distributed by Universal Uclick for UFS

Enabling the New Interface

Note! This post relates to a PC, other devices will be similar. If you don’t see the new Facebook option then Facebook has yet to rollout the change to your device.

Fire up your device and log in to your Facebook account.

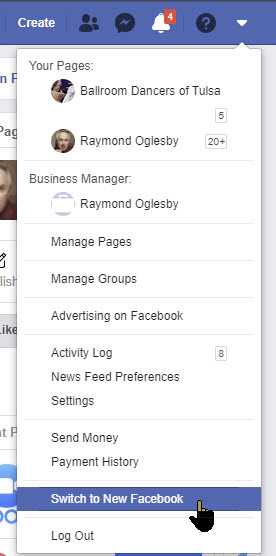
Next, click on the down arrow in the top-right corner of the interface. Select the Switch To New Facebook option. The page will refresh and the new interface design will load. Refer to below image:

Facebook New 1
Switch to the new Facebook option

A welcome message will appear the first time that you switch to the new Facebook design. Facebook claims that the redesign has faster loading time, cleaner look and bigger text. Additionally, Facebook now includes a dark mode that you can enable whenever you want.

Additionally, this update comes with a user-friendly redesign of the Groups tab and an overhaul of the News Feed. See below image:

Facebook New 2
The Welcome message for the new interface

Simply click the Next button. You will see the following image allowing you to select how yout interface will look.

Facebook New 3
Selecting your interface look

Just click the Get Started button. That’s it, you are all set with the new desktop interface. If you aren’t a fan of the Dark mode, you can switch back to Light whenever you like.

Switching Back to the Classic Interface

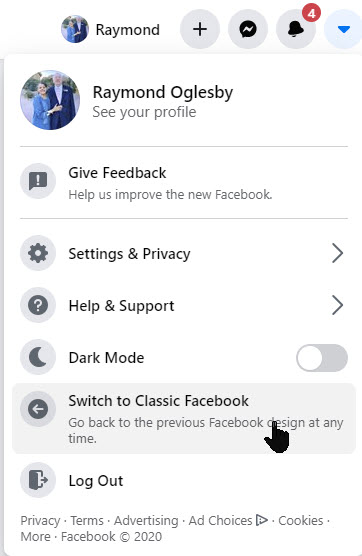
Once you’ve enabled the new interface, you can always revert the change from your Facebook account’s front page. Just click on the down arrow in the top-right and then select Switch To Classic Facebook. See following image:

Facebook New 4
Reverting back to the Classic interface

At some point in the future, Facebook may decide to roll out the new design permentally for all platforms. If so, reverting back to the classic interface will no longer be an option.

I Would Like to Hear from You

Please feel free to leave a comment. I would love hearing from you. Do you have a computer or smart device tech question? I will do my best to answer your inquiry. Please mention the device, app and version that you are using. To help us out, you can send screenshots of your data related to your question.

The author’s Vietnam eBook on the Battle for Tra Bong: Events and Aftermath

How to Record a Zoom Meeting

Why take notes during a Zoom meeting when you can refer back to a recording of the entire call? Here’s how to record a Zoom meeting, whether you’re the host or not.

Important meetings need good records, and anyone who has taken notes knows that some details can be missed. The best way to preserve a record of a meeting is to have a video recording.

 That goes doubly for remote meetings, where distractions, tech issues and other problems can lead to you missing out on essential information.

If you are using an Enterprise account to host a meeting, you may not be able to record a Zoom meeting unless your IT team has given you permission. Be sure to check with your administrator before the meeting to grant you access if you don’t have it.

If using a PC or Mac, be sure your computer has a microphone and/or camera to use Zoom to its fullest. You may also use your smartphone to record the meeting.

This if for a PC, Macs, iPhone/iPad and Android devices that support Zoom

Dilbert and Future 1
Copyright Scott Adams, Inc./Distributed by Universal Uclick for UFS

Accessing Zoom Settings

First, fire up Zoom and join an active meeting. Then click on your small profile photo in upper right-hand corner. This will open up the dialog options window. See below image:

Zoom Record 1
Zoom dialog Options window

Recording a Zoom Meeting

Next, click on the Settings option. The Settings options will be displayed. The Record video during screen sharing option should be checkmarked. Also, at the top of the screen is the location where your video will be stored upon completion. This folder was created when you installed Zoom. Refer to below image:

Zoom Record 2
Settings options for recording a video

By default, only the meeting host can record the meeting, but it’s easy to grant other participants the ability to do so. The meeting host can do so by clicking on Participants while in a meeting, looking for the More button next to an individual’s name and selecting Allow Record

Once in a meeting, those wanting to record only need to click the Record button to start capture, at which point the Record button will change into two buttons: One to Pause the recording and one to Stop recording.

When you’re done recording video, Zoom stores it temporarily in the location mentioned above. The video is encoded into MP4 format once the meeting has ended.

I Would Like to Hear from You

Please feel free to leave a comment. I would love hearing from you. Do you have a computer or smart device tech question? I will do my best to answer your inquiry. Please mention the device, app and version that you are using. To help us out, you can send screenshots of your data related to your question.

The author’s Vietnam eBook on the Battle for Tra Bong: Events and Aftermath

Online Conferencing Solutions

In this Coronavirus pandemic, many people are working from home. Our local TV news and weather people have live audio and video streaming from their homes for the daily news broadcast. Working from home has become the new norm.

This will continue after the crisis is over. Instead of going to an office or to a clients location, you will collaborate through an audio and video service.

I researched some web sites for the top call services. They have a similar mix of apps, just in a different order. Some of the web sites have organizations I never heard of. So, I like the ranking from Office Watch. Click here to read their review.

This is for modern web browsers and apps on Apple, Android and Microsoft platforms

Their top seven online call services are as follows:

  1. FaceTime – handles up to 32 people
  2. Skype – up to 50 people
  3. WhatsApp – handles 4 people
  4. Signal – one-on-one calls only
  5. Zoom and Meetings – up to 100 people for the free version; 1000 for their enterprise paid version
  6. Microsoft Teams and Live Events – can handle 4 participates, up to 10,000 for the paid version
  7. Google Hangouts – up to 150 people

I recommend Facetime or Skype for a small busines; Zoom for a medium business; and Zoom Meetings for a large enterprise. Facetime and basic Zoom are free. Click here to read the review of their rankings.

I Would Like to Hear From You

Please feel free to leave a comment. I would love hearing from you. Do you have a computer or smart device tech question? I will do my best to answer your inquiry. Please mention the device, app and version that you are using. To help us out, you can send screenshots of your data related to your question.

The author’s Vietnam eBook on the Battle for Tra Bong: Events and Aftermath

How to Setup Contacts in Zoom

Is your business using Zoom for collaboration during the Coronavirus outbreak? Zoom has become a key tool for working at home and a top choice for vittual meetings. Zoom is free for one-on-one calls that last as long as you like. For three or more people, your calls are limited to 40 minutes. Zoom also has a paid version for an enterprise; it can handle 1000 people.There’s also a plan for small and medium businesses that supports up to 300 participates per call..

Click here for a detailed review of Zoom from PCMag Labs

Click here for setup and install of Zoom from Office Watch

Zoom Meeting’s free account is generous. You can host up to 100 people on a call for free and you can see as many as 49 people on an active call in a gallery-style view. There’s no limit on how many meetings you can host. 

So, how do we setup our contacts with coworkers using Zoom? In this post we offer insight on how to do this.

This post is for Windows 7 or greater, iPhone or iPad with iOS 7 or later, Android 4 or greater, Web browsers, Macs and the Zoom app or program

Dilber and Ted Talk
Copyright Scott Adams, Inc./Distributed by Universal Uclick for UFS

Before you Begin

Of course, you have already setup the app. Linking to other people in Zoom is necessary before you can call them. A person has to be added to your Zoom contacts list and they have to add you before a call is made.

Zoom contacts are separate from Outlook and other contacts list.

Zoom links people by matching email addresses. Some people have multiple email addresses; for example, personal and work or different ones for different purposes or multiple old email addresses.

Which Email Address to Use?

Before adding a person to your contacts list it’s a good idea to check with them on which email address they use to login to Zoom.

To check, they can click on their Zoom Profile in the top right where their name and address is displayed. Refer to below image:

Zoom Contacts 1
Locate the correct email address

Invite a Contact

To link with someone, in the Zoom app, go to the Contacts section, then click the plus “+ “symbol. See following image:

Zoom Contacts 2
Linking a Zoom contact

Enter the email address of the contact you want to add to Zoom. See below image:

Zoom Contacts 3
Adding a Zoom contact

Then you have two options:

  1. Add Contact – sends a contact request to that person’s Zoom account.
  2. Copy Invitation – copies to your clipboard with web link.  Paste that into an email or instant message.

Refer to below image:

Zoom Contacts 4
Web address for the Zoom contact

There is no need to paste the entire text, change it to suit you. The web link is the important part to pass along. Make sure you include the whole web link; it’s a long link using multiple lines.

Accept a Contact Request

If a participate adds you to their Zoom contact list, you’ll see a pop-up alert. See following image:

Zoom Contacts 5
Pop-up box for a contact request

Or open your Zoom app/web page. Under Contacts look at Contact Requests.  The request will be displayed with options to Accept or Decline. Refer to below image:

Zoom Contacts 6
Accept or Decline a contact request

As you can see above, the Contact Requests you’ve made will also appear with their current status.

What to Do Next?

Now that you’ve linked with someone on Zoom, you can call them (voice, video, text, etc). If someone wants to invite you into a Zoom meeting, give them you Zoom linked email address.

That’s it on setting up your Zoom contacts. Try it out.

I Would Like to Hear from You

Please feel free to leave a comment. I would love hearing from you. Do you have a computer or smart device tech question? I will do my best to answer your inquiry. Please mention the device, app and version that you are using. To help me out, you can send screenshots of your data related to your question.

The author’s Vietnam eBook on the Battle for Tra Bong: Events and Aftermath

How to Clean Your Device

The Coronavirus is in the news in a big way, almost a Pandemic by World Health Organization. The news has you aware of how many times you touch your face, how many times do you touch your device?

What you Will Need

What can we do about this? To get our gadgets gleaming, you will need microfiber cloths, cotton swabs, isopropyl alcohol, compressed air spray and distilled water. Before you apply any cleaning, unplug or turn off your device. We are going to disinfect your device and give everything else a general cleaning.

Cleaning your Phone or Tablet

iPhone Image

Phones and tablets have fingerprint resistent coating that could come off. Manufactures generally recommend wiping them down with distilled water on a microfiber cloth, then using cotton swabs to clean around the edges of the screen, buttons and camera lens.

What To Do

Apple recently released its updated guidelines for cleaning. They endorse using 70 percent isopropyl alcohol wipe or Clorox Disinfecting Wipes. You may gently wipe the nonporous surfaces such as the screen, keyboard or other exterior surfaces.

You can create a mixure by using 70 percent alcohol and 30 percent water in a spray bottle. Be sure to wash your hands before starting the cleaning. Then remove any case (leave on any protective screen), spritz the cloth with the solution and thoroughly wipe down your device. Let it dry completely. Then be sure to wash your hands again.

What To Avoid

  • Do not use bleach
  • Avoid getting moisture in any opening
  • Do not submerge your Apple device in any cleaning agents
  • Don’t use the wipes on fabric or leather surfaces
  • Do not reuse the microfiber cloth
  • Avoid using Windex

Cleaning Your Desktop or Laptop

Laptop

First unplug your device and remove the battery for a laptop. Turn your laptop or PC keyboard upside down and (gently) shake out to get rid of dirt and crumbs. Then grab a can of compressed air blaster (available at WalMart and similar places) and blast it. Use cotton swaps to get inside the crevices like the keys.

Lightly spray a microfiber cloth with your solution and wipe down the plastic and metal surfaces to include external devices.

To clean the screen, use a screen cleaning product or your mixture and spray onto a microfiber cloth. For a laptop, a one stop solution is to try 3M Notebook and Tablet Cleaning Wipes. If you have a touch screen, clean it with a microfiber cloth; for smudges, use only water or eyeglass cleaner applied to the cloth to remove them.

Don’t forget the mouse. Using the same mixture, dab it on a cotton swab and run it over the feet of the mouse and any crevices. Then take a microfiber cloth dipped in the mixture and go over the body of the mouse and cord.

I Would Like to Hear from You

Please feel free to leave a comment. I would love hearing from you. Do you have a computer or smart device tech question? I will do my best to answer your inquiry. Please mention the device, app and version that you are using. To help us out, you can send screenshots of your data related to your question.

Five Areas to Update your LinkedIn Profile

LinkedIn software can be a dauting task to setup and maintain. You should update your LinkedIn profile regularly to attract recruiters, coworkers and friends. Of course, most of us don’t have the time, so we put off this task. If you want to take a little time, you should addrtess fives areas of your profile.

This feature is for your iOS (iPhone/iPad), Android device, Windows 10 or whatever smart device supports LinkedIn

1. Your Heading Statement

This is the short statement that appears below your name. That Heading is what the recruiter’s search for. The Heading needs to say what you do or want to do. It should hit these points using keywords. People who haven’t updated their profile in a while might have their current job title followed by a comma and then their employer or department name. If so, I suggest changing the Heading to some keywords that match what you want to do.

See below image for my Heading as a Blogger: (Note! I used the tips in this post to update my LinkedIn profile for blogging purposes).

LinkedIn Heading statement

2. Updating your Photo

Does the photo reflect who you are today? It would be unwise to visit a recruiter looking completely different from your photo. Of course, you want a headshot photo of you smiling. Put on an appropriate shirt or blouse because it might show up in the photo. You want a photo that will impress recruiters, coworkers or friends.

3. Using Keywords in your Profile

We have discussed using keywords in your Heading. Using keywords in your Skills & Endorsements is also very important. You can use a ton of keywords. Make sure you hit the top words that reflect your experience. Click the “plus” sign in upper right hand corner to add skill(s). Refer to following image:

LinkedIn Skills section

Tap in the Skill search box. Then go thru the aphabet, keying in one letter, ie, key in A, then select your keyword(s); then key in B, etc. through the alphabet to see which LinkedIn keywords to apply. See below image:

LinkedIn adding Skills using keywords

4. Using your Geography

If you are looking for work, it helps to provide a location. Its best to use a general location in a greater city areas, like Oklahoma City/Tulsa metro area instead of a just a single city. This will open up more possibilites for recruiters to locate a matching job.

5. How Open are you to Recruiters?

LinkedIn has a setting you can turn on which tells only recruiters that you are open to being contacted. When you turn on this setting, no one else can see it, only people who have recruiter accountgs. This setting is found in several places in your profile. The setting is labeled Only recuriters.

Go to your profile and look just below your Heading (refer to the first image in this post). When you tap Only recruiters, you are taken to the Job preferences screen. See below image:

LinkedIn Job Preferences

Tap the Edit icon (the pencil in upper right hand corner). Here you can add Job titles, Job locations and select Job types. Refer to below image:

LinkedIn adding Job titles, locations and types
  • Tap the Only recruiters drop down arror to allow your job information to be shown to anyone using LinkedIn or just Recruiters.

Updating these five areas of your profile will open up more job opportunities and attract more recruiters.

I Would Like to Hear from You

Please feel free to leave a comment. I would love hearing from you. Do you have a computer or smart device tech question? I will do my best to answer your inquiry. Please mention the device, app and version that you are using. To help me out, you can send screenshots of your data related to your question.

How to Disable Google from Tracking You

Whereever you go, Goggle is tracking you, especially Google Maps, and archives that activity in your Google Timeline. It is both a blessing and a curse. It can take you down memory lane, but as a curse, it leaves the door wide open to your privacy.

With Timeline, Google Maps can show where you are going and where you have been. Even photos taken and uploaded to Google Photos can reveal your location. You can also share your location in realtime on your smartphone.

If you prefer to keep your location private, you can remove your location history and stop Google from following you.

This feature is for your iOS (iPhone/iPad), Android device, Windows 10 or whatever smart device supports Google

Stop Activity and Location Tracking

  • Open your Google browser
  • Log into your account at myaccount.google.com
  • Select Data & personalization
  • You can disable what Google can tract and collect from you by managing your Activity controls. To stop tracking, click on the Title and toggle the switch to off. See below image:
Google Tracking 1
Google Activity controls

Warning! Turning off these Activity controls will effect the use of their features.

Delete your Activities

Your activities are kept until you manually delete them (the default). You have the option of deleting all data for the past 18 months or past 3 months.

  • Navigate to your Google account at myaccount.google.com
  • Select Data & personalization>Web & App Activity>Manage Activity>Choose to delete automatically. See below image:
Google Tracking 2
Google Deletion process
  • Select the 18 or 3 month option
  • Tap Next. See below image:
Google Tracking 3
Google selection of how long to keep your activity
  • Google will show you what is about to be deleted
  • Tap Confirm at the bottom of your screen. See below image:
Google Tracking 9
Google confirmation of your activity deletion
  • Also, you can delete a particular day’s browsing activity by taping the Trash icon next to the day. Refer to second image above.

To select a custom range, an hour or a date:

  • Tap the Menu icon located next to My Activity
  • Select Delete activity by. See below image:
Google Tracking 4
Google custom deletion
  • Choose one of the following options. See below image:
Goo5le Tracking 6
Google selecting your custom deletion
  • There are other privacy settings you can explore such as Location Services under Settings>Privacy and Security>Location>Location. A set of apps that use Location Services can be toggled on or off. See the following screen:
Google Tracking 8
Google Location Services to turn on or off

Warning! Turning off these Apps Location Services will effect the use of their features.

Go Incognito

The best and easist way to “hide” your browsing is to set the Incognito Mode. This feature allows you to browse without Google compiling history, cookies, site data or form information. Google has extended the feature to Maps and YouTube. Maps will stop tracking your location history; YouTube will no longer track your search and view history.

  • Launch Google
  • Tap the More icon in bottom right hand corner (the 3 dots)
  • Tap Turn on incognito. See below image:
Google Tracking 10
Google setting for Incognito Mode

You will see the following screen:

Google Tracking 7
Google Incognito Mode turned on

To turn off Incognito Mode:

  • Launch Google
  • Tap the More icon in the bottom right hand corner (the 3 dots)
  • Tap In incognito mode
  • Tap Turn off incognito. Refer to following image:
Google Tracking 7
Google Incognito Mode turned off

I Would Like to Hear from You

Please feel free to leave a comment. I would love hearing from you. Do you have a computer or smart device tech question? I will do my best to answer your inquiry. Please mention the device, app and version that you are using. To help me out, you can send screenshots of your data related to your question.

Why Auto Logging Out of Apps Should Be Required

This is for iOS, Android, Mac and PC devices

We all have our favorite smart device apps. This would include Facebook, Twitter, Instagram, LinkedIn, Tumblr, Reddit and others. What happens when you turn off your device, power off or shutdown? These apps are still active and readily available when your device is turned back on.

These apps offer you convenient access by keeping you logged in. When you log into a financial institution, say Bank of America or Morgan Stanley, you are logged out within two minutes of no activity.

Our favorite apps should do the same. By staying logged in, the apps are more subjective to hacks by others.

Of course, by logging out, means you have to reenter a UserID, Password and Passcode, if using Two Factor Authentication, to gain access. And that can be a pain but it’s worth it.

If you are selling or disposing a smart device, you should log out all apps. Also, you may consider erasing all data and/or resetting your device. Only do this if you no longer need the device.

I would like the app industry to follow the same logging out protocol as financial entities. What do you think? Please take the one question survey.

I Would Like to Hear from You

Please feel free to leave a comment. I would love hearing from you. Do you have a computer or smart device tech question? I will do my best to answer your inquiry. Please mention the device, app and version that you are using. To help me out, you can send screenshots of your data related to your question.