How to Jump to the Top in iPhone Apps

This post provides tips for iPhone users to quickly navigate to the top of any screen using simple gestures. It also explains how to use Reachability to access the top half of the screen with one hand.

This is for the iPhone. Screenshots are from iPhone 14 Pro running iOS 17.4

Did you know that a simple iPhone gesture can save your thumb the workout of scrolling back to the top of most apps? Across all apps, pages, and platforms, this simple tip will automatically return you to the top of any screen. Whether you have been scrolling Instagram or Facebook, or you have been searching in the Settings app, just tap once at the top of the iPhone’s screen to snap back to the beginning.

We are unsure why we forgot this hidden gesture. This is the BEST iPhone post we have written out of 100-plus posts on the iPhone.

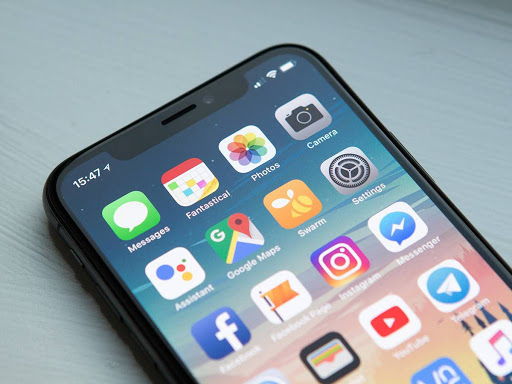
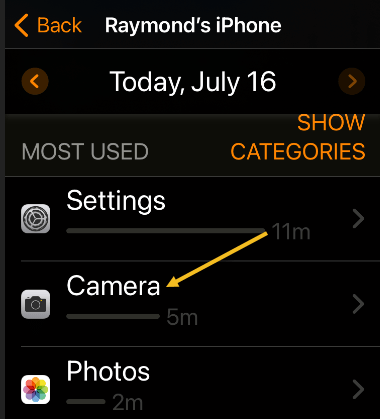
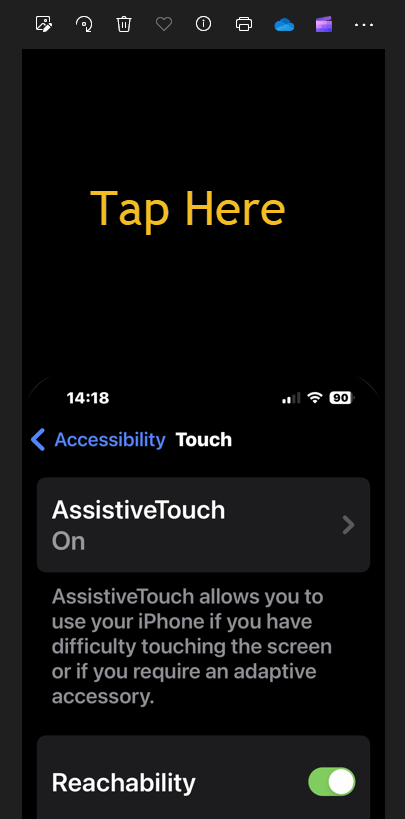
First, open any app, and simply tap the top of the iPhone screen anywhere from the Time to Battery Indicator, known as the Dynamic Island area. We are using the Settings app for our example. Refer to the below image:

Top Screen 2
Tapping to jump to the top of the Settings screen

Next, it should return you back to the top immediately. Be sure when you are doing this, you are tapping at the level of the Time or Battery Indicator. If you tap just below, nothing will happen. See the below image:

Top Screen 1
You are now at the top of the Settings screen

Now, based on your iPhone model:, here is where to tap:

  • iPhone 15 or iPhone 14 Pro — you can tap on either side of the Dynamic Island and the phone will instantly scroll up. 
  • iPhone X or any of the models with the notch—you can tap on either side of the notch.  
  • If you have an older iPhone without Dynamic Island or a notch, you can achieve the same thing by tapping the Clock on the status bar.

It’s that simple! This works in nearly any app with screens you can scroll down on, whether you’ve scrolled through endless emails, a playlist in music, or photos. etc. Now go give that poor thumb a massage.

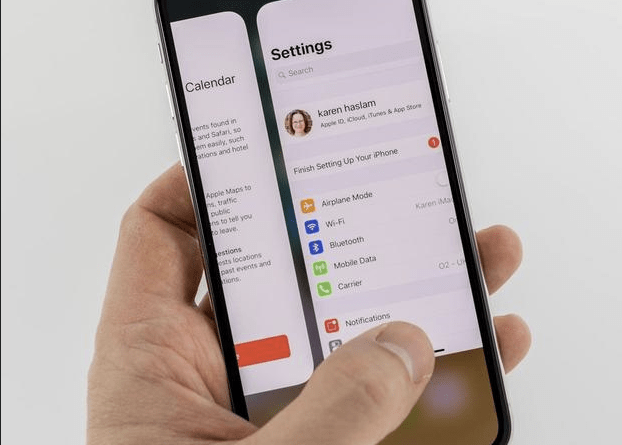
When you use an iPhone with one hand in Portrait orientation, you can use Reachability to lower the top half of the screen so it’s within easy reach of your thumb.

Head to:

Settings > Accessibility > Touch > Reachability

and toggle to ON. See the following image:

Top Screen 3
Turning on the Reachability option

To lower the top half of the screen, do one of the following:

  • On an iPhone with Face ID: Swipe down on the bottom edge of the screen.
  • On an iPhone with a Home button: Lightly double-tap the Home button.

Refer to the below image:

Top Screen 4
Swiping down to reveal the top half of the screen

To return to the full screen, tap the upper half of the screen or just wait a few seconds and the screen will return to full screen. See the below image:

Top Screen 5
Tapping the upper part of the screen to return to the full screen

In the Photos app, use the above to jump to the top. To return to the bottom, tap the Library icon or the All Photos button.

Note! If you have thousands of photos, tapping the All Photos button is faster.

See the following image:

Top Screen 6
Tapping the Library icon or All Photos button to return to the bottom

Disclaimer

Technology is always changing. Rarely is there static tech for smartphones and desktops. Thus, the contents of this post are only valid at the time of writing. Blog posts older than six months may have directions incompatible with your device or OS. Hopefully, older post content will continue to work as advertised. Thank you for reading TechSavvy.Life for Technology at Work For You.

Success is liking yourself, liking what you do, and liking how you do it.

-Maya Angelou

You are finished. Please feel free to share this post! One way to share is via Twitter.

Just click the Tweet icon below. This will launch Twitter where you click its icon to post the Tweet.

Checkout TechSavvy.Life for blog posts on smartphones, PCs, and Macs! You may email us at contact@techsavvy.life for comments or questions.

Was this post helpful? We would love to hear your comments. Do you have a computer or smart device tech question? I will do my best to answer your inquiry. Just send an email to contact@techsavvy.life. Please mention the device, app, and version you are using. To help us out, you can send screenshots of your data related to your question.

You can access the E-book from a Kindle device, or the Kindle App for a desktop or smartphone. The apps are free.

The author’s Vietnam eBook on the Battle for Tra Bong Vietnam: Events and Aftermath

How to Add a Google Apps Bookmark on Desktop and iPhone

You can start Google Chrome to open a specific page, a new tab, or continue where you left off from the On starup option. We will show you how to set this option to load your Google Apps. You can use the same procedure to load any website at startup or create a bookmark.

RAYMOND OGLESBY @RaymondOglesby2
February 20, 2024

This is for the Desktop and iPhone. Screenshots are from Windows 10 and iPhone 14 Pro running iOS 17+

You can start Google Chrome to open a specific page, a new tab, or continue where you left off from the On startup option. We will show you how to set this option to load your Google Apps. You can use the same procedure to load any website at startup or create a bookmark.

Your Google Apps can be displayed using the On startup option. First, to set this option, open Chrome and click the Menu (the 3 dots) in the upper right corner, then navigate to:

Settings > On startup

Next, under the Open a specific page or set of pages option, enter the following:

chrome://apps/

Refer to the below image:

Apps 1
Setting On startup option to your Google Apps

Now whenever you start Chrome, your Google Apps page will be displayed.

By doing the above, you can just click the Home button next to the address bar to display your Google Apps anytime. See the below image:

Apps 5
Accessing the Home button to view your Google Apps page

Clicking the Home button next to the address bar will display the page you have set as the On startup page.

If you do not have the On startup option set to Google Apps, why not create a bookmark for it. Following are the steps to do this.

First, open the Google Apps page you want to bookmark in Chrome. See the following image:

Apps 2
Setting your Google Apps page to bookmark

Next, click the Star icon in the address bar. Refer to the below image:

Apps 6
Adding your Google Apps page as a bookmark

Now, choose a name and location for your bookmark then hit Done. See the below image:

Apps 3
Editing your Google Apps bookmark

Next, head to your saved bookmark to see your Google Apps entry. See the following image:

Apps 4
Your saved Google Apps bookmark

First, open the Google Apps page you want to bookmark in Chrome then tap the Share button. Refer to the below image:

Apps 7
Setting your Google Apps page

Next, tap the Add to Bookmarks option. See the below image:

Apps 12
Adding your Google Apps bookmark

First, tap the Menu (the 3 dots) at the bottom right corner. See the following image:

Apps 9
Accessing the Menu option

Next, tap the Edit Bookmark option. Refer to the below image:

Apps 10
Choosing to edit your Google Apps bookmark


Now, change as necessary, then tap Done. See the below image:

Apps 11
Editing your Google Apps bookmark

Not only do bookmarks save you time as you do not need to type in a URL or search for your most frequently visited sites on Google every time you visit, but they are also great for keeping track of articles and videos you plan to head back to later. If you do not have Google Apps set as your startup page, creating a bookmark allows you to easily display the page.

Technology is constantly changing; there is rarely static tech for smartphones and desktops. Thus, the contents of this post are only valid at the time of writing. Blog posts older than six months may have directions incompatible with your device or OS. Hopefully, older post content will continue to work as advertised. Thank you for reading TechSavvy.Life for Technology at Work For You.

 “The best vision is insight.”

Malcolm Forbes

That’s it. Please feel free to share this post! One way to share is via Twitter.

Just click the Tweet icon below. This will launch Twitter where you click its icon to post the Tweet.

Checkout TechSavvy.Life for blog posts on smartphones, PCs, and Macs! You may email us at contact@techsavvy.life for comments or questions.

Please feel free to leave a comment. I would love to hear from you. Do you have a computer or smart device tech question? I will do my best to answer your inquiry. Just send an email to contact@techsavvy.life. Please mention the device, app, and version you are using. To help us out, you can send screenshots of your data related to your question.

You can access the e-book from a Kindle device, the Kindle App for the desktop or smartphone, which is a free app.

The author’s Vietnam eBook on the Battle for Tra Bong Vietnam: Events and Aftermath

How to Unhide/Hide Apps on iPhone

You can not really hide apps on an iPhone, but you can make them hard to find. If you can not find an app on your iPhone’s Home screen, it might still be available in your App Library. Also, some hidden app purchases can be revealed.

RAYMOND OGLESBY @RaymondOglesby2
May 12, 2022

You can not really hide apps on an iPhone, but you can make them hard to find. If you can not find an app on your iPhone’s Home Screen, it might still be available in your App Library. Also, some hidden app purchases can be revealed. Let’s explore this feature.

This is for the iPhone. Screenshots are from iPhone XR

Dilbert and Perfect
Copyright Scott Adams, Inc./Distributed by Universal Uclick for UFS

Reveal “Hiding” Apps

Starting with iOS 14, Apple introduced an App Library page to your iPhone that shows an organized list of all the apps installed on your device. An app can be installed on your iPhone that is not listed on your Home Screen but is still accessible in your App Library. If that’s the case, you can easily add the app to your Home Screen.

To open your App Library, first, repeatedly swipe to the left on your home screen of icons or swipe the page icons until you reach the last page, then swipe once more, and the App Library will open. You will see a grid of icons in different categories representing apps you have installed. Tap the Search bar at the top of the screen and type in the name of the app you are looking for. Refer to the below image:

Unhide 1
Finding an app using Search

Next, when you find it, tap and hold your finger on its icon in the results list. In the menu that appears, select Add to Home Screen. See the below image:

Unhide 2
Adding an app to your Home Screen

Now, you can go back to your Home Screen, and you will see the app icon you just added to your Home Screen on one of the pages.

In the future, if you want all newly downloaded apps to appear on your Home Screen automatically, head to:

Settings > Home Screen

and place a checkmark beside Add to Home Screen. See the following image:

Unhide 3
Selecting always add apps to Home Screen

Reveal “Hidden” App Purchases

Next, using your Apple ID settings, it’s possible to hide previous purchases of items such as apps. If you can not find an app you want to download in your Purchase History, head to:

Settings > Apple ID > Media & Purchases > View Account > Hidden Purchase

Refer to the below image:

Unhide 4
Accessing Hidden Purchases

Now, on the next screen, you will see a list of purchases you have previously hidden. Tap Unhide behind any app you would like to reveal again. See the below image:

Unhide 5
Selecting to Unhide an app

Next, the app will appear in your Purchase History.

Head to:

Settings> Apple ID > Media & Purchases > Purchase History

See the following image:

Unhide 6
Your previously hidden app

If the app is not already installed on your iPhone, you will need to re-download it from the App Store.

“Hide” a Purchase App

Now, to “hide” an app, navigate to:

App Store > Your Initials (in upper right-hand corner) > Purchased > My Purchases

and you will see a listing of your purchased apps (some may be free). Swipe left on an app, then tap Hide and your app will be “hidden”. Refer to the below image:

Unhide 7
Selecting to Hide an app

Quote For the Day

The thirst for powerful sensations takes the upper hand both over fear and over compassion for the grief of others.

Anton Chekhov

Tweet Info

You are finished. Please feel free to share this post! One way to share is via Twitter.

Just click the Tweet icon below. This will launch Twitter where you click its icon to post the Tweet.

Check out TechSavvy.Life for blog posts on smartphones, PCs, and Macs! You may email us at techsavvy.life for comments or questions.

I Would Like to Hear From You

Please feel free to leave a comment. I would love to hear from you. Do you have a computer or smart device tech question? I will do my best to answer your inquiry. Just send an email to contact@techsavvy.life. Please mention the device, app, and version you are using. To help us out, you can send screenshots of your data related to your question.

Author’s E-book

You can access the e-book from a Kindle device, the Kindle App for the desktop or smartphone, which is a free app.

The author’s Vietnam eBook on the Battle for Tra Bong Vietnam: Events and Aftermath

It’s Not Necessary to Close iPhone Apps

If you are constantly closing apps on your iPhone while attempting to speed things up or save battery life, you are doing the opposite and making your iPhone perform worse.

RAYMOND OGLESBY @RaymondOglesby2
March 9, 2022

If you are constantly closing apps on your iPhone while attempting to speed things up or save battery life, you are doing the opposite and making your iPhone perform worse. Let’s explore why.

This is for the iPhone

Dilbert and Researchers
Copyright Scott Adams, Inc./Distributed by Universal Uclick for UFS

iPhone and Resources

If you are like us, you might be familiar with how apps run on a Mac or a Windows PC. On those platforms, if an application is running in the background, it can still be using up CPU cycles or taking up RAM. Conventional wisdom says that closing those programs will make your Mac or PC perform better. Refer to the below image:

iPhones Header
iPhone Multitasking

On an iPhone, things work differently. When you switch away from an app, the app enters a suspended state, and iOS automatically frees up CPU cycles and RAM that were devoted to running the app. iPhone’s automatic resource management is so good that you never need to worry about an app paused in the background slowing down the app you are using in the foreground. On our iOS 15.2, we have 237 apps running in the background with no problems.

Officially, Apple says “You should close an app only if it’s unresponsive.”

Re-launching Apps Hurts the System

In fact, when you force an app to close on your iPhone, it will not only slow down your app experience but will also use up more battery life. That’s because, once an app is closed completely, it needs to re-launch and reload all of its resources the next time you open the app. That takes extra CPU power, which uses up your battery faster. Re-launching a completely closed app is also slower than switching quickly to a suspended app.

So, instead of increasing performance and saving battery life, regularly closing apps on iPhone will actually do exactly the opposite.

There is one exception. Sometimes a background app can check for new information. If that app is programmed improperly, it might use more battery life than usual. If an app is abusing its resources in the background, you might see evidence of it in the Battery section of the Settings app. In that case, do not force-close. Instead, you can disable Background App Refresh in Settings. Head to:

Settings > General > Background App Refresh

Here, you can turn it off on an app basis.

When to Close Apps

Despite everything we just wrote, there are still a few legitimate reasons you might need to force-close an iPhone app. If an app stops responding or is not working properly, it’s a good idea to bring up the App Switcher and close the app completely. To do so, you will need to perform a different action depending on the type of iPhone you have:

  • On iPhone X or later: Swipe upward from the bottom of the screen toward the middle of the screen, then lift your finger.
  • On iPhones with Home buttons: Double-press the Home button located below the screen.

When the App Switcher opens, you will see thumbnails of apps that are suspended in the background. To force-close an app, swipe its thumbnail upward, off the screen. See the below image:

Swipe Up Header
Force-close an app by swiping it up

When the app disappears, the app has been completely closed. The next time you tap its icon, it will re-launch itself.

Even though Apple allows you to force-close apps in this manner, doing so should be a very rare occurrence. iOS takes care of multitasking in an efficient way. 

Quote For the Day

It’s better to hang out with people better than you. Pick out associates whose behavior is better than yours and you’ll drift in that direction.

Warren Buffett

That’s it. Please feel free to share this post! One way to share is via Twitter.

Just click the Tweet icon below. This will launch Twitter where you click its icon to post the Tweet.

Check out TechSavvy.Life for blog posts on smartphones, PCs, and Macs! You may email us at contact@techsavvy.life for comments or questions.

I Would Like to Hear From You

Please feel free to leave a comment. I would love to hear from you. Do you have a computer or smart device tech question? I will do my best to answer your inquiry. Just send an email to contact@techsavvy.life. Please mention the device, app, and version you are using. To help us out, you can send screenshots of your data related to your question.

Author’s E-book

You can access the e-book from a Kindle device, the Kindle App for the desktop or smartphone, which is a free app.

The author’s Vietnam eBook on the Battle for Tra Bong Vietnam: Events and Aftermath

How to View Your Most Used Apps on iPhone

A big part of your daily time is spent using your iPhone. Whether you want to understand your app usage, change your lifestyle, or just know which apps you need to cut down on, its helpful to know about your most used apps.

RAYMOND OGLESBY @RaymondOglesby2
August 25, 2021

A big part of your daily time is spent using your iPhone. Whether you want to understand your app usage, change your lifestyle, or just know which apps you need to cut down on, its helpful to know about your most used apps. Let’s explore this feature, called Screen Time.

This is for the iPhone

Dilbert and Story
Copyright Scott Adams, Inc./Distributed by Universal Uclick for UFS

Enable Screen Time

Before you can find out which apps you use the most on your iPhone, you will need to turn on a free feature built into iOS called Screen Time. This feature helps you keep track of how you use your iPhone. It can also help you put limits on your app usage if you would like, although that’s optional.

First, open the Settings app, and then tap the Screen Time option. Refer to below image:

Apps 1
Accessing Screen Time option

Next, tap Turn on Screen Time and tap This is My iPhone or This is My Child’s iPhone. See below image:

Apps 2
Enable Screen Time

Now, you will see a Screen Time summary page with no data, but we will fix that problem. Note! Each time you enable Screen Time, you data is removed.

Check Screen Time Again

The catch with using Screen Time is that it needs to be enabled to start gathering data about which apps you use the most. If you just turned it on, you will not have a most-used app list to look at.

So, now that Screen Time has been enabled, use your iPhone as you normally would. After a while, you can check back in with Screen Time and see some statistics.

Next, open the Settings app and tap Screen Time again. See following image:

Apps 1
Accessing Screen Time option

Now, on the Screen Time summary page, you will see a chart that shows your average daily activity. Just under that chart, tap See All Activity. Refer to below image:

Apps 4
Selecting to See All Activity

Next, choose whether you want to see your most used apps over the period of a day, week, month, or year at the top of the screen. See below image:

Apps 5
Selecting your time period

Now, scroll down to the Most Used section, and you will see a list of apps sorted by which you used the most over the selected time period, with your most used apps listed at the top. Tap an app to see more details. See following image:

Apps 6
Selecting an app to view its details

Add a Limit

Next, while on the detailed-view screen, if you want to set a time limit to prevent you from using the app too much, scroll down and tap Add Limit. Refer to below image:

Apps 7
Selecting Add a Limit to control how much time you spend using the app

Now, you will see a screen where you can set a time limit for the app in hours or minutes. When you’re done, tap Add. See below image:

Apps 8
Setting the time limit

From now on, whenever your time is up, you will see an alert pop up, reminding you not to use the app anymore.

Quote For the Day

True terror is to wake up one morning and discover that your high school class is running the country.

Kurt Vonnegut

That’s it. Please feel free to share this post! One way to share is via Twitter.

Just click the Tweet icon below. This will launch Twitter where you click its icon to post the Tweet.

Check out TechSavvy.Life for blog posts on smartphones, PCs, and Macs! You may email us at contact@techsavvy.life for comments or questions.

I Would Like to Hear From You

Please feel free to leave a comment. I would love hearing from you. Do you have a computer or smart device tech question? I will do my best to answer your inquiry. Just send an email to contact@techsavvy.life. Please mention the device, app and version that you are using. To help us out, you can send screenshots of your data related to your question.

The author’s Vietnam eBook on the Battle for Tra Bong: Events and Aftermath

How to Reinstall Missing or Deleted Canned iPhone Apps

Every iPhone, iPad, and iPod touch comes pre-loaded with a ton of useful apps from Apple, but sometimes those apps can go missing. If that happens, you may wonder where they went, why they disappeared, and how to get them back.

Every iPhone, iPad, and iPod touch comes pre-loaded with a ton of useful apps from Apple, but sometimes those apps can go missing. If that happens, you may wonder where they went, why they disappeared, and how to get them back. Let’s explore how to do this.

This is for the iPhone

Dilbert and Projects
Copyright Scott Adams, Inc./Distributed by Universal Uclick for UFS

The apps that this can happen to include iTunes, FaceTime, Reminders, Stocks, Calendar, Music, Calculator, News, Notes, and many others; in fact 27 apps can be deleted. There are a number of possible reasons why an app has disappeared. It could have been moved or deleted. That’s obvious. Less obvious is that “missing” apps may still be on your device but have been hidden.

Find App Using Spotlight Searcn

First, before you try to reinstall a missing app, make sure that it’s not simply hiding on your device. On your Home screen, swipe downward with one finger near the middle of the screen, and your Spotlight Search bar will appear. Now, type in the name of the app to see whether its icon appears in the results. In our example, we are searching for the Stocks app. Although Stocks appears in the results list, it’s not the right icon. Refer to below image:

Apps 1
Using Spotlight Search

If you see the app in the results, then the app is installed. But where is it? It’s possible that you can not see it on a cluttered screen full of apps, or it might be hidden in a folder somewhere. Also, with iOS 14 and higher, the app could be in your App Library but not present on your Home screen.

Find App Using App Library

To check your App Library, swipe all the way to the left (to the last page) and look for it. In my case, it’s in the Recently Added box because I just added it in creating this blog post. See below image:

Apps 2
Using the App Librtary

Download App From App Store

If you do not see the app you are looking for in the Spotlight Search results or the App Library, then the app is not on your device. Fortunately, every removable iPhone app is available for free download again from the App Store. To get it back, open the App Store app. See following image:

Apps 3
Accessing the App Store

Next, when the App Store opens, type the name of the app you are looking for in the search bar and tap the Search button. Refer to below image:

Apps 4
Searching for the Stocks app

Some third-party apps have similar names to the built-in apps and may show up in the results. To confirm it’s the real app you are looking for, tap on its entry in the results list to see if it’s from Apple. See below image:

Apps 5
Finding the Stocks app

Now, the app you want will be free to download; you will see Apple’s iCloud download icon in the listing instead of a Get or Buy button. If you see an Open button, you already have the app on your device. See following image:

Apps 6
Download the Stocks app from iCloud

Check if App is From Apple

Next, when you are ready to download, just tap the iCloud download button and the app will be downloaded to your device. Once downloaded, you may ccheck if this is the correct app. Open the app and tap the blue link at the bottom labeled, in our example, About Stocks and Privacy… Refer to below image:

Apps 7
Check to see if we have the correct Stocks app

Now, read the verbage for mentioning of Apple. In the below image, a reference is made to Stocks are provided by Apple News:

Apps 8
Verifying the Stocks app is from Apple

Repeat the above process with any other missing Apple apps you want restored. Next, exit out of all open screens.

You are finished restoring a missing or deleted app. Please feel free to share this post! One way to share is via Twitter.

Just click the Tweet icon below. This will launch Twitter where you click its icon to post the Tweet.

Check out TechSavvy.Life for blog posts on smartphones, PCs, and Macs! You may email us at contact@techsavvy.life for comments or questions.

I Would Like to Hear From You

Please feel free to leave a comment. I would love hearing from you. Do you have a computer or smart device tech question? I will do my best to answer your inquiry. Just send an email to contact@techsavvy.life. Please mention the device, app and version that you are using. To help us out, you can send screenshots of your data related to your question.

The author’s Vietnam eBook on the Battle for Tra Bong: Events and Aftermath

Why Auto Logging Out of Apps Should Be Required

This is for iOS, Android, Mac and PC devices

We all have our favorite smart device apps. This would include Facebook, Twitter, Instagram, LinkedIn, Tumblr, Reddit and others. What happens when you turn off your device, power off or shutdown? These apps are still active and readily available when your device is turned back on.

These apps offer you convenient access by keeping you logged in. When you log into a financial institution, say Bank of America or Morgan Stanley, you are logged out within two minutes of no activity.

Our favorite apps should do the same. By staying logged in, the apps are more subjective to hacks by others.

Of course, by logging out, means you have to reenter a UserID, Password and Passcode, if using Two Factor Authentication, to gain access. And that can be a pain but it’s worth it.

If you are selling or disposing a smart device, you should log out all apps. Also, you may consider erasing all data and/or resetting your device. Only do this if you no longer need the device.

I would like the app industry to follow the same logging out protocol as financial entities. What do you think? Please take the one question survey.

I Would Like to Hear from You

Please feel free to leave a comment. I would love hearing from you. Do you have a computer or smart device tech question? I will do my best to answer your inquiry. Please mention the device, app and version that you are using. To help me out, you can send screenshots of your data related to your question.