4 Tips to Speed Up Google Chrome for Better Performance

The article emphasizes the importance of a web browser, specifically Google Chrome, in daily online activities. It provides four methods to enhance its performance: updating Chrome, clearing the cache, upgrading security settings, and managing performance settings like using Memory Saver. These steps aim to ensure a smoother browsing experience.

RAYMOND OGLESBY @RaymondOglesby2
March 11, 2025 – 6 minutes read time

In many ways, your web browser is as important as, if not more so than, your computer’s operating system. Think about it: Nearly everything you do, from writing emails and posting on social media to editing documents and streaming videos, can happen inside a browser. So when Chrome starts feeling sluggish, it can affect your whole online experience, professionally and personally. Do not get bogged down by your browser. Here are four ways to speed it up.

This tip works on devices running Google Chrome. Screenshots are from Windows 11 Pro running Chrome Version 134.0.6998.36 (Official Build) (64-bit).

Each new version of Chrome contains fresh features, security fixes, and performance improvements. So, it’s possible that updating to the latest version may help your speed woes. Even if it does not, it will keep you safer from online threats. When a new version is available, Chrome automatically updates in the background, when you close and re-open the browser.

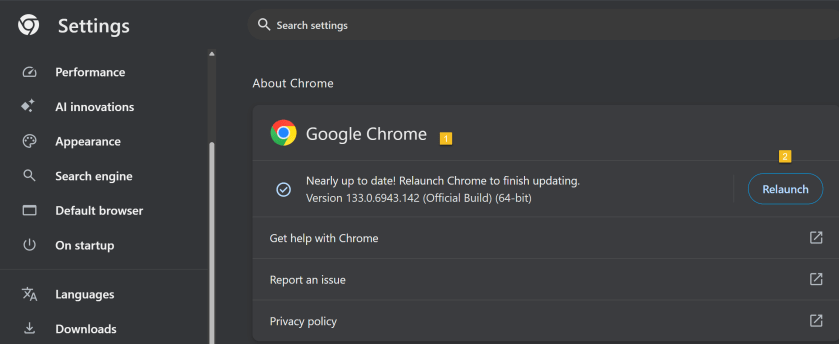
First, open Chrome and click the Menu icon (the 3 dots) in the upper right. From the Menu, click the Settings option. Next, on the left side, scroll down to the bottom and click on the About Chrome option.

If Chrome is not up-to-date, Chrome will automatically download. Now, click the Relaunch button to update Chrome and reopen the browser. Your Chrome browser is now up-to-date. Refer to the below image:

Chrome 1
Updating Google Chrome

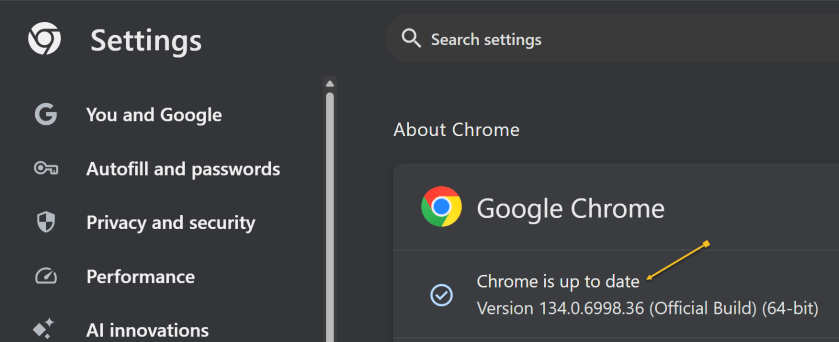
To check which version of Chrome you are running, repeat the above. Chrome will show the version and indicate it is up-to-date. See the below image:

Chrome 2
Google Chrome up to date

To clear your cache in Google Chrome, you clear your browsing data. This will clear your cache, cookies, and other browsing history. 

Clearing your cache can fix problems with loading or formatting on websites.

In the Chrome browser:

  1. Open Chrome and click the Menu icon (the 3 dots) in the upper right.
  2. From the Menu, click the Settings option.
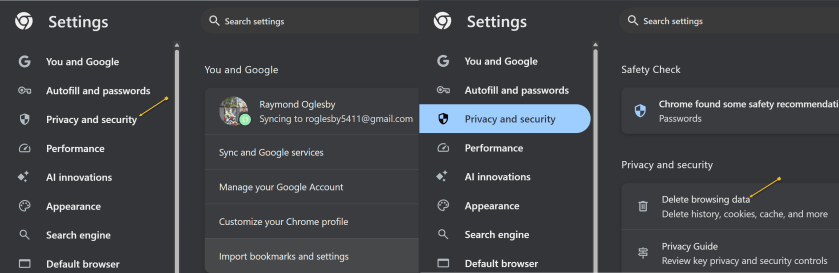
  3. On the left side, click Privacy and security option.
  4. Under the Privacy and security section click the Delete browsing data button. See the following image:
Chrome 3
Accessing Privacy and security options
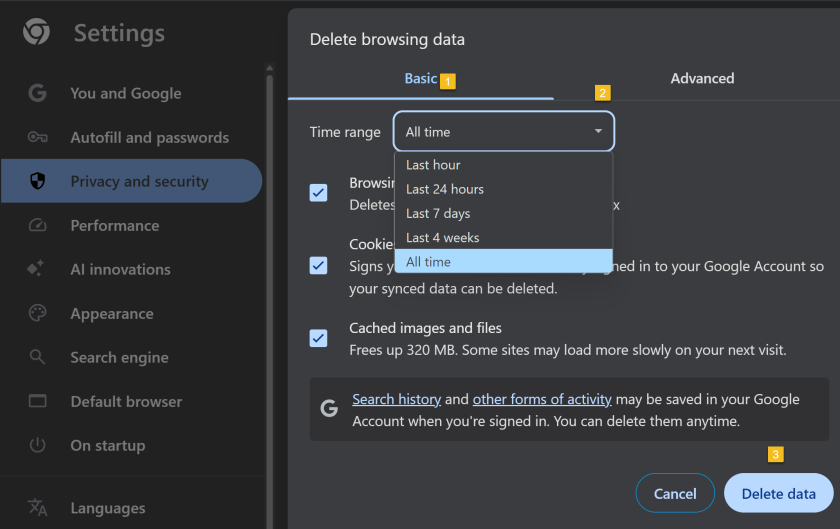
  1. A new dialogue box will open.
  2. Click the Basic menu option.
  3. Select the period to delete from in the Time range drop down menu
    (To clear all cached data and cookies, select All time, this is recommended).
  4. Ensure check boxes for Browsing history. Cookies and other site data and Cached images and files are ticked.
  5. Click on Delete data and wait for that dialogue box to exit. 
  6. Close all open Chrome tabs.
  7. Restart Chrome.

Refer to the below image:

Chrome 5
Selecting what data and when to delete

Once upon a time, Google developed the Chrome Cleanup Tool, an application that helps find and remove unwanted software (UwS), toolbars, and other automatically installed extensions that antivirus probes may miss from Windows devices. These types of programs can slow down your browser, so checking it for unwanted add-ons every so often is a must.

Unfortunately, the program was shut down in 2023. However, Google says users will remain “automatically protected” by its Safe Browsing features in Chrome. For extra protection, navigate to:

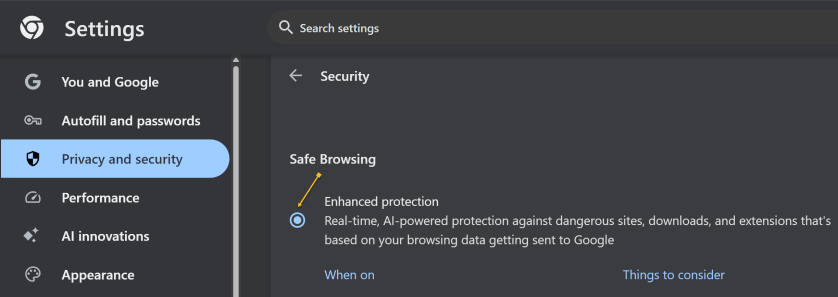
Settings >Privacy and security > Security, > Enhanced Protection

And enable which offers “real-time, AI-powered protection against dangerous sites, downloads, and extensions that’s based on your browsing data getting sent to Google.” See the below image:

Chrome 6
Enable Enhanced protection

There are two types of people in the world: Those who open just a few tabs at a time, then close them, and those who hoard tabs like they have never heard of bookmarking. If you are the latter, it’s a safe bet what’s causing your slowdown, and you should take action. Not sure which tabs to close? Hover over a tab, and the pop-up preview shows how much memory it’s taking up.

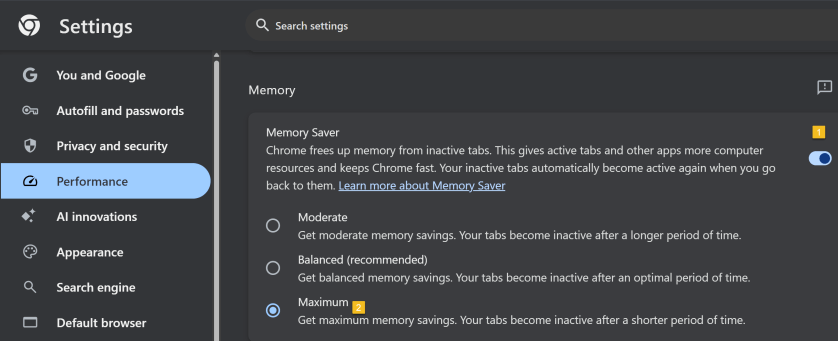
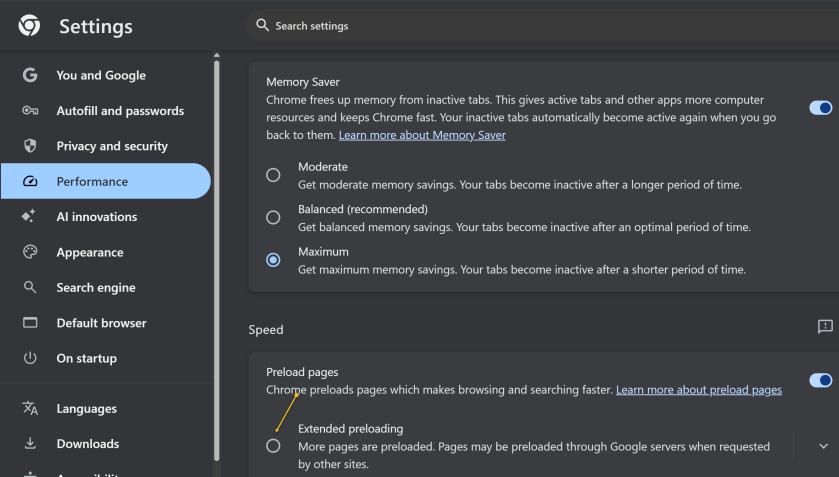
For something more automatic, Google introduced Memory Saver mode in 2022. This feature frees up resources from unused tabs in order to improve performance on tabs that are in use. While this feature should be enabled by default, you can open:

Settings > Performance > Memory Saver

and set to Maximum so tabs become inactive sooner. See the following image:

Chrome 7
Setting Memory Saver to Maximum

While you are here, go one further and scroll down to the Speed section. Make sure Preload pagesis enabled so websites and search results load faster. For an extra boost, enable Extended preloading for an even faster experience, though Google will be able to see what sites are being preloaded for you. Refer to the below image:

Chrome 8
Enable Preload and Extended preloading

Technology is constantly evolving, and smartphone and desktop tech rarely remains static. Therefore, the information in this post is only accurate as of the date it was written. Blog posts that are older than six months may contain instructions that are no longer compatible with your device or operating system. We hope that the content from previous posts continues to function as intended. Thank you for reading TechSavvy.Life, where technology works for you.

“Technology is nothing. What’s important is that you have faith in people, that they’re basically good and smart, and if you give them tools, they’ll do wonderful things with them.”

-Steve Jobs

You are finished. Please feel free to share this post! One way to share is via Twitter.

Just click the Tweet icon below. This will launch Twitter where you click its icon to post the Tweet.

Checkout TechSavvy.Life for blog posts on smartphones, PCs, and Macs! You may email us at contact@techsavvy.life for comments or questions.

We value your feedback! Was this post helpful? Please share your comments with us. If you have a tech question related to your computer or smart device, feel free to reach out. Just send an email to contact@techsavvy.life, and be sure to include the device, app, and version you are using. To assist us further, you can also attach screenshots related to your inquiry.

Author’s eBook

The author’s Vietnam eBook on the “Battle for Tra Bong Vietnam: Events and Aftermath” can be accessed from a Kindle device or the Kindle App for a desktop or smartphone. The apps are free.

The author’s Vietnam eBook on the Battle for Tra Bong Vietnam: Events and Aftermath

How to Download PDFs Instead of Viewing Them Using Chrome

When you click a PDF link in Chrome, the browser opens the PDF in a preview window. If you do not want this, you can change its default behavior.

RAYMOND OGLESBY @RaymondOglesby2
August 19, 2021

When you click a PDF link in Chrome, the browser opens the PDF in a preview window. If you do not want this, you can change its default behavior.

The Chrome browser has a built-in option to change this default setting. You can instruct Chrome to automatically download the PDF file without opening it in a preview window.

Instead, Chrome will prompt you to save your PDFs. Let’s explore how to set this feature in Google Chrome.

This is for devices running Google Chrome

Dilbert and Jesus
Copyright Scott Adams, Inc./Distributed by Universal Uclick for UFS

First, open Google Chrome on your computer. Next, click the Chrome menu (three dots hamburger icon) in the top right-hand corner of your window. Now, select Settings. Refer to below image:

PDF 1
Accessing Settings

Next, in Chrome settings, click Privacy and security in the left sidebar. Click Site Settings on the right. See below image:

PDF 2
Accessing Site Settings

Now, scroll down in Site Settings and click Additional content settings at the very bottom of your screen. See following image:

PDF 3

Accessing additional content

Next, in the expanded menu, select PDF documents on the left. Refer to below image:

PDF 4
Accessing PDF documents

Now, toggle ON the Download PDF files instead of automatically opening them in Chrome option. Refer to below image:

PDF 5
Enable download of PDF documents instead of preview

Chrome will now display the standard save prompt for PDFs.

Quote For the Day

But the fact that some geniuses were laughed at does not imply that all who are laughed at are geniuses. They laughed at Columbus, they laughed at Fulton, they laughed at the Wright Brothers. But they also laughed at Bozo the Clown.

Carl Sagan

You are finished. Please feel free to share this post! One way to share is via Twitter.

Just click the Tweet icon below. This will launch Twitter where you click its icon to post the Tweet.

Check out TechSavvy.Life for blog posts on smartphones, PCs, and Macs! You may email us at contact@techsavvy.life for comments or questions.

I Would Like to Hear From You

Please feel free to leave a comment. I would love hearing from you. Do you have a computer or smart device tech question? I will do my best to answer your inquiry. Just send an email to contact@techsavvy.life. Please mention the device, app and version that you are using. To help us out, you can send screenshots of your data related to your question.

The author’s Vietnam eBook on the Battle for Tra Bong: Events and Aftermath

How to Change Chrome New Tab Background

It’s easy to get bored at Chrome’s single white image background. Can we change this background image when opening a new tab? Yes we can. Chrome allows you to automatically switch the new tab page’s wallpaper every day.

RAYMOND OGLESBY @RaymondOglesby2
August 12, 2021

It’s easy to get bored at Chrome’s single white image background. Can we change this background image when opening a new tab? Yes we can. Chrome allows you to automatically switch the new tab page’s wallpaper every day. Let’s explore how this is done.

This is for devices running Google Chrome

Dilbert and Zoom
Copyright Scott Adams, Inc./Distributed by Universal Uclick for UFS

First, launch the Google Chrome browser on your Windows 10, Mac, Chrome OS, or Linux computer. Next, open a new tab and click the Customize pencil icon in the bottom-right corner of your screen. Refer to below image:

Background 1
Accessing new tab Customize icon

Now, in the pop-up window that appears, make sure that you are in the Background section. See below image:

Background 2
The Background section

Next, on the Background page, you will find a number of preset collections of backdrops, such as “Textures,” “Seascapes,” “Art,” and “Earth.” Google Chrome can automatically apply a new wallpaper from any one of these collections every day on your new tab page.

Let’s say that you want Google Chrome to display a new wallpaper from the “Seascapes” collection on your new tab page.

To do this, first, click the collection’s thumbnail in the grid. See following image:

Background 3
Accessing the Seascapes collection

Now, on the next page, Google Chrome will list all of the collection’s wallpapers. Turn on the Refresh Daily switch in the top-right corner of the pop-up window. Refer to below image:

Background 4
Enabling daily switch

Now, click Done to save your preferences. See below image:

Background 5
Your Done

Next, the new tab page on your Google Chrome browser will show a fresh backdrop from the “Seascapes” collection (or whichever collection you have chosen) every day.

If you like one of the background images, you can see the name of the current background’s creator and its source in the bottom-left corner of the new tab page. See following image:

Background 6
Info about the backdrop

There are plenty of other ways that you can customize Google Chrome, such as edit more elements of the new tab page, or create your own browser theme.

Quote For the Day

Only two things are infinite, the universe and human stupidity, and I’m not sure about the former.

Albert Einstein

I like this little known feature of Chrome. Please feel free to share this post! One way to share is via Twitter.

Just click the Tweet icon below. This will launch Twitter where you click its icon to post the Tweet.

Check out TechSavvy.Life for blog posts on smartphones, PCs, and Macs! You may email us at contact@techsavvy.life for comments or questions.

I Would Like to Hear From You

Please feel free to leave a comment. I would love hearing from you. Do you have a computer or smart device tech question? I will do my best to answer your inquiry. Just send an email to contact@techsavvy.life. Please mention the device, app and version that you are using. To help us out, you can send screenshots of your data related to your question.

The author’s Vietnam eBook on the Battle for Tra Bong: Events and Aftermath

How to Name Chrome Windows for Alt+Tab and Taskbar

If you keep many Google Chrome windows open to organize your tabs like me, you can go one step further and name each window. Chrome’s built-in naming feature makes it easy to remember the windows name in the Taskbar or the overview screen (Alt+Tab).

If you keep many Google Chrome windows open to organize your tabs like me, you can go one step further and name each window. Chrome’s built-in naming feature makes it easy to remember the windows name in the Taskbar or the overview screen (Alt+Tab).

The Windows naming feature was introduced in Chrome 90 and is available for Chrome on Windows 10, Mac, and Linux. It is easy to use and can save you from opening the wrong window.

This is for devices running Chrome 90. Screenshots are from Windows 10

Dilbert and Workplace
Copyright Scott Adams, Inc./Distributed by Universal Uclick for UFS

First, launch Chrome and open a Chrome window. Next, click the three-dot menu (the hamburger) icon in the top-right of the Chrome window. Refer to below image:

Name 1
Accessing the main menu

Now, from the drop-down menu, select More Tools. See below image:

Name 2
Selecting More Tools option

Next, from the expanded options, click Name Window. If you don’t see this, you are not running Chrome 90. To check your Chrome version, go to:

Click the three-dot menu (the hamburger) icon > Help > About Google Chrome

Now, your Google version will be displayed. Google should auto update to the latest version.

See following image for your expanded options:

Name 3
Accessing Name window option

A pop-up text box will appear. Now, enter the name for the window and click OK. Refer to below image:

Name 4
Naming your window

Alternatively, you can right-click the title bar of the Chrome window and select Name Window from the drop-down menu and go through the process of assigning it a name. See below image:

Name 5
Accessing Name window option from title bar

You will now see this name in the Alt+Tab on Windows 10. See following image:

Name 6
Your Alt+Tab named window

Additionally, this name will appear in the Taskbar on Windows 10. Refer to below image:

Name 7
Your Taskbar named window

Quote For the Day

The more you eliminate the inefficient use of information, the better it is for productivity.

Mitch Kapor

You are finished. This is probably a pretty niche feature, but for those of us who like to organize Chrome tabs by separating them out into windows, it’s a handy little trick.

Please feel free to share this post! One way to share is via Twitter.

Just click the Tweet icon below. This will launch Twitter where you click its icon to post the Tweet.

Check out TechSavvy.Life for blog posts on smartphones, PCs, and Macs! You may email us at contact@techsavvy.life for comments or questions.

I Would Like to Hear From You

Please feel free to leave a comment. I would love hearing from you. Do you have a computer or smart device tech question? I will do my best to answer your inquiry. Just send an email to contact@techsavvy.life. Please mention the device, app and version that you are using. To help us out, you can send screenshots of your data related to your question.

The author’s Vietnam eBook on the Battle for Tra Bong: Events and Aftermath

How to Control Text in Google Chrome

If you’re having trouble comfortably reading text that is either too small or too big on a website in Google Chrome, there’s a quick way to change it.

If you’re having trouble comfortably reading text that is either too small or too big on a website in Google Chrome, there’s a quick way to change it. Let’s explore how to do this.

Chrome includes a feature called Zoom that allows you to quickly make text and images bigger or smaller on any website. You can zoom a web page from anywhere between 25% and 500% of its usual size.

When you navigate away from a page, Chrome will remember your zoom level for that website when you come back to it.

This is for devices using Google Chrome

Dilbert and Book
Copyright Scott Adams, Inc./Distributed by Universal Uclick for UFS

Check out TechSavvy.Life for similar blog posts!

First, open Chrome on your devuce,.

Method 1: Using Keyboard Shortcuts

  • Press Ctrl and + (plus) to zoom in
  • Press Ctrl and (minus) to zoom out
  • Press Ctrl and 0 (zero) to return to the default size, normally 100%

Method 2: Using the Mouse

Press and hold the Ctrl key and rotate the scroll wheel on your mouse. Depending on which direction you spin the wheel, the text will become larger or smaller.

Method 3: Using the Menu

Select the Hamburger icon (the one with 3 dots) in the top-right of the Chrome web browser. Refer to below image:

Google Text 1
The Hamburger icon

In the Zoom section, select the + (plus) button to increase the size of text and images. Select the (minus) button to decrease the size of text and images. See below image:

Google Text 2
Selecting a Zoom level

Press the Esc key to hide the menu.

Reset Zoom

One way is to use any of the zoom methods listed above to set the zoom level to 100%.

Another way is to select the magnifying glass icon in the address bar (this will only appear if you are zoomed to a level other than 100%), then select Reset. If you dont see the magnifying glass (normally due to numerous icons), just press and hold the Ctrl key while pressing the + (plus) or (minus) key or mouse scroll. See following image;

Google Text 3
Resetting the Zoom

Set a Custom Default

You can customise the default zoom level used by the Google Chrome browser. This way, text and images will always appear larger or smaller whenever you use the browser. To do so:

Select the Hamburger icon (the one with 3 dots) in the top-right of the Chrome web browser. Refer to below image:

Google Text 1
The Hamburger icon

Select Settings from the menu. See below image;

Google Text 4
Accessing the Settings

In the search box at the top of the Settings page, type “page zoom”. See following image:

Google Text 5
Using the Settings search box

Under the Appearance options, select the drop-down menu for Page zoom and choose a new default zoom level. Refer to below image:

Google Text 6
Selecting a custome Zoom level

That’s it. Now you can make your Chrome browsing easier on your eyes.

I have found TechSavvy.Life blog posts extremely helpful. Check them out for posts on smart phone apps, Macs and PCs!

I Would Like to Hear From You

Please feel free to leave a comment. I would love hearing from you. Do you have a computer or smart device tech question? I will do my best to answer your inquiry. Please mention the device, app and version that you are using. To help us out, you can send screenshots of your data related to your question.

The author’s Vietnam eBook on the Battle for Tra Bong: Events and Aftermath

How to Use Google Chrome Media Controls

Google Chrome is adding a new feature for controlling media within your Chrome browse on a desktop or laptop. Instead of trying to figure out where the video/sound is coming from, you can hear and/or see it in your Chrome browser. The update is rolling out gradually and is for Chrome version 79+. Instead of waiting for the update you can always go to the flags menu (see below) and manually trigger the new media playback controls.

This is for any device that uses Google Chrome.

Check Chrome Version

First, let’s check what version of Chrome you have; just follow these steps:

  • Click on the Menu icon in the upper right corner of the screen, the one with 3 dots
  • Click on Help
  • Click on About Google Chrome

Your Chrome browser version number is displayed like the example below:

Chrome Version
Chrome version screen
  • Close Chrome

Update Chrome

If you have a lower a version than 79, let’s try to update by doing the following:

  • Open Chrome
  • Click on Menu icon in the upper right corner of the screen, the one with the 3 dots
  • Click Update Google Chrome. Note! If you don’t see this button, you’re on the latest version.
  • Close Chrome

Setup Media Control

  • Open Chrome
  • Type in chrome://flags as the URL like the screenshot below:
Chrome URL for Flags
Chrome URL for flags
  • Type in Global Media Controls as your Search, like the example below:
Chrome Media Control Flag
  • Click on the Default drop down box and select Enabled
  • Click the Relaunch button in the lower right of the screen
  • Type in chrome://flags as the URL
  • Type in Global Media Controls as your Search

Your screen should show the Global Media Controls Enabled like the screen below:

Chrome Media Enabled
  • Close Chrome

After a browser restart, a Play button should show up whenever you have media playing.

If you don’t see the option, head to YouTube and play a video. A Play button should show up next to the address bar. Clicking on it will display the media content like title, source of the content, the play/pause and skip buttons.
This feature works for lots of websites to include Spotify, Netflix, Amazon Prime, Dailymotion and Microsoft.

I Would Like to Hear from You

Please feel free to leave a comment. I would love hearing from you. Do you have a computer tech question? I will do my best to answer your inquiry. Please mention the app and version that you are using. To help me out, you can send screenshots of your data related to your question.