RAYMOND OGLESBY @RaymondOglesby2
October 17, 2023
This is for the iPhone with iOS 13 +. Screenshots are from iPhone 14 Pro running iOS 16+
When your phone rings and the Caller ID is blocked, or it’s an unknown caller, it’s pretty frustrating. Especially with repeat unknown calls. If you are ready to stop those annoying spam calls and unmask the Caller ID behind them, these are some of the best methods to reveal unknown numbers.
Quick Definitions
- There are two important distinctions you should know. No Caller ID and Unknown Caller are two different things.
- No Caller ID means that the caller intentionally blocked their ID from you. On the contrary, an Unknown Caller means the Caller ID was not recognized even though it was provided.
- The best way to handle this is to turn on the option to block unknown callers on iOS. It sometimes blocks real callers, but it’s a good balance between being inundated with spam calls all day.
Block Your Outgoing Caller ID
If you are looking to hide your phone number when making outbound calls, you do not need to even fiddle with your phone’s settings.
Simply dial *67 followed by the phone number you are trying to call. When you do this, it tells your carrier not to show any Caller ID for that call.
An example of the phone number string to dial would be *67-555-555-5555.
Block Unwanted Incoming Calls
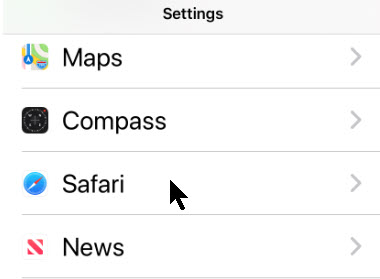
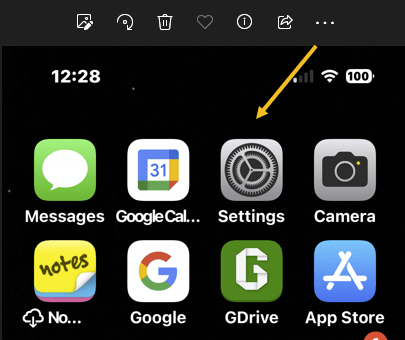
First, open the Settings app on your iPhone. Refer to the below image:
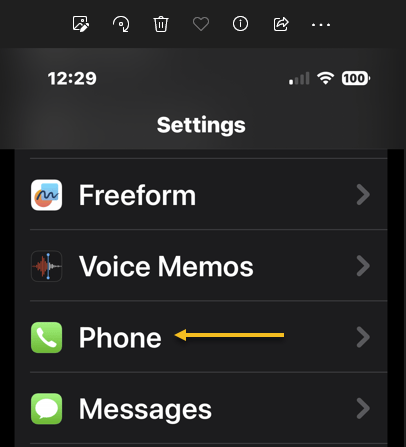
Next, scroll down to the Phone option and tap on it. See the below image:
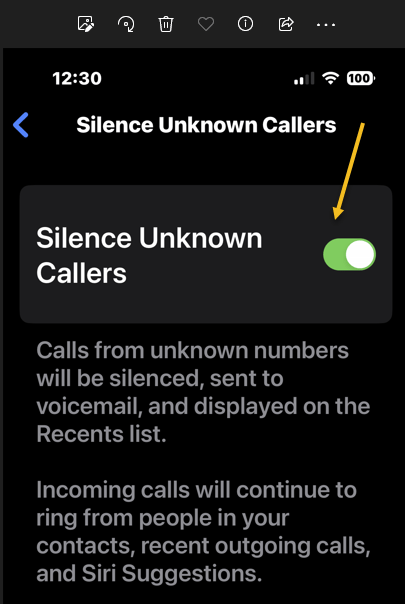
Now, scroll down to the Silence Unknown Callers option. See the following image:

Next, toggle its switch to the ON position. Refer to the below image:
All calls without a Caller ID will be automatically blocked from your phone. Remember, real numbers and callers can also be affected by this, and customer service-based calls frequently are a target. We recommend you check your voicemails and missed calls list.
FAQ
Can you find out a no Caller ID number?
If you receive a call without any Caller ID, the caller has deliberately blocked their phone number from showing up. There’s no way to find out the number if the call was purposely blocked.
What does *57 do on a phone?
The service code *57 activates malicious caller identification. This is an upcharged fee service offered by some phone company providers. *57 should be dialed immediately after receiving a call from a number with no Caller ID. When you do so, it records the metadata of the malicious call to aid law enforcement investigations.
How do you call a number with a blocked ID back?
You can not call back a number that calls you with a hidden ID. If you miss a call from these numbers, you must wait till they call you back. Their hidden Caller ID prevents you from calling back if you do not have their number.
Will my telephone provider reveal an Unknown Caller’s ID to me?
It is against the law for your mobile carrier to reveal information about another user to you. They can only do that if you can prove that you are in danger or feel threatened. If you are going to request details like that from your mobile carrier, you must have enough evidence to back up your claim and most likely a police report.
Disclaimer
Technology is always changing and rarely is there static tech for smartphones and desktops. Thus, the contents of this post are only valid at the time of writing. Blog posts older than six months may have directions incompatible with your device or OS. Hopefully, older post content will continue to work as advertised. Thank you for reading TechSavvy.Life for Technology at Work For You.
Quote For the Day
When I’m old and dying, I plan to look back on my life and say, ‘Wow, that was an adventure,’ not, “Wow, I sure felt safe”.
Tom Preston-Werner
Tweet Info
That’s it. Please feel free to share this post! One way to share is via Twitter.
Just click the Tweet icon below. This will launch Twitter where you click its icon to post the Tweet.
Checkout TechSavvy.Life for blog posts on smartphones, PCs, and Macs! You may email us at contact@techsavvy.life for comments or questions.
Tweet
I Would Like to Hear From You
Please feel free to leave a comment. I would love to hear from you. Do you have a computer or smart device tech question? I will do my best to answer your inquiry. Just send an email to contact@techsavvy.life. Please mention the device, app, and version you are using. To help us out, you can send screenshots of your data related to your question.
Author’s E-Book
You can access the e-book from a Kindle device, the Kindle App for the desktop or smartphone, which is a free app.