Does your iPhone earpiece sound muffled or somewhat weird? The iPhone has a microphone next to the iSight camera for noise cancellation, allowing the user to block out ambient noise and get a more clearer sound in the earpiece. But at times, noise cancellation can be a hit or miss, resulting in muffled or fuzzy sound, making things tough to understand. If you’re facing such an issue, let’s turn off noise cancellation to fix things in a jiffy.
Does your iPhone earpiece sound muffled or somewhat weird? The iPhone has a microphone next to the iSight camera for noise cancellation, allowing the user to block out ambient noise and get a more clearer sound in the earpiece. But at times, noise cancellation can be a hit or miss, resulting in muffled or fuzzy sound, making things tough to understand. If you’re facing such an issue, let’s turn off noise cancellation to fix things in a jiffy.
This is for the iPhone running iOS 14
Copyright Scott Adams, Inc./Distributed by Universal Uclick for UFS
To Tweet about this post, click the Tweet icon below to launch Twitter, then click its Tweet icon to post.
Check out TechSavvy.Life for their blog posts on smartphone apps, PCs. and Macs!
Phone noise cancellation, first introduced in iOS 7, monitors levels of ambient background noise and produces an inverse audio signal to cancel that background noise, so you don’t hear it on a phone call. The technology works best with continuous low-level background noise, and it typically works very well. But sometimes it can produce an eerily quiet phone conversation or unsettling audio sounds, such as small crowd noises or low-level background music.
Also, some people find the noise-cancellation effect physically uncomfortable especially when using a headset. Fortunately, phone noise cancellation is easy to turn off on the iPhone. Let’s explore how to do this.
Disable Noise Cancellation
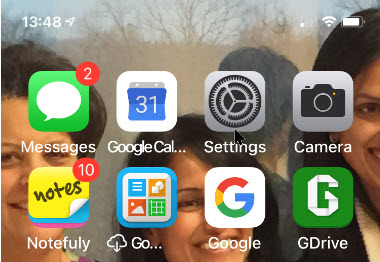
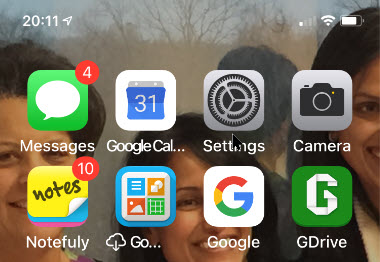
First, open Settings (the gear icon). Refer to below image:
Accessing Settings
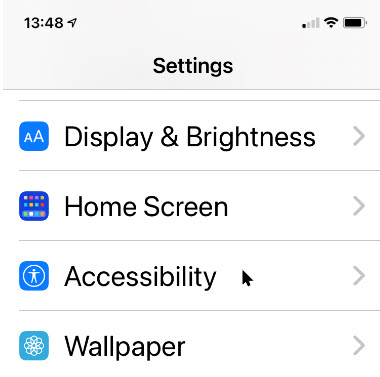
Now, scroll down and launch Accessibility. See below image:
Accessing Accessibility
Next, scroll down to the Hearing section and tap Audio/Visual. See following image:
Accessing Audio/Visual
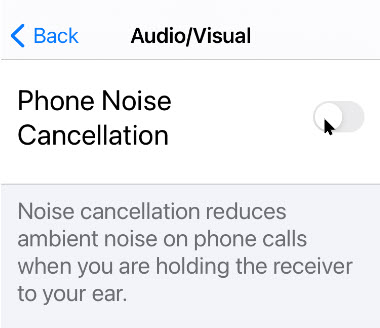
Now, tap the Phone Noise Cancellation toggle to turn it off (the default setting is On). Refer to below image:
Disabling Phone Noise Cancellation
Next, let’s go back one screen to make sure the change registers. You can now exit Settings. The next time you place or receive a phone call, noise cancellation will be disabled.
That’s it. You may enable the feature at any time by following the above steps.
I hope you have found this post helpful. If so, click the Tweet icon below. This will launch Twitter where you click its icon to post the Tweet.
I have found TechSavvy.Life blog posts extremely helpful. Check them out for posts on smart phone apps, Macs and PCs!
Please feel free to leave a comment. I would love hearing from you. Do you have a computer or smart device tech question? I will do my best to answer your inquiry. Please mention the device, app and version that you are using. To help us out, you can send screenshots of your data related to your question.
The author’s Vietnam eBook on the Battle for Tra Bong: Events and Aftermath
f you use a lot of terms, proper names, acronyms, or places, you may want to turn off Auto-Correct that is enabled by default.
If you use a lot of terms, proper names, acronyms, or places, you may want to turn off Auto-Correct that is enabled by default.
When your iPhone or iPad corrects a word automatically, it’s drawing on both a dictionary and a predictive text algorithm that learns from how you type. The dictionary may not include every proper name, acronym, or new term as it appears on the screen, so it can be frustrating when Auto-Correct changes what you know is correct. Also, if you misspell a certain word frequently enough, the predictive text algorithm will learn that typo, and it may begin “fixing” correct instances of a word or term when you do not want it to.
The easiest way to deal with Auto-Correct is to turn it off completely. (Note! IFfyou use an everyday language, it is recommended not to disable this feature to avoid typos). If you need to turn it off, here’s how to disable Auto-Correct.
This is for the iPhone or iPad running iOS 14
Copyright Scott Adams, Inc./Distributed by Universal Uclick for UFS
To Tweet about this post, click the Tweet icon below to launch Twitter, then click its Tweet icon to post.
Check out TechSavvy.Life for their blog posts on smartphone apps, PCs. and Macs!
Please feel free to leave a comment. I would love hearing from you. Do you have a computer or smart device tech question? I will do my best to answer your inquiry. Please mention the device, app and version that you are using. To help us out, you can send screenshots of your data related to your question.
The author’s Vietnam eBook on the Battle for Tra Bong: Events and Aftermath
In addition to the App Library feature, another prominent change in iOS 14, is the addition of Widgets that can be added to any page.
In addition to the App Library feature, another prominent change in iOS 14, is the addition of Widgets that can be added to any page.
We have had Widgets on the Today View (the screen to the left of your first Home Screen) for years, but not a lot of people use that screen. And what’s the point of glanceable info if you have to swipe around to see it?
With iOS 14, Apple is replacing the old Widgets with all new ones that are more dynamic, can pull in more information, come in three sizes, and most importantly, can be placed anywhere on the Home Screen. Let’s explore how this is done.
This is for the iPhone running iOS 14
Copyright Scott Adams, Inc./Distributed by Universal Uclick for UFS
To Tweet about this post, click the Tweet icon below to launch Twitter, then click its Tweet icon to post.
Check out TechSavvy.Life for their blog posts on smartphone apps, PCs. and Macs!
Touch and hold an empty area on your screen until your apps jiggle and show minus (-) symbols. or tap Edit Home Screen. Refer to below image:
The Jiggle screen
Tap the plus /+) sign in the upper-left corner. See below image:
Selecting to add a Widget
You will bring up a menu of existing Widgets. See following image:
Existing Widgets to chose from
Tap on the Widget you want to add, or use the search bar to find one. Swipe left and right to choose the Widget’s size and shape.
Widgets can come in three sizes. Small Widgets are the same size as a 2 by 2 block of app icons. Medium Widgets are two icons high, but four icons wide (taking up the entire width of your Home Screen). Large Widgets are four icons wide and four icons tall.
Tap Add Widget. Refer to below image:
Adding a Widget
Once you have added the Widget, tap anywhere on the Home Screen to go out of edit (jiggle) mode.
Note! The first time you tap the new Widget, you may be asked to adjust its features (for example, to tell a weather Widget in what you want it to report).
You can even place multiple copies of the same Widget!
Move or Delete a Widget
To move the Widget around the screen or to another screen, just long-press it until it starts to shake and then move it where you want it.
If you want to get rid of the Widget, long-press to bring up a remove option or tap the little (-) button in the upper left corner of the Widget. See below image:
Remove a Widget
Create a Widget Stack
You can create a stack of Widgets if you want to save space or if there’s one Widget you will only want to use occasionally.
To create a stack:
Select a Widget for your Home Screen as described above and place it where you want it. Select the next Widget you want to stack (you can stack as many as 10) and save it to your Home Screen. See following image:
Selecting Widgets to create a stack
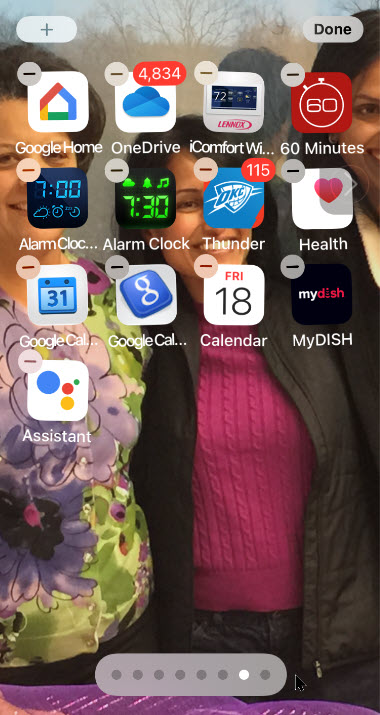
Long press the Widget so that you can move it around the screen, and place it on top of the first. Note that the Widget must be the same size and shape; you can not, say, place a small Widget on a medium-sized one. Refer to below image:
Creating the stack
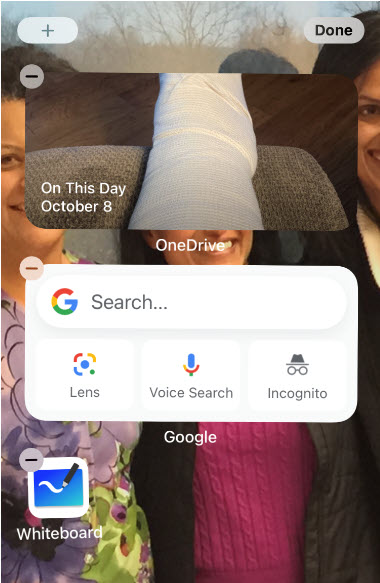
To see each Widget in your stack, swipe up or down on the top Widget and the next one will be revealed. In my example, I have stacked OneDrive on top of Google Search.
Tap Done when finished. See below image:
The finished stack consisting of OneDrive and Google Drive
Move or Delete a Widget Stack
If you want to change the position of or remove any of the apps in the stack:
Long press the stack and select Edit Stack. See following image:
Edit a stack
Press the three lines to the side of each app to change its position in the stack. Refer to below image:
Change an app position in the stack
In my example, I have stacked Google Drive on top, previously it was OneDrive. See below image :
Positioned Google Drive to be on top of OneDrive
To remove a Widget, swipe it to the left and tap Delete.
The Smart Rotateoption, if On, will automatically rotate the Widget you use the most to the top. If Off, the Widgets are fixed.
Use the Smart Stack
Apple has also created a feature it calls a Smart Stack, which will automatically choose which Widget should be on top depending on your location, what time it is, or what you most often look at. It takes into account your usual app use, the time of day, and your location, and does all of this locally on your iPhone so no data is sent to Apple or anyone else.
iOS 14 comes with a pre-built Smart Stack made up of a group of selected apps. You add that stack the same way you would add any widget:
Long press on your Home Screen and tap the plus (+) icon in the upper-left corner.
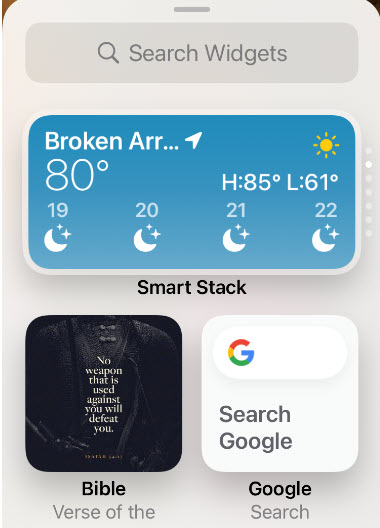
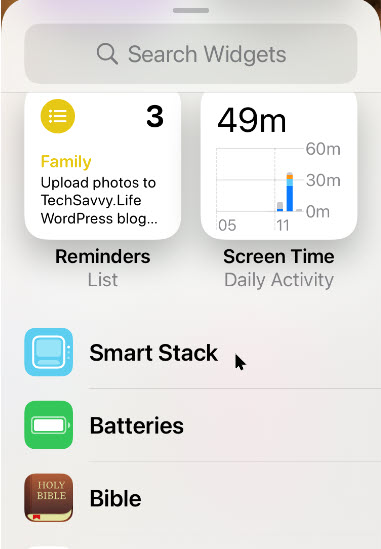
Scroll down until you see the Widget called Smart Stack. See following image:
The Smart Stack option
As with the other Widgets, scroll sideways to choose the size you want, and then tap Add Widget.
Note! There is no way to determine at a glance if apps are stacked. You have to swipe or chose Edit Stack.
Create a Smart Stack
You can make your own Smart Stack by simply dragging Widgets on top of each other.
Just place Widgets how you normally would. Drag any two Widgets of the same size on top of each other, and you have got a new stack! It works just like making a folder with app icons.
Move or DeleteSmart Stack
You can edit your stack the same way you do the Smart Stack. Turn Smart Rotate on or off, reorder the Widgets or remove the ones you no longer want.
Just long-press any stack you have created and select Edit Stack.
That’s it for the basics. There is much more on Widgets to explore, like third-party and the most popular ones.
I hope you have found this post helpful. If so, click the Tweet icon below. This will launch Twitter where you click its icon to post the Tweet.
I have found TechSavvy.Life blog posts extremely helpful. Check them out for posts on smart phone apps, Macs and PCs!
Please feel free to leave a comment. I would love hearing from you. Do you have a computer or smart device tech question? I will do my best to answer your inquiry. Please mention the device, app and version that you are using. To help us out, you can send screenshots of your data related to your question.
The author’s Vietnam eBook on the Battle for Tra Bong: Events and Aftermath
iPhones with iOS 14 or later, now support Picture -In-Picture (PIP) mode like their cousin, the iPad. By default, when you switch from playing a full-screen video in a supported media app, it will continue playing in the corner of the screen. If you find this annoying, like me, you can easily turn it off.
iPhones with iOS 14 or later, now support Picture -In-Picture (PIP) mode like their cousin, the iPad. By default, when you switch from playing a full-screen video in a supported media app, it will continue playing in the corner of the screen. If you find this annoying, like me, you can easily turn it off. Here’s how to do this.
This is for the iPhone running iOS 14
Copyright Scott Adams, Inc./Distributed by Universal Uclick for UFS
To Tweet about this post, click the Tweet icon below to launch Twitter, then click its Tweet icon to post.
Check out TechSavvy.Life for their blog posts on smartphone apps, PCs. and Macs!
First, launch Settings (the gear icon). Refer to below image:
Accessing Settings
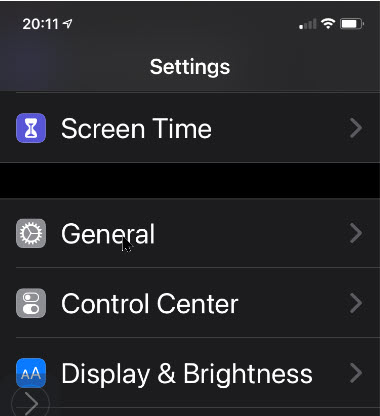
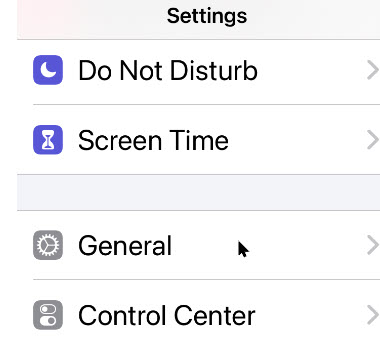
Now, scroll down and tap on the General option. See below image:
Accessing the General option
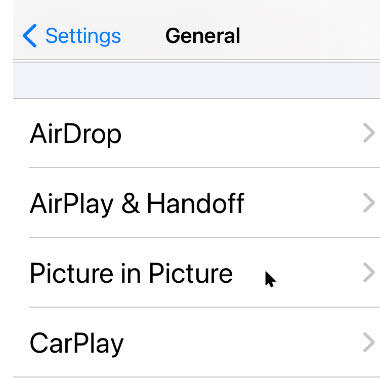
Next, tap on the Picture in Picture option. See following image:
Accessing the PIP option
Tap on it to open the Picture in Picture settings. Now, toggle off (disable) the Start PIP Automatically option. Refer to below image:
Disabling the PIP option
Now, the next time you return to the Home Screen while playing a video, the Picture-in-Picture will not pop-up automatically. To manually open Picture-in–Picture, just tap the Picture-in-Picture button (if the app you are using supports it.)
That’s it. You just disabled a possible annoying feature of iOS 14.
I hope you have found this post helpful. If so, click the Tweet icon below. This will launch Twitter where you click its icon to post the Tweet.
I have found TechSavvy.Life blog posts extremely helpful. Check them out for posts on smart phone apps, Macs and PCs!>
Please feel free to leave a comment. I would love hearing from you. Do you have a computer or smart device tech question? I will do my best to answer your inquiry. Please mention the device, app and version that you are using. To help us out, you can send screenshots of your data related to your question.
The author’s Vietnam eBook on the Battle for Tra Bong: Events and Aftermath
One of the new features that has arrived with iOS 14 that didn’t make a big splash but will be super useful for all users is something called Back Tap. The new iPhone feature lets you customize Double and Triple taps on the back of your iPhone to use for Shortcuts automations, Accessibility features, and iOS system actions.
One of the new features that has arrived with iOS 14 that did not make a big splash but will be super useful for all users is something called Back Tap. The new iPhone feature lets you customize Double and Triple taps on the back of your iPhone to use for Shortcuts automations, Accessibility features, and iOS system actions.
Possibilities for iPhone Back Tap custom controls are pretty much only limited by your imagination since the feature works with Shortcuts app automations. But if you want to keep things simpler, you can assign a Double or Triple tap on the back of your iPhone to do things like open Control Center, take a screenshot, or enable Accessibility features like AssistiveTouch, VoiceOver, Zoom, etc.
How Does It Work
Back Tap uses the accelerometer in the iPhone 8 or higher to detect taps on the back side of your device running iOS 14. You assign the actions you want to launch upon tapping.
Back Tap works from the Home Screen, within apps (including third-party), and even from your your lock screen.
Let’s explore how to launch the built-in iOS 14 actions upon tapping.
First, open Settings (the gear icon). Refer to below image:
Accessing Settings
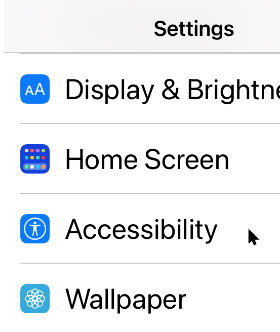
Now, scroll down and tap the Accessibility option. See below image:
Accessing Accessibility
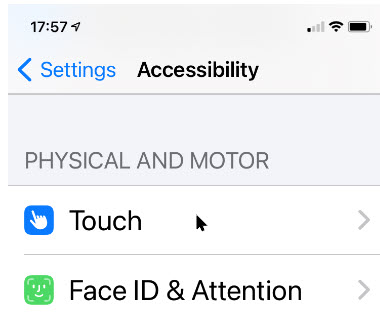
Under Accessibility option, scroll down and tap the Touch option. See following image:
Accessing Touch
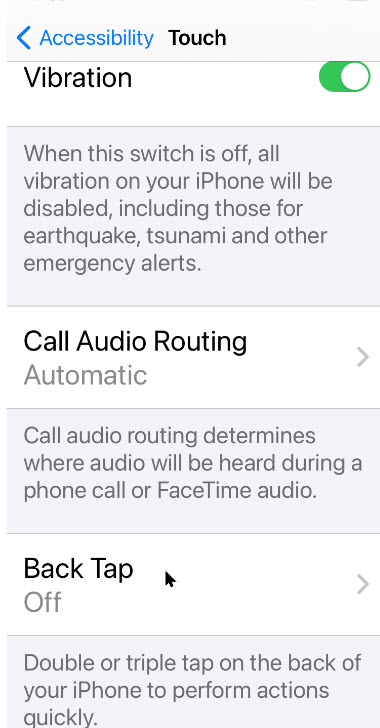
On the Touch Settings screen, scroll down until you see the Back Tap option, now tap it. Refer to below image:
Accessing Back Tap
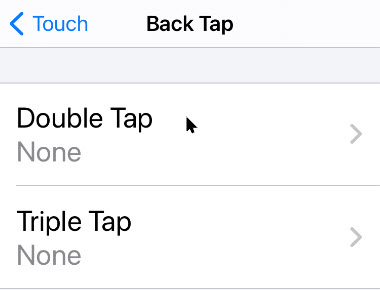
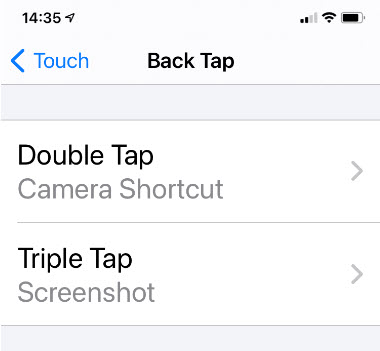
Next, in Back Tap settings, you can set the an action to either Double Tap or TripleTap on back of the iPhone. See below image:
Selecting your Back Tap option
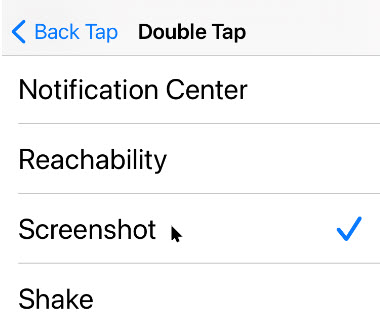
Chose one of the list of available actions. At the bottom you will find the System actions. See following image for my example in selecting Screenshot for a Triple Tap.
Selecting your Back Tap action
Scroll to the bottom to see your shortcuts. If you don’t see any or you want to create one, follow along. Here is how you can build a Camera Shortcut, then attach it to the Back Tap iOS 14 accessibility gesture.
Create a Shortcut
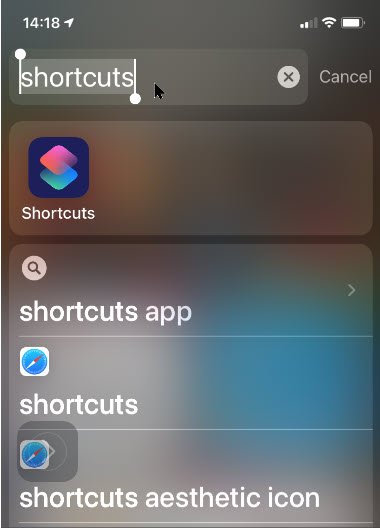
Open Shortcuts on your iPhone by swiping past your first Home Screen, then enter Shortcuts in the Search Box and tap the app. Refer to below image:
Entering Shortcuts search
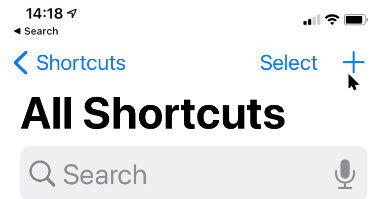
Tap the plus (+) button in the upper-right corner. See below image:
Selecting the Add icon
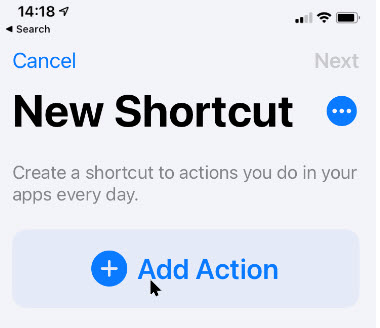
Tap Add Action. Refer to below image:
Selecting the Add Action option
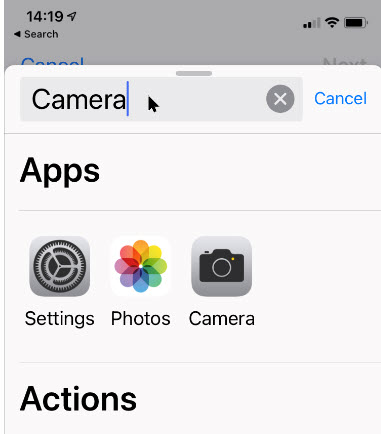
Tap the Search Bar. Now ttype in Camera and tap the app. See below image:
Entering the Camera search
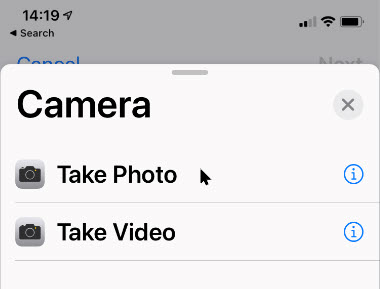
Tap your selection, Take Photo Or Take Video. See following image:
Selecting your Camera option
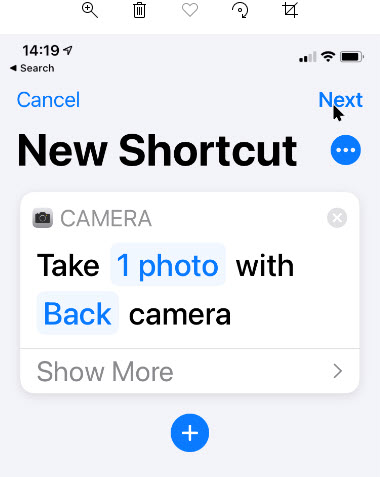
Tap Next in upper right-hand corner. Refer to below image:
Accessing the Next link
Enter a shortcut name, like Camera Shortcut and tap Done in upper right-hand corner. See below image:
Entering a Shortcut name
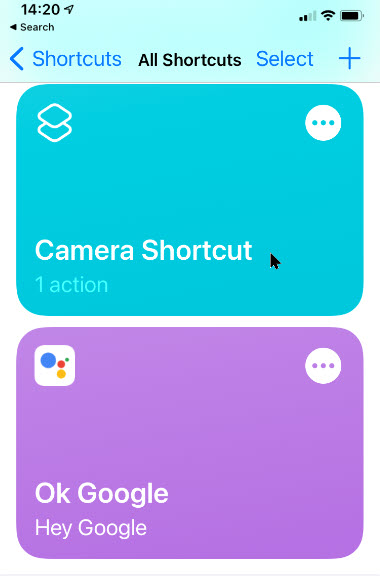
Your Shortcut(s) will be displayed. See following image;
Viewing your Shortcuts
Now exit Shortcuts. You’have now successfully created your Camera shortcut. Just follow the above steps and chose this as an action to be associated with Double or Triple Back Tap. Refer to below image for my example of assigning Camera Shortcut to Double Tap and Screenshot to Triple Tap:
Displaying your Back Tap actions
That’s it. In writing this blog post, I have found the Double Tap to be too sensitive; the associated action goes off accidentally.
I hope you have found this post helpful. If so, click the Tweet icon below. This will launch Twitter where you click its icon to post the Tweet.
I have found TechSavvy.Life blog posts extremely helpful. Check them out for posts on smart phone apps, Macs and PCs!
Please feel free to leave a comment. I would love hearing from you. Do you have a computer or smart device tech question? I will do my best to answer your inquiry. Please mention the device, app and version that you are using. To help us out, you can send screenshots of your data related to your question.
The author’s Vietnam eBook on the Battle for Tra Bong: Events and Aftermath
So as to not clutter up your Home Screen, newly-downloaded apps from the App Store can be sent directly to the App Library. But what if you later want to open the app without digging through the library?
Ina previous post, we discussed how to move an app from your Home Screen to your App Library. In this post, we are learning the opposite; moving an app from your App Library to your Home Screen in iOS 14.
So as to not clutter up your Home Screen, newly-downloaded apps from the App Store can be sent directly to the App Library. But what if you later want to open the app without digging through the library?
In regards to moving an app, we are not deleting an app. Your app remains in the App Library. Apple should have used the terminalogy of “copying” an app instead of “moving” one. Anyway, lets explore how to move an app from the App Library to your Home Screen.
This is for the iPhone running iOS 14
Copyright Scott Adams, Inc./Distributed by Universal Uclick for UFS
Check out TechSavvy.Life for their blog posts on smartphone apps, PCs. and Macs!
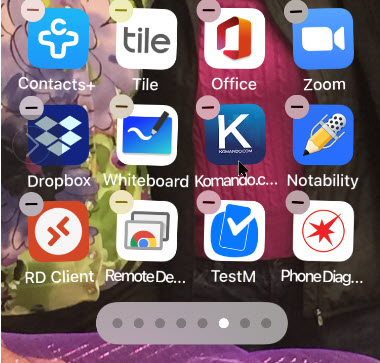
First, swipe over to the right-most Home Screen page, or press on the Dots Bar at bottom of screen and swipe; to view your App Library. Next, locate an app that you would like to move that isn’t already on your Home Screen. Press and hold down on the app. In my example, I am wanting to move the Kim Komando app under the Entertainment grouping. Refer to below image:
Locating an app to move
Next, tap the Add to Home Screen option from the pop-up context menu.Note! the app has moved to a different position because Apple automatically organizes the apps based on usage. See below image:
Selecting Add to Home Screen option
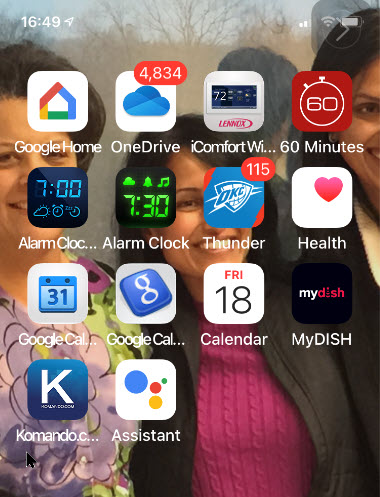
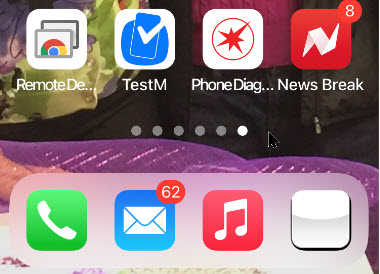
The application will be moved and placed on your Home Screen automatically in the first unused icon area which may not be your first screen. In my example, the app is moved to my eighth page because my preceeding seven pages are full. See following image:
The app added to Home Screen
Heading back to the App Library, notice that the Kim Komando app is still in the App Library under the Enertainment grouping. Refer to below image:
The app is still in your App Library
If an app is already on one of your Home Screens(s) (visible or hidden), the Add to Home Screen option won’t appear in the pop-up context menu. Instead, you’ll have to enter Jiggle mode.
Enter Jiggle Mode
Locate an app (not a folder) in your iPhone’s App Library that’s already on your Home Screen. Press and hold on the app’s icon. After a second, a pop-up context menu will appear. Continue holding down on the app until it appears on your Home Screen.
You will activate Jiggle mode (where your apps and folders will bounce around on your screen). See below image:
Entering Jiggle mode
Placing Your App
Hold down on your app and place it wherever you like on your iPhone. Tap the Done button in the top-right corner when you are finished moving the app. In my example, I am moving the Kim Komado app to the sixth screen. (Note! In between screengrabs, I deleted a page.) See following image:
Placing your app
Use the Search Bar
If you can not find a specific app in one of the App Library’s automatically-generated groupings, you can tap on the Search Bar at the top to locate the application. Just type in a few characters of the app name. Refer to below image:
Using the Search Bar to find your app
Use the Alphabet List
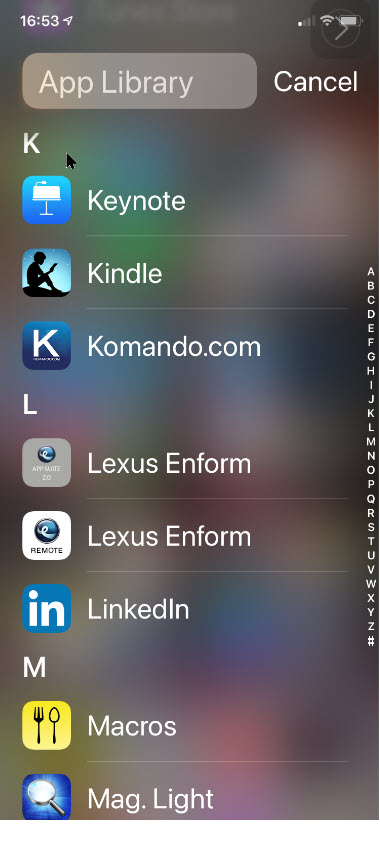
You may use the alphabetical list to find an app. Next, press and hold the listing until it is highlighted. The block will look like it is hovering above the rest of the menu when properly selected. See following image for my selection of “K”.
Using the alphabetical list to locate your app
In my example, when I release the hold, I can see the Kim Komando app. Refer to below image:
Viewing the found app
Enter Home Screen
Now, press and hold the app to move it to the left or right. You will be immediately shifted to your Home Screen with Jiggle mode enabled. See below image:
App being added to your Home Screen
Tap the Done button in the top-right corner when you are finished moving the app. See See following image for my placement of the Kim Komando from App Linrary to Home Screen by swiping left:
That was a lot of swipes and knowing when and where to swipe. I find iOS 14 cumbersome to use; it’s like Apple created the App Library feature as an afterthought. Have you found the App Library useful?
I have found TechSavvy.Life blog posts extremely helpful. Check them out for posts on smart phone apps, Macs and PCs!
Please feel free to leave a comment. I would love hearing from you. Do you have a computer or smart device tech question? I will do my best to answer your inquiry. Please mention the device, app and version that you are using. To help us out, you can send screenshots of your data related to your question.
The author’s Vietnam eBook on the Battle for Tra Bong: Events and Aftermath
Apple added an App Library to the iPhone with the release of iOS 14. To view the App Library page, swipe all the way to the left, or press on the Dots Bar at bottom of screen and swipe; it will be your last page. To exit the App Library, swipe up. Ready to remove an app from your Home Screen to reduce your screen clutter?
In a previous post, we discussed how to move an app from your App Library to your Home Screen. In this post, we are learning the opposite; moving an app from your Home Screen to your App Library in iOS 14.
Apple added an App Library to the iPhone with the release of iOS 14. To view the App Library page, swipe all the way to the left, or press on the Dots Bar at bottom of screen and swipe; it will be your last page. To exit the App Library, swipe up. Ready to remove an app from your Home Screen to reduce your screen clutter? Lets explore how this is done
This is for the iPhone running iOS 14
Copyright Scott Adams, Inc./Distributed by Universal Uclick for UFS
Check out TechSavvy.Life for their blog posts on smartphone apps, PCs. and Macs!
First, locate an app on your Home Screen you would like to move. Press and hold down the app. In my example, I am wanting to move the Kim Komando app. Refer to below image:
Viewing the Kim Komando app on the Home Screen
Next, tap the Remove App option from the pop-up context menu. See below image:
The pop-up menu for the Kim Komando app
Your iPhone will display a message asking if you want to move the selected app to the App Library or delete it. Just select the Move to App Library. See following image:
The message notification for the Kim Komando app
Use Alphabetical List
The app will now disappear from your Home Screen. Now, swipe over to the right-most Home Screen page, or press on the Dots Bar at bottom of screen and swipe; to view your App Library. You can find the app that you moved in one of the automatically-generated groupings, or by tapping on the App Library Search bar, or by tapping on a letter in the alphabetical list of installed apps. Refer to below image for searching by the alphabetical list:
Accessing the alphabetical list
Use Search Bar
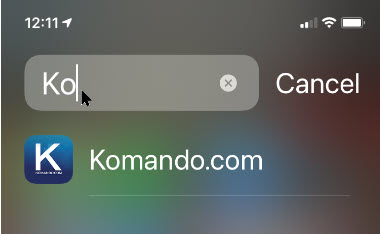
You may start typing into the App Library SearchBar the first couple of letters of the app’s name to find it. See below image in locating the Kim Komandoapp:
Typing in a few characters to locate the Kim Komando app
Launch the App
Once you have found the app, just tap it to launch the app. See following image for my Kim Komando app in the Suggestions library:
The App Library showing the Kim Komando app
For now, Apple doesn’t allow you to create your own groups or to decide which app should go in which group. Hopefully, Apple will improve the feature over the coming months.
Please feel free to leave a comment. I would love hearing from you. Do you have a computer or smart device tech question? I will do my best to answer your inquiry. Please mention the device, app and version that you are using. To help us out, you can send screenshots of your data related to your question.
The author’s Vietnam eBook on the Battle for Tra Bong: Events and Aftermath
When you download an app it usually appears either on your Home Screen or a subsequent screen of apps. In iOS 14, you can have it moved straight to the App Library and the relevant app category, instead of it appearing on the Home Screen or another screen of apps. By doing so, you can reduce the Home Screen clutter
When you download an app it usually appears either on your Home Screen or a subsequent screen of apps. In iOS 14, you can have it moved straight to the App Library and the relevant app category, instead of it appearing on the Home Screen or another screen of apps. By doing so, you can reduce the Home Screen clutter. Let’s explore how this is done.
This is for the iPhone running iOS 14
Copyright Scott Adams, Inc./Distributed by Universal Uclick for UFS
Check out TechSavvy.Life for their blog posts on smartphone apps, PCs. and Macs!
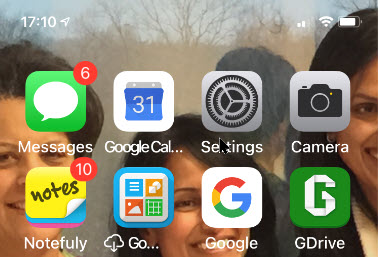
First, open the Settings app (the gear icon). Refer to below image:
Accessing Settings
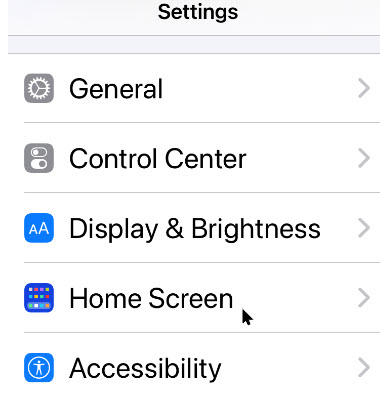
Now, scroll down to the Home Screen section and tap it, See below image:
Acc essing the Home Screen section
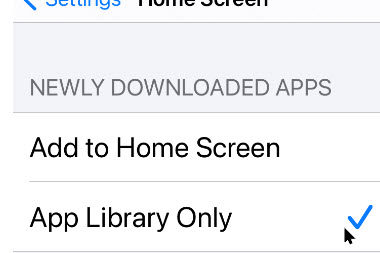
Next, under the New App Downloads heading, select the App Library Only option. See following image:
Enabling sending new apps to the App Library
If you want to see notification badges (like number of unread Tweets) for apps in the App Library, tap the toggle next to the Show In App Library option. Refer to below image:
Enabling new apps notifications
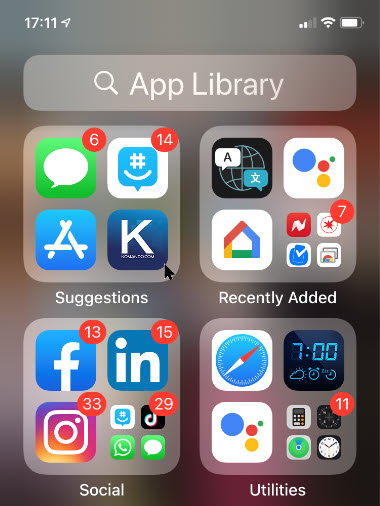
That it’s . When you download new apps, they will show up in the App Library instead of on your Home Screen. See below image fpr an App Library page:
The App Libtary page (trhe last page of your Home Screen)
I have found TechSavvy.Life blog posts extremely helpful. Check them out for posts on smart phone apps, Macs and PCs!
Please feel free to leave a comment. I would love hearing from you. Do you have a computer or smart device tech question? I will do my best to answer your inquiry. Please mention the device, app and version that you are using. To help us out, you can send screenshots of your data related to your question.
The author’s Vietnam eBook on the Battle for Tra Bong: Events and Aftermath
With iOS 14, there are new ways to find and organize the apps on your iPhone — so you see what you want, where you want. It is called the App Library, the main feature of iOS 14.
With iOS 14, there are new ways to find and organize the apps on your iPhone — so you see what you want, where you want. It is called the App Library, the main feature of iOS 14.
The App Library is added and configured automatically once you install iOS 14.
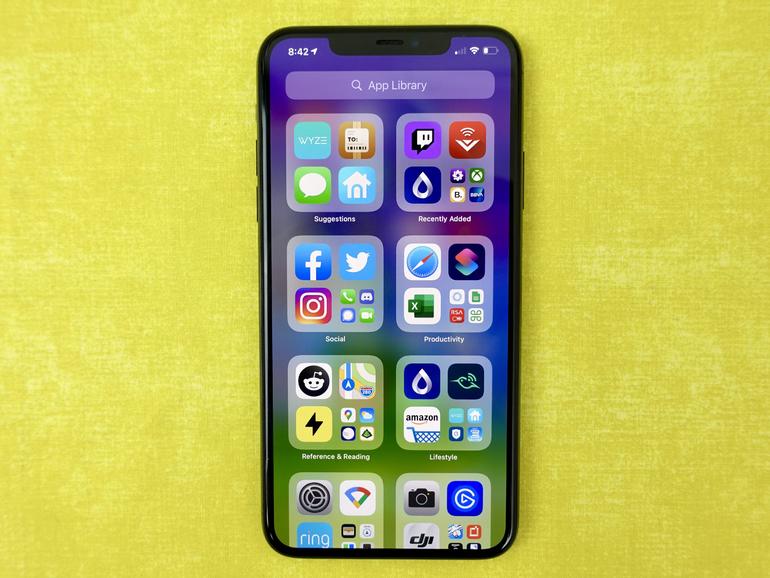
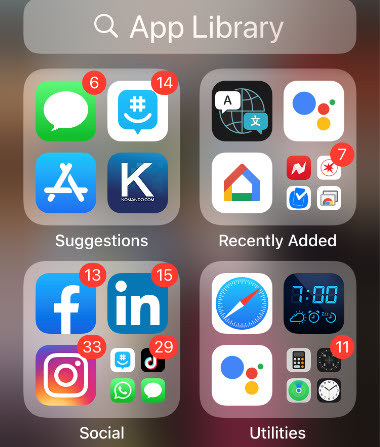
To view the App Library page, swipe all the way to the left, or press on the Dots Bar at bottom of screen and swipe; it will be your last page. Refer to below image:
The App Library page
Your apps are automatically sorted into categories. For example, you might see your social media apps under a Social category. The apps that you use most frequently will automatically reorder based on your usage.
Now that all apps are available in the App Library, it brings up the question. Why should you keep all those pages on the Home Screen as well? Let’s explore how to remove pages from your Home Screen.
This is for the iPhone and iPad running iOS 14
Copyright Scott Adams, Inc./Distributed by Universal Uclick for UFS
Check out TechSavvy.Life for their blog posts on smartphone apps, PCs. and Macs!
If you’re like us, you probably have a couple of pages filled with apps that you almost never visit. You might want to remove some or all the pages between your first page and the App Library page.
First, go to a page you seldom visit or any page. In my example, I am on the last page of my Home Screen. See below image:
A seldom used page
Editing a Page
Now, tap and hold on an empty part of your iPhone’s Home Screen to enter editing mode. See following image:
Entering edit mode
Next, tap the Page Dots found above the dock at the bottom of the device’s display. In my example, I have 7 dots representing 7 pages.
This will bring up a new User Interface (UI) that lists all of the pages in a grid. Tap the checkmark below a page to remove it. You can do this for as many pages as you want (except for the first page).
You can come back here at any time to re-enable a page. Once you’re done editing, tap the Done button in the upper right-hand corner. In my example, I have checkmarked my last page. Refer to below image:
Selecting a page to be removed from Home Screen
Viewing Your Changes
Once you go back to the Home Screen, you will see that the page dots at the bottom of the screen have reduced in number. Depending on how many pages you have removed; allows faster access to the App Library page. The apps are not being deleted, just removed from a page. Notice I now have 6 dots or 6 pages. See below image:
Viewing your removal of page(s)
Once you are on the App Library page, swipe up to return to your Home Screen..
Now you have a cleaner look and fewer swipes for navigation of your pages.
I have found TechSavvy.Life blog posts extremely helpful. Check them out for posts on smart phone apps, Macs and PCs!
Please feel free to leave a comment. I would love hearing from you. Do you have a computer or smart device tech question? I will do my best to answer your inquiry. Please mention the device, app and version that you are using. To help us out, you can send screenshots of your data related to your question.
The author’s Vietnam eBook on the Battle for Tra Bong: Events and Aftermath