Using Facebook Messenger’s “Secret Conversations” feature, you can ensure your messages and calls are end-to-end encrypted so that only the sender and the receiver can access them.
Using Facebook Messenger’s “Secret Conversations” feature, you can ensure your messages and calls are end-to-end encrypted so that only the sender and the receiver can access them. Let’s explore how to utilize this feature on your iPhone and Android phone.
Note:Facebook Messenger’s “Secret Conversations” feature is only available on iPhone and Android. You can not use it in Messenger on the web.
This is for iPhone and Android. screenshots are from iPhone XR running iOS 16+
Copyright Scott Adams, Inc./Distributed by Universal Uclick for UFS
How Does the Secret Conversations Feature Work
When you enable the “Secret Conversations” feature with a user, Messenger encrypts your messages and calls as soon as you send them. Then, these contents are only decrypted on the receiver’s phone. This ensures no one can access your chat content, not even Meta without physical access.
That encryption is the difference between a regular chat and a secret one. If any bad actors gain access to Meta’s servers, they can not see your encrypted messages. Any of your regular chats might be visible, as they remain unencrypted on Meta’s servers.
However, Meta restricts who you can have secret chats with. At the time of writing in September 2022, you can not start such a chat with businesses, professional accounts, Instagram accounts from Messenger, and people you have not messaged before. Also, both you and your chatting partner need to be using the latest version of the app, so make sure you both update Messenger on your respective devices.
Additionally, certain features you might be used to will not work while in one of these chats. Meta states that group messages and money payments are not supported in secret conversations. If those limitations create problems for you, look into alternative secure communication methods that might offer the features you need.
Start a Secret Chat
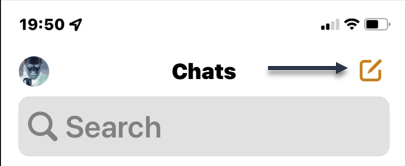
First, launch the Messenger app on your phone. In the Messenger app’s top-right corner, tap the Edit icon. Refer to the below image:
Accessing Edit mode
Next, in the New Message screen, at the top-right-hand corner, enable the “Secret Conversations” (the lock icon) option. See the below image:
Selecting the Lock icon
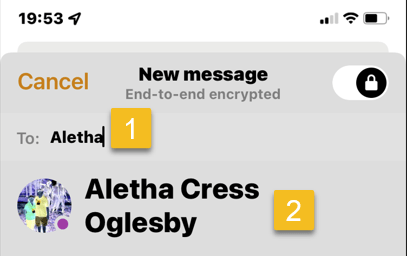
Now, on the same page, in the To field, enter the name of the person you want to have a secret chat with. Then, select that person from the list. See the following image:
Selecting a person to Chat with
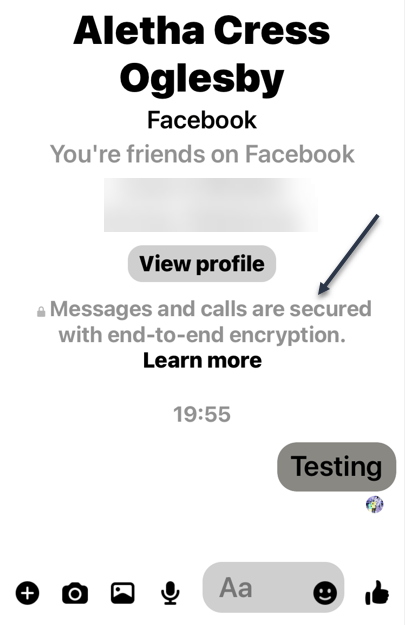
Next, a new chat will start with your chosen person. Any messages or calls you make in this conversation will be end-to-end encrypted. You can start sending messages as usual. Refer to the below image:
Sending your encrypted message
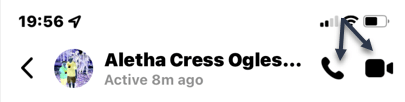
Now, to make a voice or video call, at the top of the chat screen, tap the appropriate icon. See the below image:
Making a voice or video call
Delete a Chat
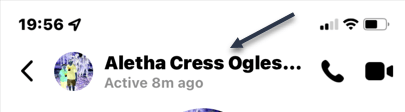
Next, to delete your secret chat with someone, tap the person’s name at the top. See the following image:
Selecting a person to delete the Chat
Now, in the menu that opens, choose Delete Chat. Refer to the below image:
Deleting the Chat
Quote For the Day
We take the highest and best of human faculties, and, exalting them in our imagination to an unlimited extent, endeavour to attain an imperfect conception of that Infinite Power which created everything around us.
Charles Babbage (1791-1871), pioneer of modern computer
Tweet Info
That’s it. Please feel free to share this post! One way to share is via Twitter.
Just click the Tweet icon below. This will launch Twitter where you click its icon to post the Tweet.
Checkout TechSavvy.Life for blog posts on smartphones, PCs, and Macs! You may email us at contact@techsavvy.life for comments or questions.
Please feel free to leave a comment. I would love to hear from you. Do you have a computer or smart device tech question? I will do my best to answer your inquiry. Just send an email to contact@techsavvy.life. Please mention the device, app, and version you are using. To help us out, you can send screenshots of your data related to your question.
Author’s E-Book
You can access the e-book from a Kindle device, the Kindle App for the desktop or smartphone, which is a free app.
The author’s Vietnam eBook on the Battle for Tra Bong Vietnam: Events and Aftermath
Changing your iPhone Lock screen and Home screen wallpaper is probably the most effective way of making your phone look and feel unique. Now you can take your wallpaper to the next level by creating or modifying your own designs in just a few taps; no app is required.
This is for the iPhone running iOS 16+. Screenshots are from iPhone XR
Copyright Scott Adams, Inc./Distributed by Universal Uclick for UFS
iOS 16 Required
You can access the new wallpaper creation tools and Lock Screen gallery using iOS 16. If you do not see the Lock screen gallery when you long-press your Lock screen, you might need to update your iPhone to iOS 16.
If you need to, you can upgrade to iOS 16 by going to:
Settings > General > Software Update
Create a Wallpaper
You can create your own wallpapers using the Lock screen gallery. To access the gallery, first, tap and hold the Lock screen to reveal it.
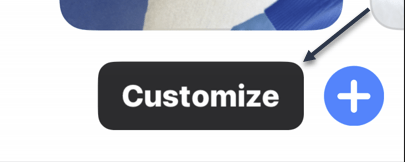
Next, tap Customize to modify your existing Lock screen or tap the plus “+” icon to create a new Lock screen. Refer to the below image:
Customize or add a wallpaper
Now, creating a new Lock screen will take you straight to the wallpaper picker. You will then see a few options at the top of the screen that will allow you to create your own wallpaper:
Photos: Pick a photo from your media library, then customize it by swiping left and right to apply different filters.
Photo Shuffle: Using shuffle mode, you can choose more than one background image. These photos will then change throughout the day. You can also have your iPhone pick photos for you.
Emoji: Pick your favorite emoji, then choose from different patterns and background colors.
Weather: The weather option is a dynamic background that changes based on the weather conditions in your area.
Astronomy: This dynamic background changes based on the position of the earth, the moon, or the planets in our solar system.
Color: Pick a solid color, then swipe left and right to choose different effects like gradients and color intensity.
Next, you can create multiple wallpapers and save them to the Lock screen gallery, then switch between them as you please by tapping and holding your Lock screen at any time. See the below image:
Select a wallpaper
Now, the most fun you can have here is by creating custom Emoji and color wallpapers. Creating wallpapers using your own photos is easier using these tools too. There’s no need to edit or apply filters to your photos inside the Photos app first.
Next, some photos can even be used to create a Depth Effect that overlays subjects on top of the clock (though getting this to work is a bit hit-and-miss).
Using Existing Designs
You can also use the Lock screen gallery to pick from existing or featured designs. Now, take a look at the Featured and Collections areas to see some of Apple’s best offerings. See the following image :
Select template wallpapers
Next, iOS will also put photos in the Suggested Photos slider that should work well on a Lock screen, many of which are compatible with the Depth Effect mentioned above.
If you use Widgets on your Lock screen, you forgo the ability to use the Depth Effect.
There’s also a huge range of apps in the App Store for creating or downloading custom wallpapers, including, Vellum, Everpix, and Pixs. Unlike those apps, Apple’s built-in options are completely free to use.
Please feel free to leave a comment. I would love to hear from you. Do you have a computer or smart device tech question? I will do my best to answer your inquiry. Just send an email to contact@techsavvy.life. Please mention the device, app, and version you are using. To help us out, you can send screenshots of your data related to your question.
Author’s E-Book
You can access the e-book from a Kindle device, the Kindle App for the desktop or smartphone, which is a free app.
The author’s Vietnam eBook on the Battle for Tra Bong Vietnam: Events and Aftermath
Modern iPhones can withstand a splash of water, but you should not rely on Apple’s water-resistant rating and take too many chances. Let’s improve your device’s chances.
This is for the iPhone
Copyright Scott Adams, Inc./Distributed by Universal Uclick for UFS
Your iPhone is Water Resistant
If you have an iPhone 7 or newer, the good news is that your device has some level of water resistance. The bad news is that this rating may have waned over time, so it should not be taken for granted.
The following iPhone models are able to withstand a depth of 6 meters for up to 30 minutes:
iPhone 13 (including mini, Pro, Pro Max)
iPhone 12 ((including mini, Pro, Pro Max)
The following iPhone models can withstand 4 meters for up to 30 minutes:
iPhone 11 Pro
iPhone 11 Pro Max
The following iPhone models can withstand 2 meters for up to 30 minutes:
iPhone 11
iPhone XS
iPhone XS Max
These remaining iPhone models can handle 1 meter for up to 30 minutes:
iPhone SE (second-generation)
iPhone XR
iPhone X
iPhone 8 (including 8 Plus)
iPhone 7 (including 7 Plus)
If you have an older device, there is no guarantee of any water resistance. This does not equate to moisture meaning game over, but rather the chances of your device surviving a dunk are much slimmer.
Age and damage to the chassis may severely impact water resistance. Using compressed air to clean the charging port may also damage the seal (clean the charging port carefully instead). You should take care not to get your iPhone wet, even if you have a modern iPhone with a relatively high level of protection. Water damage is not covered by Apple’s standard warranty.
Turn Off Your iPhone If It Gets Wet
Water may damage your iPhone because it conducts electricity, so turning your iPhone off is a good idea if it gets wet. This is especially true if you have an iPhone model that lacks water resistance, is old, or has been damaged in some way that you believe may have jeopardized the water-resistant seal.
Drying your device out thoroughly before turning it back on will give it the best chance of survival. You should wait around 48 hours before powering it up and leaving it in a warm, dry place for the moisture to evaporate.
Dry Off
Most modern iPhone models can withstand a splash of water, whether that’s a heavy downpour, a spill at the dinner table, or being dropped in the bath. After turning your device off, dry out your iPhone thoroughly. Use a soft cloth to remove moisture, paying close attention to the charging port where droplets are harder to reach.
You should wait for your iPhone to dry out thoroughly before charging. Your iPhone may give you a warning about moisture being detected in the charging port. If so, it is recommended to wait 48 hours before charging again to make sure all moisture has evaporated.
If you are confident that your iPhone’s water-resistant rating has not been jeopardized you may decide to continue using it as normal during this time. If you are low on charge, consider charging wirelessly so that the charging port has time to dry out.
Remove Moisture From Speaker
If you have decided to use your iPhone as normal, you may notice that the speaker does not work quite as it should. A muffled or crackling tone may sound, which is caused by moisture that has yet to evaporate. You can either wait for this to occur naturally or try using an app like Sonic Ⓥ from the App Store. Refer to the below image:
Sonic V from the App Store
This app is a tone generator that has a dedicated button for generating a tone designed to remove moisture from an iPhone speaker. It’s ad-supported so you can experiment with a full range of tones from 0Hz to 25,000Hz to shift any moisture that’s causing issues. Just tap Stop when finished.
Use Fresh Water
Salt water causes corrosion at a much faster rate than fresh water, so it’s important to rinse your iPhone thoroughly if you drop it in the ocean. You should do this as soon as possible since the longer you wait the worse things can get. If you fail to get rid of the salt, corrosion may continue even in the absence of moisture.
Since salt water is so corrosive, the damage may already be done. The gold contacts in the charging port can quickly corrode, which will prevent your iPhone from charging at all using a cable. You will want to remove any salt residue using a soft brush and fresh water to give your iPhone the best chance of survival.
This advice goes for sugary and alcoholic drinks too, though they will not cause corrosion like salt water.
Using Rice Does Not Help
Putting your iPhone into rice will not help to dry it out, and may instead cause grains of rice to become stuck in the charging port.
You are far better off leaving your iPhone in a dry, warm place with plenty of airflow for around 48 hours to evaporate any remaining moisture.
Get a Waterproof Case
If there’s a good chance your iPhone is going to get wet, why not take the preemptive step of getting a waterproof case? These can provide peace of mind from water damage, with a range of designs to choose from.
There are waterproof cases to satisfy just about every kind of user. The LifeProof FRE all-rounder is a good choice and protects against drops and moisture at a depth of up to 2 meters.
LifeProof FRĒ Compatible with Magsafe SERIES Waterproof Case for iPhone 13 Pro Max (ONLY) – BLACK
Protect your iPhone against drops and moisture with the LifeProof FRE, a MagSafe-compatible case that now uses 60% recycled plastic in its construction.
Amazon: $89.27
Model Number
77-87690
Brand
LifeProof
Compatible Phone Models
IPhone 13 Pro Max (ONLY)
Color
Black
Compatible Devices
IPhone 13 Pro Max (ONLY)
LifeProof FRĒ case
If you are a recreational user who loves to boat or kayak, a floating dry bag may be a better choice. Something like the CaliCase Universal Waterproof Floating Case hangs around your neck and ensures your device will float should it drop in the water. You can spend a lot less on a case like this, but make sure it’s tough enough to withstand some wear and tear depending on your hobby.
CaliCase Universal Waterproof Floating Case – White
Protect your iPhone while out on the water with a floating case that you can hang around your neck. If the worst should happen you should be able to find your iPhone again because it will be floating on the water, not at the bottom of a lake.
If you are keen to take your iPhone a little deeper, a diving case will allow you to use it for underwater photography and videography. Look into the YOGRE Diving Case which can withstand depths of 15 meters (50 feet) and has a handy camera grip design.
YOGRE iPhone Samsung Diving Phone Case, Underwater Photography Video Housings Case with Lanyard[50ft/15m], Diving Waterproof Case for iPhone 13/13 Pro/13 Pro Max/12/12 Pro/12 Pro Max LG Google etc
Take your iPhone to new depths with the YOGRE Diving Case. Engage in underwater photography at depths of up to 15 meters (50 feet), just make sure your iPhone model is supported before you buy.
Amazon: $55.99
Brand
YOGRE
Compatible Phone Models
Compatible with iPhone, Samsung, LG, Google, OPPO, vivo, Xiaomi, Redmi, Huawei Series One Plus etc
Color
Orange
Compatible Devices
Compatible with iPhone, Samsung, LG, Google, OPPO, vivo, Xiaomi, Redmi, Huawei Series One Plus etc
Material
Polycarbonate, Thermoplastic Polyurethane
YOGRE case
Even with a case, you should still take care to rinse the housing thoroughly before you remove your device.
iPhones Are Getting More Water Resistant
The good news is that your iPhone will probably be fine in most instances. Apple’s smartphones are more resistant to water ingress and drops than ever before. With that in mind, AppleCare+ might be a good idea if you are especially concerned.
Quote For the Day
The technology you use impresses no one. The experience you create with it is everything.
Sean Gerety
Tweet Info
That’s it. Please feel free to share this post! One way to share is via Twitter.
Just click the Tweet icon below. This will launch Twitter where you click its icon to post the Tweet.
Checkout TechSavvy.Life for blog posts on smartphones, PCs, and Macs! You may email us at contact@techsavvy.life for comments or questions.
Please feel free to leave a comment. I would love to hear from you. Do you have a computer or smart device tech question? I will do my best to answer your inquiry. Just send an email to contact@techsavvy.life. Please mention the device, app, and version you are using. To help us out, you can send screenshots of your data related to your question.
Author’s E-Book
You can access the e-book from a Kindle device, the Kindle App for the desktop or smartphone, which is a free app.
The author’s Vietnam eBook on the Battle for Tra Bong Vietnam: Events and Aftermath
Listening to bird calls is a great, relaxing way to enjoy nature. If your curiosity gets the best of you, hearing the calls may not be enough. Let’s explore how to identify birds.
This is for the iPhone and Android. Screenshots are from iPhone XR running iOS 15.6+
Copyright Scott Adams, Inc./Distributed by Universal Uclick for UFS
There’s a good chance you take your phone with you when you are out for a nature walk. Did you know it can be a surprisingly accurate bird identification tool?
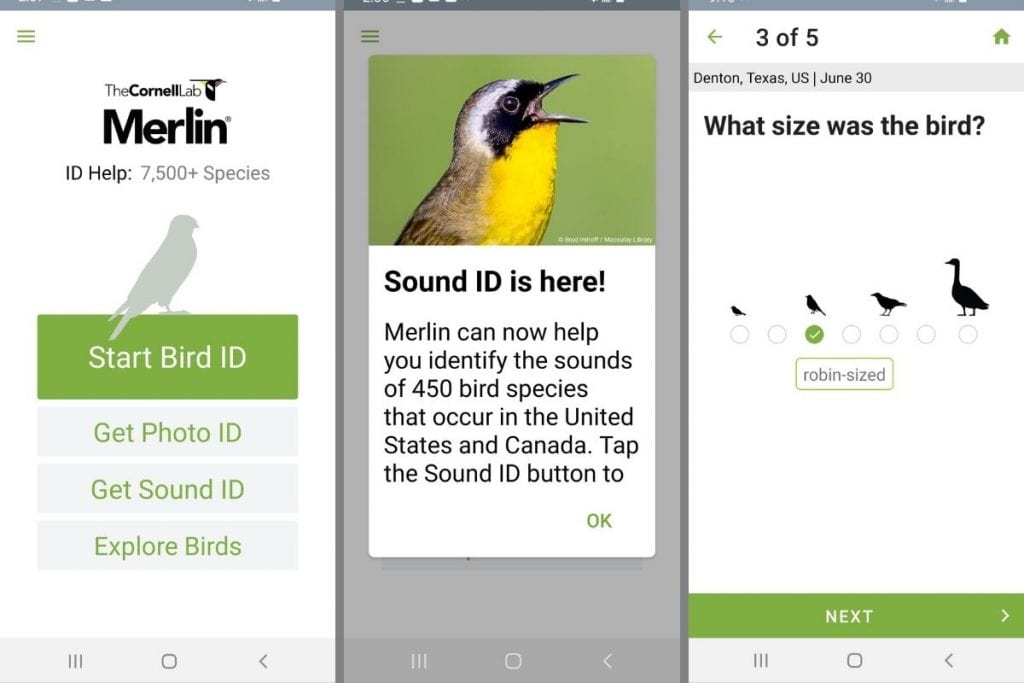
Merlin Bird ID by Cornell Lab
The Cornell Lab of Ornithology is one of the top resources for information about birds. The Merlin Bird ID app puts all of that great information at your fingertips. It’s available for Android and iPhone. First, access the App store and search for Merlin Bird ID.
Next, tap Get to download the app. Refer to the below image:
Download the app from the App Store
Now, enter your email address and tap the Submit button. See the below image:
Enter your email address
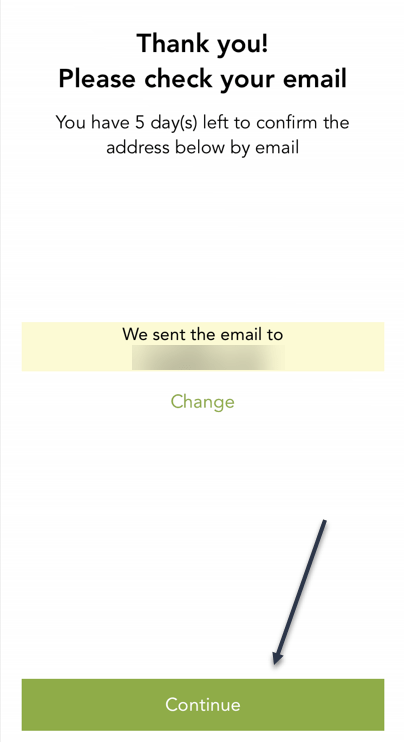
Next, check your email to confirm your address, then tap the Continue button. See the following image:
Confirm your email
Now, the Merlin Bird ID app will open. Here, tap on View Suggested for Bird Packs. Refer to the below image:
Select the View Suggested option
Next, we are selecting the Oklahoma and Texas Bird Pack since we live in Oklahoma, then tap the Install button. Note! check your phone’s remaining storage before downloading. See the below image:
Install a Bird Pack
Now, when the app opens, you have a few options. Start Bird ID and Photo ID are for identifying birds based on their sound or appearance. The one we want to use is Sound ID, so tap it. See the following image:
Select Sound ID
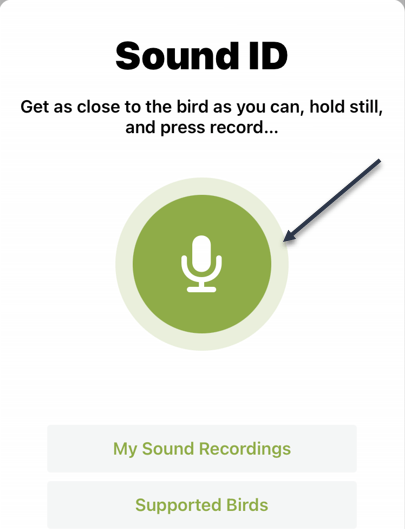
Next, a menu will appear with a few options. To immediately start listening for bird calls around you, tap the big Microphone button. Refer to the below image:
Listen for birds
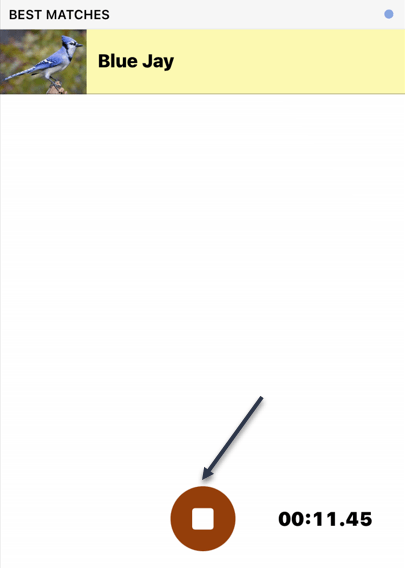
Now, the app will immediately start listening and populate the identified birds on the screen. The bird that is currently singing is highlighted in yellow. See the below image:
The identified bird is highlighted in yellow
Next, tap the red Stop button when you are done. You will get a list of all the birds identified, and you can select any of them to read more information. See the following image:
Stop recording
Your Bird Recordings
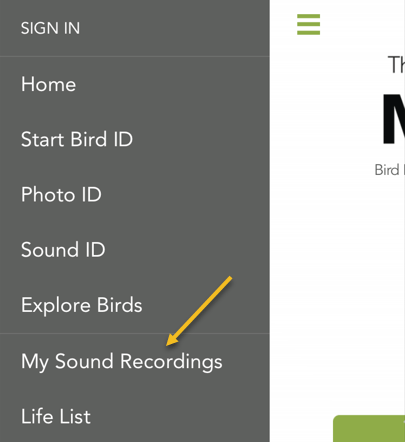
Now, go back to the Merlin Bird ID home page and tap the Menu icon in the upper left-hand corner. Refer to the below image:
Accessing the Menu
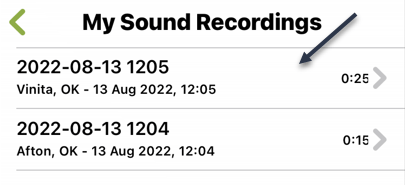
Next, on the menu that opens, tap the My Sound Recordings option. See the below image:
Select the My Sound Recordings option
Now, tap the top listing for your latest bird sound recording. See the following image:
Select a recording
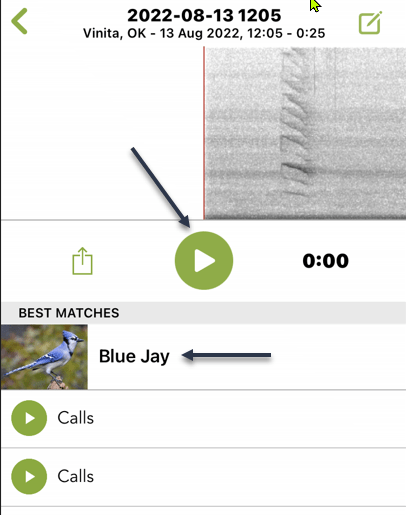
Next, once again, tap the top listing, then the Play button to hear the bird recording. Refer to the below image:
Play the recording
You can simply let the app listen to your surroundings and watch the identified birds pop up on the screen. The Merlin Bird ID app is chock full of great information if you are curious about birds.
Quote For the Day
We live in a society exquistely dependent on science and technology, in which hardly anyone knows anything about science and technology.
Carl Sagan
Tweet Info
That’s it. Please feel free to share this post! One way to share is via Twitter.
Just click the Tweet icon below. This will launch Twitter where you click its icon to post the Tweet.
Checkout TechSavvy.Life for blog posts on smartphones, PCs, and Macs! You may email us at contact@techsavvy.life for comments or questions.
Please feel free to leave a comment. I would love to hear from you. Do you have a computer or smart device tech question? I will do my best to answer your inquiry. Just send an email to contact@techsavvy.life. Please mention the device, app, and version you are using. To help us out, you can send screenshots of your data related to your question.
Author’s E-Book
You can access the e-book from a Kindle device, the Kindle App for the desktop or smartphone, which is a free app.
The author’s Vietnam eBook on the Battle for Tra Bong Vietnam: Events and Aftermath
YouTube has been around since 2005, and it’s one of the most visited websites in the world. Tons of features have been added to the YouTube website and apps over the years.
YouTube has been around since 2005, and it’s one of the most visited websites in the world. Tons of features have been added to the YouTube website and apps over the years. Here are some features you may not know about.
This is for devices using YouTube. Screenshots are from iPhone XR running iOS 15.6+
Copyright Scott Adams, Inc./Distributed by Universal Uclick for UFS
Save Videos to Watch Later
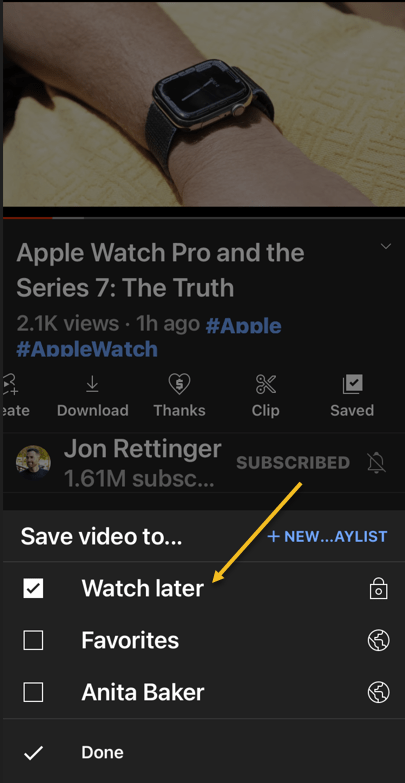
You have probably been browsing YouTube and come across a video that looks interesting. What if you do not have the time to watch it right at that moment? The Watch Later feature is perfect for this.
Watch Later is essentially just a playlist that you can add videos to for watching later. It’s great for saving videos that you do not want to forget about, and it works everywhere you can access the YouTube website or app.
First, find a YouTube video you want to watch later. Next, tap the Save icon in the toolbar below the video. Now, from the Menu that opens, select the Watch Later option. Refer to the below image:
Selecting Watch Later option
Set YouTube Videos to Fill Your iPhone Screen
It’s pretty common for your phone’s display to have a different aspect ratio than YouTube videos. You can pinch to zoom to fill the full screen when watching a video, but you have to do that every time.
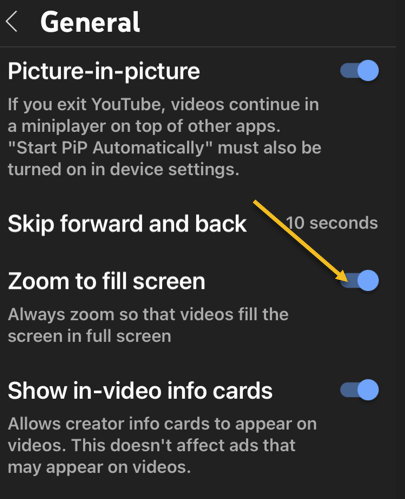
You can actually make it so videos will always fill the full screen. You will not have to pinch-to-zoom every time, but you will be able to zoom out if too much of the video is being cut off.
First, open the YouTube app on your iPhone or iPad device. Next, double-tap your profile icon in the top right-hand corner. Now, from the Manu that opens, select
Settings > General
and toggle Zoom to Fill Screen to ON. See the below image:
Enabling Zoom to fill the screen
Skip Forward/Backward Fast
Here’s a quick tip that will save you a lot of time watching videos on the YouTube mobile app. Rather than using the seek bar to skip forward and back in the video, simply double-tap the left or right side of the video. See the following image:
Skip Forward or Backward
Change the Double-Tap Skip Time
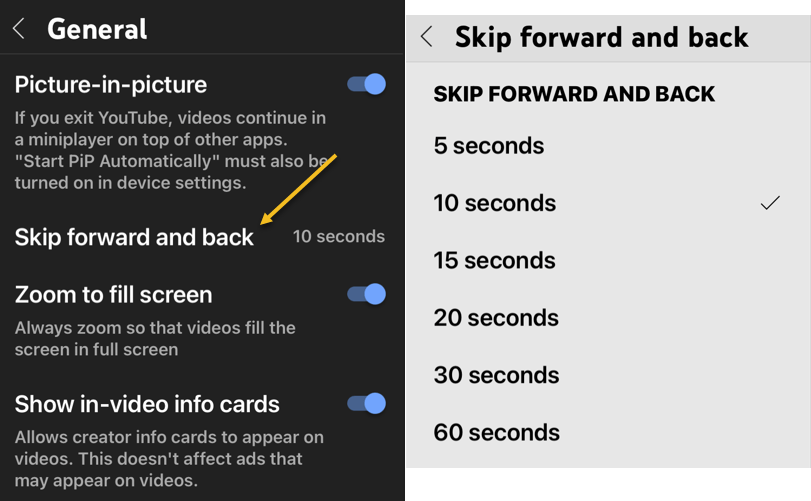
Speaking of double-tapping to skip forward or back in a video, you can adjust the length of these skips. By default, it’s 10-seconds. You can customize this length from 5 to 60 seconds. It’s a great thing to do if you find yourself tapping the video too much.
First, open the YouTube app on your iPhone or iPad, device. Next, double-tap your profile icon in the top right-hand corner. Now, from the Manu that opens, select
Settings > General
and select the Skip Forward and Back option. Next, choose one of the time increments from the Menu. Refer to the below image:
Set timer for Skip Forward and Backward
Speed Up or Slow Down a Video
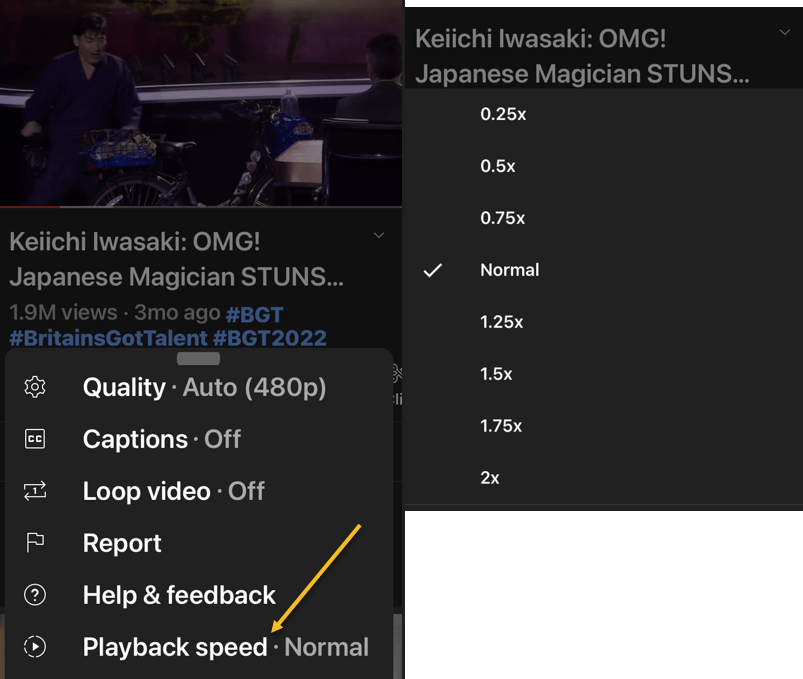
YouTube videos do not have to be played at the speed of how they were uploaded. You can speed up or slow down any video you want. This is super handy for rewatching moments in slow motion or getting through long videos a little faster.
The Playback Speed controls can be accessed on the web and mobile apps. You can select a speed anywhere between 0.25- 2 times the normal speed, with 1 being the normal speed.
First, open the YouTube app and play a video. Next, tap the screen once to bring up the toolbar, Now, tap the Settings icon located in the upper right-hand corner of the video frame.
Next, in the Menu that pops up, select Playback speed. In the list that appears, select the speed you would like. See the below image:
Set timer for Playback speed
Now, close the Menu, and the video will resume at the selected speed. If you need to change it back to the regular speed, repeat the above and change the speed to 1 for normal speed.
Quote For the Day
An outlook… at the vast mysteries of the universe should only confirm our belief in the certainty of its Creator.
Wernher Von Braun
Tweet Info
That’s it. Please feel free to share this post! One way to share is via Twitter.
Just click the Tweet icon below. This will launch Twitter where you click its icon to post the Tweet.
Checkout TechSavvy.Life for blog posts on smartphones, PCs, and Macs! You may email us at contact@techsavvy.life for comments or questions.
Please feel free to leave a comment. I would love to hear from you. Do you have a computer or smart device tech question? I will do my best to answer your inquiry. Just send an email to contact@techsavvy.life. Please mention the device, app, and version you are using. To help us out, you can send screenshots of your data related to your question.
Author’s E-Book
You can access the e-book from a Kindle device, the Kindle App for the desktop or smartphone, which is a free app.
The author’s Vietnam eBook on the Battle for Tra Bong Vietnam: Events and Aftermath
YouTube on Android has had Picture-in-Picture support for several years, but the iPhone app lagged behind. That finally changed, and you can now watch YouTube in a floating window on your iPhone or iPad, too.
YouTube on Android has had Picture-in-Picture support for several years, but the iPhone app lagged behind. That finally changed, and you can now watch YouTube in a floating window on your iPhone or iPad, too. Let’s explore this feature.
This is for the iPhone and iPad. Screenshots are from iPhone XR running iOS 15.6+
Copyright Scott Adams, Inc./Distributedsfd by Universal Uclick for UFS
It was a long journey for iOS and iPadOS devices to get Picture-in-Picture for YouTube. The feature started out as an experiment for Premium subscribers in August 2021. A few months later, the experiment ended. In July 2022, Google started rolling it out for real.
Non-Premium Members: Everyone in the U.S. can use Picture-in-Picture in the YouTube app regardless of whether they have a Premium subscription or not. PiP only works with non-music videos.
Premium Members: Premium subscribers in all areas of the world can use Picture-in-Picture in the YouTube app for both music and non-music videos.
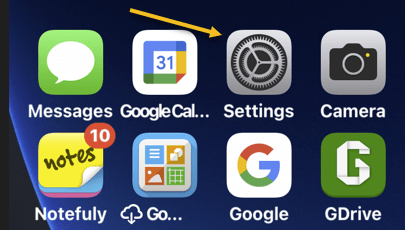
First, we need to make sure your iPhone or iPad has Start PiP Automatically enabled. To do so, open the Settings app. Refer to the below image:
Accessing Settings app
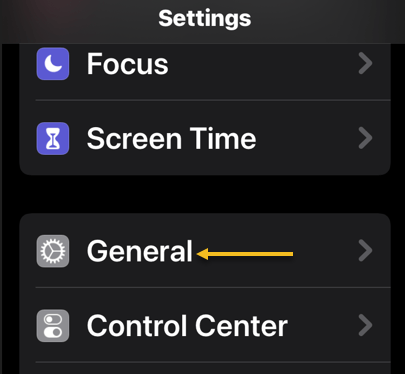
Next, go to General. See the below image:
Accessing General option
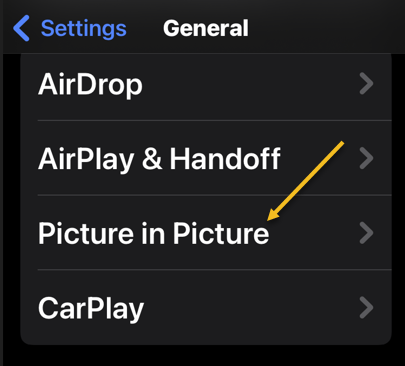
Now, select Picture in Picture. See the following image:
Accessing the Picture in Picture option
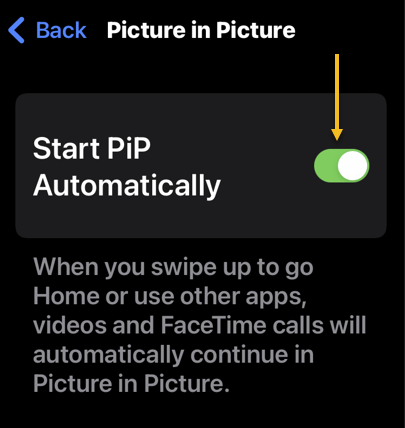
Next, make sure Start PiP Automatically is toggled to ON. Refer to the below image:
Enabling PiP
Using Picture-in-Picture
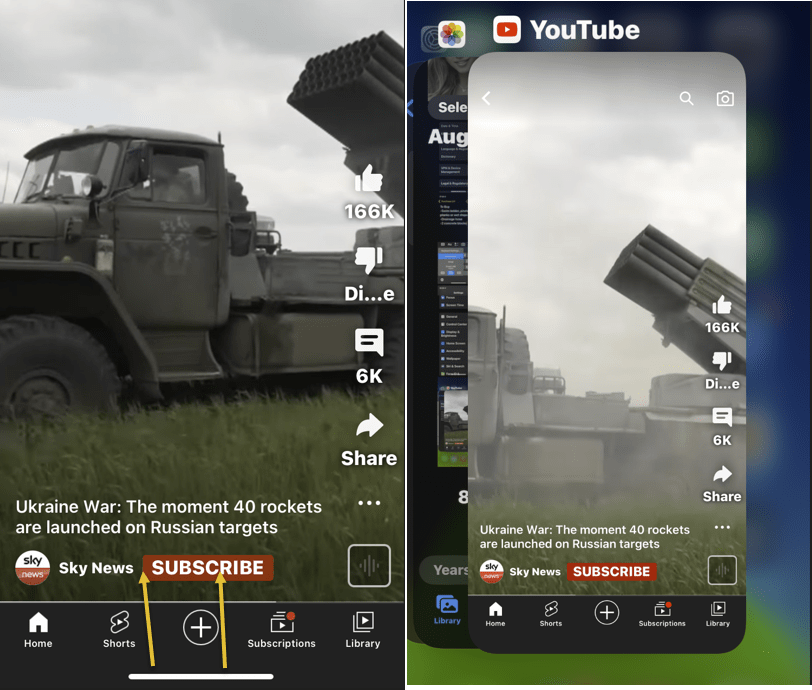
Using Picture-in-Picture mode is actually very easy. The feature is enabled by default once you get it. First, watch a video and swipe up on the bottom of the screen to go to your Home screen. The video will display the PiP mode. See the below image:
Your YouTube video
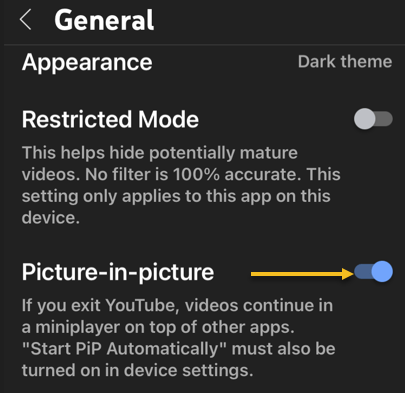
Next, if you want to double-check to make sure Picture-in-Picture is ON or turn it OFF, you can do so in the YouTube settings under:
Settings > General > Picture-in-Picture
and toggle it ON or OFF. See the following image:
Enabling Picture-in-Picture on YouTube
Picture-in-Picture is a great feature to have on a phone or tablet. Now you enjoy YouTube on your Apple device while being able to do other things at the same time.
Quote For the Day
Modern technology has become a total phenomenon for civilization, the defining force of a new social order in which efficiency is no longer an option but a neccisity imposed on all human activity.
Jacques Ellul
Tweet Info
You are finished. Please feel free to share this post! One way to share is via Twitter.
Just click the Tweet icon below. This will launch Twitter where you click its icon to post the Tweet.
Checkout TechSavvy.Life for blog posts on smartphones, PCs, and Macs! You may email us at contact@techsavvy.life for comments or questions.
Please feel free to leave a comment. I would love to hear from you. Do you have a computer or smart device tech question? I will do my best to answer your inquiry. Just send an email to contact@techsavvy.life. Please mention the device, app, and version you are using. To help us out, you can send screenshots of your data related to your question.
Author’s E-Book
You can access the e-book from a Kindle device, the Kindle App for the desktop or smartphone, which is a free app.
The author’s Vietnam eBook on the Battle for Tra Bong Vietnam: Events and Aftermath
Your iPhone has Lock screen widgets that give you quick access to information regarding your schedule, the weather, and more. You can even tie these widgets to specific Focus Modes so that different widgets appear (or disappear) depending on what you are doing.
Your iPhone has Lock screen widgets that give you quick access to information regarding your schedule, the weather, and more. You can even tie these widgets to specific Focus Modes so that different widgets appear (or disappear) depending on what you are doing. Let’s ex[ore this feature.
This is for the iPhone running iOS 16+. Screenshots are from iPhone XR
Copyright Scott Adams, Inc./Distributed by Universal Uclick for UFS
Tip: It is recommended you view the post on “How to Use Lock and Home Screen Wallpapers on iPhone in iOS 16+” before implementing this post.
Using the Lock Screen Galleries
First, tap and hold your Lock screen anywhere to show the Lock screen gallery, then tap on the plus “+” icon to add a new Lock screen. Refer to the below image:
About to add a wallpaper
Next, select a wallpaper to appear on your Lock screen. Tap on the Photos option to use an image you have taken or saved to your device. You can also use emojis, the weather, the position of the planets, and more. See the below image:
Selecting a wallpaper from the gallery
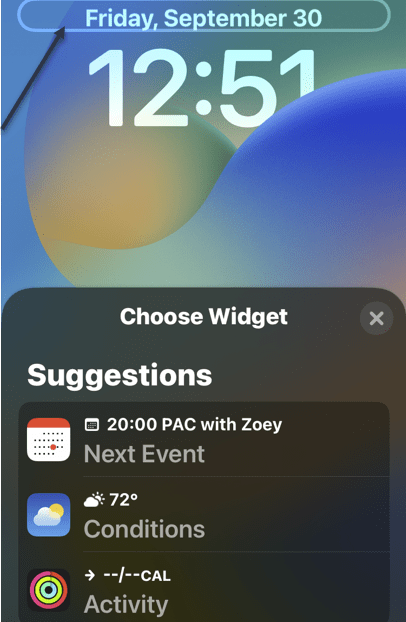
Now, with your wallpaper chosen, modify your Lock screen by tapping on the various elements. You can tap on the date to change what information is displayed here, which will add more information to the date display like how much energy you have burned or upcoming calendar events. See the following image:
Browse your suggestions
Next, you can also tap on the time to choose a specific font and color scheme, and swipe left and right on the wallpaper to change how your background is displayed with filters. Refer to the below image:
Choosing elements
Finally, tap on the Add Widgets box to add a single row of widgets to your Lock screen. See the below image:
Selecting to add widgets
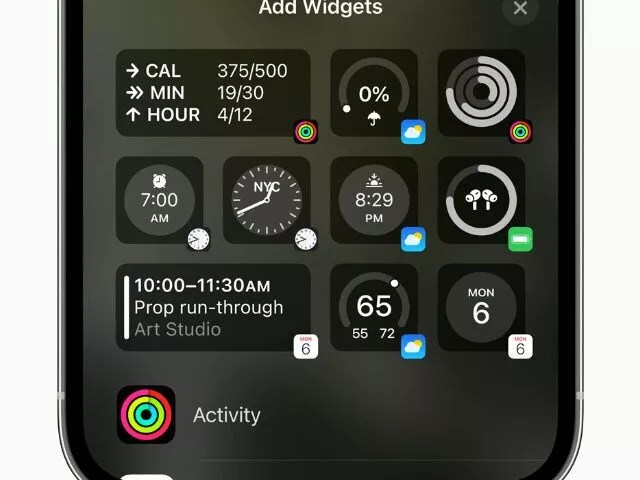
Choosing Widgets
Widgets are information that you can easily see from your Lock screen. Many of these appear as smaller circles, of which you can fit four on a single Lock screen. See the below image:
Adding the weather widget
Others take the form of double-length rectangles, including a more detailed weather forecast, upcoming reminders, news headlines, and information about markets and stocks. You can fit two of these, or one rectangular and two smaller circular widgets. See the following image:
The added weather widget
When you choose to use widgets, you forego the ability to use the Depth Effect with your wallpaper. This can be toggled using the “…” ellipsis button while customizing a wallpaper. Refer to the below image:
Adding Depth Effect
This effect makes it possible to overlay some elements of an image over the clock, for a more dynamic feel. It looks impressive, but it’s not particularly useful and widgets are arguably more useful.
At this point, save your newly created Lock screen wallpaper. Tap Done in the upper right-hand corner. See the below image:
Save your wallpaper
Focus Modes
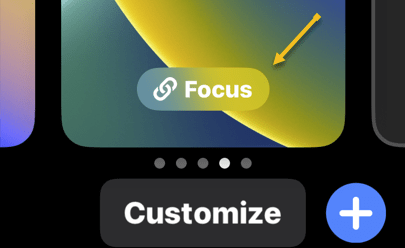
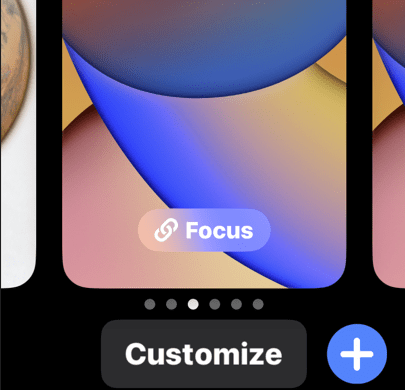
While selecting a Lock screen from the Lock screen gallery, tap on the Focus button to tie your chosen Lock screen to a particular Focus Mode. Assuming you have set up Focus Modes already, this lets you show relevant information while specific Focus Modes are active. See the following image:
Accessing Focus
You can set up a custom Focus that triggers a particular activity or use one of the common ones. Refer to the below image:
Selecting a Focus Mode
The Lock screen gallery and its associated widgets are available with the iOS 16 update. If you do not see these options, make sure you have updated your iPhone (and that your device is compatible with iOS 16).
Quote For the Day
Just because something doesn’t do what you planned it to do doesn’t mean it’s useless.
Thomas Edison
Tweet Info
That’s it. Please feel free to share this post! One way to share is via Twitter.
Just click the Tweet icon below. This will launch Twitter where you click its icon to post the Tweet.
Checkout TechSavvy.Life for blog posts on smartphones, PCs, and Macs! You may email us at contact@techsavvy.life for comments or questions.
Please feel free to leave a comment. I would love to hear from you. Do you have a computer or smart device tech question? I will do my best to answer your inquiry. Just send an email to contact@techsavvy.life. Please mention the device, app, and version you are using. To help us out, you can send screenshots of your data related to your question.
Author’s E-Book
You can access the e-book from a Kindle device, the Kindle App for the desktop or smartphone, which is a free app.
The author’s Vietnam eBook on the Battle for Tra Bong Vietnam: Events and Aftermath
Wallpaper is probably the easiest way to customize the look of your iPhone, and you have two areas to do it; the Home screen and the Lock screen. Let’s explore this iOS 16+ feature.
This is for the iPhone. Screenshots are from iPhone XR running iOS 16+
Copyright Scott Adams, Inc./Distributed by Universal Uclick for UFS
Tip: It is recommended you view the post on “How to Add Widgets on iPhone Lock Screen in iOS 16+” next.
The iPhone has supported separate wallpapers on the Home screen and Lock screen for a while, but iOS 16 introduced a big reworking of the process in 2022.
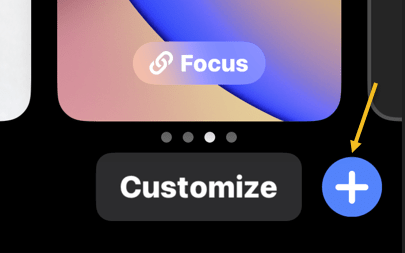
First, unlock your iPhone and tap and hold on a blank space on the Lock screen. The Lock screen will zoom out, and you will see a Customize and a plus button. Tap the plus button. Refer to the below image:
Selecting to add a wallpaper
If this is your first time playing with the Lock screen wallpaper in iOS 16, you will need to tap Add New when prompted. This will switch you over to the new Lock screen style. See the below image:
Add a new wallpaper
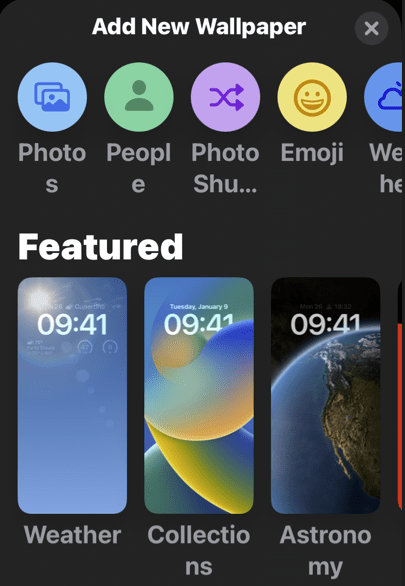
Next, you have a bunch of different options for wallpapers. At the top, you can select from a few categories. Scroll down to see a bunch of pre-made Lock screens. Choose a wallpaper for the Lock screen to proceed. See the following image:
Choosing a wallpaper
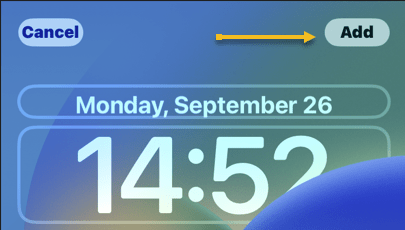
Now, once you have a wallpaper that you want to use for the Lock screen, tap the Add button in the top right-hand corner. Refer to the below image:
Selecting the Add button
Next, here’s where you have to option to use a different wallpaper for the Home screen. Tap Customize Home Screen to proceed. See the below image:
Selecting Customize Home Screen button
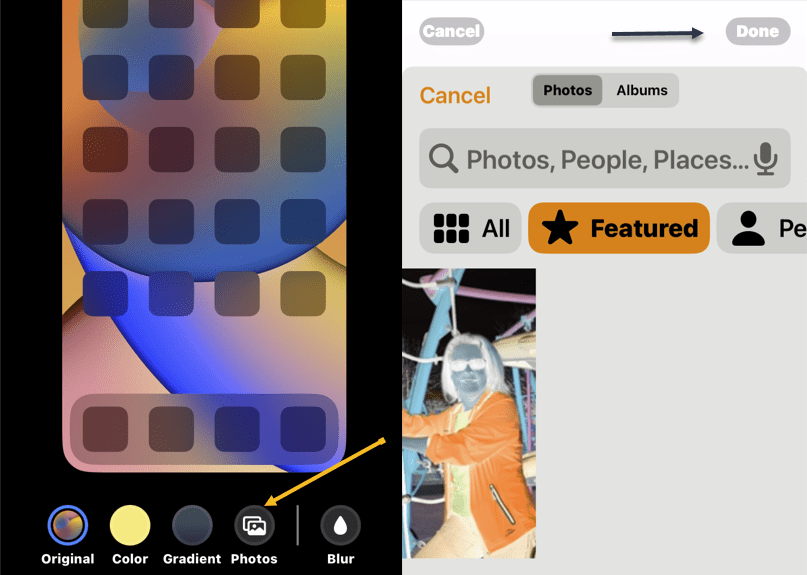
Now, you have a few options to choose from. You can blur the Lock screen wallpaper, choose a color based on the Lock screen wallpaper, a gradient based on the Lock screen wallpaper, or from your photos. After you have made your selection, tap Done in the top right-hand corner (if you choose a photo, you will need to tap Done twice). See the following image:
Adding a Home Screen wallpaper
Next, you will be brought back to the Lock screen preview screen. Tap the Lock screen to leave and see your new Lock screen and Home screen wallpapers! Refer to the below image:
Your Lock Screen
This is just a fraction of what you can do with the Lock screen on iOS 16+. You can also add widgets, customize the clock font, and apply a cool 3D depth effect to some wallpapers. More on this in another post as mentioned above.
Delete a Wallpaper
First, unlock your iPhone. Next, long-press anywhere on the unlocked Lock screen. See the below image:
Accessing the Lock Screen for deletion
Now, when the Lock screen goes into edit mode, you will see your current Lock screen as a preview among other Lock screens. Swipe to the wallpaper you want to delete. Then, swipe up on the wallpaper preview to reveal more options.
Note: The swipe-up gesture only works if you have another wallpaper added to your Lock screen collections. If you are trying to delete the only remaining Lock screen wallpaper from your iPhone, you will not be able to perform the swipe gesture on this wallpaper.
Next, you will now see a red-colored Trash icon below the selected wallpaper. Tap on the Trash icon to delete this Lock screen wallpaper permanently from your iPhone. See the following image:
Selecting the Trash icon to delete
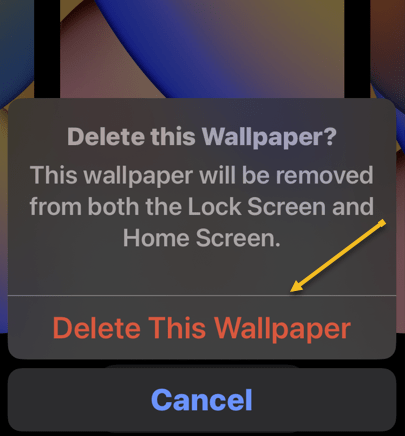
Now, to confirm your action, tap on Delete This Wallpaper in the prompt that appears at the bottom. Refer to the below image:
Confirming the deletion
The selected wallpaper will now be removed from the edit screen and iOS will now load up your previous wallpaper for your Lock screen.
Quote For the Day
Technology like art is a soaring exercise of the human imagination.
Daniel Bell
Tweet Info
You are finished. Please feel free to share this post! One way to share is via Twitter.
Just click the Tweet icon below. This will launch Twitter where you click its icon to post the Tweet.
Checkout TechSavvy.Life for blog posts on smartphones, PCs, and Macs! You may email us at contact@techsavvy.life for comments or questions.
I Would Like to Hear From You
Please feel free to leave a comment. I would love to hear from you. Do you have a computer or smart device tech question? I will do my best to answer your inquiry. Just send an email to contact@techsavvy.life. Please mention the device, app, and version you are using. To help us out, you can send screenshots of your data related to your question.
Author’s E-Book
You can access the e-book from a Kindle device, the Kindle App for the desktop or smartphone, which is a free app.
The author’s Vietnam eBook on the Battle for Tra Bong Vietnam: Events and Aftermath
If you are looking at your cellular data usage in the Settings app on your iPhone, you might notice data usage statistics from a Current Period. But what exactly is the current period, and when did it start?
If you are looking at your cellular data usage in the Settings app on your iPhone, you might notice data usage statistics from a Current Period. But what exactly is the current period, and when did it start? Let’s find out.
This is for the iPhone. Screenshots are from iPhone XR
Copyright Scott Adams, Inc./Distributed by Universal Uclick for UFS
First, open the Settings app and tap Cellular in the list. Refer to the below image:
Selecting Cellular option
Next, near the top of the Cellular Settings page, you will see a section titled Cellular Data. At the top of that, you will see the Current Period with a cumulative data count beside it. This is how much cellular data you have used in total during the current period.
If you have never checked this statistic in Settings before, this number can look frighteningly large. So the big question remains: How long is this current period, and when did it start? See the below image:
Selecting Current Period
It turns out that, on some cellular carriers, this Current Period is tied to your actual cell phone billing cycle. On other carriers, the Current Period is an arbitrary length of time since you last reset your cellular statistics.
If you have hundreds of apps installed on your iPhone, you might never notice that you can scroll all the way to the bottom of the app list and see the date when the Current Period statistics were last reset. On our iPhone, this statistic has never been reset. See the following image:
Your last reset date and time
Now, to reset the statistics for the current period, tap Reset Statistics. Refer to the below image:
Warning: You will lose all your stored Cellular data statistics, and the counts will reset to zero.
Selecting Reset Statistics
With a tap of Reset Statistics, a new Current Period has just begun. Check back in:
Settings > Cellular
over time to see your statistics and which apps are using the most data.
Why and When to Reset Cellular Statistics
It is recommended to reset cellular data statistics every month to ensure that you will get a more accurate picture of your actual data usage that corresponds to the billing cycle of your current data plan or subscription.
The latest statistics reset data will be posted at the bottom of the screen.
Resetting your iPhone’s Cellular Data settings, on the other hand, can also be considered among the potential solutions when dealing with cellular data issues including no service or no signal.
Quote For the Day
It’s impossible to move, to live, to operate at any level without leaving traces, bits, seemingly meaningless fragments of personal information.
William Gibson
Tweet Info
That’s it. Please feel free to share this post! One way to share is via Twitter.
Just click the Tweet icon below. This will launch Twitter where you click its icon to post the Tweet.
Checkout TechSavvy.Life for blog posts on smartphones, PCs, and Macs! You may email us at contact@techsavvy.life for comments or questions.
Please feel free to leave a comment. I would love to hear from you. Do you have a computer or smart device tech question? I will do my best to answer your inquiry. Just send an email to contact@techsavvy.life. Please mention the device, app, and version you are using. To help us out, you can send screenshots of your data related to your question.
Author’s E-book
You can access the e-book from a Kindle device, the Kindle App for the desktop or smartphone, which is a free app.
The author’s Vietnam eBook on the Battle for Tra Bong Vietnam: Events and Aftermath
To help you type faster and more conveniently, your iPhone offers a Predictive Text feature that automatically suggests the words that you are likely to type. You can activate this feature from both Settings and your Keyboard menu on your iPhone.
To help you type faster and more conveniently, your iPhone offers a Predictive Text feature that automatically suggests the words that you are likely to type. You can activate this feature from both Settings and your Keyboard menu on your iPhone. Let’s find out about this feature.
This is for the iPhone. Screenshots are from iPhone XR running iOS 15.6 +
Copyright Scott Adams, Inc./Distributed by Universal Uclick for UFS
What Is Predictive Text
As the name implies, the Predictive Text feature predicts the words that you are likely going to type next. You can then tap those predicted words to add them to what you are already typing, which speeds up your input.
For example, if you start typing “How are,” the feature automatically suggests “you,” so your resulting sentence is “How are you?”
The feature predicts words based on the data it has gathered from your past conversations, writing style, and the sites you have visited in Safari. It may also use your other apps and recent activity to suggest words.
Enable Predictive Text from Settings
If you are not typing anything at the moment (meaning your keyboard is not open), use the Settings app to activate Predictive Text on your iPhone.
First, head to:
Settings > General > Keyboard.
Refer to the below image:
Accessing the Keyboard option
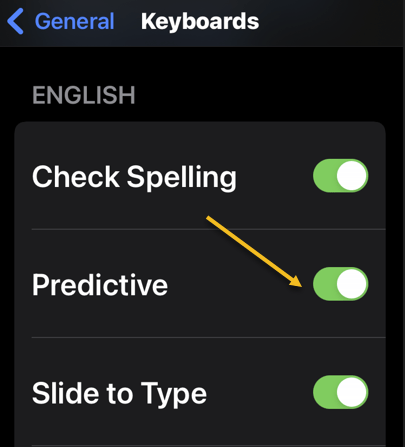
Next, scroll down the Keyboards page that opens to the bottom. There, turn on the Predictive option. See the below image:
Tip: To disable Predictive Text later, toggle off the Predictive option in General > Keyboard.
Enabling Predictive Text
You are done. From now on, your keyboard will suggest words that you should be using in your text when you’re typing something on your iPhone.
Enable Predictive Text From Keyboard Settings
If you are typing something and your iPhone’s keyboard is open, you can use an option on the keyboard itself to toggle on the Predictive Text feature.
First, open your iPhone’s keyboard, then tap and hold on to the globe icon (just beside the space bar). See the following image:
Tap and hold the Globe icon
Next, in the menu that opens, select Keyboard Settings. Refer to the below image:
Selecting the Keyboard Settings button
Now, on the Keyboards page, scroll down to the bottom. There, enable the Predictive feature. See the below image:
Enabling Predictive Text
Your keyboard will now predict the words you are likely going to type. And that’s how you make typing faster and easier on your iPhone.
Quote For The Day
The real problem is not whether machines think but whether men do.
B.F. Skinner
Tweet Info
That’s it. Please feel free to share this post! One way to share is via Twitter.
Just click the Tweet icon below. This will launch Twitter where you click its icon to post the Tweet.
Checkout TechSavvy.Life for blog posts on smartphones, PCs, and Macs! You may email us at contact@techsavvy.life for comments or questions.
Please feel free to leave a comment. I would love to hear from you. Do you have a computer or smart device tech question? I will do my best to answer your inquiry. Just send an email to contact@techsavvy.life. Please mention the device, app, and version you are using. To help us out, you can send screenshots of your data related to your question.
Author’s E-Book
You can access the e-book from a Kindle device, the Kindle App for the desktop or smartphone, which is a free app.
The author’s Vietnam eBook on the Battle for Tra Bong Vietnam: Events and Aftermath