The article explains how to change an iPhone’s clock format from the default 12-hour cycle to a 24-hour format. This option, known as military time, helps prevent confusion between a.m. and p.m. It details the steps to toggle the feature on, enhancing clarity in time management.
RAYMOND OGLESBY @RaymondOglesby2 June 17, 2025 – 3 minutes read time
Overview
If you are in the US, your iPhone Clock app is automatically set to a 12-hour cycle. But did you know that you can change the time format on your iPhone? A 24-hour clock format, also known as military time, is a popular way to tell time worldwide.
Perks of the 24-hour time format include never accidentally setting an alarm for noon instead of midnight! If you already know how to change the time on your phone, you should have an easy time switching to a 24-hour clock. Let’s explore setting your iPhone to 24-hour format.
Why You Will Like This Tip
Get in sync with the rest of the world by using a 24-hour clock in the US.
If you mix up a.m. and p.m., make sure your alarms are set for the right time of day.
System Requirements
This tip should work on all versions of iOS, but the steps and screenshots below were captured on an IPhone 14 Pro running iOS 18.5.
CClick here to learn how to update your iPhone to the latest iOS version.
Setting Your iPhone to 24-Hour Format
First, head to:
Settings > General > Date & Time
Refer to the image below:
Accessing the Date & Time option
Next, toggle on 24-Hour Time. See the image below:
Toggle on 24-Hour Time
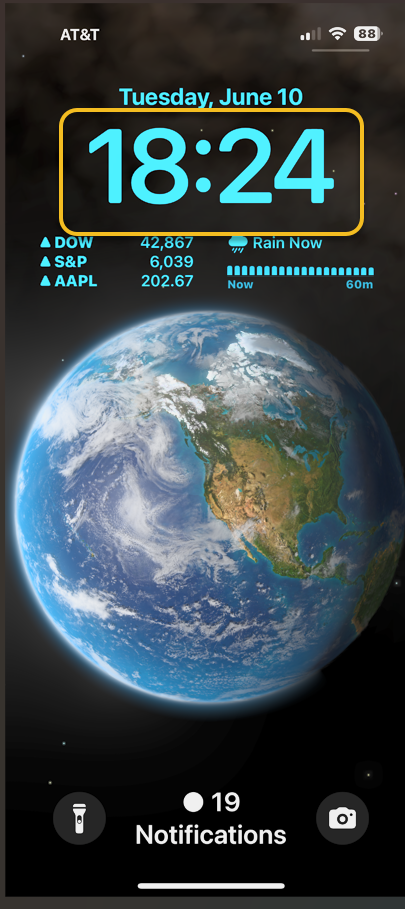
Now, the time on your iPhone will be in 24-hour format. See the following image:
Your Home screen time in a 24-hour format
Disclaimer
Technology is constantly evolving, and smartphone and desktop tech rarely remains static. Therefore, the information in this post is only accurate as of the date it was written. Blog posts that are older than six months may contain instructions that are no longer compatible with your device or operating system. We hope that the content from previous posts continues to function as intended. Thank you for reading TechSavvy.Life, where technology works for you.
Quote For the Day
“The rise of powerful AI will be either the best or the worst thing ever to happen to humanity.”
– Stephen Hawking
(X) Twitter Info
That was easy. Please feel free to share this post! One way to share is via Twitter.
Just click the Tweet icon below. This will launch Twitter where you click its icon to post the Tweet.
Checkout TechSavvy.Life for blog posts on smartphones, PCs, and Macs! You may email us at contact@techsavvy.life for comments or questions.
We value your feedback! Was this post helpful? Please share your comments with us. If you have a tech question related to your computer or smart device, feel free to reach out. Just send an email to contact@techsavvy.life, and be sure to include the device, app, and version you are using. To assist us further, you can also attach screenshots related to your inquiry.
The author’s Vietnam eBook on the “Battle for Tra Bong Vietnam: Events and Aftermath” can be accessed from a Kindle device or the Kindle App for a desktop or smartphone. The apps are free.
The author’s Vietnam eBook on the Battle for Tra Bong Vietnam: Events and Aftermath
This post guides iPhone users on recovering deleted voicemails and managing storage. It details steps to undelete voicemails, clear all deleted messages, or select specific ones for deletion. The content highlights system requirements, emphasizes storing voicemails, and serves as a tech resource.
RAYMOND OGLESBY @RaymondOglesby2 June 10, 2025 – 4 minutes read time
Overview
We have all accidentally deleted an important voicemail or deleted a voicemail only to realize we need it back. Fortunately, we can show you how to recover deleted voicemail on your iPhone. Let’s explore how this is accomplished.
Why You Will Like This Tip
Save voicemails you accidentally moved to the trash.
Retrieve deleted voicemail on iPhone in just a few easy steps.
Free up storage space by removing deleted voicemails.
System Requirements
This tip was performed on an iPhone 14 Pro running iOS 18.5.
Click here to learn how to update your iPhone to the latest iOS version.
Storage Limits for Voicemails
You cannot directly set a limit to the number of active voicemails on an iPhone, as this is a function of your carrier’s service and storage capacity. You cannot dictate how many voicemails can be stored before they are considered “full”. Instead, you can manage the voicemail system by deleting old messages or by choosing a voicemail service that offers more storage.
Retrieve a Deleted Voicemail
First, open the Phone app. Refer to the image below:
Selecting the Phone app
Next, tap Voicemail. See the image below:
Selecting the Voicemail icon
Now, scroll to the very bottom of your voicemails and tap Deleted Messages. See the following image:
Selecting the Deleted Messages option
Next, tap the voicemail you want to undelete. (Make sure to tap in the middle of the voicemail, not the info icon to the side). Refer to the image below:
Selecting a Voicemail to undelete
Now, tap the Undelete icon (red trashcan with a slash through it). The message will automatically be moved back into your main voicemail box. See the image below:
Selecting the Undelete icon to retrieve the Voicemail
Remove Deleted Voicemails
If you have a lot of deleted voicemails (like us, we have 800), you have a couple of options.
Remove All Deleted Voicemails
First, in the Deleted Messages section, tap Clear All to permanently remove all deleted voicemails from your iPhone.
Next, you may be prompted to confirm the deletion. If so, tap Clear All again to proceed.
See the following image:
Selecting the Clear All option to remove all deleted Voicemails
Remove Multiple Deleted Voicemails
If you just have certain voicemails you want to remove, just tap the Edit button at the top of the screen. Refer to the image below:
Selecting the Edit option
Next, tap the buttons to the left of the voicemails to select the ones you wish to remove. You can then tap Delete at the bottom of the screen. See the image below:
Selecting a Voicemail to delete
Disclaimer
Technology is constantly evolving, and smartphone and desktop tech rarely remains static. Therefore, the information in this post is only accurate as of the date it was written. Blog posts that are older than six months may contain instructions that are no longer compatible with your device or operating system. We hope that the content from previous posts continues to function as intended. Thank you for reading TechSavvy.Life, where technology works for you.
Quote For the Day
. “Technology is the knack of so arranging the world that we do not experience it.”
― Rollo May
(X) Twitter Info
That’s it. Please feel free to share this post! One way to share is via Twitter.
Just click the Tweet icon below. This will launch Twitter where you click its icon to post the Tweet.
Checkout TechSavvy.Life for blog posts on smartphones, PCs, and Macs! You may email us at contact@techsavvy.life for comments or questions.
We value your feedback! Was this post helpful? Please share your comments with us. If you have a tech question related to your computer or smart device, feel free to reach out. Just send an email to contact@techsavvy.life, and be sure to include the device, app, and version you are using. To assist us further, you can also attach screenshots related to your inquiry.
The author’s Vietnam eBook on the “Battle for Tra Bong Vietnam: Events and Aftermath” can be accessed from a Kindle device or the Kindle App for a desktop or smartphone. The apps are free.
The author’s Vietnam eBook on the Battle for Tra Bong Vietnam: Events and Aftermath
The Notes app on Apple devices sorts notes by default based on the most recent update. However, users can change settings to organize notes alphabetically by title or first line. This enhances note accessibility and organization. The guide also addresses setting defaults for new notes.
RAYMOND OGLESBY @RaymondOglesby2 June 3, 2025– 3 minutes read time
Overview
Can you alphabetize in Notes? Yes! By default, the Notes app sorts your notes by most recently updated. Even if you created a note years ago, if you edit that note, it will appear at the top of the list afterward.
But you can easily sort your notes alphabetically by changing your Settings. Your notes will then be sorted according to either the title or first line (if the note does not have a title). Let explore how to sort Apple Notes alphabetically on iPhone or iPad.
Why You Will Like This Tip
Alphabetize notes by note titles or the beginning of your note, instead of by date created or last edited.
Alphabetize notes on iPhone and iPad to make your notes more organized and easier to find.
System Requirements
This tip was performed on an iPhone 14 Pro running iOS 18.5.
Click here to learn how to update your iPhone to the latest iOS version.
Sorting Notes Alphabetically
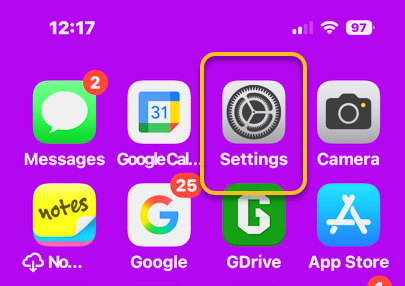
First, open the Settings app. Refer to below image:
Selecting Settings
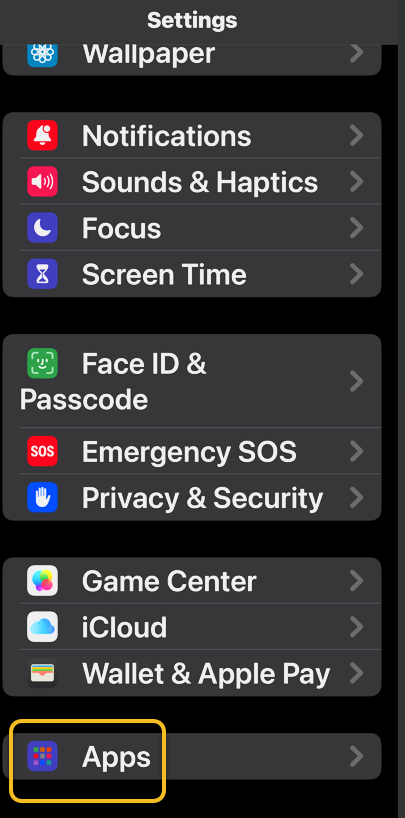
Next, scroll down and tap Apps. See the image below:
Selecting Apps
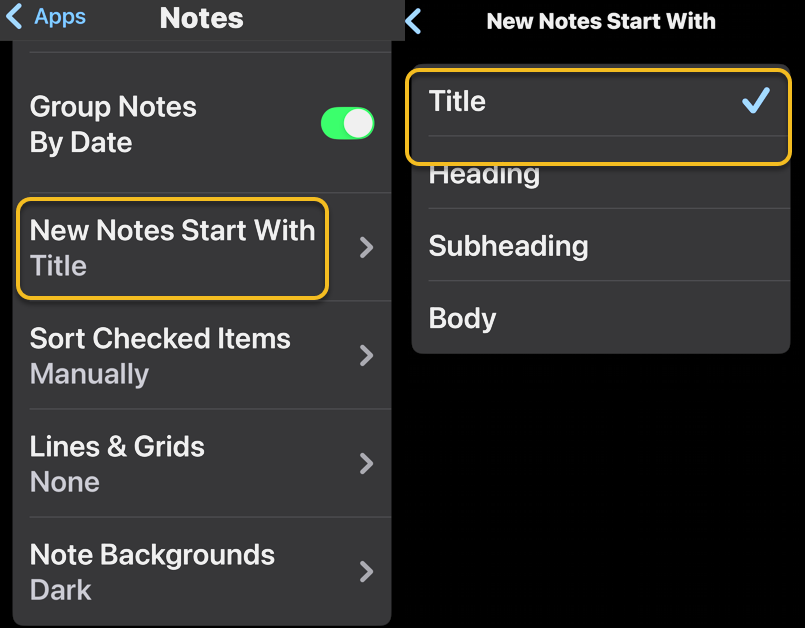
Now, rap Notes. See the following image:
Selecting Notes
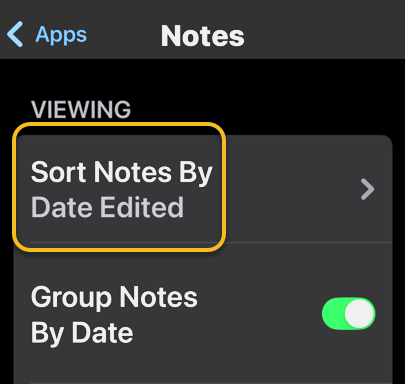
Next, tap Sort Notes By: Refer to image below:
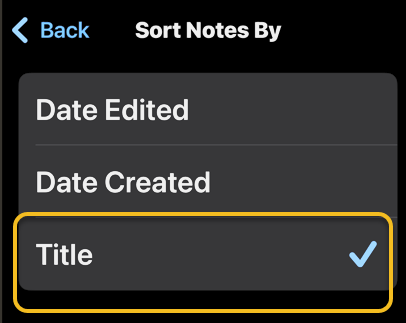
Selecting the Sort Notes By option
Now, tap Title. See the image below:
Selecting the Title option
Choosing Title will sort your Notes alphabetically. You can also select Date Created if you would rather have all your notes sorted by the day each was started.
Setting Defaults
You may want to set a couple of defaults. One is to set the Title as the default heading for a New Note. See the following image:
Selecting the New Notes Start With Title option
If you prefer a New Note with lines or grids, you can choose from various styles. Refer to the image below:
Selecting a Style for a New Note
Disclaimer
Technology is constantly evolving, and smartphone and desktop tech rarely remains static. Therefore, the information in this post is only accurate as of the date it was written. Blog posts that are older than six months may contain instructions that are no longer compatible with your device or operating system. We hope that the content from previous posts continues to function as intended. Thank you for reading TechSavvy.Life, where technology works for you.
Quote For the Day
“Technology is not just a tool. It can give learners a voice that they may not have had before.”
― George Couros
(X) Twitter Infio
You are finished. Please feel free to share this post! One way to share is via Twitter.
Just click the Tweet icon below. This will launch Twitter where you click its icon to post the Tweet.
Checkout TechSavvy.Life for blog posts on smartphones, PCs, and Macs! You may email us at contact@techsavvy.life for comments or questions.
We value your feedback! Was this post helpful? Please share your comments with us. If you have a tech question related to your computer or smart device, feel free to reach out. Just send an email to contact@techsavvy.life, and be sure to include the device, app, and version you are using. To assist us further, you can also attach screenshots related to your inquiry.
The author’s Vietnam eBook on the “Battle for Tra Bong Vietnam: Events and Aftermath” can be accessed from a Kindle device or the Kindle App for a desktop or smartphone. The apps are free.
The author’s Vietnam eBook on the Battle for Tra Bong Vietnam: Events and Aftermath
The post provides a step-by-step guide on how to change the default web browser on an iPhone from Safari to a preferred alternative, such as Chrome. It includes tips, system requirements, and FAQs regarding browser functionalities, catering to users seeking to customize their browsing experience on Apple devices.
RAYMOND OGLESBY @RaymondOglesby2 May 27, 2025 – 3 minutes read time
Overview
On Apple devices, Safari is the default browser. However, many people prefer to use other browsers, such as Chrome, instead of Safari. Fortunately, you can easily change the default web browser on your iPhone to your preferred one. Here’s how to change the default browser on an iPhone.
Why You Will Like This Tip
Easily change default browser from Safari.
You have different preferences than Apple’s standard browser.
System Requirements
This tip was performed in iPhone 14 Pro running iOS 18.5
Click here to learn how to update your iPhone to the latest iOS version.
Change Your Default Browser
First, open the Settings app. Refer to the image below:
Selecting Settings
Next, tap Apps. See the image below:
Selecting Apps
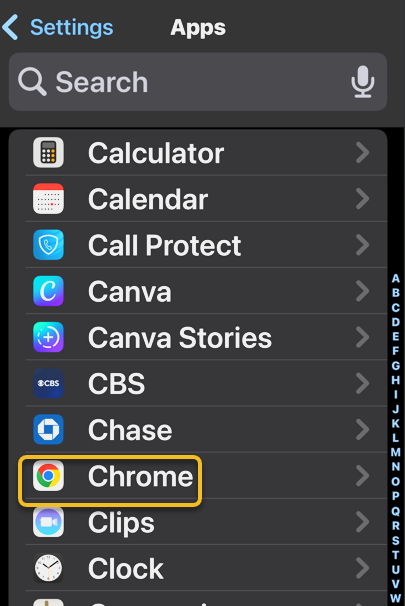
Now, scroll down to the app list to find your preferred browser, such as Chrome, and tap it. See the following image:
Selecting preferred browser
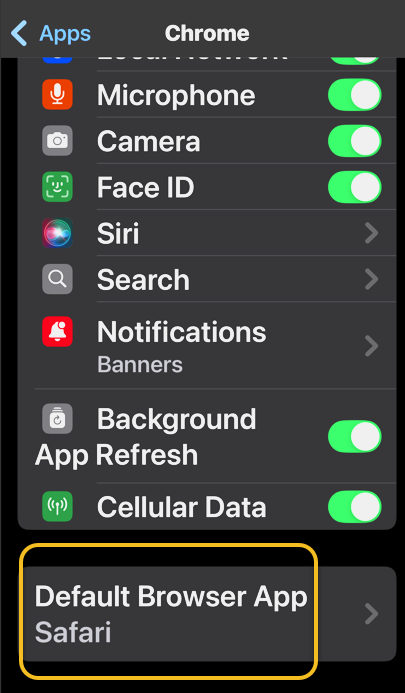
Next, tap Default Browser App. Refer to the image below:
Selecting Defsult Briwser App option
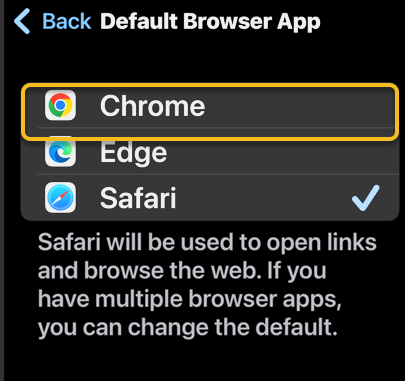
Now, tap whichever browser you would like to use as your default browser. See the image below:
Selecting a browser
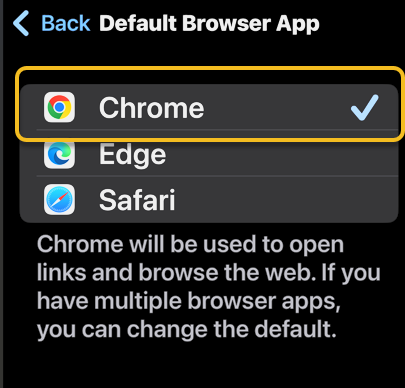
Next, when you haveselected your new default browser, you will see a blue check mark next to it. See the following image:
Your preferred browser selected
Now that you know how to change the default browser on your iPhone, you can easily open links in your preferred web browser, whether it’s Safari, Chrome, Edge, or another browser.
FAQ
How do I clear my Safari history on my iPhone? To clear your Safari history on an iPhone, tap the Bookmark icon, then the History tab, then choose which parts of your Safari history you want to delete.
How do I make Safari the default browser again? Follow the same steps above and select Safari from Apps. Alternatively, if you uninstall the browser app that is set as default, your iPhone will automatically switch back to Safari.
What do I do if Safari is not working on my iPhone? If Safari is not working on your iPhone, make sure you have a strong Wi-Fi or cellular connection. Additionally, verify that Screen Time limits are not enabled.
Disclaimer
Technology is constantly evolving, and smartphone and desktop tech rarely remains static. Therefore, the information in this post is only accurate as of the date it was written. Blog posts that are older than six months may contain instructions that are no longer compatible with your device or operating system. We hope that the content from previous posts continues to function as intended. Thank you for reading TechSavvy.Life, where technology works for you.
Quote For the Day
“Technology means you can now do amazing things easily, but you can’t easily do them legally.”
― Lawrence Lessig
(X) Twitter Info
That’s it. Please feel free to share this post! One way to share is via Twitter.
Just click the Tweet icon below. This will launch Twitter where you click its icon to post the Tweet.
Checkout TechSavvy.Life for blog posts on smartphones, PCs, and Macs! You may email us at contact@techsavvy.life for comments or questions.
We value your feedback! Was this post helpful? Please share your comments with us. If you have a tech question related to your computer or smart device, feel free to reach out. Just send an email to contact@techsavvy.life, and be sure to include the device, app, and version you are using. To assist us further, you can also attach screenshots related to your inquiry.
The author’s Vietnam eBook on the “Battle for Tra Bong Vietnam: Events and Aftermath” can be accessed from a Kindle device or the Kindle App for a desktop or smartphone. The apps are free.
The author’s Vietnam eBook on the Battle for Tra Bong Vietnam: Events and Aftermath
The article explains how to set up an Alternate Appearance for Face ID on iPhones, allowing other users to unlock the device in emergencies. This is useful for shared phones. Instructions are provided for adding a second face, including using it while wearing a mask. Full access is granted to added faces.
RAYMOND OGLESBY @RaymondOglesby2 May 20, 2025– 5 minutes read time
Overview
Face ID has been the default security feature for Apple’s smartphones since its debut. However, if you would like to share your iPhone with a partner, friend, or child, unlocking might be a little difficult. Fortunately, just like Touch ID allows you to save multiple fingerprints, there is a way to enable another person’s face to unlock your iPhone. Let’s explore how to add another Face ID.
Why You Will Like This Tip
Set up an Alternate Appearance for Face ID to allow other family members or friends to unlock your device in case of emergency.
If someone is sharing an iPhone, adding two appearances to Face ID ensures both users can get into the phone.
System Requirements
This tip was performed on an iPhone 14 Pro running iOS 18.4.1.
Click here to learn how to update your iPhone to the latest iOS version.
Add Another Face ID
Before we begin, it’s essential to note that the Alternate Appearance option is designed to enable the use of Face ID and Apple Pay while wearing glasses, sunglasses, facemasks, hats, and other similar accessories.
Please be aware that if you set up this feature to add the face of a partner, friend, or child so that they can unlock your phone, they will have full access to your device.
Now, here’s how to add a second Face ID by adding an alternate appearance.
First, open the Settings app, and select Face ID & Passcode option. You will be prompted to enter your passcode to continue. Refer to the image below:
Selecting the Face ID & Passcode option
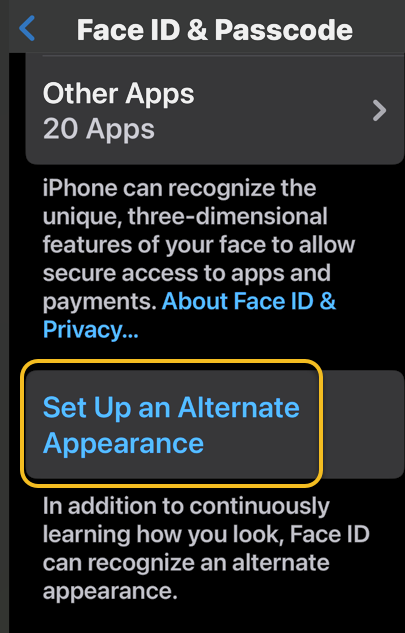
Next, tap Set Up an Alternate Appearance option. See the image below:
Selecting the Setup Up an Alternate Appearance option
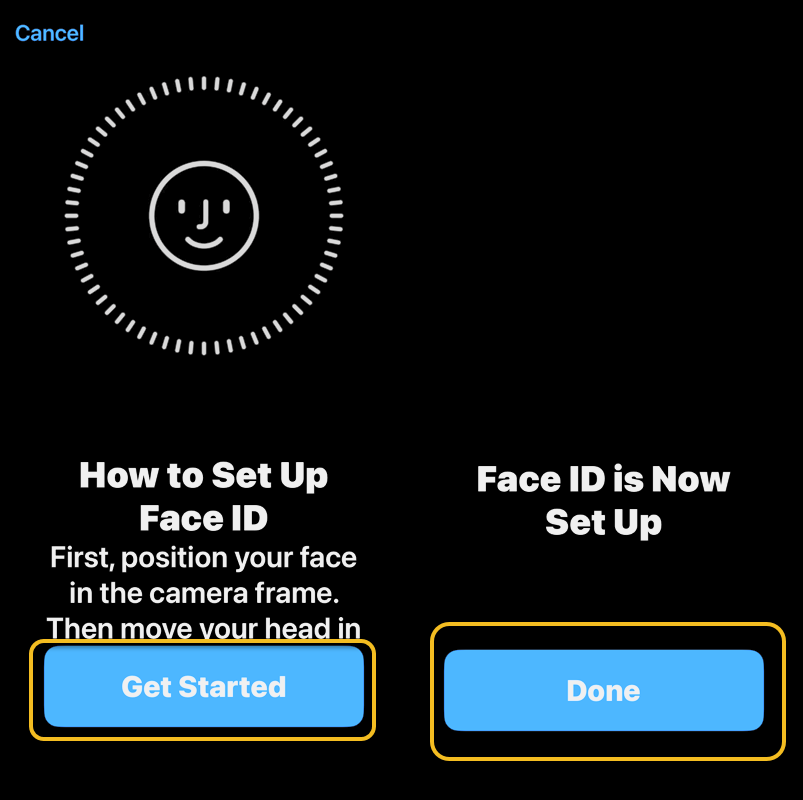
Now, tap Get Started and follow the on-screen prompts to add a second face to Face ID. See the following image:
Selecting Get Started, then Done when finished
Next, if you do not see the Set Up an Alternate Appearance button, you may already have an alternate appearance saved. The only way to remove an alternate appearance and add a new one is to tap Reset Face ID. When resetting Face ID, you will need to set up your own face again before setting up the alternate appearance. Refer to the image below:
Selecting the Reset Face ID option
That’s how to add another face to Face ID. Once you have set up an Alternate Appearance for Face ID, they should have no problem using Face ID to unlock your device. This can be incredibly useful in the event of an emergency in which you are unable to unlock your phone yourself.
Be aware that if you have locked any apps with Face ID, any other faces you have saved as alternate appearances will also be able to unlock them. Alternate faces will also be able to make purchases with Face ID.
Add Face ID When Wearing a Mask
Additionally, you can setup an Alternate Appearance when wearing a mask. First, head to:
Settings > Face IO & Passcode
You will be prompted to enter your passcode to continue. See the image below:
Selecting the Face ID & Passcode option
Next, scroll down and tap Setup Face ID with a Mask for Alternate Appearance. See the following image:
Selecting the Set Up Face ID with a Mask for the Alternate Appearance option
Now, tap Use Face ID with a Mask and follow the on-screen prompts. Refer to the image below:
Selecting the Use Face ID with a Mask option
Disclaimer
Technology is constantly evolving, and smartphone and desktop tech rarely remains static. Therefore, the information in this post is only accurate as of the date it was written. Blog posts that are older than six months may contain instructions that are no longer compatible with your device or operating system. We hope that the content from previous posts continues to function as intended. Thank you for reading TechSavvy.Life, where technology works for you.
Quote For the Day
“Humanity is acquiring all the right technology for all the wrong reasons.”
― R. Buckminster Fuller
(X) Twitter Info
You are finished. Please feel free to share this post! One way to share is via Twitter.
Just click the Tweet icon below. This will launch Twitter where you click its icon to post the Tweet.
Checkout TechSavvy.Life for blog posts on smartphones, PCs, and Macs! You may email us at contact@techsavvy.life for comments or questions.
We value your feedback! Was this post helpful? Please share your comments with us. If you have a tech question related to your computer or smart device, feel free to reach out. Just send an email to contact@techsavvy.life, and be sure to include the device, app, and version you are using. To assist us further, you can also attach screenshots related to your inquiry.
The author’s Vietnam eBook on the “Battle for Tra Bong Vietnam: Events and Aftermath” can be accessed from a Kindle device or the Kindle App for a desktop or smartphone. The apps are free.
The author’s Vietnam eBook on the Battle for Tra Bong Vietnam: Events and Aftermath
The iPhone Dark Mode feature enhances user experience by darkening backgrounds and lightening text for better contrast, reducing eye strain, and improving battery life. Accessible through Settings or Control Center, it can be toggled manually or set to activate automatically. This feature is available on most iPhone models.
RAYMOND OGLESBY @RaymondOglesby2 May 13, 2025 – 3 minutes read time
Overview
The iPhone Dark Mode feature reverses the color scheme on your iPhone, darkening the background and lightening text to provide higher contrast. This change will affect the theme for built-in apps, including Files, Messages, Music, Notes, Safari, and Settings.
Additionally, it can help reduce eye strain caused by looking at bright screens, or just look better to some users. To enable Dark Mode on iPhones of most models, simply make a quick change in the Settings app.
Enabling Dark Mode on your iPhone is easy, as it can be turned on and off as needed, or you can set it to activate automatically in the evenings. Let’s explore this feature.
Why You will Like This Tip
Dark Mode on iPhone is a neat setting that can help reduce eye strain while you use your iPhone.
You can also enjoy longer battery life and improved focus while using Dark Mode for iPhone.
Your phone can automatically toggle between Light and Dark Mode, depending on the time of day!
System Requirements
This tip was performed on an iPhone 14 Pro running iOS 18.4.1 but will work on most models and older software versions.
Click here to learn how to update your iPhone to the latest iOS version.
Enable Dark Mode
First, open Settings. Refer to the image below:
Selecting the Settings app
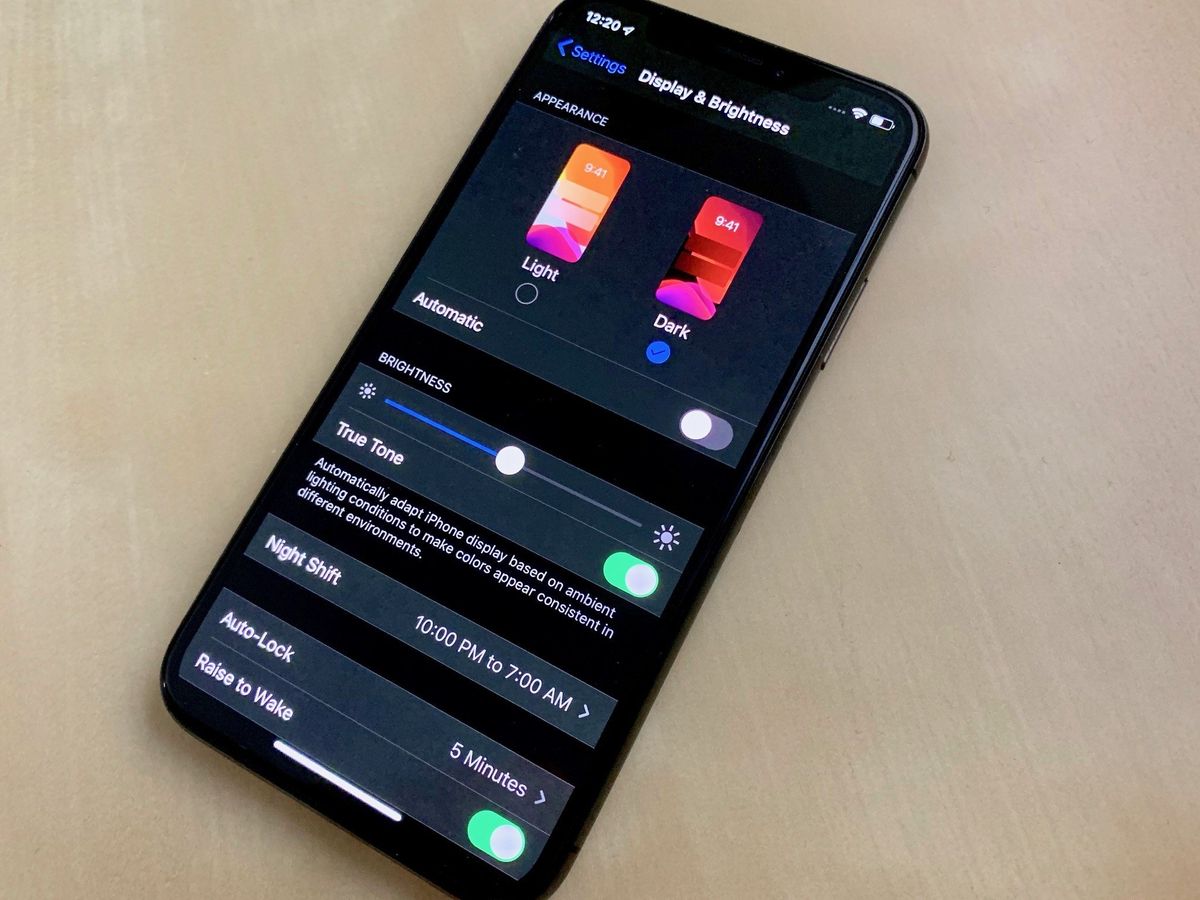
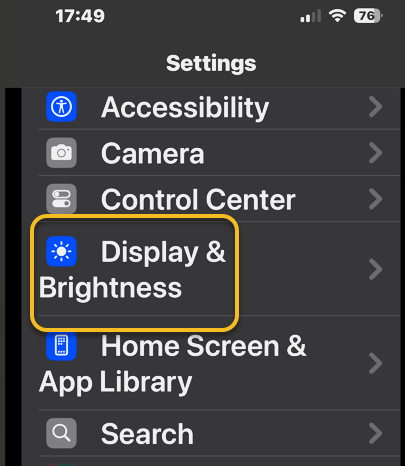
Next, tap Disply & Brightness. See the image below:
Selecting the Display & Brightness option
Now, tap the circle under Dark. See the following image:
Running on Dark Mode
Next, to make Dark Mode turn on automatically when the sun sets and off again when the sun rises, make sure that Automatic is toggled on. Refer to the image below:
Enabling automatic Dark Mode
Now, Dark Mode is turned on for your iPhone, and you can enjoy some battery saving, improved focus, and reduced eye strain!
Use Control Center to Access Dark Mode
You can also access Dark Mode from your Control Center. Simply open your Control Center by swiping down from the upper right corner. Then, touch and hold the Brightness bar and select Dark Mode. See the image below:
Accessing Dark Mode via Control Center
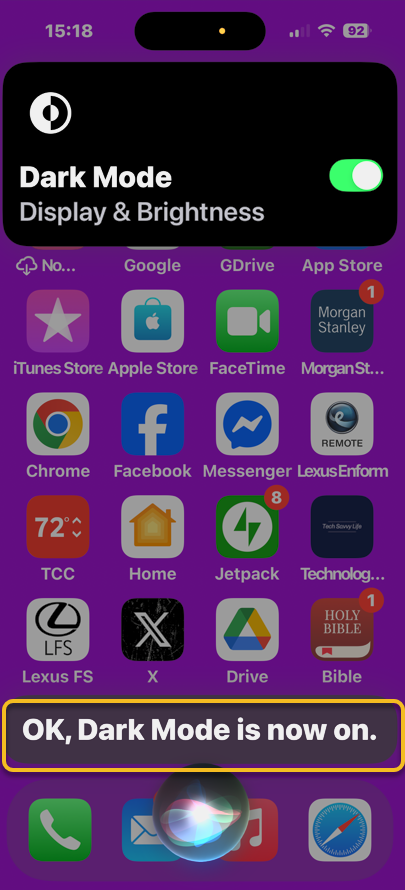
The fastest way to turn Dark Mode on or off is to just ask Siri. “Hey Siri, turn on Dark Mode. See the following image:
Using Siri to access Dark Mode
Disclaimer
Technology is constantly evolving, and smartphone and desktop tech rarely remains static. Therefore, the information in this post is only accurate as of the date it was written. Blog posts that are older than six months may contain instructions that are no longer compatible with your device or operating system. We hope that the content from previous posts continues to function as intended. Thank you for reading TechSavvy.Life, where technology works for you.
Quote For the Day
. “I’d rather check my Facebook than face my checkbook.”
― Craig Coelho
(X) Twitter Info
That’s it. Please feel free to share this post! One way to share is via Twitter.
Just click the Tweet icon below. This will launch Twitter where you click its icon to post the Tweet.
Checkout TechSavvy.Life for blog posts on smartphones, PCs, and Macs! You may email us at contact@techsavvy.life for comments or questions.
We value your feedback! Was this post helpful? Please share your comments with us. If you have a tech question related to your computer or smart device, feel free to reach out. Just send an email to contact@techsavvy.life, and be sure to include the device, app, and version you are using. To assist us further, you can also attach screenshots related to your inquiry.
The author’s Vietnam eBook on the “Battle for Tra Bong Vietnam: Events and Aftermath” can be accessed from a Kindle device or the Kindle App for a desktop or smartphone. The apps are free.
The author’s Vietnam eBook on the Battle for Tra Bong Vietnam: Events and Aftermath
The post details how to forward text messages, including photos, on an iPhone. To forward a message, users should long press the message, select “More,” choose additional messages if desired, tap the forward icon, enter the recipient’s contact, and send it. This method allows efficient sharing without creating group texts.
RAYMOND OGLESBY @RaymondOglesby2 May 6, 2025– 4 minutes read time
Overview
You can easily forward texts from the Messages app, including photos. Just press and hold the message you want to forward. Let’s explore how to forward a text message on an iPhone.
Why You Will Like This Tip
Learn how to forward a text on iPhone to quickly send pictures you received in Messages to friends and family.
Use text message forwarding to send the same message to multiple people without making it a group text
System Requirements
This tip was performed on an iPhone 14 Pro running iOS 18.4..1.
Click here to learn how to update your iPhone to the latest iOS version.
Text Forwarding Explained
Whether it’s sharing important information, funny memes, or heartfelt messages, we often find ourselves wanting to pass along these texts to others. Fortunately, forwarding a text message is a simple task that can be accomplished on most smartphones.
Text message forwarding allows you to send a message you have received to another recipient, either within the same messaging app or through a different platform like email. This feature is handy for sharing information quickly and efficiently. However, remember that forwarded text messages can not be deleted once sent to another contact.
Forward a Text
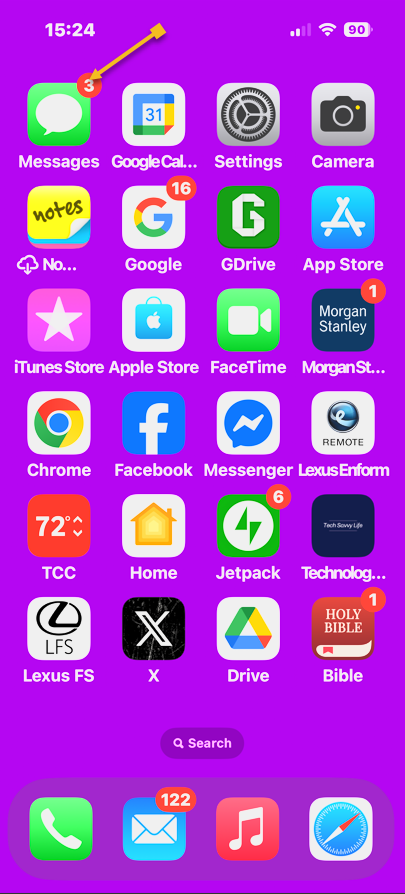
First, open the Messages app. Refer to the image below.
Selecting the Messages app
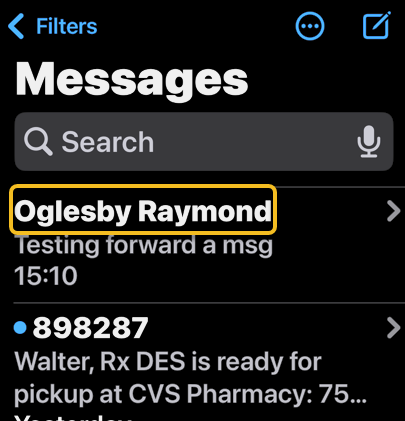
Next, tap the conversation containing the text you want to forward. See the below image:
Selecting a conversation
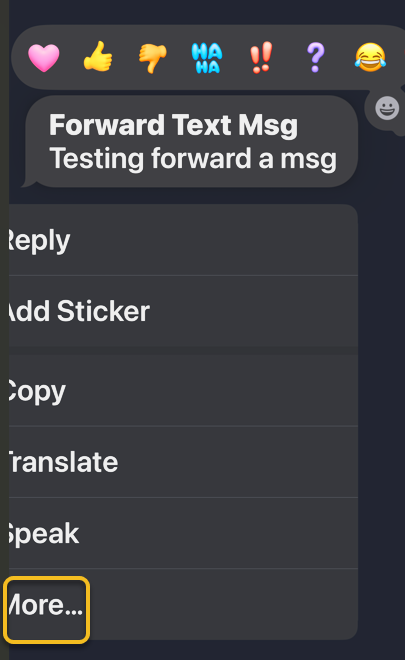
Now, long press on the body of the message you want to forward, then tap More. See the following image:
Selecting the More option
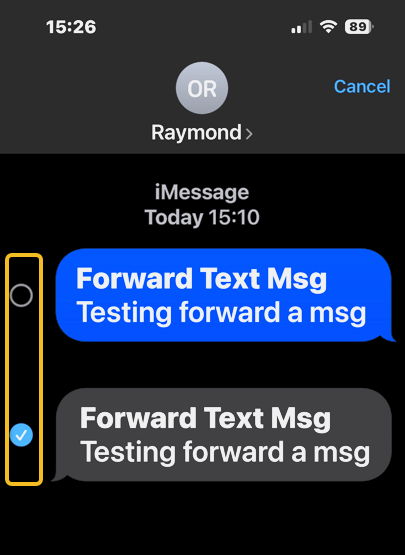
Next, all the messages will have small circles that will appear to the left of each text, with the chosen message already selected. If desired, tap the circle next to any other messages you want to forward. Refer to the image below:
Tapping the circle next to the message you want to forward
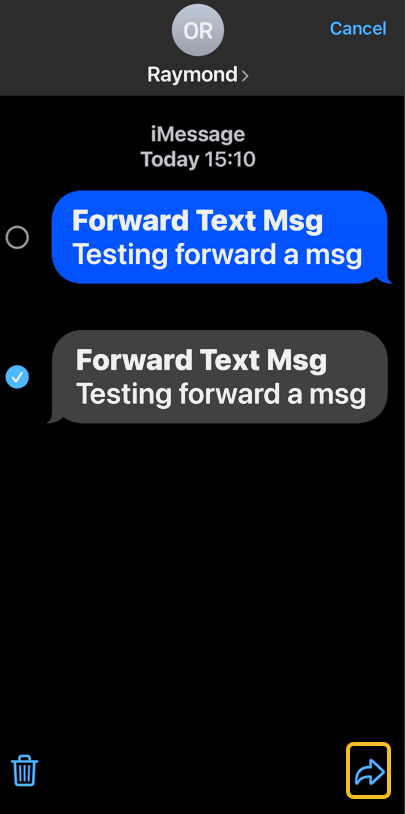
Now, tap the Forward icon, and a new message will open. See the below image:
Selecting the Forward icon
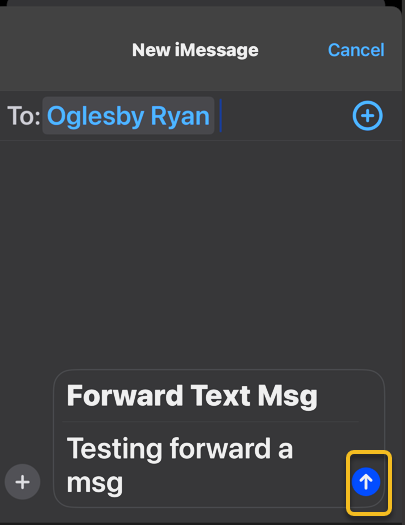
Next, enter your recipient’s contact information and tap the contact when it pops up. See the following image:
Entering a contact
Now, tap the Send icon. Refer to the image below:
Selecting the Send icon
Your friend will receive the text you have forwarded. So much easier than retyping a whole message or using copy and paste!
Disclaimer
Technology is constantly evolving, and smartphone and desktop tech rarely remains static. Therefore, the information in this post is only accurate as of the date it was written. Blog posts that are older than six months may contain instructions that are no longer compatible with your device or operating system. We hope that the content from previous posts continues to function as intended. Thank you for reading TechSavvy.Life, where technology works for you.
Quote For the Day
. “Even the technology that promises to unite us divides us. Each of us is now electronically connected to the globe, and yet we feel utterly alone.”
― Dan Brown
X (Twitter) Info
That’s it. Please feel free to share this post! One way to share is via Twitter.
Just click the Tweet icon below. This will launch Twitter where you click its icon to post the Tweet.
Checkout TechSavvy.Life for blog posts on smartphones, PCs, and Macs! You may email us at contact@techsavvy.life for comments or questions.
We value your feedback! Was this post helpful? Please share your comments with us. If you have a tech question related to your computer or smart device, feel free to reach out. Just send an email to contact@techsavvy.life, and be sure to include the device, app, and version you are using. To assist us further, you can also attach screenshots related to your inquiry.
The author’s Vietnam eBook on the “Battle for Tra Bong Vietnam: Events and Aftermath” can be accessed from a Kindle device or the Kindle App for a desktop or smartphone. The apps are free.
The author’s Vietnam eBook on the Battle for Tra Bong Vietnam: Events and Aftermath
This post provides a guide on changing Siri’s voice on iPhones. Users can select different accents and voice options in the Settings app under Siri. The process is straightforward, enhancing user experience by personalizing Siri’s voice to be more relatable and understandable. Compatibility depends on current iOS versions.
RAYMOND OGLESBY @RaymondOglesby2 April 29, 2025 – 3 minutes read time
Overview
Tired of your current Siri voice? Let’s learn how to change it. Apple has recorded actors’ voices and run them through its neural text-to-speech engine in an effort to make Siri sound more natural, so you have more options than ever for how Siri’s voice should sound.
If you have not used Siri before, when you first use the virtual assistant, you will be prompted to choose a voice for it, but if you have, you can change the voice Siri is using manually. So, how do you change Siri’s voice? You can customize Siri’s voice in the Settings app. Let’s find out how.
Why You Will Like This Tip
Customize Siri’s voice to one that you like the best.
Make Siri more understandable by matching the voice to your country’s native accent.
System Requirements
This tip was performed on an iPhone 14 Pro running iOS 18.4.1
Click here to learn how to update your iPhone to the latest iOS version.
Change Siri’s Voice
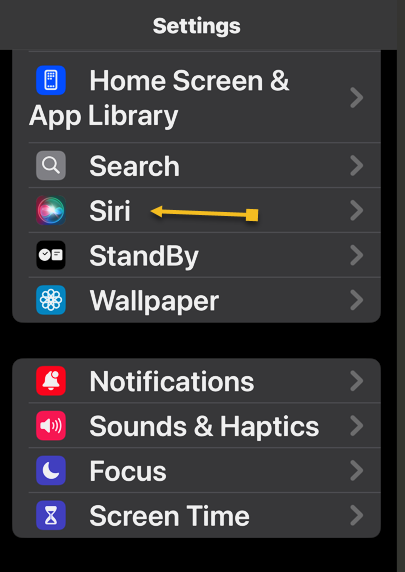
First, open Settings, and tap either Siri or Apple Intelligence & Siri (the menu option will appear differently depending on whether or not you have an Apple Intelligence-enabled device). Refer to the below image:
Selecting the Siri option
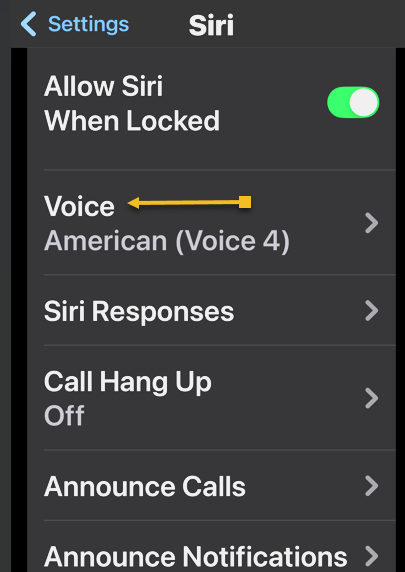
Next, tap Voice. See the image below:
Selecting the Voice option
Now, under Variations, you can choose between American, Australian, British, Indian, Irish, or South African. See the following image:
Selecting a Voice Variation
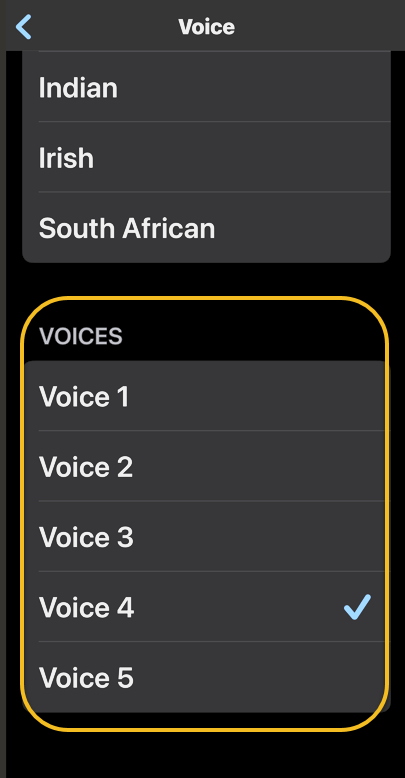
Next, after you have decided on your Variation, you can select a Voice. Depending on which Variation you chose, you should have between 2-5 different voices. Refer to the image below:
Selecting a Voice
Now, once you have found one you like, it will take some time for your iPhone to completely download the voice, though you do not need to wait in Settings for it to do so. See the image below:
Downloading a Voice
If you change the voice of your Siri on your iPhone, it will change it across your synced devices.
That’s how to change Siri’s voice. It’s that easy!
Disclaimer
Technology is constantly evolving, and smartphone and desktop tech rarely remains static. Therefore, the information in this post is only accurate as of the date it was written. Blog posts that are older than six months may contain instructions that are no longer compatible with your device or operating system. We hope that the content from previous posts continues to function as intended. Thank you for reading TechSavvy.Life, where technology works for you.
Quote For the Day
. “Cars will soon have the Internet on the dashboard. I worry that this will distract me from my texting.”
― Andy Borowitz
X (Twitter) Info
That’s it. Please feel free to share this post! One way to share is via Twitter.
Just click the Tweet icon below. This will launch Twitter where you click its icon to post the Tweet.
vCheckout TechSavvy.Life for blog posts on smartphones, PCs, and Macs! You may email us at contact@techsavvy.life for comments or questions.
We value your feedback! Was this post helpful? Please share your comments with us. If you have a tech question related to your computer or smart device, feel free to reach out. Just send an email to contact@techsavvy.life, and be sure to include the device, app, and version you are using. To assist us further, you can also attach screenshots related to your inquiry.
The author’s Vietnam eBook on the “Battle for Tra Bong Vietnam: Events and Aftermath” can be accessed from a Kindle device or the Kindle App for a desktop or smartphone. The apps are free.
The author’s Vietnam eBook on the Battle for Tra Bong Vietnam: Events and Aftermath
Apple has disabled Advanced Data Protection (ADP) for iCloud in the UK due to government demands for law enforcement access. This compromises data security, as backdoor access could be exploited. In contrast, ADP offers end-to-end encryption unavailable to Apple, ensuring only users can access their data. Users outside the UK retain this protection.
Insert dRAYMOND OGLESBY @RaymondOglesby2 April 1, 2025 – 6 minutes read time
Overview
Recently. Apple took the unusual step of turning off its highest level of iCloud encryption, Advanced Data Protection (ADP) for customers in the UK. The British government has reportedly demanded that Apple provide a method for law enforcement to access encrypted data as part of criminal investigations. But that creates a serious security problem, because this type of backdoor access can also be exploited by criminals or untrustworthy governments.
Why You Will like This Tip
Have the best encryption for your Apple devices.
Prevent hackers from accessing and viewing your data.
System Requirements
See below for the Apple software versions. These screenshots were captured using iOS 18.3.2 on iPhone 14 Pro.
Click here to learn how to update your iPhone to the latest iOS version.
United Kingdom vs United States
For people in the UK, ADP can no longer be enabled. If you are currently using ADP, you will need to turn off the feature at a future date.
If you are outside the UK and concerned about who can see your data, ADP adds an extra layer of security by making it unreadable even by Apple. If ADP is disabled, your data could be at risk because it can still be unlocked by Apple, a legal request or a data breach.
Let’s explore how to turn Advanced Data Protection on, and how it differs from the default iCloud encryption methods.
How Does ADP Work
The key difference between ADP and how Apple encrypts data by default is how accessible your information is when stored on Apple’s servers.
In what Apple calls standard data protection, information sent between points, such as files stored on iCloud Drive and iCloud backups of your devices, is encrypted and transmitted securely. If someone intercepts that data between the two points, they will see only gibberish.
That data remains encrypted when it’s stored on Apple’s servers, so you can access it from other devices, for instance. However, Apple can still access the encryption keys to unscramble and read the data; and provide it to law enforcement following a legal request.
By contrast, when you enable Advanced Data Protection for iCloud, the data is end-to-end encrypted, meaning only your trusted devices possess the encryption keys to read it. The information remains encrypted on the servers, and not even Apple can access its contents. (Not all iCloud data can be end-to-end encrypted. Apple breaks out-which types of information, such as iCloud Mail messages, that remain covered by standard data protection even when ADP is turned on.)
The UK’s Investigatory Powers Act, the “Snooperd’s Charter”, makes that inaccessibility illegal, which is why Apple is turning the feature off for UK customers.
Some services are end-to-end encrypted regardless due to the sensitivity of the data, such as passwords, information stored in the Health app and payment information.
Setup Your Account for ADP
Note! Setting up ADP applies to all devices in your Apple account.
To set up ADP on your account, first make sure you have met all the prerequisites for the feature:
Your Apple Account must use two-factor authentication.
You must have a recovery method set up in case you lose access to your account. That can be a 28-character Recovery Key or a person you have designated as a Trusted Contact.
Every device connected with your Apple Account must be able to run at least
iOS 16.2, iPadOS 16.2, MacOS 13.1
WatchOS 9.2
TVOS 16.2
HomePod 16.0
For Windows computers, make sure iCloud for Windows is at version 14.1 or later.
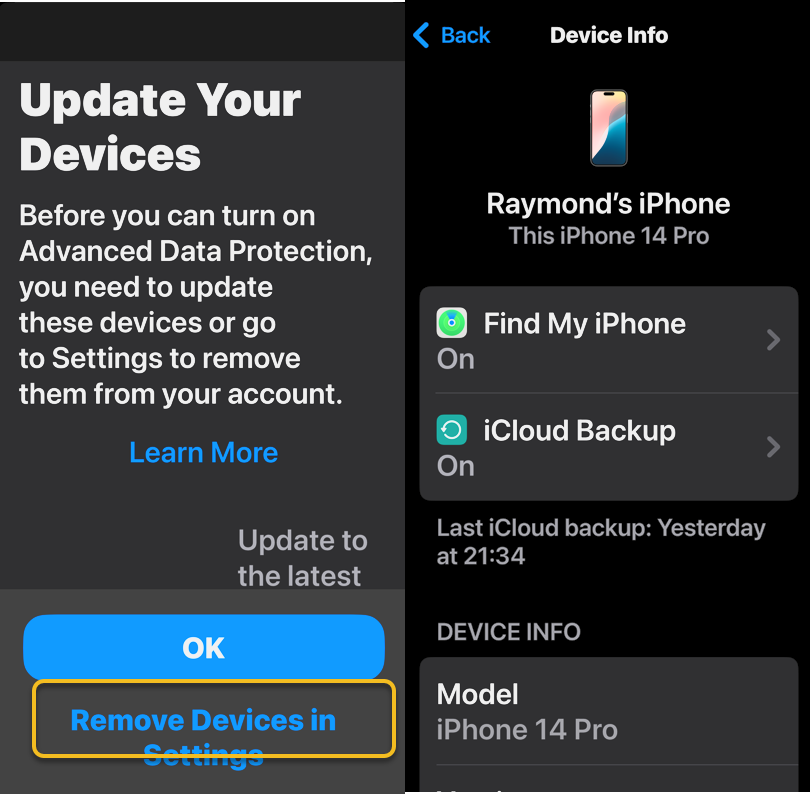
If any of your devices do not qualify, you will be warned during the ADP setup process. If any of those are too old or you no longer have access to them, head to:
Settings > Remove Devices and delete them from your list.
Refer to the below image:
Update your Devices
How to Setup
To turn on ADP on an iPhone, iPad or Mac do the following:
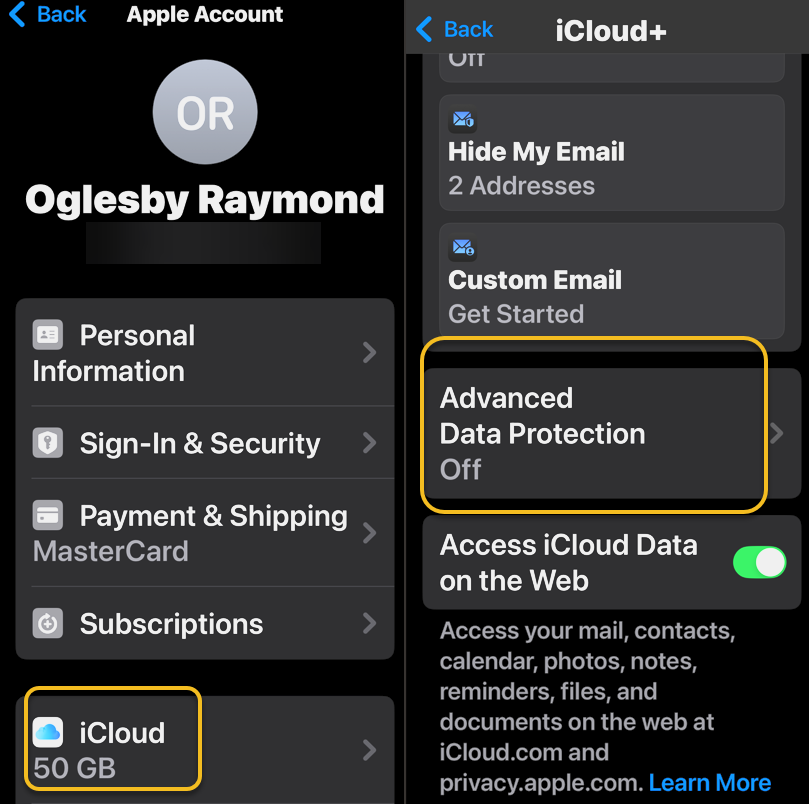
1. Go to Settings > [Your Name] > iCloud. On a Mac, open System Settings > [Your Name] > iCloud.
2. Scroll down to Advanced Data Protection, which likely says Off, and tap that to enable. This will take some time, and the screen will appear to be unresponsive; Just be patient. Later, if you want to disable ADP, repeat the above steps and select the Turn Off button.
See the below image:
Turn on ADP
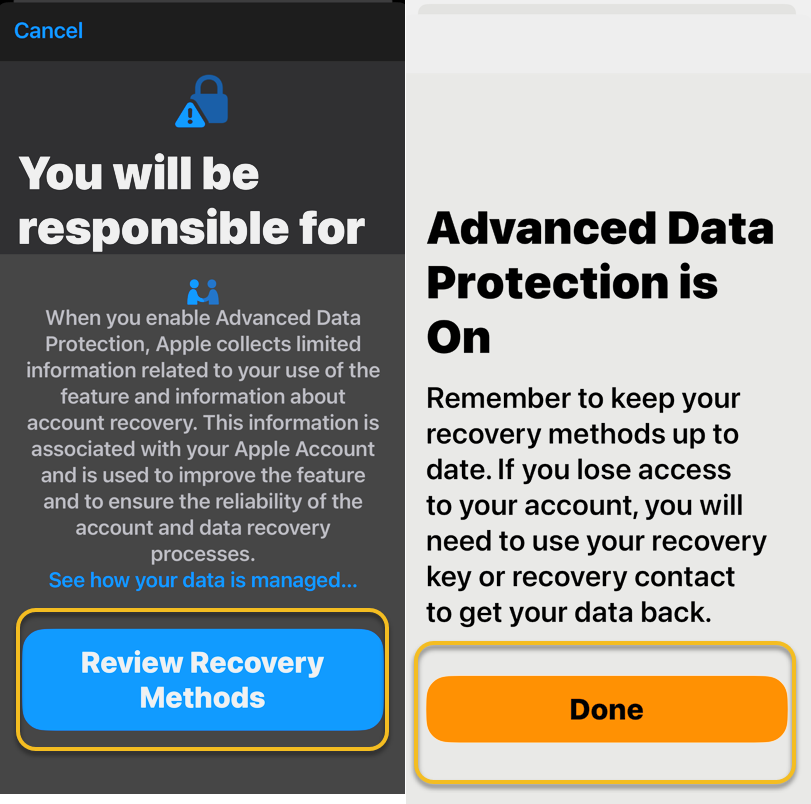
3, If there are any of the aforementioned impediments to setting up ADP, such as needing to update other devices on your account, you will review them on the next screen.
4. In the following screen, tap Review Recovery Options. You need to have a Recovery Key, Recovery Contact or both to ensure that you can get your data if you lose access to your iCloud account.
5. Enter your device’s passcode to finish.
See the following image:
ADP is Enables
Activating ADP on one device means it’s on for all of your devices using the same Apple account, so you only need to set it up once.
Disclaimer
Technology is constantly evolving, and smartphone and desktop tech rarely remains static. Therefore, the information in this post is only accurate as of the date it was written. Blog posts that are older than six months may contain instructions that are no longer compatible with your device or operating system. We hope that the content from previous posts continues to function as intended. Thank you for reading TechSavvy.Life, where technology works for you.
Quote For the Day
. “Imagination is more important than knowledge. For knowledge is limited, whereas imagination embraces the entire world, stimulating progress, giving birth to evolution.”
-Albert Einstein
X (Twitter) info
That’s it. Please feel free to share this post! One way to share is via Twitter.
Just click the Tweet icon below. This will launch Twitter where you click its icon to post the Tweet.
Checkout TechSavvy.Life for blog posts on smartphones, PCs, and Macs! You may email us at contact@techsavvy.life for comments or questions.
We value your feedback! Was this post helpful? Please share your comments with us. If you have a tech question related to your computer or smart device, feel free to reach out. Just send an email to contact@techsavvy.life, and be sure to include the device, app, and version you are using. To assist us further, you can also attach screenshots related to your inquiry.
The author’s Vietnam eBook on the “Battle for Tra Bong Vietnam: Events and Aftermath” can be accessed from a Kindle device or the Kindle App for a desktop or smartphone. The apps are free.
The author’s Vietnam eBook on the Battle for Tra Bong Vietnam: Events and Aftermath
This post highlights a helpful trick for iPhone users to type numbers and symbols without switching keyboards. By holding the 123 button, users can access numbers while continuing to type with the ABC keyboard. It also discusses a fun, less practical feature in iOS 17 that displays the time on-screen.
RAYMOND OGLESBY @RaymondOglesby2 March 25, 2025 – 5 minutes read time
Overview
It would be convenient if Apple added a numbers row to the standard iPhone keyboard, but it has not happened yet. If you want an iPhone keyboard with numbers, here’s an iPhone texting trick. This post shows how to access iOS keyboard symbols and numbers without leaving the standard keyboard.
Why You Will like This Tip
Type numbers quickly and efficiently without having to switch to the number keyboard.
Impress your friends with your iPhone keyboard-shortcut knowledge.
System Requirements
While the steps below work on previous iOS software versions, the screenshots shown were captured using iOS 18.3.2 on iPhone 14 Pro.
Click here to learn how to update your iPhone to the latest iOS version.
Typing Numbers
Have you been wishing for an iPhone keyboard with numbers and symbols? Let’s go over how to access numbers and symbols without leaving the ABC keyboard on your iPhone.
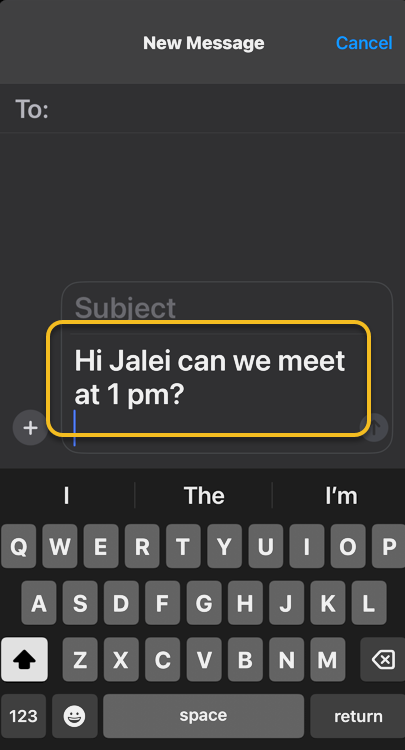
First, open any app where you want to use a keypad with numbers, such as Messages or Notes.
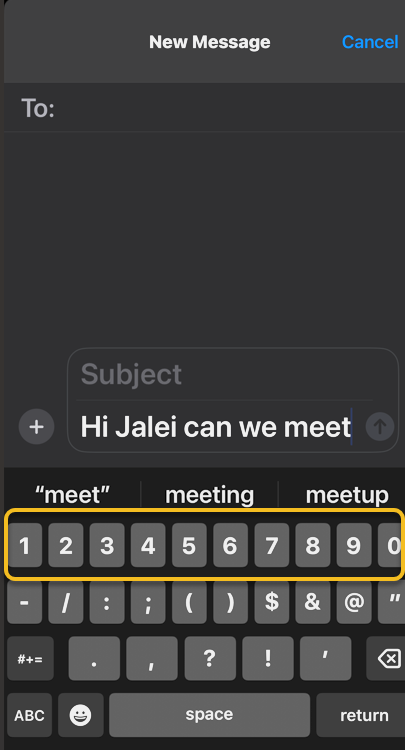
Next, when typing, touch and hold the 123 button to bring up the keypad with numbers. Since the button is on the left side of the screen, it works best to do this with your left hand. You will need to keep holding it while you type the numbers and/or symbols. Refer to the below image:
Entering a new message
Now, while still holding the 123 buttons, type the numbers or symbols you need using the other hand. See the below image:
Holding down the 123 button to display the numbers
Next, release the 123 button, which will automatically switch back to the ABC keys. You can then carry on typing in the standard iPhone keyboard to complete your text. See the following image:
Release the 123 button to return the normal keyboard
That’s how to get numbers on an iPhone keyboard the quickest way! For those who already type with two hands, this will be a breeze. If you typically type with only one hand, this iPhone keyboard shortcut may take a little bit of getting used to, but it’s still faster than having to navigate from the ABC keyboard to the 123 keyboard and back!
BONUS: A Favorite Useless Tip
This tip uses the StandBy feature introduced in iOS 17. It should be enabled by default in iOS 17 and higher, but you will still want to confirm that it’s set up for this tip to work.
This nameless tip will show the time in the middle of your screen upon a certain action.
First, head to:
Settings > StandBy
and make sure StandBy and Always On (if you have that feature) are enabled.
Next, if you want to see notifications, turn on Show Notifications.
Now, tap the Display option, then enable the Night Mode switch if you want the screen to take on a red tint in reaction to low ambient light at night so it does not disturb your sleep. Refer to the below image:
Enabling options
Bext, you simply press and hold down the Time indicator in the status bar (top left). The current time will be displayed in the middle of your screen and stay there until you release the Time indicator. We ask, why? Some Apple engineer had too much time on his hands. See the below image:
Press and hold the Time indicator to display Time in the middle of the screen
Want more useless information? Press and hold the other indicators (signal strength, WiFi and Battery). See the following image:
Display another useless indicators
Disclaimer
Technology is constantly evolving, and smartphone and desktop tech rarely remains static. Therefore, the information in this post is only accurate as of the date it was written. Blog posts that are older than six months may contain instructions that are no longer compatible with your device or operating system. We hope that the content from previous posts continues to function as intended. Thank you for reading TechSavvy.Life, where technology works for you.
Quote For the Day
“Please, no matter how we advance technologically, please don’t abandon the book. There is nothing in our material world more beautiful than the book.”
-Patti Smith
X (Twitter Info)
That’s it. Please feel free to share this post! One way to share is via Twitter.
Just click the Tweet icon below. This will launch Twitter where you click its icon to post the Tweet.
Checkout TechSavvy.Life for blog posts on smartphones, PCs, and Macs! You may email us at contact@techsavvy.life for comments or questions.
We value your feedback! Was this post helpful? Please share your comments with us. If you have a tech question related to your computer or smart device, feel free to reach out. Just send an email to contact@techsavvy.life, and be sure to include the device, app, and version you are using. To assist us further, you can also attach screenshots related to your inquiry.
The author’s Vietnam eBook on the “Battle for Tra Bong Vietnam: Events and Aftermath” can be accessed from a Kindle device or the Kindle App for a desktop or smartphone. The apps are free.
The author’s Vietnam eBook on the Battle for Tra Bong Vietnam: Events and Aftermath