How to Use the New Windows Backup Tool

The new Windows Backup tool allows users to back up specific folders, apps, settings, and credentials to OneDrive, enabling restoration on the same or different PCs. A Microsoft Account is required, while traditional desktop apps cannot be backed up. Users can manage their backups through the Windows Backup interface.

RAYMOND OGLESBY @RaymondOglesby2
April 15, 2025 – 5 minutes read time

The new Windows Backup tool will back up specific folders, apps, settings, and credentials to the cloud.Also, user data and files, including documents, pictures, music, and videos, are backed up. You can then restore all those items to the same PC or a new computer. To use this feature, you need a Microsoft Account (work and school accounts are not supported, and neither is a local account). You also need adequate storage space. OneDrive offers 5GB for free, but you may need to upgrade to one of the paid Microsoft 365 plans for more storage.

NOTE! The primary limitation of the Windows Backup tool is that it will back up only certain locations and items. For example, it will not back up and restore traditional desktop apps, such as Microsoft 365 (which is strange), so make sure you have the software and sources for all the programs you will need to reinstall.

  • Peace of mind knowing your PC is backed up.
  • If something goes wrong, you can restore your data.

A PC Desktop or Laptop running Windows 10 or 11. Screenshots are from Windows 11 Pro.

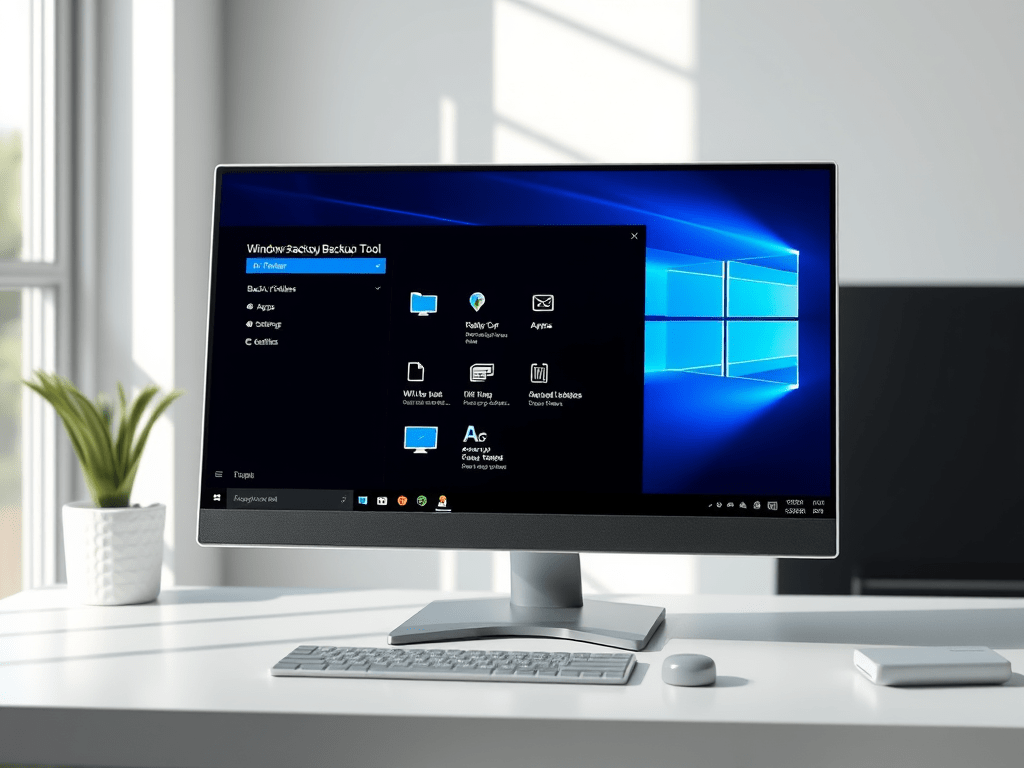
First, turn to the PC you want to back up. In Windows 10, click the Start button and select Windows Backup from the menu. In Windows 11, click the Start button, go to the All Apps screen, and then select Windows Backup. The Windows Backup Tool offers four different categories to configure—Folders, Apps, Settings, and Credentials. Refer to the image below:

Backup 1
Starting Windows Backup Tool

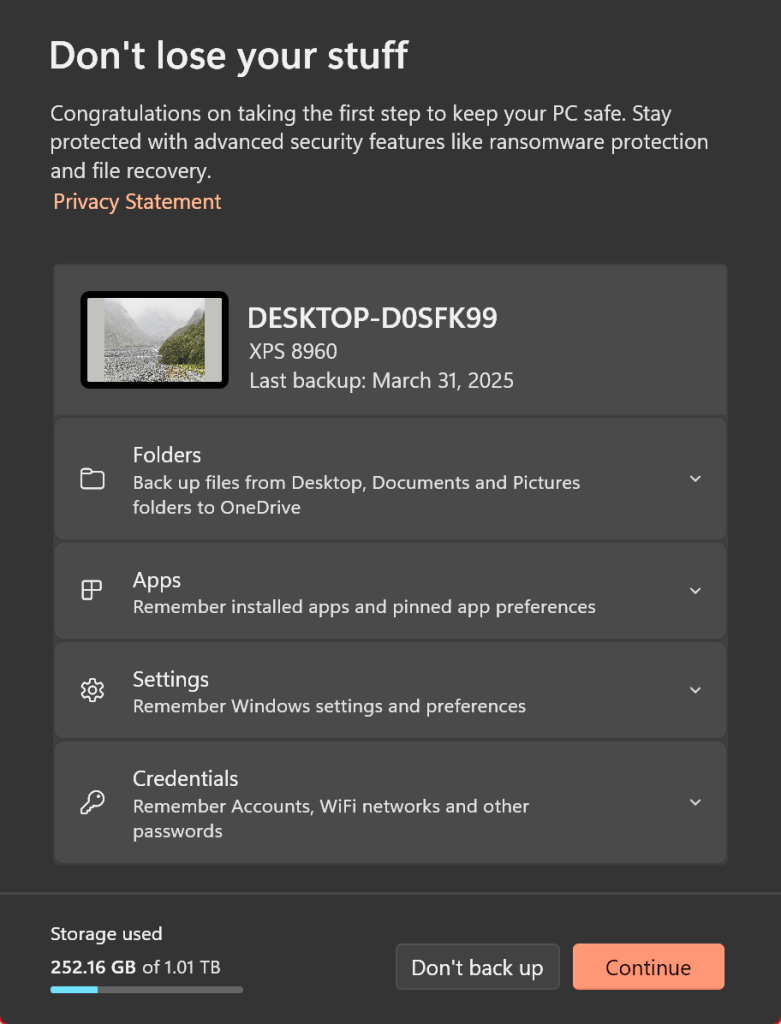
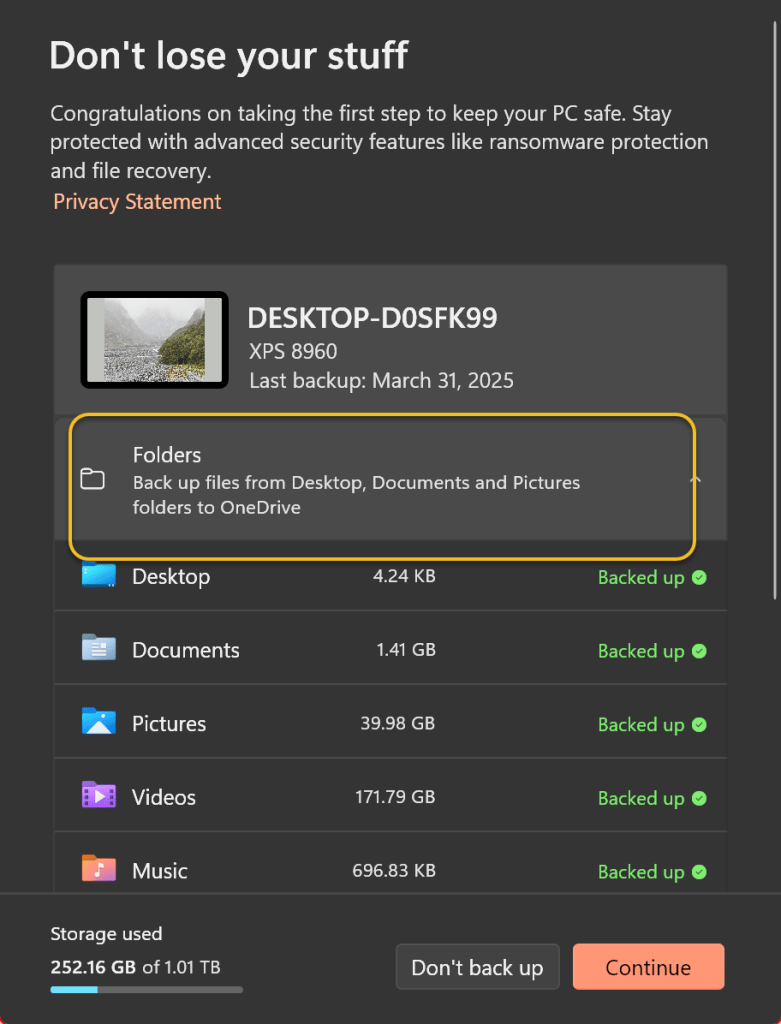
Now, click the down arrow next to Folders and enable the folders you wish to back up. If you have previously done a folder(s) backup, the last backup date will be shown and is enabled. You will be able to back up the Desktop, Documents, and Pictures folders. See the image below:

Backup 2
Selecting folders to backup

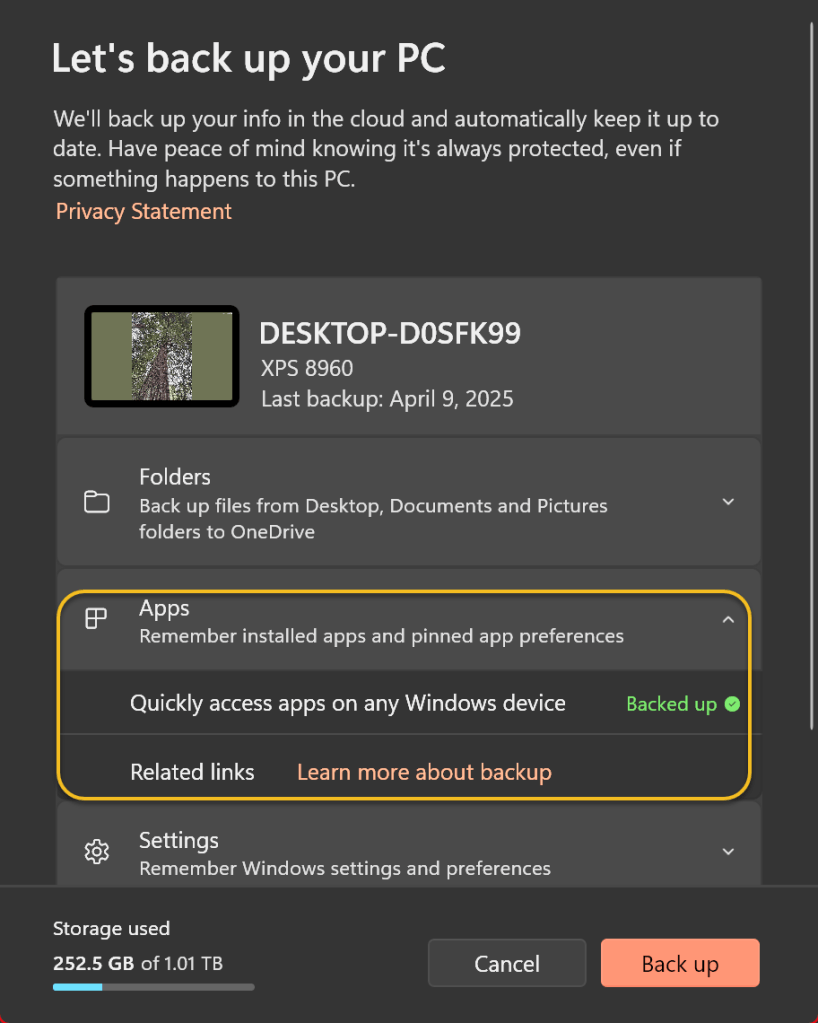
Next, click the down arrow next to Apps. Make sure Quickly access apps on any Windows device is turned on, as this will generate a list of installed apps so you can more easily recover them when you restore the backup. See the following image:

Backup 3
Selecting all Apps to backup

Now, click the down arrow next to Credentials and make sure the switch for Accounts, Wi-Fi networks and other passwords is turned on. Refer to the image below:

Backup 4
Selecting everything else to backup

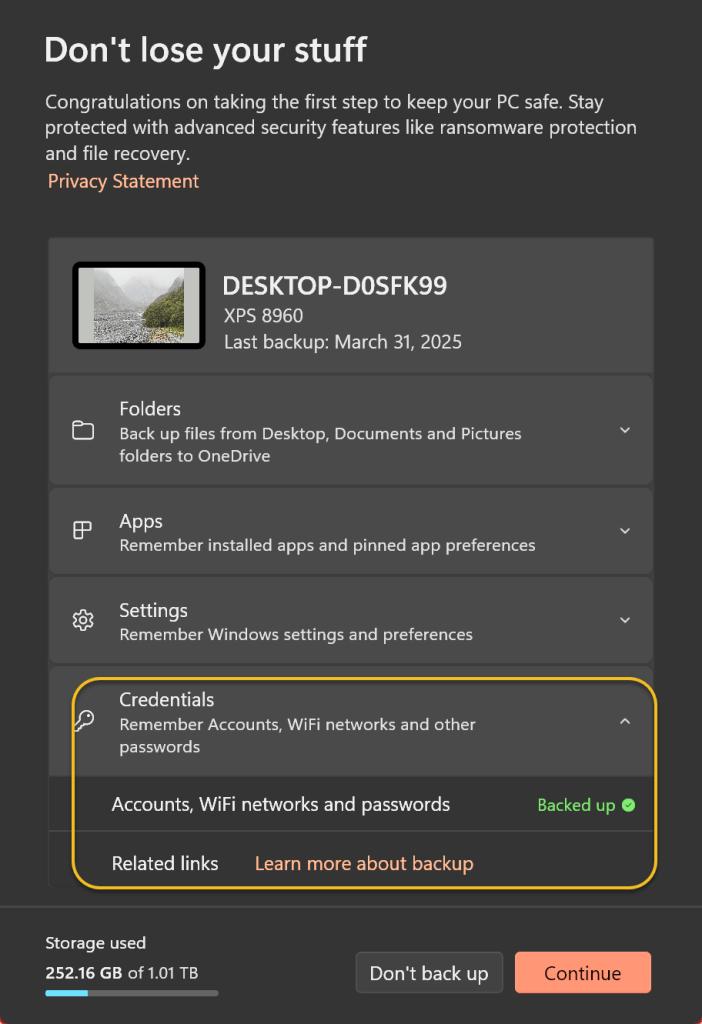
Next, when you are ready, click the Continue button. The items you selected are then backed up to your OneDrive storage. As the backup runs, you can minimize the Windows Backup app and work on other tasks. When the entire backup is finished, you will see that each of the four categories has been backed up. See the image below:

Backup 5
Clicking Continue to start the backup

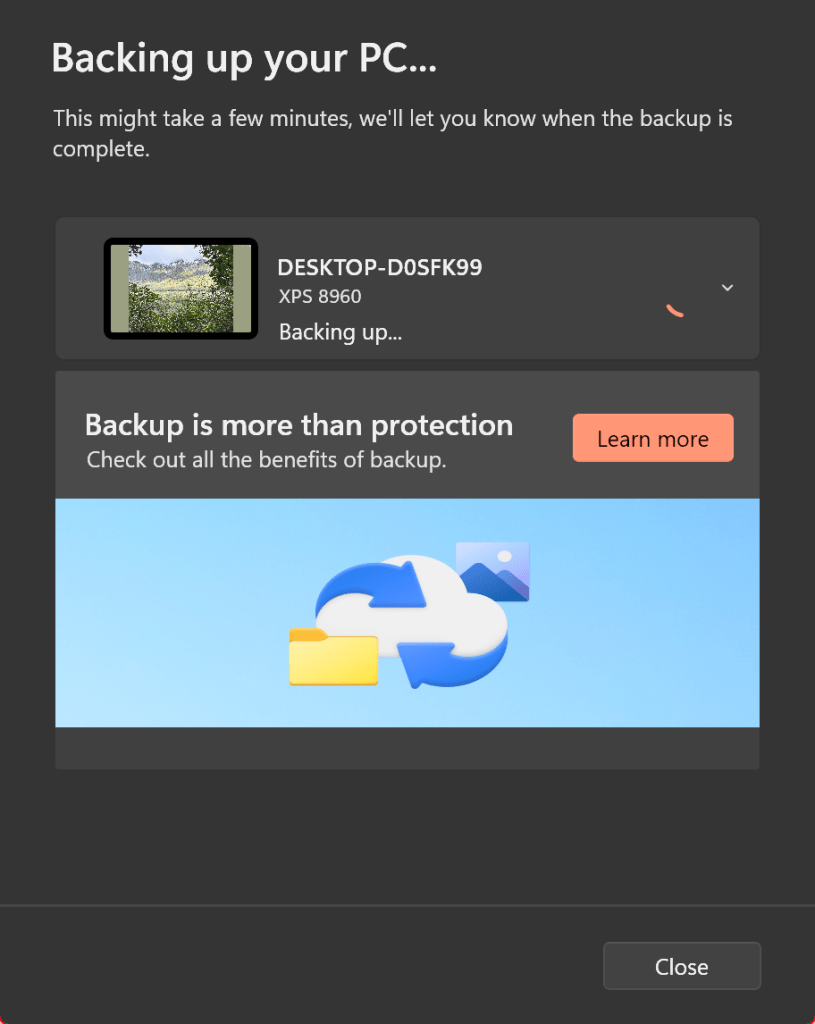
Now, you will receive a screen stating that your backup is in process. See the following image:

Backup 6
Your backup progress screen

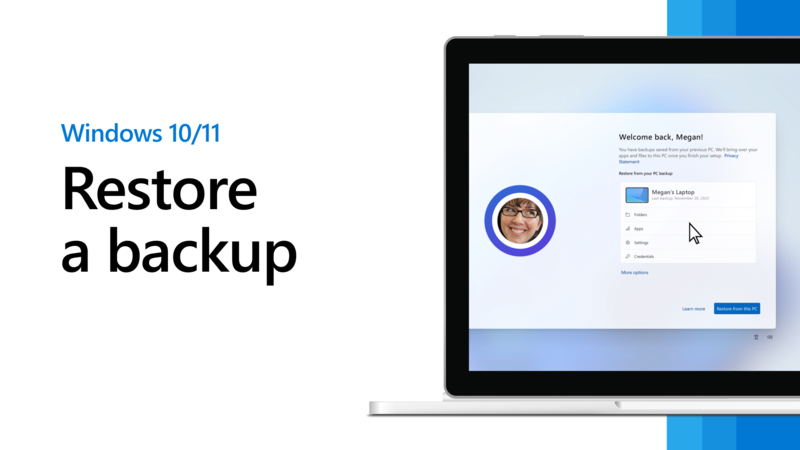
Now, if you reset Windows or switch to a new PC, you can restore your saved files during the setup process. You should see a screen welcoming you back and telling you that there are backups saved from the previous PC. Click the More options link. Refer to the image below:

Backup 0
Selecting to start a Restore from a backup

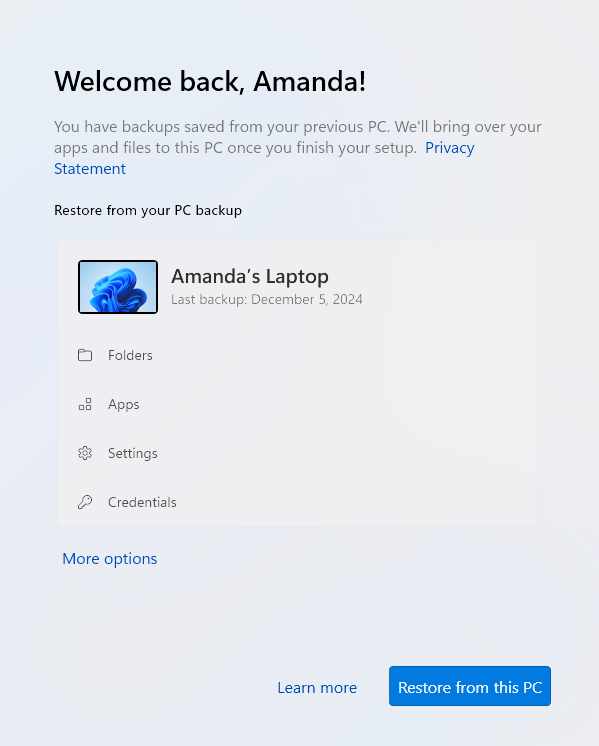
Next, select the name of the backup of your previous PC, and then click the Restore from this PC button. The items that you chose to back up are restored to your new computer. After this process is done, continue with the setup. When finished, sign in to your PC. See the image below:

Backup 8
Clicking Restore from this PC to begin the restore process

Now, click the Start menu, Settings screen, and File Explorer to see which apps and settings have been restored. Any program that needs to be reinstalled will display an arrow with the word Install on the icon. Click the app to either automatically reinstall it or open the Microsoft Store so you can download the program.

Disclaimer

Technology is constantly evolving, and smartphone and desktop tech rarely remains static. Therefore, the information in this post is only accurate as of the date it was written. Blog posts that are older than six months may contain instructions that are no longer compatible with your device or operating system. We hope that the content from previous posts continues to function as intended. Thank you for reading TechSavvy.Life, where technology works for you.

 “Good, bad, or indifferent, if you are not investing in new technology, you are going to be left behind.

— Philip Green

You are finished. Please feel free to share this post! One way to share is via Twitter.

Just click the Tweet icon below. This will launch Twitter where you click its icon to post the Tweet.

Checkout TechSavvy.Life for blog posts on smartphones, PCs, and Macs! You may email us at contact@techsavvy.life for comments or questions.

We value your feedback! Was this post helpful? Please share your comments with us. If you have a tech question related to your computer or smart device, feel free to reach out. Just send an email to contact@techsavvy.life, and be sure to include the device, app, and version you are using. To assist us further, you can also attach screenshots related to your inquiry.

AAuthor’s eBook

The author’s Vietnam eBook on the “Battle for Tra Bong Vietnam: Events and Aftermath” can be accessed from a Kindle device or the Kindle App for a desktop or smartphone. The apps are free.

The author’s Vietnam eBook on the Battle for Tra Bong Vietnam: Events and Aftermath

How to Send eBooks to Your Kindle: A Step-by-Step Guide

The Amazon Kindle is an effective ebook reader, linked closely to Amazon’s ecosystem. Users can send various ebook formats to their Kindle via methods like the Send to Kindle tool, Kindle app, or email. Free ebooks are readily available through various platforms, enhancing Kindle’s reading options.

RAYMOND OGLESBY @RaymondOglesby2
January 28, 2025 – 7 minutes read time

The Amazon Kindle is a great ebook reader, but it’s tightly tied to Amazon’s ecosystem. If you have a Fire tablet or a smartphone, you can download other e-reading apps to beef up your library, but with the Kindle hardware, you are pretty much tied to getting your content directly from Amazon. Well, sort of. Using some free software, you can take ebooks in various formats and zap them over to your Kindle.

Let’s explore how to send other ebook formats to your e-reader, and where to get free ebooks.

  • Of course, we all like free stuff.
  • A large variety of free ebooks to choose from.
  • Download in a variety of formats for reading on your Kindle.

This is for the Amazon Kindle. It uses the iPhone, Android, PC, and Mac. The screenshots are from Windows 10 and iPhone 14 Pro.

Amazon offers a Send to Kindle page where you can upload ebook files saved on your device. First, on amazon.com/sendtokindle, click Select files from device. Refer to the below image:

Kindle 1
Selecting files to send

Next, select the book you want on your Kindle. This tool supports PDF, DOC, DOCX, TXT, RTF, HTM, HTML, PNG, GIF, JPG, JPEG, BMP, and EPUB formats on ebooks up to 200MB in size. (Amazon no longer supports sending new Mobi files.) Ensure the Add to your library toggle is ON, then click Send. See the below image:

Kindle 2
Send your files

Now, a status bar will appear, letting you keep tabs on the upload. You will see a checkmark and an In Library notice when it’s ready. See the following image:

Kindle 3
Status of sending to Kindle

Amazon also has an app for Windows and macOS that lets you do the same thing. Chrome has an extension you can enable though results are mixed.

If you have the Kindle app installed on your iPhone or Android device, you can add ebooks to your library with a few taps. In the example below we downloaded an ebook from Project Gutenberg on the iPhone.

First, open your Kindle app on your iPhone and search for an ebook. Next, tap the ebook. From here, you can Download sample to see a preview or tap the Share icon. Now, locate the Kindle app and tap it. Refer to the below image:

Kindle 5
Selecting a file to send to Kindle

Next, ensure the Add to your library toggle is ON, then tap Send. Now, the ebook will be saved in your library in the Kindle app and on our Kindle device. The process is similar for Android. See the below image:

Kindle 5
Send your file

Amazon also lets you email ebooks to your Kindle account via a specially crafted email address. First, to get your Kindle’s email address, go to:

amazon.com/myk 

or go to:

Account & Lists > Content Library > Devices

Next, in the list below, find your Kindle device and click it. In the drop-down window, click [your name’s] Kindle. See the following image:

Kindle 7
Find your Kindle

On the next page, you will see a Device Summary that lists your @kindle.com email address. (It’s set to a default address, but you can change it by clicking Edit.)  Refer to the below page:

Kindle 7
Your Kindle information

Back up top, click the Preferences tab, and scroll down to Personal Document Settings. Click the down arrow on the right and scroll to Approved Personal Document E-mail List. The email attached to your Amazon account should be listed here. If that’s the email address you will be using to send ebooks to your Kindle, you are all set. To use a different email, click:

Add a new approved e-mail address and enter the address you want to use.

Remember, your Kindle needs to be attached to a Wi-Fi network for this to work.

Amazon can automatically convert PDFs into the Kindle format, but you get two formatting choices. If you want your Kindle to display every page in the PDF as if it were a graphic, just email the .pdf file to your Kindle’s address without a subject line, upload it via the Send to Kindle website, or drag and drop the file onto a Kindle that’s attached to your PC with a USB cable.

That will maintain the formatting and graphics; it will appear on your Kindle like on your laptop. However, the font size may be too small to read.

Your other option is to attach the PDF file to an email and make the subject line “convert”—just that word. Send it to your Kindle email address and your PDF will be converted into a Kindle version that will let you mark it up and change the formatting. The graphics will still be in there as well, but you will lose the layout of the original PDF.

Third-party software, such as MiniTool PDF Editor – Kindle format converter, can also convert PDF files to Kindle formats like Word, image, TXT, and HTML.

Once you have emailed your ebook, on your Kindle head to:

Home > From Your Library

It might take a few minutes, but if your Kindle is connected to Wi-Fi, it should update automatically and the ebook will appear.

Want to delete the ebook? Tap the Menu icon (the three-dots) on the bottom right of your ebook in Your Library and select Remove download to remove it from your Kindle or Permanently Delete to remove it from your Amazon account.

  • Amazon hosts periodic Stuff Your Kindle Days, where select ebooks are free for a 24-hour period. They are usually grouped by theme.
  • To hook into public library catalogs and send ebooks to your Kindle, check out the Libby app from OverDrive. (Hoopla offers a similar service.)
  • If you want classics, Project Gutenberg has 70,000+ copyright-free ebooks.
  • For historical and academic texts, check out archive.org.
  • ManyBooks.net has a mix of free and paid classics and self-published titles.
  • Free-Ebooks.net has a large collection of self-published ebooks and classics; provide your email address to get five free ebooks per month.
  • If you like science fiction, the publisher Baen also has a set of free ebooks.
  • BookBub has a free ebook section filled with romance novels and other casual reads.

Source: Amazon, PC Mag

Disclaimer

Technology is always changing. Rarely is there static tech for smartphones and desktops. Thus, the contents of this post are only valid at the time of writing. Blog posts older than six months may have directions incompatible with your device or OS. Hopefully, older post content will continue to work as advertised. Thank you for reading TechSavvy.Life for Technology at Work For You.

Technology is just a tool. In terms of getting the kids working together and motivating them, the teacher is the most important.

-Bill Gates

That’s it. Please feel free to share this post! One way to share is via Twitter.

Just click the Tweet icon below. This will launch Twitter where you click its icon to post the Tweet.

Checkout TechSavvy.Life for blog posts on smartphones, PCs, and Macs! You may email us at contact@techsavvy.life for comments or questions.

Was this post helpful? We would love to hear your comments. Do you have a computer or smart device tech question? I will do my best to answer your inquiry. Just send an email to contact@techsavvy.life. Please mention the device, app, and version you are using. To help us, you can send screenshots of the data related to your question.

Author’s eBook

The author’s Vietnam eBook on the “Battle for Tra Bong Vietnam: Events and Aftermath” can be accessed from a Kindle device or the Kindle App for a desktop or smartphone. The apps are free.

The author’s Vietnam eBook on the Battle for Tra Bong Vietnam: Events and Aftermath

Enhance Windows 10 Security Post-Microsoft Support with 0patch

0patch, a Slovenia-based service, offers extended Windows 10 updates after Microsoft’s support ends in October 2025. For €24.95 ($27) per year, users receive small security “micropatches” for critical vulnerabilities, without needing to reboot. This service may appeal to those with incompatible Windows 11 PCs.

RAYMOND OGLESBY @RaymondOglesby2
October 8, 2024 – 4 minutes read time

This is for devices running Windows 10. Screenshots are from Dell XPS PC

As Microsoft prepares to end support for Windows 10, a third-party service is ready to step into the void by offering five years of extra updates for the popular OS. 

The offer comes from Slovenia-based 0patch, which has made a business out of patching out-of-date Windows operating systems, including Windows 7. It plans to supply critical security patches for $27.00 annually to Windows 10 users once Microsoft officially stops supporting the OS in October 2025. 

“With 0patch, you will be receiving security ‘micro patches’ for critical, likely-to-be-exploited vulnerabilities that get discovered after October 14, 2025,” Refer to the below image:

Protected by Opatch screen

The catch is trusting Opatch, an unofficial Microsoft service, to safely maintain your Windows 10 installation. Extended support will cost €24.95 ($27) per year. 

Still, the price might be a bargain. Microsoft will also offer an Extended Security Updates (ESU) program, but the cost to business customers starts at $61 per device per year and doubles every consecutive year for up to three years ESU does not include new features, nonsecurity updates, or design changes. It has not announced pricing for consumers yet, but it will likely be more than $27 per year as Microsoft would prefer you upgrade to Windows 11.

The 0patch service may appeal to those with one of the estimated 240 million PCswhich are incompatible with Windows 11.

“Many of us do not want to, or simply can not upgrade to Windows 11,” 0patch wrote in a blog post that also excoriates Microsoft’s efforts to revamp the OS. “We do not want to because of increasing enshittification including bloatware, Start Menu ads, and serious privacy issues. We do not want to have an automated integrated screenshot and key-logging feature constantly recording our activity on the computer”.

In contrast, 0patch promises to maintain Windows 10 by serving its critical security fixes. “These patches will be small, typically just a couple of CPU instructions (hence the name), and will get applied to running processes in memory without modifying a single byte of original Microsoft’s binary files,” the service says.  Thus, no CrowdStrike-like crash.

“There will be no rebooting the computer after a patch is downloaded because applying the patch in memory can be done by briefly stopping the application, patching it, and then letting it continue,” 0patch adds. “Users will not even notice that their computer was patched while they were writing a document, just like servers with 0patch get patched without any downtime at all.”

Still, 0patch will not fix every security vulnerability for Windows 10, only “the important ones, such as those exploited in the wild or those without official vendor patches.” If demand for 0patch’s Windows 10 support is high, the service plans will support the OS beyond five years.

Source – PC Mag, Microsoft

Disclaimer

Technology is always changing. Rarely is there static tech for smartphones and desktops. Thus, the contents of this post are only valid at the time of writing. Blog posts older than six months may have directions incompatible with your device or OS. Hopefully, older post content will continue to work as advertised. Thank you for reading TechSavvy.Life for Technology at Work For You.

“Real stupidity beats artificial intelligence every time.”

-Terry Prachett

That’s it. Please feel free to share this post! One way to share is via Twitter.

Just click the Tweet icon below. This will launch Twitter where you click its icon to post the Tweet.

Checkout TechSavvy.Life for blog posts on smartphones, PCs, and Macs! You may email us at contact@techsavvy.life for comments or questions.

Was this post helpful? We would love to hear your comments. Do you have a computer or smart device tech question? I will do my best to answer your inquiry. Just send an email to contact@techsavvy.life. Please mention the device, app, and version you are using. To help us out, you can send screenshots of the data related to your question.

The author’s Vietnam eBook on the “Battle for Tra Bong Vietnam: Events and Aftermath” can be accessed from a Kindle device or the Kindle App for a desktop or smartphone. The apps are free.

The author’s Vietnam eBook on the Battle for Tra Bong Vietnam: Events and Aftermath

Protect Your Privacy: How to Opt Out of Yahoo Data Selling

This post provides instructions for protecting your privacy on Yahoo Mail for iPhone and PC. It explains how to prevent Yahoo from selling your information and control personalized ads.

RAYMOND OGLESBY @RaymondOglesby2
October 1, 2024 – 4 minutes read time

This is for the iPhone and PC running Yahoo Mail. Screenshots are from iPhone 14 Pro running iOS 17.7

Most companies today are selling your information in some way or form. Luckily, most companies allow you to opt out of having your data sold; if you know how to ask for it.

While you would think the “do not sell my personal information” setting would be on the Yahoo security page, you will find it under a different menu. Let’s explore telling Yahoo, “Do not sell my personal information” and control personalized ads.

  • Yahoo Mail
  • iOS 16 or later
  • Browser
  • Windows 11/10
  • iPhone

Click here to learn how to update your iPhone to the latest iOS version.

  • Protect your privacy by stopping Yahoo from selling your information.
  • Make sure your data stays out of the hands of third parties.

First, open the Yahoo Mail app. Next, tap your profile icon in the upper left. Now, tap Settings. Refer to the below image:

Yahoo 1
Accessing Settings

First, scroll down and tap Manage account privacy. Next, tap Your Privacy controls. Now, tap the Yahoo logo. See the below image:

Yahoo 2
Accessing Privacy

First, you will be prompted to log into your Yahoo mail account. Enter your username/email address, tap Next, and follow the on-screen prompts to log in. Next, After logging in, scroll down to the Sale and sharing of personal information and tap the link. See the following image:

Yahoo 3
Accessing the Sale and Share link

First, tap the toggle. The default is set to Allow Yahoo to sell your data. Next, the page and its toggle will turn gray, indicating that the setting has been disabled. Refer to the below image:

Yahoo 4
Setting the Do Not Sale option

You may want to read the “fine print” about setting the option to Don’t Allow. If you clear cookies for your browser, the option is reset to Allow. See the below image:

Yahoo 5
The fine print

While here, go back to the Sale and sharing of personal information screen to control ads. Tap the Personalized ads link and turn off any option on delivering ads. See the following image on the first of four options:

Yahoo 6
Turning off Personalized ads
  • Open Yahoo Mail
  • Click the Gear icon in the upper left below the Home icon
  • Click the More settings link
  • Click About our Ads menu option. You would think of accessing the Security and Privacy menu option, but Yahoo wants to hide selling your data.
  • Under What choices do I have section, click View our other Privacy Controls
  • click the Yahoo logo, and sign in
  • Click the Sale and sharing personal information link
  • Click the toggle. The default is set to Allow Yahoo to sell your data. Next, the page and its toggle will turn gray, indicating that the setting has been disabled. If you have set the toggle to Don’t Allow on your iPhone first, the toggle will already be disabled.

Disclaimer

Technology is always changing. Rarely is there static tech for smartphones and desktops. Thus, the contents of this post are only valid at the time of writing. Blog posts older than six months may have directions incompatible with your device or OS. Hopefully, older post content will continue to work as advertised. Thank you for reading TechSavvy.Life for Technology at Work For You.

“I play to win, whether during practice or a real game.”

– Michael Jordan

That’s it. Please feel free to share this post! One way to share is via Twitter.

Just click the Tweet icon below. This will launch Twitter where you click its icon to post the Tweet.

Checkout TechSavvy.Life for blog posts on smartphones, PCs, and Macs! You may email us at contact@techsavvy.life for comments or questions.

Was this post helpful? We would love to hear your comments. Do you have a computer or smart device tech question? I will do my best to answer your inquiry. Just send an email to contact@techsavvy.life. Please mention the device, app, and version you are using. To help us out, you can send screenshots of the data related to your question.

The author’s Vietnam eBook on the “Battle for Tra Bong Vietnam: Events and Aftermath” can be accessed from a Kindle device or the Kindle App for a desktop or smartphone. The apps are free.

The author’s Vietnam eBook on the Battle for Tra Bong Vietnam: Events and Aftermath

How to Setup a Dark Web Monitoring Profile and View the Web Report

Google One offers Dark Web Monitoring to track personal information in the hidden internet, aiming to provide proactive protection, convenience, and comprehensive monitoring. Users with a Google One membership can set up a monitoring profile to check for breached data. The feature is designed to help users stay informed and take action to protect their digital identity.

RAYMOND OGLESBY @RaymondOglesby2
May 7, 2024

This is for the desktop using Google One. Screenshots are from Windows 10

Table of Contents

  • What is the Dark Web
  • Personal Information on the Dark Web
  • Who is Eligible
  • Set Up Monitoring Profile
  • How to Use Your Monitoring Profile
  • Dark Web Monitoring Feature
  • Enabling Dark Web Monitoring
  • Viewing Your Dark Web Report
  • Why Does Dark Web Monitoring Matter?
  • Not a Google One Member?
  • Availability of Dark Web Report
  • Conclusion

The dark web is a hidden part of the internet not indexed by traditional search engines like Google, Bing, or Yahoo. It is intentionally designed to be anonymous, making it a haven for illegal activities such as the sale of stolen data, drugs, weapons, and more stuff of nightmares. It’s where cybercriminals often trade in stolen personal information like credit card numbers, login credentials, and social security numbers. It’s also where lots of stolen personal data from breaches end up for sale.

With a Google One membership, you can set up a profile to monitor the dark web to see if your info is found in breaches.

You can check for data on the dark web that might be associated with your email address or other info you add to your monitoring profile. Breach results may contain information including:

  • Your name
  • Address
  • Phone number
  • Email
  • Social Security Number (SSN)
  • Username
  • Password

Tip: only accounts with a US billing method can add a Social Security Number to their monitoring profile.

Any information in the breach results will be displayed in redacted form to maintain data privacy.

With the results, you can review your information and make informed decisions about how to protect yourself.

You can set up a monitoring profile with a paid Google One membership. Click here for help on signing up for a Google One account.

You do not need a paid Google One membership to run a dark web report for the email address associated with your Google AccountClick here for help on scanning the dark web with your email address.

You can monitor your Google Account email address or add other information to your monitoring profile.

  1. On your computer, click here if you have a Google One account.
  2. Under Dark web report, click Set up and then Start monitoring.
    • To include additional Google Account personal information in your monitoring profile:
      1. Select the desired checkboxes.
      2. Click Allow.
    • Confirm your selections and add any additional data you want to monitor.
    • Click Done.

When you set up your monitoring profile in Google One, your profile info is used to check whether a match was found on the dark web. If matching info is found, we will email or notify you. You can find guidance to protect your personal information on the Google One website and app.

Learn how Google One protects your privacy and keeps you in control.

Google’s Dark Web Monitoring feature is designed to help users stay informed about the presence of their personal information on the dark web. Here’s how it works:

  1. Continuous Scanning: One of Google’s many sophisticated algorithms scans the dark web continuously, looking for any signs of your personal information, such as email addresses, passwords, or financial details. The best part is you are in control of what it scans for.
  2. Alerts: If Google’s monitoring system detects any of your information on the dark web, it will send you an alert. This alert will prompt you to secure your accounts and data.
  3. Reporting: Once set up, you can view the report right away from your Google One homepage

First, we need to set up the feature. Fortunately, Google has made this process relatively straightforward:

  1. Access Your Google Account: Start by logging into your Google account.  Click here to log in.
  2. Security Tab: Once logged in, click the Security tab at the top of the page. This section contains various settings related to your account’s security.
  3. Dark Web Monitoring: Scroll down to find the Dark Web Monitoring section. If it’s your first time accessing this feature, you might need to provide your password for verification.
  4. Turn On Dark Web Monitoring: Click the Turn On button to activate the feature. Google will ask you to confirm your choice.
  5. Verification: To ensure the security of this feature, Google may prompt you to re-enter your Google Account password.
  6. Confirmation: Once you have completed the above steps, you should receive a confirmation message that Dark Web Monitoring is active for your account.

Refer to the below image:

Dark Web 1
Accessing the Security tab

s

To view your report, click the Security tab, and scroll down to the Dark web report section. Now, click the link See results with Google One. See the below Image:

Dark Web 2
Selecting to view your results

You will see a summary of your results. You can click an individual breech (or the All button; we have 29 breeches) to view detailed information and recommended actions. See the following image:

Dark Web 4
Selecting a single breach

The selected breech details are now displayed. Refer to the below image:

Dark Web 5
Viewing details of a single breach
  1. Proactive Protection: With this feature, Google aims to provide proactive protection. Instead of waiting until a data breach occurs, you can take action as soon as your information appears on the dark web, reducing the potential impact of cyberattacks.
  2. User Convenience: Google’s Dark Web Monitoring is seamlessly integrated into the user experience, making monitoring their online security easier for everyday users. You need not be a cybersecurity expert to benefit from this feature.
  3. Comprehensive Monitoring: Google’s vast resources and expertise allow for comprehensive dark web monitoring. It can scan many sources, increasing the likelihood of detecting compromised information.
  4. Data Privacy: Google emphasizes data privacy and security. The company ensures that your personal data is protected while providing this service, addressing concerns about potential privacy breaches.

You can still access some features without the membership, it essentially boils down to whether you want continuous monitoring or not and if the other Google One features are enough to justify the monthly costs (depending on the plan you choose) Here’s a breakdown of what Google One members and non-members get. See the below image:

Dark Web 6
Google One and non-menbers features

The Dark Web Report is available in the following countries or regions.

  • Albania
  • Algeria
  • Argentina
  • Austria
  • Australia
  • Bangladesh
  • Belgium
  • Bolivia
  • Brazil
  • Canada
  • Chile
  • Colombia
  • Denmark
  • Ecuador
  • Finland
  • France
  • Germany
  • Greece
  • Iceland
  • India
  • Indonesia
  • Ireland
  • Israel
  • Italy
  • Japan
  • Mexico
  • Morocco
  • Netherlands
  • Nicaragua
  • Norway
  • Pakistan
  • Philippines
  • Senegal
  • Slovenia
  • South Korea
  • Spain
  • Sri Lanka
  • Sweden
  • Switzerland
  • Taiwan
  • Türkiye
  • Ukraine
  • United Kingdom
  • United States
  • Venezuela
  • Vietnam

Your personal data is constantly under threat. Google’s Dark Web Monitoring feature represents a significant step toward enhancing online security and protecting your digital identity. By providing continuous scanning, timely alerts, and actionable recommendations, Google empowers users to take control of their online safety. While no security measure is foolproof, this feature is a valuable addition to Google’s suite of tools aimed at helping users stay one step ahead of cybercriminals. Your digital identity is worth safeguarding, and it appears Google is here to help you.

Source: Google Help

Disclaimer

Technology is always changing. Rarely is there static tech for smartphones and desktops. Thus, the contents of this post are only valid at the time of writing. Blog posts older than six months may have directions incompatible with your device or OS. Hopefully, older post content will continue to work as advertised. Thank you for reading TechSavvy.Life for Technology at Work For You.

Visualize this thing you want. See it, feel it, believe in it. Make your mental blueprint and begin.

Robert Collier

That’s it. Please feel free to share this post! One way to share is via Twitter.

Just click the Tweet icon below. This will launch Twitter where you click its icon to post the Tweet.

Checkout TechSavvy.Life for blog posts on smartphones, PCs, and Macs! You may email us at contact@techsavvy.life for comments or questions.

Please feel free to leave a comment. I would love to hear from you. Do you have a computer or smart device tech question? I will do my best to answer your inquiry. Just send an email to contact@techsavvy.life. Please mention the device, app, and version you are using. To help us out, you can send screenshots of your data related to your question.

You can access the E-book from a Kindle device, or the Kindle App for a desktop or smartphone. The apps are free.

The author’s Vietnam eBook on the Battle for Tra Bong Vietnam: Events and Aftermath

Eleven Ways to Get More Out of Windows 10

Microsoft’s latest operating system, Windows 11, has high requirements many users cannot meet with their current PCs. Consequently, many users might stick with Windows 10, which will receive Microsoft’s official support until 2025. Tips and tricks, some old and some specific to Windows 10, can enhance the user experience.

RAYMOND OGLESBY @RaymondOglesby2
February 27, 2024

This is for devices running Windows 10. Screenshots are from Windows 10

Windows 11 is the latest and greatest operating system from Microsoft, but it will be a few years before it surpasses Windows 10 as the most popular desktop OS in the world. Despite the company’s desire to get us all to upgrade, Microsoft has made it difficult with high requirements many users can not meet with their current PCs.

If you are sticking with Windows 10 instead of buying a new computer, you have until 2025 before Microsoft begins to wind down official support. So there’s still plenty to learn to get the most out of your aging operating system. Personally, we do not like Windows 11. We will wait for Windows 12 before upgrading from Windows 10.

Whether you do not consider yourself a power user or made the jump from macOS, these tips will help you get more out of your Windows 10 experience. Some of these tricks originated from an older generation of Windows, while others are new to this iteration.

If you are a fan of that old-school (i.e. non-tiled) Start menu experience, you can still (sort of) have it. Right-click on the Windows icon in the bottom-left corner to prompt a textual jump menu with several familiar destinations, including Apps and Features, Search, and Run. All these options are available through the standard menu interface, but you can access them quickly here.

Note! In this post your can access Settings from the Start menu as noted below or in the Sortana type “Settings”, then click on the Settings app in the Search results.

Refer to the below image:

Win 10 Tricks 1
Start Menu

You do not have to minimize all your open windows just to look at the desktop. There’s a secret button in the bottom-right corner of the taskbar. If you do not see it, look all the way to the bottom and right, beyond the date and time. There, you will find a small sliver of an invisible button. Click it to minimize all your open windows at once; click it again to bring everything back. See the below image:

Win 10 Tricks 2
Accessing View Your Desktop

There’s also the option to minimize windows when you hover over the small silver button versus clicking. Select your preference in:

Settings > Personalization > Taskbar

then flip the switch to ON under Use Peek to preview the desktop… See the following image:

Win 10 Tricks 3
View your Desktop option

If your PC searches are taking too long in Windows, narrow things down under:

Settings > Search > Searching Windows

Set search to Classic, which only applies searches to your libraries and desktop. The Enhanced option indexes your whole computer, which can take longer and uses more power. You can further narrow your search by marking certain folders as excluded. Refer to the below image:

Win 10 Tricks 4
Search Settings

This may be a little too niche for most users, but if you are a power user or IT professional who wants access to all of Windows’ control panels from one folder, God Mode is for you. Right-click on the desktop and select:

 New > Folder

.Re-name the new folder with this bit of code:

GodMode.{ED7BA470-8E54-465E-825C-99712043E01C}

To enter God Mode or the Windows Master Control Panel shortcut, as it is officially called, simply double-click the folder. See the below image:

Win 10 Tricks 5
God Mode

If you like to dig into the innards of Windows with the Command Prompt, you will be happy to know you can customize the tool. Open the Command Prompt from the Cortana search box, right-click on the window’s top bar, and select Properties to personalize your experience.

The Properties window allows you to change the controls, font, layout, colors, and cursor within the Command Prompt. You can also turn the window transparent by opening the Colors tab and moving the Opacity slider. This lets you code while simultaneously observing the desktop. See the following image for the color setting:

Win 10 Tricks 6
Command Prompt colors

Windows 10 gives you a significant amount of control over color themes. Open:

Settings > Personalization > Colors

 and you can set the operating system to either Dark mode or Light mode. These themes change the color of the Start menu, Taskbar, Action Center, File Explorer, Settings menus, and any other compatible programs. There is also a custom option that will let you set one theme for Windows menus and another for apps. Want a little more color? There are swatches of color themes available to choose from that can help your menus and taskbars really pop Refer to the below image:

We all use the Windows Clipboard to cut and paste, but did you know you can save multiple items at once and paste across devices? Use the command Win + V to view the last 25 clippings saved to the Clipboard. Go to: 

Win 10 Tricks 7
Dark and Light mode

Settings > System > Clipboard

 to control this feature and to sign into your Microsoft Account for cross-device usage. See the below image:

Win 10 Tricks 8
Bulk Copy and Paste

Windows 10 Pro users have an extra asset to protect them against dangerous apps and files. If you enable Windows Sandbox inside the Control Panel, it will create a virtual instance of Windows inside Windows. In the Cortana search box, type in Control Panel then click the Control Panel app in the Search results. Now, click:

Programs > Programs and Features > Turn Windows features on or off link. > Windows Sandbox in the popup > Select a program

Note! If you receive a message about Sandbox virtualization support is disabled in the firmware, then click here on how to enable.

You can then safely open anything you are unsure about before introducing it to your Windows installation. Once you close out of Sandbox, everything inside it goes away without hurting your computer. See the following image:

Win 10 Tricks 9
Sandbox

Back in the day, Ctrl + Alt + Delete was the go-to command if your PC was acting up. If you are sick of having to select Task Manager from the menu that appears, there’s a quicker option. Use the keyboard shortcut Ctrl + Shift + Esc to immediately open the Task Manager and make things a little easier. Refer to the below image:

Win 10 Tricks 10
Task Manager

By default, Windows hides file extensions in File Explorer, requiring you to dig into the file’s properties to see if it’s a .jpg or .png file. But you can set it so Windows shows you the file extension automatically. Open:

File Explorer >View > Options > View

Scroll down to the option for Hide extension for known file types and uncheck the box. Click Apply, and now file types will be listed at the end of all file names inside File Explorer. See the below image:

Win 10 Tricks 11
Do not hide the File Extensions option

Have you ever noticed the shortcut options that Windows offers when you open the Start menu? Just above the power button, you should have links to Settings, Documents, and Pictures. However, if you do not find those options useful, Windows lets you change them.

Head to:

Settings > Personalization > Start > Choose which folders appear on Start link

You can then add a shortcut for File Explorer, Downloads, and a few others. See the following image:

Win 10 Tricks 12
Start Menu options

Technology is always changing and rarely is there static tech for smartphones and desktops. Thus, the contents of this post are only valid at the time of writing. Blog posts older than six months may have directions incompatible with your device or OS. Hopefully, older post content will continue to work as advertised. Thank you for reading TechSavvy.Life for Technology at Work For You.

You will either step forward into growth or you will step back into safety.

Abraham Maslow

That’s it. Please feel free to share this post! One way to share is via Twitter.

Just click the Tweet icon below. This will launch Twitter where you click its icon to post the Tweet.

Checkout TechSavvy.Life for blog posts on smartphones, PCs, and Macs! You may email us at contact@techsavvy.life for comments or questions.

Please feel free to leave a comment. I would love to hear from you. Do you have a computer or smart device tech question? I will do my best to answer your inquiry. Just send an email to contact@techsavvy.life. Please mention the device, app, and version you are using. To help us out, you can send screenshots of your data related to your question.

You can access the e-book from a Kindle device, the Kindle App for the desktop or smartphone, which is a free app.

The author’s Vietnam eBook on the Battle for Tra Bong Vietnam: Events and Aftermath

How to Add a Google Apps Bookmark on Desktop and iPhone

You can start Google Chrome to open a specific page, a new tab, or continue where you left off from the On starup option. We will show you how to set this option to load your Google Apps. You can use the same procedure to load any website at startup or create a bookmark.

RAYMOND OGLESBY @RaymondOglesby2
February 20, 2024

This is for the Desktop and iPhone. Screenshots are from Windows 10 and iPhone 14 Pro running iOS 17+

You can start Google Chrome to open a specific page, a new tab, or continue where you left off from the On startup option. We will show you how to set this option to load your Google Apps. You can use the same procedure to load any website at startup or create a bookmark.

Your Google Apps can be displayed using the On startup option. First, to set this option, open Chrome and click the Menu (the 3 dots) in the upper right corner, then navigate to:

Settings > On startup

Next, under the Open a specific page or set of pages option, enter the following:

chrome://apps/

Refer to the below image:

Apps 1
Setting On startup option to your Google Apps

Now whenever you start Chrome, your Google Apps page will be displayed.

By doing the above, you can just click the Home button next to the address bar to display your Google Apps anytime. See the below image:

Apps 5
Accessing the Home button to view your Google Apps page

Clicking the Home button next to the address bar will display the page you have set as the On startup page.

If you do not have the On startup option set to Google Apps, why not create a bookmark for it. Following are the steps to do this.

First, open the Google Apps page you want to bookmark in Chrome. See the following image:

Apps 2
Setting your Google Apps page to bookmark

Next, click the Star icon in the address bar. Refer to the below image:

Apps 6
Adding your Google Apps page as a bookmark

Now, choose a name and location for your bookmark then hit Done. See the below image:

Apps 3
Editing your Google Apps bookmark

Next, head to your saved bookmark to see your Google Apps entry. See the following image:

Apps 4
Your saved Google Apps bookmark

First, open the Google Apps page you want to bookmark in Chrome then tap the Share button. Refer to the below image:

Apps 7
Setting your Google Apps page

Next, tap the Add to Bookmarks option. See the below image:

Apps 12
Adding your Google Apps bookmark

First, tap the Menu (the 3 dots) at the bottom right corner. See the following image:

Apps 9
Accessing the Menu option

Next, tap the Edit Bookmark option. Refer to the below image:

Apps 10
Choosing to edit your Google Apps bookmark


Now, change as necessary, then tap Done. See the below image:

Apps 11
Editing your Google Apps bookmark

Not only do bookmarks save you time as you do not need to type in a URL or search for your most frequently visited sites on Google every time you visit, but they are also great for keeping track of articles and videos you plan to head back to later. If you do not have Google Apps set as your startup page, creating a bookmark allows you to easily display the page.

Technology is constantly changing; there is rarely static tech for smartphones and desktops. Thus, the contents of this post are only valid at the time of writing. Blog posts older than six months may have directions incompatible with your device or OS. Hopefully, older post content will continue to work as advertised. Thank you for reading TechSavvy.Life for Technology at Work For You.

 “The best vision is insight.”

Malcolm Forbes

That’s it. Please feel free to share this post! One way to share is via Twitter.

Just click the Tweet icon below. This will launch Twitter where you click its icon to post the Tweet.

Checkout TechSavvy.Life for blog posts on smartphones, PCs, and Macs! You may email us at contact@techsavvy.life for comments or questions.

Please feel free to leave a comment. I would love to hear from you. Do you have a computer or smart device tech question? I will do my best to answer your inquiry. Just send an email to contact@techsavvy.life. Please mention the device, app, and version you are using. To help us out, you can send screenshots of your data related to your question.

You can access the e-book from a Kindle device, the Kindle App for the desktop or smartphone, which is a free app.

The author’s Vietnam eBook on the Battle for Tra Bong Vietnam: Events and Aftermath

How to View Saved Wi-Fi Passwords

This post provides instructions on finding Wi-Fi passwords on Windows and iPhone devices. For Windows, it details how to access and reveal the password in plain text. For iPhone, it explains the steps to reveal the Wi-Fi password. The post also includes a disclaimer about technology changes and a quote by Thomas Sowell.

RAYMOND OGLESBY @RaymondOglesby2
February 13, 2024

This is for Windows 10/11 and iPhone. Screenshots are from Windows 10 and iPhone 14 Pro running iOS 17+

Are you connected to Wi-Fi on one device, but need the password to log in on another? Here’s how to find Wi-Fi passwords in Windows and iOS.

Struggling to connect to Wi-Fi? Maybe your laptop is connected but your phone is not, or you need to share your network with a guest but can not remember the password. There are ways to wirelessly share passwords between devices, but that’s not always an option.

Below, we will outline how to grab a Wi-Fi password from already-connected devices by viewing it as plain text. This way you do not need to reset the network security or hack the Wi-Fi network so everyone can get online.

Windows makes this easy, as long as you are connected to the network.

For Windows 10, open:

Settings > Network & Internet

then click the Change Adapter Options button. Refer to the below image:

Password 1
Accessing your network

For Windows 11, open:

Advanced network settings > More network adapter options

then right-click on your computer’s Wi-Fi adapter in the list and choose:

Status > Wireless Properties

Open the Security tab, and you should see a password box with dots in it. Click the Show Characters box to see the password in plain text. See the below image for Windows 10:

Password 2
Viewing your password in plain text on Windows 10

If you are trying to view the password for a network you are not currently connected to, things are a tad more complicated. You can download a third-party app like Wi-Fi Password Revealer which will show you the passwords of all saved networks. See the following image :

Password 3
Viewing Password Revealer software

iPhone users could not view Wi-Fi passwords as plain text until iOS 16. First, open:

Settings > Wi-Fi

Refer to the below image:

Password 4
Accessing your Wi-Fi network

Now, tap the “i” icon for the current network. See the below image:

Password 5
Tapping the informational icon

Next, select the Password entry and verify your identity with FaceID, Touch ID, or a Passcode. See the following image:

Password 6
Tapping the hidden password

Now tap the password box with dots in it to reveal the password in plain text. Refer to the below image:

Password 7
Revealing the hidden password in plain text

Disclaimer

Technology is always changing and rarely is there static tech for smartphones and desktops. Thus, the contents of this post are only valid at the time of writing. Blog posts older than six months may have directions incompatible with your device or OS. Hopefully, older post content will continue to work as advertised. Thank you for reading TechSavvy.Life for Technology at Work For You.

It is hard to imagine a more stupid or more dangerous way of making decisions than by putting those decisions in the hands of people who pay no price for being wrong.

Thomas Sowell

That’s it. Please feel free to share this post! One way to share is via Twitter.

Just click the Tweet icon below. This will launch Twitter where you click its icon to post the Tweet.

Checkout TechSavvy.Life for blog posts on smartphones, PCs, and Macs! You may email us at contact@techsavvy.life for comments or questions.

Please feel free to leave a comment. I would love to hear from you. Do you have a computer or smart device tech question? I will do my best to answer your inquiry. Just send an email to contact@techsavvy.life. Please mention the device, app, and version you are using. To help us out, you can send screenshots of your data related to your question.

You can access the e-book from a Kindle device, the Kindle App for the desktop or smartphone, which is a free app.

The author’s Vietnam eBook on the Battle for Tra Bong Vietnam: Events and Aftermath

How to Use Everything App for Windows

At the top of our shortlist of outstanding apps is Everything. This app has been around for a long time but we have recently discovered the Windows app.

RAYMOND OGLESBY @RaymondOglesby2
August 8, 2023

This is for Windows XP through Windows 11. Screenshots are from Windows 10

At the top of our shortlist of outstanding apps is Everything. This app has been around for a long time but we have recently discovered the Windows app. It’s now an integral part of our Windows apps.

What is Everything

Everything is a Windows freeware file search application created by programmer David Carpenter in 2008.

The single most notable thing about Everything is the speed.

If you have ever used Windows file search (File Explorer)or even some third-party file search tools, the most memorable thing about the experience is how long it takes.

Even after all these years, Windows file search is agonizingly slow. Truly, it’s agony. In an age of inexpensive SSDs with instant booting and instant program loading, waiting thirty seconds for Windows to grind through a search feels like torture. It does not matter if you are still using Windows 7 or upgraded to Windows 11, Windows search has never been speedy.

Everything sidesteps the shortcomings of the Windows file search by doing something that was novel when the application was first released and remains novel; it taps right into the file table at the file system level for lightning-fast search.

How fast is it? It’s so fast that if you create a new file, by the time you open up the Everything search box a moment later, the file is instantly in the index. It’s unlikely you could create the file and get to the search box fast enough to beat the nearly instantaneous addition of the entry into the Everything index.

The only downside to Everything is that it works off the file table and the file names and does not index the contents of the files. If you need a tool that will look deep into documents and help you find key phrases, this tool is not it. But if you are just trying to find where, exactly, you put your tax returns from five years ago, it’s almost magical in its speed and efficiency.

Why Is It Indispensable

We have a huge number of files, across a huge number of folders and drives. But as long as we name files and folders sensibly as they come in, it does not matter where they end up. They could be on the C drive, the G drive (portable external drive), or even buried in a network drive hosted somewhere (you can enable network drive search in the Everything settings).

No matter where the files are, you can find them if you member even a fraction of the folder or file name. Old taxes, work forms, Photoshop projects, comic books you hoarded five years ago, you name it. If you want it, you can churn it up to the surface with a few keywords.

For example, I need to find old tax returns to answer questions from the IRS about depreciation. That made me say, “Didn’t I squirrel those returns somewhere?” and sure enough, I did. I might have forgotten where they were, but Everything did not. Refer to the below image:

Everything 1
Everything displaying tax returns

You do not need wildcards for your search. Everything search implies wildcard searches; the app will find all files/folders that include your search criteria. In the menu bar, select Search to view more options. See the below image:

Everything 1
Accessing the Search options

It instantly scanned hundreds of thousands of files and folders on my computer and the attached drives to find exactly what I wanted.

If you can remember anything about the file; part of the name, the file extension, the root directory it might be deeply buried in; you can dig it up with a few keystrokes.

Even on my laptops, where the files are definitely not stacked terabytes deep, I still install Everything, I certainly do not want to be stuck waiting for Windows search to sift through the files at a slow pace.

it’s freeware. So Download it. The website name has an odd name, Voidtools, but this is the download page.

Take Notice

If you need to download this app or any other on a desktop or laptop, always download it from the manufacturer. Another safe bet is to download from a store like Apple Store or Microsoft Store.

Never download from these websites:

FileHorse
Softonic
CNET
Download 82
Softlay
Dealnews
Windowsinside
Us7p
Files10
Soft112
UpdateStar
Techno360
ColorMango
MajorGeeks
FileHonor
FilesWin
iGeeksBlog
Neowin
Linenseapps
Business Wire
SoftwareKeep
TechShout
Windows Latest’
Wondershare
Slant
iMobie
BitsDuJour
Softfree.eu
Uptodown
FreeProSoftz
TechWhoop
Tickcoupon
CrackDJ
AbbasPC
Giev Away of the Day
GroovyPost
TechGeek365
TechMoran
Digital Connect Mag
Malavida
…. and 16 more

The above websites should be banned. If you download from any other site besides the manufacturer or a store, expect viruses and malware to appear. If this happens, immediately Shutdown and/or Restart your PC and run a virus scan.

As a test, I downloaded it from File Horse. I got popups from Google Chrome saying my PC has been hacked followed by a full webpage saying my PC is corrupted. I got rid of the messages. but I had more problems. The FtleHorse website gave the site access to everything on my PC. I had to manually go through Google Privacy and Security Settings to block each access.

I recommend only using Voidtools website for downloading. Then feel the speed of searching, Everything, on your computer instantly.

Disclaimer

Technology is always changing and rarely is there static tech for smartphones and desktops. Thus, the contents of this post are only valid at the time of writing. Blog posts older than six months may have directions incompatible with your device or OS. Hopefully, older post content will continue to work as advertised. Thank you for reading TechSavvy.Life for Technology at Work For You.

Quote For the Day

The most intractable problem today is not pollution or technology or war; but the lack of belief that the future is very much in the hands of the individual.

Margaret Mead

Tweet Info

You are finished. Please feel free to share this post! One way to share is via Twitter.

Just click the Tweet icon below. This will launch Twitter where you click its icon to post the Tweet.

Checkout TechSavvy.Life for blog posts on smartphones, PCs, and Macs! You may email us at contact@techsavvy.life for comments or questions.

I Would Like to Hear From You

Please feel free to leave a comment. I would love to hear from you. Do you have a computer or smart device tech question? I will do my best to answer your inquiry. Just send an email to contact@techsavvy.life. Please mention the device, app, and version you are using. To help us out, you can send screenshots of your data related to your question.

Author’s E-Book

You can access the e-book from a Kindle device, the Kindle App for the desktop or smartphone, which is a free app.

The author’s Vietnam eBook on the Battle for Tra Bong Vietnam: Events and Aftermath

How to Change Link Handling in Outlook for Windows

You may have noticed that opening a link in Outlook behaves differently and not in your chosen browser. That’s because Microsoft wants to push their Edge browser, though they have some excuses for the change.

RAYMOND OGLESBY @RaymondOglesby2
July 11, 2023

This is for devices running Microsoft Outlook. Screenshots are from Microsoft Outlook 365 in Windows 10

You may have noticed that opening a link in Outlook behaves differently and not in your chosen browser. That’s because Microsoft wants to push their Edge browser, though they have some excuses for the change.

When you click on a link in Outlook for Windows, it might open in the Edge browser, even though you have chosen a different default browser in Windows settings (like Chrome or Firefox).

And instead of just opening the web page, the email appears in a right side-pane alongside the link you clicked. Refer to the below image:

Link Handling 1
Side-by-Side View

According to Microsoft, this change means “No more disruptive switching—just your email and the web content you need to reference, in a single, side-by-side view.” They may have a point and it’s a change that suits some people.  

It’s also a shameless attempt to push people to the Edge browser by overriding their browser choice with Microsoft’s preference.

This applies to Windows 10 or 11 only. Microsoft only says this is for ‘Outlook’ not which versions, but presumably Outlook 365 for Windows. For now, it only works on Microsoft-hosted emails including Outlook.com/Hotmail however it will be extended to Gmail later.

Change Browser via Windows

First, the default browser is chosen in Windows. To set up this browser, head to:

Settings | Apps | Default Apps

and choose your preferred browser. See the below image:

Link Handling 2
Setting Chrome as the web browser in Windows

Change the Search Engine and Default Browser

Next, for Chrome, ensure you have set the search engine. To find out, open Chrome and head to:

Menu (the 3 dots in the upper right) | Settings | Search engine

and, if necessary, set your search engine to Chrome. See the following image:

Link Handling 3
Setting Chrome as the search engine

Now, for Chrome, ensure you have set the default browser. To find out, open Chrome and head to:

Menu (the 3 dots in the upper right) | Settings | Default browser

Refer to the below image:

Link Handling 5
Your default browser

The reason why we are doing the above is to ensure we are using Google products. You can have Firefox as your browser and Chrome as your search engine.

Change Outlook Links Default Browser

Next, open Outlook and go to:

File | Options | Advanced | Link Handling

to change the browser to Default Browser. See the below image:

Link Handling 4
Setting Default Browser in Outlook

Side-by-Side View May Not Work

To be honest, you may not get this feature to work no matter what combination of Outlook, Windows, and Edge you try. We prefer to test for ourselves and not take Microsoft’s word. If your email links open in your browser with no side-by-side view, do not worry.

Disclaimer

Technology is always changing and rarely is there static tech for smartphones and desktops. Thus, the contents of this post are only valid at the time of writing. Blog posts older than six months may have directions incompatible with your device or OS. Hopefully, older post content will continue to work as advertised. Thank you for reading TechSavvy.Life for Technology at Work For You.

Quote For the Day

Ideas are easy. Implementation is hard.

Guy Kawasaki

Tweet Info

That’s it. Please feel free to share this post! One way to share is via Twitter.

Just click the Tweet icon below. This will launch Twitter where you click its icon to post the Tweet.

Checkout TechSavvy.Life for blog posts on smartphones, PCs, and Macs! You may email us at contact@techsavvy.life for comments or questions.

I Would Like to Hear From You

Please feel free to leave a comment. I would love to hear from you. Do you have a computer or smart device tech question? I will do my best to answer your inquiry. Just send an email to contact@techsavvy.life. Please mention the device, app, and version you are using. To help us out, you can send screenshots of your data related to your question.

Author’s E-Book

You can access the e-book from a Kindle device, the Kindle App for the desktop or smartphone, which is a free app.

The author’s Vietnam eBook on the Battle for Tra Bong Vietnam: Events and Aftermath