
Has Windows been acting flaky? It could be a specific piece of software that’s wreaking havoc on your system. Maybe you have installed a new application or driver. Perhaps Windows is crashing or blue screening and you have no idea why. Do not worry because all is not lost if you have a system Restore Point waiting to roll your PC back to functionality.
This is for devices running Windows 10. Also works for Windows 8 and 7. Screenshots are from Windows 10

A Restore Point is essentially a snapshot of Windows at any given time. You can create restore points on a regular basis, and if Windows ever breaks, you can bring it back to a point from before the problem occurred. The best part of using this method over a Recovery Drive is that only system files and settings will be affected, while all your documents and personal files will be left untouched.
Windows automatically creates a Restore Point, if enabled, at key moments, such as when you install certain software programs and drivers or apply Windows updates. However, you should manually create these points yourself on a regular basis, perhaps once a month, to ensure that your system can be restored to a recent state in the event of a mishap. You should also create one before you attempt any type of major change to Windows that could inadvertently lead to unstable behavior or other issues.
Create a Automatic Restore Point
First, locate the Restore Point utility by clicking Start and entering the text “restore” (without quotes) in the Cortana search box located next to Start. Refer to below image:

Next, click your search result, Create a restore point, in upper left-hand corner. See below image:

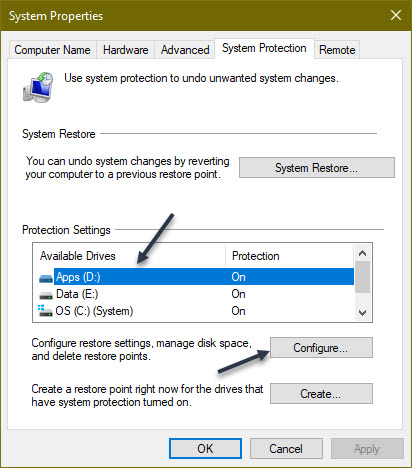
Now, you will be taken to the System Protection tab of the System Properties window.
If System Protection has not yet been enabled, the Create button is grayed out. In this case, select the drive you want to protect and then click the Configure button.
If System Protection is enabled for a drive, highlight the drive and click the Configure button. See following image:
Next, click the Turn on System Protection radio button if not enabled. You will now need to decide how much disk space you want to devote to all your restore points. If you run out of space, the oldest restore points will start getting deleted. If you have ample free space, then you may want to devote more storage for the restore points. Otherwise, you can stick with the suggested percentage, usually anywhere from 1% to 3% depending on the overall size of the drive or move the slider to the percentage you want. Once set, click OK. Refer to below image:

Your restore points will be created automatically at certain key moments. You can repeat these steps if you have other drives that you wish to protect. You can also return to this screen in the future to delete all existing system restore points if you are running low on disk space. To do this, click the Delete button and click Continue to confirm the deletion.
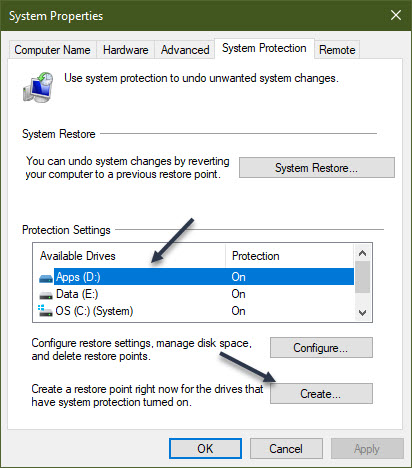
Create a Manual Restore Point
Head back to the Configure screen (second image above). This time, highlight an available drive and click the Create button. See below image:
Next, type in a name for the restore point. Since the current date and time will automatically be added to the name, you might want to include a note about the action you are about to take or another reason for the restore point. If you have multiple drives, include the drive name or letter in the name. Now, click the Create button. See following image:

Windows will tell you if the restore point was created successfully. Now, click the Close button. Refer to below image:

You can repeat the above steps if you want to create a restore point for your other drives. When done, click OK to shut down the System Protection window
Restore to a Previous State
If you have an issue, you can return to the System Protection window and click the System Restore button. See below image:

At the Restore system files and settings screen, Windows explains what System Restore does. Click Next to continue. See following image:

Now, select a drive restore point, then click the Scan for affected programs button. Refer to below image:

Windows scans for any applications that were added since the last restore point in order to delete them and looks for any that were removed in order to restore them. It also scans for any programs and drivers that might be restored but may not work correctly and may need to be reinstalled. Note the results if Windows finds anything important. After the scan completes, click Close to return to the previous System Restore window. See below image:

Make sure the restore point you want to use is selected. Now, click Next. See following image:

Windows will display a Confirm your restore point window. Next, click the Finish button. Refer to below image:

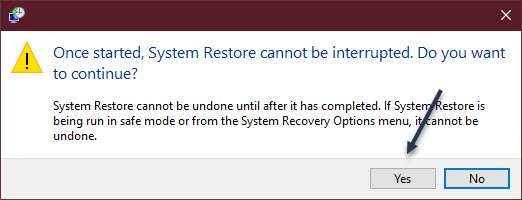
You will be told that the System Restore cannot be interrupted. Next, click Yes to continue. See below image:
Windows will bring your system back to the restore point you selected and reboot, telling you that your files and settings are being restored. Once Windows is back up again, you can log back in.
Next, you should receive a pop-up screen regarding the success of the Restore. You may now need to reinstall any applications, drivers, or other software that were removed. You will also want to play around in Windows to see if the problem that prompted you to restore it has been eliminated.
You are now finished. Now you know how to create a system Restore Point for all your hard drives and restore your system to a previous state. Please feel free to share this post! One way to share is via Twitter.
Just click the Tweet icon below. This will launch Twitter where you click its icon to post the Tweet.
Check out TechSavvy.Life for blog posts on smartphones, PCs, and Macs! You may email us at contact@techsavvy.life for comments or questions.
Tweet
I Would Like to Hear From You
Please feel free to leave a comment. I would love hearing from you. Do you have a computer or smart device tech question? I will do my best to answer your inquiry. Just send an email to contact@techsavvy.life. Please mention the device, app and version that you are using. To help us out, you can send screenshots of your data related to your question.
