

IRAYMOND OGLESBY @RaymondOglesby2
September 1, 2026 – 3 minutes read time
Overview
Notifications on your iPhone provide you with important updates and information at a glance. However, if you are like us and do not dismiss or interact with your notifications frequently, they can start to pile up. When your Notification Center becomes cluttered and clogged up, you can easily clear all your notifications at once.
If you are feeling overwhelmed by all the unread notifications in your Notification Center, it might help to delete all your notifications. There’s a trick that makes this easy. Let’s explore how to clear notifications on iPhone:
Key Takeaways
- Instantly get rid of all your notifications at once.
- Declutter your Notification Center in a matter of seconds.
System Requirements
This tip was performed on an iPhone 17 Pro running iOS 26.5.
Click here to learn how to update your iPhone to the latest iOS version.
Clearing Your Notifications
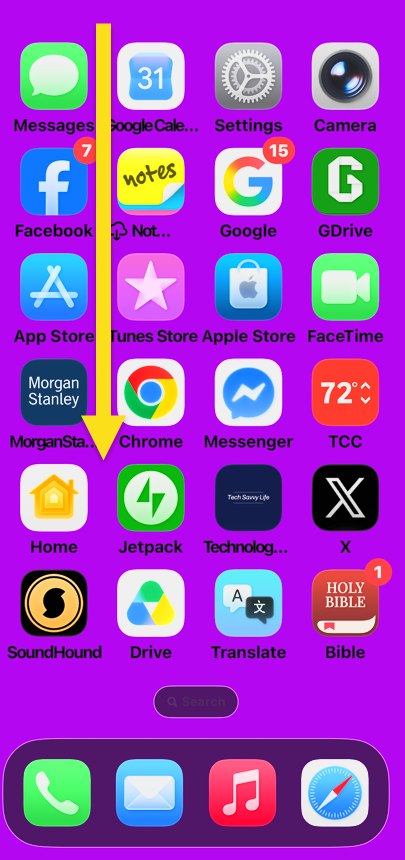
1. If your iPhone is unlocked, swipe down from the top left of your screen to open the Notification Center. Refer to the image below:
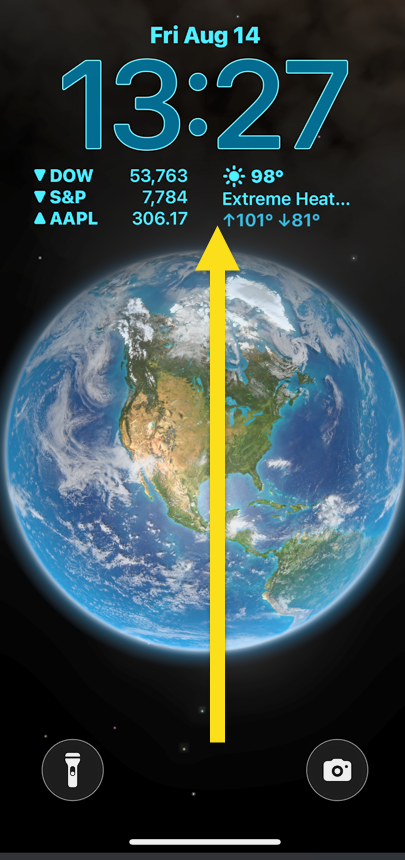
2. If you do not see any notifications, try swiping up from your Lock Screen to pull them up. See the image below:
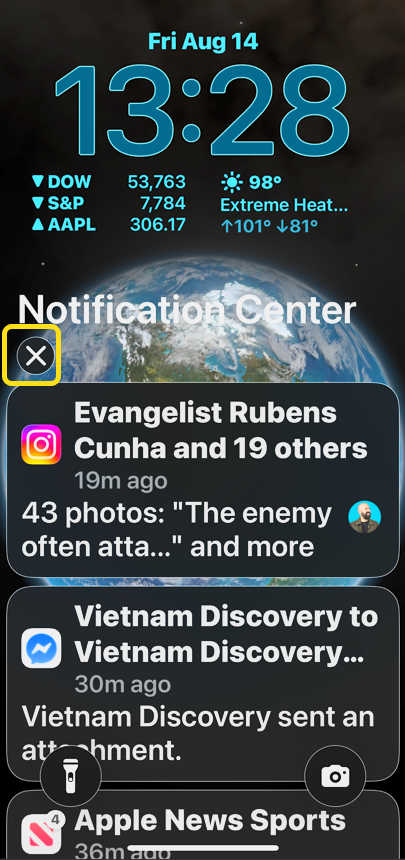
3. Tap and hold the X icon for a moment. See the following image:
4. Tap Clear All Notifications when it pops up. Their is no confirmation for this action. Refer to the image below:

That’s how to clear iPhone notifications. Once you tap Clear All Notifications on your iPhone, all of your notifications will immediately disappear from the Notification Center
There is no limit on the number of notifications your iPhone will keep. If you have never cleared your iPhone notifications, you could have hundreds of them.. It is recommended you remove those unneeded notifications. Now you do not have to deal with hundreds of notifications clogging up your iPhone every day!
Note! Once you clear your notifications from the Notification Center, they are permanently deleted.
Shame pm Apple software engineers. At least on Android devices, you can recover cleared notifications within past 24 hours.
Disclaimer
Technology is constantly evolving, and smartphone and desktop tech rarely remains static. Therefore, the information in this post is only accurate as of the date it was written. Blog posts that are older than six months may contain instructions that are no longer compatible with your device or operating system. We hope that the content from previous posts continues to function as intended. Thank you for reading TechSavvy.Life, where technology works for you.
Quote For the Day
If we continue to develop our technology without wisdom or prudence, our servant may prove to be our executioner.
– Omar N. Bradley
(X) Twitter Info
TThat’s it. Please feel free to share this post! One way to share is via Twitter.
Just click the Tweet icon below. This will launch Twitter where you click its icon to post the Tweet.
Checkout TechSavvy.Life for blog posts on smartphones, PCs, and Macs! You may email us at contact@techsavvy.life for comments or questions.
Tweet
I Would Like to Hear From You
We value your feedback! Was this post helpful? Please share your comments with us. If you have a tech question related to your computer or smart device, feel free to reach out. Just send an email to contact@techsavvy.life, and be sure to include the device, app, and version you are using. To assist us further, you can also attach screenshots related to your inquiry.
The author’s Vietnam eBook, “Battle for Tra Bong Vietnam: Events and Aftermath”, is available on Kindle devices and the Kindle App for desktop, laptop, and smartphone. The apps are free.


