How to Clear Cache on iPhone for Better Performance

Cache accumulation on smartphones, particularly iPhones, can slow performance significantly. Regularly clearing browser and app cache, including offloading unused apps, helps enhance speed and responsiveness. Users should perform these tasks periodically, especially after updates, to maintain optimal device functionality. Instructions for clearing caches in Safari and Chrome are provided.

RAYMOND OGLESBY @RaymondOglesby2
September 15,2026 – 4 minutes read time

Cache is all the data your phone stores locally, but it can build up over time and slow things down.

Is your iPhone feeling sluggish lately? If your web pages take forever to load, your phone’s cache may be to blame. This data is collected as you visit websites and use apps, so it can deliver faster results. Your phone’s cache makes using your devices more convenient, but over time, or after an update, it can actually slow things down.

When this happens you will need to clear your cache, like you would for a web browser, to wipe out the collection of data in your phone’s browsers and apps. It’s a simple task that you should be performing once every few months to boost your phone’s performance. Let’s explore how to do this for your phone’s browsers and individual apps.

  • Improve the performance of your iPhone.
  • Offload apps you are not using for more storage space. and faster response.

This tip was performed on an iPhone 17 Pro running iOS 26.5.

Click here to learn how to update your iPhone to the latest iOS version.

Let’s start with browsers. First, close all those tabs that you no longer need. The process varies for each browser, but here are instructions for Safari and Chrome.

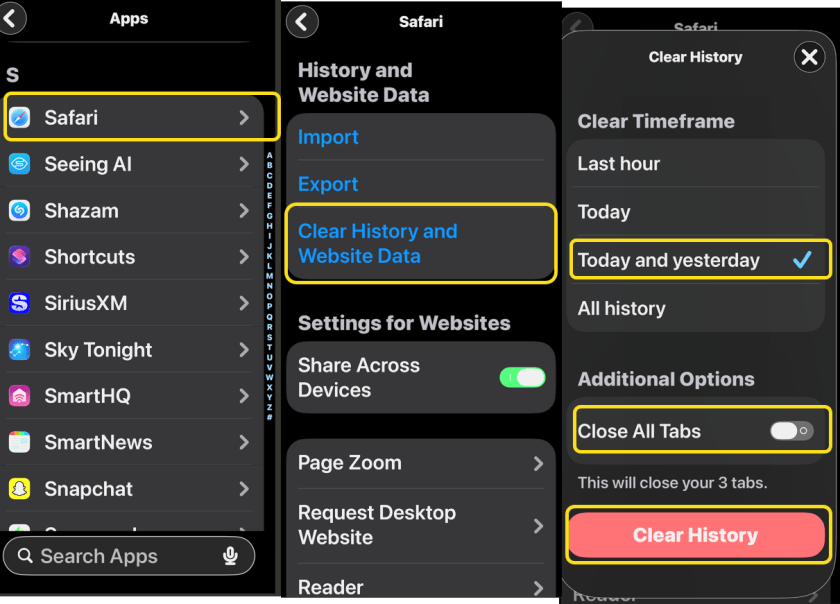
Safari: Go to:

Settings > Apps > Safari > Clear History and Website Data

Then choose whether to clear the Last Hour, Today, Today and Yesterday, or All History. (There’s also the option to Close All Tabs from this menu.) To complete the action, tap Clear History. Refer to the image below:

Clear Cache 1_3
Clearing Safari

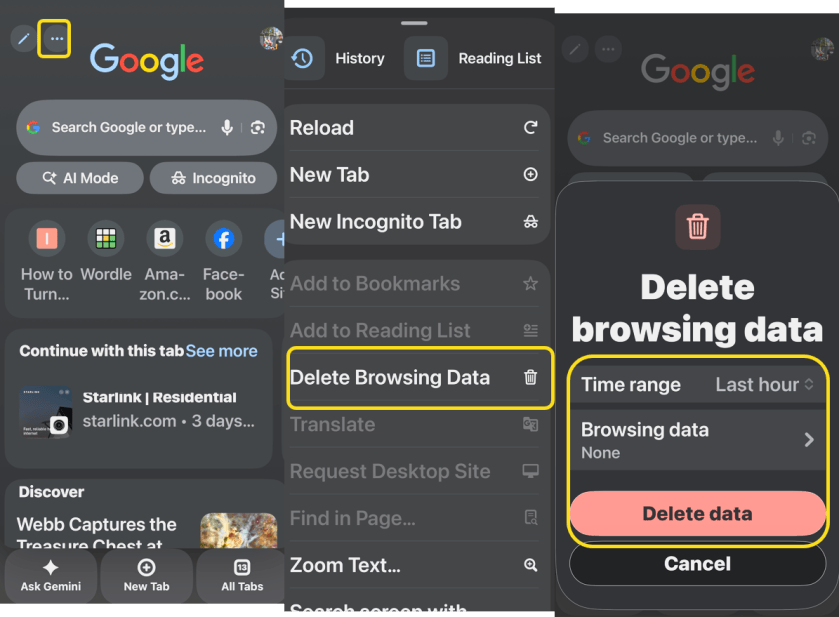
Chrome: Open the ap then select:

More > Delete Browsing Data > Browsing Data

and select what you want to remove via Time range, and/or Browsing data. When you are done, tap Delete data

You will need to sign back into your online accounts once the cache is cleared. See the image below:

Clear Cache 4_6
Clearing Chrome

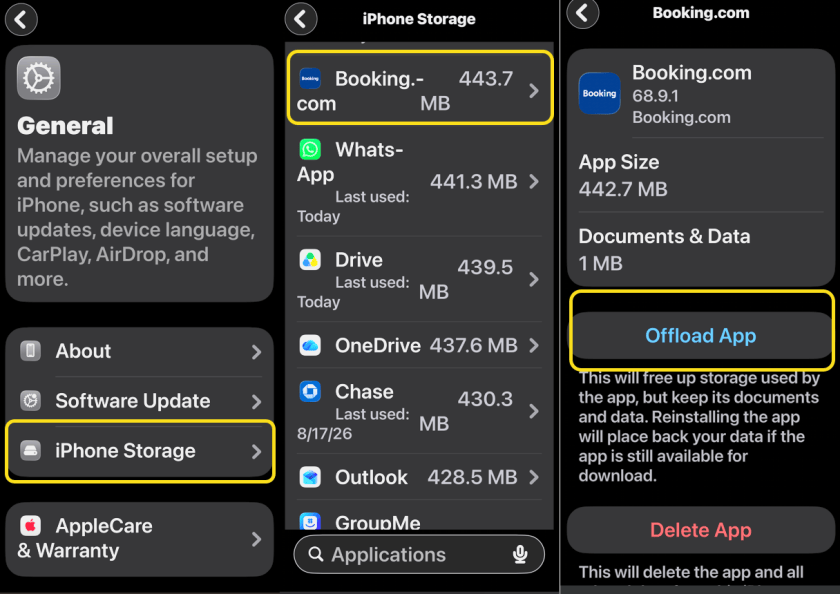
You can not technically clear individual app caches on an iPhone, but offloading an app will essentially achieve the same thing. Go to:

Settings > General > iPhone Storage 

to see what apps you use the least. Tap any apps you do not need on your phone right now and select Offload App. The app will remain on your Home screen, but you will need to tap it to re-download before you can get back in. See the following image:

Clear Cache 7_9
Offload an app

Technology is constantly evolving, and smartphone and desktop tech rarely remains static. Therefore, the information in this post is only accurate as of the date it was written. Blog posts that are older than six months may contain instructions that are no longer compatible with your device or operating system. We hope that the content from previous posts continues to function as intended. Thank you for reading TechSavvy.Life, where technology works for you.

Technology is nothing. What’s important is that you have a faith in people, that they’re basically good and smart, and if you give them tools, they’ll do wonderful things with them.

– Steve Jobs

That’s it. Please feel free to share this post! One way to share is via Twitter.

Just click the Tweet icon below. This will launch Twitter where you click its icon to post the Tweet.

Checkout TechSavvy.Life for blog posts on smartphones, PCs, and Macs! You may email us at contact@techsavvy.life for comments or questions.

We value your feedback! Was this post helpful? Please share your comments with us. If you have a tech question related to your computer or smart device, feel free to reach out. Just send an email to contact@techsavvy.life, and be sure to include the device, app, and version you are using. To assist us further, you can also attach screenshots related to your inquiry.

Author’s eBook

The author’s Vietnam eBook, “Battle for Tra Bong Vietnam: Events and Aftermath”, is available on Kindle devices and the Kindle App for desktop, laptop, and smartphone. The apps are free.
The author’s Vietnam eBook on the Battle for Tra Bong Vietnam: Events and Aftermath

Fix iPhone Messages Hiding Behind Keyboard: Easy Workarounds

iPhone users may face a glitch where the keyboard hides parts of their messages. Restarting the device often resolves this issue. In the meantime, workarounds include tapping and holding, double-tapping, or single-tapping in the message area to reveal hidden content.

RAYMOND OGLESBY @RaymondOglesby2
September 8, 2026 –3 minutes read time

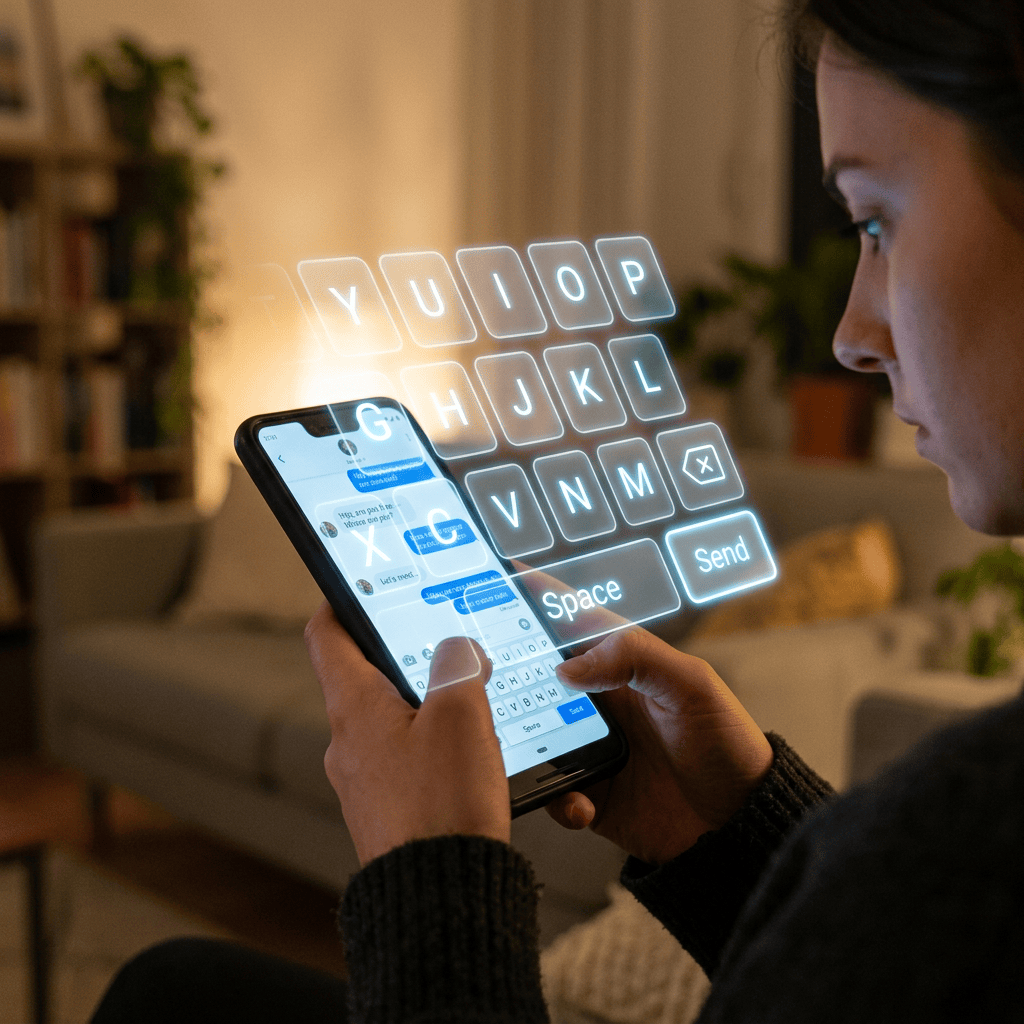
Your iPhone may be hiding parts of your messages due to a glitch. When you open a message, if the keyboard is displayed it may be hiding part of the message you are viewing. This is usually due to iOS failing to reset the layout when viewing a message. When this happens, here is no way to turn off the keyboard being displayed.

The best way to fix this problem is to shutdown and restart your iPhone. We tried this several times over a couple of weeks and the problem persisted. Then, finally a restart corrected the glitch. In the meantime, here are some workarounds to view parts of your message lucking behind the keyboard display.

  • Workarounds for keyboard hiding parts of your message.
  • Reduce frustrations when viewing aa message.

This tip was performed by iPhone 17 Pro running iOS 26.5.

Click here to learn how to update your iPhone to the latest iOS version.

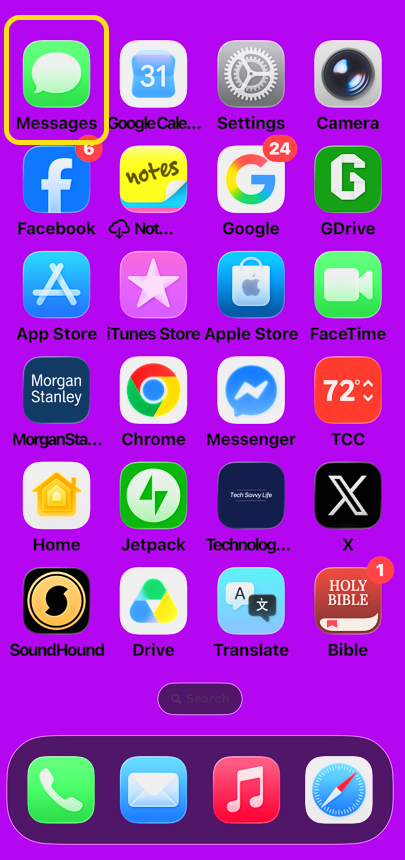
  1. Open the Messages app. Refer to the image below:
A smartphone home screen displaying various app icons on a purple background, with the Messages app highlighted in yellow.
Selecting the Messages app

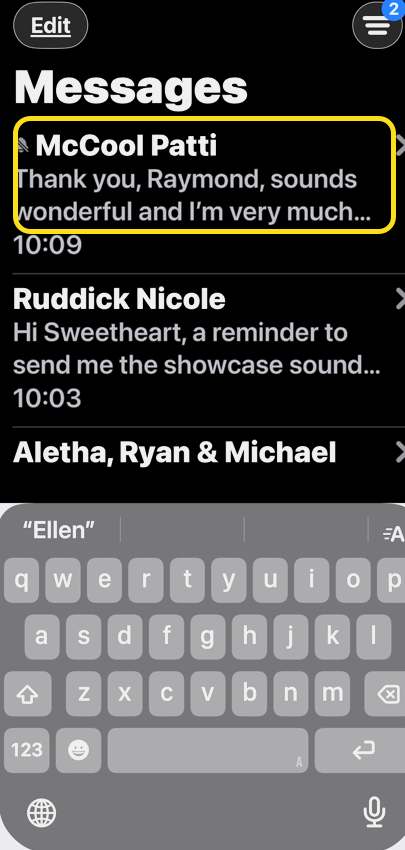
2.If you see the keyboard, parts of a message may be hidden behind the keyboard display. Tap on a message. See the image below:

Screenshot of a messaging app showing conversations with messages from McCool Patti, Ruddick Nicole, and Aletha, Ryan & Michael. The keyboard is visible at the bottom.
Tapping a message

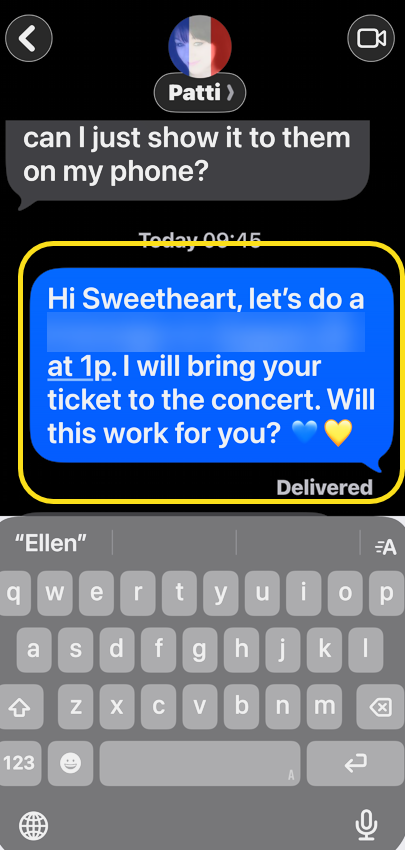
3. At this point, is there more to the message? We do not know. Your are unable to dismiss the keyboard. See the following image:

Message 3
Viewing the message

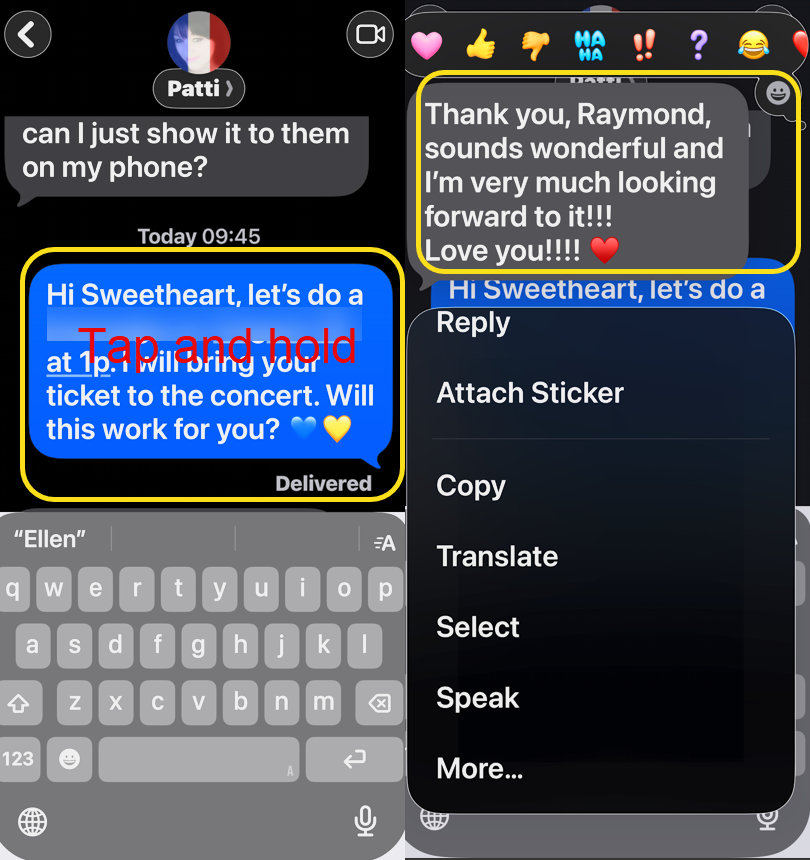
4. Workaround 1 – tap and hold on the message to reveal the missing part at the top of your screen. Refer to the image below:

Screenshot of a text conversation discussing concert plans, with messages from 'Patti' and 'Raymond', including options for responding and interacting in a messaging app.
Tap and hold the message

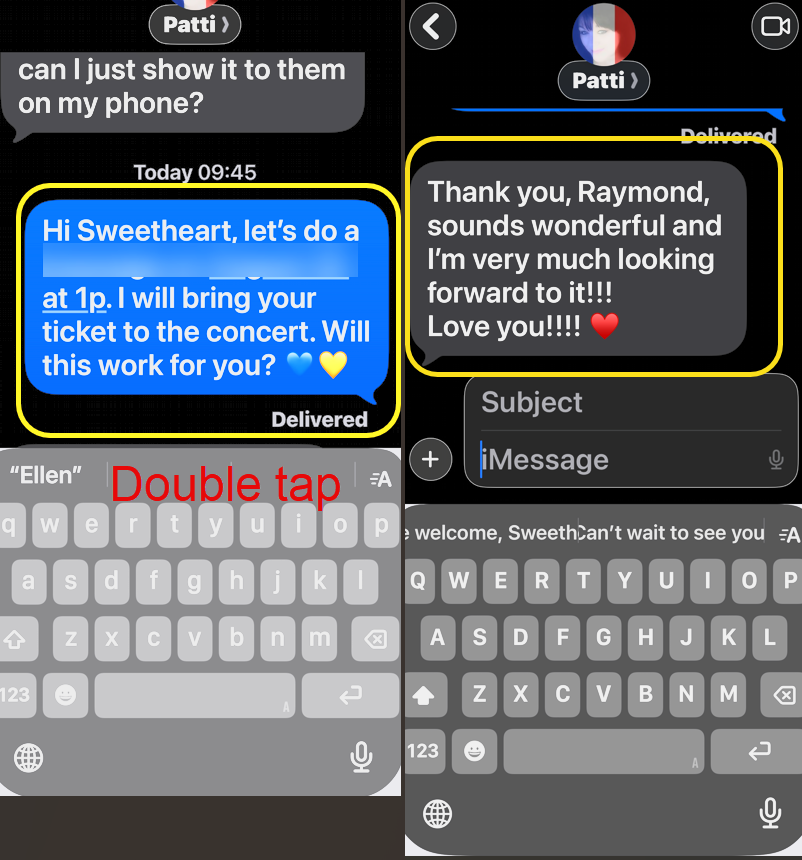
5. Workaround 2 – double tap the empty space on the keyboard above the letter row to reveal the missing part. See the image below:

A screenshot of a messaging application conversation between two people, Patti and Raymond. The left side shows Patti asking if she can show something on her phone, while the right side displays a joyful response from Patti about meeting Raymond and looking forward to a concert. The bottom section shows the keyboard interface for typing messages.
Double tap at top of keyboard

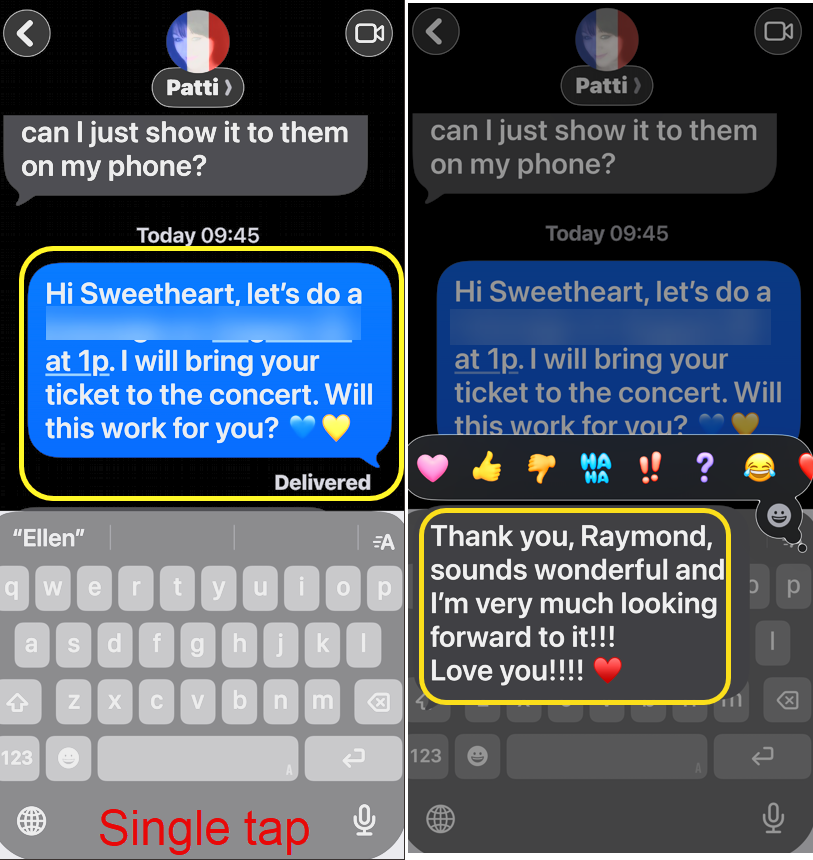
6. Workaround 3 – single tap the empty space at the bottom of the keyboard to reveal the rest of the message. See the following image:

Screenshot of a text conversation discussing plans for a concert, featuring messages between two individuals about meeting times and ticket details.
Single tap at bottom of keyboard

7. Alternatively, you can tap and hold the message, then scroll up keeping your finger on the message. We find this frustrating because a ssoon as you let go of the message, the missing part disappears.

Technology is constantly evolving, and smartphone and desktop tech rarely remains static. Therefore, the information in this post is only accurate as of the date it was written. Blog posts that are older than six months may contain instructions that are no longer compatible with your device or operating system. We hope that the content from previous posts continues to function as intended. Thank you for reading TechSavvy.Life, where technology works for you.

Technology… is a queer thing. It brings you great gifts with one hand, and it stabs you in the back with the other.

– Carrie Snow

That’s it. Please feel free to share this post! One way to share is via Twitter.

Just click the Tweet icon below. This will launch Twitter where you click its icon to post the Tweet.

Checkout TechSavvy.Life for blog posts on smartphones, PCs, and Macs! You may email us at contact@techsavvy.life for comments or questions.

We value your feedback! Was this post helpful? Please share your comments with us. If you have a tech question related to your computer or smart device, feel free to reach out. Just send an email to contact@techsavvy.life, and be sure to include the device, app, and version you are using. To assist us further, you can also attach screenshots related to your inquiry.

Author’s eBook

The author’s Vietnam eBook, “Battle for Tra Bong Vietnam: Events and Aftermath”, is available on Kindle devices and the Kindle App for desktop, laptop, and smartphone. The apps are free.
The author’s Vietnam eBook on the Battle for Tra Bong Vietnam: Events and Aftermath

How to Quickly Clear All Notifications on iPhone

The post discusses how to efficiently clear notifications on an iPhone, particularly when they become overwhelming. It outlines a simple method involving swiping down to access the Notification Center, then using the “Clear All Notifications” option. Users are advised that cleared notifications cannot be recovered, emphasizing the importance of decluttering.

IRAYMOND OGLESBY @RaymondOglesby2
September 1, 2026 – 3 minutes read time

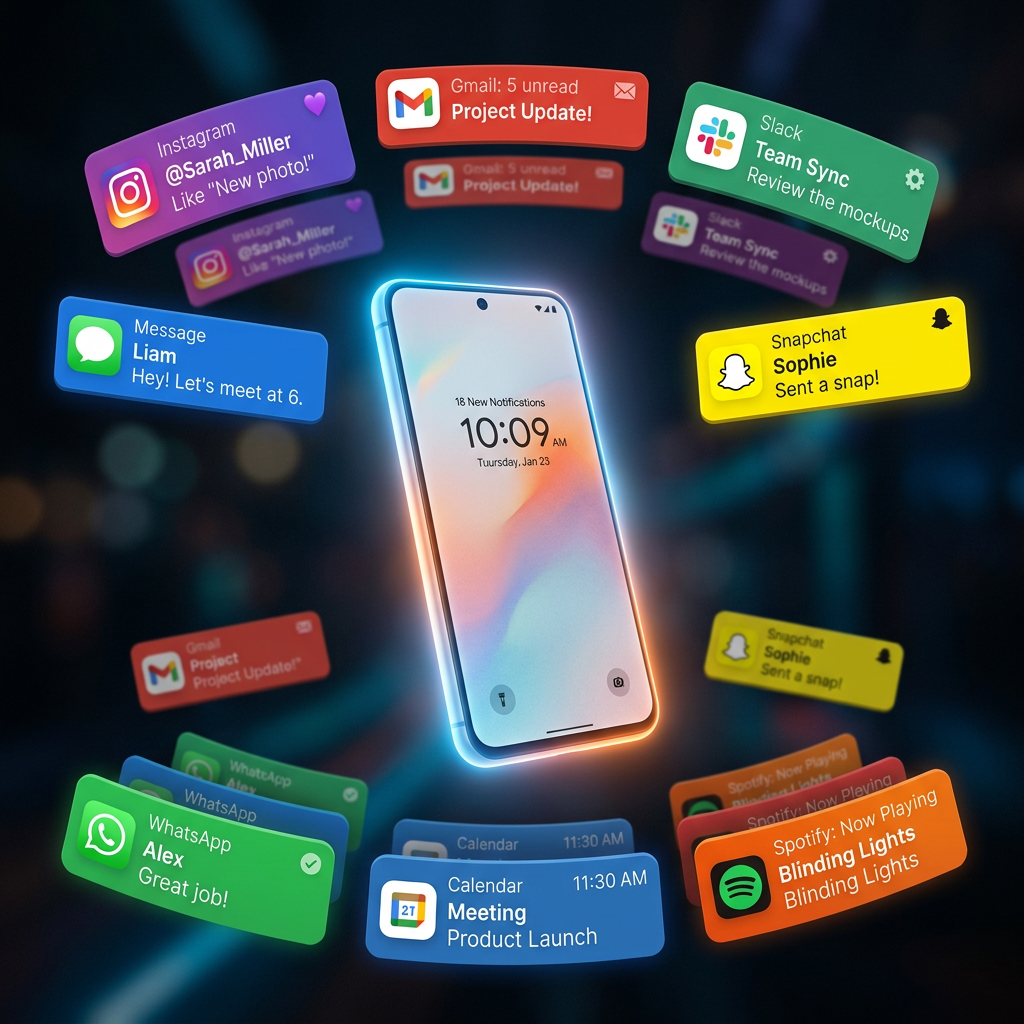
Notifications on your iPhone provide you with important updates and information at a glance. However, if you are like us and do not dismiss or interact with your notifications frequently, they can start to pile up. When your Notification Center becomes cluttered and clogged up, you can easily clear all your notifications at once.

If you are feeling overwhelmed by all the unread notifications in your Notification Center, it might help to delete all your notifications. There’s a trick that makes this easy. Let’s explore how to clear notifications on iPhone:

  • Instantly get rid of all your notifications at once.
  • Declutter your Notification Center in a matter of seconds.

This tip was performed on an iPhone 17 Pro running iOS 26.5.

Click here to learn how to update your iPhone to the latest iOS version.

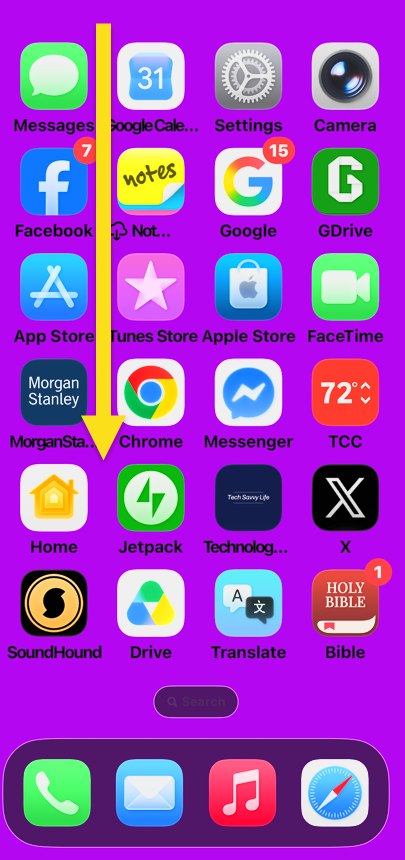
1. If your iPhone is unlocked, swipe down from the top left of your screen to open the Notification Center. Refer to the image below:

Clear All 1

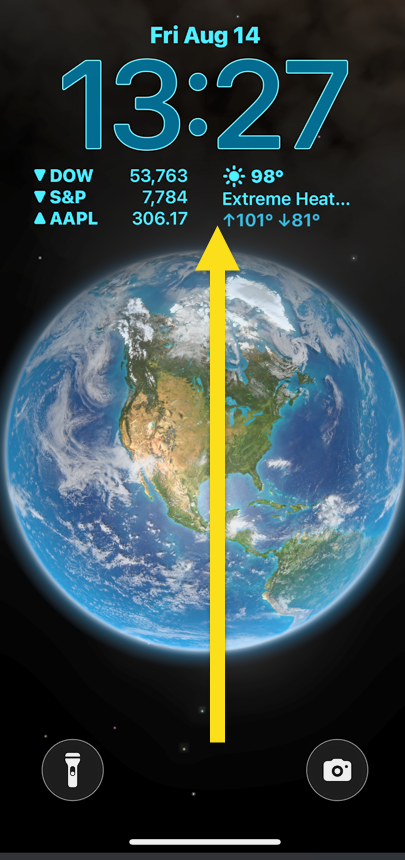
2.  If you do not see any notifications, try swiping up from your Lock Screen to pull them up. See the image below:

Clear All 2

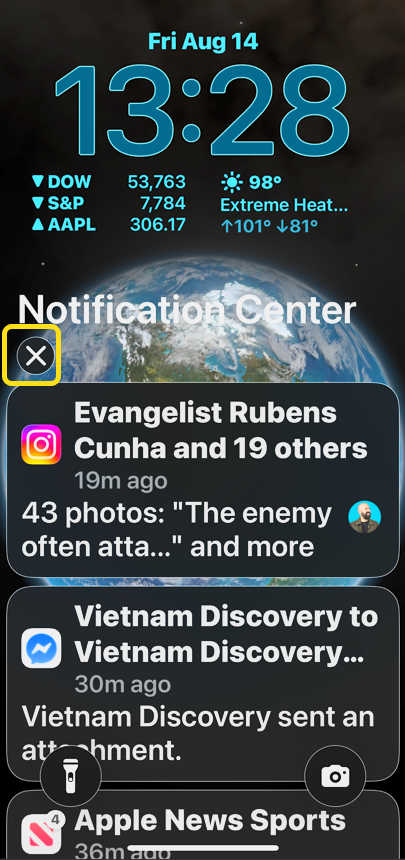
3. Tap and hold the X icon for a moment. See the following image:

Clear All 3

4. Tap Clear All Notifications when it pops up. Their is no confirmation for this action. Refer to the image below:

Clear All 4

That’s how to clear iPhone notifications. Once you tap Clear All Notifications on your iPhone, all of your notifications will immediately disappear from the Notification Center

There is no limit on the number of notifications your iPhone will keep. If you have never cleared your iPhone notifications, you could have hundreds of them.. It is recommended you remove those unneeded notifications. Now you do not have to deal with hundreds of notifications clogging up your iPhone every day!

Note! Once you clear your notifications from the Notification Center, they are permanently deleted.

Shame pm Apple software engineers. At least on Android devices, you can recover cleared notifications within past 24 hours.

Technology is constantly evolving, and smartphone and desktop tech rarely remains static. Therefore, the information in this post is only accurate as of the date it was written. Blog posts that are older than six months may contain instructions that are no longer compatible with your device or operating system. We hope that the content from previous posts continues to function as intended. Thank you for reading TechSavvy.Life, where technology works for you.

If we continue to develop our technology without wisdom or prudence, our servant may prove to be our executioner.

– Omar N. Bradley

TThat’s it. Please feel free to share this post! One way to share is via Twitter.

Just click the Tweet icon below. This will launch Twitter where you click its icon to post the Tweet.

Checkout TechSavvy.Life for blog posts on smartphones, PCs, and Macs! You may email us at contact@techsavvy.life for comments or questions.

We value your feedback! Was this post helpful? Please share your comments with us. If you have a tech question related to your computer or smart device, feel free to reach out. Just send an email to contact@techsavvy.life, and be sure to include the device, app, and version you are using. To assist us further, you can also attach screenshots related to your inquiry.

Author’s eBook

The author’s Vietnam eBook, “Battle for Tra Bong Vietnam: Events and Aftermath”, is available on Kindle devices and the Kindle App for desktop, laptop, and smartphone. The apps are free.
The author’s Vietnam eBook on the Battle for Tra Bong Vietnam: Events and Aftermath

How to Control Background App Refresh on iPhone

Background App Refresh can consume data and battery life on your device. Users can optimize its usage by enabling it only when connected to Wi-Fi. This setting helps preserve cellular data and battery life while keeping apps up-to-date when needed. Instructions for adjusting these settings are provided for iPhone users.

RAYMOND OGLESBY @RaymondOglesby2
February 3 , 2026 – 4 minutes read time

Background App Refresh can siphon off your data and battery without you noticing. But you can choose to turn Background App Refresh on only when your device is connected to Wi-Fi. That way, you can enjoy the perks of the feature without worrying about how much data it’s using.

For years, it has been recommended to turn off Background App Refresh on your device to save battery life and cellular data. Background App Refresh automatically refreshes apps you have open in the background, so when you go back to them, the page is already up to date and loaded. This can consume data and battery life. Here’s how to set background app refresh to Wi-Fi only on iPhone.

Note! All iPhone users should setup this tip. Why Apple does not make this the default is beyond us.

  • Save battery life by preventing apps from constantly refreshing.
  • Ensure you do not use up extra cellular data by allowing apps to refresh only over Wi-Fi.

This tip was performed on an iPhone 17 Pro running iOS 26.2.

Click here to learn how to update your iPhone to the latest iOS version.

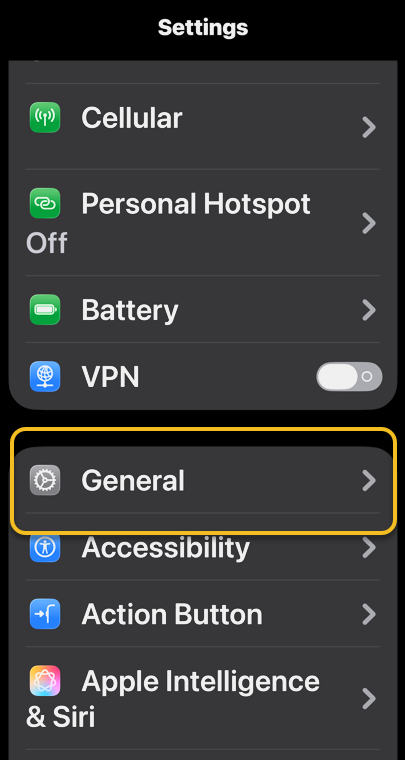
First, open Settings, and select General. Refer to the image :

Refresh 1
Selecting the General option

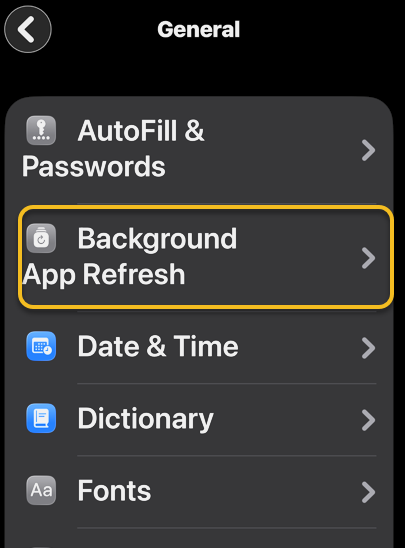
Next, tap Background App Refresh. See the image below:

Refresh 2
Selecting the Background App Refresh option

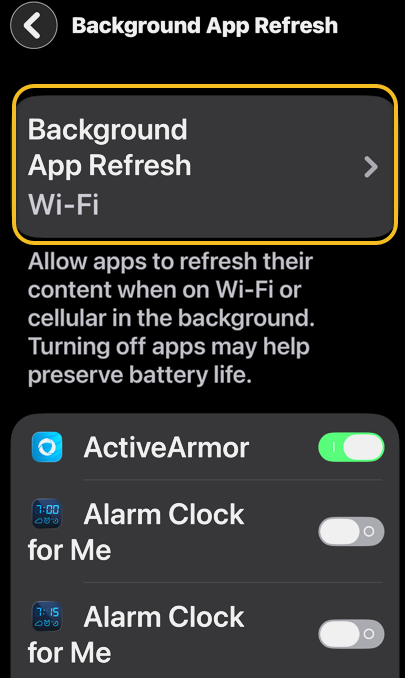
Now, select Background App Refresh again. See the following image:

Refresh 3
Selecting the Background App Refresh option again

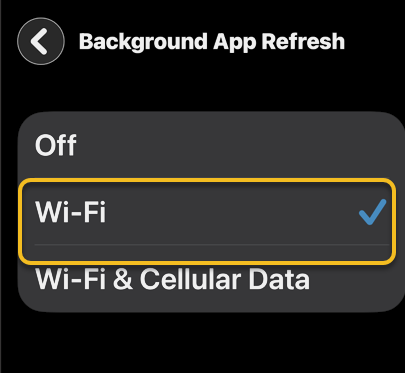
Next, select Wi-Fi to turn on Background App Refresh only when your device is connected to Wi-Fi. Refer to the image below:

Refresh 4
Turning Wi-Fi on

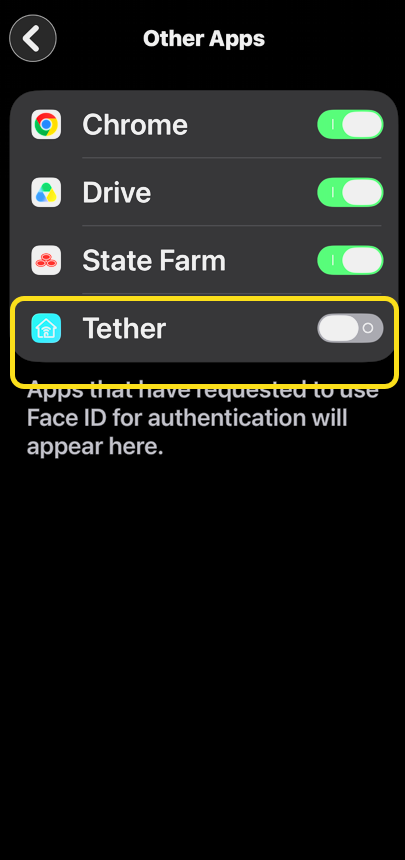
Now, you can enable/disable background refresh per app by tapping its toggle. see the image below:

efresh 5
Disable Background App Refresh

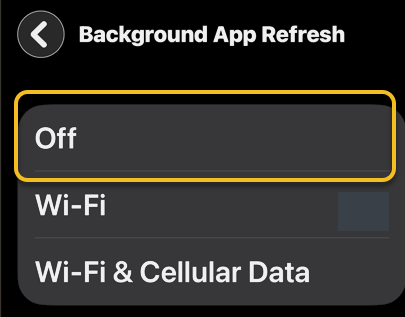
That’s how to adjust the settings for background app refresh on iPhone. If you want to know how to turn off background app refresh completely, just select Off in the last step. This is a good option if you do not want your apps updating without you knowing. This can stop updates you actually do not want from being installed on your phone (which can be a huge advantage), but it will be annoying when you open an app you need to use now, only to get a notification that you will have to update before you can use it.

Technology is constantly evolving, and smartphone and desktop tech rarely remains static. Therefore, the information in this post is only accurate as of the date it was written. Blog posts that are older than six months may contain instructions that are no longer compatible with your device or operating system. We hope that the content from previous posts continues to function as intended. Thank you for reading TechSavvy.Life, where technology works for you.

Our technological powers increase, but the side effects and potential hazards also escalate.

. – Alvin Toffler

That’s it. Please feel free to share this post! One way to share is via Twitter.

Just click the Tweet icon below. This will launch Twitter where you click its icon to post the Tweet.

Checkout TechSavvy.Life for blog posts on smartphones, PCs, and Macs! You may email us at contact@techsavvy.life for comments or questions.

We value your feedback! Was this post helpful? Please share your comments with us. If you have a tech question related to your computer or smart device, feel free to reach out. Just send an email to contact@techsavvy.life, and be sure to include the device, app, and version you are using. To assist us further, you can also attach screenshots related to your inquiry.

Author’s eBook

The author’s Vietnam eBook on the “Battle for Tra Bong Vietnam: Events and Aftermath” can be accessed from a Kindle device or the Kindle App for a desktop or smartphone. The apps are free.
The author’s Vietnam eBook on the Battle for Tra Bong Vietnam: Events and Aftermath