I am Raymond Oglesby, an Information Technology (IT) specialist with 30 years in the field. I have taught Microsoft Applications and troubleshot computers in 15 countries and many States. My career was focused on mainframes and desktops from application development to implementation. I have written hundreds of programs for various architectures. I decided to start a blog to share my knowledge and experiences with you. I plan on updating this blog at least twice a week about smart phone apps to Windows.
Please feel free to leave a Comment or Tweet. I would love to hear from you. Do you have a computer tech question? I will do my best to answer your inquiry. Please mention the app and version that you are using. To help me out, you can send screenshots of your data related to your question.
The article discusses how to quickly view notifications from the Lock screen on an iPhone 17 Pro running iOS 26.3. It outlines two methods: swiping up on the Lock screen or tapping the unread notification count. Additionally, it provides a setup guide for enabling notification previews.
RAYMOND OGLESBY @RaymondOglesby2 March 24, 2026 – 3 minutes read time
Overview
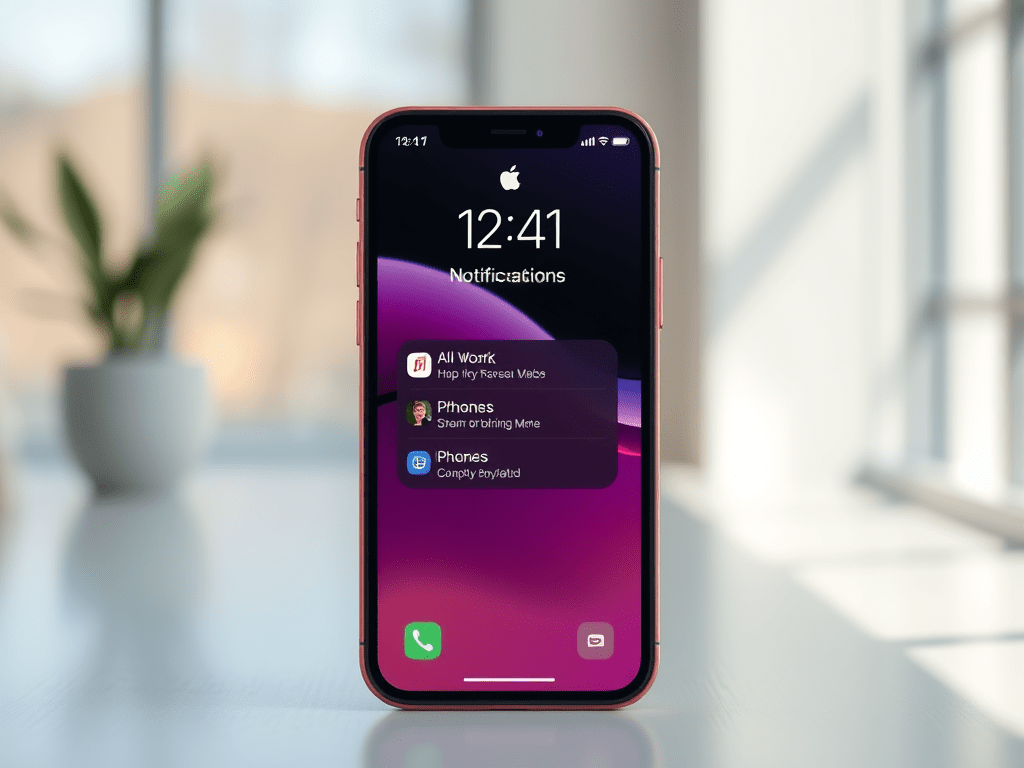
Want to view notifications fast? There are two ways of doing this from your Lock screen. We used to open my iPhone to view notifications; now there’s a faster way. Let’s explore this nifty feature.
Key Takeaways
View your notifications quickly. See the number of unread notifications from the Lock screen.
System Requirements
This tip was performed on an iPhone 17 Pro running iOS 26.3.
Click here to learn how to update your iPhone to the latest iOS version.
Setting Up Easy Access to Notifications
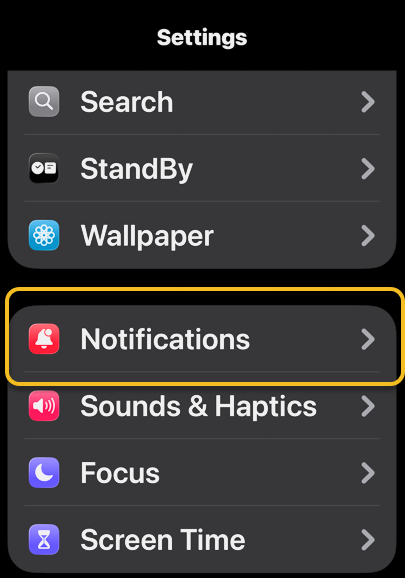
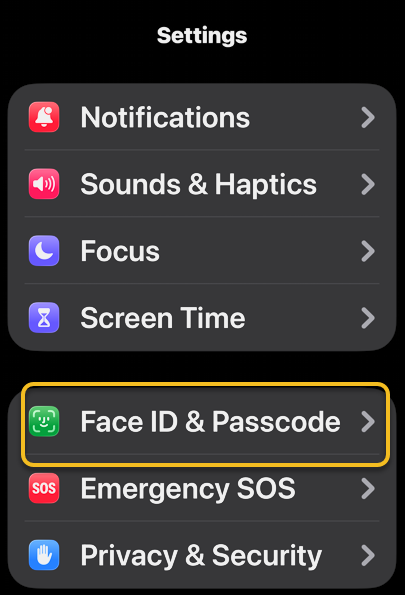
First, open Settings, then tap Notifications. Refer to the image below:
Selecting the Notifications option
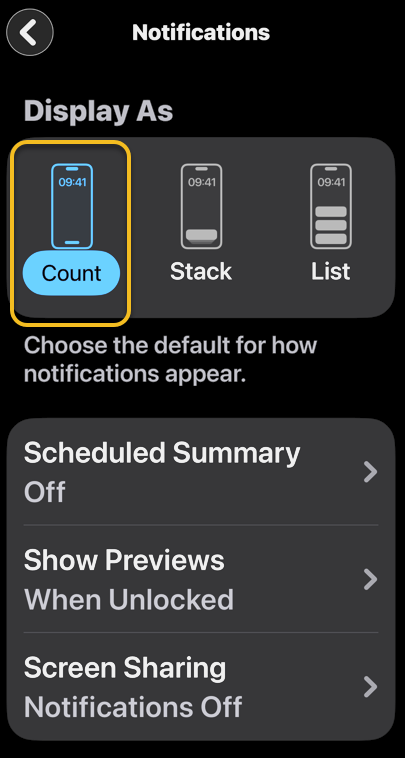
Next, under Display As, tap on the Count option. See the below image;
Selecting the Count option
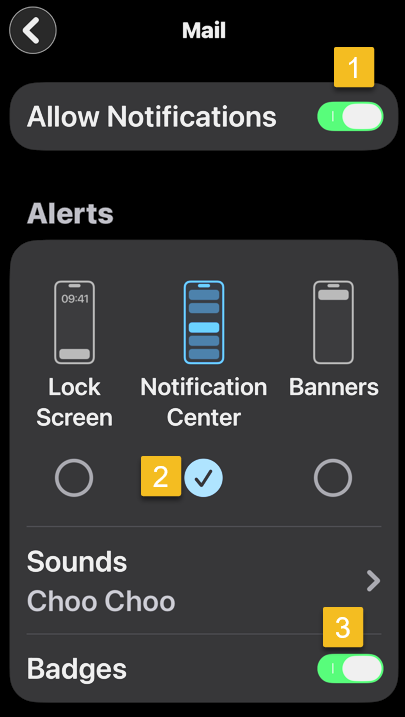
Now, scroll down to Notification Style section and tap on the Mail option. See the following image
Now, under Settings, tap Face ID & Passcode option. See the image below:
Selecting the Face ID & Passcode option
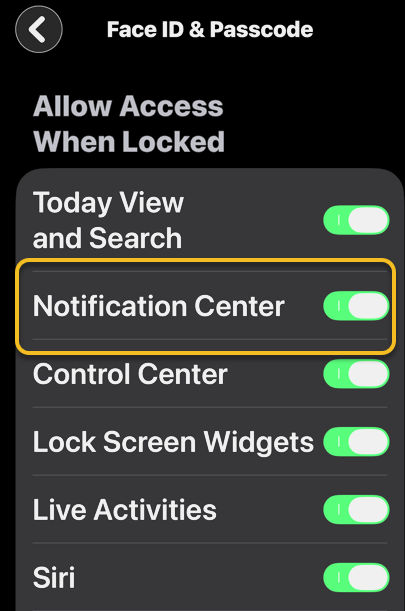
Next, enable the Notification Center toggle. See the following image:
Enabling the NotificationCenter toggle
Two Ways to View Notifications
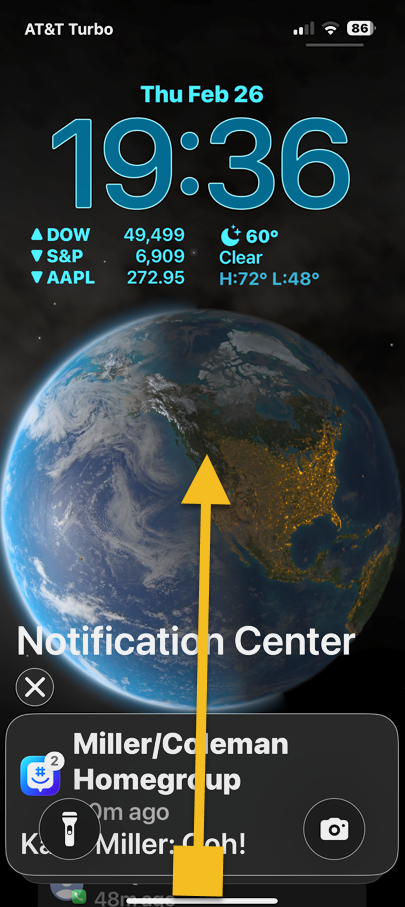
Now that you have finished the setup process, there are two ways to view your notifications on the Lock screen. On your activated Lock screen, hold your finger near the bottom and slowly swipe up until the Notification Center appears. Refer to the image below:
Slowly swipe up to reveal Notification Center
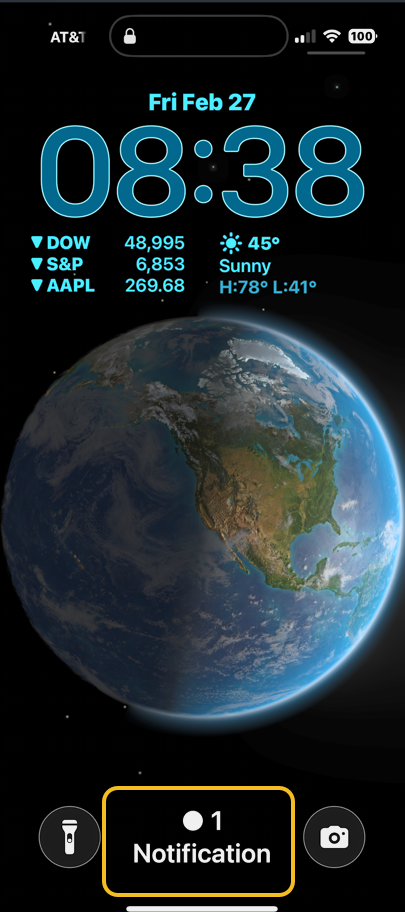
Or if you have unread Notifications, the number will be displayed at the bottom of your Lock screen. Just tap on it to view your notifications. See the image below:
Tap on Notification to reveal the Notification Center
Disclaimer
Technology is constantly evolving, and smartphone and desktop tech rarely remains static. Therefore, the information in this post is only accurate as of the date it was written. Blog posts that are older than six months may contain instructions that are no longer compatible with your device or operating system. We hope that the content from previous posts continues to function as intended. Thank you for reading TechSavvy.Life, where technology works for you.
Quote For the Day
We are stuck with technology when what we really want is just stuff that works.
– Douglas Adams
(X) Twitter Info
– Douglas AdamsThat’s it. Please feel free to share this post! One way to share is via Twitter.
Just click the Tweet icon below. This will launch Twitter where you click its icon to post the Tweet.
Checkout TechSavvy.Life for blog posts on smartphones, PCs, and Macs! You may email us at contact@techsavvy.life for comments or questions.
We value your feedback! Was this post helpful? Please share your comments with us. If you have a tech question related to your computer or smart device, feel free to reach out. Just send an email to contact@techsavvy.life, and be sure to include the device, app, and version you are using. To assist us further, you can also attach screenshots related to your inquiry.
The author’s Vietnam eBook, “Battle for Tra Bong Vietnam: Events and Aftermath,” is available on Kindle devices and the Kindle App for desktop, laptop, and smartphone. The apps are free.
The author’s Vietnam eBook on the Battle for Tra Bong Vietnam: Events and Aftermath
The Photos app on iOS 18 features an improved search function, allowing users to find pictures using specific search terms like dates, locations, or objects. Users can now easily search for text or items within photos, enhancing the efficiency of locating images from vacations or other events.
RAYMOND OGLESBY @RaymondOglesby2 March 10 2026 – 4 minutes read time
Overview
You can use multiple search terms to find specific pictures in the Photos app. We use this time-saving feature to search for specific pictures from vacations, entering a date and location to see all videos and photos from each trip.
With iOS 18, Apple completely revamped the Photos app, introducing a brand-new search function. Previously, you could use search terms from one or more of the following categories: date, location, business name, events, people, pets, captions, and type of photo. Now, you can do an image search on your iPhone for objects or text that show up in your photos. For example, we often forget our license plate number when paying for public parking. We know we have photos of it, so we can just go into the Photos app, type “license plate,” and our phone will show me all the photos of our license plate. Let’s explore how to image search on your iPhone and iPad using multiple keywords.
Key Tskeaways
Learn how to search photos on your iPhone and iPad to find Photos of nearly anything.
Do an iPhone photo search to find objects or text that appear in your photos.
System Requirements
This tip works on iPhones running iOS 18 or later, but was tested on an iPhone 17 Pro running iOS 26.3.
Click here to learn how to update your iPhone to the latest iOS version.…
Searching Photos
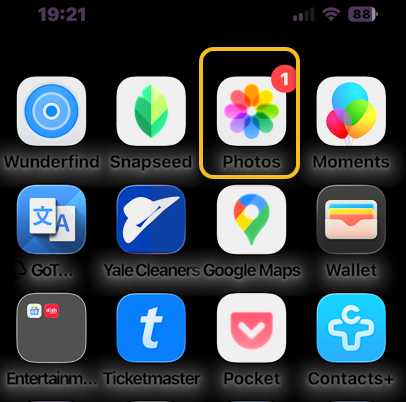
First, open the Photos app. Refer to the image below:
Selecting the Photos app
Next, tap the Search icon. See the image below:
Selecting the Search icon
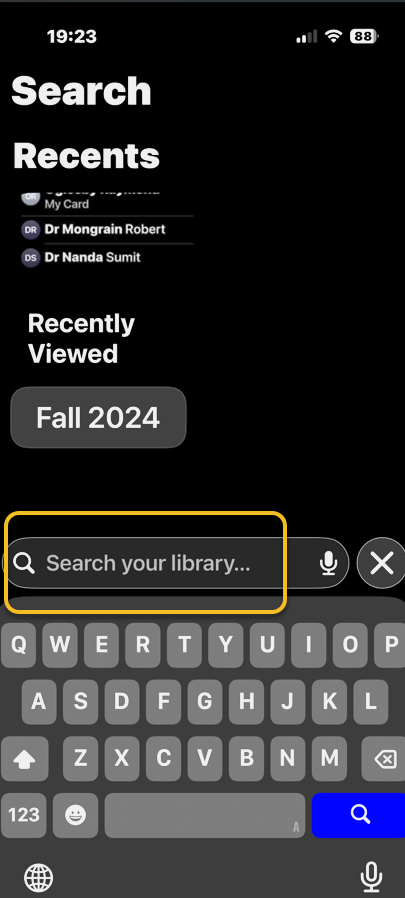
Now, you will see some personalized suggestions, which you can tap. Or you can tap the Search bar to type in your own search terms. See the following image:
Selecting the Search bar
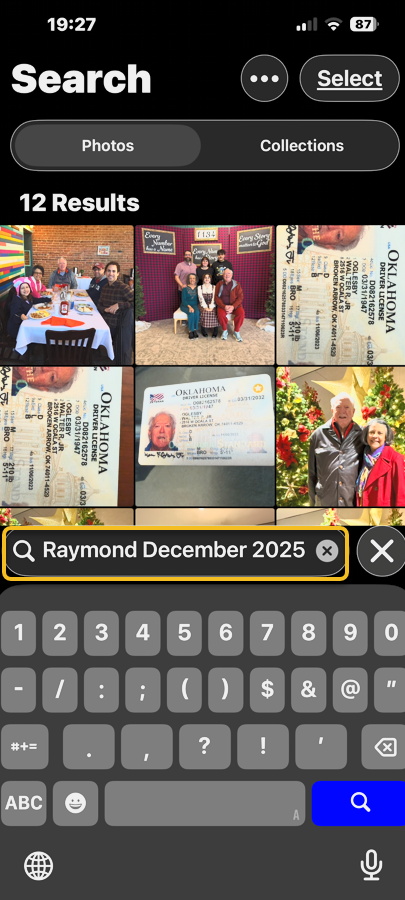
Next, once you enter a search term, you will see all the photos in your library that match. For example, we searched “Raymond December 2025”, and now we can see all my photos of myself, Raymond, from December 2025. Notice that it found blurred text and rotated images. Refer to the image below:
Entering your search criteria into the Search bar
That’s how to search photos on the iPhone or iPad. Try it out yourself! Put in a few search terms and see what you get. It’s super easy to find the exact photo you are looking for every time.
Disclaimer
Technology is constantly evolving, and smartphone and desktop tech rarely remains static. Therefore, the information in this post is only accurate as of the date it was written. Blog posts that are older than six months may contain instructions that are no longer compatible with your device or operating system. We hope that the content from previous posts continues to function as intended. Thank you for reading TechSavvy.Life, where technology works for you.
Quote For the Day
The art challenges the technology, and the technology inspires the art.
. – John Lasseter
X (Twitter) Info
That’s it. Please feel free to share this post! One way to share is via Twitter.
Just click the Tweet icon below. This will launch Twitter where you click its icon to post the Tweet.
Checkout TechSavvy.Life for blog posts on smartphones, PCs, and Macs! You may email us at contact@techsavvy.life for comments or questions.
We value your feedback! Was this post helpful? Please share your comments with us. If you have a tech question related to your computer or smart device, feel free to reach out. Just send an email to contact@techsavvy.life, and be sure to include the device, app, and version you are using. To assist us further, you can also attach screenshots related to your inquiry.
The author’s Vietnam eBook, “Battle for Tra Bong Vietnam: Events and Aftermath,” is available on Kindle devices and the Kindle App for desktop, laptop, and smartphone. The apps are free.
The author’s Vietnam eBook on the Battle for Tra Bong Vietnam: Events and Aftermath
The post explains how to easily share iPhone contacts through the Contacts app without the need for manual entry. Users can customize which parts of the contact card to share and choose various sharing methods like email or AirDrop. It emphasizes simplicity and efficiency in sharing contact information.
RAYMOND OGLESBY @RaymondOglesby2 March 3, 2026 – 3 minutes read time
Overview
You can share iPhone contacts (also known as a contact card) directly from the Contacts app on your iPhone, and it does not involve copying and pasting or tediously typing it out!
When you add people to your contacts, a contact card is automatically created on your iPhone for each contact so that all of the contact’s information is grouped into one place. This makes it simple to share or send a contact on iPhone. Let’s explore how to share a contact on iPhone.
Key Takeaways
Learn how to share contacts on iPhone so you can send your own or someone else’s contact card; no more typing out numbers!
Customize which parts of the contact card you want to share; you can leave off the email address, phone number, first name, and/or last name.
System Requirements
This tip was performed on an iPhone 17 Pro running iOS 26.2.1.
Click here to learn how to update your iPhone to the latest iOS version.
Share a Contact
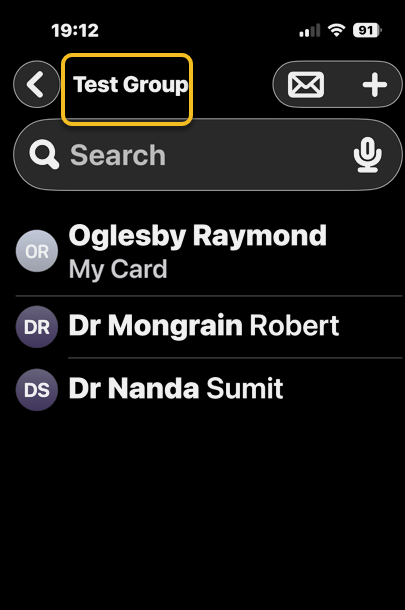
First, open the Contacts app. In our example, we are selecting a contact group from Contacts. Refer to the image below:
Opening your Contacts app
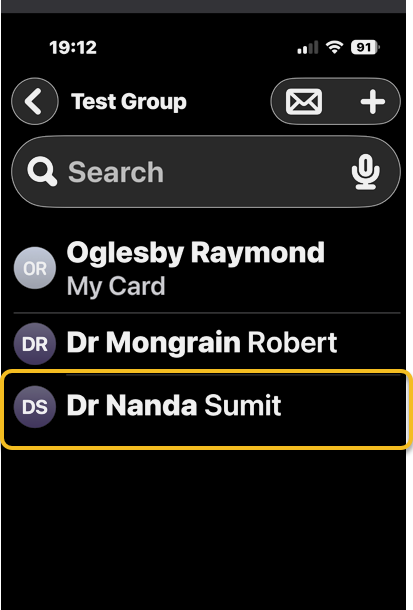
Next, tap the contact you wish to share. See the image below:
Selecting a contact
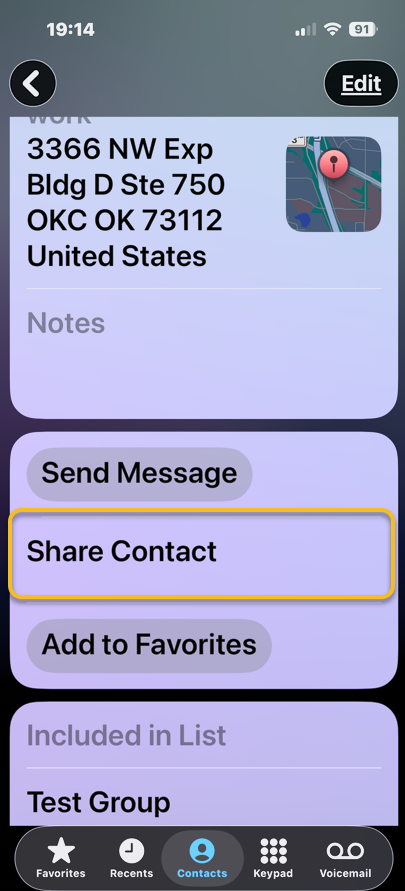
Now, tap Share Contact. See the following image:
Selecting the Share Contact option
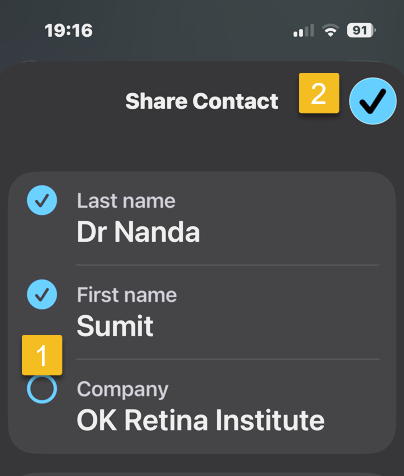
Next, tap the blue dot next to any part of the contact card you do NOT wish to share, then tap the check mark in the blue circle at upper right. Refer to the image below:
Unselect items you do NOT want to share and save your results
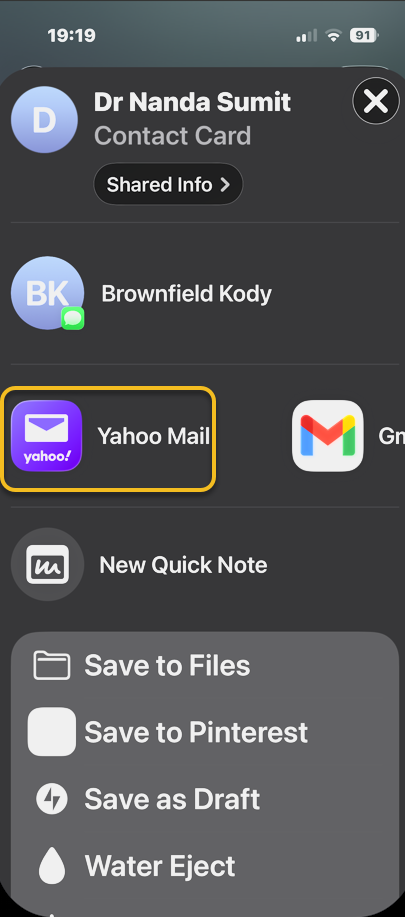
Now, tap a sharing method, such as email, text message, AirDrop, and more. See the image below:
Selecting a sharing method
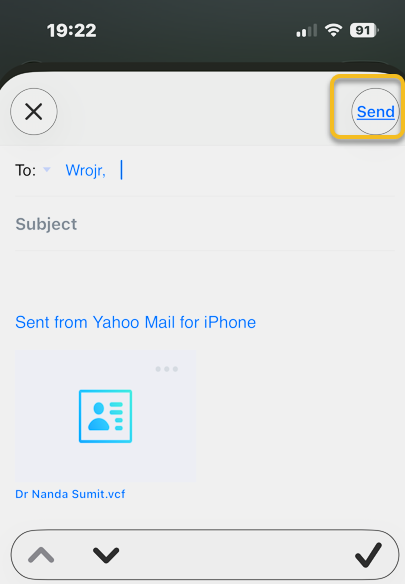
Next, choose a recipient and tap the Send icon to share the contact. See the following image:
Selecting a recipient and sending the contact info
Now you know how to send contact information on iPhone to recipients using the contact card on your phone! It’s never been easier to share a contact on iPhone.
Disclaimer
Technology is constantly evolving, and smartphone and desktop tech rarely remains static. Therefore, the information in this post is only accurate as of the date it was written. Blog posts that are older than six months may contain instructions that are no longer compatible with your device or operating system. We hope that the content from previous posts continues to function as intended. Thank you for reading TechSavvy.Life, where technology works for you.
Quote For the Day
It’s supposed to be automatic, but actually, you have to push this button.
– John Brunner
(X) Twitter Info
That’s it. Please feel free to share this post! One way to share is via Twitter.
Just click the Tweet icon below. This will launch Twitter where you click its icon to post the Tweet.
Checkout TechSavvy.Life for blog posts on smartphones, PCs, and Macs! You may email us at contact@techsavvy.life for comments or questions.
We value your feedback! Was this post helpful? Please share your comments with us. If you have a tech question related to your computer or smart device, feel free to reach out. Just send an email to contact@techsavvy.life, and be sure to include the device, app, and version you are using. To assist us further, you can also attach screenshots related to your inquiry.
The author’s Vietnam eBook on the “Battle for Tra Bong Vietnam: Events and Aftermath” can be accessed from a Kindle device or the Kindle App for a desktop or smartphone. The apps are free.
The author’s Vietnam eBook on the Battle for Tra Bong Vietnam: Events and Aftermath
Apple has integrated ChatGPT into iPhones through Apple Intelligence, enhancing user interaction with Siri. Users can disable this feature for privacy concerns or to avoid supporting ChatGPT. The process involves modifying settings in the Apple Intelligence menu. Overall, users can maintain privacy while utilizing AI functionalities.
InRAYMOND OGLESBY @RaymondOglesby2 February 24, 2026 – 3 minutes read time
Overview
Apple Intelligence enhances how you use your iPhone, including when you speak to Siri. Thanks to a collaboration between Apple and OpenAI, you can now use ChatGPT on your iPhone with Apple Intelligence. But if you have privacy concerns or prefer not to support ChatGPT, you can disable it.
Does the iPhone have ChatGPT? Apple has natively integrated ChatGPT on iPhone, so that if Apple Intelligence fails to find an answer for you, it can defer to ChatGPT. This works without a ChatGPT account or subscription and allows you to use the AI chatbot a bit more anonymously than if you were to use the app. However, some may still have reservations about using AI unnecessarily or having their searches logged by ChatGPT. If you do not want to use ChatGPT on your iPhone, you can disable it. Let’s explore how to turn off AI on your iPhone.
Key Takeaways
Maintain privacy by preventing ChatGPT from accessing your information.
Avoid supporting ChatGPT if you oppose its environmental impact.
System Requirements
This tip was performed on an iPhone 17 Pro running iOS 26.2.
Click here to learn how to update your iPhone to the latest iOS version.
Disable Chat GPT
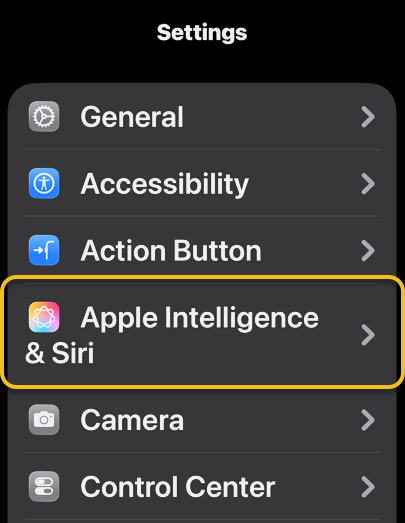
First, open the Settings app, and tap the Apple Intelligence option. Refer to the image below:
Selecting the Apple Intelligence option
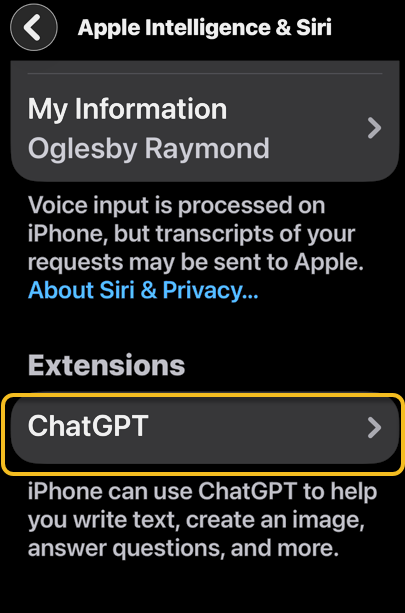
Now, scroll down to Extensions and tap ChatGPT. See the below image:
Selecting the ChatGPT option
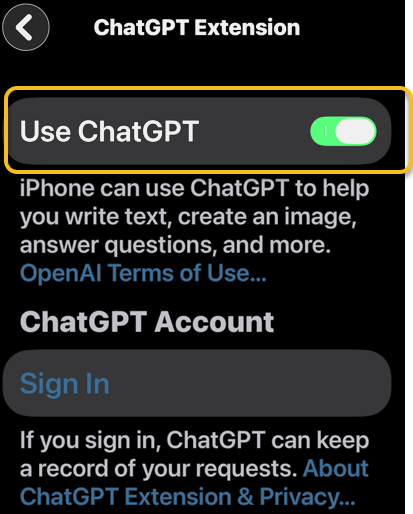
Next, switch off the toggle next to Use ChatGPT to disable it. See the following image:
Turn Off the ChatGPT toggle
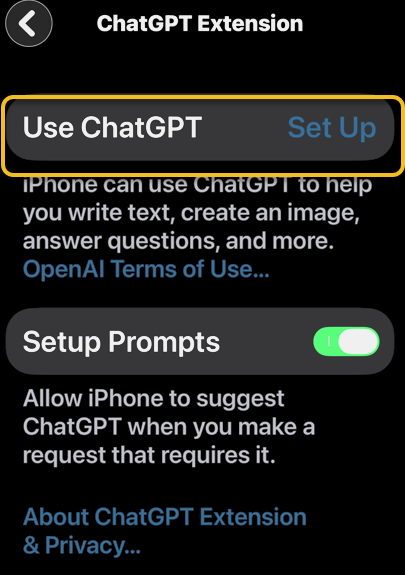
Now, when ChatGPT is turned off, you will see a Set Up prompt instead of a toggle. Refer to the below image:
The Use ChatGPT option is now in Set Up mode
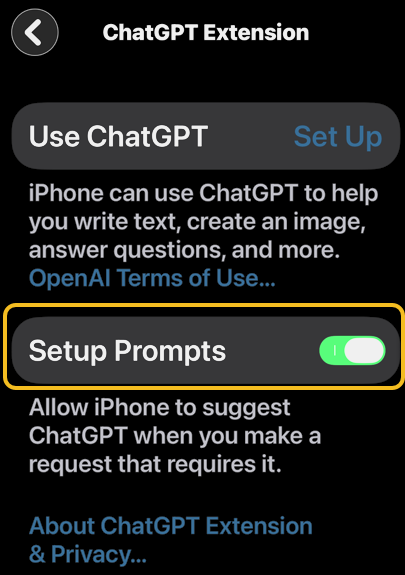
Next, when ChatGPT disabled, your iPhone will continue to prompt you to set it up, so tap the toggle next to Setup Prompts to turn this off as well. See the below image:
Turn Off the Setup Prompts toggle
Note! If you want to enable ChatGPT, go back to Extensions and tap the ChatGPT toggle to on.
That’s how to turn off ChatGPT on iOS. Now you can rely exclusively on the privacy of Apple Intelligence for all your AI needs.
Disclaimer
Technology is constantly evolving, and smartphone and desktop tech rarely remains static. Therefore, the information in this post is only accurate as of the date it was written. Blog posts that are older than six months may contain instructions that are no longer compatible with your device or operating system. We hope that the content from previous posts continues to function as intended. Thank you for reading TechSavvy.Life, where technology works for you.
Quote For the Day
The technology you use impresses no one. The experience you create with it is everything.
– Sean Gerety
(X) Twitter Info
That’s it. Please feel free to share this post! One way to share is via Twitter.
Just click the Tweet icon below. This will launch Twitter where you click its icon to post the Tweet.
Checkout TechSavvy.Life for blog posts on smartphones, PCs, and Macs! You may email us at contact@techsavvy.life for comments or questions.
We value your feedback! Was this post helpful? Please share your comments with us. If you have a tech question related to your computer or smart device, feel free to reach out. Just send an email to contact@techsavvy.life, and be sure to include the device, app, and version you are using. To assist us further, you can also attach screenshots related to your inquiry.
The author’s Vietnam eBook, “Battle for Tra Bong Vietnam: Events and Aftermath,” is available on Kindle devices and the Kindle App for desktop, laptop, and smartphone. The apps are free.
The author’s Vietnam eBook on the Battle for Tra Bong Vietnam: Events and Aftermath
A cybersecurity firm has identified 17 malicious browser extensions, including “Google Translate in Right Click,” which collectively garnered over 840,000 downloads. Mozilla and Microsoft have removed these from their stores, but users must uninstall them manually. The extensions pose risks across several popular web browsers.
RAYMOND OGLESBY @RaymondOglesby2 February 17, 2026 –3 minutes read time
Overview
The most popular malicious extension, dubbed Google Translate in Right Click, was downloaded more than 500,000 times from app stores. Another, Translate Selected Text with Google, racked up almost 160,000 downloads.
If you have been using browser extensions to download YouTube videos or images from Pinterest, translate text in real time, check Amazon price histories, or even enhance colors, you might have some uninstalling to do.
Cybersecurity firm LayerX has uncovered 17 malicious browser extensions that were downloaded more than 840,000 times in total, with some remaining active in the wild for up to five years. Instances were recorded across Firefox, Google Chrome, and Microsoft Edge browsers.
Mozilla and Microsoft have removed all of the extensions from their official stores at the time of writing. However, if you have already installed one, you will need to uninstall it manually.
Extensions to Remove
Here is the list of extensions you should remove:
Google Translate in Right Click
Translate Selected Text with Google
One Key Translate
Translate Selected Text with Right Click
Cool Cursor
Screenshot Clipper
Ads Block Ultimate
Convert Everything
Amazon Price History
RSS Feed
Color Enhancer
Floating Player – PiP Mode
YouTube Download
, Instagram Downloader
Save Image to Pinterest on Right Click
Full Page Screenshot
Youtube Download
Removing Chrome Extensions
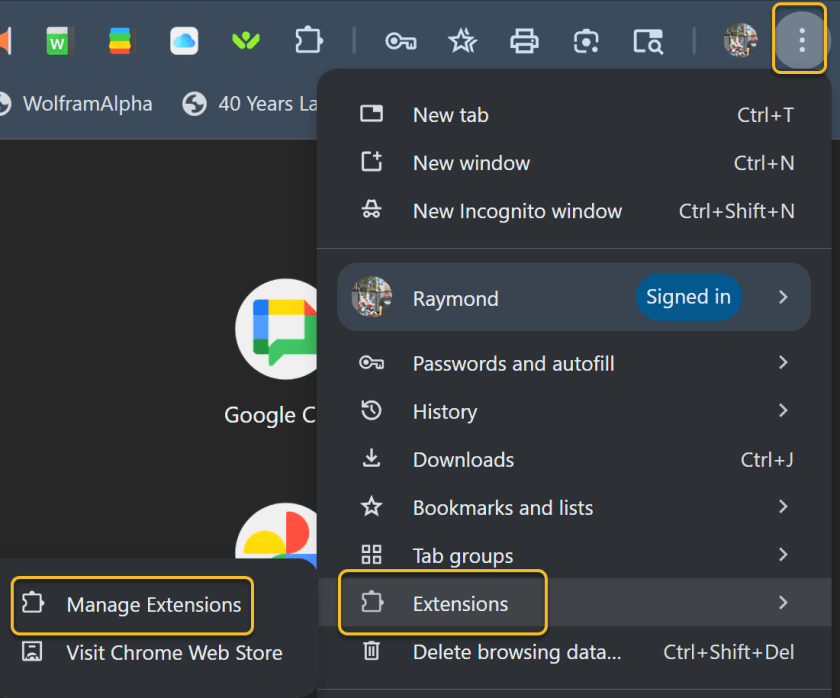
If you want to view all your extensions in Chrome, click the three-dot icon in the upper right, move to More tools, and select Extensions. Alternatively, click the Extensions button on the toolbar and select Manage extensions. This will take you to a page where you can manage all your installed extensions. Refer to the image below:
Accessing Manage Extensions option
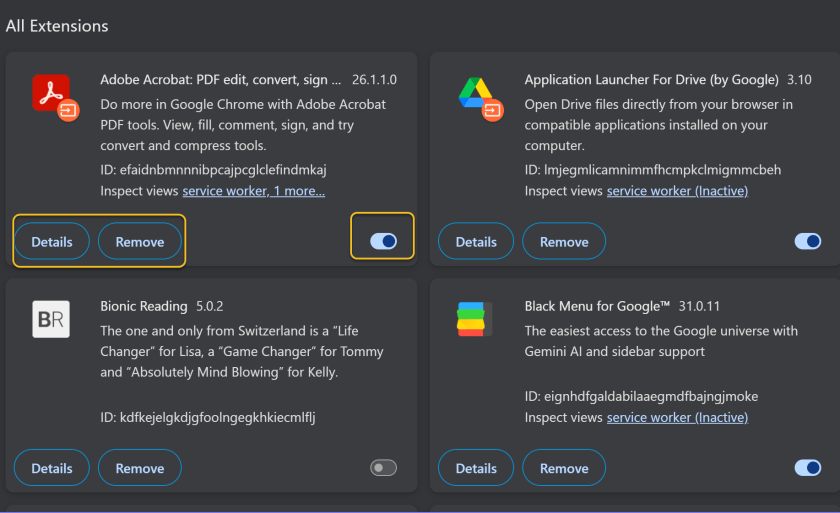
You can click Details to view information on a specific extension. If you turn off an extension switch, this will temporarily disable it. Otherwise, click Remove to uninstall the extension completely. See the image below:
Disable, Remove, or view Details for an Extension
Disclaimer
Technology is constantly evolving, and smartphone and desktop tech rarely remains static. Therefore, the information in this post is only accurate as of the date it was written. Blog posts that are older than six months may contain instructions that are no longer compatible with your device or operating system. We hope that the content from previous posts continues to function as intended. Thank you for reading TechSavvy.Life, where technology works for you.
Quote For the Day
Technology is a gift of God. After the gift of life it is perhaps the greatest of God’s gifts. It is the motherof civilizations, of arts and of sciences.
– Freeman Dyson
(X) Twitter Info
That’s it. Please feel free to share this post! One way to share is via Twitter.
Just click the Tweet icon below. This will launch Twitter where you click its icon to post the Tweet.
Checkout TechSavvy.Life for blog posts on smartphones, PCs, and Macs! You may email us at contact@techsavvy.life for comments or questions.
We value your feedback! Was this post helpful? Please share your comments with us. If you have a tech question related to your computer or smart device, feel free to reach out. Just send an email to contact@techsavvy.life, and be sure to include the device, app, and version you are using. To assist us further, you can also attach screenshots related to your inquiry.
The author’s Vietnam eBook, “Battle for Tra Bong Vietnam: Events and Aftermath,” can be accessed on a Kindle device or the Kindle App for a desktop, laptop, or smartphone. The apps are free.
The author’s Vietnam eBook on the Battle for Tra Bong Vietnam: Events and Aftermath
This post offers guidance on enhancing readability on iPhones and iPads through accessibility settings. Users can learn to bold text, adjust size, and add navigation aids like button borders and on/off labels. The tutorial outlines steps for changing these settings, ensuring a more user-friendly experience for visually impaired individuals.
RAYMOND OGLESBY @RaymondOglesby2 February 10, 2026 – 4 minutes read time
Overview
Are you tired of squinting while looking at content on your iPhone? Good news! You can change the display and text size on your iPhone and iPad for easier readability.
Apple’s accessibility settings allow individuals to customize their display settings so they can more easily navigate and view content on their devices. Follow the steps below to learn how to bold text on your iPhone and iPad, change text size, and add button shapes and toggle labels.
Key Takeaways
Make text larger and bolded for easier readability of text messages, emails, and more.
Add borders to buttons and on/off labels to toggles for easier navigation.
System Requirements
This tip was performed on an iPhone 17 Pro running iOS 26.2.
Click here to learn how to update your iPhone to the latest iOS version.
Making Your Font Bigger
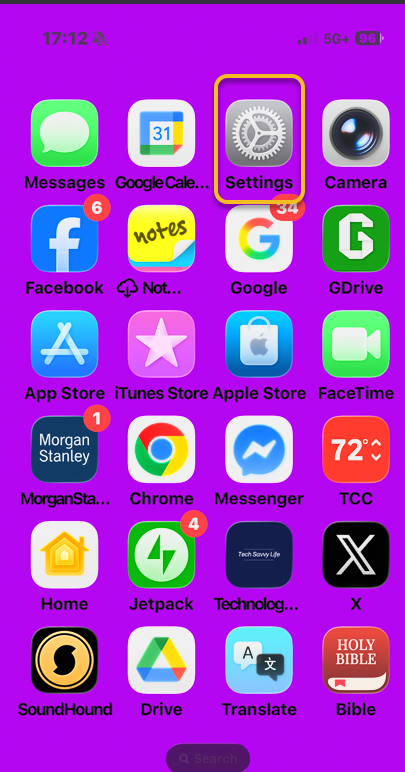
First, open the Settings app. Refer to the image below:
Accessing Settings
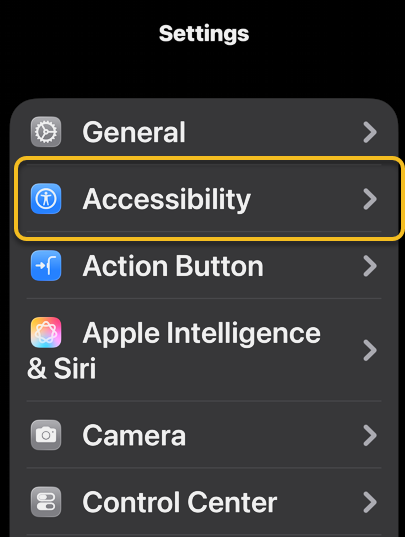
Next scroll down and tap Accessibility. See the image below:
Selecting the Accessibility option
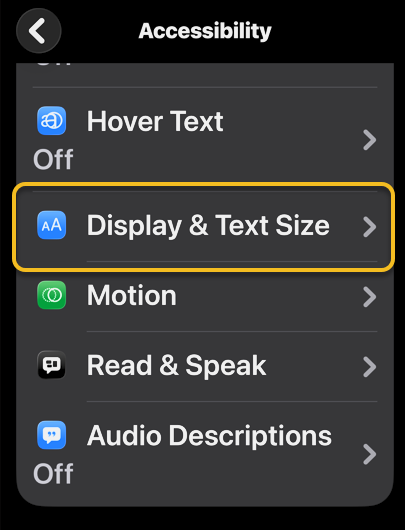
Now, tap Display & Text Size. See the following image:
Selecting the Display & Text Size option
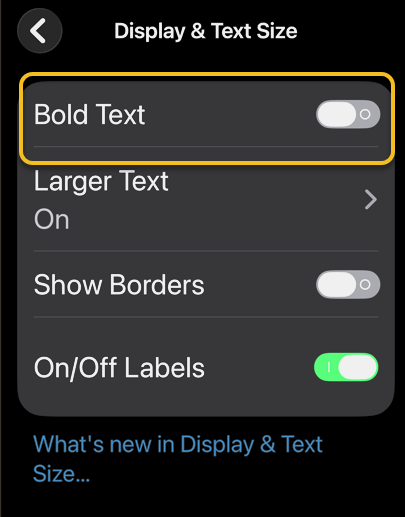
Next, if you want the text on your iPhone or iPad to be bolded, tap the Bold Text toggle to enable it. The toggle is green when enabled. Refer to the image below:
Enabling the Bold Text toggle
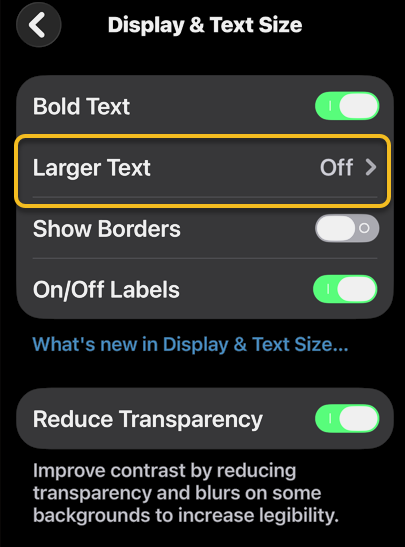
Now, to change the text size, tap Larger Text.See the image below:
Selecting the Larger Text option
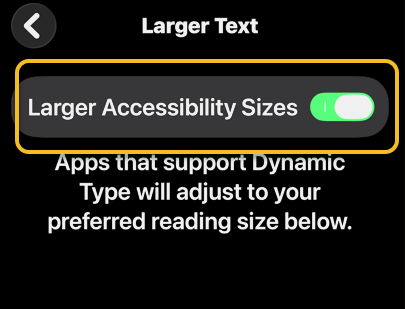
Next, tap to enable the Larger Accessibility Sizes toggle. Once enabled, apps that allow you to change the text size will display your preferred font size. See the following image:
Enabling the Larger Accessibility Sizes toggle
Now, once you have set your preferred font size, tap the back icon to return to main Display & Text Size menu. Refer to the image below:
Go back to main screen
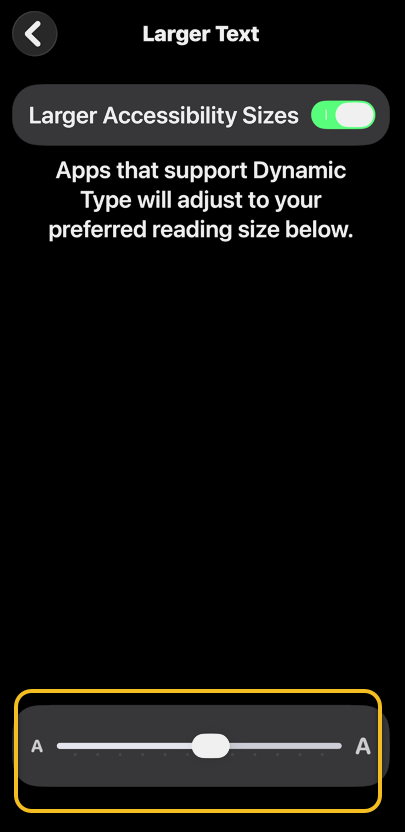
Next. to set your preferred text size, drag the slider left to decrease font size or right to increase font size. See the image below:
Drag the slider to increase or decrease font size
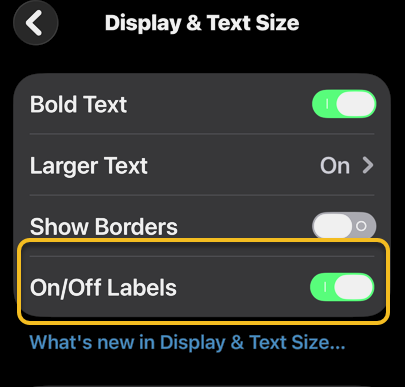
Now, if you want to add on/off labels to toggles, you can also tap to enable the On/Off Labels toggle. The “I” indicates the toggle is on, and “O” indicates it is off. See the following image:
Enabling the On/Off Labels toggle
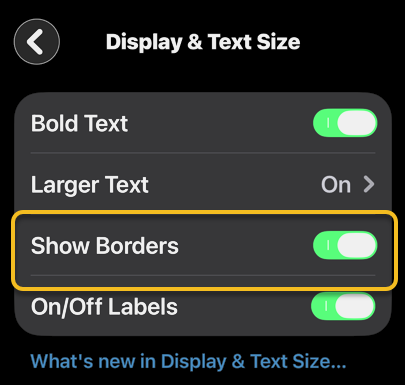
Finally, you can toggle on Show Borders (our favorite) to get thin borders around buttons that would otherwise lack a clear border. Refer to the image below:
Enabling the Show Borders option
Disclaimer
Technology is constantly evolving, and smartphone and desktop tech rarely remains static. Therefore, the information in this post is only accurate as of the date it was written. Blog posts that are older than six months may contain instructions that are no longer compatible with your device or operating system. We hope that the content from previous posts continues to function as intended. Thank you for reading TechSavvy.Life, where technology works for you.
Quote For the Day
The most technologically efficient machine that man has ever invented is the book.
– Northrop Frye
(X) Twitter Info
You are finished. Please feel free to share this post! One way to share is via Twitter.
Just click the Tweet icon below. This will launch Twitter where you click its icon to post the Tweet.
Checkout TechSavvy.Life for blog posts on smartphones, PCs, and Macs! You may email us at contact@techsavvy.life for comments or questions.
We value your feedback! Was this post helpful? Please share your comments with us. If you have a tech question related to your computer or smart device, feel free to reach out. Just send an email to contact@techsavvy.life, and be sure to include the device, app, and version you are using. To assist us further, you can also attach screenshots related to your inquiry.
The author’s Vietnam eBook on the “Battle for Tra Bong Vietnam: Events and Aftermath” can be accessed on a Kindle device or the Kindle App for a desktop or smartphone. The apps are free.
The author’s Vietnam eBook on the Battle for Tra Bong Vietnam: Events and Aftermath
Background App Refresh can consume data and battery life on your device. Users can optimize its usage by enabling it only when connected to Wi-Fi. This setting helps preserve cellular data and battery life while keeping apps up-to-date when needed. Instructions for adjusting these settings are provided for iPhone users.
RAYMOND OGLESBY @RaymondOglesby2 February 3 , 2026 – 4 minutes read time
Overview
Background App Refresh can siphon off your data and battery without you noticing. But you can choose to turn Background App Refresh on only when your device is connected to Wi-Fi. That way, you can enjoy the perks of the feature without worrying about how much data it’s using.
What Is Background Refresh
For years, it has been recommended to turn off Background App Refresh on your device to save battery life and cellular data. Background App Refresh automatically refreshes apps you have open in the background, so when you go back to them, the page is already up to date and loaded. This can consume data and battery life. Here’s how to set background app refresh to Wi-Fi only on iPhone.
Note! All iPhone users should setup this tip. Why Apple does not make this the default is beyond us.
Key Takeaways
Save battery life by preventing apps from constantly refreshing.
Ensure you do not use up extra cellular data by allowing apps to refresh only over Wi-Fi.
System Requirements
This tip was performed on an iPhone 17 Pro running iOS 26.2.
Click here to learn how to update your iPhone to the latest iOS version.
Set Background App Refresh
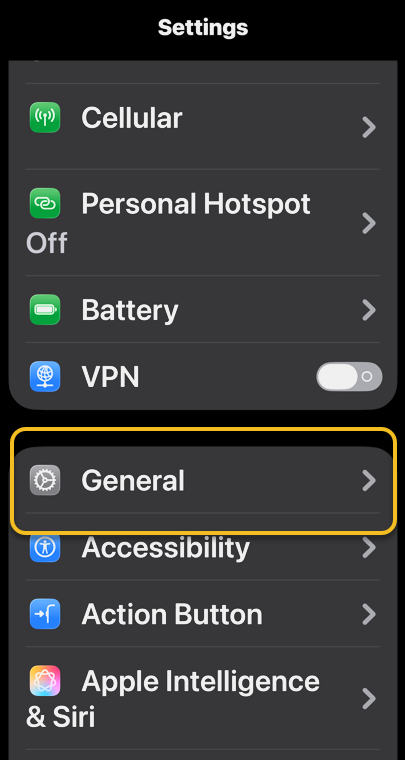
First, open Settings, and select General. Refer to the image :
Selecting the General option
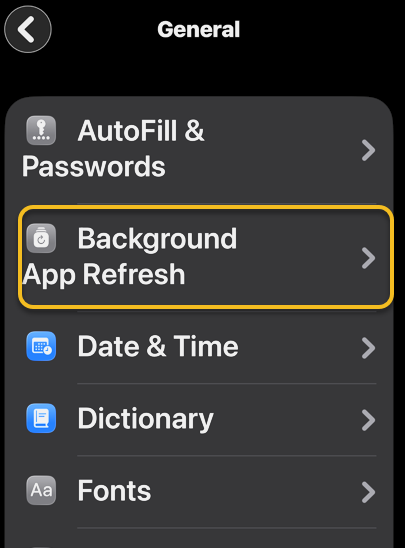
Next, tap Background App Refresh. See the image below:
Selecting the Background App Refresh option
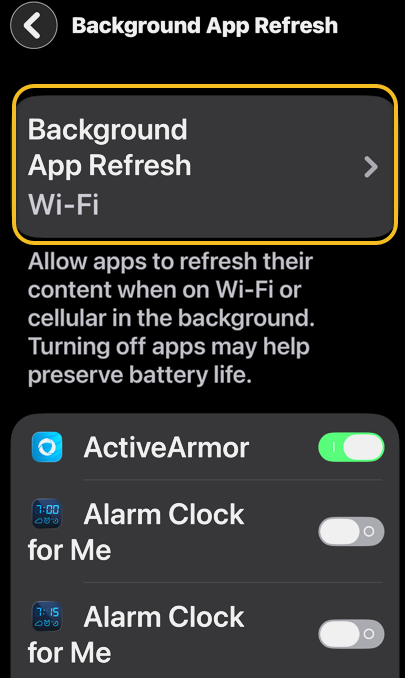
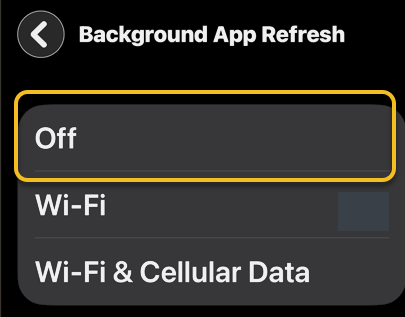
Now, select Background App Refresh again. See the following image:
Selecting the Background App Refresh option again
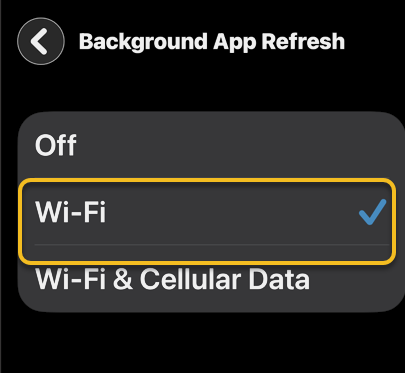
Next, select Wi-Fi to turn on Background App Refresh only when your device is connected to Wi-Fi. Refer to the image below:
Turning Wi-Fi on
Now, you can enable/disable background refresh per app by tapping its toggle. see the image below:
Disable Background App Refresh
That’s how to adjust the settings for background app refresh on iPhone. If you want to know how to turn off background app refresh completely, just select Off in the last step. This is a good option if you do not want your apps updating without you knowing. This can stop updates you actually do not want from being installed on your phone (which can be a huge advantage), but it will be annoying when you open an app you need to use now, only to get a notification that you will have to update before you can use it.
Disclaimer
Technology is constantly evolving, and smartphone and desktop tech rarely remains static. Therefore, the information in this post is only accurate as of the date it was written. Blog posts that are older than six months may contain instructions that are no longer compatible with your device or operating system. We hope that the content from previous posts continues to function as intended. Thank you for reading TechSavvy.Life, where technology works for you.
Quote For the Day
Our technological powers increase, but the side effects and potential hazards also escalate.
. – Alvin Toffler
(x) Twitter Info
That’s it. Please feel free to share this post! One way to share is via Twitter.
Just click the Tweet icon below. This will launch Twitter where you click its icon to post the Tweet.
Checkout TechSavvy.Life for blog posts on smartphones, PCs, and Macs! You may email us at contact@techsavvy.life for comments or questions.
We value your feedback! Was this post helpful? Please share your comments with us. If you have a tech question related to your computer or smart device, feel free to reach out. Just send an email to contact@techsavvy.life, and be sure to include the device, app, and version you are using. To assist us further, you can also attach screenshots related to your inquiry.
The author’s Vietnam eBook on the “Battle for Tra Bong Vietnam: Events and Aftermath” can be accessed from a Kindle device or the Kindle App for a desktop or smartphone. The apps are free.
The author’s Vietnam eBook on the Battle for Tra Bong Vietnam: Events and Aftermath
This post explains how to quickly disable specific app notifications from the iPhone Lock Screen, simplifying the process compared to accessing the Notification Settings. Users can swipe left on a notification, select Options, and then turn off alerts, but must be cautious as there’s no confirmation to revert changes.
RAYMOND OGLESBY @RaymondOglesby2 January 27, 2026 – 3 minutes read time
Overview
Did you know that you can quickly turn off specific app notifications without having to dig deep in your notifications settings? Let’s learn how to turn notifications off on iPhone’s Lock Screen in just a few quick steps. This is an easy way to reduce declutter by turning off iPhone notifications as soon as they pop up.
You may already know how to turn off notifications on iPhone in the Notification Settings. However, it is even easier to turn off an unwanted app notification the moment it pops up, directly from your Lock Screen.
Key Takeaways
Turn off specific app notifications the moment you get them.
Avoid the hassle of navigating to Notification Settings and disable notifications directly from your Lock Screen.
System Requirements
This tip was performed on an iPhone 17 Pro running iOS 26.2.
Click here to learn how to update your iPhone to the latest iOS version.
Turning Off Notifications
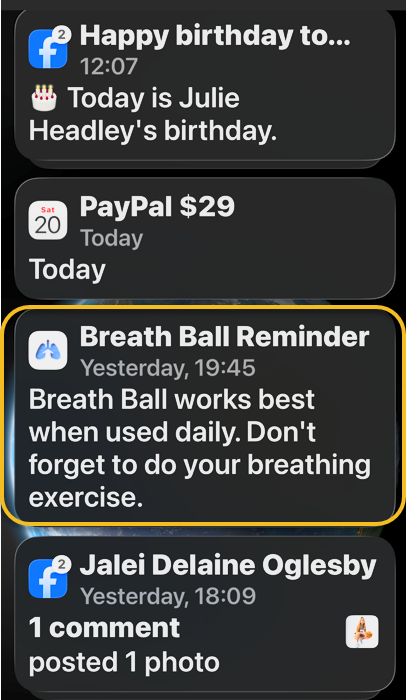
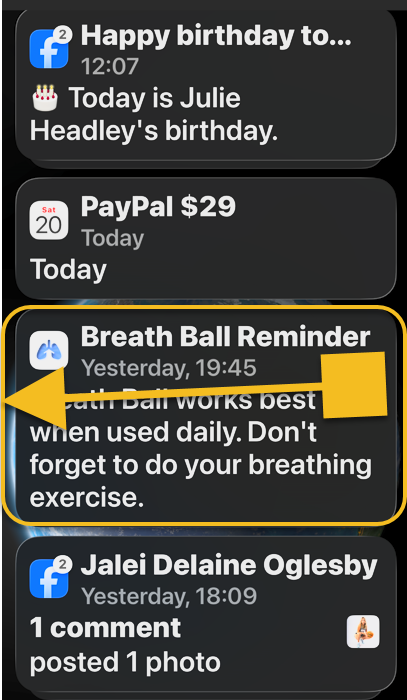
First, locate a notification from an app on your Lock Screen that you wish to silence. Refer to the image below:
Selecting a notification
Next, swipe slowly from right to left over the notification. See the below image:
Swipe the notification slowly
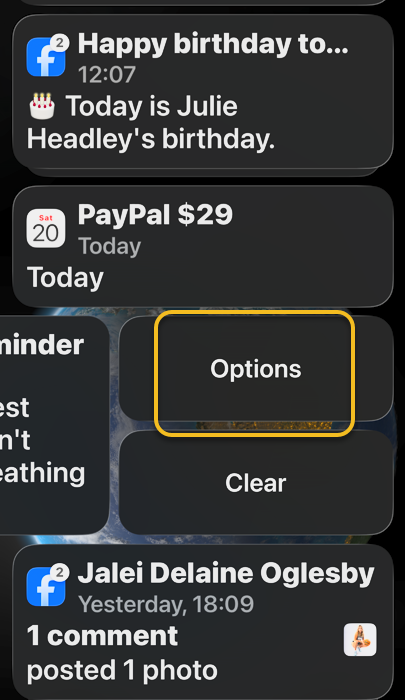
Now, tap Options. If you tap Clear, just this one notification will be removed. See the following image:
Selecting Options
Next, select Turn Off. Refer to the image below:
Selecting to Turn Off all notifications for this app
Another trick is that instead of tapping Turn Off, you can tap View Settings which will take you to the page with all the settings for that particular app.
Note! There is no confirmation step once you tap Turn Off, so if you accidentally turn off the wrong app notifications, you will have to turn them back on via Settings
Also, for example if you turn off Best Buy app Deals notifications it will generally disable all alerts from the app, to include order and shipping uupdates, so be careful what you turn off.
Now you know how to turn off iPhone notifications directly from the Lock Screen!
Disclaimer
Technology is constantly evolving, and smartphone and desktop tech rarely remains static. Therefore, the information in this post is only accurate as of the date it was written. Blog posts that are older than six months may contain instructions that are no longer compatible with your device or operating system. We hope that the content from previous posts continues to function as intended. Thank you for reading TechSavvy.Life, where technology works for you.
Quote For the Day
The saddest aspect of life right now is that science gathers knowledge faster than society gathers wisdom.
– Isaac Asimov
(X) Twitter Info
That’s it. Please feel free to share this post! One way to share is via Twitter.
Just click the Tweet icon below. This will launch Twitter where you click its icon to post the Tweet.
Checkout TechSavvy.Life for blog posts on smartphones, PCs, and Macs! You may email us at contact@techsavvy.life for comments or questions.
We value your feedback! Was this post helpful? Please share your comments with us. If you have a tech question related to your computer or smart device, feel free to reach out. Just send an email to contact@techsavvy.life, and be sure to include the device, app, and version you are using. To assist us further, you can also attach screenshots related to your inquiry.
The author’s Vietnam eBook on the “Battle for Tra Bong Vietnam: Events and Aftermath” can be accessed from a Kindle device or the Kindle App for a desktop or smartphone. The apps are free.
The author’s Vietnam eBook on the Battle for Tra Bong Vietnam: Events and Aftermath
Apple Intelligence is a new AI feature for iPhone 15 Pro and later, allowing users to rewrite text in seconds. It includes tools for improving writing, managing messages, and ensuring privacy. Despite its capabilities, the author suggests it needs refinement compared to Grammarly Pro. Compatibility and usage instructions are provided.
RAYMOND OGLESBY @RaymondOglesby2 January 20, 2026 – 4 minutes read time
Overview
Now, there’s an easy way to rewrite any text or email in just a matter of seconds. With Apple Intelligence, you can now let your iPhone’s AI rewrite text for you.
Apple Intelligence is capable of using handy rewriting tools to change up any passage of text that you have typed, as long as you are using an iPhone 15 Pro or later model. Let’s explore this AI feature.
What is Apple intelligence
Apple Intelligence is a suite of AI-powered tools that use your personal data to generate information and recommendations tailored to you. It’s available on the iPhone, iPad, and Mac, and is integrated into the core of the operating system and existing apps.
Apple Intelligence includes features like:
Image Playground: A tool for generating cartoon-style images based on text descriptions
Genmoji: A tool for creating emojis for any situation
Writing Tools: Tools for enhancing your writing, including ChatGPT integration and reformatting tools like List and Table
Priority Messages: A tool for prioritizing messages in your inbox
Notification summaries: A tool for scanning long or stacked notifications with key details
Reduce Interruptions: A Focus that surfaces only notifications that might need immediate attention
Smart Reply: A tool in Mail that identifies questions you were asked in an email and offers relevant selections to include in your response
Apple Intelligence is designed to protect your privacy at every step. It’s aware of your personal information without collecting it, and it uses on-device processing and Private Cloud Compute to handle more complex requests.
Key aTakeaways
Rewrite and improve typed text anywhere on your iPhone.
Make sure your messages are always written correctly.
System Requirements
This tip works on the iPhone 15 Pro or later running iOS 18.1 or later. Screenshots are from iPhone 17 Pro running iOS 26.1.
Click here to learn how to update your iPhone to the latest iOS version.
How to Use
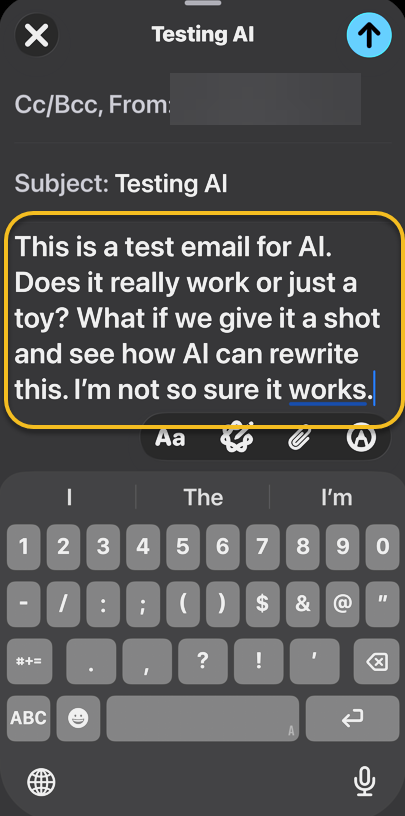
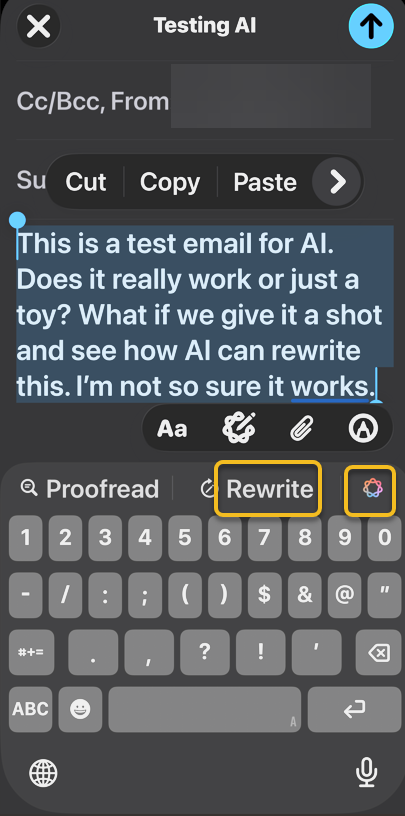
First, in any area where you have typed text, such as an email, select the text. Refer to the below image:
selecting an email text
Next, you can tap Rewrite or the Apple Intelligence icon. If you tapped the Apple Intelligence icon, select Rewrite. See the image below:
Selecting the Rewrite option
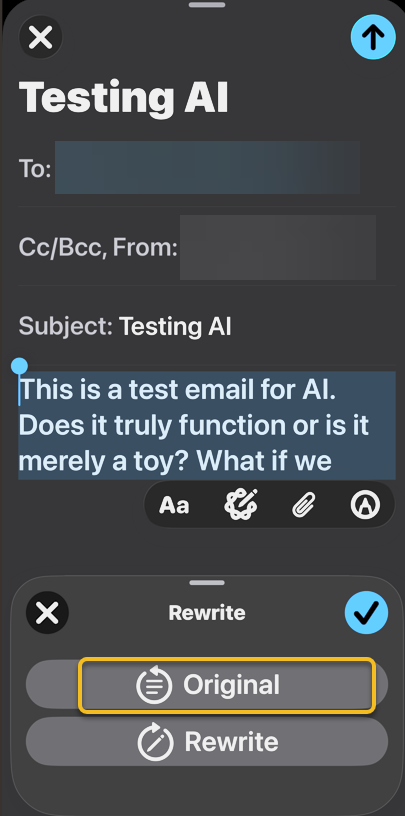
Now, tap Original to see the original. See the following image:
Selecting the Original option
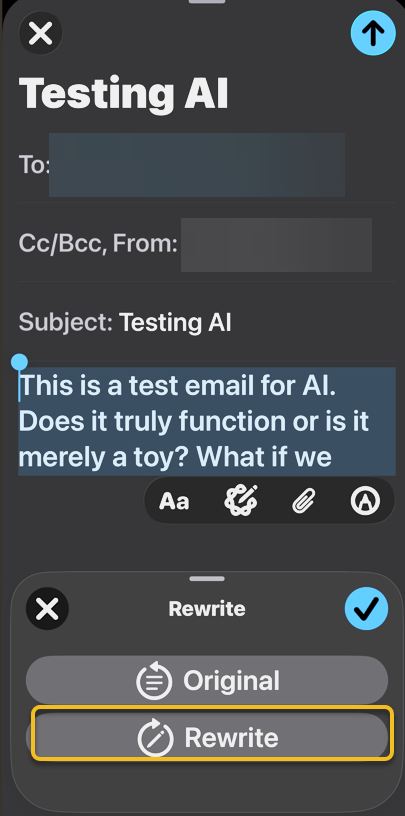
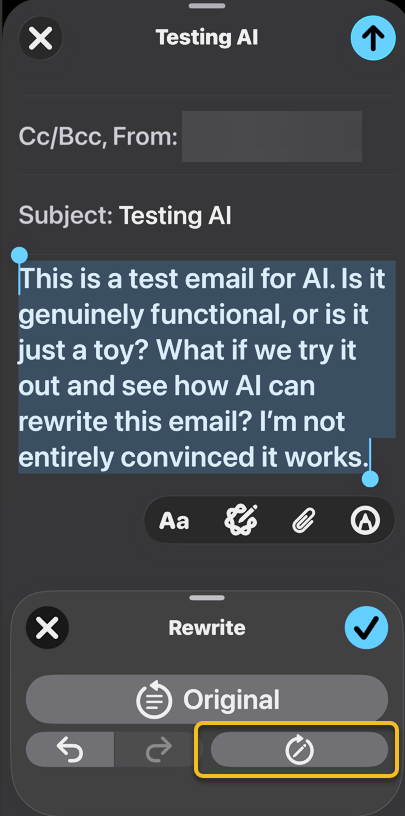
Next, tap Rewrite to rewrite it again. Refer to the image below:
Selecting the Rewrite option again
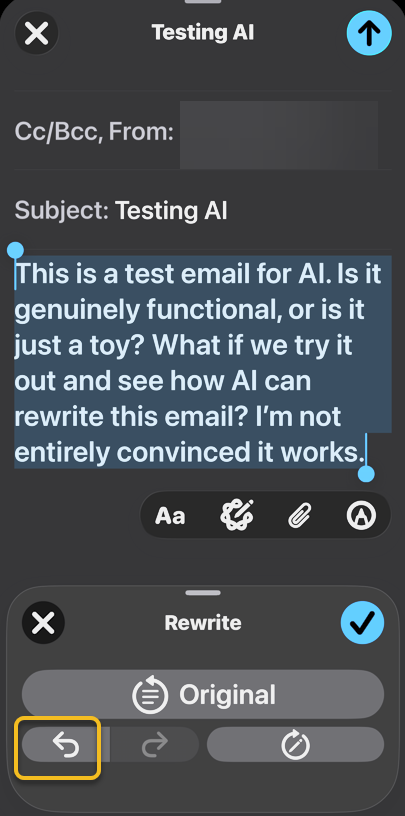
Now, you can use the Undo and Redo buttons to cycle through different rewrites. See the image below:
Selecting the Undo option
Next, you can tap the Rewrite icon to rewrite the text again. See the following image:
Selecting the Rewrite icon
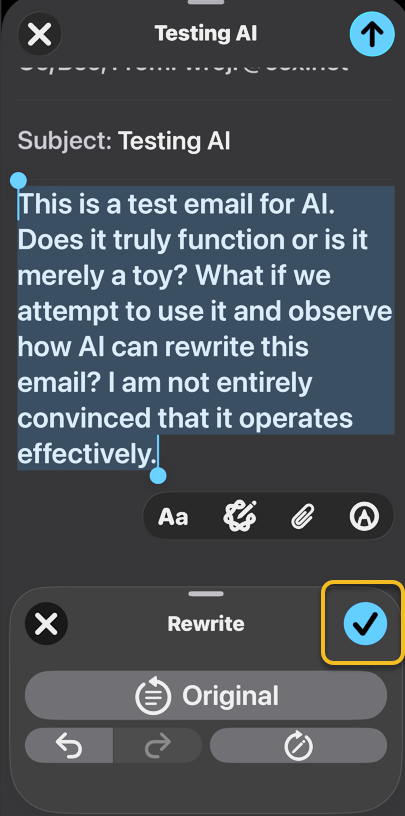
Now, select Done to save the rewritten text. Refer to he image below:
Save your changes
That’s how to use the new Apple Intelligence rewrite tools to change up your text after you have typed it.
In the author’s opinion, Apple Intelligence is lacking and needs refinements. We prefer to use Grammarly Pro.
Disclaimer
Technology is constantly evolving, and smartphone and desktop tech rarely remains static. Therefore, the information in this post is only accurate as of the date it was written. Blog posts that are older than six months may contain instructions that are no longer compatible with your device or operating system. We hope that the content from previous posts continues to function as intended. Thank you for reading TechSavvy.Life, where technology works for you.
Quote For the Day
Technology like art is a soaring exercise of the human imagination.
– Daniel Bell
X (Twitter) Info
That’s it. Please feel free to share this post! One way to share is via Twitter.
Just click the Tweet icon below. This will launch Twitter where you click its icon to post the Tweet.
Checkout TechSavvy.Life for blog posts on smartphones, PCs, and Macs! You may email us at contact@techsavvy.life for comments or questions.
We value your feedback! Was this post helpful? Please share your comments with us. If you have a tech question related to your computer or smart device, feel free to reach out. Just send an email to contact@techsavvy.life, and be sure to include the device, app, and version you are using. To assist us further, you can also attach screenshots related to your inquiry.
The author’s Vietnam eBook on the “Battle for Tra Bong Vietnam: Events and Aftermath” can be accessed from a Kindle device or the Kindle App for a desktop or smartphone. The apps are free.
The author’s Vietnam eBook on the Battle for Tra Bong Vietnam: Events and Aftermath
Windows 11’s Settings app is loaded with unexpected features beyond basic configurations. It allows wireless file sharing via Nearby Sharing, Dynamic Lock using Bluetooth, and clipboard syncing across devices, including Android. Other highlights include Storage Sense for disk cleanup, projecting from other devices, and an End Task button for frozen applications.
InRAYMOND OGLESBY @RaymondOglesby2 January 13, 2026 – 11 minutes read time
Overview
The Windows 11 Settings app isn’t just for configuring your PC’s display and changing your password. It’s also packed with surprisingly weird (and mostly useful) features that give the desktop OS a bit of flair. For example, did you know that it has a native option for sharing files wirelessly between your PCs? Or that you could sync your clipboard to an Android phone? We dug deep through the Settings app to surface the most unexpected capabilities in Windows. Simply press Windows key + I to open the Settings app and get started.
Key Takeaways
Learn some hidden useful Windows 11 Settings options.
Make Windows 11 easier to use.
System Requirements
This post was performed on Windows 11 Pro desktop running 25H2 version.
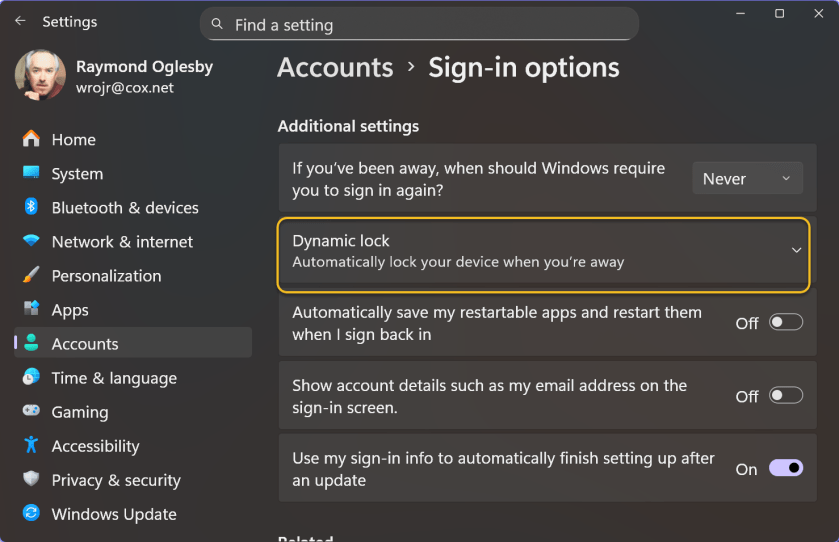
Dynamic Lock
Windows 11 can track your phone’s movements via its Bluetooth signal strength, locking your PC when your phone moves too far away from your computer. Microsoft calls this feature Dynamic Lock, and it serves as an alternative to the Windows key+L shortcut. To activate Dynamic Lock, head to:
Accounts > Sign-In Options > Additional Settings
Refer to the image below:
Dynamic Lock
Some modern Windows 11 PCs with presence sensors do not need to rely on your phone for this feature—they know when you are sitting in front of them. This is probably the more convenient solution in the long term, especially since presence sensors work well with Windows Hello facial recognition. Your PC’s presence sensor notices when you sit back down, and the IR camera checks your face before automatically signing you in. However, until this type of hardware becomes mainstream, setting up Dynamic Lock to work with your phone is the next best option.
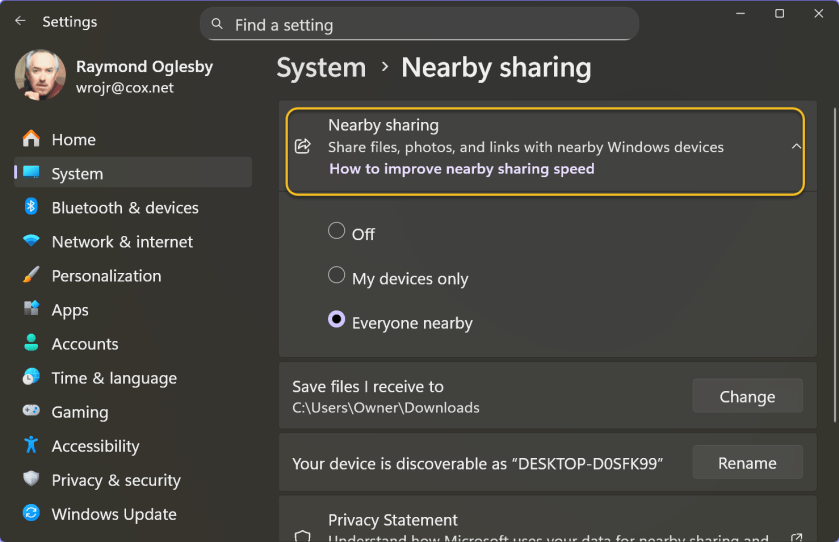
Nearby Sharing
What if Microsoft built the Windows version of Apple’s AirDrop, but nobody noticed? That’s exactly what Nearby Sharing is. I do not think I have ever seen Microsoft seriously promote it.
Nearby Sharing lets you share files, photos, and website links between close by PCs using Bluetooth or Wi-Fi. You can restrict it to devices signed in with the same Microsoft account or allow anyone nearby to send you things. To activate and configure this feature, head to:
System > Nearby Sharing > Share
For example, you can right-click a file in File Explorer and select the Share option. You will see Nearby Sharing as an option here.
Nearby Sharing works only between Windows devices. See the image below:
Nearby Sharing
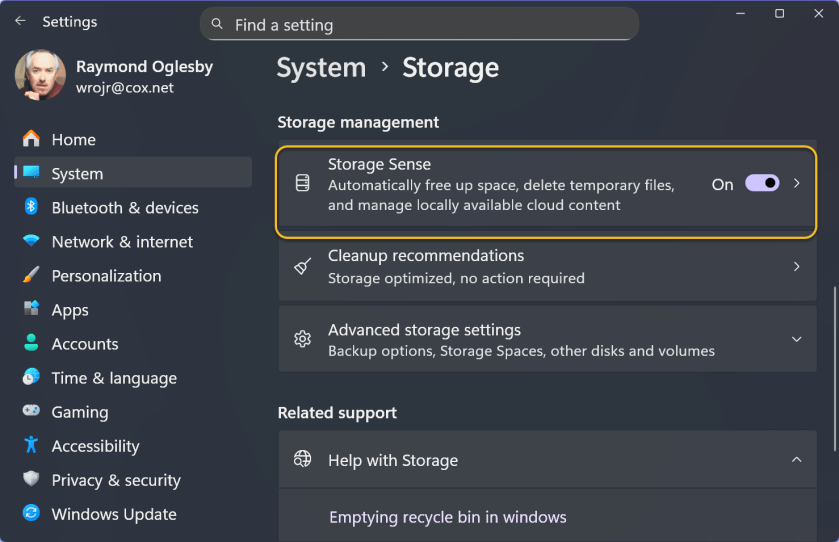
Storage Sense
Windows 11 offers multiple methods for freeing up disk space. You can turn to the classic Disk Cleanup tool, for example, or use something called Storage Sense. The most interesting option under the Storage Sense umbrella is the ability to purge files from your Downloads folder. But it can also automatically clean up temporary files and empty your Recycle Bin. Be sure to save all necessary information from those locations before enabling these settin Simply head to:
System > Storage > Storage Sense
to get started. Under Cleanup schedules, you can choose to have Windows automatically delete files from your Downloads folder if you have not opened them in one, 14, 30, or 60 days. Yes, Windows 11 can automatically delete downloads you have not touched in 24 hours, if you like to live dangerously. See the following image:
Storage Sense
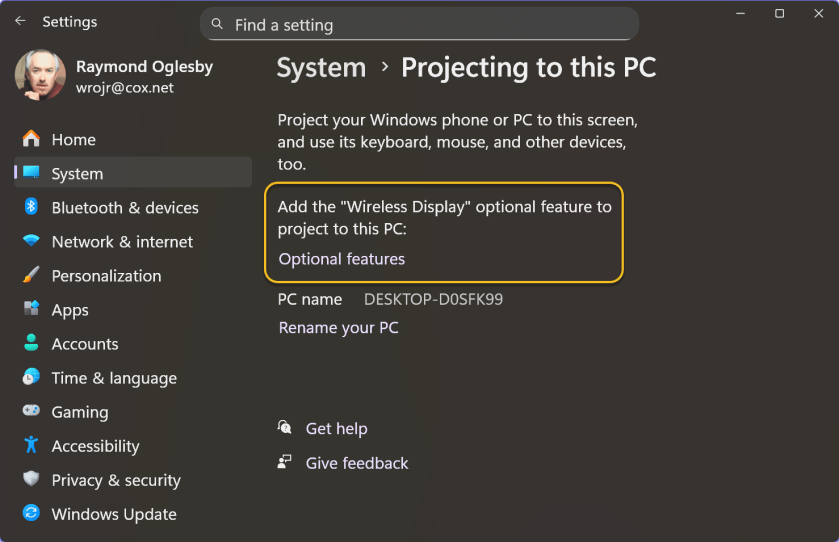
Project to Your PC
Sure, you can project from your Windows PC to an external display. But did you know that you can project from another device—like a PC or phone—and use your PC’s display as a target. To set this up, head to:
System > Projecting to this PC
Windows will ask you to install the Wireless Display optional feature to continue. After activating it, you can press Windows key+K on another PC on your network and cast to your PC’s display.
This capability could be useful if you have a Windows 11 laptop with a small screen and want to interact with it on your larger all-in-one (AIO)machine.
Here’s another oddity: This screen says you can “Project your Windows phone or PC to this screen.” Hey Microsoft, it’s 2026! People no longer have Windows phones. Refer to the image below:
Project to Tour PC
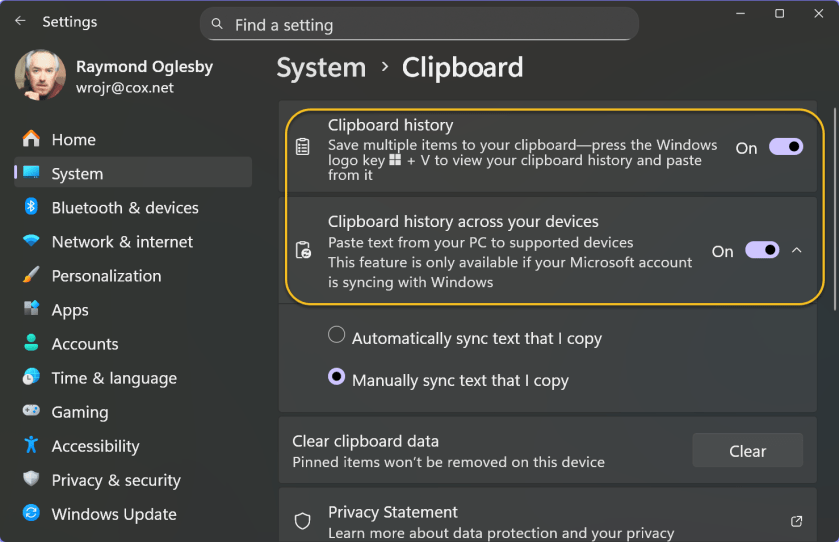
Clipboard Sync
You might be aware that Windows 11 has a clipboard history feature (press Windows key+V to see it), but you might not know that Windows can sync your clipboard between PCs. If you activate that feature, you can copy text on your desktop PC and paste it on your laptop. The clipboard sync feature is strangely configurable and powerful.
Windows offers multiple types of clipboard sync. One is automatic: Everything you copy syncs to your other Windows PCs. The other is manual: You can copy some text, press Windows key+V, and then choose to push that content to your other PCs. In other words, Windows does not sync anything you copy to the cloud until you explicitly request it.
You can also sync your Clipboard to your Android phone by signing into the Microsoft-owned SwiftKey keyboard with your Microsoft account. iPhone users are out of luck—the SwiftKey app does not offer the Clipboard sync feature on iOS. See the image below:
Clipboard Sync
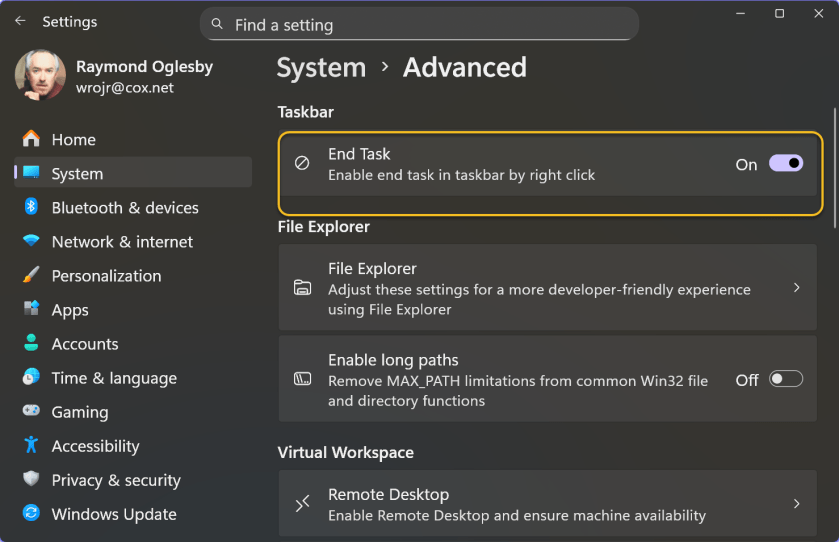
An End Task Button on the Taskbar
If a program freezes or starts to misbehave, you normally have to visit the Task Manager and use the End Task feature to forcibly close it. If you find yourself doing that often, Microsoft has a convenient shortcut for you: You can add an End Task button on the taskbar. After that, you can right-click an application icon and select End Task to forcibly close it. It’s not ideal for day-to-day use—you are forcibly closing an application without giving it a chance to save your work and any data—but it definitely comes in handy sometimes. To turn this on, head to:
System > Advanced
and activate the End Task toggle under the Taskbar section. see the following image:
End Task Button
Game Mode
Game Mode, which is on by default, is not as straightforward as it sounds. In theory, it means that Windows should detect when you are playing a game and limit background tasks to improve performance. When Game Mode originally launched with Windows 10’s Creators Update in 2017, it was more aggressive. Microsoft provided APIs for game developers to manage the system.
Now, Game Mode primarily prevents Windows from sending notifications that interrupt your gameplay. Microsoft makes a vague promise that Game Mode stops Windows Update from installing driver updates while you are gaming and “helps achieve a more stable frame rate depending on the specific game and system,” with no further explanation. YouTube is full of benchmark videos showing no real change in game performance with Game Mode on or off. To find this toggle, head to:
Gaming > Game Mode
The good news is you likely will never have to turn Game Mode off—it should never break anything because it does not do much. Refer to the image below:
Game Mode
Eye Tracking
Did you know that Windows 11 supports eye-tracking hardware without any third-party software? What this means is you can use your eyes to control your PC, including clicking and typing. Of course, you need very specific hardwareto use this accessibility feature, such as a Tobii eye tracking device.
Despite Microsoft pushing PCs with IR cameras and presence sensors, Windows can not perform eye-tracking with standard hardware. Perhaps that’s something we should expect to see in the future as Windows increasingly embraces AI. Imagine if Copilot Vision could see what you were looking at. Right now, even an AI laptop with an NPU for on-device AI processing ca not do much more. Related options are in:
Accessibility > Eye control
See the image below:
Eye Tracking
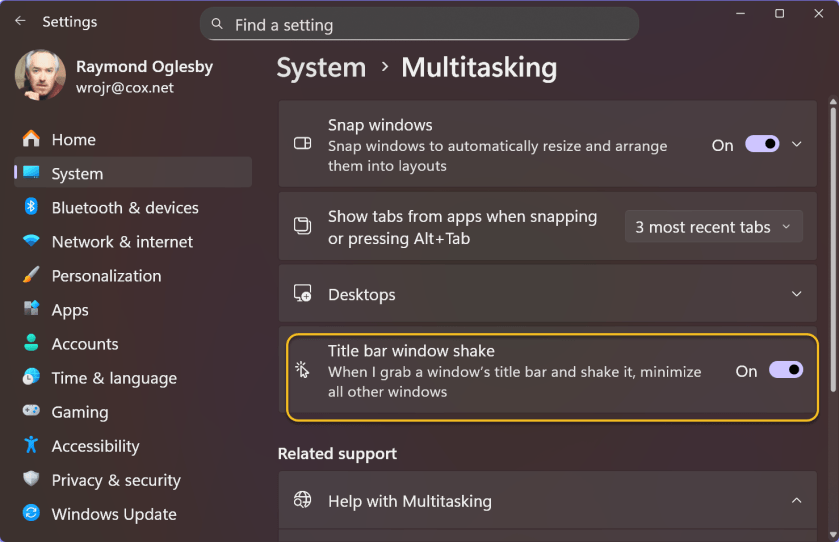
Title Bar Window Shake
Windows Aero launched with Windows Vista and became even better with Windows 7. Some beloved Aero features, such as the Aero Glass translucent interface, are no longer available. (Check out macOS Tahoe if you enjoyed that aesthetic.) Microsoft rebranded other Aero features, however: Aero Snap, for example, evolved into Snap Layouts for arranging desktop windows.
One odd feature that somehow survived under a new name is Aero Shake. It allows you to grab a window’s title bar with your mouse and shake it to minimize all other windows. It’s off by default but was apparently important enough that Microsoft kept it around. To activate this option, head to:
System > Multitasking
and then look for the Title Bar Window Shake option. See the following image:
Title Bar Shake
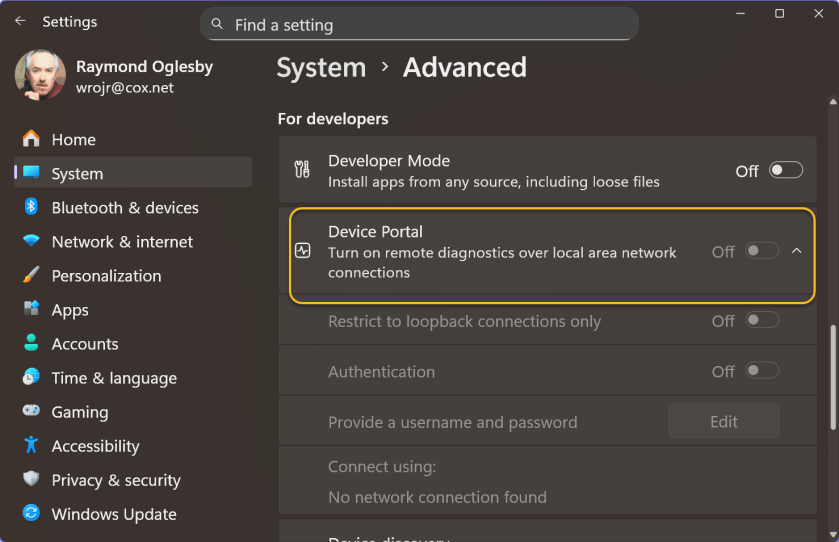
Device Portal
Windows 11 has a Device Portal web interface for “remote diagnostics over local area network connections.” You can activate it via the
System > Advanced
pane. Just turn on Developer Mode and then Device Portal.
This web interface is very strange. It includes an empty Mixed Reality page—functionality that is now no longer available in Windows. It also features a Window Manager page that does not show a single window open on your PC’s desktop. The File Explorer page also highlights the long-forgotten 3D Objects folder. It’s downright bizarre.
The Device Portal was originally meant for managing Microsoft HoloLens hardware, as Microsoft explains. The Window Manager page presumably only shows the kind of floating Mixed Reality windows you would see on a HoloLens. Of course, HoloLens is now dead—Microsoft handed its US military contract off to Anduril earlier this year. Mixed Reality and 3D Objects are gone, too.
But the ghost of HoloLens past lives on, available just a few clicks away in Windows 11’s Settings app. If your PC is not on a network, the options are unavailable. Refer to the image below:
Device Portal
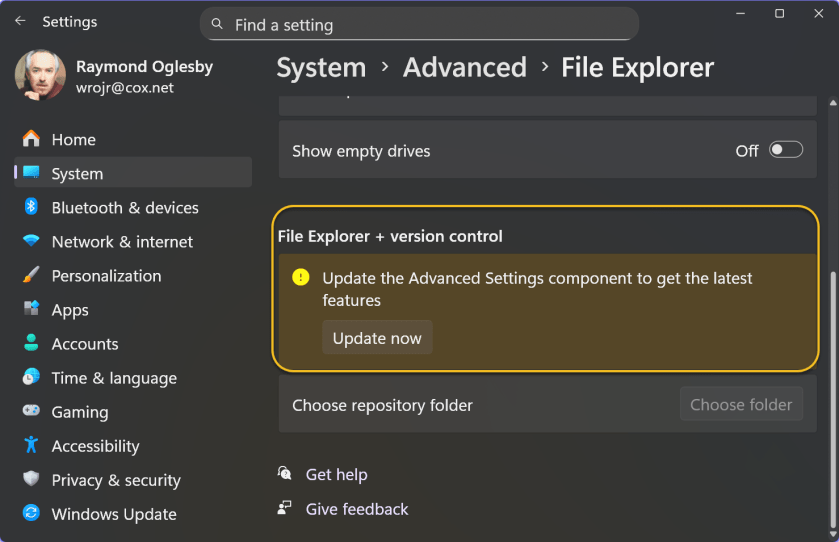
File Explorer
Advanced Windows Settings provides additional functionality to the Advanced page inside Windows settings, such as File Explorer with version control integration. File Explorer with version control integration lets you view Git information directly in your source folder. Head to:
System > Advanced > File Explorer
Under the File Explorer + version control section, click the Update Now button to see if you have the latest Advanced Settings control. See the image below:
File Explorer
The Settings App Is the New Control Panel
Although Microsoft has not finished migrating all the useful options from Windows 11’s Control Panel to the Settings app yet, the latter is already (and amusingly) becoming a junk drawer full of historical options. Exploring the Settings app is like walking through a Windows history museum. Some options only make sense if you understand Microsoft’s original intentions when they were released. Perhaps Microsoft’s Mu-based AI agent can clean things up in the future.
Disclaimer
Technology is constantly evolving, and smartphone and desktop tech rarely remains static. Therefore, the information in this post is only accurate as of the date it was written. Blog posts that are older than six months may contain instructions that are no longer compatible with your device or operating system. We hope that the content from previous posts continues to function as intended. Thank you for reading TechSavvy.Life, where technology works for you.
Quote For the Day
Let’s go invent tomorrow instead of worrying about what happened yesterday – Steve Jobs
(X) Twitter Info
You are finished. Please feel free to share this post! One way to share is via Twitter.
Just click the Tweet icon below. This will launch Twitter where you click its icon to post the Tweet.
Checkout TechSavvy.Life for blog posts on smartphones, PCs, and Macs! You may email us at contact@techsavvy.life for comments or questions.
We value your feedback! Was this post helpful? Please share your comments with us. If you have a tech question related to your computer or smart device, feel free to reach out. Just send an email to contact@techsavvy.life, and be sure to include the device, app, and version you are using. To assist us further, you can also attach screenshots related to your inquiry.
The author’s Vietnam eBook on the “Battle for Tra Bong Vietnam: Events and Aftermath” can be accessed from a Kindle device or the Kindle App for a desktop or smartphone. The apps are free.
The author’s Vietnam eBook on the Battle for Tra Bong Vietnam: Events and Aftermath