How to Save iPhone Voicemails

The Visual Voicemail feature on iPhone makes it super easy to access and manage your voicemails, freeing you from the drudgery of dialing a number and doing it the old-fashioned way. Not only that, but it also lets you save important voicemails to your iPhone with just a few steps.

RAYMOND OGLESBY @RaymondOglesby2
July 4, 2023

This is for the iPhone. Screenshots from iPhone Pro 14 running iOS 16+

The Visual Voicemail feature on iPhone makes it super easy to access and manage your voicemails, freeing you from the drudgery of dialing a number and doing it the old-fashioned way. Not only that, but it also lets you save important voicemails to your iPhone with just a few steps. Let’s explore how this is done.

Save Voicemails on iPhone

First, open the Phone app and choose the Voicemail tab in the bottom right-hand corner. Refer to the below image:

Voicemail 1
Selecting the Voicemail tab

Next, you should see a list of your voicemails. Scroll to the message you want to save and tap it. This will bring up a pop-up window with several controls, including a play button, speaker icon, and phone button. On the top right, you will see a Share button that looks like a box with an arrow coming out of it. Tap it to bring up the share sheet and see all the possible ways you can save or share your voicemail. See the below image:

Voicemail 2
Selecting the Share button

Now, to save the voicemail locally on your iPhone,, select Save to Files and then On My iPhone. Choose a folder where you want to store the voicemail and hit Save.

Voicemails displayed here are stored on your cellular carrier’s servers until you download them.

You can also save the voicemail directly to a cloud storage service like iCloud. To do so, choose the Save to Files option (same as above) from the Share menu. See the following image:

Voicemail 3
Selecting the Save to Files option

Next, select iCloud Drive or Google Drive under the list of storage locations. Refer to the below image:

Voicemail 4
Choosing a location to save the voicemail

If you wish to export voicemails to your Mac or IPad, you can use AirDrop. From the Share menu, tap the AirDrop icon and choose your Mac or iPad. Ensure the receiving device has AirDrop set to receive from Contacts only. The file will be transferred instantly and saved to the Downloads folder on the receiving device. See the below image:

Voicemail 5
Selecting the Airdrop button

This approach only works if your carrier offers Visual Voicemails support. If you can see a list of voicemails when you open the Voicemail tab, your carrier supports the feature. On the other hand, if your carrier requires dialing in or other methods for accessing your messages, this method will not work.

Save Noicemails Without Visual Voicemail

You can also use Screen Recording to save and share voicemails. This is a great workaround if you do not have access to Visual Voicemail and thus can not save messages using the standard method discussed above. This method also comes in handy if you want to capture additional context along with the voicemail contents, such as caller ID and timestamps.

Tip: This will also let you save audio “voicemails” and video messages from apps that do not normally allow you to save or download those messages.

First, to screen record a voicemail, use the Screen Recorder. First, swipe down to reveal Control Center and tap the Screen Recording button. See the following image:

Voicemail 6
Selecting the Screen Recording button

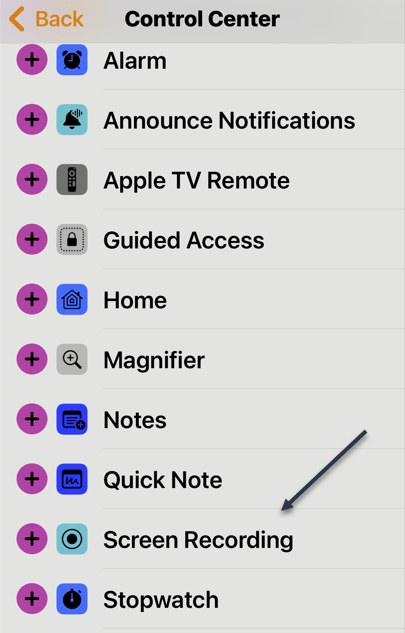
If you do not see the button, go to:

Settings > Control Center > More Controls

and add the Screen Recording toggle by clicking the green + icon. Refer to the below image:

Voicemail 7
Finding the Screen Recording option

Also, make sure you have turned on the microphone in the Screen Recording settings, or your recording will have no audio. You can check this by holding the Screen Recording toggle. Lastly, head to the Phone app, play the voicemail through the speaker, and let Screen Recording do its job.

Next, tap the Screen Recording button when you are done to finish saving the recording. The screen recording will be saved to the Photos app.

After exporting your voicemails to your iPhone, it’ll be a good idea to back them up to a cloud storage service such as iCloud or Google Drive. This will allow you to easily access your messages from other devices, and you will not have to worry about losing them if you ever lose or reset your iPhone.

Disclaimer

Technology is always changing and rarely is there static tech for smartphones and desktops. Thus, the contents of this post are only valid at the time of writing. Blog posts older than six months may have directions incompatible with your device or OS. Hopefully, older post content will continue to work as advertised. Thank you for reading TechSavvy.Life for Technology at Work For You.

Quote For the Day

Even in such technical lines as engineering, about 15% of one’s financial success is due one’s technical knowledge and about 85% is due to skill in human engineering, to personality and the ability to lead people.

Dale Carnegie

Tweet Info

You are finished. Please feel free to share this post! One way to share is via Twitter.

Just click the Tweet icon below. This will launch Twitter where you click its icon to post the Tweet.

Checkout TechSavvy.Life for blog posts on smartphones, PCs, and Macs! You may email us at contact@techsavvy.life for comments or questions.

I Would Like to Hear From You

Please feel free to leave a comment. I would love to hear from you. Do you have a computer or smart device tech question? I will do my best to answer your inquiry. Just send an email to contact@techsavvy.life. Please mention the device, app, and version you are using. To help us out, you can send screenshots of your data related to your question.

Author’s E-Book

You can access the e-book from a Kindle device, the Kindle App for the desktop or smartphone, which is a free app.

The author’s Vietnam eBook on the Battle for Tra Bong Vietnam: Events and Aftermath

How to Add Weather to Your Lock Screen in Windows 10 and 11

People love to check the weather. On your phone, smartwatch, or computer, it’s nice to have easy access to this information.

RAYMOND OGLESBY @RaymondOglesby2
June 27, 2023

This is for devices running Windows 10 and 11

People love to check the weather. On your phone, smartwatch, or computer, it’s nice to have easy access to this information. Windows 10 and Windows 11 allow you to put the weather on the Lock Screen.

For Windows 10

To add Weather to the Windows 10 Lock Screen, here’s a summary.

Settings > Personalization > Lock Screen > Change the background to “Windows Spotlight” > Choose “Weather” as the app to display.

Now, for the details. First, open Settings on your Windows 10 PC and go to the Personalization section. Refer to the below image:

Weather 1
Accessing Personalization

Next, select the Lock Screen section. See the below image:

Weather 2
Selecting the Lock Screen section

Now, make sure the Background drop-down menu is set to Windows spotlight. See the following image:

Weather 3
Selecting Windows spotlight

Next, select the app icon under the text that reads: Choose one app to show detailed status on the lock screen. Refer to the below image:

Weather 4
Selecting the one app icon

Now, choose Weather from the list of available apps. See the below image:

Weather 5
Selecting Weather app

That’s all there is to it! The weather information will be shown underneath the clock and the date on the Lock Screen.

For Windows 11

To add Weather to the Windows 11 Lock Screen, here’s a summary.

Settings > Personalization > Lock Screen > Choose “Weather” for the “Lock Screen Status” feature.

Note! You need to have Microsoft’s MSN Weather app installed for this to be available.

First, open Settings on your Windows 11 PC and select Personalization. See the following image:

Weather 6
Accessing Personalization

Now, go to the Lock Screen section. Refer to the below image:

Weather 7
Selecting the Lock Screen option

Next, look for Lock Screen Status and select Weather from the drop-down menu. This will not be available if you do not have the MSN Weather app installed. See the below image:

Weather 8
Selecting Weather app

That’s it! The weather information will appear centered at the bottom of the Lock Screen.

You may not look at the Lock Screen on your Windows PC as much as your smartphone, but it’s mostly a blank canvas for glanceable information.

Disclaimer

Technology is always changing and rarely is there static tech for smartphones and desktops. Thus, the contents of this post are only valid at the time of writing. Blog posts older than six months may have directions incompatible with your device or OS. Hopefully, older post content will continue to work as advertised. Thank you for reading TechSavvy.Life for Technology at Work For You.

Quote For the Day

There is a difference between what technology enables and what historical business practices enable.

Bill Gates

Tweet Info

That’s it. Please feel free to share this post! One way to share is via Twitter.

Just click the Tweet icon below. This will launch Twitter where you click its icon to post the Tweet.

Checkout TechSavvy.Life for blog posts on smartphones, PCs, and Macs! You may email us at contact@techsavvy.life for comments or questions.

I Would Like to Hear From You

Please feel free to leave a comment. I would love to hear from you. Do you have a computer or smart device tech question? I will do my best to answer your inquiry. Just send an email to contact@techsavvy.life. Please mention the device, app, and version you are using. To help us out, you can send screenshots of your data related to your question.

Author’s E-Book

You can access the e-book from a Kindle device, the Kindle App for the desktop or smartphone, which is a free app.

The author’s Vietnam eBook on the Battle for Tra Bong Vietnam: Events and Aftermath

Is it Okay to Run Your Laptop With the Lid Closed

If you use your laptop with an external display docked at a desk, you may want to run it with its lid closed to save space. However, your laptop was not designed to run full-tilt with a closed lid, right?

RAYMOND OGLESBY @RaymondOglesby2
June 20, 2023

This is for laptops

If you use your laptop with an external display docked at a desk, you may want to run it with its lid closed to save space. However, your laptop was not designed to run full-tilt with a closed lid, right?

Depends on the Laptop

The main concern when using a laptop with the lid closed is inadequate cooling. However, whether this is true depends on the cooling design of the specific laptop. If we are talking about the fanless, low-power M1 or M2 MacBook Air computers, you can run them this way. You can even buy stands designed for this use case.

On the other hand, if you have a workstation or gaming laptop, there is a good chance that the top deck of the computer plays a role in ventilation. If you close the lid, it can affect airflow. Some laptops are designed to lift the bottom of the laptop off the surface of your desk when the screen opens. With this type of design, running the system with the lid closed is not a good idea.

If you are unsure, check with the manufacturer whether they condone running the system under load with the lid closed.

Heat Can Damage the LCDs

Even if your laptop can adequately cool its CPU and GPU with the lid closed, another consideration is whether the LCD panel could be damaged by being close to the hot laptop body during operation.

Like any electronic device, LCD panels have a maximum safe operating temperature. The exact numbers differ from one device to the next but are typically between 40C and 60C, based on the specifications we have read. Since a closed laptop screen traps a layer of air between itself and the laptop body, it’s conceivable that the temperature in that gap can reach the point where it affects the lifespan of the liquid crystals or the screen’s coating.

Of course, it’s difficult to state conclusively that the heat from your high-performance laptop will damage the laptop’s LCD in either the short or the long term. However, it stands to reason that subjecting an LCD to temperatures outside the room-temperature range it was designed for is a bad idea.

Cooling Pads?

Cooling pads are popular as laptop stands with integrated cooling fans and vents. The idea is that they remove heat from the laptop through its vents and body so that the internal fans do not have to work as hard.

In theory, this is not a bad idea, but it depends on the exact cooling design of your laptop and the cooling pad. Even then, cooling pads offer relatively small drops in temperature, and they are not helping cool the gap between your screen and laptop body directly.

Running Overnight or as a Server?

Some users are not looking to run a laptop with its lid closed while attached to an external display. For example, you might be using your old laptop as an in-home server, or downloading to run overnight.

Assuming you are sure any vents are not blocked (and enabled it to run while the lid’s closed), you can leave the laptop running with the lid closed if it’s only doing medium or low-intensity work that will not heat it up much.

However, you can go the middle way and close the lid just enough to switch off the screen, but not enough to close the laptop entirely. As long as hot air is not venting directly onto the screen, this should work. However, it will not do much to keep dust out, so be prepared to clean your laptop regularly.

So What Is the Problem?

If your laptop is overheating or throttling its performance when you have the lid closed, that’s clearly an issue, and you should strongly consider opening the lid to prevent this from happening. If you are mainly worried that heat exposure will ruin your laptop screen, there’s no clear evidence we could find that this is the case. We have run laptops with their lids closed for years and have never experienced a display failure that could be directly linked to heat. That being said, it’s impossible to rule it out entirely.

Ultimately, the only safe option is to run your laptop with the lid open. Besides, this offers a second screen if you are using an external monitor, which is almost always more useful than only having a single display. Then again, running your laptop with the lid closed frees up space-saving benefits, so the tradeoff depends on how much you value form over function, or what specific job you need your laptop to do.

Disclaimer

Technology is always changing and rarely is there static tech for smartphones and desktops. Thus, the contents of this post are only valid at the time of writing. Blog posts older than six months may have directions incompatible with your device or OS. Hopefully, older post content will continue to work as advertised. Thank you for reading TechSavvy.Life for Technology at Work For You.

Quote For the Day

Art is obsolete now. New technologies are taking over.

Jeff Koons

Tweet Info

That’s it. Please feel free to share this post! One way to share is via Twitter.

Just click the Tweet icon below. This will launch Twitter where you click its icon to post the Tweet.

Checkout TechSavvy.Life for blog posts on smartphones, PCs, and Macs! You may email us at contact@techsavvy.life for comments or questions.

I Would Like to Hear From You

Please feel free to leave a comment. I would love to hear from you. Do you have a computer or smart device tech question? I will do my best to answer your inquiry. Just send an email to contact@techsavvy.life. Please mention the device, app, and version you are using. To help us out, you can send screenshots of your data related to your question.

Author’s E-Book

You can access the e-book from a Kindle device, the Kindle App for the desktop or smartphone, which is a free app.

The author’s Vietnam eBook on the Battle for Tra Bong Vietnam: Events and Aftermath

OneNote New Scribble Feature for Quick Deletion

OneNote is one of the most underrated apps in the Microsoft 365 suite, especially if you have a tablet with a stylus. Now, it’s easier than ever to erase stuff you wrote.

RAYMOND OGLESBY @RaymondOglesby2
June 13, 2023

This is for devices using Microsoft 365 OneNote on Windows 11

OneNote is one of the most underrated apps in the Microsoft 365 suite, especially if you have a tablet with a stylus. Now, it’s easier than ever to erase stuff you wrote.

OneNote for Windows has just introduced a brand new gesture to quickly erase things you wrote. In many handwriting apps, you need to reach for the eraser tool if you want to get rid of something you wrote. Now, though, it’s much easier. Just scratch it out, draw a scribble on top of the ink content you want to erase, and watch it disappear. It’s basically like striking through handwriting in real life, except this motion actually makes content disappear. Click on the below Microsoft video to watch Scribble in action:

OneNote Scribble in Action for Quick Deletion

If you frequently make mistakes in notes, constantly reaching for the eraser and switching back can be an annoying experience, which is why this is a huge improvement in usability. If you do not like it for whatever reason, you can also disable it by going to:

File > Options > Advanced > Pen

The new erase gesture is only available to people in the Beta Channel of OneNote for Windows, but if testing goes well, it will likely roll out to everyone within the next few weeks or months. It’s not coming to the “OneNote for Windows 10” app, since Microsoft is working on replacing that app entirely with the regular Windows version.

Source: Microsoft

Disclaimer

Technology is always changing and rarely is there static tech for smartphones and desktops. Thus, the contents of this post are only valid at the time of writing. Blog posts older than six months may have directions incompatible with your device or OS. Hopefully, older post content will continue to work as advertised. Thank you for reading TechSavvy.Life for Technology at Work For You.

Quote For the Day

The real problem is not whether machines think but whether men do.

B.F. Skinner

Tweet Info

That’s it. Please feel free to share this post! One way to share is via Twitter.

Just click the Tweet icon below. This will launch Twitter where you click its icon to post the Tweet.

Checkout TechSavvy.Life for blog posts on smartphones, PCs, and Macs! You may email us at contact@techsavvy.life for comments or questions.

I Would Like to Hear From You

Please feel free to leave a comment. I would love to hear from you. Do you have a computer or smart device tech question? I will do my best to answer your inquiry. Just send an email to contact@techsavvy.life. Please mention the device, app, and version you are using. To help us out, you can send screenshots of your data related to your question.

Author’s E-Book

You can access the e-book from a Kindle device, the Kindle App for the desktop or smartphone, which is a free app.

The author’s Vietnam eBook on the Battle for Tra Bong Vietnam: Events and Aftermath

How to Use Bionic Reading in Chrome

We are all constantly absorbing information online. Bionic Reading is an approach to reading that can help you read faster, retain more information, and boost your productivity in your favorite web browser, like Chrome.

RAYMOND OGLESBY @RaymondOglesby2
June 6, 2023

This is for desktops using Chrome or other browsers. Screenshots are from Windows 10

We are all constantly absorbing information online. Bionic Reading is an approach to reading that can help you read faster, retain more information, and boost your productivity in your favorite web browser, like Chrome.

Bionic Reading Explained

Bionic reading is a method of reading that combines traditional reading with technology-assisted tools. This helps readers increase their reading speed, improve their comprehension and retention, and ultimately become more productive in their reading activities.

Was the above paragraph easier and quicker to read? If you said yes, then you have just experienced some of the benefits of Bionic Reading. Now, imagine that but for a whole article, essay, or book.

Your brain does not always read every letter of every word. It only intakes enough information for you to understand a word, and then it moves on to the next one. The bolding of the first half of each word lets your mind fast-track through paragraphs.

The bolding aspect is the most notable factor in Bionic Reading, but there’s more as well. A lot of apps and extensions also remove colors from images and change white or black backgrounds to gray. These changes help your eyes focus on the text.

Why Use Bionic Reading

Using Bionic Reading in Chrome, or any other web browser, can offer several benefits.

It can help you read faster and more efficiently, which allows you to cover more material in less time.

Bionic Reading can also help you retain more information by training your brain to focus on the most important parts of any text.

As a result of the two above-mentioned benefits, it can improve your productivity by allowing you to process information more effectively. This can be particularly useful in academic or work-related settings.

Bionic Reading in any browser can be a valuable tool for anyone looking to optimize their online reading experience.

Think of Bionic Reading as akin to Speed Reading but they are different in their approach. Speed Reading is the process of rapidly recognizing and absorbing phrases or sentences on a page all at once, rather than identifying individual words.

How Bionic Reading Helps You

Bionic Reading helps you read faster and more efficiently with techniques including skimming, scanning, chunking, and altering images to be easier on the eye. Refer to the below image:

Bionic Reader 1
Bionic Reading example from Chrome Web Store

For example, when you skim a text, you quickly glance through it to get a general idea of the content without reading every word. Similarly, when you scan a text, you search for specific keywords or phrases that are relevant to your reading goals.

By using these techniques, you can save time and energy. Bionic Reading tools like web browser extensions or apps can help automate some of these techniques.

Bionic Reading Trains Your Brain to Retain Information

By using Bionic Reading, you can begin to retain more information by training your brain to focus on the most crucial parts of any text, such as key concepts, arguments, or evidence.

Through using techniques like skimming or scanning (as mentioned above), you can quickly identify the main points of the text and decide what information is relevant to your reading goals. In turn, this uses less mental energy.

By consistently applying these techniques, you can train your brain to become more efficient at processing and retaining information. Studying, researching, and editing your own work can become easier as a result.

Bionic Reading Improves Your Productivity

Before we go into how Bionic Reading increases your productivity, you need a frame of reference for how your productivity can suffer through everyday means.

Using your eyes takes up about 50% of your brain power. That’s more than any of your other senses. We, as humans, heavily rely on our vision for pretty much everything we do.

As your brain becomes able to retain more information, you will need to re-read the same text less often.

Reading faster and more efficiently drastically cuts down on the stress your eyes and brain suffer while researching, writing, and doing similar work, especially when you are mentally digesting new information.

To summarize, by improving your reading efficiency and training your brain to better retain information, your productivity should increase.

Bionic Reading Chrome Extension

You can get the Bionic Reading extension for Chrome on the Chrome Web Store. See the below image:

Bionic Reader 2
Adding Bionic Reading Chrome extension

At the top of a Chrome window, click the Menu icon (the 3 dots) to open the Menu. Now, click More Tools > Extensions to view the extension. See the following image:

Bionic Reader 3
Bionic Reading Chrome extension

After installing it, you can manage the Bionic Reading extension through the Extensions menu at the top-right of your window (click the little jigsaw piece icon). Refer to the below image:

Bionic Reader 4

Activate Bionic Reading

You are now ready to begin using the Bionic Reading extension! When you want to activate it on any given webpage, all you need to do is click the jigsaw piece icon at the top-right of your window and then click the Bionic Reading icon. To turn Bionic Reading off, do the same thing again. See the below image:

Bionic Reader 5
Bionic Reading example

Everything is removed from the web page but the text. That’s all there is to it! Start saving your energy for tougher tasks by letting Bionic Reading do the heavy visual lifting.

Disclaimer

Technology is always changing and rarely is there static tech for smartphones and desktops. Thus, the contents of this post are only valid at the time of writing. Blog posts older than six months may have directions incompatible with your device or OS. Hopefully, older post content will continue to work as advertised. Thank you for reading TechSavvy.Life for Technology at Work For You.

Quote For the Day

I would like to die on Mars. Just not on impact.

Elon Musk

Tweet Info

That’s it. Please feel free to share this post! One way to share is via Twitter.

Just click the Tweet icon below. This will launch Twitter where you click its icon to post the Tweet.

Checkout TechSavvy.Life for blog posts on smartphones, PCs, and Macs! You may email us at contact@techsavvy.life for comments or questions.

I Would Like to Hear From You

Please feel free to leave a comment. I would love to hear from you. Do you have a computer or smart device tech question? I will do my best to answer your inquiry. Just send an email to contact@techsavvy.life. Please mention the device, app, and version you are using. To help us out, you can send screenshots of your data related to your question.

Author’s E-Book

You can access the e-book from a Kindle device, the Kindle App for the desktop or smartphone, which is a free app.

The author’s Vietnam eBook on the Battle for Tra Bong Vietnam: Events and Aftermath

Using a Keyboard Shortcut to Clear Your Browser History

Want to clear your browser history quickly? There’s a keyboard shortcut for that. It works in any browser, including Google Chrome, Apple Safari, Microsoft Edge, and Mozilla Firefox (on both Windows PCs and Macs.)

RAYMOND OGLESBY @RaymondOglesby2
May 30, 2023

This is for popular browsers on a PC or Mac

Want to clear your browser history quickly? There’s a keyboard shortcut for that. It works in any browser, including Google Chrome, Apple Safari, Microsoft Edge, and Mozilla Firefox (on both Windows PCs and Macs.)

Depending on your web browser of choice, you can speed things up in the future by activating the Clear button with a few keystrokes. You may have to tab through the interface to select the Clear button before hitting Enter.

Here’s how it works on a few popular browsers on a Windows 10 or Windows 11 PC:

  • Google Chrome: Press Ctrl+Shift+Delete and press Enter.
  • Mozilla Firefox: Press Ctrl+Shift+Delete and press Enter.
  • Microsoft Edge: Press Ctrl+Shift+Delete and press Enter.

You can now configure exactly what you want to delete. Your browser will remember the settings you pick here, so you will only have to set this up once.

You can pick a time range, or history from a time period like the last hour, last 24 hours, last week, or from all time. You can also pick the types of data: browsing history, download history, cookies, cached files, and more.

When you are done, click the Clear data or Clear now button. Refer to the below image for Chrome:

Clear Chrome 1
Selecting to Clear data in Chrome

Incognito Mode

In the future, you can eliminate the need to clear your browser history by browsing in a private-browsing mode, like Incognito Mode in Chrome. You will just have to close the private-browsing window, and your browser will immediately forget the history associated with your private browsing.

You can use keyboard shortcuts to open and close a private-browsing mode window, too.

  • Google Chrome: Press Ctrl+Shift+N
  • Mozilla Firefox: Press Ctrl+Shift+P
  • Safari or Chrome on a Mac: Press Command instead of Ctrl; for example, press Shift+Command+N.

When you are done, press Ctrl+W to close a single tab or Ctrl+Shift+W to close an entire window. (On a Mac, press Command instead of Ctrl.)

Just remember that Incognito Mode does not offer complete privacy online. It only prevents your web browser from storing your browsing history locally. You may want to combine it with a VPN to boost your online privacy.

Disclaimer

Technology is always changing and rarely is there static tech for smartphones and desktops. Thus, the contents of this post are only valid at the time of writing. Blog posts older than six months may have directions incompatible with your device or OS. Hopefully, older post content will continue to work as advertised. Thank you for reading TechSavvy.Life for Technology at Work For You.

Quote For the Day

Knowledge is of no value unless you put it into practice.

Anton Chekhov

Tweet Info

That was easy. Please feel free to share this post! One way to share is via Twitter.

Just click the Tweet icon below. This will launch Twitter where you click its icon to post the Tweet.

Checkout TechSavvy.Life for blog posts on smartphones, PCs, and Macs! You may email us at contact@techsavvy.life for comments or questions.

I Would Like to Hear From You

Please feel free to leave a comment. I would love to hear from you. Do you have a computer or smart device tech question? I will do my best to answer your inquiry. Just send an email to contact@techsavvy.life. Please mention the device, app, and version you are using. To help us out, you can send screenshots of your data related to your question.

Author’s E-Book

You can access the e-book from a Kindle device, the Kindle App for the desktop or smartphone, which is a free app.

The author’s Vietnam eBook on the Battle for Tra Bong Vietnam: Events and Aftermath

How to Use Hidden Reader Mode in Chrome

Most web browsers have a built-in “Reader Mode” that converts web pages into a more reader-friendly view. Strangely, Google Chrome does not have this feature; unless you know how to find it.

RAYMOND OGLESBY @RaymondOglesby2
May 23, 2023

Most web browsers have a built-in “Reader Mode” that converts web pages into a more reader-friendly view. Strangely, Google Chrome does not have this feature; unless you know how to find it. Let’s find out where it is.

This is for devices running Google Chrome. Screenshots are from Windows 10

Google Chrome has included a hidden Reader Mode all the way back to version 75. However, it’s never been upgraded to a stable, standard feature. Even Microsoft Edge; which is also based on Chromium; has a Reader Mode. So let’s enable it in Chrome.

Enable Hidden Reader Mode

First, we will need to enable a Chrome feature flag. Open the Chrome browser on your computer, and type:

chrome://flags

in the address bar, and hit Enter. Refer to the below image:

Chrome Reader 1
Accessing Chrome flags

Next, search for “Reader Mode” in the text box at the top and enable the flag titled “Enable Reader Mode.” See the below image:

Chrome Reader 2
Enabling Reader Mode

Now, after enabling the flag, click the “Relaunch” button at the bottom of the screen to apply the changes. See the following image:

Chrome Reader 3
Restarting Chrome

Next, when you now visit a webpage that has a lot of text, you will see a little book icon on the right side of the address bar. Click it to switch to Reader Mode.

You can also click:

Menu > Enter Reader Mode

to activate it. Refer to the below image:

Chrome Reader 4
Selecting the Reader Mode icon

Now, you are now looking at a much simpler, less cluttered view of the webpage. Images still appear, but ads and some other items are removed. To adjust the view, click the “A” icon in the top right. See the below image:

Chrome Reader 5
Changing Font size

Next, from here you can change the font, text size, and background color. See the following image:

Chrome Reader 6
Customizing appearance

That’s all there is to it! You can now minimize distractions while reading long articles in Chrome. It’s strange that Google has kept this a hidden feature for years, but at least you know how to enable it yourself.

Disclaimer

Technology is always changing and rarely is there static tech for smartphones and desktops. Thus, the contents of this post are only valid at the time of writing. Blog posts older than six months may have directions incompatible with your device or OS. Hopefully, older post content will continue to work as advertised. Thank you for reading TechSavvy.Life for Technology at Work For You.

Quote For the Day

Man is still the most extraordinary computer of all.

John F Kennedy

Tweet Info

That’s it. Please feel free to share this post! One way to share is via Twitter.

Note! Twitter may be no longer supported by WordPress. If so, the below Tweet button will not work.

Just click the Tweet icon below. This will launch Twitter where you click its icon to post the Tweet.

Checkout TechSavvy.Life for blog posts on smartphones, PCs, and Macs! You may email us at contact@techsavvy.life for comments or questions.

I Would Like to Hear From You

Please feel free to leave a comment. I would love to hear from you. Do you have a computer or smart device tech question? I will do my best to answer your inquiry. Just send an email to contact@techsavvy.life. Please mention the device, app, and version you are using. To help us out, you can send screenshots of your data related to your question.

The author’s Vietnam eBook on the Battle for Tra Bong Vietnam: Events and Aftermath

How to Make Google Chrome Fast

Google Chrome is a very popular browser despite being infamously greedy with your computer’s resources. If you feel like Chrome is starting to get slow, let’s speed it up.

RAYMOND OGLESBY @RaymondOglesby2
May 16, 2023

Google Chrome is a very popular browser despite being infamously greedy with your computer’s resources. If you feel like Chrome is starting to get slow, let’s speed it up.

This is for devices running Google Chrome. Screenshots are from Windows 10

Update Chrome

The simplest thing you can do is make sure Chrome is up to date. This will ensure that you always have the latest improvements and optimizations for Chrome. The browser will usually install updates automatically, but you can update manually to be sure.

To manually update Chrome, head to:

Menu (3 dots) > Settings > About Chrome

If not up-to-date, Chrome will automatically update. Refer to the below image:

Fast Chrome 1
Update Chrome

Preload Images

Chrome has a feature that allows it to “predict” which links it thinks you might open and preload in the background. That way, if you do click the link, it will already be partially loaded.

If you want to enable this feature. First, head to:

Menu (3 dots) > Settings > Privacy and Security > Cookies and Other Site Data

Next, toggle the switch ON for Preload pages for faster browsing and searching. See the below image:

Fast Chrome 2
Select to Reload Images

Tabs Under Control

Chrome has some built-in tools to help mitigate the performance impact of having a lot of tabs open, but keeping your tabs tidy on your own will help even more.

There are a couple of things you can do if you are someone that constantly has tons of tabs open. The easiest thing to do is use Chrome’s Reading List and Bookmarks features. That way, you can save pages for later without actually keeping them open in a tab.

Use Energy Saver

As the name implies, Chrome’s Energy Saver feature is intended to help improve battery life when your laptop is unplugged. However, it can also be used to speed up performance in a pinch.

Energy Saver limits background activity, visual effects, and video frame rates. Limiting those things helps stretch out your battery, which is a result of Chrome not asking your computer to work as hard. You can only use Energy Saver if your computer is running on battery or below 20% power. Head to:

Menu (3 dots) > Settings > Performance

and toggle ON the Energy Saver switch.

Memory Saver

With the latest release of Chrome on the desktop, there is a new performance setting so Chrome uses up to 40% and 10GB less memory to keep your tabs running smoothly.

If you have a bunch of tabs open in Chrome that you plan to come back to later; Memory Saver mode frees up memory from tabs you are not currently using so the active websites you are browsing are fast. This is especially useful if you are running other intensive applications, like editing family videos or playing games. Any inactive tabs will be reloaded when you need them. Head to:

Menu (3 dots) > Settings > Performance

and toggle ON the Memory Saver switch. See the following image:

Fast Chrome 3
Enable Memory Saver

Hardware Acceleration

Hardware acceleration is a feature that allows Chrome to take advantage of your computer’s GPU to speed up processes. Hardware can perform some functions faster than software running on the CPU alone.

When enabled, Chrome will utilize your computer’s GPU for graphics-intensive tasks, like playing games and watching videos. It’s typically enabled by default but can be disabled if there are driver compatibility issues. You can ensure it’s enabled by heading to:

Menu (3 dots) > Settings > System

and toggle ON the option Use hardware acceleration when available. Refer to the below image:

Fast Chrome 4
Select to Use Hardware Acceleration

Check Task Manager

If you feel like Chrome is particularly sluggish, there might be a rogue extension causing it. Chrome has its own built-in Task Manager that lets you see what’s running in the browser; extensions, web pages, and apps; and how many resources each individual thing is using.

Chrome’s Task Manager shows each tab and all the extensions that are currently running. You can see the memory footprint and CPU usage. If a process uses too much CPU, you can simply tap the End Process button and see if that fixes the problem.

The Task Manager can be found in:

Menu (the 3 dots) > More Tools > Task Manager

Just click on the option from the drop-down menu. See the below image:

Fast Chrome 5
Check the Task Manager

Check Extensions

Similar to how you might have apps on your phone that you do not use anymore, there are probably some Extensions in Chrome that you could get rid of. They could be running in the background and eating up resources.

Regardless of performance, it’s generally a good idea to routinely check up on your Extensions. Chrome gives you the option to “Disable” by turning the Toggle to OFF or “Remove.” Disabling will keep the Extension installed, but it cannot run. To check your Extensions, head to:

?Menu (3 dots} > More Tools > Extensions

See the following image:

Fast Chrome 6
Check your Extensions

Clear Your Browsing Data

Chrome collects a lot of data while you are browsing to improve your experience. All this site data, cookies, and cached images and files can add up over time. Occasionally clearing this data can potentially lighten up your browser, but it also means you will need to re-sign into websites.

There are two ways to do this. First, head to:

Menu (the 3 dots) > More Tools >Clear Browsing Data

Second, you can use the keyboard shortcut Ctrl + Shift + Del. Both methods will bring up a menu with options (Basic or Advanced) for clearing the data.

Checkmark any option(s) and click Clear data. Refer to the below image:

Fast Chrome 7
Clear your Browsing Data

Reset Without Uninstalling

The “nuclear option” for speeding up Chrome is performing a browser reset. This will essentially bring Chrome back to the way it was when you first installed it while still saving some of your personal stuff.

A browser reset will reset the search engine, homepage, startup tabs, new tab page, pinned tabs, content settings, cookies, site data, extensions, and themes. However, it will not erase your bookmarks, browser history, or saved passwords.

To perform a browser reset, head to:

Menu (3 dots) > Settings > Reset settings > Restore settings to their original defaults

See the below image:

Fast Chrome 8
Reset Settings

Just click the option. Next, you will see a confirmation screen. Here, click on the Reset settings button. See the following image:

Fast Chrome 9
Reset Settings confirmation. Use with caution
Disclaimer

Technology is always changing and rarely is there static tech for smartphones and desktops. Thus, the contents of this post are only valid at the time of writing. Blog posts older than six months may have directions incompatible with your device or OS. Hopefully, older post content will continue to work as advertised. Thank you for reading TechSavvy.Life for Technology at Work For You.

Quote For the Day

“While we’re all very dependent on technology, it doesn’t always work.

Bill Gates

Tweet Info

That’s it. Please feel free to share this post! One way to share is via Twitter.

Just click the Tweet icon below. This will launch Twitter where you click its icon to post the Tweet.

Checkout TechSavvy.Life for blog posts on smartphones, PCs, and Macs! You may email us at contact@techsavvy.life for comments or questions.

I Would Like to Hear From You

Please feel free to leave a comment. I would love to hear from you. Do you have a computer or smart device tech question? I will do my best to answer your inquiry. Just send an email to contact@techsavvy.life. Please mention the device, app, and version you are using. To help us out, you can send screenshots of your data related to your question.

Author’s E-Book

You can access the e-book from a Kindle device, the Kindle App for the desktop or smartphone, which is a free app.

The author’s Vietnam eBook on the Battle for Tra Bong Vietnam: Events and Aftermath

Amazon RxPass for Your Prescriptions

Hot on the heels of shutting down the AmazonSmile charity platform, a new add-on to Amazon Prime has been revealed. It aims to fill prescriptions for generic medications for one low monthly price.

RAYMOND OGLESBY @RaymondOglesby2
May 11, 2023

Hot on the heels of shutting down the AmazonSmile charity platform, a new add-on to Amazon Prime has been revealed. It aims to fill prescriptions for generic medications for one low monthly price.

This is for devices using Amazon

Amazon already runs a pharmacy through its online store, bolstered by the purchase of PillPack in 2018, but now the company is going a step further. Instead of buying each drug individually, Amazon is launching an optional subscription called RxPass, priced at $5 per month in the United States. No health insurance is required, but most (if not all) of the medications are controlled substances that require a prescription from a doctor.

RxPass does not cover every drug Amazon sells, but it does provide access to “commonly prescribed generic medications that treat more than 80 common health conditions.” There’s a full list on the RxPass website (scroll down to see the list), which includes anti-inflammatory drugs like Piroxicam and Naproxen, nine medications for high blood pressure and cardiac dysrhythmias, and even some drugs for treating Parkinson’s disease.

The new subscription could potentially save some people a lot of money, but there is a darker side to RxPass. CNN reports the subscription is almost certainly a loss leader for Amazon, meaning it’s intended to maintain subscriptions to Amazon Prime rather than be self-sustaining. You are probably going to be less likely to cancel Amazon Prime on the next price hike if it’s responsible for your access to critical medication, and Amazon’s FAQ page says canceling Prime will also cancel RxPass.

Disclaimer

Technology is always changing, and rarely is there static tech for smartphones and desktops. Thus, the contents of this post are only valid at the time of writing. Blog posts older than six months may have directions incompatible with your device or OS. Hopefully, older post content will continue to work as advertised. Thank you for reading TechSavvy.Life for Technology at Work For You.

Quote For the Day

We live in a society exquisitely dependent on science and technology, in which hardly anyone knows anything about science and technology.

Carl Sagan

Tweet Info

That’s it. Please feel free to share this post! One way to share is via Twitter.

Just click the Tweet icon below. This will launch Twitter where you click its icon to post the Tweet.

Checkout TechSavvy.Life for blog posts on smartphones, PCs, and Macs! You may email us at contact@techsavvy.life for comments or questions.

I Would Like to Hear From You

Please feel free to leave a comment. I would love to hear from you. Do you have a computer or smart device tech question? I will do my best to answer your inquiry. Just send an email to contact@techsavvy.life. Please mention the device, app, and version you are using. To help us out, you can send screenshots of your data related to your question.

Author’s E-Book

You can access the e-book from a Kindle device, the Kindle App for the desktop or smartphone, which is a free app.

The author’s Vietnam eBook on the Battle for Tra Bong Vietnam: Events and Aftermath

What is the New Rapid Response from Apple

Rapid Security Responses are a new software release for iPhone, iPad, and Mac. They deliver important security improvements between software updates — for example, improvements to the Safari web browser, the WebKit framework stack, or other critical system libraries. They may also be used to mitigate some security issues more quickly, such as issues that might have been exploited or reported to exist “in the wild.”

RAYMOND OGLESBY @RaymondOglesby2
May 9, 2023

This is for iPhone, iPad, and Mac

Rapid Security Responses deliver significant security improvements between software updates.

Rapid Security Responses are a new software release for iPhone, iPad, and Mac. They deliver important security improvements between software updates; for example, improvements to the Safari web browser, the WebKit framework stack, or other critical system libraries. They may also be used to mitigate some security issues more quickly, such as issues that might have been exploited or reported to exist “in the wild.”

New Rapid Security Responses are delivered only for the latest version of iOS, iPadOS, and macOS — beginning with iOS 16.4.1, iPadOS 16.4.1, and macOS 13.3.1.

By default, your device allows Rapid Security Responses to be applied automatically and, if necessary, will prompt you to restart your device. To check your device settings:

On iPhone or iPad head to:

  • Settings > General > Software Update > Automatic Updates

Then make sure that Security Responses & System Files are turned on. Refer to the below image:

Rapid 1
Security Responses enabled

On a Mac head to:

  • Apple menu  > System Settings >General > Software Update > Show Details button next to Automatic Updates

Then make sure that Install Security Responses and system files are turned on.

When a Rapid Security Response has been applied, a letter appears after the software version number, as in this example: iOS 16.4.1 (a).

Suppose you choose to turn off this setting or not to apply Rapid Security Responses when they are available. In that case, your device will receive relevant fixes or mitigations when they have included in a subsequent software update.

Source: Apple Support

Disclaimer

Technology is always changing and rarely is there static tech for smartphones and desktops. Thus, the contents of this post are only valid at the time of writing. Blog posts older than six months may have directions incompatible with your device or OS. Hopefully, older post content will continue to work as advertised. Thank you for reading TechSavvy.Life for Technology at Work For You.

Quote For the Date

Even in such technical lines as engineering, about 15% of one’s financial success is due one’s technical knowledge and about 85% is due to skill in human engineering, to personality and the ability to lead people.

Dale Carnegie

Tweet Info

That’s it. Please feel free to share this post! One way to share is via Twitter.

Just click the Tweet icon below. This will launch Twitter where you click its icon to post the Tweet.

Checkout TechSavvy.Life for blog posts on smartphones, PCs, and Macs! You may email us at contact@techsavvy.life for comments or questions.

I Would Like to Hear From You

Please feel free to leave a comment. I would love to hear from you. Do you have a computer or smart device tech question? I will do my best to answer your inquiry. Just send an email to contact@techsavvy.life. Please mention the device, app, and version you are using. To help us out, you can send screenshots of your data related to your question.

Author’s E-Book

You can access the e-book from a Kindle device, the Kindle App for the desktop or smartphone, which is a free app.

The author’s Vietnam eBook on the Battle for Tra Bong Vietnam: Events and Aftermath