RAYMOND OGLESBY @RaymondOglesby2
September 17, 2024 – 4 minutes read time
Overview
Apple landed in hot water with customers several years ago when a feature designed to slow the processors of older iPhone models to keep them from suddenly shutting down came to light. Critics maintained that Apple was throttling the speed of earlier iPhone models to push customers toward newer devices. At the same time, Apple insisted that the feature was necessary to cope with aging batteries. Now, Apple lets users monitor the health of their iPhones’ battery. Let’s explore this feature.
System Requirements
This post works on iPhones running iOS 15 or later
Click here to learn how to update your iPhone to the latest iOS version.
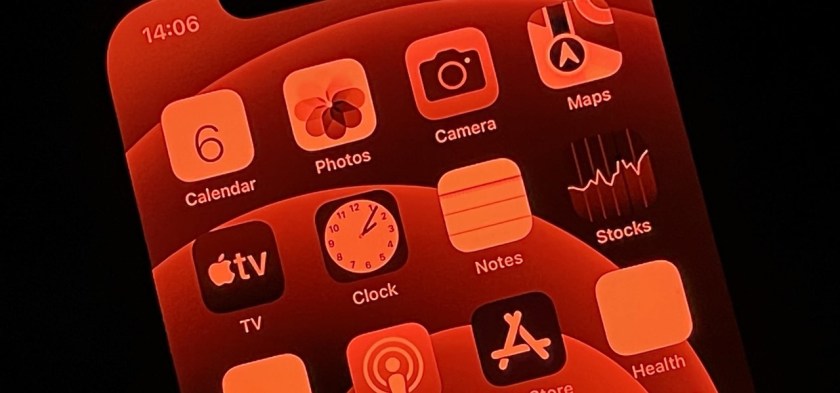
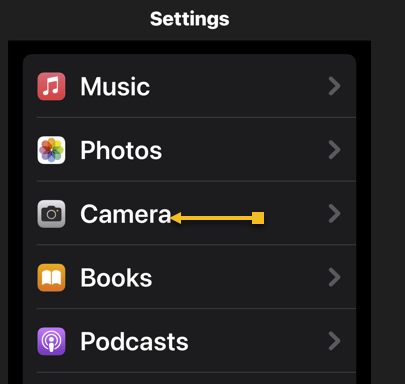
Check Battery Health
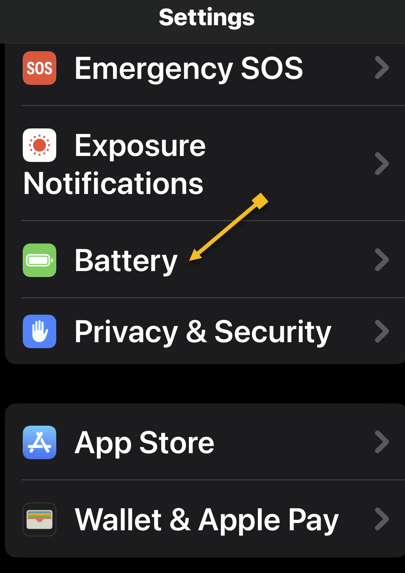
First, open the Settings app, and tap on Battery. Refer to the below image:
Next, tap on Battery Health & Charging. See the below image:
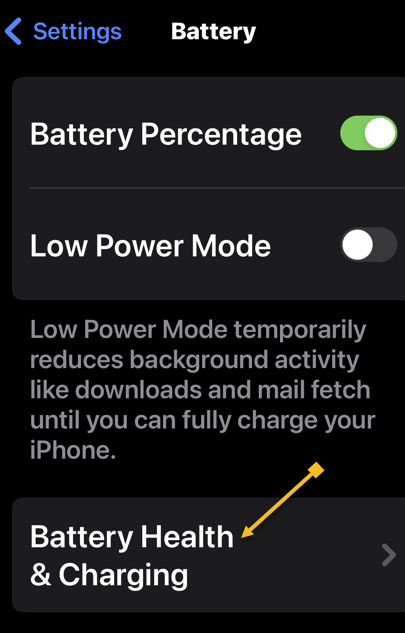
Now, you will see your battery capacity next to Maximum Capacity. See the following image:
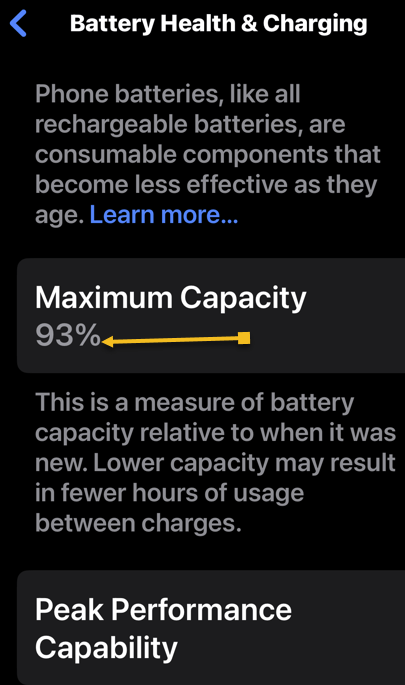
The Maximum Capacity tells you your iPhone battery’s capacity compared to its capacity when it was brand new. For example, if your Maximum Capacity is 85%, that is all your battery can charge. On this screen, you can also enable Optimized Battery Charging, which reduces aging by optimizing how your battery behaves when charging. Refer to the below image:

If your battery’s Maximum Capacity has dropped below 80%, a message like this will pop up on your screen if you experience an unexpected shutdown. See the below image:
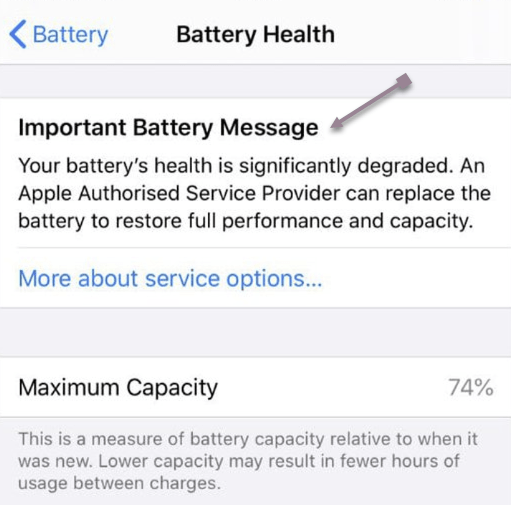
You can tap Disable to turn off battery throttling on your iPhone or you may want to consider replacing your battery to improve your iPhone’s performance and the amount of time it can operate between charges.
Track Battery Usage by App
To view your battery usage by app, go back to:
Settings > Battery
Swipe down on the Battery settings screen and you will discover battery usage by app, starting with the biggest battery hogs. By default, the tool shows you the percentage of battery charge by each app. Tap Show Activity or a specific app, and the information changes to display the time the app has used the battery, both in the foreground and background. See the following image:

Conserve Battery
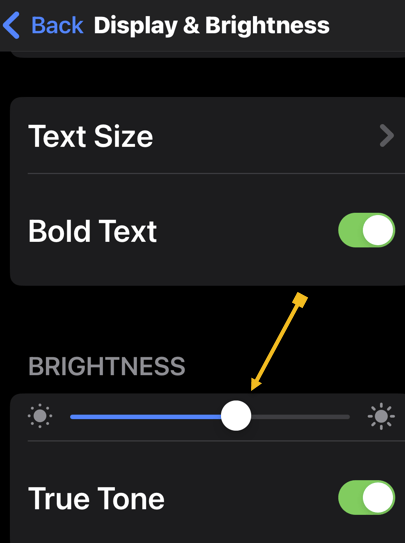
Besides Optimized Battery Charging you can conserve your battery, turning down the brightness of your screen will increase battery health. To adjust the screen brightness, head to:
Settings > Display & Brightness
and moving the slider. Refer to the below image:
Keep Your iPhone Cool
Using your iPhone in hot conditions can permanently shorten battery life. Store your device where the temperature is between -20º and 45º C (-4º to 113º F). Do not leave your device in your car, because temperatures in parked cars can exceed this range.
If your device gets too warm or too cold, certain features might become temporarily disabled. In extreme conditions, your device might become temporarily disabled. A temperature warning screen will be displayed. See the below image:

Disclaimer
Technology is always changing. Rarely is there static tech for smartphones and desktops. Thus, the contents of this post are only valid at the time of writing. Blog posts older than six months may have directions incompatible with your device or OS. Hopefully, older post content will continue to work as advertised. Thank you for reading TechSavvy.Life for Technology at Work For You.
Quote For the Day
The real secret to a life of abundance is to stop spending your days searching for security and to start spending your time pursuing opportunity.
Robin S. Charma
X (Twitter) Info
That’s it. Please feel free to share this post! One way to share is via Twitter.
Just click the Tweet icon below. This will launch Twitter where you click its icon to post the Tweet.
Checkout TechSavvy.Life for blog posts on smartphones, PCs, and Macs! You may email us at contact@techsavvy.life for comments or questions.
Tweet
I Would Like to Hear From You
Was this post helpful? We would love to hear your comments. Do you have a computer or smart device tech question? I will do my best to answer your inquiry. Just send an email to contact@techsavvy.life. Please mention the device, app, and version you are using. To help us, you can send screenshots of the data related to your question.
The author’s Vietnam eBook on the “Battle for Tra Bong Vietnam: Events and Aftermath” can be accessed from a Kindle device or the Kindle App for a desktop or smartphone. The apps are free.