I am Raymond Oglesby, an Information Technology (IT) specialist with 30 years in the field. I have taught Microsoft Applications and troubleshot computers in 15 countries and many States. My career was focused on mainframes and desktops from application development to implementation. I have written hundreds of programs for various architectures. I decided to start a blog to share my knowledge and experiences with you. I plan on updating this blog at least twice a week about smart phone apps to Windows.
Please feel free to leave a Comment or Tweet. I would love to hear from you. Do you have a computer tech question? I will do my best to answer your inquiry. Please mention the app and version that you are using. To help me out, you can send screenshots of your data related to your question.
Apple has introduced the Time to Leave feature for iOS 18, which alerts users when it’s time to depart for calendar events. By enabling Location Services and adjusting settings in the Calendar app, users receive timely notifications that include traffic conditions, ensuring they arrive on time to their destinations.
RAYMOND OGLESBY @RaymondOglesby2 February 11, 2025 – 3 minutes read time
Overview
Have you ever wished your iPad or iPhone would not only remind you of calendar events but also give a calendar alert when it’s time to depart? Well, now you can. Apple has just introduced the new Time to Leave feature, which automatically calculates when you need to leave your current location so you can arrive at your destination on time. Let’s explore how to use the Time to Leave feature.
Why You Will Like This Tip:
Get notified when it’s time to get in your car and head to your appointment or meet-up.
With built-in drive time reminders, you need never be late again!
System Requirements
The steps below will only work on an iPhone updated to iOS 18. The screenshots are from iPhone 14 Pro running iOS 18.3.
Click here to learn how to update your iPhone to the latest iOS version.
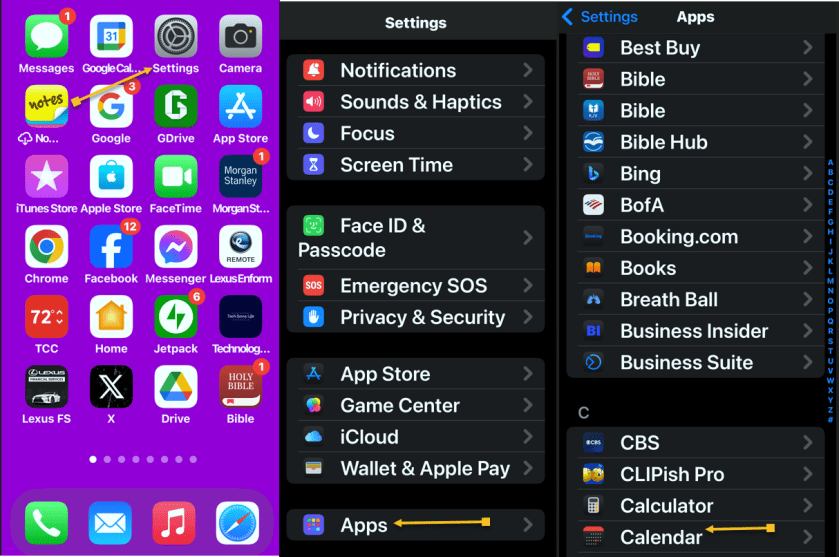
You will also need to be sure Location Services is enabled. Head to:
Settings > Privacy & Security > Location Services
and turn the toggle to the ON position.
Setup and Use Time to Leave Feature
First, navigate to:
Settings > Apps > Calendar
Refer to the below image:
Open the Calendar app
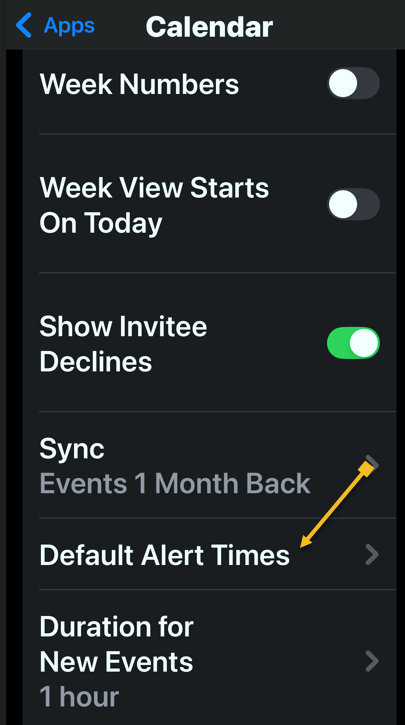
Next, tap the Default Alert Times option. See the below image:
Select the Default Alert Times option
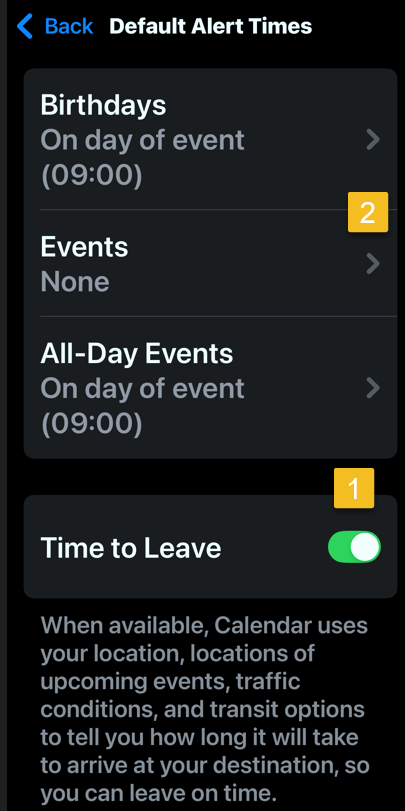
Now, toggle Time to Leave to the ON position.
Note! the Event must be set to None for this feature to work!
See the following image:
Enable Time to Leave toggle
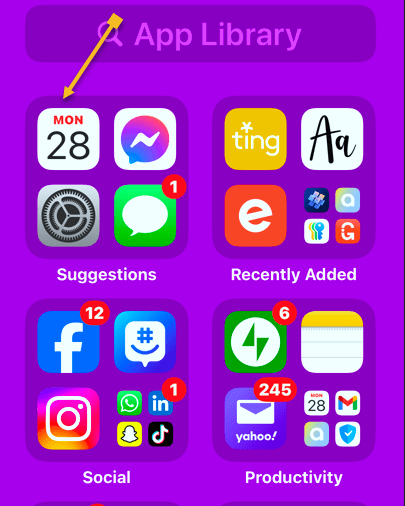
Next, open the Calendar app. Refer to the below image:
Open the Calendar app
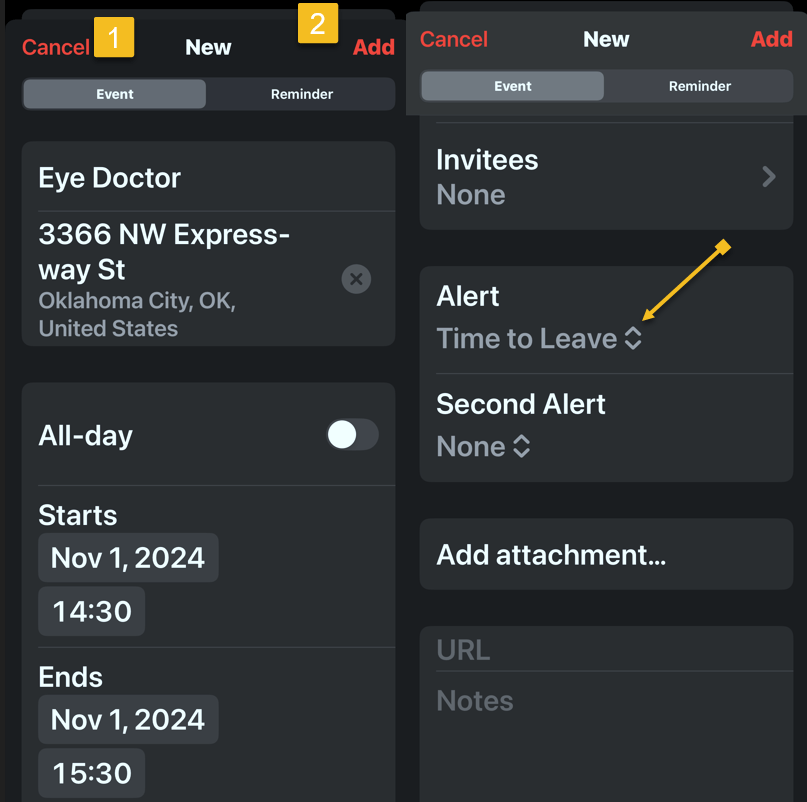
Now, create a calendar event as you normally would, then tap the Add icon. You will see that your Time to Leave alert has been automatically added to the event. See the below image:
Create a calendar event
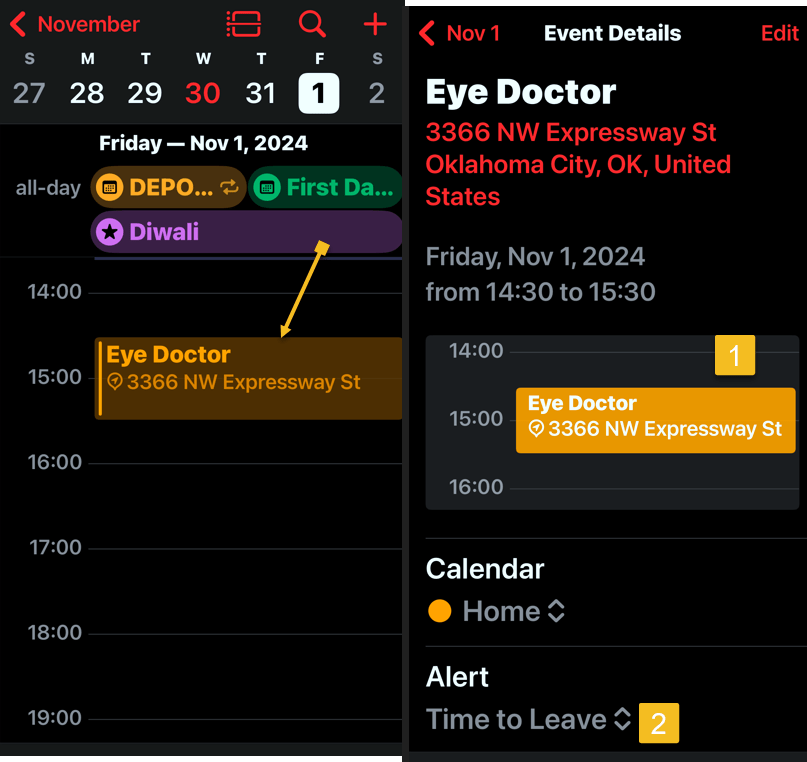
Next, open your Calendar and find your event. Tap the event to see its details. Notice the Time to Leave alert. See the following image:
Time to Leave details
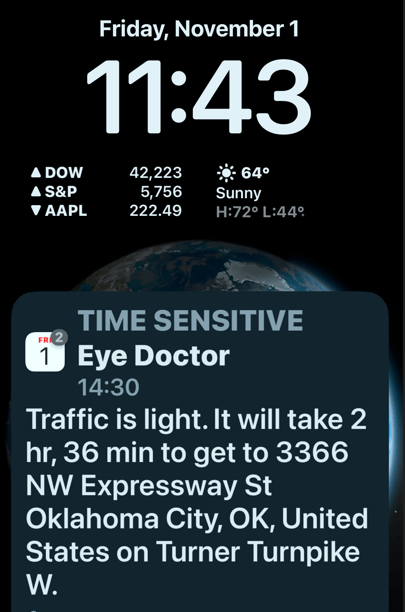
At the designated time, you will receive a Notification about the event that includes traffic conditions and travel time to reach your destination. Refer to the below image:
Your Time to Leave notification
Now you know how to enable and use Time to Leave alerts in your iPad and iPhone Calendar settings
Disclaimer
Technology is always changing. Rarely is there static tech for smartphones and desktops. Thus, the contents of this post are only valid at the time of writing. Blog posts older than six months may have directions incompatible with your device or OS. Hopefully, older post content will continue to work as advertised. Thank you for reading TechSavvy.Life for Technology at Work For You.
Quote For the Day
The great myth of our times is that technology is communication.
Libby Larsen
X (Twitter) Info
That’s it. Please feel free to share this post! One way to share is via Twitter.
Just click the Tweet icon below. This will launch Twitter where you click its icon to post the Tweet.
Checkout TechSavvy.Life for blog posts on smartphones, PCs, and Macs! You may email us at contact@techsavvy.life for comments or questions.
Was this post helpful? We would love to hear your comments. Do you have a computer or smart device tech question? I will do my best to answer your inquiry. Just send an email to contact@techsavvy.life. Please mention the device, app, and version you are using. To help us, you can send screenshots of the data related to your question.
The author’s Vietnam eBook on the “Battle for Tra Bong Vietnam: Events and Aftermath” can be accessed from a Kindle device or the Kindle App for a desktop or smartphone. The apps are free.
The Emergency SOS feature lets you call for help in many different ways, including discreetly by holding down a button, via satellite, and even automatically if
RAYMOND OGLESBY @RaymondOglesby2 February 4, 2025 – 4 minutes read time
Overview
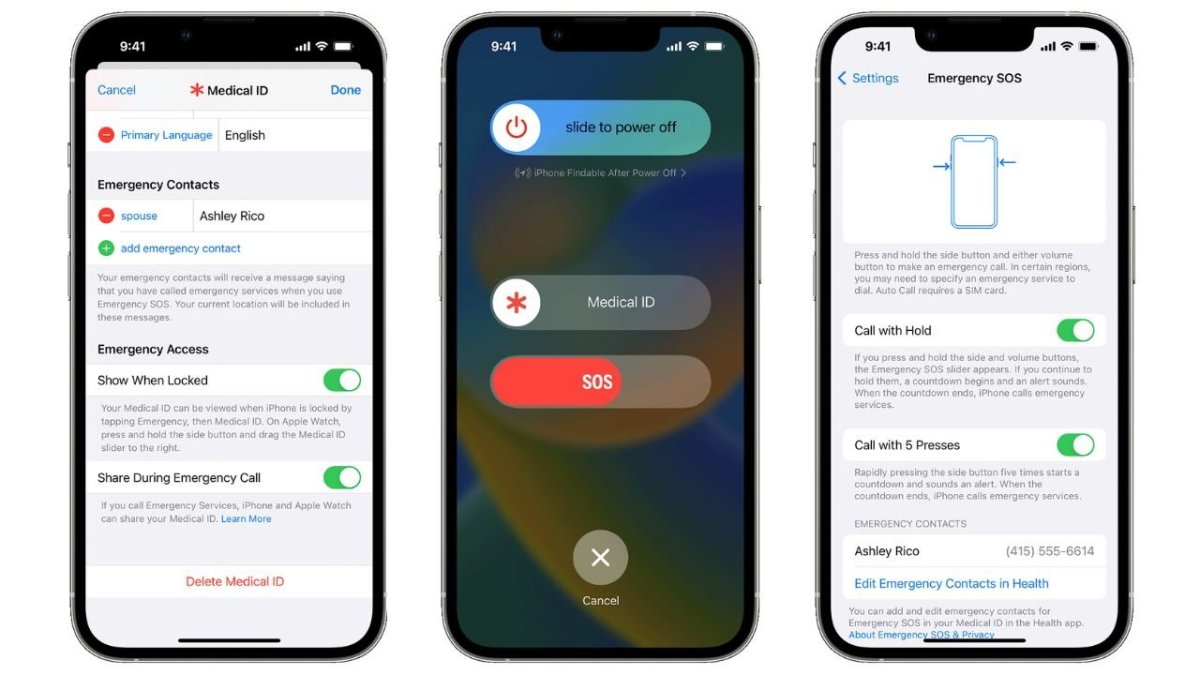
The Emergency SOS feature lets you call for help in many different ways, including discreetly by holding down a button, via satellite, and even automatically if a car crash or fall is detected. After an Emergency SOS call ends, your iPhone will automatically send a message with your location to your Emergency contact(s). Add an extra layer of security to your life by adding your iPhone emergency contact(s).
Why You Will Like This Tip
Give your loved ones peace of mind by adding them as Emergency contacts.
Customize your Emergency SOS settings to suit your needs.
System Requirements
This tip works on iPhones 14 and above running iOS 18 or later.
Screenshots are from iPhone 14 Pro running iOS 18.3
Click here to learn how to update your iPhone to the latest iOS version.
Setup Emergency Contacts
There are many different ways to set up and activate Emergency SOS depending on what devices and device models you have. Only iPhone 14 and newer models can use Emergency SOS via satellite and have automatic Crash Detection (on by default.) iPhones running iOS 18 can use Live Video during emergency calls. You will need a newer Apple Watch model to use automatic Fall Detection. Here’s how to set your iPhone’s Emergency SOS contact(s). In this example, we are setting up Zoey Oglesby as an emergency contact,
First, open the Health app on your iPhone. Refer to the below image:
Find and open the Health app
Next, tap your Profile icon in the to right corner. See the below image:
Select your Profile icon
Now, select Medical ID. See the following image:
Select the Medical ID option
Next, under Emergency Access section, toggle Show When Locked and Share During Emergency Call to ON. Refer to the below image:
Toggle Show When Locked and Share During Emergency Call to ON
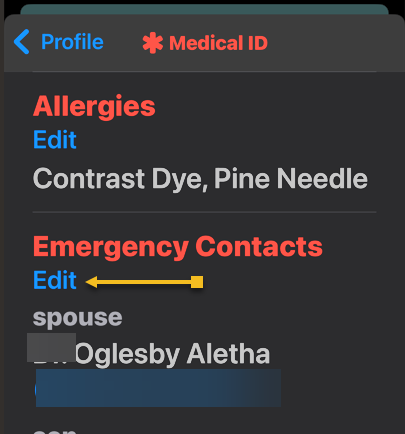
Now, scroll down to Emergency Contacts and tap Edit. See the below image:
Select to Edit Emergency Contacts
Next, tap the green plus sign to add a new emergency contact. See the following image:
Select the plus icon to Add Emergency Contact
Now, your Contacts will pop up. Find the contact you want and tap on their name. Refer to the below image:
Select a contact
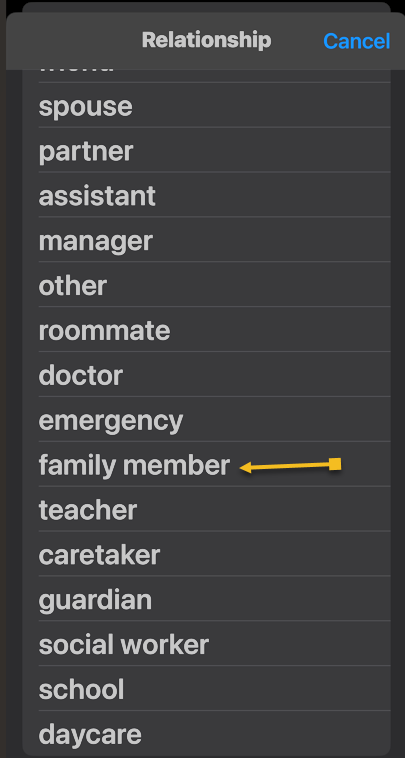
Next, select their relationship with you. See the below image:
Select their Relationship with you
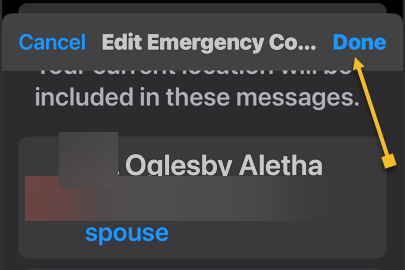
Next, tap Done. See the following image:
Select Done to add the contact
Your emergency contact(s) will now receive a text message and your location should you make an emergency call using Emergency SOS on your iPhone. In your Contacts, the emergency contact(s) are indicated by an asterisk (*) next to their name. Refer to the image below, where four family members are indicated as emergency contacts (others are on a different contact page):
Your added Emergency Contacts indicated by an asterisk (*)
Accessing your Medical ID within the Health app allows you to display only your emergency contacts. When the Show When Locked option is turned on, your emergency contact information will appear on the Lock screen.
Disclaimer
Technology is constantly evolving, and smartphone and desktop tech rarely remains static. Therefore, the information in this post is only accurate as of the date it was written. Blog posts that are older than six months may contain instructions that are no longer compatible with your device or operating system. We hope that the content from previous posts continues to function as intended. Thank you for reading TechSavvy.Life, where technology works for you.
Quote For the Day
The technology you use impresses no one. The experience you create with it is everything.
-Sean Gerety
X (Twitter) Info
That’s it. You have just setup emergency contacts that may save your life. Please feel free to share this post! One way to share is via Twitter.
Just click the Tweet icon below. This will launch Twitter where you click its icon to post the Tweet.
Checkout TechSavvy.Life for blog posts on smartphones, PCs, and Macs! You may email us at contact@techsavvy.life for comments or questions.
We value your feedback! Was this post helpful? Please share your comments with us. If you have a tech question related to your computer or smart device, feel free to reach out. Just send an email to contact@techsavvy.life, and be sure to include the device, app, and version you are using. To assist us further, you can also attach screenshots related to your inquiry.
The author’s Vietnam eBook on the “Battle for Tra Bong Vietnam: Events and Aftermath” can be accessed from a Kindle device or the Kindle App for a desktop or smartphone. The apps are free.
The author’s Vietnam eBook on the Battle for Tra Bong Vietnam: Events and Aftermath
The Amazon Kindle is an effective ebook reader, linked closely to Amazon’s ecosystem. Users can send various ebook formats to their Kindle via methods like the Send to Kindle tool, Kindle app, or email. Free ebooks are readily available through various platforms, enhancing Kindle’s reading options.
RAYMOND OGLESBY @RaymondOglesby2 January 28, 2025 – 7 minutes read time
Overview
The Amazon Kindle is a great ebook reader, but it’s tightly tied to Amazon’s ecosystem. If you have a Fire tablet or a smartphone, you can download other e-reading apps to beef up your library, but with the Kindle hardware, you are pretty much tied to getting your content directly from Amazon. Well, sort of. Using some free software, you can take ebooks in various formats and zap them over to your Kindle.
Let’s explore how to send other ebook formats to your e-reader, and where to get free ebooks.
Why You Will Like This Tip
Of course, we all like free stuff.
A large variety of free ebooks to choose from.
Download in a variety of formats for reading on your Kindle.
System Requirements
This is for the Amazon Kindle. It uses the iPhone, Android, PC, and Mac. The screenshots are from Windows 10 and iPhone 14 Pro.
Use “Send to Kindle”
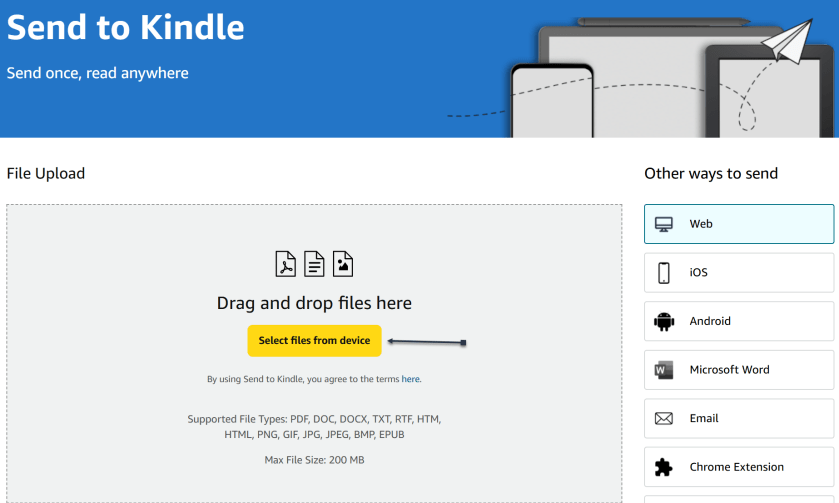
Amazon offers a Send to Kindle page where you can upload ebook files saved on your device. First, on amazon.com/sendtokindle, click Select files from device. Refer to the below image:
Selecting files to send
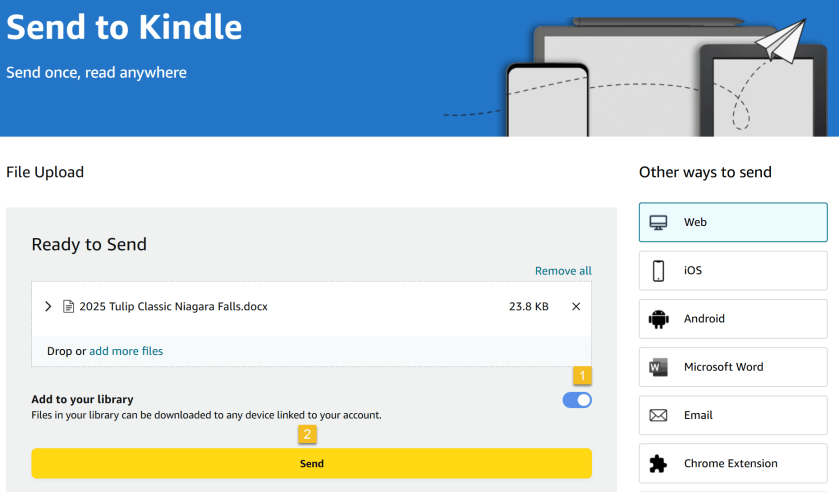
Next, select the book you want on your Kindle. This tool supports PDF, DOC, DOCX, TXT, RTF, HTM, HTML, PNG, GIF, JPG, JPEG, BMP, and EPUB formats on ebooks up to 200MB in size. (Amazon no longer supports sending new Mobi files.) Ensure the Add to your library toggle is ON, then click Send. See the below image:
Send your files
Now, a status bar will appear, letting you keep tabs on the upload. You will see a checkmark and an In Library notice when it’s ready. See the following image:
Status of sending to Kindle
Amazon also has an app for Windows and macOS that lets you do the same thing. Chrome has an extension you can enable though results are mixed.
Use Your iPhone
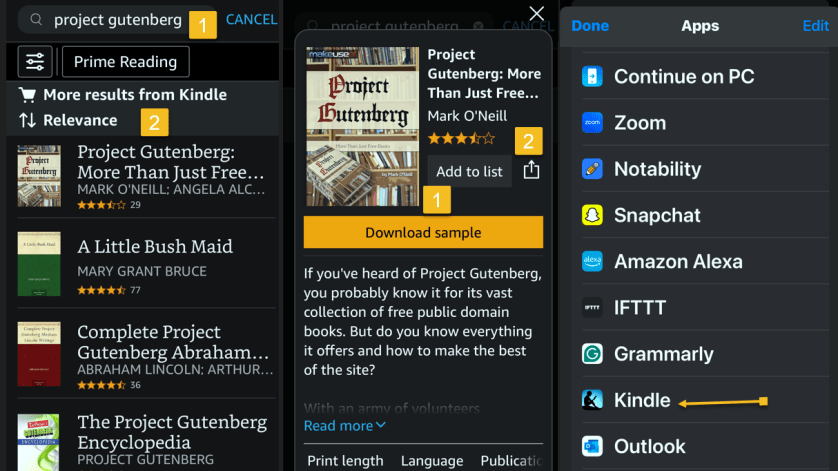
If you have the Kindle app installed on your iPhone or Android device, you can add ebooks to your library with a few taps. In the example below we downloaded an ebook from Project Gutenberg on the iPhone.
First, open your Kindle app on your iPhone and search for an ebook. Next, tap the ebook. From here, you can Download sample to see a preview or tap the Share icon. Now, locate the Kindle app and tap it. Refer to the below image:
Selecting a file to send to Kindle
Next, ensure the Add to your library toggle is ON, then tap Send. Now, the ebook will be saved in your library in the Kindle app and on our Kindle device. The process is similar for Android. See the below image:
Send your file
Use Your Kindle Email
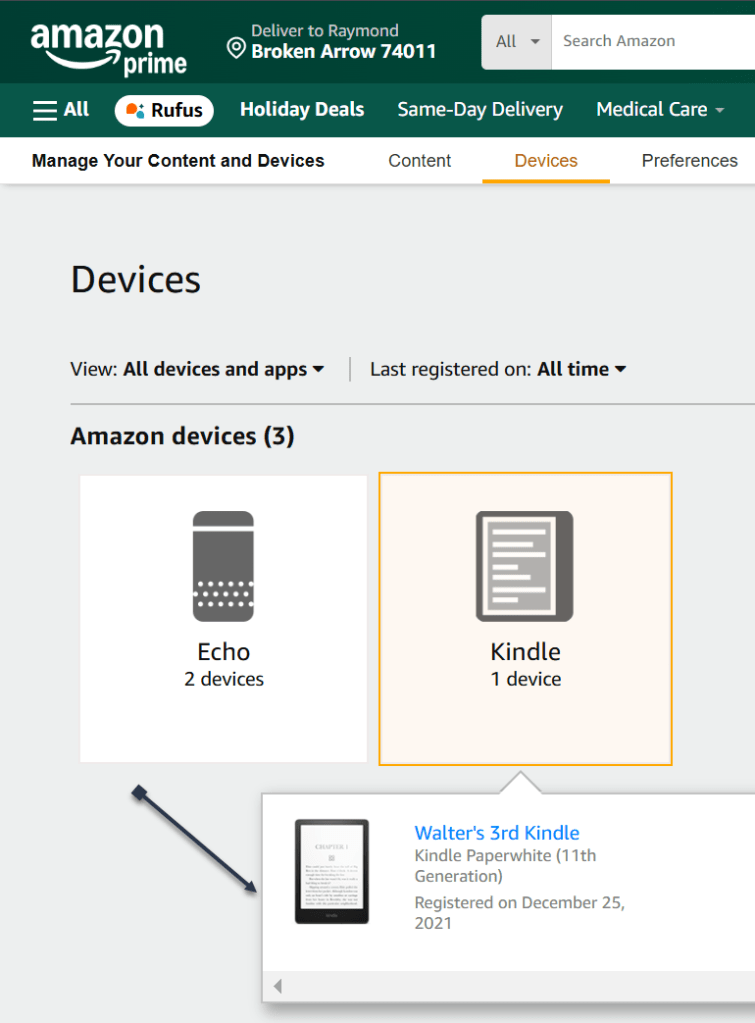
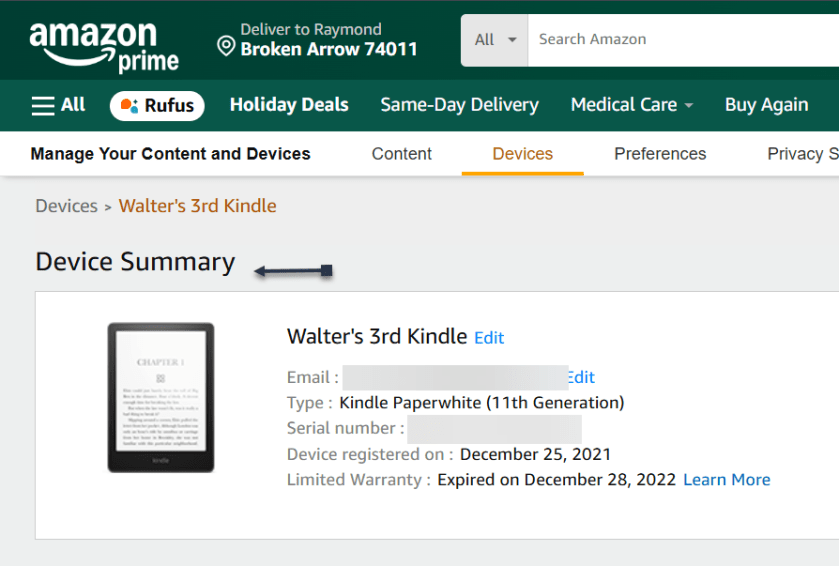
Amazon also lets you email ebooks to your Kindle account via a specially crafted email address. First, to get your Kindle’s email address, go to:
Next, in the list below, find your Kindle device and click it. In the drop-down window, click [your name’s] Kindle. See the following image:
Find your Kindle
On the next page, you will see a Device Summary that lists your @kindle.com email address. (It’s set to a default address, but you can change it by clicking Edit.) Refer to the below page:
Your Kindle information
Back up top, click the Preferences tab, and scroll down to Personal Document Settings. Click the down arrow on the right and scroll to Approved Personal Document E-mail List. The email attached to your Amazon account should be listed here. If that’s the email address you will be using to send ebooks to your Kindle, you are all set. To use a different email, click:
Add a new approved e-mail address and enter the address you want to use.
Remember, your Kindle needs to be attached to a Wi-Fi network for this to work.
Use a PDF
Amazon can automatically convert PDFs into the Kindle format, but you get two formatting choices. If you want your Kindle to display every page in the PDF as if it were a graphic, just email the .pdf file to your Kindle’s address without a subject line, upload it via the Send to Kindle website, or drag and drop the file onto a Kindle that’s attached to your PC with a USB cable.
That will maintain the formatting and graphics; it will appear on your Kindle like on your laptop. However, the font size may be too small to read.
Your other option is to attach the PDF file to an email and make the subject line “convert”—just that word. Send it to your Kindle email address and your PDF will be converted into a Kindle version that will let you mark it up and change the formatting. The graphics will still be in there as well, but you will lose the layout of the original PDF.
Third-party software, such as MiniTool PDF Editor – Kindle format converter, can also convert PDF files to Kindle formats like Word, image, TXT, and HTML.
Where to Find Your eBooks
Once you have emailed your ebook, on your Kindle head to:
Home > From Your Library
It might take a few minutes, but if your Kindle is connected to Wi-Fi, it should update automatically and the ebook will appear.
Want to delete the ebook? Tap the Menu icon (the three-dots) on the bottom right of your ebook in Your Library and select Remove download to remove it from your Kindle or Permanently Delete to remove it from your Amazon account.
Where to Find Free eBooks
Amazon hosts periodic Stuff Your Kindle Days, where select ebooks are free for a 24-hour period. They are usually grouped by theme.
To hook into public library catalogs and send ebooks to your Kindle, check out the Libby app from OverDrive. (Hoopla offers a similar service.)
If you want classics, Project Gutenberg has 70,000+ copyright-free ebooks.
For historical and academic texts, check out archive.org.
ManyBooks.net has a mix of free and paid classics and self-published titles.
Free-Ebooks.net has a large collection of self-published ebooks and classics; provide your email address to get five free ebooks per month.
If you like science fiction, the publisher Baen also has a set of free ebooks.
BookBub has a free ebook section filled with romance novels and other casual reads.
Source: Amazon, PC Mag
Disclaimer
Technology is always changing. Rarely is there static tech for smartphones and desktops. Thus, the contents of this post are only valid at the time of writing. Blog posts older than six months may have directions incompatible with your device or OS. Hopefully, older post content will continue to work as advertised. Thank you for reading TechSavvy.Life for Technology at Work For You.
Quote For the Day
Technology is just a tool. In terms of getting the kids working together and motivating them, the teacher is the most important.
-Bill Gates
X (Twitter) Info
That’s it. Please feel free to share this post! One way to share is via Twitter.
Just click the Tweet icon below. This will launch Twitter where you click its icon to post the Tweet.
Checkout TechSavvy.Life for blog posts on smartphones, PCs, and Macs! You may email us at contact@techsavvy.life for comments or questions.
Was this post helpful? We would love to hear your comments. Do you have a computer or smart device tech question? I will do my best to answer your inquiry. Just send an email to contact@techsavvy.life. Please mention the device, app, and version you are using. To help us, you can send screenshots of the data related to your question.
The author’s Vietnam eBook on the “Battle for Tra Bong Vietnam: Events and Aftermath” can be accessed from a Kindle device or the Kindle App for a desktop or smartphone. The apps are free.
The author’s Vietnam eBook on the Battle for Tra Bong Vietnam: Events and Aftermath
With recent iOS updates, iPhone users can now lock apps, enhancing privacy and security. To lock an app, long-press the icon and select “Require Face ID.” If Face ID fails, users can unlock via passcode. However, certain apps like Maps and Clock cannot be locked.
RAYMOND OGLESBY @RaymondOglesby2 January 21, 2025 – 4 minutes read time
Overview
Can you lock apps on the iPhone? Yes! For a long time, there was no way to lock apps on iOS. However, the latest updates added a new feature that allows you to lock down an app.
This is useful because it means you can unlock your iPhone and hand it to someone to look at something, knowing they will not be able to open the locked apps. Suppose someone using your iPhone tries to open an app you have manually locked using the method described below. In that case, they will see a popup informing them that it can not be accessed without secondary authentication via Face ID (or Touch ID on the iPhone SE).
If Stolen Device Protection is active, entering a passcode to unlock an app is not an option, so even if your iPhone is stolen and the thief knows your passcode, they can open the app. However, if Stolen Device Protection is not enabled, a passcode prompt appears that can be used to unlock the app after three failed Face ID attempts.
It’s worth noting that not all apps can be locked. Apple does not provide the lock option for apps like Maps, Clock, Calculator, and Settings. Otherwise, almost every other app can be locked, including third-party apps. Let’s explore how this is done.
Why You Will Like This Tip
Prevent others from accessing apps with personal information.
Secure apps that do not have a Face ID login option.
System Requirements
This is for the iPhone running iOS 18 or later. The screenshots are from iPhone 14 Pro running iOS 18.2.1.
Click here to learn how to update your iPhone to the latest iOS version.
How to Lock an App
First, find the app you want to lock, and long-press on it. Refer to the below page:
Find an app you want to lock
Next, when the menu appears, select Require Face ID. See the below image:
Select the Require Face ID option
Now, tap Require Face ID. See the following image:
Tap the Require Face ID option
Next, Face ID will scan your face. When you open the app, there will be a message telling you that Face ID is required to open the app. Refer to the below image:
Point your iPhone at your face to open the locked app
Now, you can tap Try Face ID Again if Face ID fails. See the below image:
If the Face ID scan fails then tap and try again
Next, if Face ID fails a second time, you can select Enter Passcode to unlock the app with your iPhone passcode. See the following image:
If Face ID fails again then enter your passcode to open the locked app
How to Unlock an App
Simply long-press on the app’s icon and choose the Don’t Require Face ID. See the below image:
Remove the requirement to use Face ID for the app
As long as you have Stolen Device Protection enabled, turning the lock on and off requires a Face ID scan, so it can not be turned off without your knowledge.
Summary
That’s how to lock an app on the iPhone. Now you can keep your apps protected from prying eyes.
Source: Apple Support, MacRumors
Disclaimer
Technology is always changing. Rarely is there static tech for smartphones and desktops. Thus, the contents of this post are only valid at the time of writing. Blog posts older than six months may have directions incompatible with your device or OS. Hopefully, older post content will continue to work as advertised. Thank you for reading TechSavvy.Life for Technology at Work For You.
Quote For the Day
Technology should improve your life… not become your life.
– Billy Cox
X (Twitter) Info
That’s it. Please feel free to share this post! One way to share is via Twitter.
Just click the Tweet icon below. This will launch Twitter where you click its icon to post the Tweet.
Checkout TechSavvy.Life for blog posts on smartphones, PCs, and Macs! You may email us at contact@techsavvy.life for comments or questions.
Was this post helpful? We would love to hear your comments. Do you have a computer or smart device tech question? I will do my best to answer your inquiry. Just send an email to contact@techsavvy.life. Please mention the device, app, and version you are using. To help us, you can send screenshots of the data related to your question.
The author’s Vietnam eBook on the “Battle for Tra Bong Vietnam: Events and Aftermath” can be accessed from a Kindle device or the Kindle App for a desktop or smartphone. The apps are free.
The author’s Vietnam eBook on the Battle for Tra Bong Vietnam: Events and Aftermath
The post warns about the risks of overheating computers, which can harm performance and lifespan. It suggests monitoring CPU temperatures using the BIOS or third-party software like Core Temp. Tips for reducing heat include cleaning dust, adjusting fan settings, and ensuring proper CPU cooler contact. Regular checks are advisable for maintaining optimal performance.
RAYMOND OGLESBY @RaymondOglesby2 January 14, 2025 – 8 minutes read time
Overview
If your computer gets too hot, its performance will suffer and the CPU could get damaged.
Just as you do not want your phone to get too hot, an overheating computer is no joke. If your CPU goes over a certain temperature, it will start throttling performance in an effort to reduce excess heat. If your internal components get too hot for too long, it can decrease the lifespan of your PC, not to mention burn your thighs if you are using your laptop on bare legs, which, by the way, is not a good idea.
Unfortunately, most PCs do not have user-facing temperature-monitoring tools, so you can not easily check how hot your computer is getting at any given time. If you want to see how hot your computer is running, you will need to download some extra software. Let’s explore what you need to check your machine’s internal temperature.
Why You Will Like This Tip
Ability to monitor the CPU core(s) temperature.
Keep your PC running at peak performance with a cool CPU temperature.
System Requirements
Windows 7 or above with 32 or 64 bit OS.
Screenshots are from Dell XPS 8960 running Windows 11 Pro.
How to Monitor CPU Temperature in Windows
Use the BIOS Screen
Do not want to install third-party software? The only way to observe your PC’s internal temperature is from the BIOS screen. To access this menu, restart your computer and hit a button on the keyboard that will disrupt the normal boot process (it can be Delete, Esc, or Enter; it will say on the screen). Or Google your machine for the button to press to view its BIOS screen upon a restart. For our Dell XPS 8960 desktop, it is the F2 key.
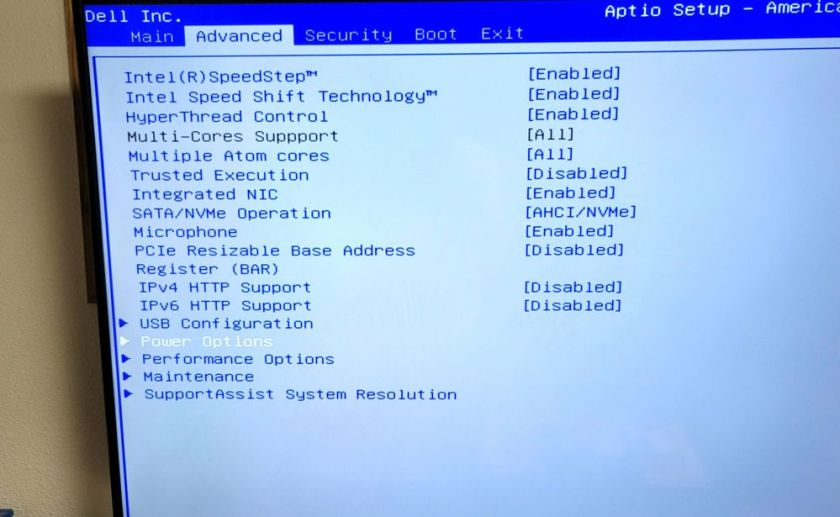
Every BIOS screen is different, so we cannot tell you where to look for your specific manufacturer, but the machine’s internal temperature should be displayed on the main screen. Some may even show CPU and motherboard temperatures separately. Refer to the below image:
the BIOS screen
The CPU temperature is not displayed on our Dell XPS 8960 desktop, so we need to use a third-party app.
Use Core Temp App
Unfortunately, this is no way to consistently monitor your PC temperature, so you will want to use third-party software instead.
There are dozens of temperature-monitoring programs out there, but we recommend Core Temp for Windows for most users.
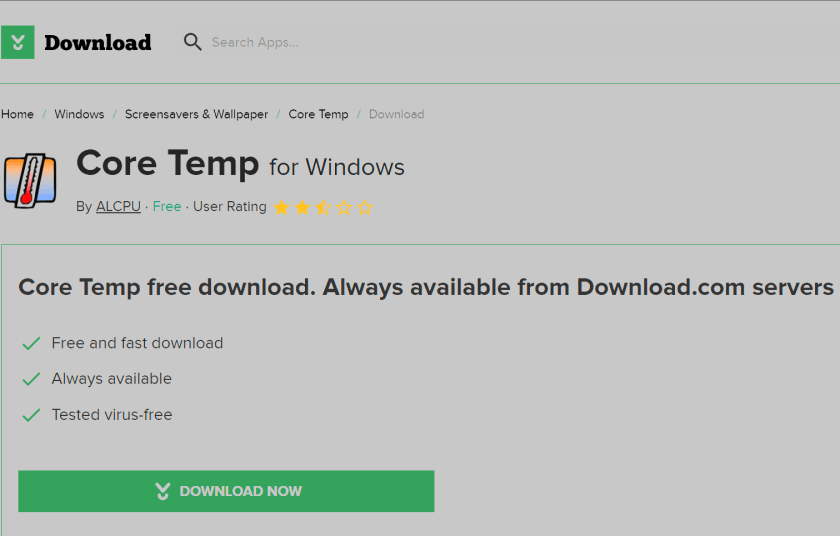
Note! We are downloading the app from the CNET website. We recommend only using this website. The CNET webpage will point to the ALCPU page, the app’s owner. Click the download button on the left of your screen. See the below image:
The Core Temp main webpage has too many download buttons to choose from is the reason for using CNET. Some of their download buttons will download blotware, browser extensions, etc., that you do not need.
Also, when installing the app, consider the install options as they want to install a game.
Download Core Temp app
The app provides plenty of information without being as overwhelming as more thorough utilities, and it comes as an installer and EXE file. Plus, it allows you to monitor your temperature from the Windows taskbar, which is great if you want to keep an eye on it over time.
Our Dell XPS 8960 desktop has an Intel i9 processor with 24 cores. See the following image:
Running Core Temp app
The top portion of the window lists your CPU, its current load, and a few other technical tidbits. The real meat is at the bottom, where it says Temperature Readings. You will see the current temperature in the left column, alongside the lowest and highest recorded temperatures since you last launched it. If you are using an AMD CPU, you will probably have one value here, while Intel CPUs will likely have one reading per CPU core; just watch the hottest core to keep things simple.
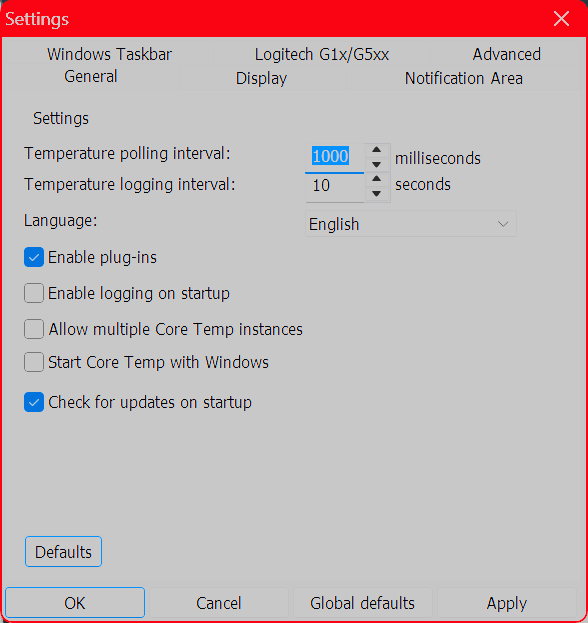
We highly recommend heading to:
Options > Settings
and playing with the options available here, especially those under the Notification Area tab, which will let you view your CPU temperature in the taskbar. We personally recommend selecting Highest Temperature here, then clicking the system tray’s arrow and dragging Core Temp’s icon to the taskbar to keep it visible at all times. You can also enable Core Temp to start with Windows. Refer to the below image:
Use Other Third Party Apps for Windows
HWINFO – Provides detailed reporting on chipsets, graphics cards, and processors for AMD and Intel families. It can also help detect overheating, performance loss, and overload.
If your CPU gets too hot, it will reduce performance to try and reduce the temperature; meaning whatever you are doing at the time will probably run slower. It will also keep your fans spinning at high speeds—meaning lots of noise; and could permanently damage your CPU, fan, or battery.
“Normal” temperatures, though, can vary wildly depending on the CPU type of computer. A thin and light ultraportable laptop that crams a powerful CPU into a small space with little airflow, for example, will likely get hotter than a desktop PC with a low-power CPU, even when performing the same tasks. And a CPU running at 70 degrees is likely to be just as effective as a CPU running at 40 degrees in that given moment.
That said, your CPU does have a maximum threshold; a specific temperature it will try to avoid going over. This is known as the maximum temperature junction or TJ Max. It varies from CPU to CPU, but for most chips, it lies somewhere between 95° C and 105° C. (Our Dell XPS 8960 TJ Max temperature is 100 degrees). So if your computer is regularly hitting that temperature, it’s probably throttling itself (and, if it cannot decrease the temperature, it may even shut itself off to prevent overheating.)
Lower CPU Temperature
If you regularly experience that kind of heat, you have a few options. First, open up your computer, either by removing the side panel on a desktop or unscrewing the bottom case on a laptop, and blow out any dust bunnies with an air blower or Blaster. This should help improve airflow and reduce temperatures. You can also adjust your CPU’s fan behavior, allowing it to run at higher speeds more often.
If you have a desktop, you may even want to reseat the CPU cooler to make sure it’s making good contact with the CPU, and if your computer is rather old, some new thermal paste could help lower temperatures as well. If you have a thin laptop known for overheating, though, these tips may only take you so far; and you will just have to deal with the excess heat. The next time you buy a laptop, be sure to read through reviews that include heat and fan noise before you commit.Spacer
Disclaimer
Technology is constantly evolving, and smartphone and desktop tech rarely remains static. Therefore, the information in this post is only accurate as of the date it was written. Blog posts that are older than six months may contain instructions that are no longer compatible with your device or operating system. We hope that the content from previous posts continues to function as intended. Thank you for reading TechSavvy.Life, where technology works for you.
Quote For the Day
“Technology made large populations possible; large populations now make technology indispensable.”
– Joseph Krutch
X (Twitter) Info
That’s it. Please feel free to share this post! One way to share is via Twitter.
Just click the Tweet icon below. This will launch Twitter where you click its icon to post the Tweet.
Checkout TechSavvy.Life for blog posts on smartphones, PCs, and Macs! You may email us at contact@techsavvy.life for comments or questions.
We value your feedback! Was this post helpful? Please share your comments with us. If you have a tech question related to your computer or smart device, feel free to reach out. Just send an email to contact@techsavvy.life, and be sure to include the device, app, and version you are using. To assist us further, you can also attach screenshots related to your inquiry.
The author’s Vietnam eBook on the “Battle for Tra Bong Vietnam: Events and Aftermath” can be accessed from a Kindle device or the Kindle App for a desktop or smartphone. The apps are free.
The author’s Vietnam eBook on the Battle for Tra Bong Vietnam: Events and Aftermath
The iOS 18.1 update introduces Safari Summaries, allowing users to quickly grasp webpage content without extensive scrolling. Apple Intelligence, integrated into various devices, offers tailor-made AI tools like image generation, message prioritization, and smart replies, while emphasizing user privacy. This feature enhances the browsing experience by providing clear website summaries.
RAYMOND OGLESBY @RaymondOglesby2 January 7, 2025 – 4 minutes read time
Overview
If you have ever been lost in the middle of a website and wished you could just get the gist without reading through the entire page, I have good news for you.
Safari gets Apple Intelligence! The iOS 18.1 update brings Safari summaries to webpages, letting you get the gist of an article quickly and clearly. This is one of the top iOS 18 Safari highlights, and it’s easy to implement. Here’s how
Why You Will Like This Tip
iOS 18 will summarize a website for you so you can skip the scrolling.
Enjoy a clear website summary without reading the whole thing.
Discover quickly if the article has the information you need.
System Requirements
This tip requires an iPhone 15 Pro and later models running iOS 18.1 or later. Screenshots are from iPhone 15 Pro running iOS 18.1.1.
Click here to learn how to update your iPhone to the latest iOS version.
What is Apple Intelligence
Apple Intelligence is a suite of AI-powered tools that use your personal data to generate information and recommendations tailored to you. It’s available on the iPhone, iPad, and Mac, and is integrated into the core of the operating system and existing apps.
Apple Intelligence includes features like:
Image Playground: A tool for generating cartoon-style images based on text descriptions
Genmoji: A tool for creating emojis for any situation
Writing Tools: Tools for enhancing your writing, including ChatGPT integration and reformatting tools like List and Table
Priority Messages: A tool for prioritizing messages in your inbox
Notification summaries: A tool for scanning long or stacked notifications with key details
Reduce Interruptions: A Focus that surfaces only notifications that might need immediate attention
Smart Reply: A tool in Mail that identifies questions you were asked in an email and offers relevant selections to include in your response
Apple Intelligence is designed to protect your privacy at every step. It’s aware of your personal information without collecting it, and it uses on-device processing and Private Cloud Compute to handle more complex requests.
Summarize a Safari Webpage
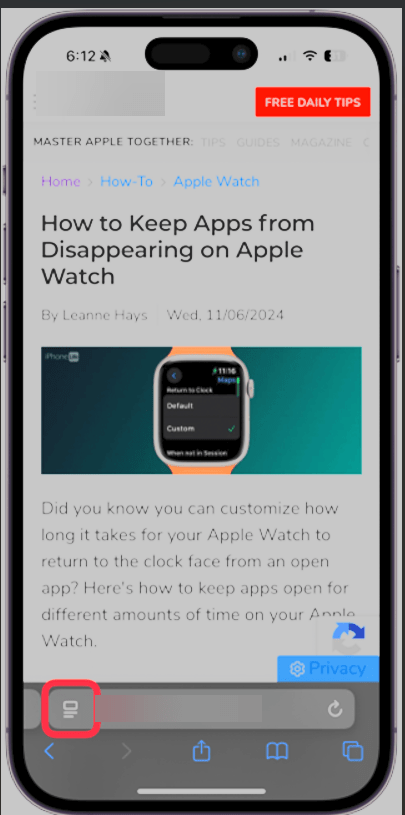
Open your webpage in Safari and tap the Page Settings button at the bottom left. Refer to the below image:
Selecting Page Settings button
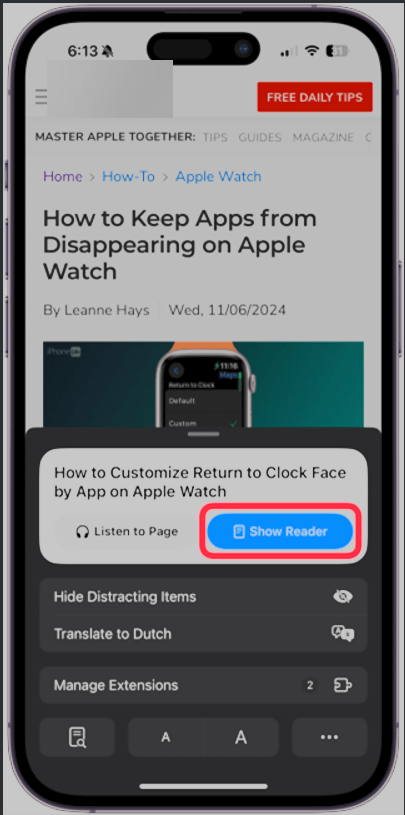
Next, tap Show Reader. See the below image:
Selecting Show Reader button
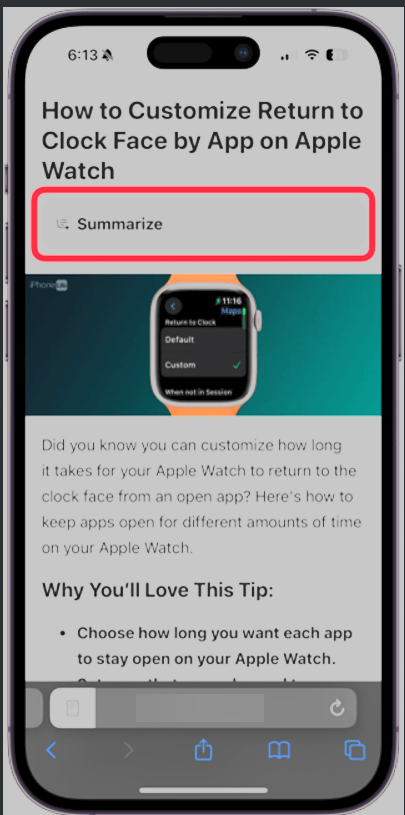
Now, tap Summarize. See the following image:
Selecting Summarize button
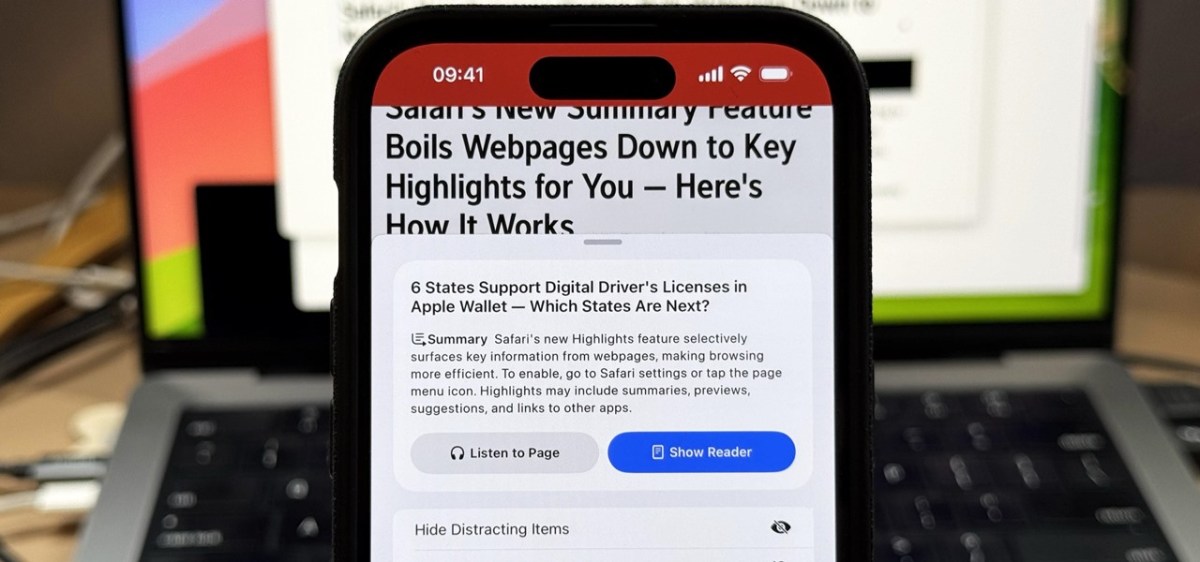
Next, you will see the summary displayed at the top of the page in a gray box. Refer to the below image:
The Summary
It’s that easy! Now, you can enjoy clear, concise summaries of the webpages you do not want to have to read through or make sure a website has the information you need before you spend ten minutes scrolling.
Disclaimer
Technology is constantly evolving, and smartphone and desktop tech rarely remains static. Therefore, the information in this post is only accurate as of the date it was written. Blog posts that are older than six months may contain instructions that are no longer compatible with your device or operating system. We hope that the content from previous posts continues to function as intended. Thank you for reading TechSavvy.Life, where technology works for you.
Quote For the Day
“Technology is a word that describes something that doesn’t work yet.”
― Douglas Adams
X (Twitter) Info
That’s it. Please feel free to share this post! One way to share is via Twitter.
Just click the Tweet icon below. This will launch Twitter where you click its icon to post the Tweet.
Check out TechSavvy.Life for blog posts on smartphones, PCs, and Macs! If you have comments or questions, email us at contact@techsavvy.life.
We value your feedback! Was this post helpful? Please share your comments with us. If you have a tech question related to your computer or smart device, feel free to reach out. Just send an email to contact@techsavvy.life, and be sure to include the device, app, and version you are using. To assist us further, you can also attach screenshots related to your inquiry.
The author’s Vietnam eBook on the “Battle for Tra Bong Vietnam: Events and Aftermath” can be accessed from a Kindle device or the Kindle App for a desktop or smartphone. The apps are free.
The author’s Vietnam eBook on the Battle for Tra Bong Vietnam: Events and Aftermath
The iOS 18 update allows users to hide apps on their iPhone, providing a way to lock them from the Home Screen and Spotlight search. While most apps can be hidden, certain default apps cannot. Hidden apps are stored in a Face ID-protected folder in the App Library for easy access.
RAYMOND OGLESBY @RaymondOglesby2 December 17, 2024 – 4 minutes read time
Overview
For a really long time, there was not a straightforward way to hide apps on iPhone, but the iOS 18 update introduced a brand new way to lock apps and hide them from the Spotlight search, your Home Screen, and the unlocked portion of the App Library.
One downside is that not all apps can be hidden. Another is that all your hidden apps go to a locked Hidden folder in the App Library. Besides this, it is a nifty feature, so let’s explore this feature for hiding apps on your iPhone.
Why YouWill Like This Tip
Most but not all apps can be hidden using a feature introduced with the iOS 18 update.
Apps hidden using this method will appear in a Hidden folder in the App Library that can be unlocked using Face ID!
System Requirements
this tip works on iPhones running iOS 18 or newer. The screenshots are from iPhone 14 Pro using iOS 18.1.1
Click here to learn how to update your iPhone to the latest iOS version.
Hide an App
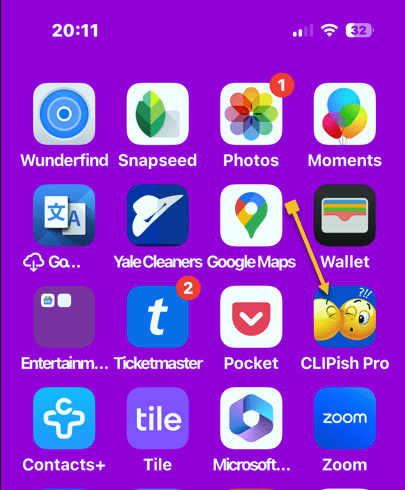
First, on your Home Screen or App Library, long-press the app you wish to hide. In our example, we will be hiding the CLIPish Pro app. Refer to the below image:
Selecting an app to hide from Home screen
Next, tap the Require Face ID option. See the below image:
Selecting the Require Face ID option
Now, select the Hide and Require Face ID option. See the following image:
Selecting the Hide and Require Face ID option
Next, confirm that you wish to hide the app using Face ID and by tapping the Hide App button. Refer to the below image:
Confirm to Hide App
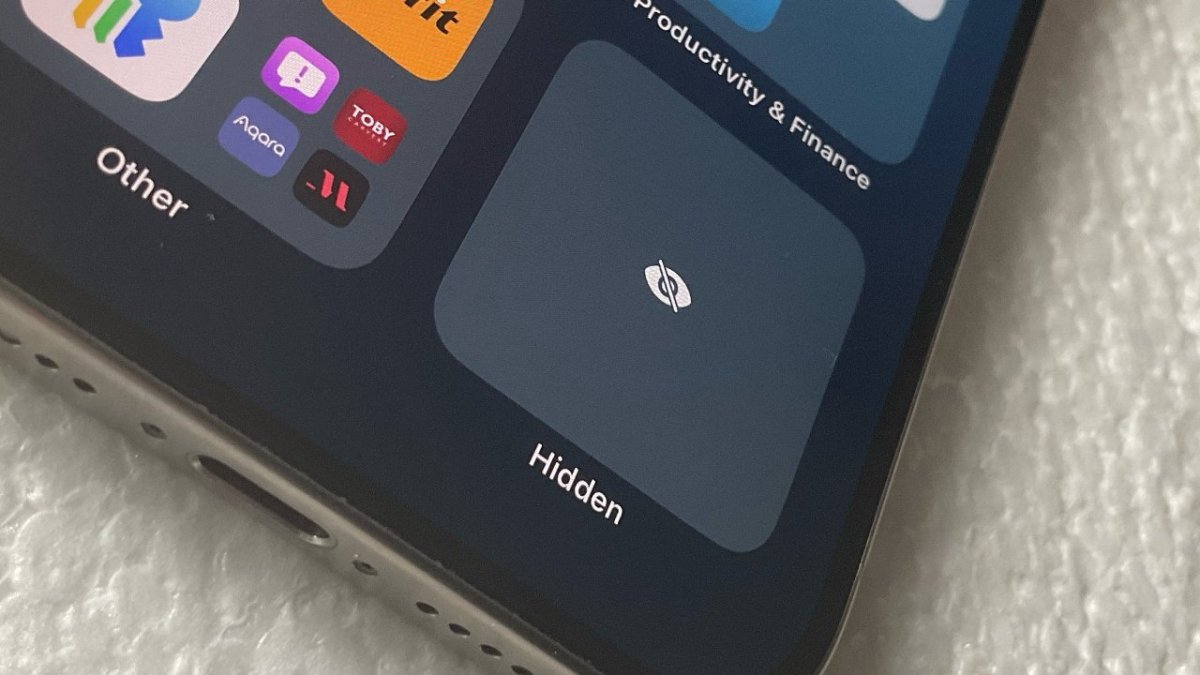
Now, any hidden apps will appear in the Hidden folder in the App Library, which is locked using Face ID. See the below image:
Your app in the Hidden folder
Apps Your Are Unable to Hide
You are unable to hide:
Apps installed with iOS 18: Apps like Photos and Wallet can mot be hidden.
Default web browser or app marketplace: Apps set as the default web browser or app marketplace can not be hidden.
Unhide an App
If you are wondering how to unhide apps on iPhones, just open the Hidden folder in the App Library. Tap inside the folder to reveal your hidden app(s). Follow the same steps, and tap the Don’t Require Face ID button. See the following image:
Selecting the Don’t Require Face ID option to unhide your app
Add App Back to Home Screen
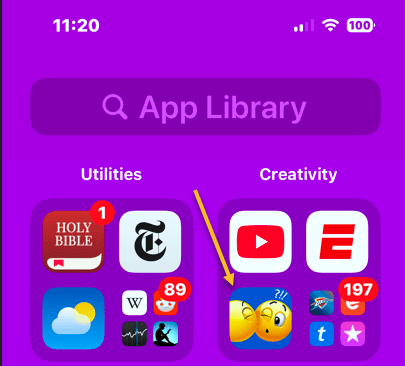
First, locate your app in the App Library. If the app has been hidden, it will be in the Hidden folder. If you have unhidden the app, it will be in a folder section. In our example, our CLIPish Pro app is in the Creativity section. Refer to the below image:
Selecting your app to add back to your Home screen
Next, long-press the app and tap the Add to Home Screen option. Your app will appear on your Home screen. See the below image:
Selecting the Add to Home Screen option
Disclaimer
Technology is constantly evolving, and smartphone and desktop tech rarely remains static. Therefore, the information in this post is only accurate as of the date it was written. Blog posts that are older than six months may contain instructions that are no longer compatible with your device or operating system. We hope that the content from previous posts continues to function as intended. Thank you for reading TechSavvy.Life, where technology works for you.
Quote For the Day
.“Technology is a gift of God. After the gift of life, it is perhaps the greatest of God’s gifts. It is the mother of civilizations, of arts and of sciences.”
―Freeman Dyson
X (Twitter) Info
That’s it. Please feel free to share this post! One way to share is via Twitter.
Just click the Tweet icon below. This will launch Twitter where you click its icon to post the Tweet.
Checkout TechSavvy.Life for blog posts on smartphones, PCs, and Macs! You may email us at contact@techsavvy.life for comments or questions.
We value your feedback! Was this post helpful? Please share your comments with us. If you have a tech question related to your computer or smart device, feel free to reach out. Just send an email to contact@techsavvy.life, and be sure to include the device, app, and version you are using. To assist us further, you can also attach screenshots related to your inquiry.
The author’s Vietnam eBook on the “Battle for Tra Bong Vietnam: Events and Aftermath” can be accessed from a Kindle device or the Kindle App for a desktop or smartphone. The apps are free.
The author’s Vietnam eBook on the Battle for Tra Bong Vietnam: Events and Aftermath
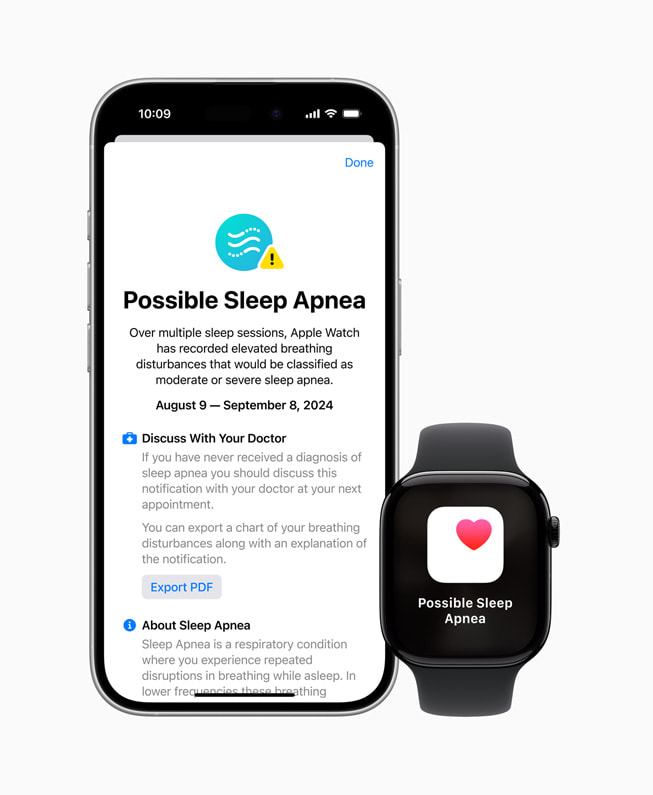
Apple Watch now features sleep apnea detection for users over 18 who haven’t been previously diagnosed. By tracking breathing disturbances through its accelerometer while sleeping, the watch warns users if issues persist over 30 days. However, it’s crucial to consult a doctor for an accurate diagnosis rather than solely relying on these notifications.
RAYMOND OGLESBY @RaymondOglesby2 December 10, 2024 – 6 minutes read time
Overview
The new Sleep Apnea Apple Watch feature uses the watch’s internal accelerometer to detect breathing disturbances. Sleep apnea detection is only available on newer Apple Watch models and users over 18 years old who have not been diagnosed with sleep apnea in the past.
About Sleep Apnea
Sleep apnea is a respiratory condition where you experience repeated disruptions in your breathing while you sleep. These breathing disturbances are fairly common, and people typically experience a few disturbances a night. Your alcohol intake, upper respiratory illnesses, and even some medications can lead to elevated breathing disturbances. When you wear your Apple Watch to bed, it uses the accelerometer to look for breathing disturbances while you sleep. These are categorized as “Elevated” or “Not Elevated.” Over a 30-day evaluation period, if you consistently experience “Elevated” breathing disturbances, you receive a notification, letting you know it identified signs of sleep apnea. You should talk to your doctor if you receive a sleep apnea notification.
Why You Will Like This Tip
Set up Sleep apnea Apple Watch notifications to learn if you are experiencing any signs of sleep apnea.
Sleep apnea notifications can help you know when it’s time to make an appointment with your doctor.
You must wear your Apple Watch to sleep for a minimum of 10 nights over a 30 day period. Your data will be analyzed every 30 days.
Sleep apnea notifications are intended for use by people 18 years or older who have not been diagnosed with sleep apnea.
The screenshots are from iPhone 14 Pro running iOS 18.1.1.
Set Up Notifications
Sleep Apnea is a much-anticipated Apple Watch feature that is finally here. This post explores how to set up and use notifications for sleep apnea breathing disturbances.
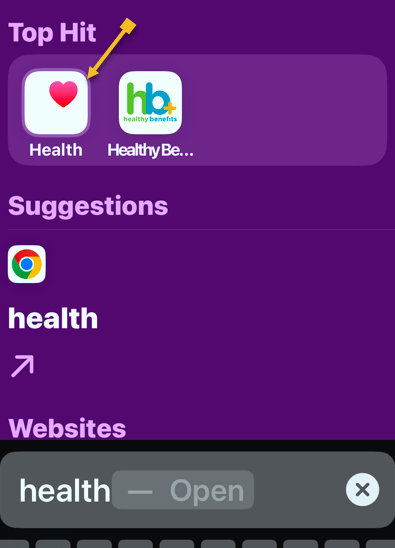
First, open the Health app. Refer to the below image:
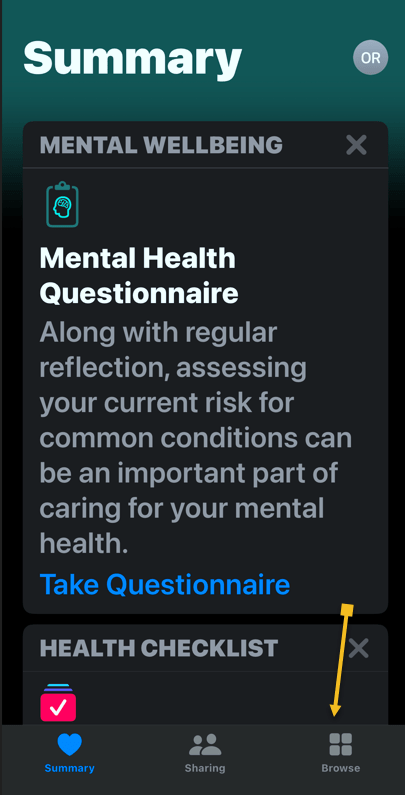
Next, navigate to the Browse tab if you are not already there. See the below image:
Now, scroll down and select either Sleep or Respiratory. See the following image:
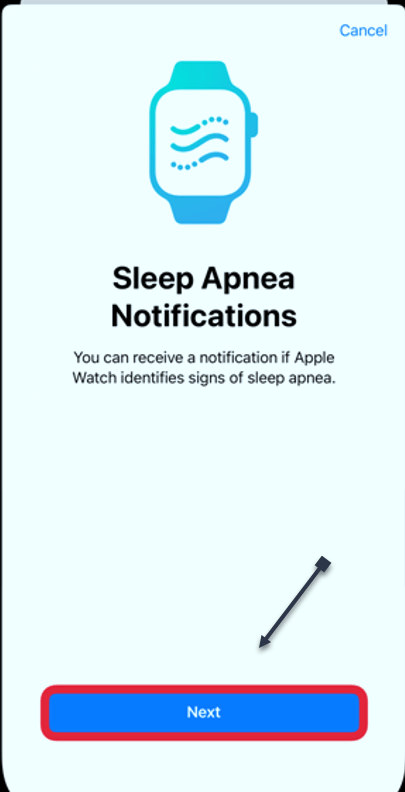
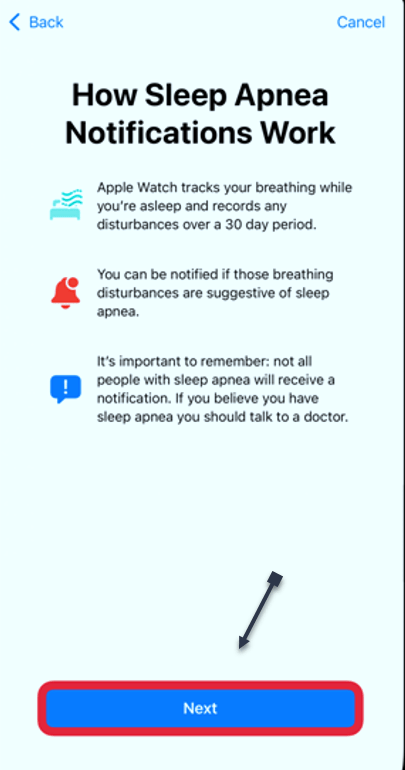
Next, scroll down until you see Sleep Apnea Notifications, tap Set Up. Refer to the below image:
Now, tap Next. See the below image:
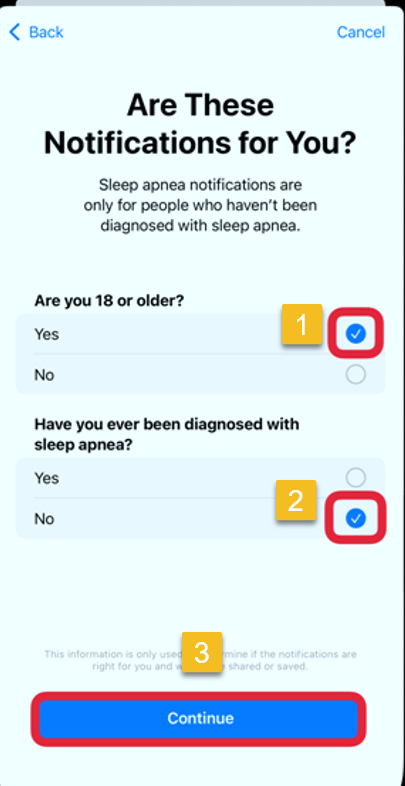
Next, you can only track sleep apnea if you are over 18 and have not been diagnosed with sleep apnea. If applicable, tap on Yes and No respectively. Then tap Continue. See the following image:
Now, tap Next. Refer to the below image:
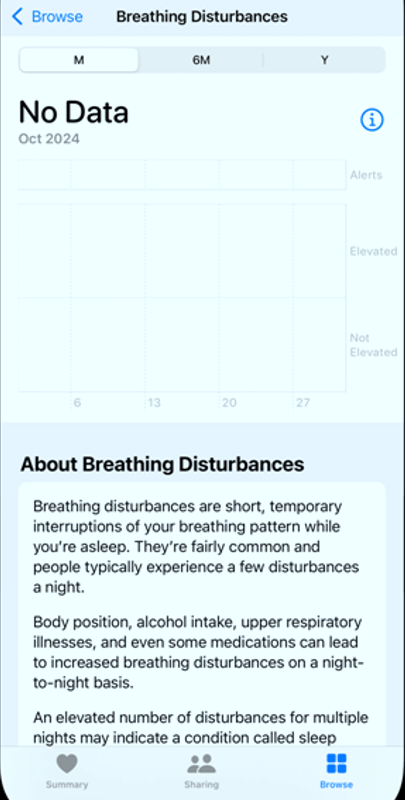
Next, you will be taken to a page showing Breathing Disturbances. If this is your first time using the app, you will not see any data here yet. But you can scroll down to read more about them to learn what to expect. See the below image:
There is no specific Sleep Apnea app, but you can track any disturbance within the Health app. From now on, you will be notified if any breathing disturbances are detected. Please keep in mind that while the Apple Watch may be able to detect sleep apnea, you will have to see your doctor to get a proper diagnosis and receive any necessary medical care.
Enabling the Apple Watch
Turn on Track Sleep with Apple Watch. It should appear during the initial setup, although you can go to the Watch app on your iPhone > My Watch Tab.
Select Sleep and toggle on Track Sleep with Apple Watch.
Wear your watch to sleep for at least 10 nights in a 30-day period to get analyzed results.
Viewing Your Results
Your results will be reflected in the Health app as soon as your first night. If it detects an elevated level of breathing disturbances, it will proactively send you an alert.
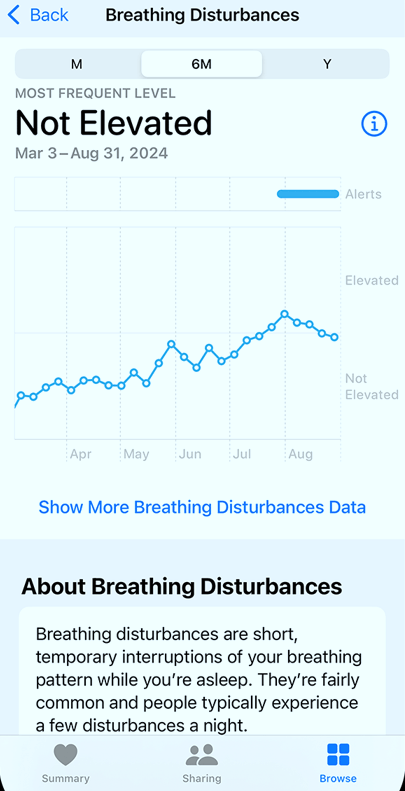
If you want to view the data for yourself, you can open the Health app once more and navigate back to breathing disturbances. It will show each night’s results on a graph, ranging from not elevated to elevated. You can view it each night or over time. See the following image:
To be clear, if a positive detection is triggered, it’s not diagnosing you with anything. The data can be exported and shared with your health care provider where they can make a further diagnosis.
Turning Off Sleep Apnea Notifications
First, open the Health app on your iPhone and tap your photo or initials at the top right.
Next, tap
Health Checklist > Sleep Apnea Notifications
Now, turn Sleep Apnea Notifications to OFF.
Summary
The Sleep Apnea Notifications feature is not intended to diagnose, treat, or aid in the management of sleep apnea.
Not all people with sleep apnea receive a notification.
If you believe you have sleep apnea, talk to your doctor.
Disclaimer
Technology is constantly evolving, and smartphone and desktop tech rarely remains static. Therefore, the information in this post is only accurate as of the date it was written. Blog posts that are older than six months may contain instructions that are no longer compatible with your device or operating system. We hope that the content from previous posts continues to function as intended. Thank you for reading TechSavvy.Life, where technology works for you.
Quote For the Day
“Technology is a word that describes something that doesn’t work yet.”
― Douglas Adams
X (Twitter) Info
That’s it. Please feel free to share this post! One way to share is via Twitter.
Just click the Tweet icon below. This will launch Twitter where you click its icon to post the Tweet.
Checkout TechSavvy.Life for blog posts on smartphones, PCs, and Macs! You may email us at contact@techsavvy.life for comments or questions.
We value your feedback! Was this post helpful? Please share your comments with us. If you have a tech question related to your computer or smart device, feel free to reach out. Just send an email to contact@techsavvy.life, and be sure to include the device, app, and version you are using. To assist us further, you can also attach screenshots related to your inquiry.
The author’s Vietnam eBook on the “Battle for Tra Bong Vietnam: Events and Aftermath” can be accessed from a Kindle device or the Kindle App for a desktop or smartphone. The apps are free.
The author’s Vietnam eBook on the Battle for Tra Bong Vietnam: Events and Aftermath
The Control Center on iOS 18 and iPadOS 18 simplifies access to frequently used features by allowing customization and multiple screens. Users can manage Wi-Fi, Bluetooth, volume, and more, enhancing organization. By arranging controls and adding shortcuts, users can optimize their experience, making navigation more efficient and personalized.
RAYMOND OGLESBY @RaymondOglesby2 December 3, 2024 – 6 minutes read time
Overview
For quick access to frequently used apps and settings, Control Center is just a swipe or click away. And with iOS 18 and iPadOS 18, it’s even easier to customize and use.
Navigating the settings on your iPhone, iPad, and Mac can be difficult. That’s where the Control Center comes in, providing quick access to a variety of features that might otherwise be hidden within the device’s menus. From the Control Center, you can easily adjust settings for Wi-Fi, Bluetooth, and AirDrop, as well as control brightness and volume. It also allows you to manage Focus mode, access music controls, switch to dark mode, and enable screen mirroring. Additionally, you can customize the Control Center by adding or removing features as needed.
For many years, the Control Center on your iPhone and iPad was restricted to a single screen. If you wanted to change the controls, you had to navigate into the settings of your device. However, with the introduction of iOS 18 and iPadOS 18, you can now set up multiple screens and customize them directly within the Control Center. Let’s explore how to personalize the updated Control Center.
Why You Will Like This Tip
Organize the Control Center so that your most frequently used controls are easily accessible at the front.
Maintain a tidy and organized Control Center..
System Requirements
This tip is for iPhones running iOS 18 or later. The screenshots are from iPhone 14 Pro running iOS 18+.
Click here to learn how to update your iPhone to the latest iOS version.
Customize the Control Center
First, swipe down from the upper right edge to open the Control Center. Refer to the below image:
Swiping down to access Control Center
Next, rap and hold in an empty area. See the below image:
Taping any empty area
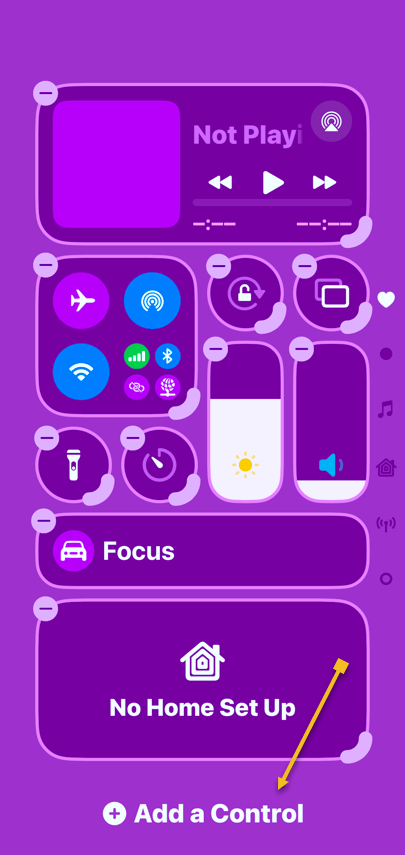
Now, the controls will have minus symbols next to them, indicating that you are in Edit mode. Tap Add a Control to get started. See the following image:
Selecting Add a Control button
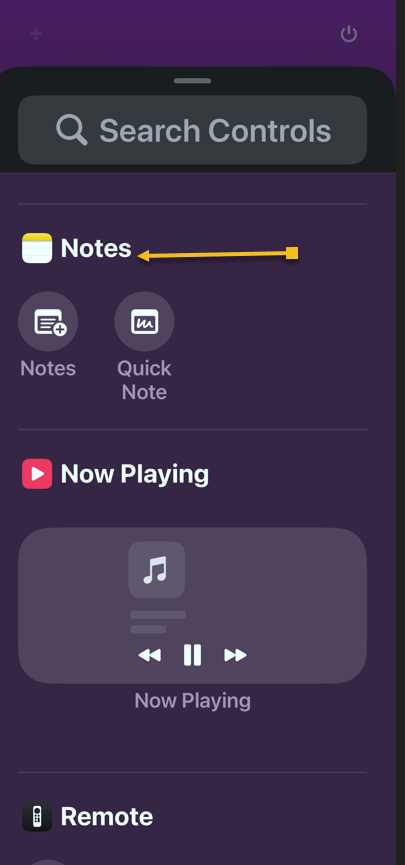
Next, find a control you want easy access to and tap on it to add it to the Control Center. Refer to the below image:
Selecting to add the Notes app
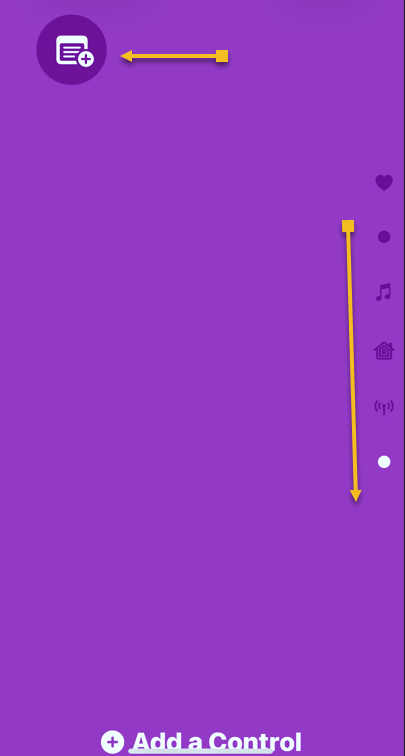
Now, if your first page becomes too full, a second page will be automatically created. You can swipe up and down to navigate between the Control Center pages. Each page is indicated by a dot on the far right side of the screen. Please note that we have a total of six pages. See the image below:
Notes app has been added
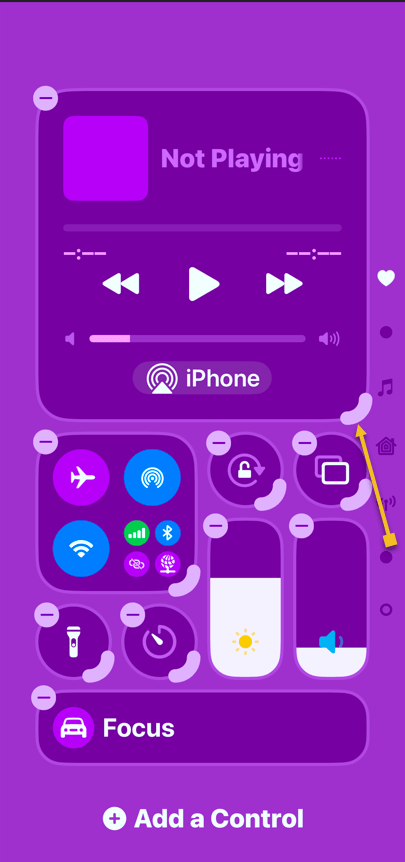
Next, to change the size of a control, tap and drag the corner. Keep in mind that some controls only have one size. See the following image:
Selecting Playback control to resize
Now, view your resized Playback control. Refer to the below image:
Playback control has been resized
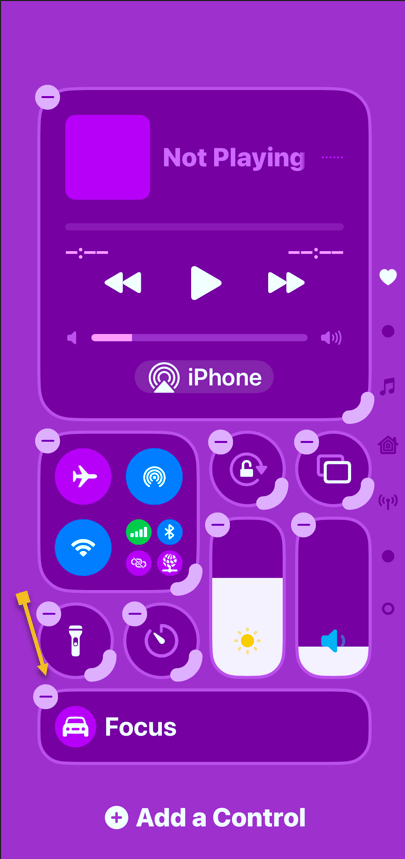
Next, to remove a control, simply tap the minus symbol next to it. See the below image:
Selecting to remove the Focus control
Now, you can place controls anywhere without worrying about order. Our Control Center has been rearranged from six pages to only three pages, as indicated by the dots on the right side. See the following image:
Final Control Center
FAQ
Why does my iPhone say SOS in the top right corner?
If your iPhone cannot connect to a cellular network or Wi-Fi, it may display ‘SOS’ in the top right corner. This indicates that your device can only make emergency calls.
What does 5GUC mean?
5GUC stands for 5G Ultra Capacity. This is T-Mobile’s higher frequency 5G network. Other cellular providers have similar higher frequency networks with different names.
What are the icons on the top right of iPhone?
At the top of your iPhone screen, you will typically see the strength of your cellular network represented by bars. To the right of this, there will be an indicator showing 4G, LTE, 5G, or a similar symbol if you are connected to a cellular network. If you are connected to Wi-Fi, you will see a Wi-Fi symbol instead. Finally, you will also find the battery indicator for your iPhone.
What do the iPhone signal symbols mean?
The signal symbols indicate whether you are using cellular data or Wi-Fi, as well as the strength of the wireless connection.
Summary
That’s how to customize the Control Center on your iPhone. We recommend placing your most-used controls on the first page.
Disclaimer
Technology is constantly evolving, and smartphone and desktop tech rarely remains static. Therefore, the information in this post is only accurate as of the date it was written. Blog posts that are older than six months may contain instructions that are no longer compatible with your device or operating system. We hope that the content from previous posts continues to function as intended. Thank you for reading TechSavvy.Life, where technology works for you.
Quote For the Day
“The march of science and technology does not imply growing intellectual complexity in the lives of most people. It often means the opposite.”
– Thomas Sowell
(X) Twitter Info
You are finished with a revised Control Center. Please feel free to share this post! One way to share is via Twitter.
Just click the Tweet icon below. This will launch Twitter where you click its icon to post the Tweet.
Checkout TechSavvy.Life for blog posts on smartphones, PCs, and Macs! You may email us at contact@techsavvy.life for comments or questions.
We value your feedback! Was this post helpful? Please share your comments with us. If you have a tech question related to your computer or smart device, feel free to reach out. Just send an email to contact@techsavvy.life, and be sure to include the device, app, and version you are using. To assist us further, you can also attach screenshots related to your inquiry.
The author’s Vietnam eBook on the “Battle for Tra Bong Vietnam: Events and Aftermath” can be accessed from a Kindle device or the Kindle App for a desktop or smartphone. The apps are free.
The author’s Vietnam eBook on the Battle for Tra Bong Vietnam: Events and Aftermath
The post explains how to enable the text-to-speech feature on iPhones or iPads, allowing users to listen to content like web pages or ebooks while multitasking. It details the setup process through the Accessibility settings and provides tips on adjusting voice options and speaking rates for an enhanced listening experience.
If you find it more convenient to listen to some text on your iPhone or iPad rather than read it, you can easily enable that capability. You might, for example, want your device to read a web page, ebook, or another document while you perform household chores.
RAYMOND OGLESBY @RaymondOglesby2 November 19, 2024 – 5 minutes read time
Overview
Apple ensured that the iPhone came with a broad array of built-in accessibility features so anyone can use it. Text-to-speech is just one of these accessibility options. Let’s explore how to set up and use text-to-speech.
Why You Will Like This Tip
Listen to web articles or books when you are busy with other tasks.
Have your iPhone or iPad read to you if you have difficulty seeing the screen well.
System Requirements
This tip works on iPhones running iOS 16 or newer. Screenshots are from iPhone 14 Pri running iOS 18+
Click here to learn how to update your iPhone to the latest iOS version.
How to Setup
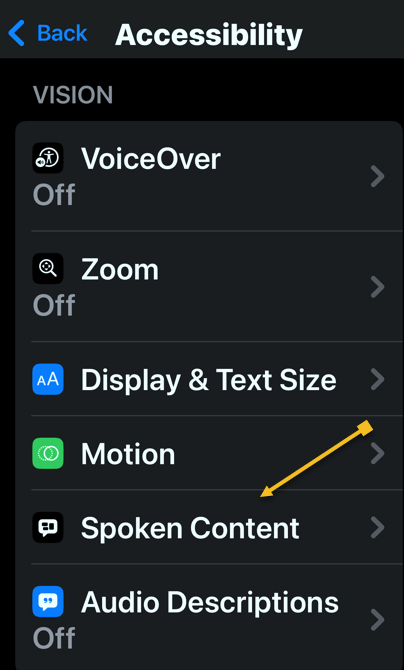
First, open the Settings app, and tap Accessibility. Refer to the below image:
Selecting the Accessibility option
Next, tap Spoken Content. See the below image:
Selecting the Spoken Content option
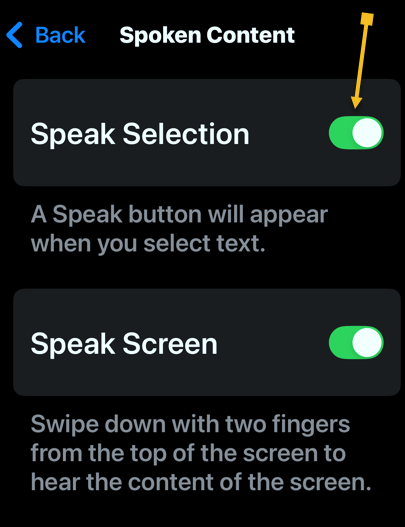
Now, tap the toggle next to Speak Selection to enable or disable it. See the following image:
Enabling the Speak Selection toggle
Tap the Highlight Content option to highlight each word as it is spoken (this is optional). Refer to the below image:
Selecting the Highlight Content option
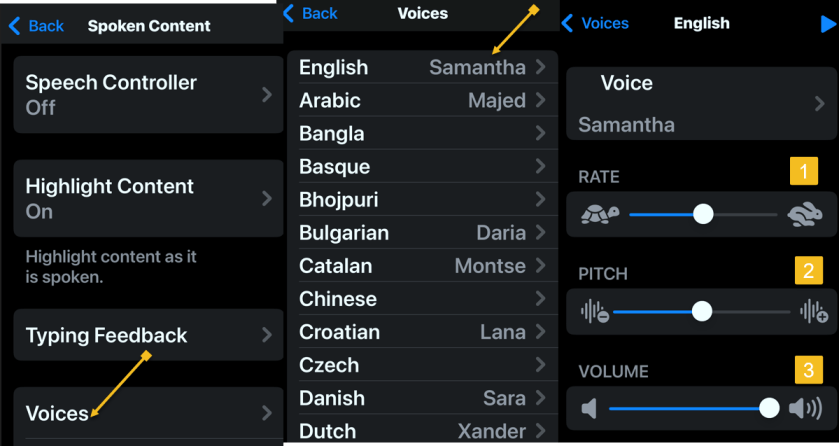
Next, you can tap Voices to choose a different computer-generated voice. See the below image:
Selecting a Voice and its options
Now, you can also select your Default Language. (Ours is set to Current Locale which is English). See the following image:
Selecting the Default Language
If you change your Default Language, you can turn the toggle next to Detect Languages to Off. This will let your iPhone read in other languages instead of translating in your default language. Refer to the below image:
Enabling the Detect Languages toggle
The Speaking Rate slider allows you to adjust how fast or slow the text-to-speech voice reads. See the below image:
Setting the Speaking Rate slider
Next, you can add Pronunciations, if the text-to-speech voice is not pronouncing something correctly. See the following image:
Adding Pronunciations
How to Use
To use text-to-speech, tap and hold some text to highlight it or use the Select or Select All option. Refer to the below image:
Highlighting text to read aloud
Now, tap the Speak option, and your iPhone will read the text aloud. See the below image:
Selecting the Speak option to read the highlighted text
Next, to stop your iPhone from reading the text, tap the highlighted text, then tap the Pause option. See the following image:
Selecting Pause option
Summary
You can use text-to-speech to have your iPhone or iPad read aloud to you if you have trouble reading everything on your screen, or while doing chores, cooking, or going for a walk.
Disclaimer
Technology is always changing. Rarely is there static tech for smartphones and desktops. Thus, the contents of this post are only valid at the time of writing. Blog posts older than six months may have directions incompatible with your device or OS. Hopefully, older post content will continue to work as advertised. Thank you for reading TechSavvy.Life for Technology at Work For You.
Quote For the Day
“Proverbs are all very fine when there’s nothing to worry you, but when you’re in real trouble, they’re not a bit of help.”
L.M. Montegomery
(X) Twitter Info
Congratulations, you are finished. Please feel free to share this post! One way to share is via Twitter.
Just click the Tweet icon below. This will launch Twitter where you click its icon to post the Tweet.
Checkout TechSavvy.Life for blog posts on smartphones, PCs, and Macs! You may email us at contact@techsavvy.life for comments or questions.
Was this post helpful? We would love to hear your comments. Do you have a computer or smart device tech question? I will do my best to answer your inquiry. Just send an email to contact@techsavvy.life. Please mention the device, app, and version you are using. To help us, you can send screenshots of the data related to your question.
The author’s Vietnam eBook on the “Battle for Tra Bong Vietnam: Events and Aftermath” can be accessed from a Kindle device or the Kindle App for a desktop or smartphone. The apps are free.